
36+ simple and effective ways to sew faster
In this sewing tutorial, I want to give you some effective sewing tips on how to sew faster, better, nicer, and how to sew professionally.
I love to sew. Sewing was in the beginning a necessity, if I wanted nice clothes, I had to sew them myself. But now it is a pleasure, my lifetime hobby. And as it happens with every lifelong occupation, I have learned a number of things that make sewing faster, less taxing, and allow you more time to enjoy the results.

I enjoy the process of making clothes for me and my family and things for the home. During all this time my fabric collection grew really huge, and I also have a big fabric stash left for me by my mother-in-law. All these colors, fibers, and textures! I don’t want my gorgeous fabrics just to sit in my closet. I am determined to use them all.
But sewing is often a slow process. It is so easy to let your imagination wander when you are choosing a design for your new dress, or fabric and a pattern to use in your next project. It takes a lot of time also to prepare the pattern, cut the fabric, sew all seams and press them. And usually, we can’t sew all day long.
I can’t cover a lot in this article (it’s not a book or a course after all). These are just tips that helped me the most to be more efficient and speed up my sewing time. So I want to recommend to you some books and courses that I found useful for me and I am sure they will help you as well if you are looking for ways to sew fast.
Note: Some of the links on this page are affiliate links. This means I will receive a commission if you order a product through one of my links. I only recommend products I believe in and use myself.
For convenience, a printable version of this article can be purchased for a small fee in my Etsy shop. The printable version also includes the three pages with action items that are offered for free to all subscribers to my newsletter. Your purchase helps me cover part of the costs of maintaining this site and allows me to write new articles and develop new projects. Thank you!
")
Not too long ago I was spending sooooo much time on every sewing project. I knew something had to change. So I was looking for something great to read about fast sewing techniques and found this book Sew Fast, Faster, Fastest by Sue Hausmann.
The book offers expert advice that shows readers how to get professional results in less time. I have read the book from cover to cover and learned many efficient techniques to sew faster even if I didn’t really like the style of the clothes she made. But it is not the garments she makes I was looking for in the book, but HOW they are made. If you sew a lot and want efficiency and speed, this is a great book. Check it out!
I am always looking for ways to be more efficient and sew faster. I don’t want to stay with one project for a few weeks, I noticed actually that the less time it takes from an idea to the result the more I am enjoying the process and I am also more satisfied with my garment.
If some pattern caught my eye in a new BurdaStyle magazine (I am a long-time subscriber), I look for suitable fabric in my closet, cut the fabric, and sew a dress for a few days (I don’t like to sew a dress in one sitting usually). If it would take a few weeks I may lose interest in this pattern and design and even leave the dress unfinished if I find a design that I like better.
Over the years I discovered many ways to sew faster and to get professional results. I am going to share them with you on this list.
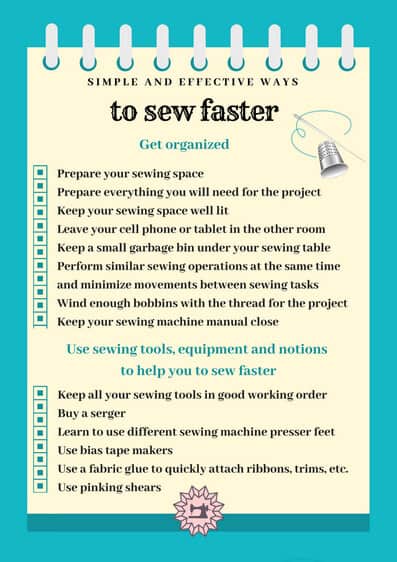
Get organized
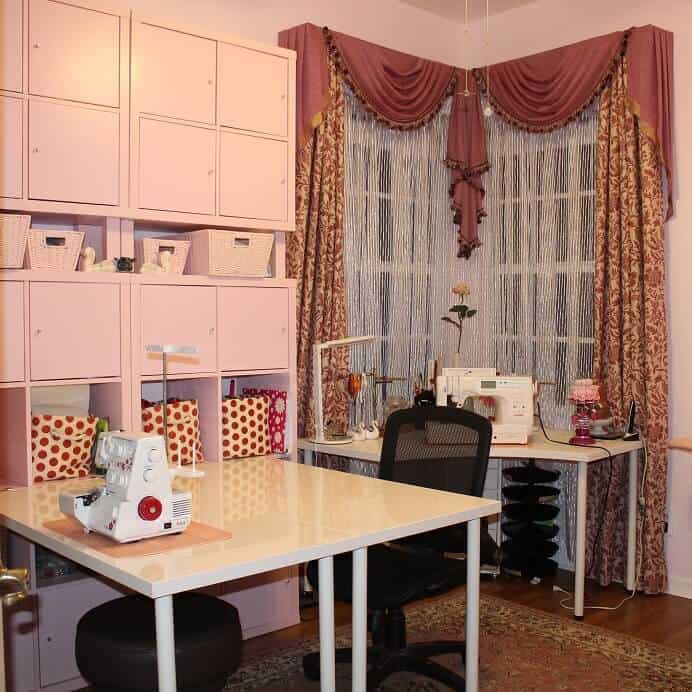
1. Prepare your sewing space and make it as comfortable and clean as possible. Put your sewing machine and a serger close to each other so you don’t lose time moving between them. Keep your ironing board near your sewing table. Keep all your tools organized and easily accessible. Remove from the workspace things that have no bearing on the process, for example, books, magazines, toys – everything that you are certain you will not use.
If you set everything close enough a rolling swivel chair can be very useful if your floor is hardwood or cement or if you can cover it with a plastic mat (or any other cover that allows the chair to roll). Not having to move from here to there 20 times in 15 minutes saves an incredible amount of time and effort.

")
I also have on my site two guides on sewing room organization – IKEA sewing room ideas and Sewing room ideas for small spaces. Building a sewing room with modular furniture from Ikea is possible, it gives you a lot of custom space, you can organize it as you wish and adapt it to the room and it will not cost you an arm and a leg. Just an arm (ha-ha).

If you would like to read more about organizing your sewing room I highly recommend this book “Dream Sewing Spaces: Design & Organization for Spaces Large & Small” by Lynette Ranney Black where you can find great ideas on how to use your workspace wisely.
2. Before starting your project prepare everything you will need: fabric, interfacing for the fabric, the pattern, threads, needles, zippers, buttons, and other notions. Put everything in a Ziploc bag or in a basket.
A special mention here to using a needle book for your needles. It is much easier to select a needle from such a book than to hunt for it through a drawer or box. My article DIY Needle Book might be useful here.
3. Keep your sewing space well-lit. If you don’t see well you will make mistakes, and it takes a lot of time to fix them. I have a quite useful guide “Sewing room lighting ideas“, perhaps, it will be useful for you.
4. Leave your cell phone or tablet in the other room. If you don’t see them you are not going to be tempted to check emails or Facebook posts and watch a funny video or scary news.
5. Keep a small garbage bin under your sewing table so you can put there all the loose threads and scrap fabric and spend less time cleaning after you are done with sewing.
6. Perform similar sewing operations at the same time. If you started to cut the fabric – cut everything at once. For example, don’t leave cutting small details or interfacing for later. Sewing instructions usually tell you exactly how many pieces you have to cut.
Then pin or baste everything you can before starting to stitch. Then sit down and sew as many seams as you can before pressing. Then press everything before pieces need to be joined again, etc.
This order will minimize movements between sewing tasks but have in mind that it will probably break the order from the sewing instructions you got with your pattern, those instructions are not designed to minimize time, just to make the process clear.
7. Wind enough bobbins with the thread (or threads) you are using for the project. If the bobbin thread will be finished while you stitch it will slow you down a lot. Or you can use pre-wound bobbins, they come mostly in white and black but recently they started to appear in different colors also. My tutorial “How to thread a bobbin correctly” might be helpful.

")
 Prewound Bobbin Thread Plastic Size A SA156 for Embroidery and Sewing Machine Polyester Thread Sewing Thread")
Please note: the above links are for bobbins class 15 (type A). Most sewing and embroidery machines use these but not all, if your machine uses different bobbin type search for it. Many types are available, for example type L at this link.
✅ Related article: Top Bobbin Thread Holders and Organizers
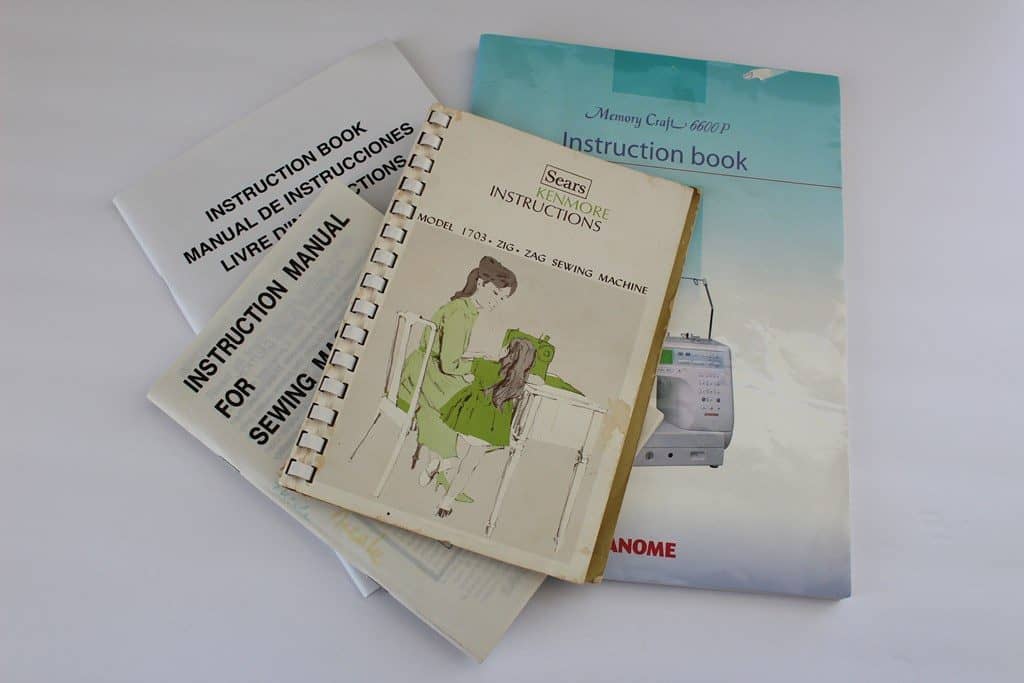
8. Keep your sewing machine manual close so in case of doubts you can check it quickly.
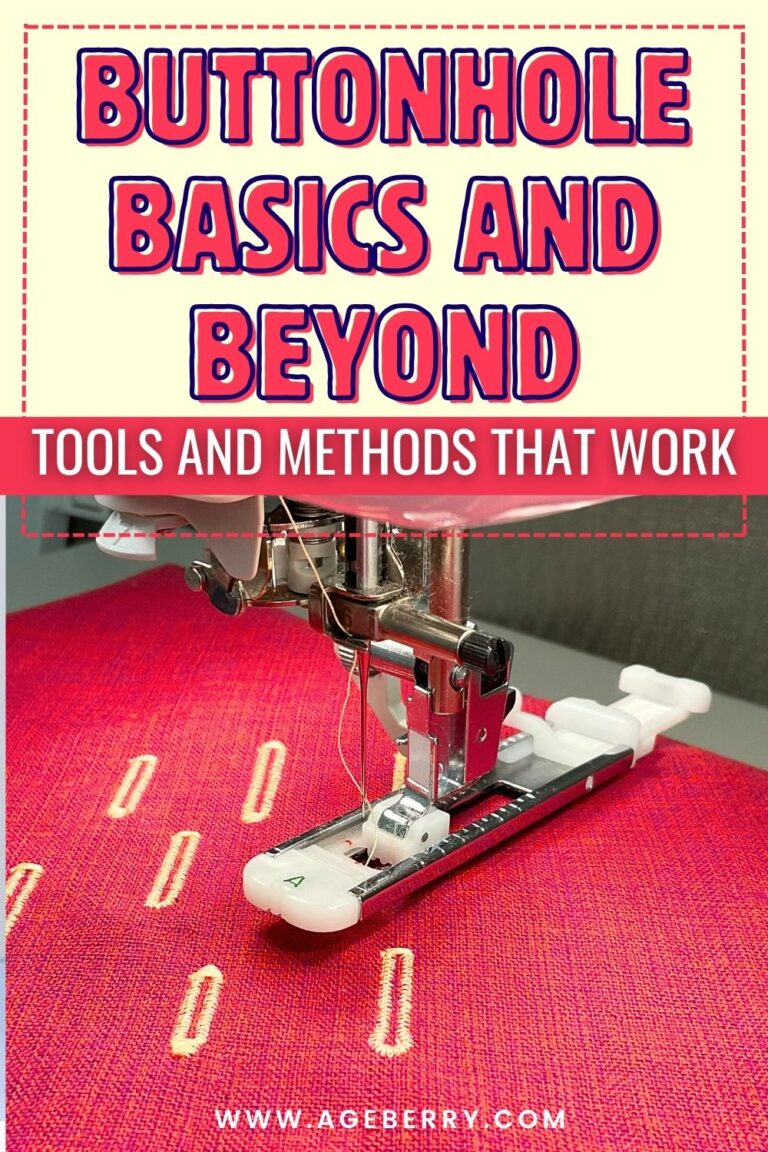
9. If you make closing with buttons make buttonholes first and then sew on buttons marking their placement through buttonholes.
✅ Related tutorial: Sewing machine buttonhole troubleshooting
10. Try to sew whenever you can. For me, many hours of continuous“heavy” weekend sewing are usually less productive and satisfying than 1-hour sewing every day.
Use sewing tools, equipment, and notions to help you to sew faster
11. Keep all your sewing tools (including your sewing machines of course) in good working order. For example, are you sewing scissors sharp? If not your cutting will be slow and annoying.
✅ Related tutorial: Care of sewing tools and equipment
12. Buy a serger. It will professionally finish all your raw edges in a flash and save you a lot of time. If you are using zigzag stitches of your regular sewing machine for finishing raw edges you will have to cut fabric close to the stitching, and it takes time. And with the serger, you can sew and overlock at the same time. Also, sergers are indispensable if you like to sew knit fabric and keep seams stretchy.
I published a review of my favorite serger Juki MO2000 and more information about sergers and coverstitch machines you can find here: Serger vs. sewing machine and Coverstitch vs. Serger. If you would like a high-end machine, I suggest considering one of the self-threading sergers covered here: The Self-Threading Serger.
13. Learn to use different sewing machine presser feet. So many of them are available right now and they really make sewing faster. Here are a few examples.
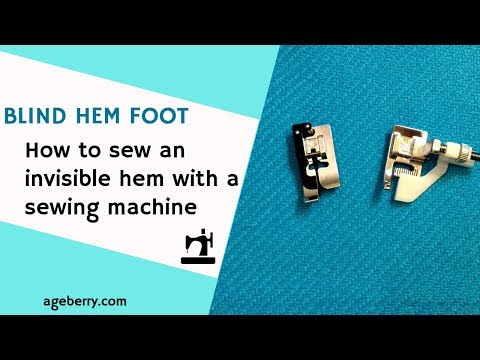
a) Blind stitch foot. It makes sewing hems so much faster and gives a professional finish to a garment especially if you sew with an invisible thread. I have a tutorial on my site “Blind hem foot: How to sew an invisible hem with a sewing machine” and a YouTube video on using the blind hem foot.
 Presser Foot (R) for Babylock,Brother,Simplicity Sewing Machine ALT:BLG-BSF,X56409051,X56409-001,XC4051031,XC4051051,XC4051-051,XE2650001-7326BR")

 Presser Foot (R) for Babylock,Brother,Simplicity Sewing Machine ALT:BLG-BSF,X56409051,X56409-001,XC4051031,XC4051051,XC4051-051,XE2650001")

b) Bias Binding Foot can be used to create neat, even edge finishes on quilts, home furnishings, and garments. It makes applying the binding which can be a tricky and time-consuming job so much quicker.
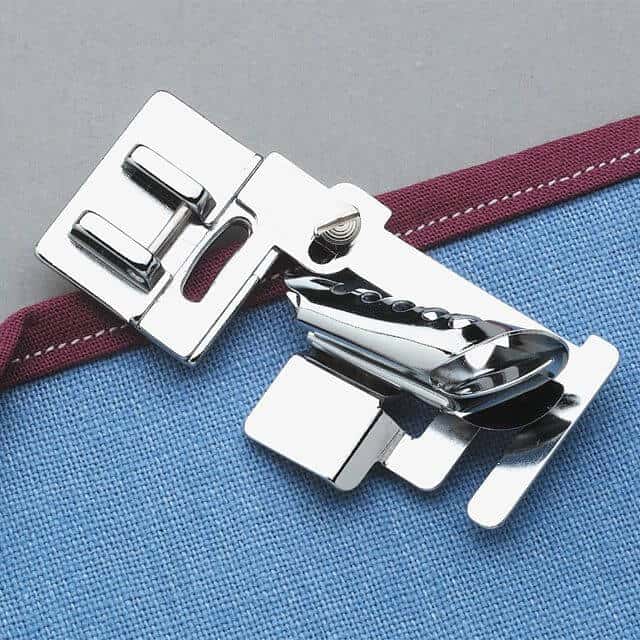
I kind of dread applying bias binding though I like how it looks. And I think anything that saves sewing time is awesome. I had no idea a bias-binding foot existed until recently, maybe this is new to you also?
It allows you to hold the bias tape perfectly centered and catch both edges of the bias at once so you don’t have to stitch the bias binding on twice – you stitch through all layers at once!
")
c) Ruffler presser foot. This foot makes pleats and you can control both the depth of each pleat and the distance between pleats. You can pleat a single layer of fabric while attaching it to a straight, ungathered layer in one operation.
I have a number of articles dealing with the use of different feet, perhaps you may find some useful information there: Blind hem foot, Presser foot guide: what is a Rotary Even Foot, How to use overcast presser feet, How to sew straight, Seam Guide Tutorial.
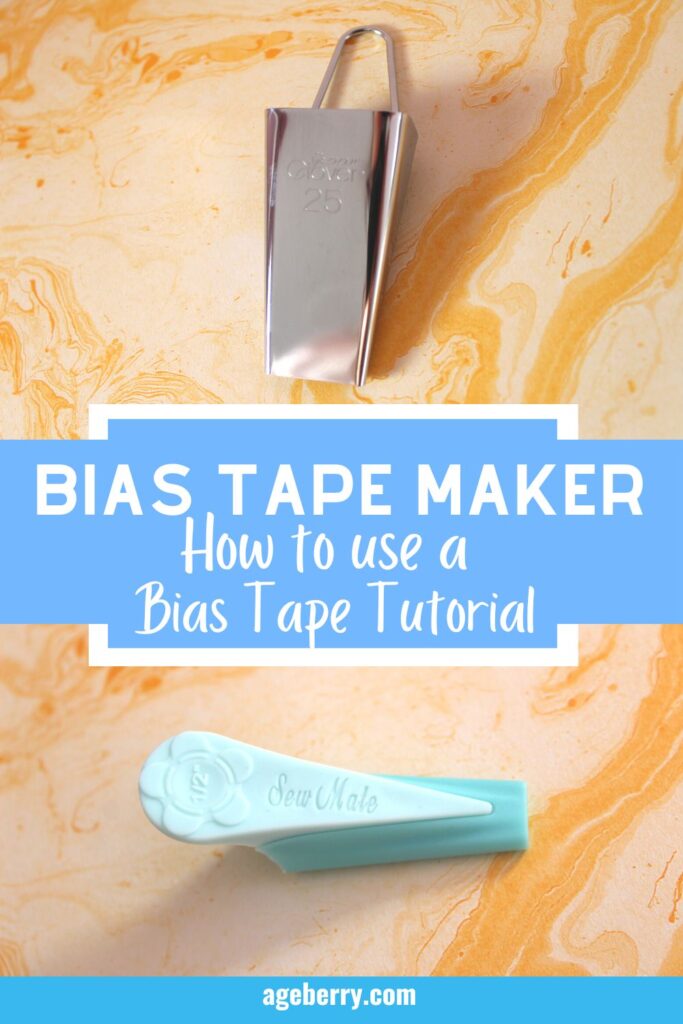
14. Use bias tape makers – a precision tool that folds fabric into perfect halves automatically. You can make really fast bias tapes of different sizes which look professional with clean edges in any color, fabric, and pattern you choose. I made a separate video tutorial that explains how it’s done and it’s really quite simple.
")
")
 with 4 Pcs Sewing Machine Presser Foot, Sewing Clips, Ball Point Pins, Awl, for Fabric Sewing and Quilting")
15. Use fabric glue to quickly attach ribbons, trims, appliques, and more to a fabric. It holds them very well before you permanently stitch them.

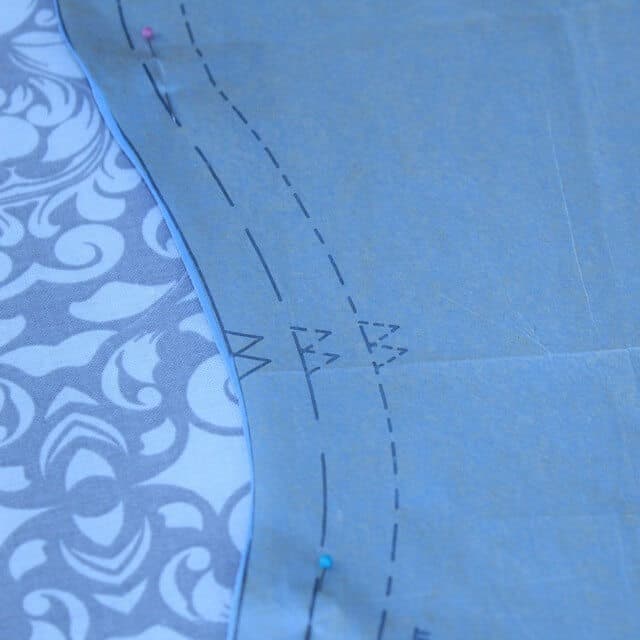
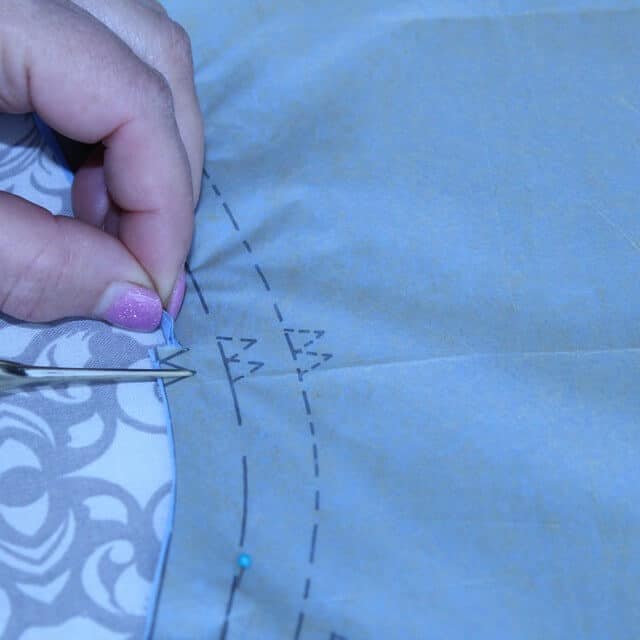
16. Use pinking shears. They can be used to quickly finish raw edges instead of serger stitches or zigzag stitches.
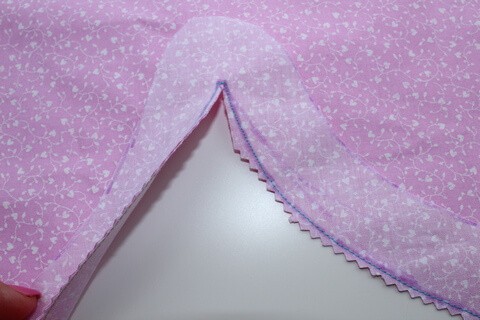
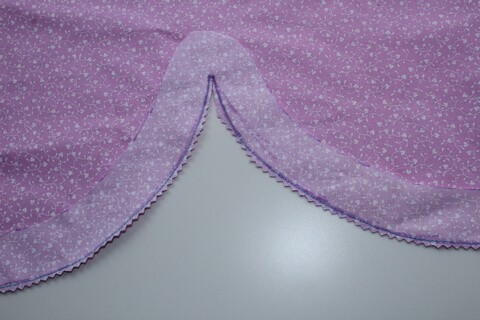
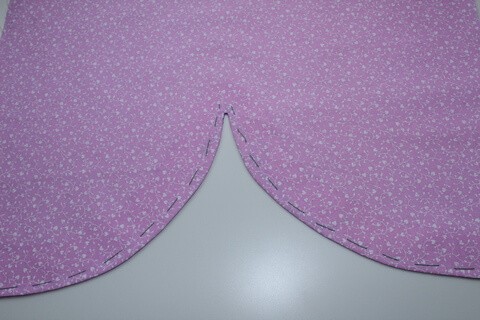
But they can be used also to make notches fast. When we sew a facing to a curved edge we need to cut small notches in the fabric approximately every 2 inches to remove bulk from the insides of seams and keep curved hems and edges flat and even. Notches are those little triangles on the seam allowances that look like V’s. If you turn the facing right side out without those notches, you will have too much fabric in there jamming it up.
Usually, we cut these notches in the fabric with sharp small scissors, but now I learned to cut them differently. It’s a time-consuming job to cut many of them at once when following the curved lines. It’s also really easy to accidentally cut past a notch and break your stitches. But cutting notches can be done in a simpler way just by using pinking shears.

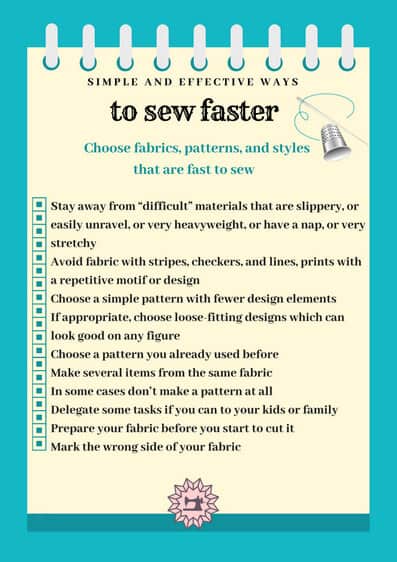
Choose fabrics, patterns, and styles that are fast to sew
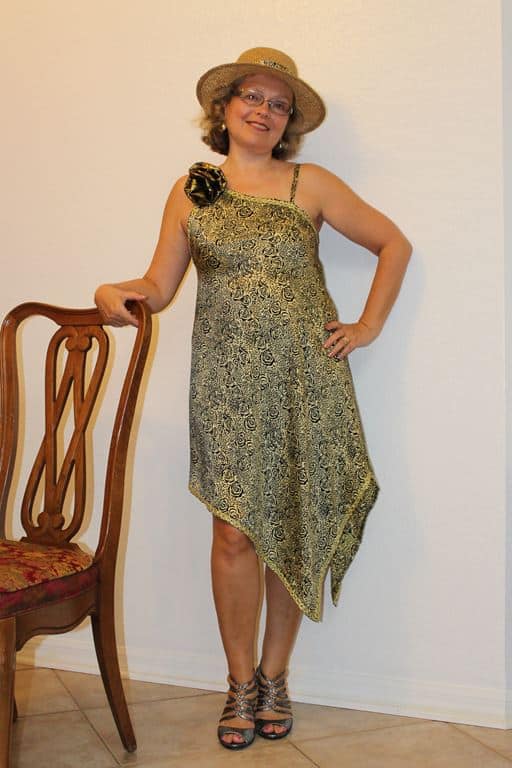
I think the dress you see in the image below is the easiest dress I ever made.
All you have to do to make this stylish flattering dress is cut the fabric – one square and one rectangle and sew only one seam. No pattern required, super simple. You could literally make this dress in 30 minutes. How cool it is! I can’t believe that sewing can be that fast and effortless. Check it out: How to make a dress that is stylish and fun in 30 minutes without a pattern

17. Stay away from “difficult” materials that are slippery, easily unravel, or very heavyweight, have a nap, or are very stretchy. Loose woven fabrics fray easier than those with a tighter weave. Natural fibers tend to unravel less than synthetics. My own experience leads me to believe that wool is the least prone to unravel, followed by linen, cotton, and then silk, this is only a personal observation, not the result of a study.
18. Avoid fabrics with stripes, checkers, lines, and prints with a repetitive motif or design. At the same time fabrics with interesting non-repetitive prints are better for fast sewing because your mistakes (which you will make for sure) are not so visible on prints.
19. Choose a simple pattern with fewer design elements. Beautiful and elegant garments are often simple. If you want to sew fast don’t set challenging tasks.
- Garments without collars are faster than with collars
- A round neckline is faster than a square or V-shaped one.
- Dolman, kimono, raglan, and flutter sleeves are faster than tailored sleeves
- Garments without sleeves are faster
- Skirts and pants with elastic waist are faster
- Garments without buttons and zippers are faster
- Clothes without lining are faster than with lining.
And so on. But have in mind, that simple patterns do not always mean ordinary garments. You can easily make extraordinary garments that will keep people staring at you just with simple patterns and simple design details. Like this dress here.

The key is often the fabric you choose for your fast project and the way the garment fits the body. A piece of lovely fabric can take a dress from plain to glorious.
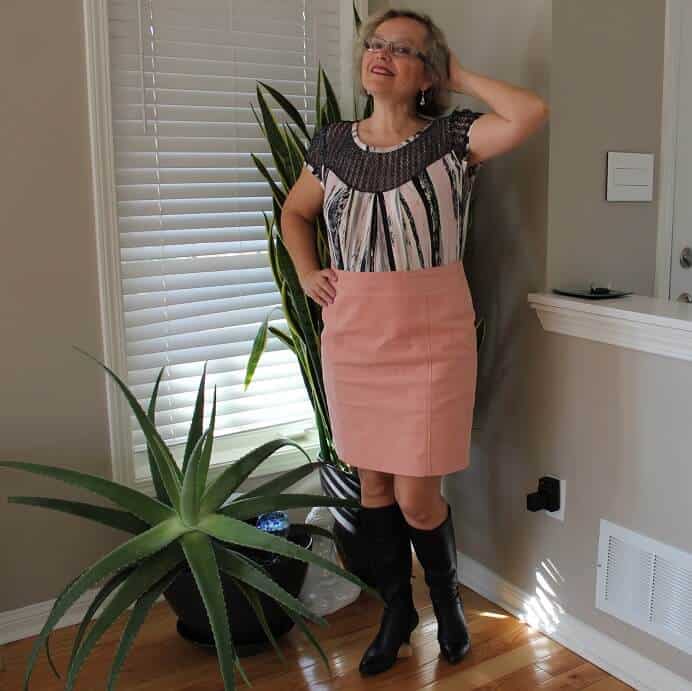
20. If appropriate, choose loose-fitting designs which can look good on any figure. Then you are not going to spend time fitting it. But be careful choosing the pattern, don’t disguise yourself with clothes. For example, check my tutorial on how to sew this off-shoulder dress (same as in the image above) I made from fabulously exciting silk which later I shortened and made into a tunic.

21. Choose a pattern you already used before. If you like the garment you made with the pattern you can sew it again fast with different fabric and different embellishments. Or you can sew a top instead of a dress, shorts instead of pants, or make sleeves longer or shorter, etc. It is incredible how a change in fabric and embellishments can result in a completely different garment even if using the same pattern.
22. Make several items from the same fabric. You will not need to change your sewing machine settings, threads, and needles. I noticed that sewing multiple items from the same fabric takes only a little longer than sewing one item. You can make a top and a skirt, or a skirt and a bag, or a dress and a cap, etc. For example, from pink corduroy, I made a jacket, a skirt, and even a hat.


23. In some cases don’t make a pattern at all. Just draw all necessary cutting lines right on the fabric. The dress below is one example.
There are plenty of sewing tutorials (just look on Pinterest) that explain how to sew something nice without any pattern; I myself used and published a few of them. Here are the links if you are interested: “How to sew a dress without a pattern” and “Easy to sew a dress that will make you look stylish and unique”
24. If you think that PDF patterns that need to be assembled from separate sheets slow you down, delegate it if you can to your kids or family. I always ask my retired father to arrange and cut them, and he really likes to do it.
25. Prepare your fabric before you start to cut it, it only seems that prewashing the fabric is a long process. You can lose more time if your newly sewn garment will shrink after the first laundry and becomes unusable.
Check my article about prewashing silk fabric: “Some secrets of silk fabric care: preparing silk fabric for sewing; washing and ironing silk garments and bedding.”
Also, look for any defects and different color spots which can be easily missed because they are not really very visible. If you will discover them already after cutting you will lose plenty of time to fix the mistake.
26. Mark the wrong side of your fabric especially if it has only a small difference between the right and wrong sides.
I usually do it with painter’s tape. Just stick a few small pieces of tape to the wrong side of some ( not all) cut pattern pieces and you are not going to lose time doubting which side is right and which side is wrong.

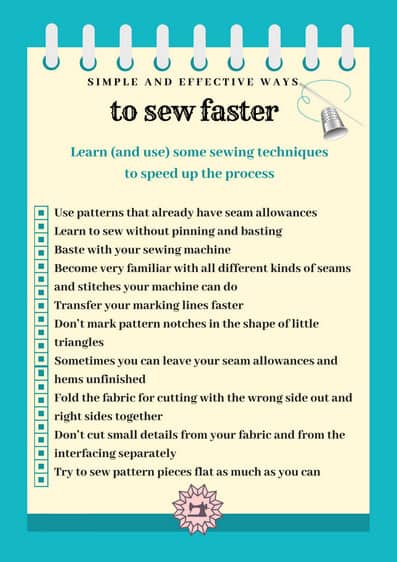
Learn (and use) some sewing techniques to speed up the process
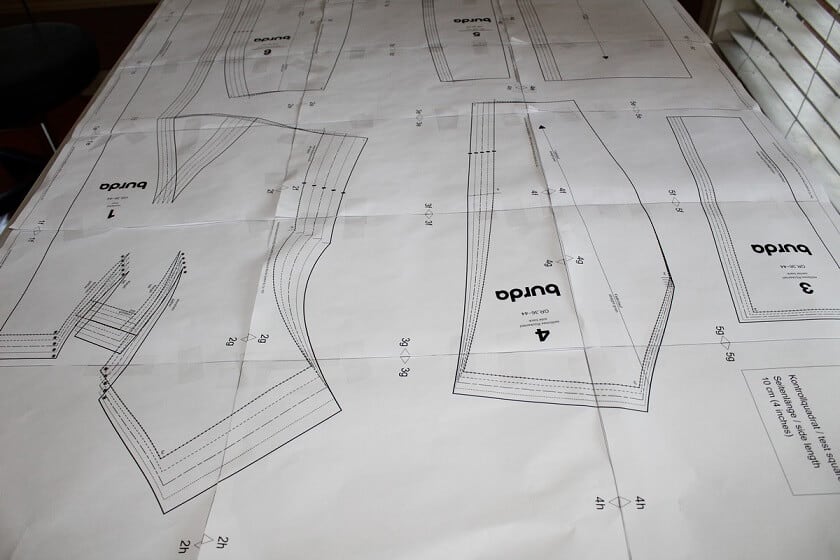
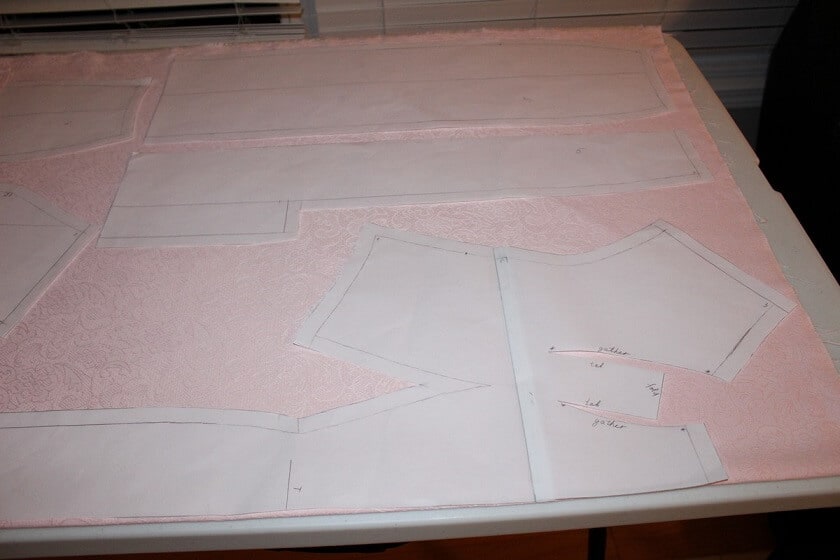
27. Use patterns that already have seam allowances. Many commercial patterns have seam allowances included, but not all. For example, all Burda magazine patterns come without seam allowances. In this case when you copy the pattern from the magazine you better mark 5/8” (1.5 cm) or 3/8” (1 cm) seam allowances right on paper. And when you sew you just align fabric edges and stitch 1.5 cm (or 1 cm) from the edge. It is more precise and really faster.
Remember that seam allowances, if not already marked on the pattern, have to be ADDED to the pattern so if you draw them, draw them outside of the pattern contour. Below is an example of a pattern copied by me with manually added seam allowances.
28. It is usually faster to sew without pinning or basting. If you can do it – fine. But more likely you will make mistakes and will have to rip. And ripping proper stitches takes a lot of time, not counting that might damage the fabric. I can’t imagine sewing a professionally finished garment without pinning. I don’t trust myself to keep it aligned without pins and if I need to backtrack, the whole “sew fast” goes nowhere. Here you see what typically happens when I sew without pinning.
29. Do basting (for example, for a first fitting) by your sewing machine. It is much faster than basting by hand.
For this make the stitch length about 5 mm and put tension to 0 or close to 0. And afterward when you will need to take the basting out don’t rip every stitch – just pull the bobbin thread (it should go easily if you put tension to 0) out of the fabric and the top thread will come out also.

30. Learn, practice on scrap (and use) different kinds of seams and stitches to become very familiar with all your machine can do. Sometimes it is faster to sew French seams, sometimes it is faster to use a serger, and sometimes you can sew fast just with regular straight stitches. Please see my article on French Seams.
If you will make the stitch length shorter the machine will sew the seams a little longer. And also you can regulate the speed of your sewing machine. If you sew straight lines make the speed as big as possible, and for curves and difficult places put the speed down. I can not emphasize enough the need to really know what your machine(s) can do. I have written an article on this subject, Stitch length.
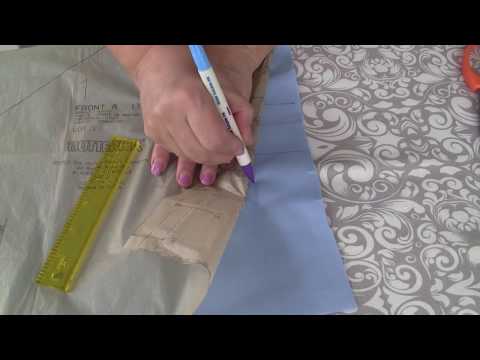
31. Transfer your marking lines faster. This is especially important for darts, pleats, and pocket marks.
Use pins and marking pens to mark pattern points, make tiny snips in the seam allowance at the darts or pleats ends, and afterward just draw the sewing lines on the fabric.
32. Don’t mark pattern notches in the shape of little triangles (as many commercial patterns recommend). It is really a time-consuming task and not really a must. Snip small straight lines instead of triangles. I used to do this because I was sewing with Burda magazine patterns mostly. And when I started to buy American patterns I was really surprised to see these triangle notches. But don’t skip this step while cutting your fabric, these notches are really helpful guides to ensure that the two different pattern pieces will come together correctly when sewn.
33. Sometimes you can leave your seam allowances unfinished if the fabric you used for the project doesn’t unravel. Usually, fabrics that are considered difficult to work with won’t fray; spandex, velvet, velour, fur, faux suede, vinyl. But felt and fleece also don’t fray. Or cut your pattern pieces with pinking shears to leave the seams unfinished. Please see my article on How to sew velvet.
34. When cutting fabric for your project fold the fabric with the wrong side out and right sides together. This way some of your pattern pieces that need to be sewn right sides together will be already prepared for pinning (or basting): for example, back pieces that have a seam in the middle, collar pieces, etc.
35. Almost for every project, we need to use fusible interfacing. It increases the sewing time. To do it faster don’t cut small details from your fabric and from interfacing separately. Iron-on interfacing on a bigger piece of fabric before cutting and then cutting all small pattern pieces that need to be interfaced. This way you speed up the cutting time and even make the cutting more precise. More details in my article How to fuse interfacing
36. Try to sew pattern pieces flat as much as you can. Sewing tubes of fabric (like regular sleeves, for example) takes longer.
There are many other ways to sew faster and they can be individual for every project. But if you use all these methods I described above you will sew faster in no time. It is not rocket science and they are all quite logical and simple to follow. Just practice – the more you sew the better and faster you get at it.
I created 3 printable pages (kind of cheatsheets) for my sewing room to remind myself about all these ways to sew faster. If you want you can download them also from my Resource Library. If you are a subscriber you can find the password to enter the Library in my weekly emails. If you are not a subscriber you can sign up in the form below and I will send you the password for the Library right away by email.
I hope you have found some helpful information in this sewing tutorial “36 ways to sew faster”. Want to remember this tutorial? Post this pin to your favorite Pinterest board so that you can find the instructions later.

Ready to take the next step in your sewing journey? Check out more step-by-step tutorials from my blog and don’t forget to share!


latest posts
- Corset Pressing Board for Sewing: What It Does and How I Use It
- 7 Essential Tools and Settings for Sewing Denim on a Regular Sewing Machine
- That Purple Thang: 10 Smart Ways to Use This Weird Little Tool
- 20+ Reasons Your Sewing Machine Thread Keeps Breaking (+ Solutions)
- Dresden Plate Quilt Block: 4th of July Fireworks
- How To Sew Curves the Easy Way Using a Curve Master Presser Foot
- 30 Sewing Hacks That Turn Ordinary Items into Useful Sewing Tools
- Seam Allowances in Sewing Patterns: What They Are and How to Use Them
- What Do You Call a Person Who Sews? I Asked My Readers and Got 1,408 Opinions

Excellent and awesome ideas you have furnished for all of us,those who really habituated with sewing.thank you
Thank you for the comment, Chaitanya ! I want to be useful to my readers always.
These are so useful. Just common sense, but sometimes it comes to me when it’s too late. Sometimes in a rush, I pass over steps that should be done before I sew just because I am anxious to see what it will look like. But then I have to go back and catch up of what I have left out.. It may seem like I am wasting time to do all the little thing first, but in the long run, it pays to be patient to get all the cuts, basting, pinning done first. Your ideas are right on! Thank you so much.
Thank you, Ginger! I agree these steps are usually simple to follow and that’s why they work for me all the time when I remember to keep everything in mind. But I am also guilty of passing some of them over in my rush to the first fitting. But it really pays to be patient with all those small steps.
Thanks for the tips, especially about ironing on the interfacing before cutting the garment. What a time saver!
Thank you very much for the note. I like to create useful posts.
outstanding article. thank you for taking the time to write it
Thanks so much for the sweet note Patti!
As an experienced seamstress I already use most of your tips. Nice to know great minds thing alike!! One thing I would recommend is a notch cutter, I didn’t know they existed till my cousin mentioned it. I use it for notches and all kinds of marking. like the dots for gathering shoulders. The main thing is that not only is it easy but I never cut a notch too deep!! Most of my sewing tends to be quilts and costumes. Renaissance faire and steampunk.
Thank you for your tip! I heard about a notch cutter and saw images of it but never used it before. Interesting idea. I will have to look at it more closely. I would like to see your quilts and costumes. Do you post them on Facebook?
Wonderful tips…..retired and getting ready to start sewing again…thanks
Thank you! Yes, when we retire we have more time for sewing. Did you plan your first project already? If not maybe you will check my article about sewing silk pillowcases… Here is the link https://www.ageberry.com/diy-silk-pillowcase-better-healthier-sleep/
Great advice and so thoroughly explained. Thank you!
God bless u! This was helpful! Just starting learning!
I am happy to be helpful. Good luck on your sewing journey! If you are just starting to learn, check out my other articles for beginners
https://www.ageberry.com/sewing-basics-10-essential-sewing-tools-beginners/
https://www.ageberry.com/sewing-basics-learn-sew-hand/
https://www.ageberry.com/sewing-tutorials-for-beginners/sewing-basics-use-sewing-machine/
Thank you almost all notes I do but when I’m in rush skip some hhhh but regret ..thanks again
Thank you for your comment! It’s very interesting for me to get some feedback.
I really like your suggestions. I’m an experienced seamstress who also realizes that if a project takes too long that I may abandon it because I lost interest in it. I love using my serger for so many things–wonderful cloth napkins that serge up in a jiff and also fleece blankets that are so nice to give for so many reasons. To make them using a single layer of fleece, I simply use Wooly Nylon thread in the loopers (regular Maxi Lock thread in the needle which I put in the far left position) and I shorten my stitch length all the way. The result is a 1/4 inch wide edge of solid color on both sides of the blanket. An adult blanket for which I use 2 yards of fleece only takes about 15 minutes to complete and baby blankets are even faster. I do separate the Maxi Lock thread from the Wooly Nylon and knot it and put a drop of Fray Block on it on each corner so that the blankets can be washed over and over again.
Thank you very much for your kind words! What serger do you have? I can’t imagine sewing without a serger and I also use Wooly Nylon threads sometimes in the loopers. As for the fleece fabric, I discovered organic cotton fleece recently I didn’t know exists. So from now on, I will use only this kind of fleece. Maybe it’s not good for blankets but it’s perfect for warmer clothes.
you have showed me so many things that I forgot to do the plastic bag great don’t stop telling all the sewers we sometimes forget Ian now into quilting so I know what you meant thank you
Thank you for your comment! I am glad I was able to help with my article. Good luck with your quilting! I plan to start to quilt also some day.
Thank you! Im a begginer and always think that I have so much to do that I have no time for sew. This is very useful!
Thank you! I am happy to know that my article is useful to you! Happy sewing!
Whao!
You have just written a book.
Thanks so much for your tips and the videos were so helpful.
God bless your wisdom.
Thank you for your kind words!
This is awesome! I don’t know why I never thought of winding several bobbins in advance of the projects. That is so smart. So many good tips here! I also didn’t know the notches didn’t have to be triangles. Thanks so much!
Thank you, Tessa! I am happy to hear that!
One tip that saves time if you must stop sewing in the middle of a project is to stop while in the middle of sewing a seam. For example, if you’re sewing the sleeve and side seam (because you sewed the sleeve in while flat, of course), stop half way and leave the fabric still in the machine with the needle down. When you resume sewing you won’t spend any time wondering where you left off. You can sit down and finish that seam immediately. Cover your machine and project with a clean cloth like an old sheet to keep dust away. This idea only works if there are no curious children or pets who might destroy your waiting project.
Thank you for the interesting tip! I think we can certainly use it but the time away from the machine shouldn’t be long (like a few minutes for a phone call or going to the restroom), right? I wouldn’t leave the machine on for a few hours. And if I turn the machine off then I can’t leave the needle down. My computerized sewing machine moves the needle sideways every time I turn it on.
This was so helpful. Your first paragraphs sounds just like me. Lol. I have sssooo much fabric, but yet I have a difficult time getting things finished. Also like you, if something takes too long, I lose interest. I’m So glad there’s someone else likes that.
All of this is so informative. Thank you so much.
I overlooked your comment somehow, but I would like to reply now (I guess, better late than never). Thank you for your kinds words! It’s always good to know there are people who share our interests, values, habits, etc.
This is the first time I have looked at your site. Is the weekly newsletter free.
Thanks
Welcome to my site! Yes, of course, my weekly newsletter is free and all the info is free also. I had to put some adds on my site, I know they are annoying sometimes, but it’s really expensive to maintain the site.
When are you going to show what the sew mate is for
If you are referring to Sew Mate Multi Tool, that is basically a seam ripper and I did not write an article about it in particular but I do have an article “How to use a seam ripper“. Also under the name Sew Mate there is a bias tape maker, I have written an article about it here: “Bias tape tutorial“
Thank you for this great article Olga! I am on the verge of insanity slowly completing projects and sewing is supposed to be enjoyable. I’ve been working with the worst fabrics ever, it’s been such a struggle! I love how you marked the wrong side of fabric with tape, genius! I need to organize my tools a little more and donate equipment that’s not compatible with my machine (purchase mistakes at the thrift store). Your tips are just what I needed. I downloaded the printables which I will gladly post on my board by my machine as a reminder! Happy sewing Olga!
Diana,
Thank you for commenting! I am happy to hear that my article was useful. I see that everybody makes printables, so I decided to try to create some too. I am not a designer and my printables are not really professional (this is the first time I made them) but if they are helpful I am very happy.
I have been sewing for years, but some of these ideas were new to me. I would like to add something to your comments about basting the first draft of a pattern. If you use a needle with a double eye in your machine, and only thread the upper eye, your stitches will be much longer and easier to remove. Keep on sewing and sharing.
Thank you so much for sharing this tip! I truly appreciate it. I have double-eye sewing machine needles and I was using them only for some embellishment, not for basting. Great tip!
These are great recommendations. I use the same patterns over and over. Each time they are used, I am faster at making the garment. I’ve been getting away from detailed garments and began a capsule wardrobe a couple years ago. Now I stick with sheath dresses and simple silk blouses and skirts and wear these garments every day. They work in almost any social situation except for when you need to wear a ball gown. I wear my linen, wool, and silk sheath dresses to run errands, go grocery shopping, and then out in the evening with friends. I love feeling more “dressed up” than just wearing Spandex shirts and leggings.
I agree about using natural fibers. Thanks for the tip on pinking the edges of curves. I’ve been avoiding PDF patterns only because of the cost – anything I would want to make in a PDF pattern I have found in a “Big Four” printed pattern, and many of those can be found UNCUT on Ebay and Etsy for even more savings. I know the PDF patterns are hugely popular, but they are more expensive and I would need to print them at the copy shop which would cost even more money. 🙁
Thank you very much! I am glad my articles are helpful. As for PDF patterns, did you hear about Lecala patterns? Take a look here. They are cheap but I tried a few and they are nice. I think it’s a great alternative to others.
Thank you for taking the time and trouble to pass on these useful tips. I am coming back to sewing after many years – raising family, working, studying etc. I’m looking forward to having a little sewing room all to myself so I took special note of your advice about organising a sewing area. Now to read all the other good stuff on your blog…:)
Thank you very much, Marie! I am so happy to know that my tutorials are useful. It’s really great to have a sewing room – otherwise, where do we put all the fabric, notions, sewing machines, etc. BTW, did you read my post about my sewing room “Ikea sewing room hacks”? Maybe it will be helpful if you’re just starting to make your sewing room. Ikea stuff is great and much cheaper than the special sewing room furniture.
Hi, I‘m Anny and I have to thank you for this article. You gave me so many ideas that I passed and lost time for it. Awesome and georges. I will directly start to organize my sewing place. AND what is most important I will keep your tips next to me. Thanks Anny
Thank you so much for your sweet note, Anny!
Thank you for this article, I just registered with you. I’ve pinned some of your ideas, and am glad I’ll now receive them on a regular basis! I’m a pencil skirt fan, and the idea of drafting my own pattern really has me going! I’ve got some gorgeous fabrics, so here comes so e skirts for summer! Thank you Olga, I look forward to a long time of sewing together! Yes, I read the articles you sent to me!!
I’ve just recently discovered and signed up for your emails. I’m signed up for several but find most of them are merely catchy headlines in the subject line for tip that turns out to be widely known anyway and then filled with ads for whatever they’re selling. The first one from you however linked to a video showing how to do a narrow hem on sheer fabric. Now I’m hooked. It’s nice to know there’s someone sharing meaningful information for the joy of showing others. There’s no better way to bring more to the fold or lure others back. Although my generation had the luxury of home ec classes, few of us continued to sew. We’re mostly self taught the more advanced or alternate techniques from various pattern instructions and have continued to use those methods that we found easier. Despite this I always find something useful or am reminded of things I’ve I meant to try or as in that video of innovative approaches in your emails. Thank you.
Hi Olga,
1’ve enjoyed all the videos I’ve already seen. All of them are really helpful, particularly the ones where you teach how to use the presser foot. I wish I had the time to write you frequently, unfortunatelly I’m a very old girl who works and has lots of chores at home, besides of teaching at school.
Sorry, Olga, but I must go, need to leave right now.
Thanks a bunch for your great effort and wisedom. Regards, Terry
Thank you Terry; it is enough that you find the articles useful, there is no better reward for me than that.
Good ideas.. seem common sense but good to have ones common sense boosted occasionally!
An extra tip.. have a piece of old sheet or similar heat proof cotton to put over ironing board when you iron on the pattern pieces to interfacing all at once. If they aren’t same shape as fabric, you will glue excess interface to board cover and waste time cleaning it..
Thank you for the tip! Very helpful! I also have a detailed tutorial on how to fuse interfacing and I show how to clean the iron if it got some glue on it.
Love your tips!! You may have gotten this tip already. If not, here it is. It saves a lot of time to chain pieces together without cutting the thread and starting over each time. This is used a lot in quilt piecing, but I use it for other things also. You also have less loose threads everywhere to clean up.
Thank you so much! Great tip! It would save so much time!
I’m a fairly new member to your website and newsletter and I already love all of them. I’ve been sewing for over 54 yrs and I’m still learning so many tips and tricks from your info. For the past few days, I’ve actually been reading every one of your lessons and I certainly appreciate all your hard work, to make them so easy for me to follow along. You have quickly become my favorite! Happy Sewing!
Thank you; I will try to remain your favorite in the future too!
I have followed you for a few years. You really speak to the home sewist. Today’s question is what brand do you consider the best pinking sheers? I have had a couple of pairs and find that they are “stiff” to use and don’t cut the length of the blade. My hand gets tired after a few tries (my thumb aches). I have not tried Ginghers pinking shears. And happy holidays.
The best I have is Fiskars but I am not using them very much so I can’t really make a good comparison Ginghers also have good reputation. Generally speaking the bigger the price the more life you can expect from the shears. And you are definitely right, the shears are kind of stiff – think about it. The length of the actual blade for a 9″ shears is not 9″, because of the zig-zag it is much longer (we can compute) and also the amount of fabric you cut is bigger. The force you need to apply is proportionally greater/
wow! this is the most useful and well-written article I’ve read in a very long time! thank you so much!