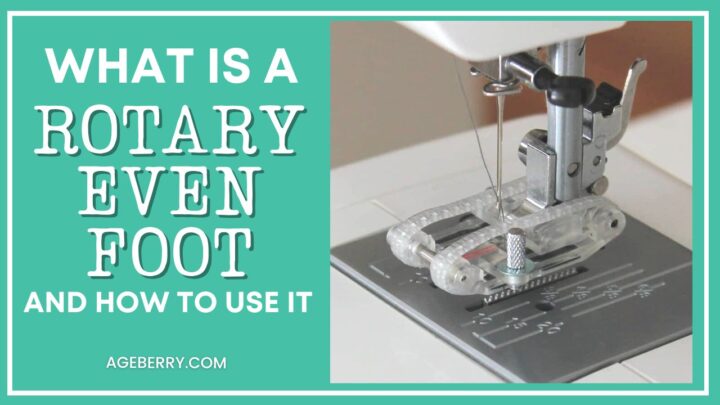
Presser foot guide: what is a Rotary Even Foot and how to use it
I like to try different gadgets all the time. Recently I have discovered a Rotary Even presser foot and now I am wondering – how did I sew without it before?
So, in this presser foot guide, you will learn what is a Rotary Even Foot and how to use it as a walking foot alternative.
If you prefer to watch the tutorial below is the YouTube video; it is about 18 minutes. I suggest though reading the article first for a general view of what this foot is and what it can do.

The main feature of this Rotary Even foot is the pair of plastic belts sometimes called caterpillars which make the foot look like a tank. The foot is made by Janome but it can be used with all low shank sewing machines that have snap-on presser feet.
In the box you will find in fact multiple accessories, I will come to this later.
What does it do? As explained on the Janome website the foot is useful “for preventing stretchy fabrics, jersey and knitted fabrics and hard to feed materials, like leather or vinyl, from slipping or puckering.” Basically, what a walking foot would do, allows difficult fabrics to be fed to the machine easier and helps avoid unequal feed for the top and bottom layers of the material.
Funny note: the Janome-made foot is NOT compatible with a Janome MC 9850 as one viewer found out. So if you do decide to give this a try, make sure first your machine does accept regular low shank feet!
Below is a short video that shows the foot:

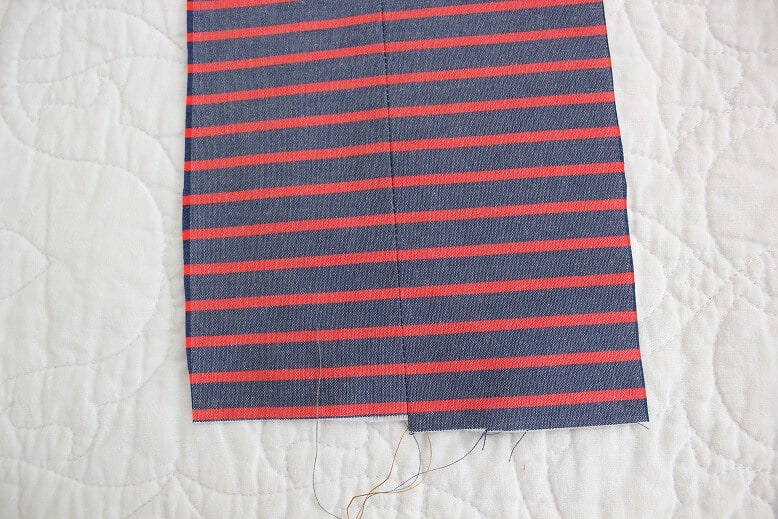
This presser foot is a really good walking foot alternative. It works similar to a walking foot: the plastic caterpillars help move the top layer of fabric through at the same rate as the lower layer of fabric so fabrics prone to slipping or shifting don’t shift under the foot. It eliminates the problem of the lower layer of fabric coming up short and moves layers of fabric in perfect synchronization with the feed dogs.
Let me show you how wonderful it works. Check the video clip below because it’s better to see the foot in action than just to read about it.
For this test I had a few pieces of thick upholstery velvet fabric – it has a short, soft, and very dense pile. When I try to sew two layers of this fabric with a regular presser foot I see horrid puckering just a few inches from the beginning of sewing.
When I change my presser foot – the Rotary Even foot sews the layers without any problem and stops the puckering. You can see in the video clip below that I have a perfectly flat seam which I couldn’t make before with a regular presser foot.

Note: Some of the links on this page are affiliate links. This means I will receive a commission if you order a product through one of my links. I only recommend products I believe in and use myself.
This foot helps very much to sew fur with long piles. I can show you how easy it does the job with my pink fur. By the way, do you use these wonderful clips instead of pins? I use them all the time, a very useful sewing tool.

Just snap the foot on the sewing machine and choose a straight stitch or actually any stitch your machine has. Absolutely no puckering or shifting. It’s good for other plush fabrics like polar fleece, for example.

Did you notice the clips I used to keep the fabric together? Easier than basting, reusable, and really cheap. And in case you wonder if the brand name ones are better, yes, they seem to be slightly better but it is difficult to say if the price difference is justified by the difference in quality. After all they don’t really need to perform a complex task!


The rotary even foot is good not only for sewing thick fabrics but also for thin stretchy fabrics – it keeps them from getting all stretched out. My Janome has a built-in walking foot which works very well but I only use it for thick fabrics; may be a personal preference but I think this foot is better for thin stretchy fabrics.

It also helps to match up stripes and plaids because it keeps the two layers of fabric perfectly aligned. But of course, you need to pin the pieces properly first.

You may say that the walking foot does the same smooth sewing of napped fabric. Yes, it does. But it’s much easier to install the Rotary Even foot – just snap it on, while the walking foot must be attached and detached by removing the presser foot holder and aligning the fork arm over the needle bar, and reinstalling the screw.
The Rotary Even foot is a bit flimsier though and I heard some people complain that caterpillars got broken. Well, everything is breakable, just try to be careful with it. I had it already for a couple of years and mine did not break yet. It is also not cheap but for certain jobs, it is probably going to save you a lot of trouble.
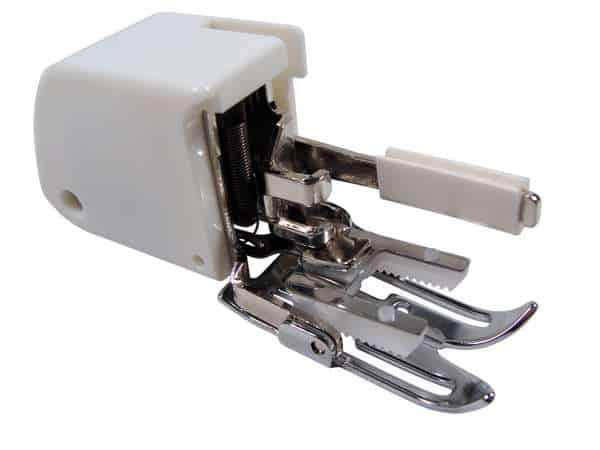

The other big difference between the two feet is that the Rotary Even foot comes with 5 very useful different attachments for various techniques: a blind hem attachment, a bias tape attachment, and hemming attachments in 3 different sizes.
I tested all of them and really like them a lot. Let me show you the attachments in action.

Hemming attachments
I don’t know why but in the instructions they are called rolled hem attachments. But to me rolled hem is completely different from what we are going to make with these attachments. You will see.
There are 3 different sizes – for ½”, ¾” and 1” hems.

It’s very easy to install all of these attachments. First, loosen and remove the screw on the rotary foot, then slide the attachment into place and tighten the screw. After that just snap the foot onto your machine.
Feed the fabric into the attachment. But before that fold the fabric edge approximately ¼” and press it with an iron. In the instructions coming with the foot, they say to cut about ⅜” off the corner of the fabric. This will make it easy to insert the fabric in the beginning. But I didn’t do it, it worked well without any cutting.
Fold the fabric and insert it into the guide so it goes under the foot.
You can adjust the position of the sliding arm so that the machine makes a stitch close to the first fold. For this just loosen the screw, and move the guide in the position you want.
Lower the needle into the fabric, lower the rotary even foot and start sewing slowly while feeding the fabric.
I used a 1” attachment for my test – the biggest one. As you can see in the video clip below the hem was done quite well. I used 100% silk shantung for this test and I see that the settings of my sewing machine were not quite right for this fabric.
But I ironed this seam and after ironing the stitch looks ok.

The bias tape attachment
The bias tape attachment is installed exactly the same way as the hemming attachment.
You can make your own bias tape or use a ready-made one.
So, feed the bias tape into the guide and adjust the width of the guide to match the width of your tape so it is lightly held in place without looseness. After that insert the raw fabric edge into position through the side opening and push it through under the rotary belts.
At this point, you will have to adjust the needle drop position. You can choose to put it as close to the fold as possible by loosening the screw on the foot.
Choose a straight stitch or a decorative stitch for attaching your bias tape.
Make sure that the fabric does not become separated from the inside of the bias tape.
I really like this bias tape attachment because it keeps the bias tape even and I can catch both sides of the tape without any problem.
The only drawback is that you can’t turn a corner with the attachment in place, so it works only on straight edges that you want to bind.

Blind hem attachment
Now let’s use the blind hem attachment. It’s especially useful when you don’t want the sewn line to be seen from the right side of the garment.
Insert the blind hem guide into place and snap the foot onto the machine.
For this to work, you need to have a special blind hem stitch on your machine. I noticed that most modern machines have this kind of stitch. Check the video below to see the blind hem stitch which is necessary to make blind hems.
Position the folded fabric in such a way that the needle just pierces the folded part of the fabric when it comes to the left side. For this align the attachment’s silver guide between the two red lines on the foot.
Place the guide next to the folded fabric edge and sew keeping the guide along the folded edge.
For this video, I used a contrast thread so it’s visible on the right side of the fabric. But if you will use an invisible thread or a thread of the same color as your fabric your hem stitches will be practically invisible.


This blind hem attachment can be used also for joining two fabric pieces together. I am finishing this tutorial in my daughter’s house her sewing machine is a very simple Janome and I still can use this fancy Rotary Even foot with all its attachments without any problems.
Let me show you how to join fabric pieces together. I think this technique is very useful for joining batting but it can be used also to make a nice seam on the thick fabric where you don’t want any bulk from the seams. Or you can join two pieces of lace or ribbon.
Choose a zig-zag or a decorative stitch and set the stitch to its maximum width. Align your two fabric pieces so the guide runs between them. You can see in the video below it catches both sides and joins them together.

Did you find this tutorial helpful? If so, save this pin (see below) on your sewing board so you can come to this tutorial later when you are ready to use the foot, and follow me on Pinterest for more tips, tutorials, and inspiration!


latest posts
- What Do You Call a Person Who Sews? I Asked My Readers and Got 1,408 Opinions
- DIY Round Purse: PDF Sewing Pattern and Detailed Instructions
- Mini Wonder Clips By Clover: Useful Sewing Tool Or Just Another Notion?
- Non-Slip Grips For Quilting Rulers: A Small Notion With A Useful Job
- Fabric Eraser for Sewing: What It Removes and When to Use It
- What Is The Best Thread For Sewing Machine Projects? Let’s Find Out!
- Butterfly Quilt Block Tutorial – Foundation Paper Piecing
- How To Sew Quilt Squares So The Corners Match
- Sewing With Fork Pins: How They Help With Pattern Matching, Slippery Fabric, And Seams