How Much Fabric Do I Need? 21 Helpful Tips For Calculating Fabric Yardage
How much fabric do I need? It’s an important question that every sewist need to answer before beginning any new sewing project. But it can be a challenging skill to learn at first. Here are my 21 top tips for learning how to determine how much fabric you need.
Don’t get me wrong; any sewist can easily answer the question: as much as possible! You can never have enough fabric, and this is one case where more is definitely better. Then perhaps the question should be “How much fabric do I need to use for a project?”. So, with this clarification, and bearing in mind that always more fabric is better, let’s see how we compute the actual use of fabric for a specific project.
When I was pretty new to sewing, I decided to tackle a particularly ambitious project for me at the time – blackout curtains. I still hadn’t mastered how to determine how much fabric I needed, so I made a wild guess when I went to buy my material.
As you might expect, I didn’t have enough lining fabric when I was getting near the end of my project! Fortunately, I was able to use a similar (but different) material in an inconspicuous way to finish it off, which was lucky, to say the least.
But I learned a crucial lesson that day: it’s much better to have too much fabric than it is to run out mid-way! And I needed to learn how to determine how many yards of fabric I needed for my projects.
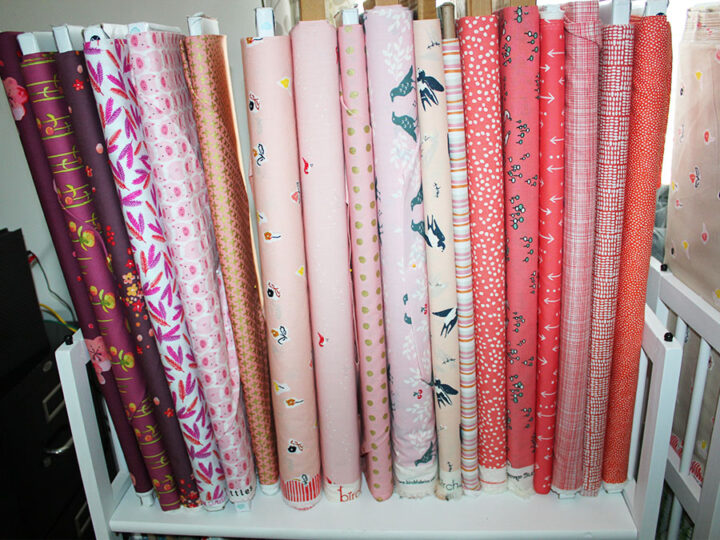
Choosing your fabric is one of the most time-consuming (and fun!) parts of starting any new sewing project. But, there’s more to it than many people may realize. Not only do you need to pick the color and pattern, but you’ll also want to select the type of material best for the project and calculate how much fabric you need for it overall.
Once I choose my fabric for any given project, I immediately ask myself, “how much fabric do I need?” With material costing anywhere from $5 – $250 per yard (well, I saw prices like $1000 per yard, but I would never spend that much), this is an essential question because the answer can significantly impact my final budget and the project’s overall outcome.
Now that I have many years of sewing and fabric estimating practice under my belt, I want to share with you some important tips I’ve learned to make the process easier and more accurate.
How Much Fabric Do I Need: 21 Top Tips
People often say experience is the best teacher. While I agree that’s true, I also believe that there are some things we can learn through others’ experiences to save ourselves some frustration. Learning how to answer the question “how much fabric do I need?” definitely falls into that category!
Use these tips to accurately determine how much fabric you’ll need to save time and money on every project.
1. Decide The Type Of Project You Want To Create
As I mentioned briefly, there are many factors to consider concerning fabric for every new project because every type of project will have different fabric needs.
Consider these things when planning your fabric needs for a project:
- The type of project you’re doing (upholstery, clothing, home decor, quilting, etc.)
- The size and shape of the project
- Fabric pattern / design / print
- Width of the material
- The fabric nap
You would need much more fabric if you want to make curtains with lining than if you want to make a chair cushion. And you would need more fabric if you want to sew a pleated skirt than you would need for a pencil skirt.
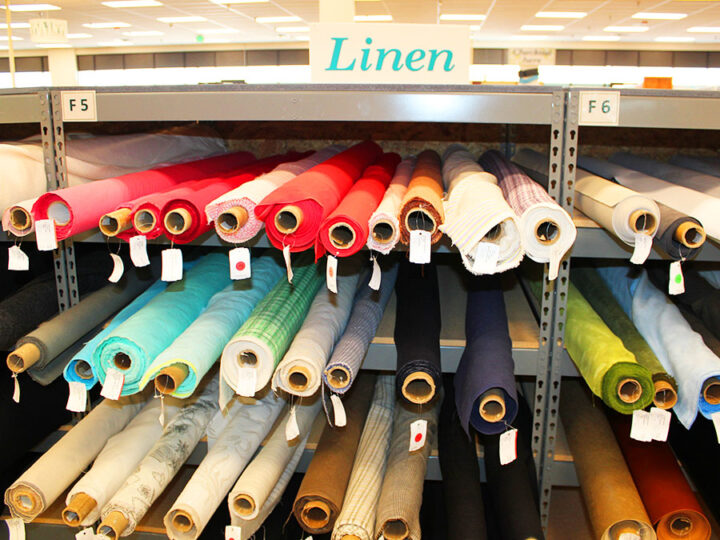
2. Find Out The Width Of The Bolt Or Roll Of Fabric
Manufacturers make fabric in various widths so that they’re ideal for different projects. In addition, different types of materials come in bolt and roll sizes suited to the fabric’s attributes.
Although you can find fabric widths ranging from 36 inches to 118 inches, standard widths typically fall at 36″, 45″, 54″, 60″, 72″, and 108.″ But not every width is a good fit for every project.
For example, clothing fabric has different qualities than upholstery fabric, which also varies from quilting fabric.
Here are a few common qualities you’ll find in material widths:
- Quilter’s cotton is often around 45” wide.
- Rayon and knit fabric rolls are frequently 54” wide.
- Denim, linen, fleece, polyester satins, and twill are often 60” wide.
- Fabric for clothing typically ranges from 36” to 60” wide.
Note: Some of the links on this page are affiliate links. This means I will receive a commission if you order a product through one of my links. I only recommend products I believe in and use myself.
Due to normal variances between fibers and looms, fabrics don’t always measure the exact width the bolt label specifies. For example, a bolt labeled 36” may actually hold material that’s 35” or 37” wide. To account for these differences, I allow a 2” buffer in my estimation.
Suppose my chosen fabric is within 2” off the stated width. In that case, I will still estimate my fabric yardage based on that standard width. On the other hand, if the actual fabric width varies more than 2” from the specified standard width, I might calculate my fabric estimate based on the next-size standard width.
By the way, I started to buy fabric on Etsy. The choice is great and the prices are not bad too. I see that most listings have 5-star reviews. Check it here.
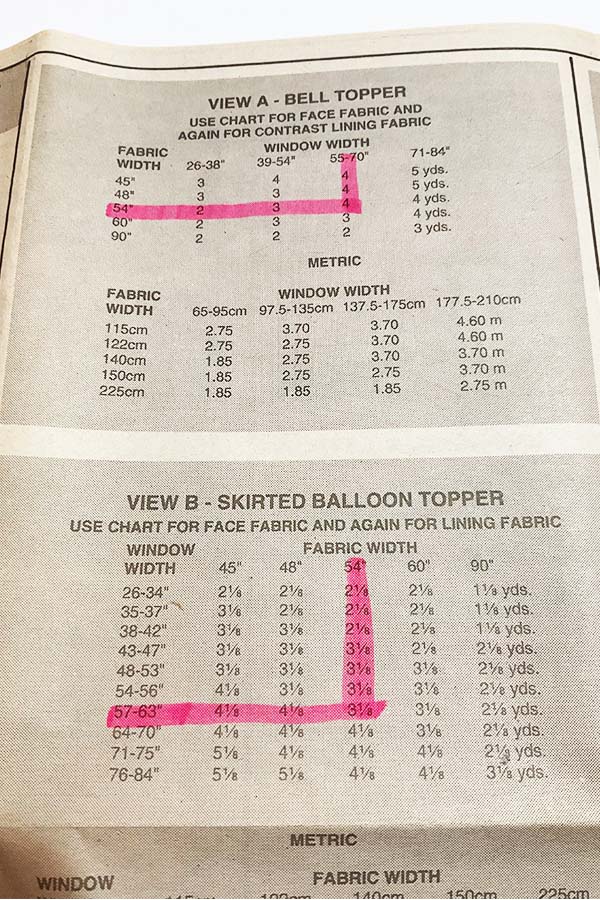
3. Use Your Patterns As A Guide
If you use patterns for your projects, take full advantage of all the information they offer! Your pattern envelope will give you so much more guidance than just the size and shapes in which to cut your fabric. It should also show you the pattern layout on the fabric and tell you how much material you’ll need for the project based on the size of your final product.
Some patterns will even tell you how stretchy the fabric should be for that pattern, see my article How to sew knits.
This information is beneficial, but only use it as a guide since you may need to make adjustments based on the specific fabric you choose.
For example, for clothing patterns,
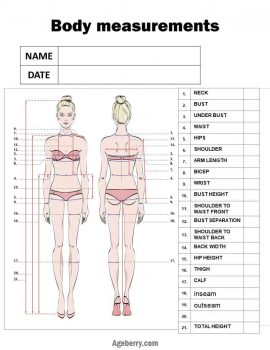
- Find your size and body measurements on the back of the pattern envelope and mark it
- Find the width of the fabric you want to buy and mark it.
- Where the two lines cross you will have the yardage you need for the project.
✅ Related tutorial: How to take body measurements for sewing
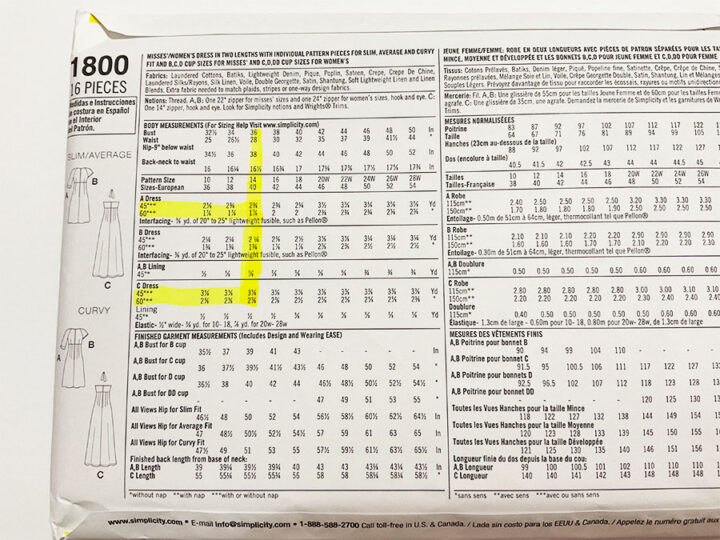
The same is true for the home decor projects but the yardage information is usually not on the pattern envelope but inside the envelope.
4. Base Total Yardage On Two Key Measurements
Did you forget your pattern envelope when you walked into the fabric store? No problem! With a bit of insider knowledge and a tape measure, you can estimate how much fabric you’ll need for a project. As a bonus, this method automatically works to factor in fabric napping!
Plus, it will come in handy if you don’t have a project already in mind but find some must-have fabric that happens to jump into your shopping cart and screams “buy me!”
You’ll need to know two key measurements: the fabric width and a few body measurements (sleeve, bodice, leg, hip and bust circumference) for the garment.
Here’s a general guide to how it works based on garment type. Once you calculate the number based on the garment, divide it by 36 to get your final answer in yards.
Shirts
- 45” or 54” widths – add 1 desired sleeve length + 2 desired shirt length (if the bust or hip circumference is under 40”) or use 3 bodice lengths for bust or hip circumference more than 40”.
- 60” width – add 1 desired sleeve length + 1 desired shirt length.
Pants (+ Shorts, Cropped Pants)
- 45” width – 2 pants lengths if the hip circumference is more than 30” or 1 pant length if the hip circumference is under 30”
- 54” and 60” widths – usually 2 pant lengths but can vary based on the width of the front and back patterns at the crotch and below the knee.
Skirts
- Straight skirt – determine the difference between your hip circumference and the width of the fabric. For a difference of 7” or more, estimate one skirt length. For differences less than 7”, estimate two skirt lengths.
- Flared skirt – 2 or 3 skirt lengths of any width fabric
Dresses
- Calculate the yardage needed for a top and a skirt and add them together.
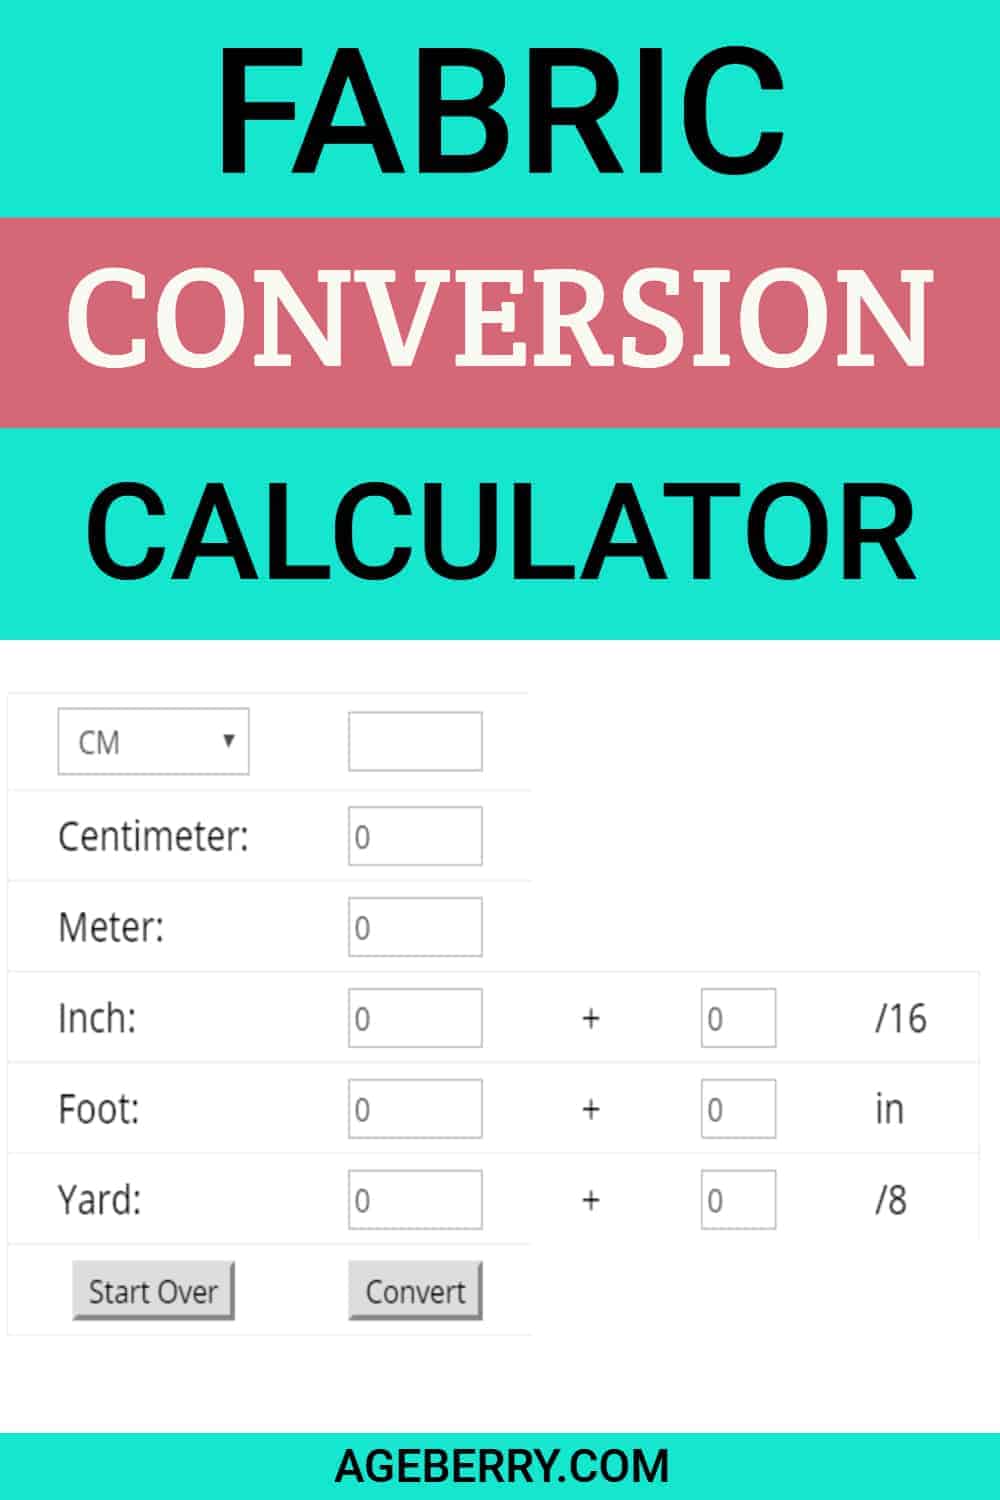
By the way, in USA we measure everything in inches but the fabric is sold in stores in yards. Do you know how to easily convert inches to yards of fabric? Use my FABRIC CONVERSION CALCULATOR to easily convert between units of measurements for fabric while sewing, such as between inches, feet, yards, centimeters, and meters.
5. Always Have Your Pattern Information On Hand
One significant benefit of the invention of smartphones is the ability to have certain information at your fingertips. For example, whenever I buy a new pattern, I take pictures of the front and back of the envelope and store the images in a photo album of patterns.
That way, I never have to remember (or get upset if I forget) to have my patterns with me when I inevitably run into a piece of must-have fabric. I can simply pull up the images to get all the information I need.
6. Know Your Body Measurements
It’s essential to know how to get body measurements accurately. Once you get them, record those measurements into your smartphone so you can pull them up if you ever forget a number.
In my Resource Library I have this free printable PDF template for recording body measurements. If you would like to download it subscribe to my weekly newsletter with helpful sewing tips and tutorials and you can download it.
7. Factor In Allowance For Unusable Fabric
Unfortunately, there are instances where you may not be able to use all of your fabric, so you need to take that into account when estimating yardage. Factor in a little extra material to account for extra-wide selvage, squaring up unevenly cut fabric, or fabric shrinkage when prewashing.
Squaring unevenly cut fabric may cause you to lose a good 4 or 6 inches of fabric, and should definitely not be ignored.
✅ Related tutorial: How to square up fabric
8. Know Your Pattern Placement Habits
Buying too little fabric can ruin your project, while buying too much can bust your budget. Remember how I suggested using pattern information as a guide? Some experienced sewists may find that they regularly buy too much fabric when following the pattern’s guidance. The pattern is made with the average sewist in mind.
Since this is often due to placing pattern pieces more carefully than the pattern accounts for, knowing your pattern placement habits can help you save money on projects.
9. Learn From Your Mistakes
Perhaps you have a tendency of making mistakes when cutting? When I started sewing, I frequently made mistakes. Even now it may happen, it is enough to draw a line in the wrong place. To account for this, I frequently have to get extra fabric, especially for projects where substitutes are not an option.
10. Buy A Little Extra To Save In The Long Run
I’m always in favor of saving money, but I’ve learned the hard way that including a small buffer of extra fabric in my estimate can help me save money. It’s better to have a little too much material than not enough!
Plus, you can save those leftovers and use them for other various small projects.
For example, I made this robe from natural silk fabric (I have 2 YouTube videos on how to make it without a pattern) and after that, made a headband.


And I have lots of projects where I am using scrap fabric:
Adorable DIY Needle Book | Easy Tutorial for Beginners
DIY Makeup Bag | Easy Project with Step-by-step Instructions
Easy DIY Fabric Storage Pods | Free Pattern And Tutorial
11. Create Fabric-Width Templates So You Can Do A Trial Layout
One clever idea I’ve seen somewhere a long time ago (so I can’t get you the source now) is to make some kind of templates that you can reuse. I made my templates from vinyl fabric (I bought the whole roll to make curtains in my garage but decided not to use the fabric for curtains in the end). So, I took 6 yards of 60” vinyl fabric and cut it into 2 equal pieces to create two 3-yard templates.
I used differently-colored permanent markers to draw lines on the vinyl to mark a few standard fabric widths. First of all I draw the line in the middle of each piece so I can use this line if I want to cut fabric on fold. And after that I drew 4 more lines to mark 2 standard fabric widths: 45” and 54”. And the 60” width is “marked” by default by the width of the vinyl.
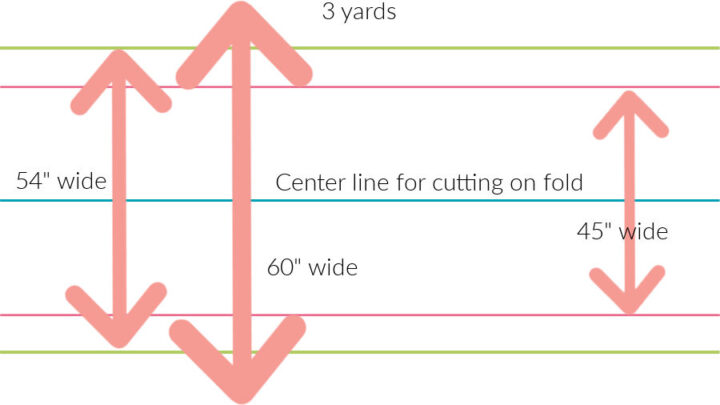
Then, when you have a pattern you want to use, cut out the pattern pieces and place them on the vinyl like you would put them on fabric. I usually put the vinyl on the floor as my cutting table is not that long.
Try different arrangements, don’t forget about the grainline (it’s usually parallel to selvages). Place the largest pattern pieces first and after that include smaller pieces like facings, collars, etc. tucking them in here and there. You should place some pieces on fold. And with some pieces, try a single layer placement.
Figure out how many pattern pieces fit within the width of the material because having fewer pattern pieces fit across the fabric width means you’ll need to buy more yardage.
The vinyl templates will allow you to quickly see exactly how much fabric you need for each width of material and help you eliminate buying unnecessary extra fabric. Of course, if you see that 3 yards are not enough (after you put your pattern pieces on the template) you can add the second template (which is exactly the same as the first one of course).
12. Calculate For Projects That Don’t Use Store-Bought Patterns
If you create your own designs or sew without using commercial patterns, you still need to estimate how much fabric you need.
Pattern envelopes offer helpful information, but you can still closely approximate how much fabric you’ll need by using your body measurements (as I specified above) to determine yardage needs.
13. Don’t Forget To Factor In Seam Allowances
It can be easy to forget certain hidden parts of sewing, such as hems, gathers, darts, and seam allowances. Allow ¼ yard – ½ yard to account for these features.
14. Allow Wiggle Room For Matching Fabric Prints
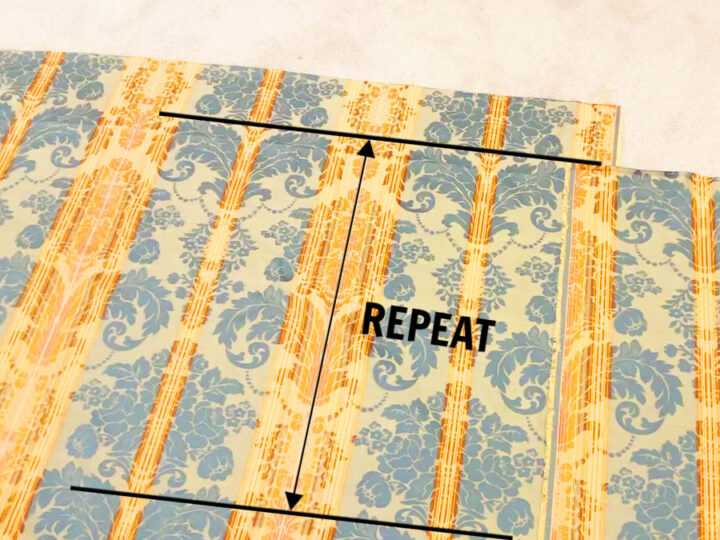
Unfortunately, piecing together print patterns in material (ex: to make seams nearly invisible) can be tricky and requires adding more fabric to your estimate than your pattern might suggest. Here’s how to determine how much extra to factor in:
- Measure the pattern repeat
- Add that amount to your final yardage estimate
What is the repeat in fabric? The repeat is the distance between two of the same rows of prints (flowers, shapes, motifs, etc.). You will need extra fabric for matching of repeats. For example, If the repeat is 30 inches you should add this amount to your calculated yardage.
15. Include Extra Material For Fabric Nap
Like print patterns, fabric texture (aka nap) also impacts how much fabric you need because additional material will be necessary to match textures up to each other. You will need to take into account the fact that all pieces must be cut with the same orientation.
If you use a pattern, the pattern envelope should guide you on how many yards of fabric you’ll need for both napped and non-napped fabrics.
“With nap” layout requires the pattern pieces to be placed facing in the same direction. Because of this, “with nap” layout requires extra yardage.
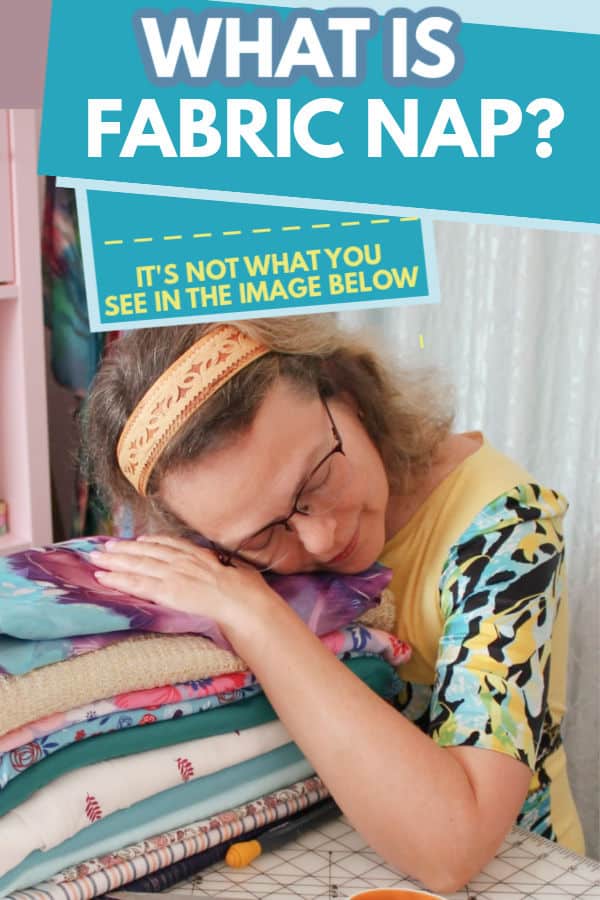
If you would like to know more about napped fabric check out my tutorial What is nap in sewing
16. It Gets Easier With Practice
Answering the question “how much fabric do I need?” may not be an easy process at first. But it will get easier with practice and experience. Over time, you’ll learn little things such as your pattern placement tendencies that will help you fine-tune your fabric estimations.
17. Ask For Help
Don’t be afraid to ask trained store salespeople for guidance and advice. That’s what they’re there for! If possible, get multiple opinions.
18. Use An Online Fabric Calculator
There are many helpful sewing tools online, including this fabric calculator from Sailrite. It can be handy for helping you determine how much fabric you need for odd-shaped projects such as upholstery, awnings, and even face masks.
19. A Yard May Go Further Than You Realize
One yard of fabric can go a long way!
✅ Related tutorial: How big is a yard of fabric
You can make many different projects with just one yard of material, including shorts, short skirts, tops, and even some simple dresses. I am not very big so I can easily make a dress from 1 yard and I even made a sewing tutorial so you can make this dress too (you might need more than a yard though).
20. It’s Okay To Cheat If Needed
Learn how to fix errors. It is not a matter of “if”, I can guarantee you will make errors; all of us do. But it is not the end of the world.
It’s okay if you happen to miss the mark a little on your estimates at first. Just do what I did with the blackout curtains I mentioned at the beginning of this article and use a different fabric in areas where it’s either hidden or combine it with your original fabric in a beautiful way.
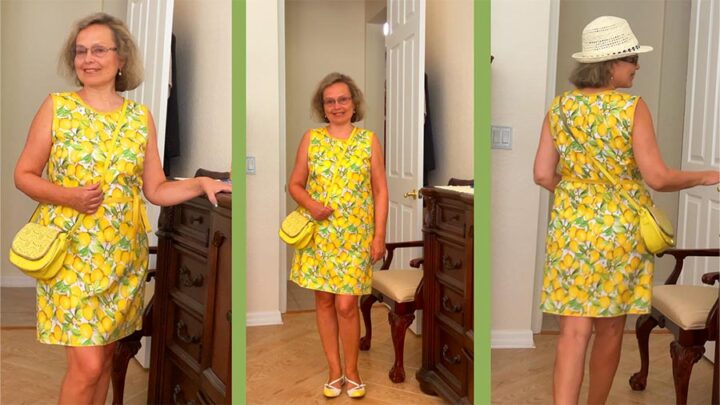
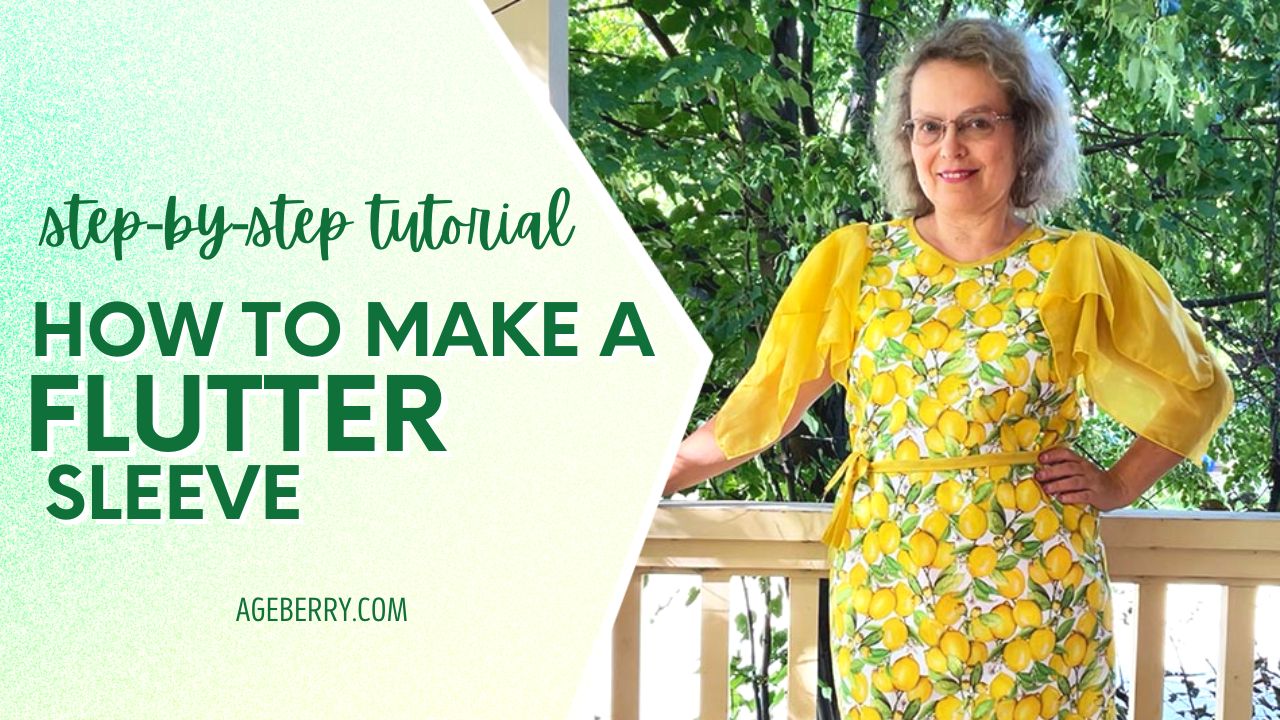
If you don’t have enough yardage you can combine different fabrics. You can also add some beautiful fabric to embellish your project. Look at that lemon dress above – I decided to add flutter sleeves and a ruffle to it and now the dress looks different.
21. Estimate Lining At The Same Time
When doing a project that requires lining, the estimate for the lining material generally should be about the same as your estimate for the main project (well, maybe only ¼ yard less).
Did you find this tutorial helpful? If so, save this pin (see below) on your sewing board so you can come to this tutorial later when you need this information on how much fabric you need, and follow me on Pinterest for more tips, tutorials, and inspiration!
latest posts
- What Do You Call a Person Who Sews? I Asked My Readers and Got 1,408 Opinions
- DIY Round Purse: PDF Sewing Pattern and Detailed Instructions
- Mini Wonder Clips By Clover: Useful Sewing Tool Or Just Another Notion?
- Non-Slip Grips For Quilting Rulers: A Small Notion With A Useful Job
- Fabric Eraser for Sewing: What It Removes and When to Use It
- What Is The Best Thread For Sewing Machine Projects? Let’s Find Out!
- Butterfly Quilt Block Tutorial – Foundation Paper Piecing
- How To Sew Quilt Squares So The Corners Match
- Sewing With Fork Pins: How They Help With Pattern Matching, Slippery Fabric, And Seams