Easy Simple Sewing Project: Fabric Jar Opener
This little jar opener is one of those fast and easy sewing projects that turns out to be very clever and useful.
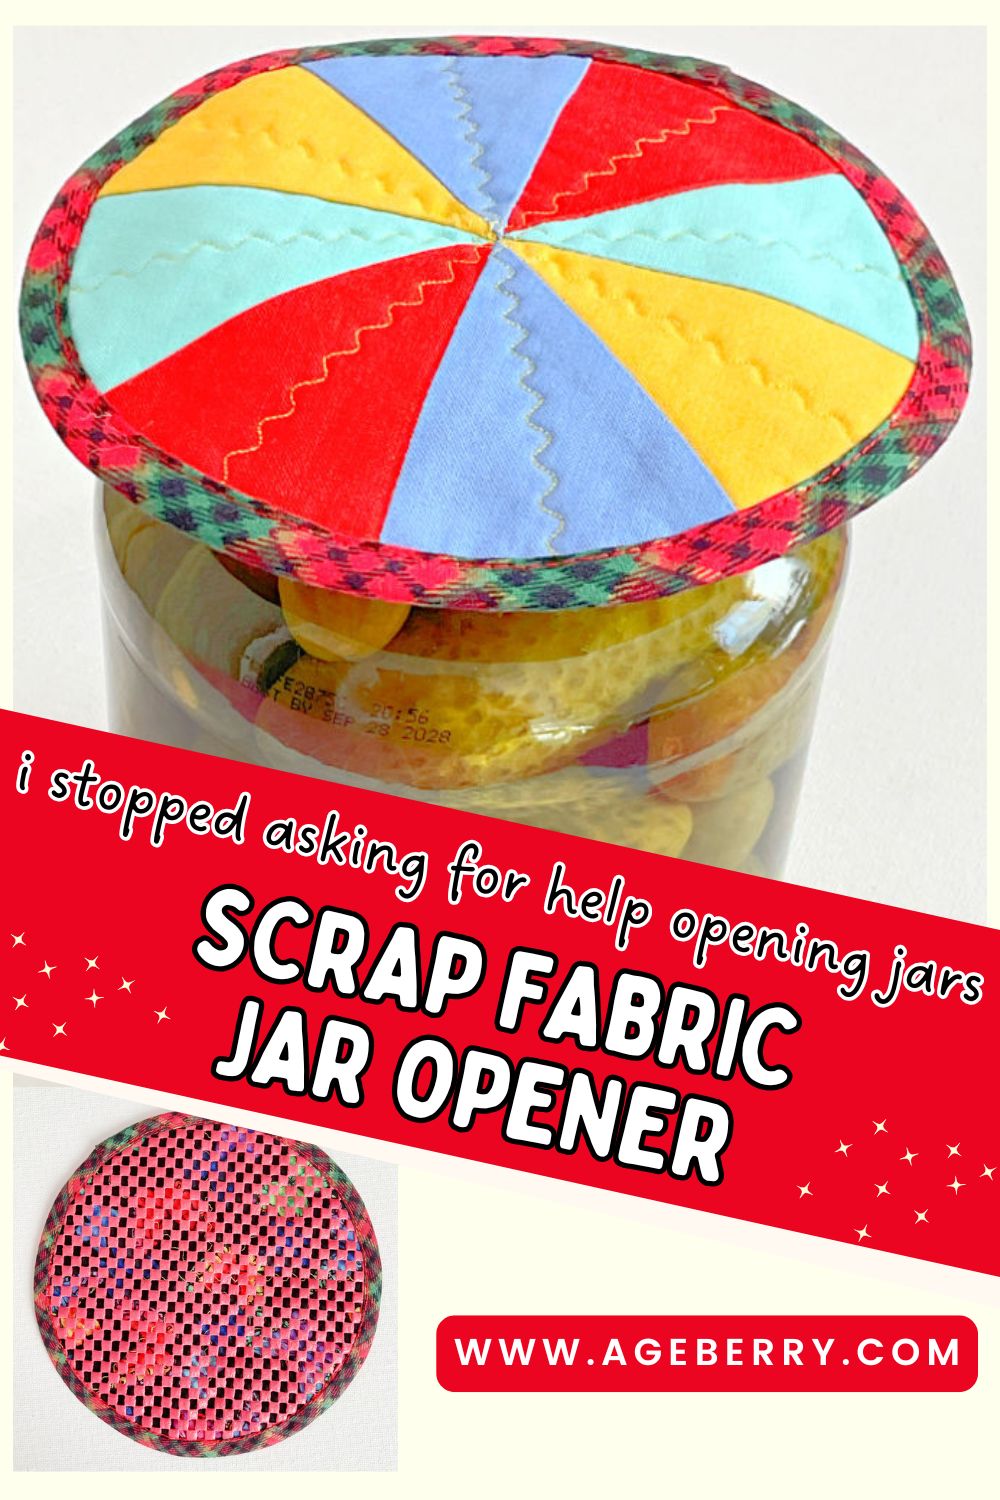
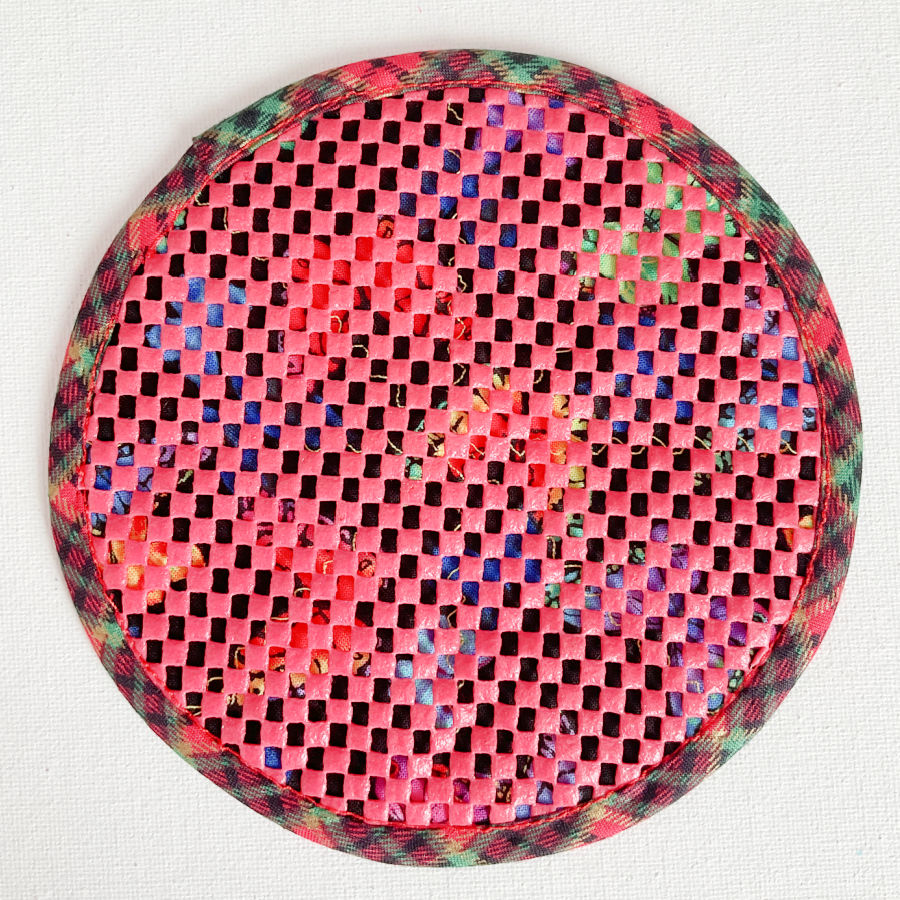
It’s a soft, round pad, about the size of your palm, with two completely different sides. One side is made from a grippy, non-slip material (often called non-slip fabric or shelf liner), which is what actually grabs the lid and gives you traction. It’s flexible but slightly textured, so it “sticks” to smooth metal lids instead of sliding around.
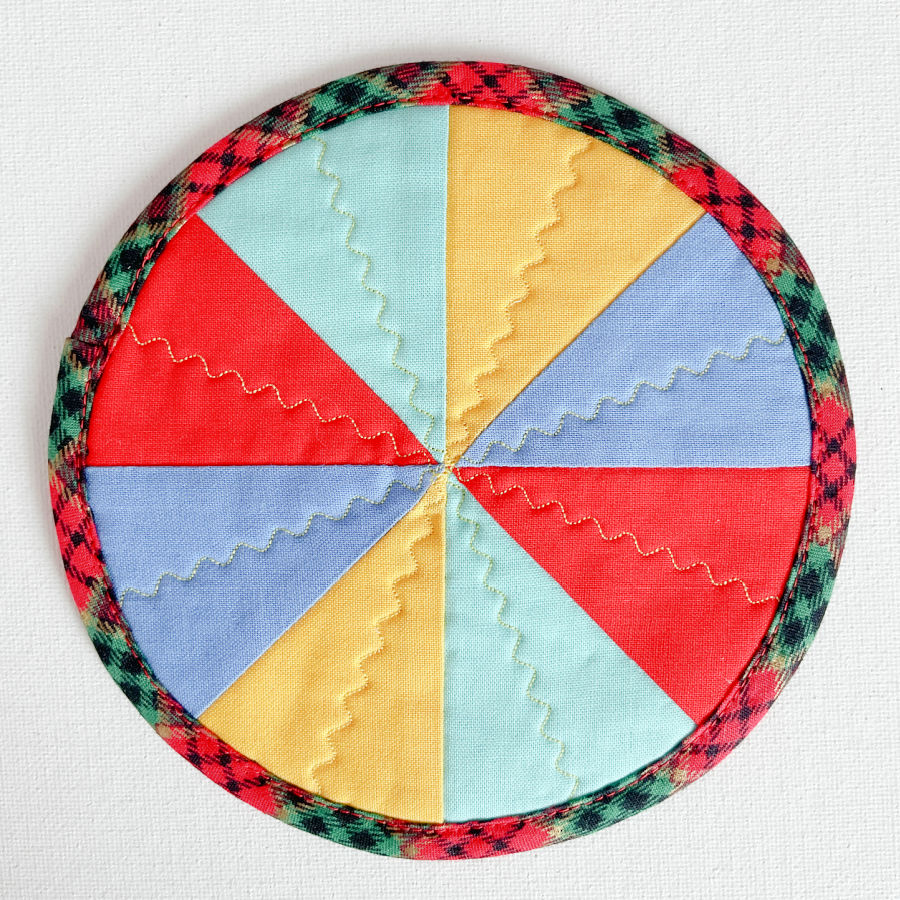
The other side is where the fun is. It’s pieced from fabric scraps into a bright circle made of wedge-shaped sections, almost like a mini quilt block. Each section is stitched together, and the whole top is quilted with simple lines that add texture and keep the batting inside from shifting. The quilting also gives it a bit more structure, so it feels sturdy in your hand without being bulky.
Inside, there’s a layer of thin batting — just enough to add softness and grip, but not so thick that it gets in the way when you’re twisting a tight lid.
Around the edge, everything is finished with binding, which gives it a polished look and makes it durable enough for daily use. The binding also ties the two sides together and adds a little contrast detail.
An ad-free, printable version of this article including a printable template page is available for a small fee in my shop: Easy Simple Sewing Project: Fabric Jar Opener.
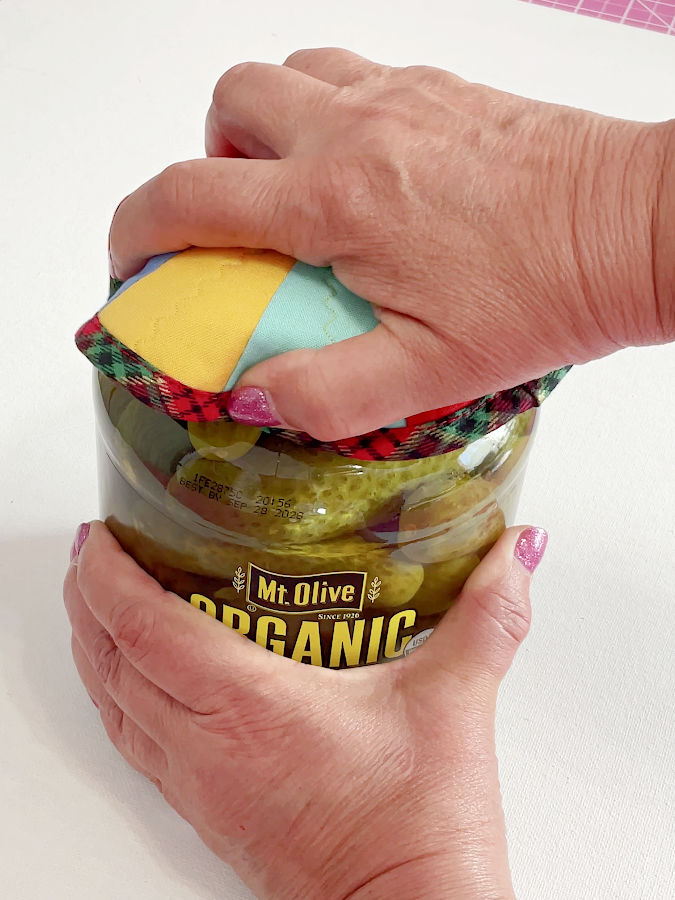
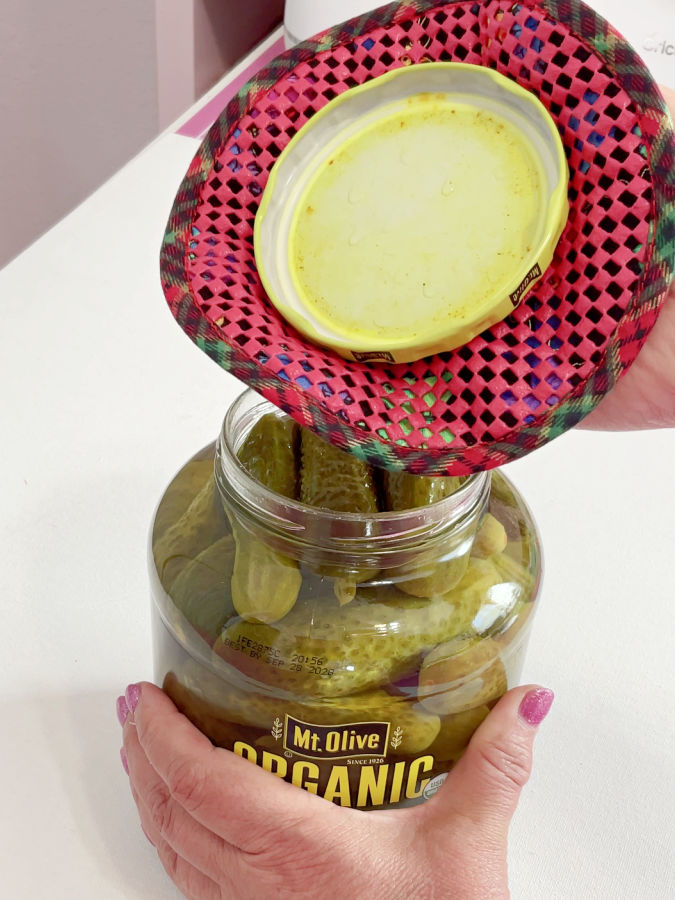
In use, it’s very straightforward: place the non-slip side against the jar lid, press down, and twist. It grips instantly and makes opening stubborn jars (like that pickle jar) much easier.
It’s practical, uses up scraps, and still gives you a chance to play with color and piecing — so it feels more like making something fun than just making a kitchen tool.
You can make this jar opener the very simple way: cut two circles from the same fabric, add the non-slip layer, bind the edge, and it will work just fine.
You could even make it as a square and skip the circle completely.
But where is the fun in that?
For me, sewing is not only about ending up with something useful. It’s also about making the useful thing look like mine. A few fabric scraps, a tiny pinwheel block, a little quilting, and suddenly this is not just a grip pad for a jar. It’s a small sewing project with color, texture, and personality.
And since it uses such small pieces, it’s a good place to practice half square triangles, matching points, quilting, and binding without committing to a whole quilt.
What you’ll need
- Fabric scraps for the pinwheel top
- Fabric for the backing
- Thin cotton batting
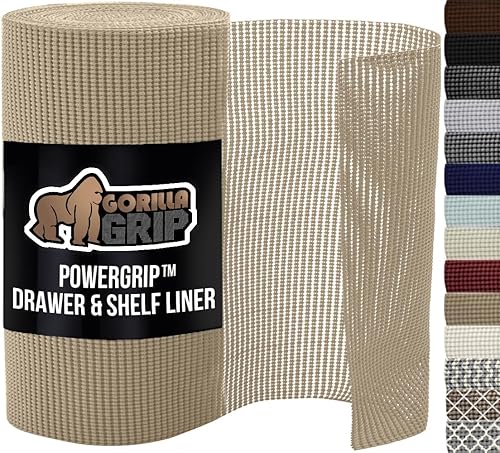
- Non-slip material (shelf liner or similar grippy mesh)
- Bias binding
- Printable PDF template
- Thread (neutral for piecing, matching for binding)
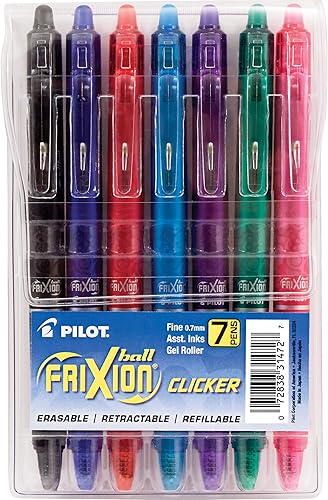
- Fabric marking tool (Frixion pen or similar)
- Tear-away stabilizer / tissue paper / pattern paper (for sewing with non-slip layer)
- Regular sewing tools
Take a minute to read through the whole tutorial before you start. A couple of steps are easier when you know what’s coming next.
Note: Some of the links on this page are affiliate links. This means I will receive a commission if you order a product through one of my links. I only recommend products I believe in and use myself.

Step 1: Make the Half Square Triangles (HSTs)
Cut 4 fabric squares using the square template from my printable PDF file. The PDF also includes the circle template you will use later and the full step-by-step sewing tutorial, so you can follow the project without figuring out the measurements yourself. It’s available for a small fee in my shop, the link is above.
I am using a right-handed Martelli rotary cutter to cut, it works very well for me and it has a very comfortable grip.

✅ Related tutorial: How To Accurately Cut Fabric For Quilting With A Rotary Cutter
Pair them like this:
- blue with yellow
- red with mint
Of course, you will probably have different colors; just make sure they go well together and try to pair one lighter with one darker for better contrast.
Place each pair right sides together.
On the wrong side of one square in each pair, draw a diagonal line from corner to corner.
I used a Frixion pen, but any fabric marking tool works here.
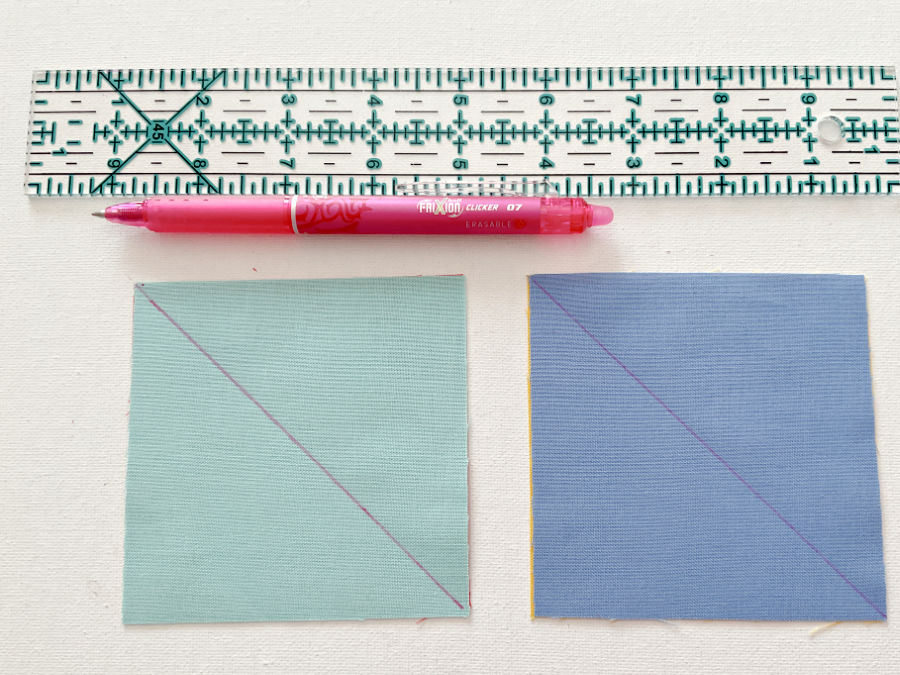

Sew ¼ inch away from the drawn line on both sides.
- I used a ¼” presser foot, which makes this step very easy.
- Thread: go with a neutral color that blends across fabrics. I used beige, and it works well with all the colors.

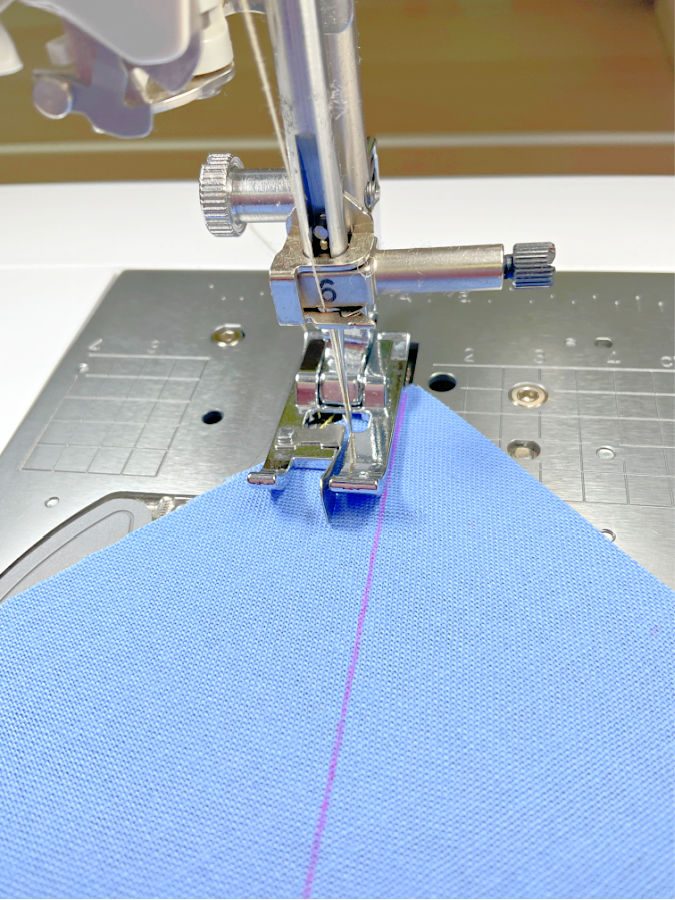
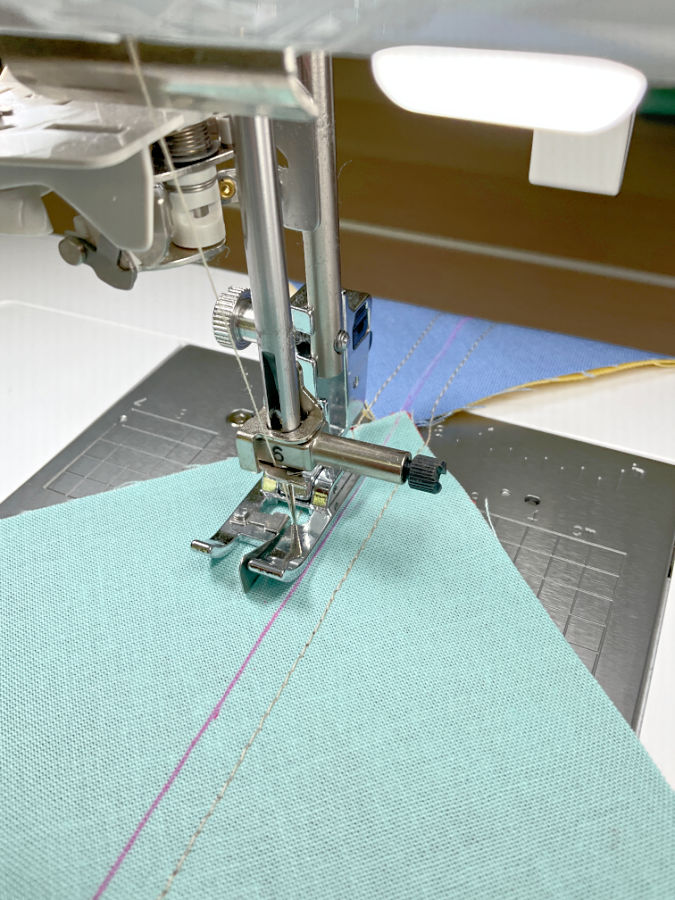
Keep your stitching perfectly parallel to the drawn line as it can affect the final result.
✅ Related tutorial: Quarter Inch Seams and Quilting Math: True, Scant, and Everything In Between
Cut directly on the drawn diagonal line.
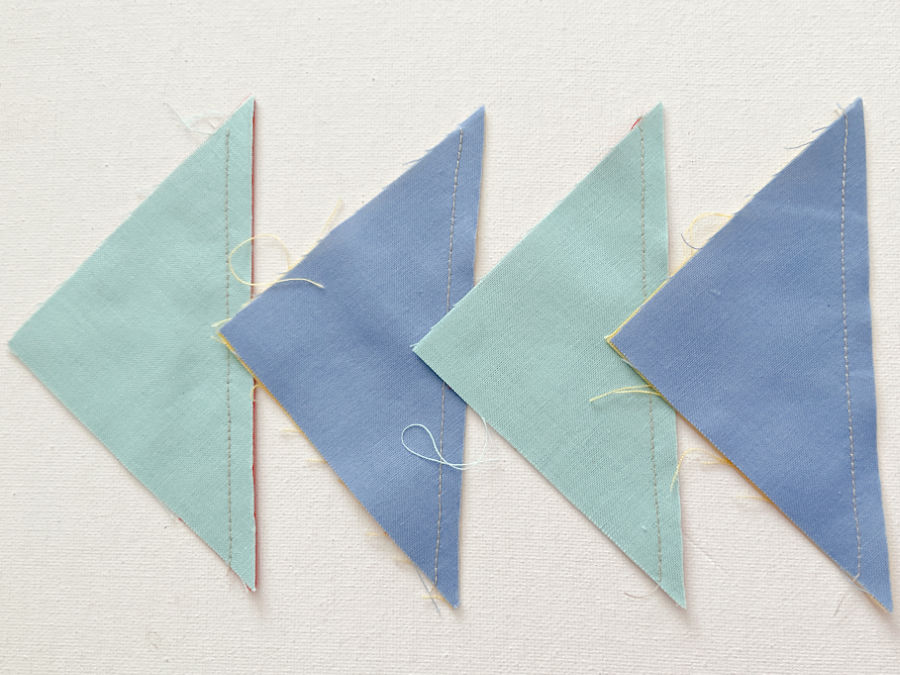
Press the seams first and then press them all to the darker side (blue and red in this case).
It’s very convenient to use a mini iron for these small pieces.


Each square will have small fabric points sticking out at the corners (called “dog ears”).
Trim those off with scissors or a rotary cutter so the edges are clean and easier to align.
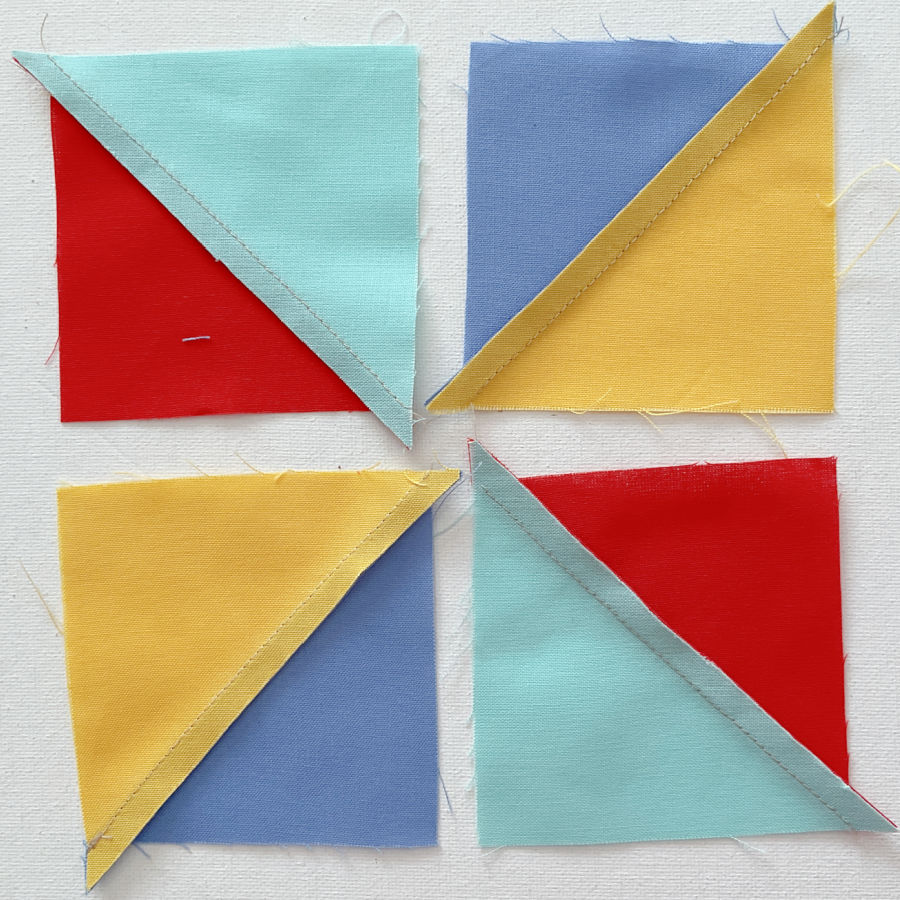
So now you have 4 squares made from half square triangles (HSTs) ready for the next step.
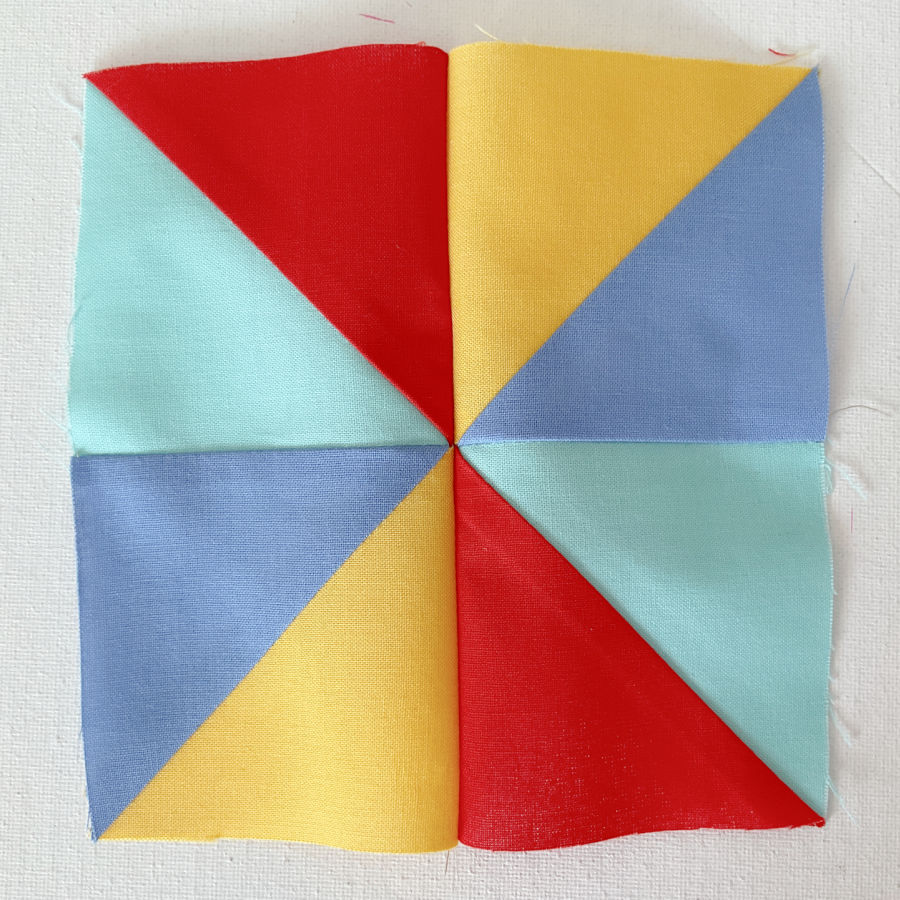
Step 2: Arrange and Sew the Pinwheel Block
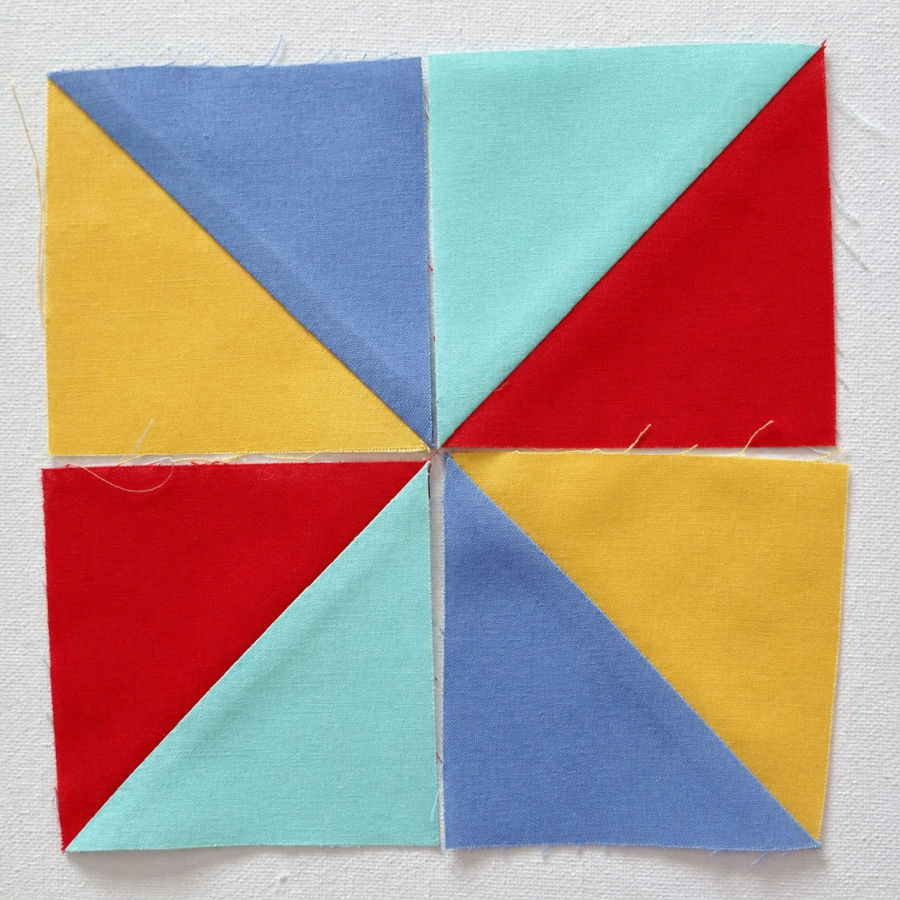
Place the 4 half square triangle squares on your table and arrange them into the pinwheel pattern.
Turn the squares until all the triangle points meet in the center. Take a quick photo with your phone — this helps if one piece suddenly decides to “help” by turning itself around.
Place the top 2 squares right sides together.
Then place the bottom 2 squares right sides together.
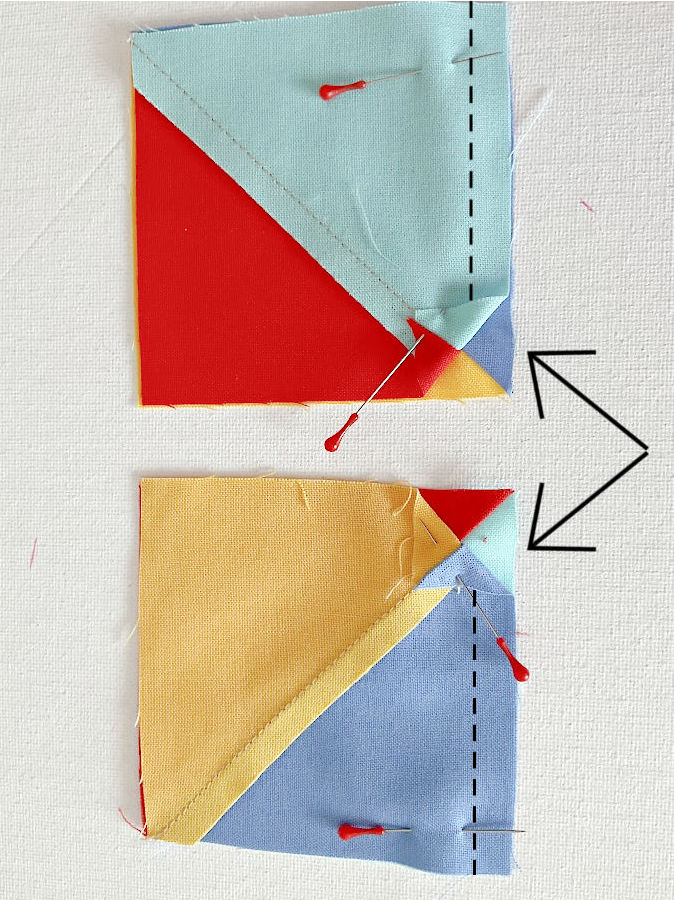
Before sewing, make sure the diagonal seams are nested.
That means the seam allowance on one square goes in one direction, and the seam allowance on the other square goes in the opposite direction. When you place the squares right sides together, those seam allowances lock against each other like tiny fabric speed bumps.
This helps the diagonal seams meet neatly, so the points line up in the center instead of shifting apart.
In this photo, I’m showing how the seams can be nested so the points line up, but this is just for alignment — not how you sew.
Close the corners back out before stitching.
Sew the side seams. Use a ¼ inch seam allowance.
Important: Don’t sew with the corners folded like in the photo above — that’s only to show how the seams meet. Just sew the side seam normally with a ¼” seam allowance.
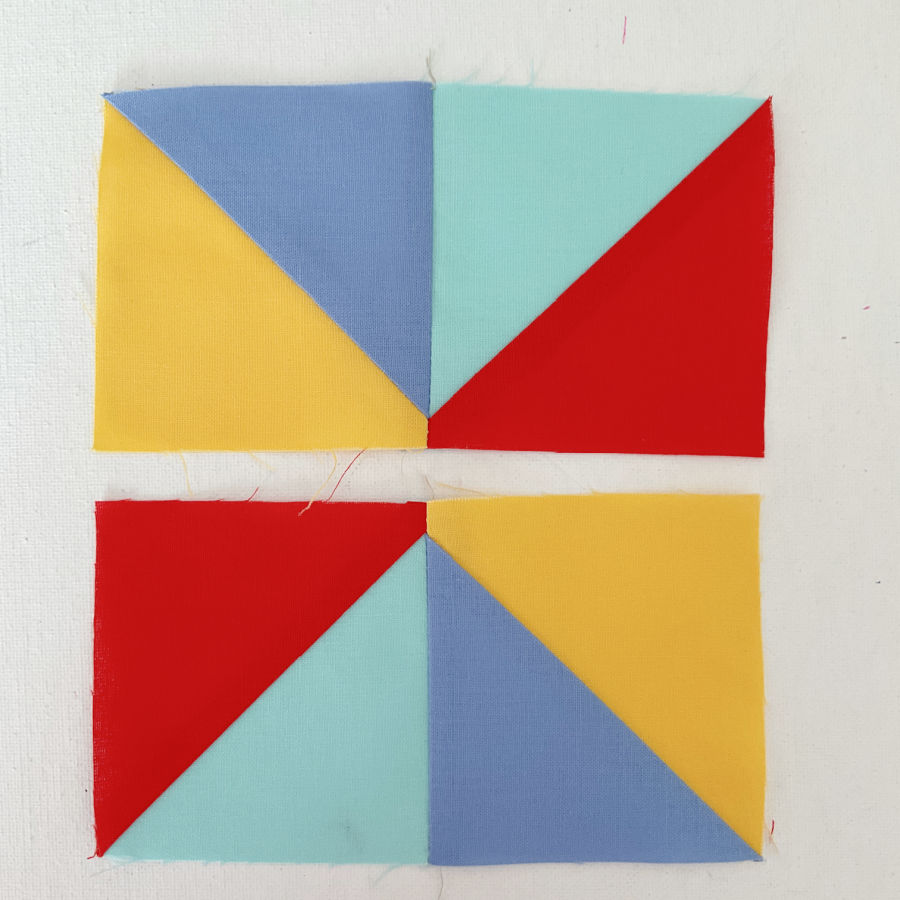
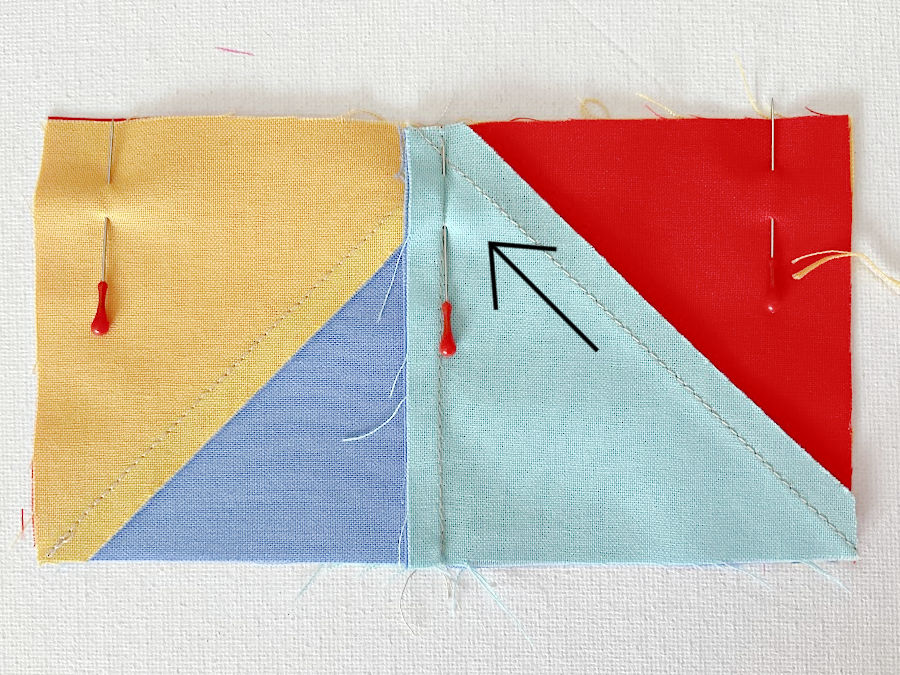
Once you sew the top pair and the bottom pair, you’ll have two rectangular units.
On the right side, each unit looks like a clean two-block strip made from half square triangles (the image below left).
- The seams meet in the middle, forming a point where the triangles come together
- You can already see the beginnings of the pinwheel shape
- The colors alternate, creating that “spinning” effect when the two rows are joined later
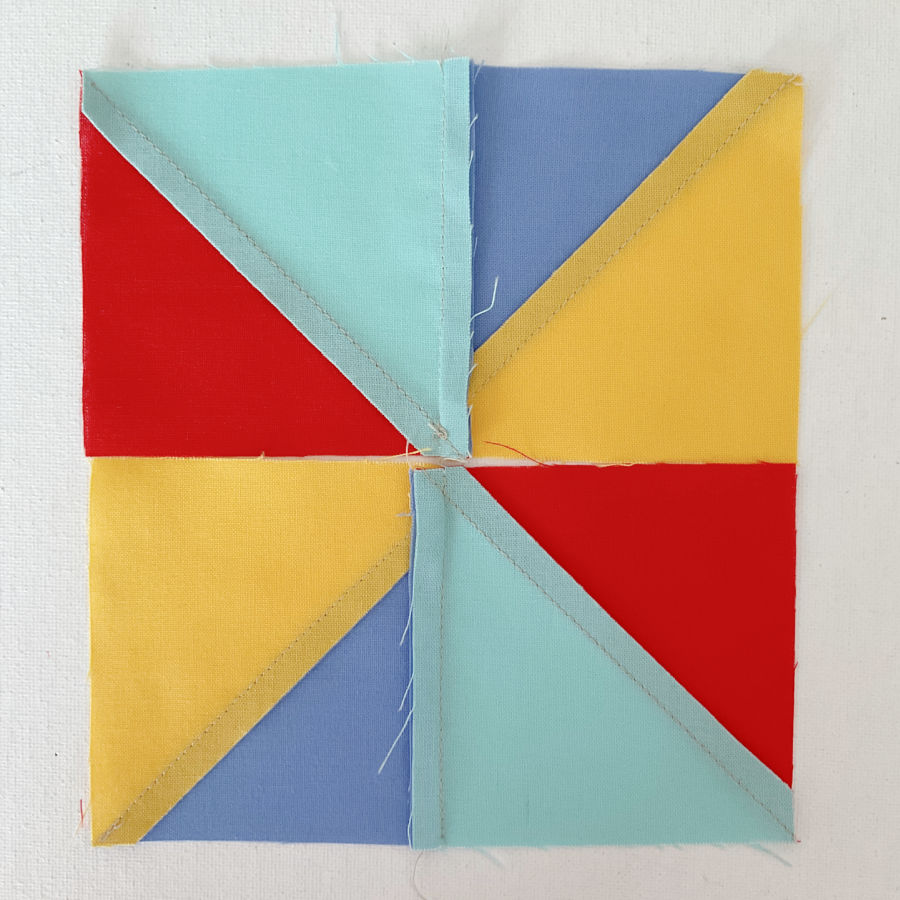
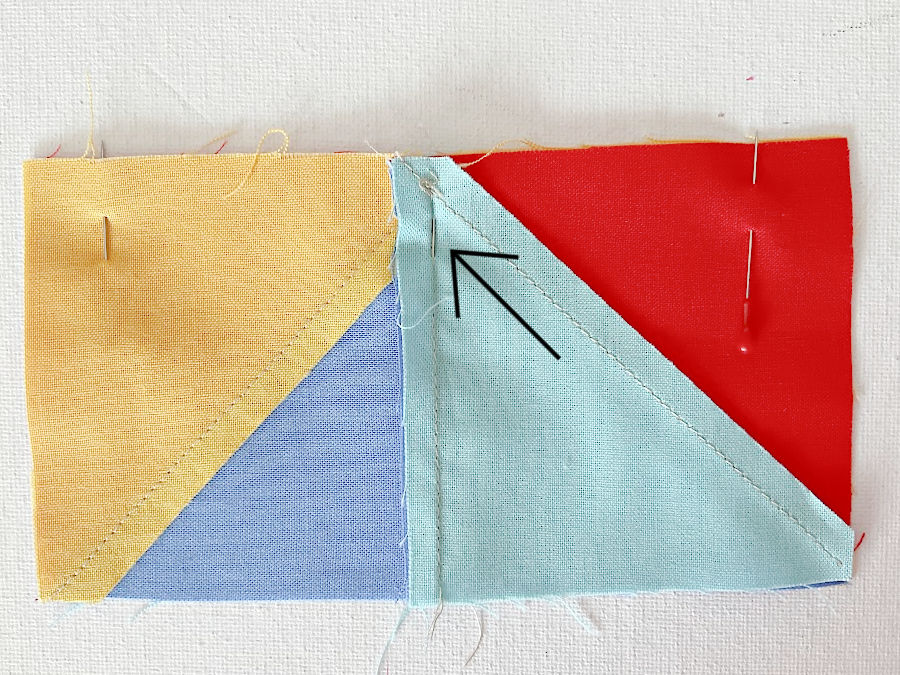
Flip the units over, and you’ll see the seam allowances (the image above right).
- The vertical seam you just sewed runs down the center
- The diagonal seams from the HSTs are visible
- Notice how the seam allowances go in opposite directions at the intersections — this is what helps the points line up when you join the two rows
At this stage, everything should lie flat, and the center intersections should feel aligned when you run your finger over them.
Step 3: Join the two rows
Now sew the two rectangles together to form the full block.
Put the two units right sides together, matching the long edge.
This is where nesting helps again.
At the middle, you’ll have two bulky seam intersections. Make sure the seam allowances go in opposite directions so they lock together.
When they’re nested correctly, the center point will sit neatly instead of shifting.
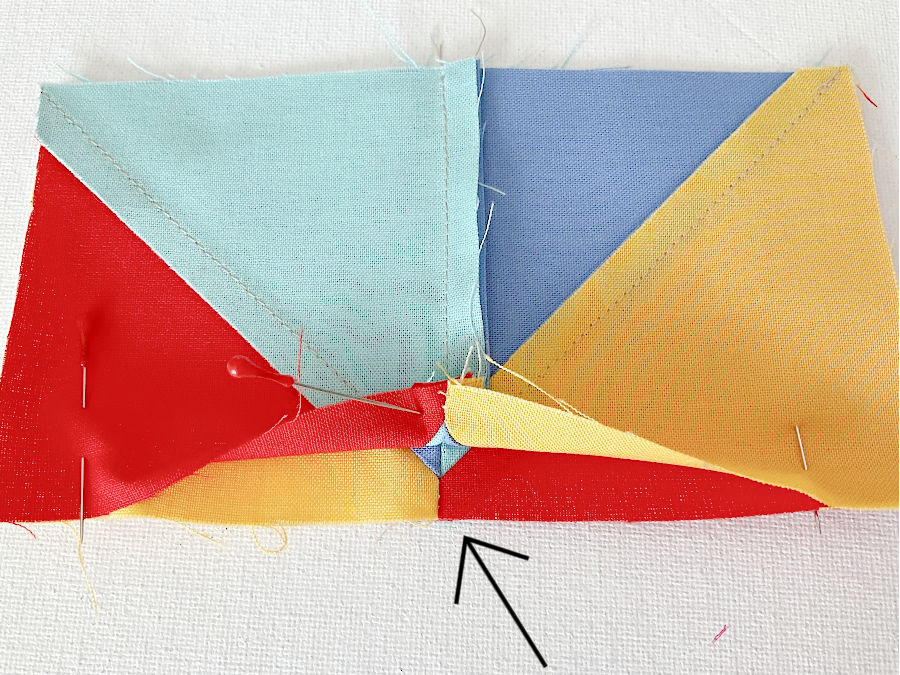
I also like to place a pin exactly through the seam intersection.
Push the pin straight down through the center point on one side, then check the other side — the pin should come out right in the seam there too. That’s how you know everything is lined up.
Add a few more pins along the edge to keep the layers from moving.
Sew the rows together with a ¼” seam allowance.
Remove pins as you sew — don’t stitch over them, or the needle can hit the pin and break.
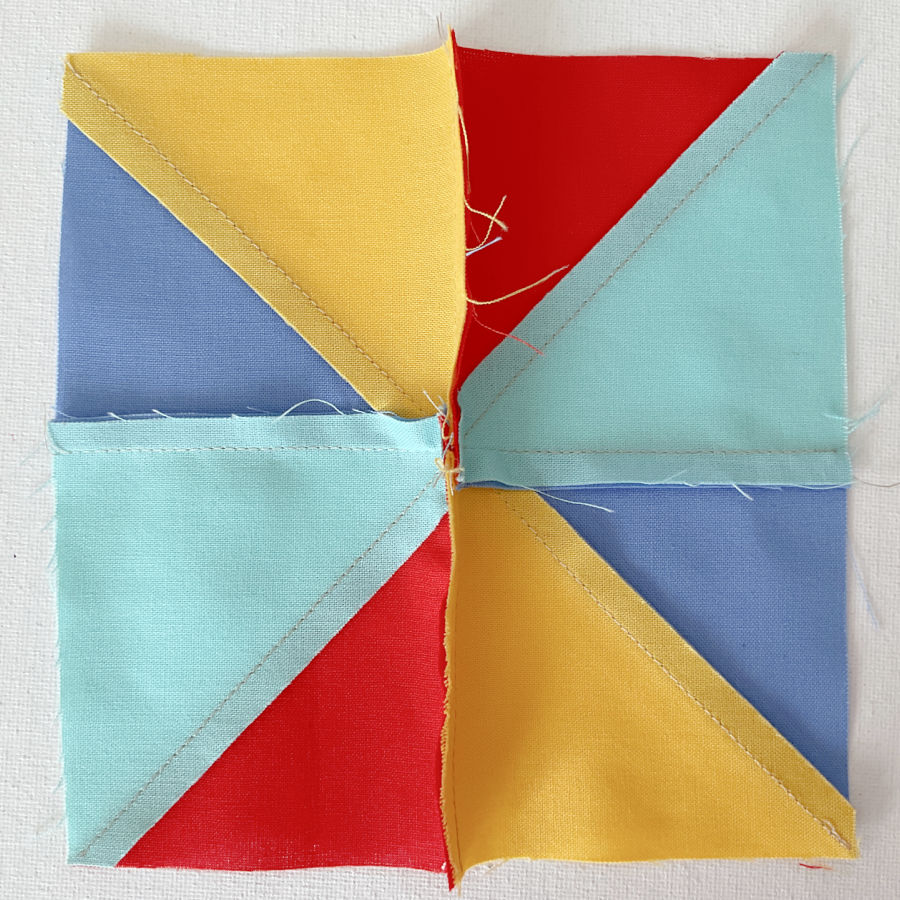
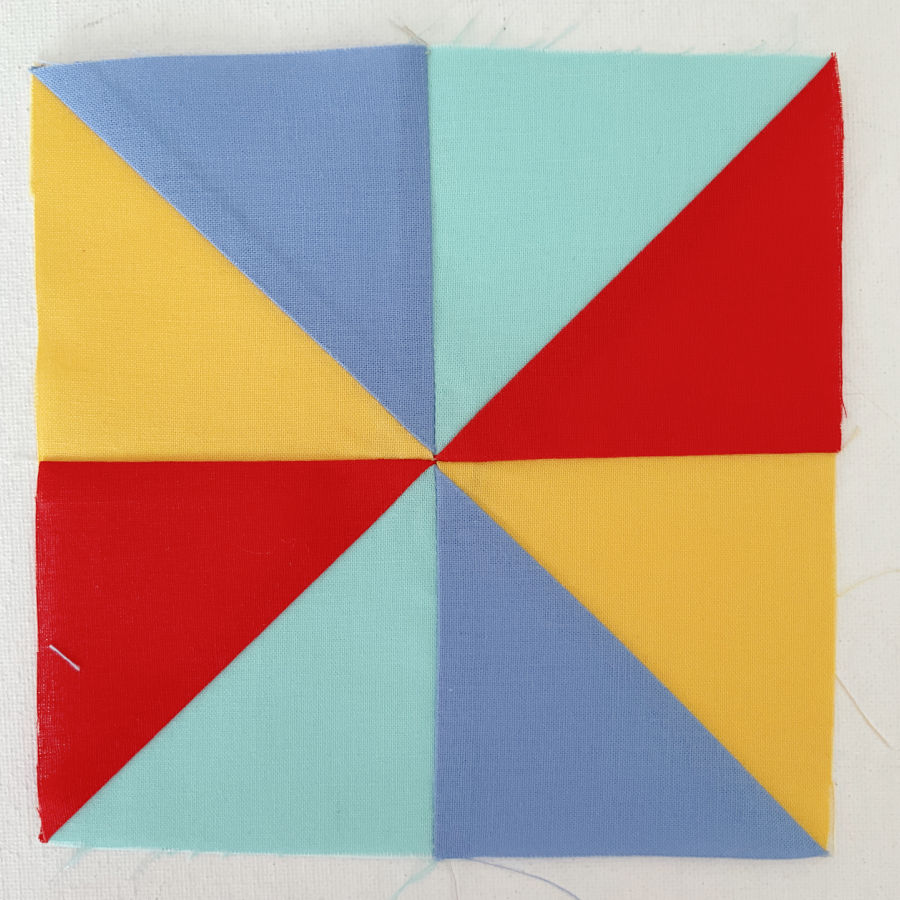
After sewing, your points should meet nicely in the center, forming the pinwheel.
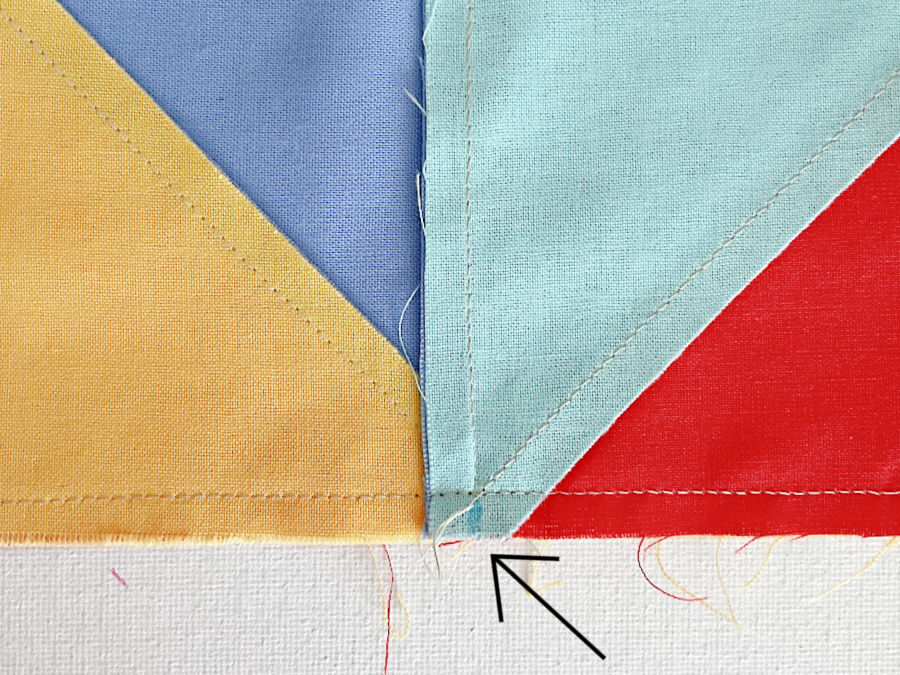
Press the seam flat right after stitching, just as it comes off the sewing machine.
Don’t press it open and don’t push it to one side yet — just press the seam to set the stitches.
If everything was aligned well, the points should meet right in the center.
Right now, the block doesn’t look perfectly flat — that’s normal. You can see a bit of fullness and slight lifting along the center seam in the image. That’s because all the seam allowances are stacked inside, creating bulk.
We’ll fix that in the next step by managing the seam allowances so everything lays flat.
Step 4: Reduce the Bulk at the Center
After the two rows are sewn together, the center will feel bulky because several seam allowances meet in the same spot. This is normal, but we can make it much flatter.
Turn the block to the wrong side.
Take a seam ripper and gently remove the 3 or 4 stitches that are sitting in the seam allowance of the final seam.You are not opening the whole seam. You only need to unpick the two short seams that are perpendicular to the final seam, right near the center point.
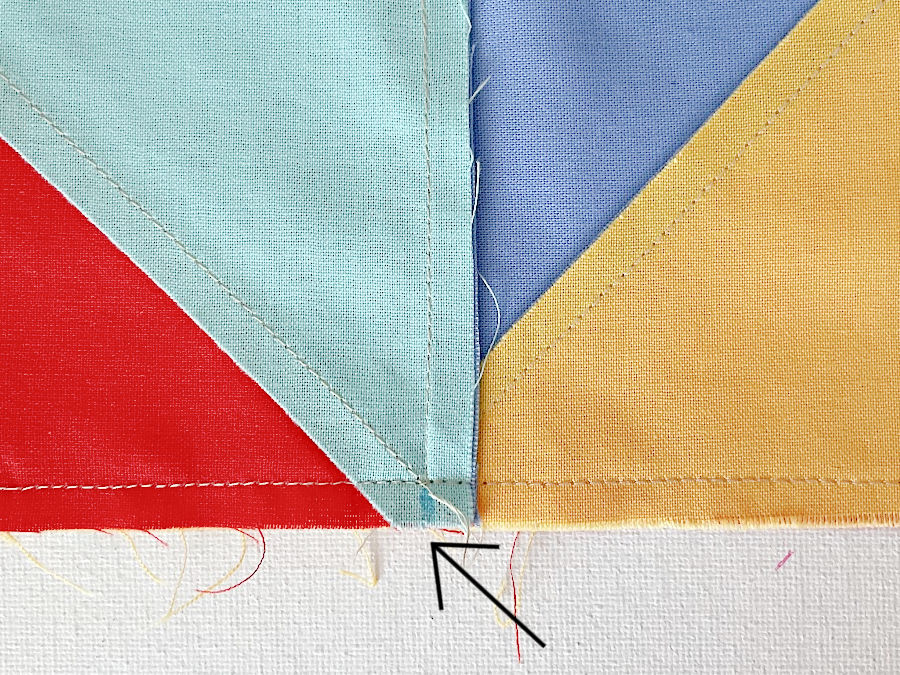
Be careful not to cut any other stitches of the block.
Once those few stitches are released, the seam allowances will be able to spread out around the center.
Arrange them so they fan out in a circle. On the wrong side, you’ll see a tiny little pinwheel forming in the center of the block.
That little pinwheel on the back is what removes the bulk.
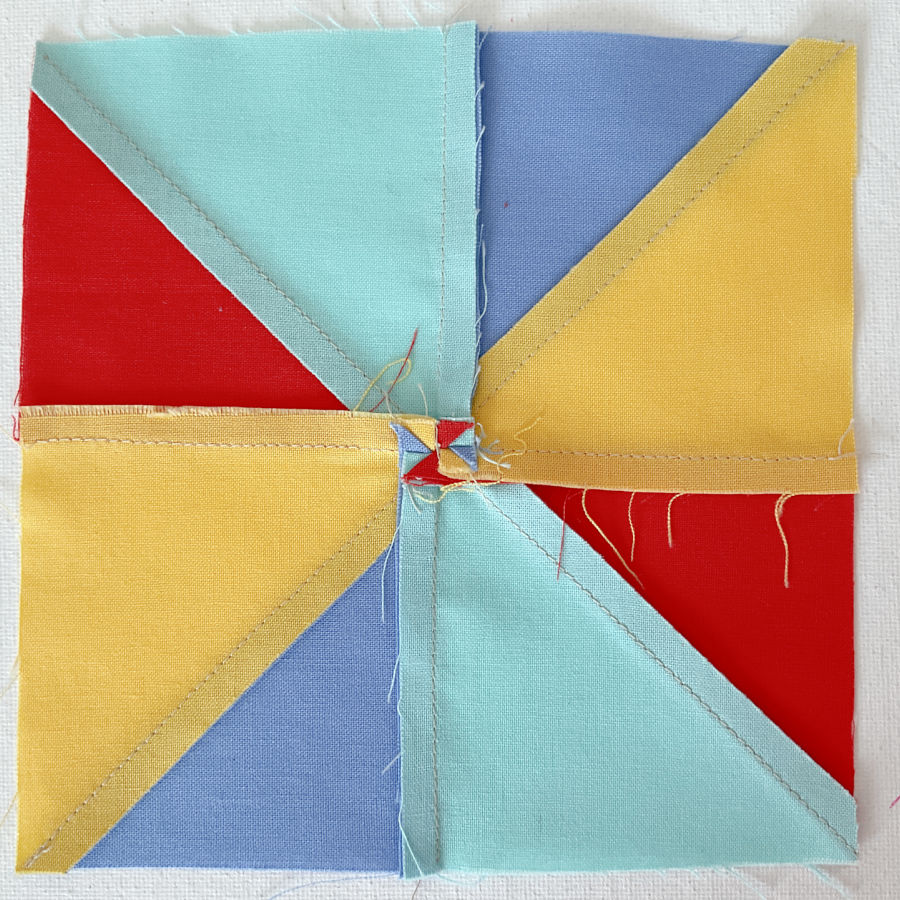
Press the center well.
The wrong side will have that tiny pinwheel of seam allowances, and the right side should now have a much flatter, cleaner pinwheel with the points meeting nicely in the middle.
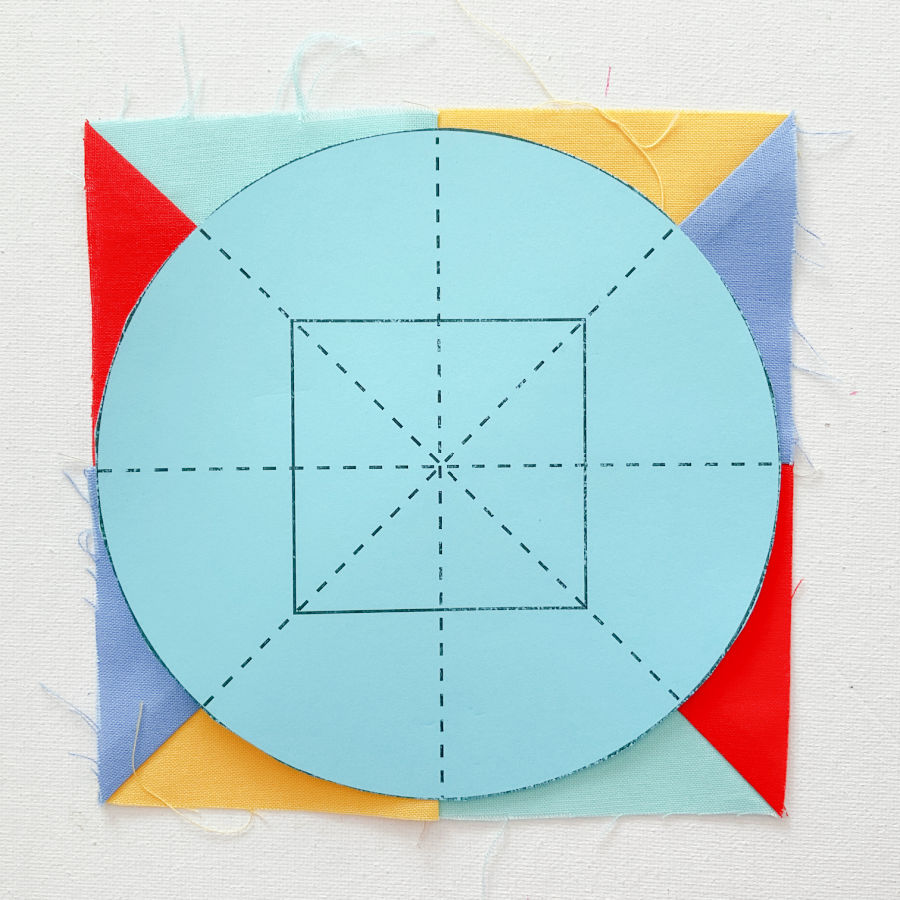
Step 5: Cut the circles
Place the circle template (available in my PDF file) on top of your pinwheel block.
Make sure the center of the template lines up exactly with the center of the pinwheel, where all 8 triangles meet. This step matters — if it’s off, the design will look uneven.
Trace around the template and cut out the circle.
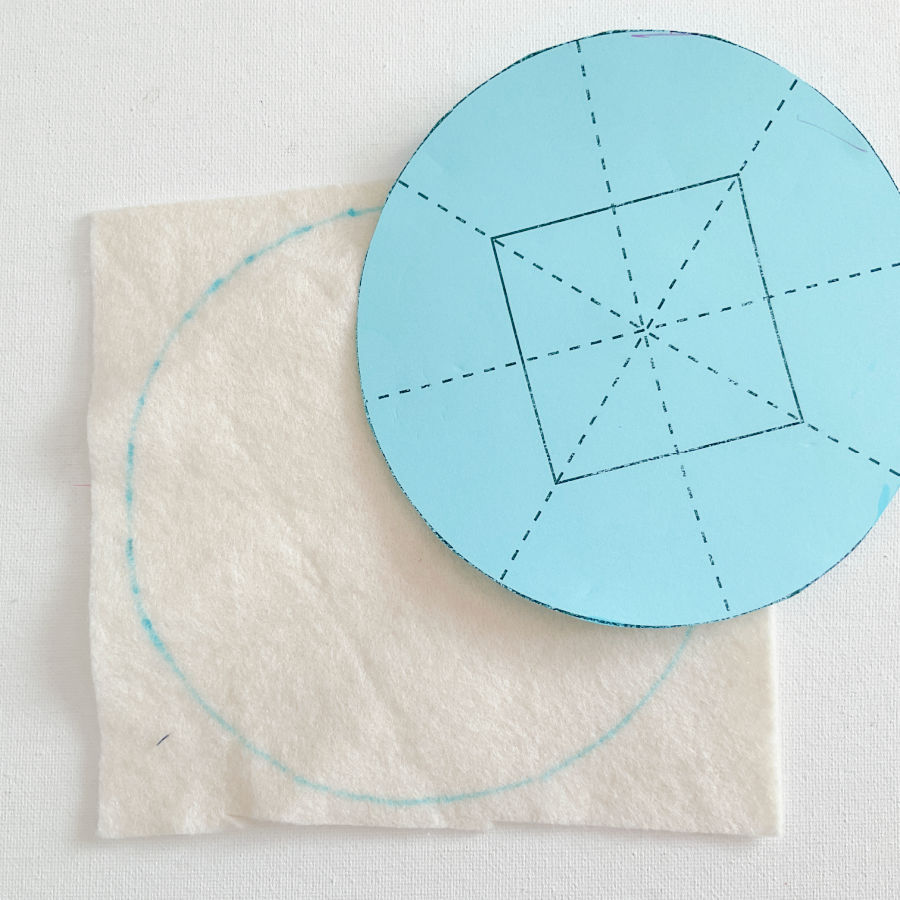
Use the same template to cut a circle from thin cotton batting.
You don’t need to be overly precise here, but try to keep it close to the same size as the fabric circle.
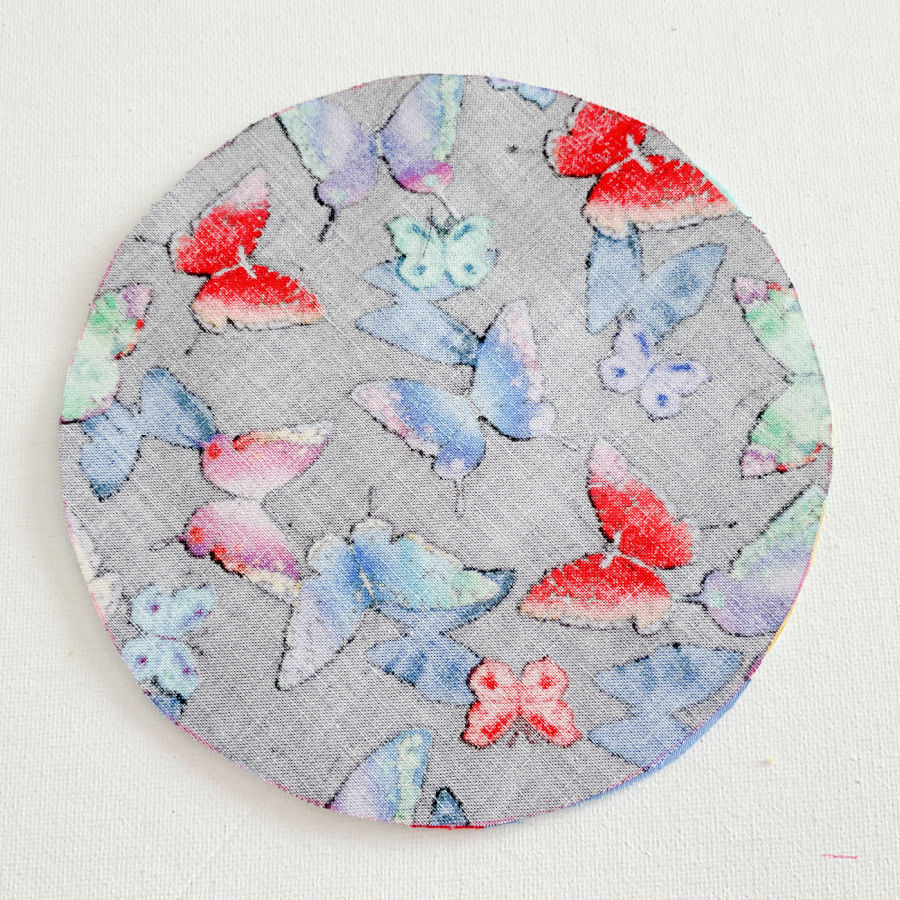
Cut one more circle from fabric for the back side of the jar opener.
This can be any fabric you like — something fun, or something practical. It almost won’t show while using the opener, but it’s still nice to make it look good.
Now you have three layers:
- pinwheel top
- batting
- backing fabric
Ready for assembly in the next step.
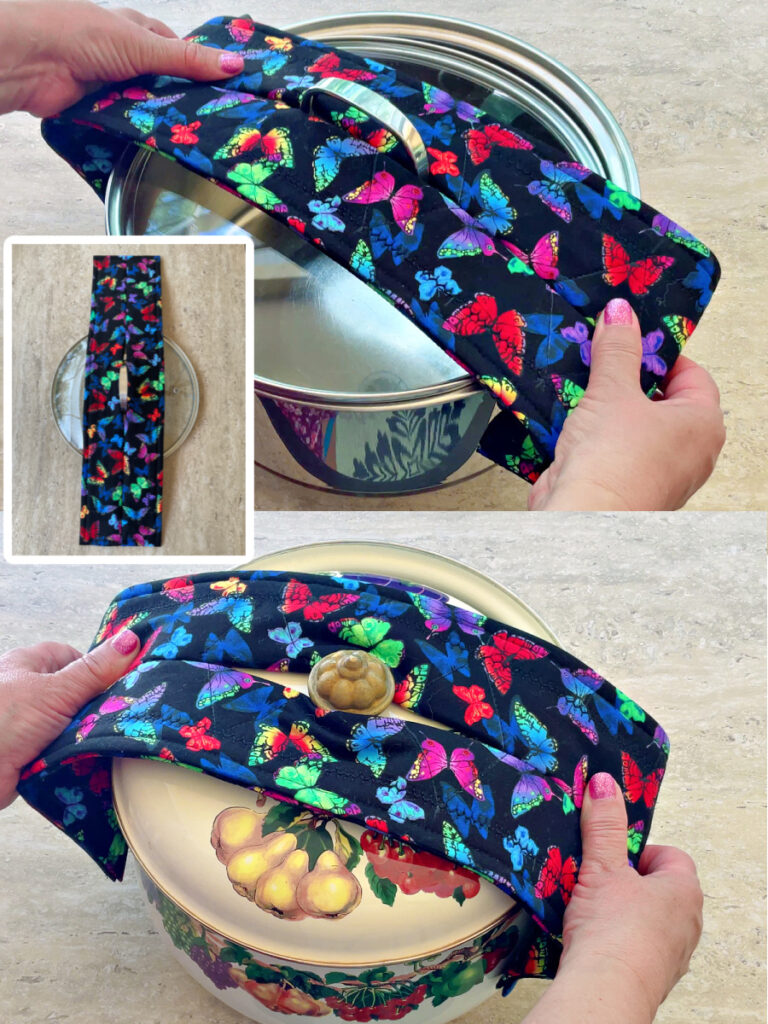
By the way, if you like quick, practical sewing projects, I recently made a potholder that works very differently from the usual ones. It wraps around the handle and stays in place, so you can lift pots or drain hot water safely. It’s quick to sew and makes a really nice handmade gift. I made a detailed PDF tutorial with all the steps – take a look here.
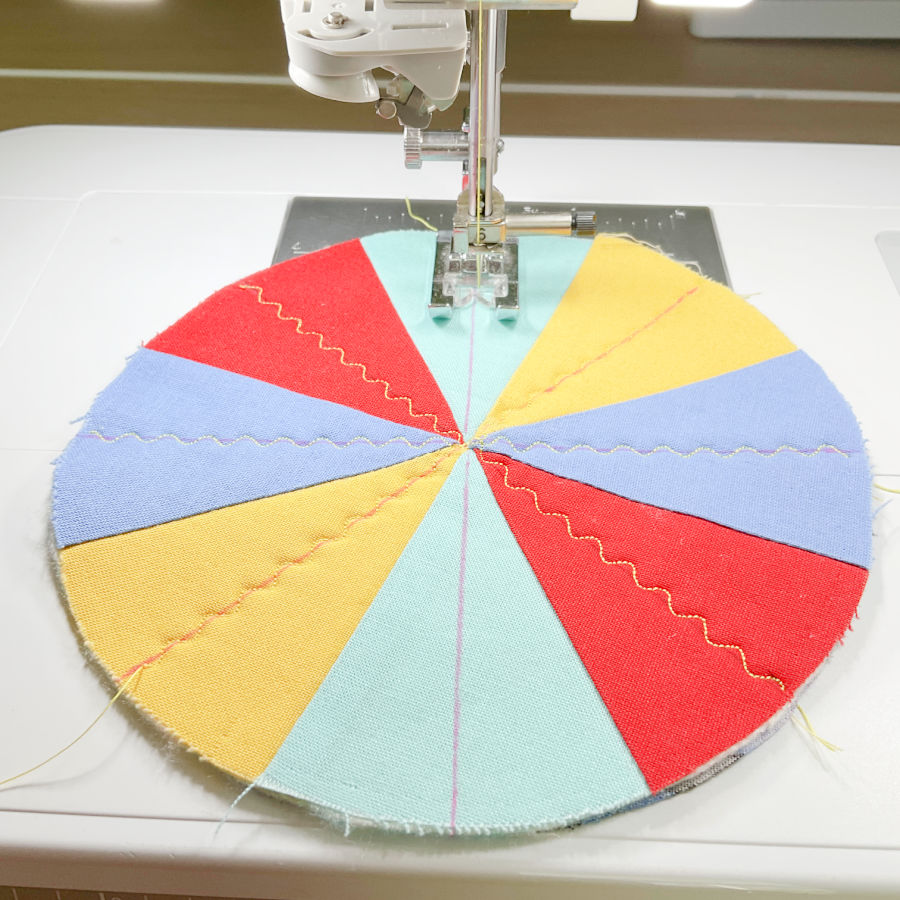
Step 6: Quilt the layers
Now mark your quilting lines.
The easiest way is to draw a line from the middle of one color section, through the center point, to the middle of the opposite section.
Then repeat this for all remaining sections.You only need to draw 8 lines, and they go all the way across the circle.
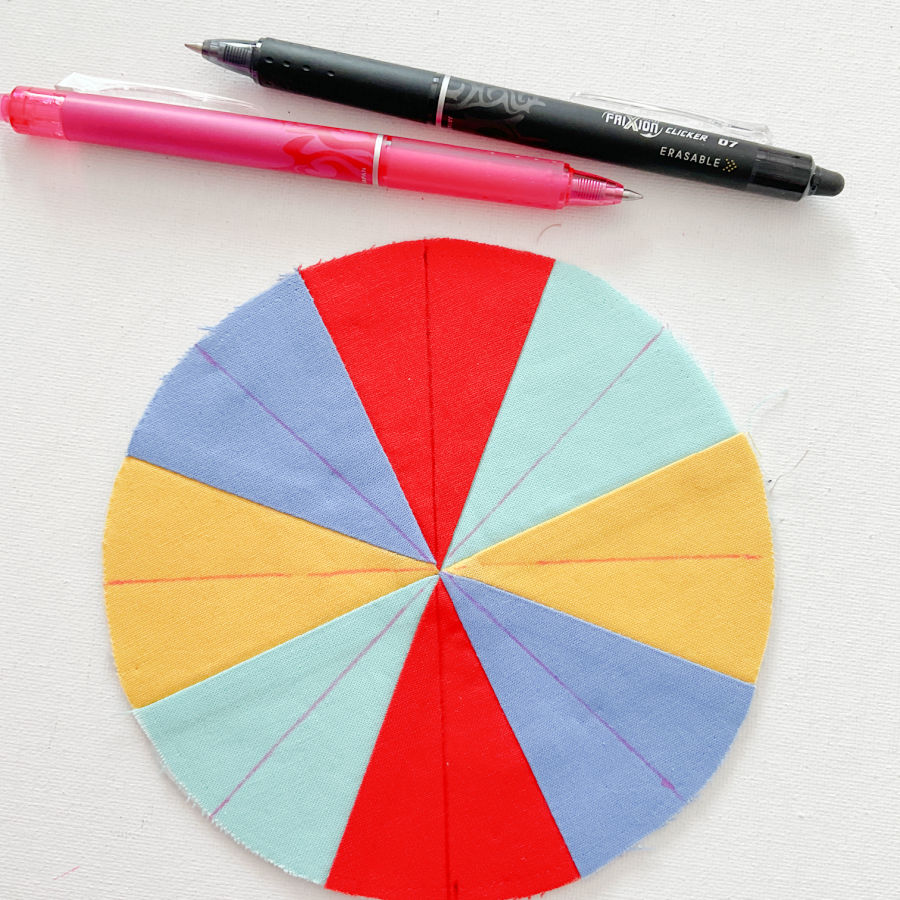
I used a Frixion pen, but any fabric marking tool will work.
Next, make the quilt sandwich. Layer the pieces like this:
- Backing fabric – wrong side up
- Batting – centered on top
- Pinwheel front – right side up
Smooth everything out and pin to keep the layers from shifting.
Take it to the sewing machine and stitch along those lines.
This is called straight line quilting, even if you choose a decorative stitch.
- I used a serpentine stitch for a bit of texture
- You can use a straight stitch, zigzag, or any stitch you like
Sew through the center each time, completing all 8 lines.
This step holds all layers together and adds structure to the jar opener.
✅ Related tutorial: The Basics of Straight Line Quilting
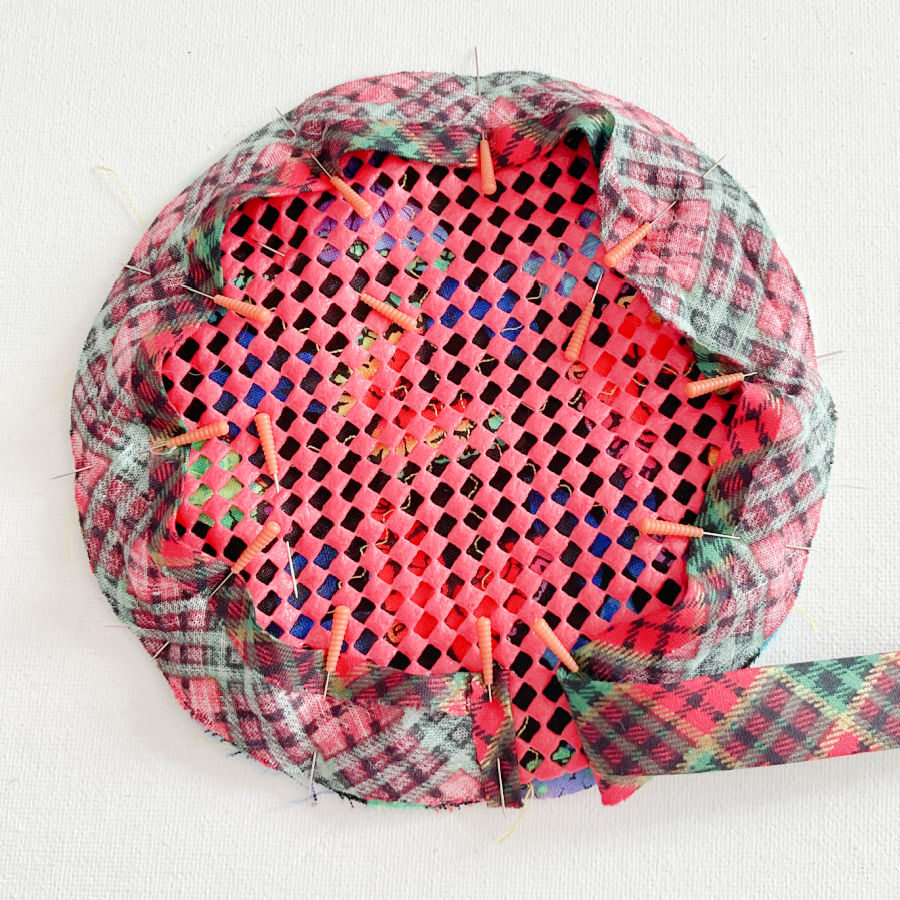
Step 7: Add the non-slip layer and bind the edge
Cut one more circle using the same template, this time from non-slip material.
This is usually a flexible plastic mesh or shelf liner — the kind used to keep rugs from sliding or to line kitchen drawers. It has a slightly rubbery feel and a textured surface with small openings. That texture is what grips the jar lid, so it doesn’t slide when you twist.
Place the non-slip circle on the back side of your quilted piece and pin it in place.
Prepare the binding. You’ll need a short length of bias binding (not straight-grain strips). Bias binding stretches slightly, which helps it go smoothly around the circle.
I used a leftover piece from another project.
Press the binding well so the folds are crisp and easy to follow. This is usually called single-fold binding.
✅ Related tutorial: Binding in Sewing: What It Is, Why It Matters, and How to Use It
A tailor’s clapper helps here — it sets the creases so they stay sharp, which makes attaching the binding much easier.
✅ Related tutorial: Tailor’s Clapper: What It Does, Why It Works, And How To Use It Right
Fold the short end of the binding under to create a clean starting edge.
Unfold the binding and place it around the circle with the non-slip side facing up. This is important — if you try to sew from the fabric side, the machine will not move the non-slip layer.
Start pinning the binding all the way around the edge. You’ll need to gently ease it to follow the curve.
Sew the binding right in the fold line.
Go slowly and keep the stitching consistent all the way around.
When you reach the starting point, the end of the binding will slightly overlap the beginning — this keeps the finish neat.
Step 8: Finish the binding
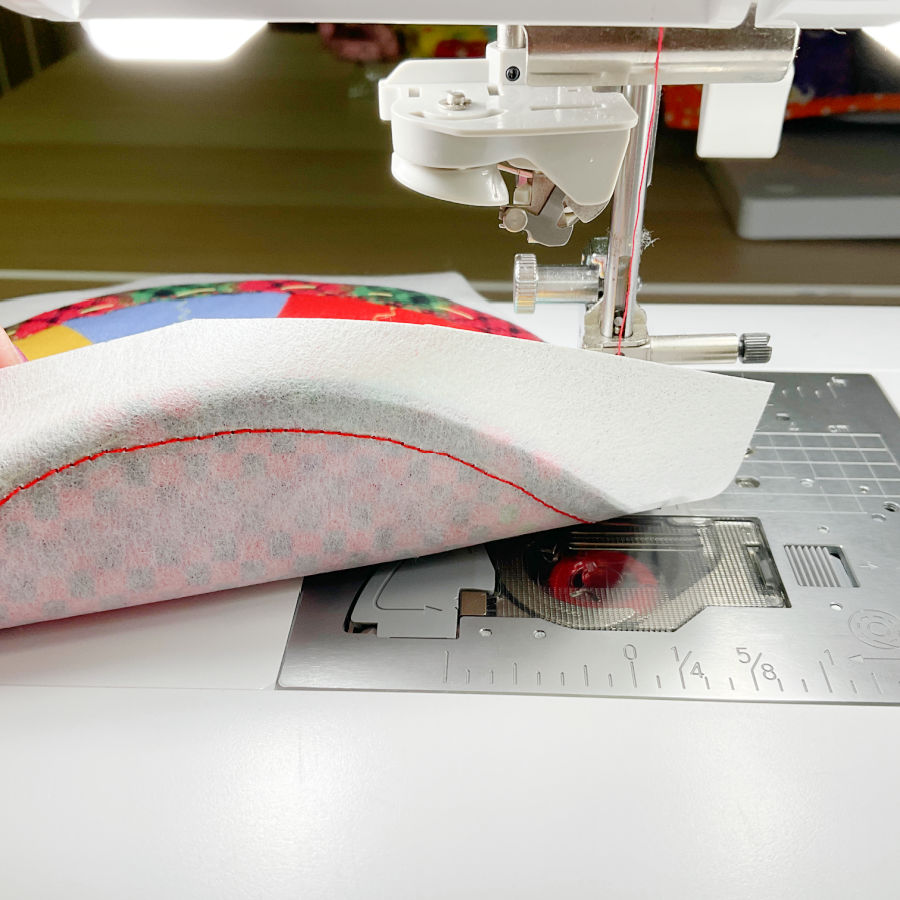
Turn the binding over the edge to the right side of the circle.
Then fold the remaining edge of the binding over. You’ll see the second fold line — that’s your guide. It should wrap neatly around the edge and cover the previous stitching line. Baste this binding by hand sewing.
Now stitch the binding in place, sewing very close to the binding edge.Use a matching thread for a clean finish.
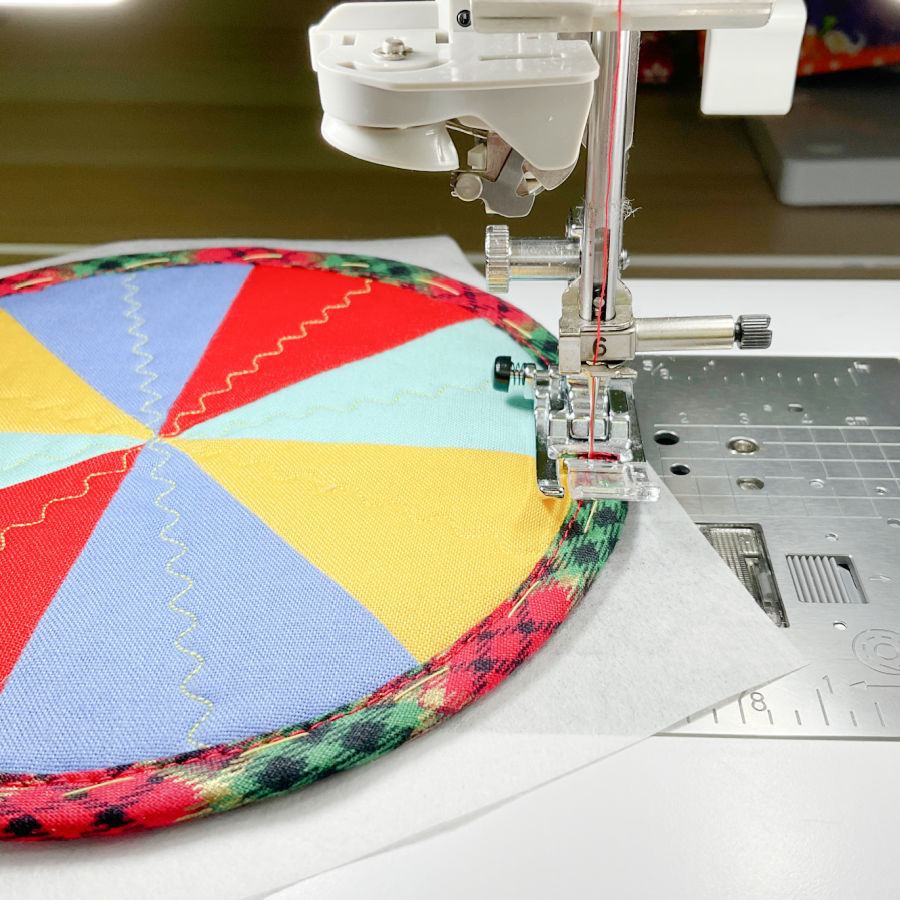
At this point, the non-slip side is against the machine bed, and it won’t glide at all.
So, what is the solution? Place a piece of tear-away stabilizer under the non-slip side.
- Stitch through all layers with the stabilizer underneath
- Then simply tear it away after sewing
If you don’t have tear away stabilizer, you can use pattern paper or even tissue paper — they work the same way.
Give the piece a light press — but only from the fabric side. Do not press directly on the non-slip plastic.
And that’s it — your jar opener is finished and ready to use!
I’m not especially strong, and my usual jar-opening method is very advanced: hand the jar to my husband. But with this little opener, I was able to open a pickle jar pretty easily. The non-slip side grips the lid, and the padded fabric gives your hand something comfortable to hold while you twist.
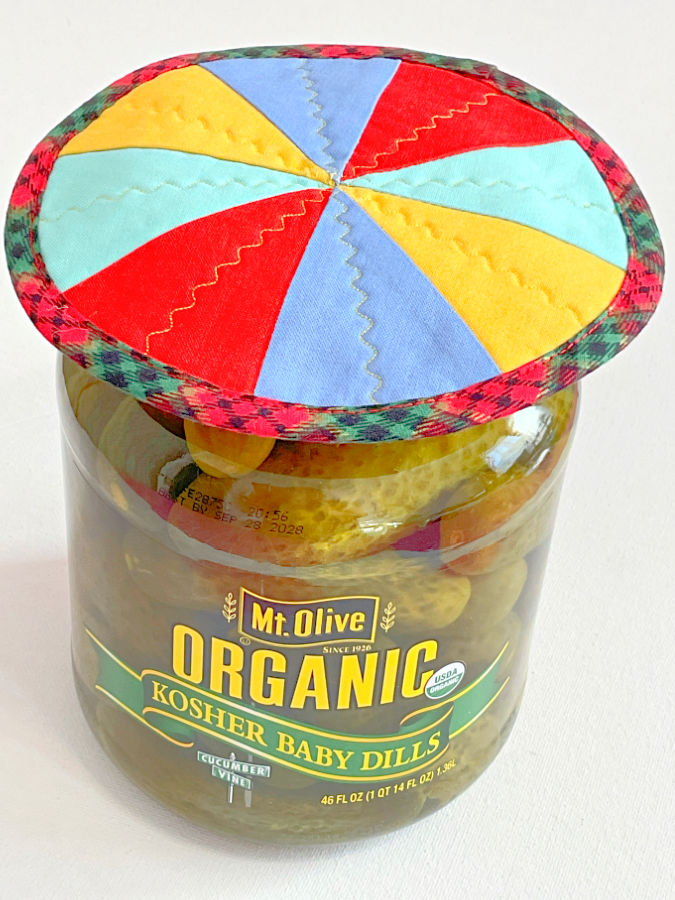
Save this pin to your sewing board so this jar opener tutorial doesn’t disappear when you decide to sew one. And follow me on Pinterest for more practical sewing projects, tips, and tutorials.
latest posts
- What Do You Call a Person Who Sews? I Asked My Readers and Got 1,408 Opinions
- DIY Round Purse: PDF Sewing Pattern and Detailed Instructions
- Mini Wonder Clips By Clover: Useful Sewing Tool Or Just Another Notion?
- Non-Slip Grips For Quilting Rulers: A Small Notion With A Useful Job
- Fabric Eraser for Sewing: What It Removes and When to Use It
- What Is The Best Thread For Sewing Machine Projects? Let’s Find Out!
- Butterfly Quilt Block Tutorial – Foundation Paper Piecing
- How To Sew Quilt Squares So The Corners Match
- Sewing With Fork Pins: How They Help With Pattern Matching, Slippery Fabric, And Seams