
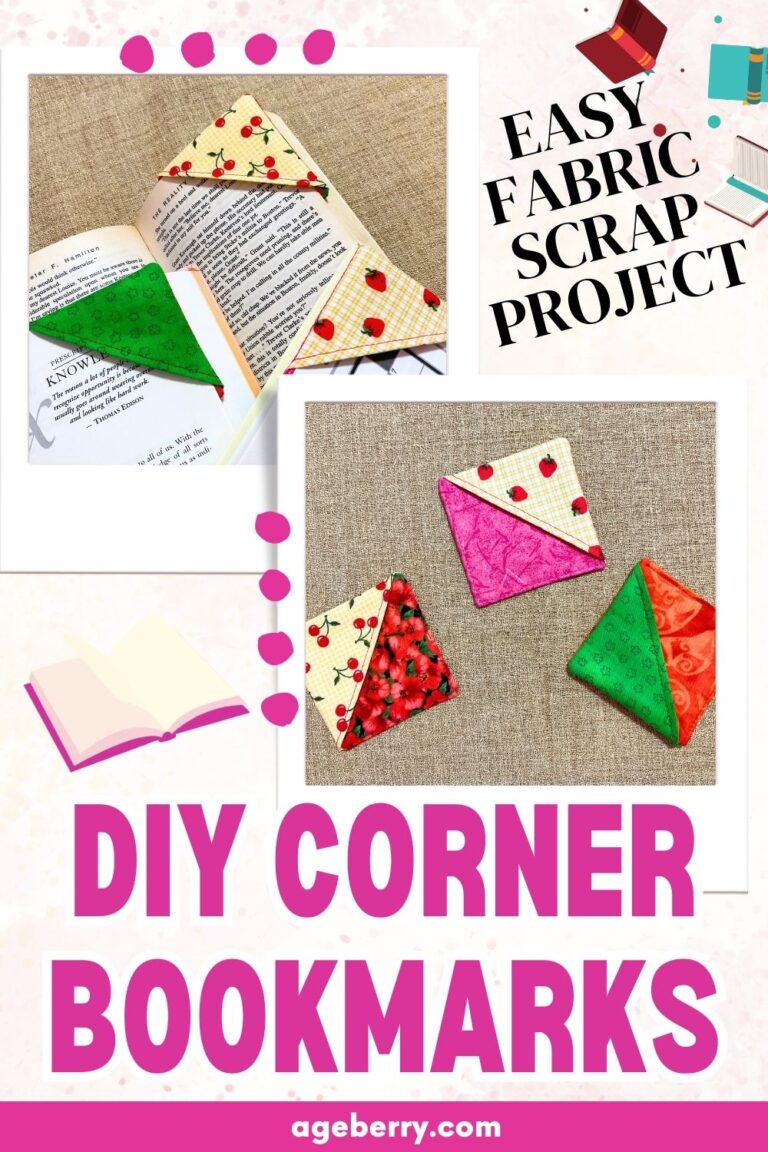
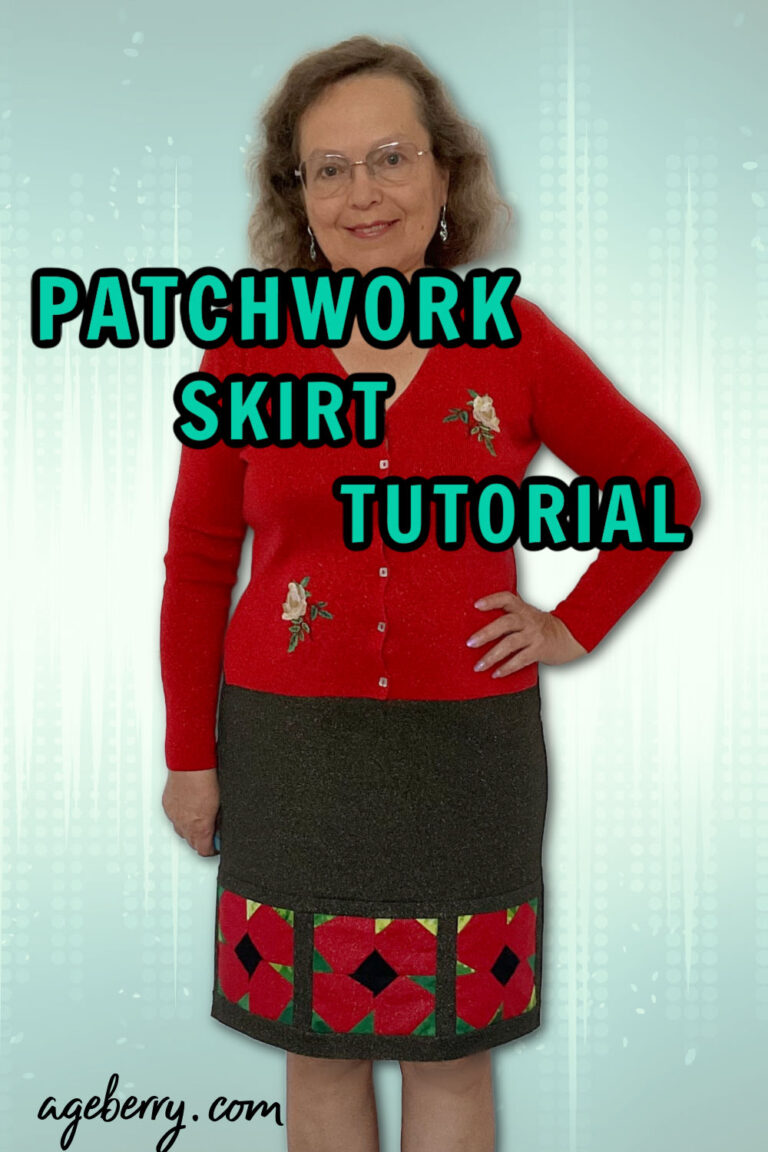
How to sew a simple skirt – a knit pencil skirt pattern and tutorial
In this sewing tutorial, I will show you how to sew a simple pencil skirt from knit fabric and how to make a pencil skirt sewing pattern fast and easy.
I want to dispel the myth that a simple cut is boring and uninteresting.
The whole secret of any simple garment is fabric. Choose a high-quality unusual beautiful fabric that you like. And with the right approach and the right pattern, your skirt will be wonderful!
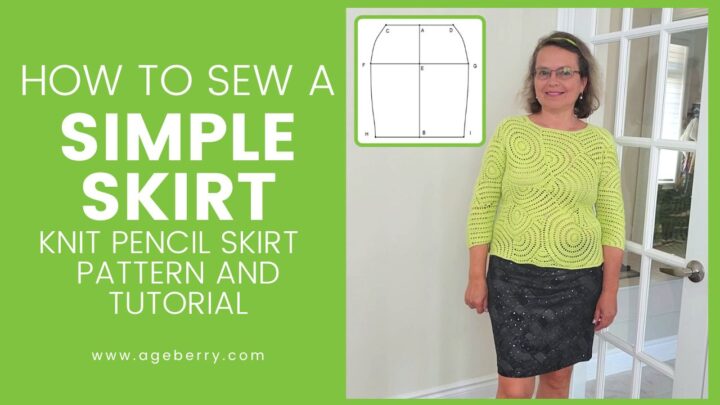
The skirt is very fast and easy to sew even for a complete beginner.
Note: Some of the links on this page are affiliate links. This means I will receive a commission if you order a product through one of my links. I only recommend products I believe in and use myself.
What you’ll need
Knit fabric for the skirt – medium or heavy weight. Read more about choosing the fabric below.
Ballpoint/stretch needles designed for sewing with knit fabric
Regular sewing supplies
Knit garments do not wrinkle and do not constrain movements, which allows you to feel confident throughout the day.
Of course, you can browse the wide variety of patterns to find the one that suits you perfectly. But you can also make a simple pattern yourself – let me show you how to do it.
This pencil skirt fits most body types, but not EVERY FIGURE. The fit may not be perfect for women with a big stomach, big buttocks, or a big difference between the waist and hips.
But the good thing is that the skirt would still be wearable even if you feel that you have some problems with the fit. Make the skirt shorter (just above knee length) and wear it with a tunic or long cardigan – they will cover the problem fit for sure.
First, you will need to take 4 measurements – check out my tutorial on taking body measurements for sewing correctly.
Waist
Hips
Waist to hips – just measure the distance from your waist to the hipline
Desired length of the skirt
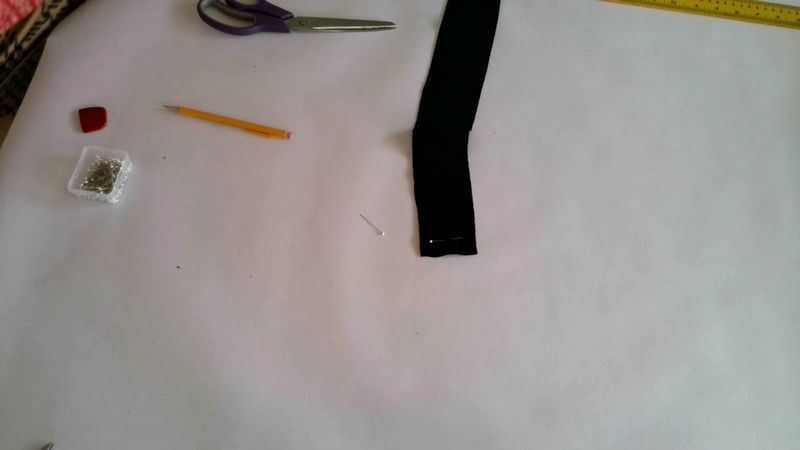
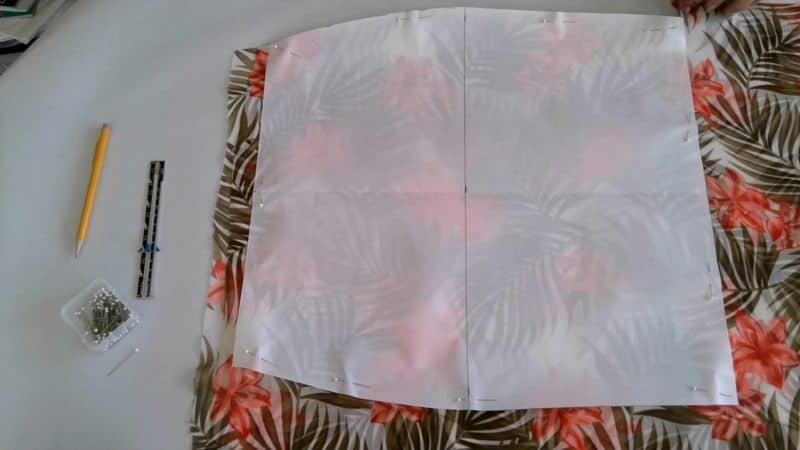
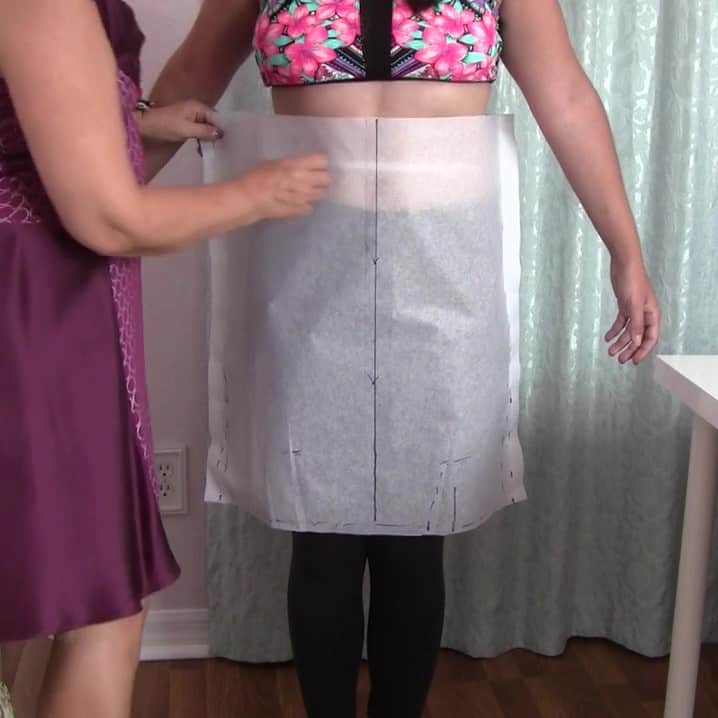
You can draw the pattern lines right on your fabric but I advise you to do it on paper first, it’s easier to correct if you make a mistake and it’s easier to cut the pattern this way.
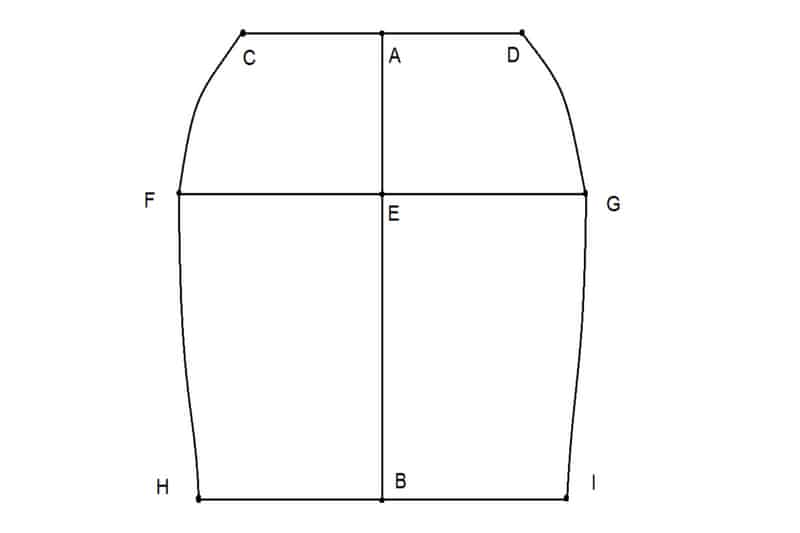
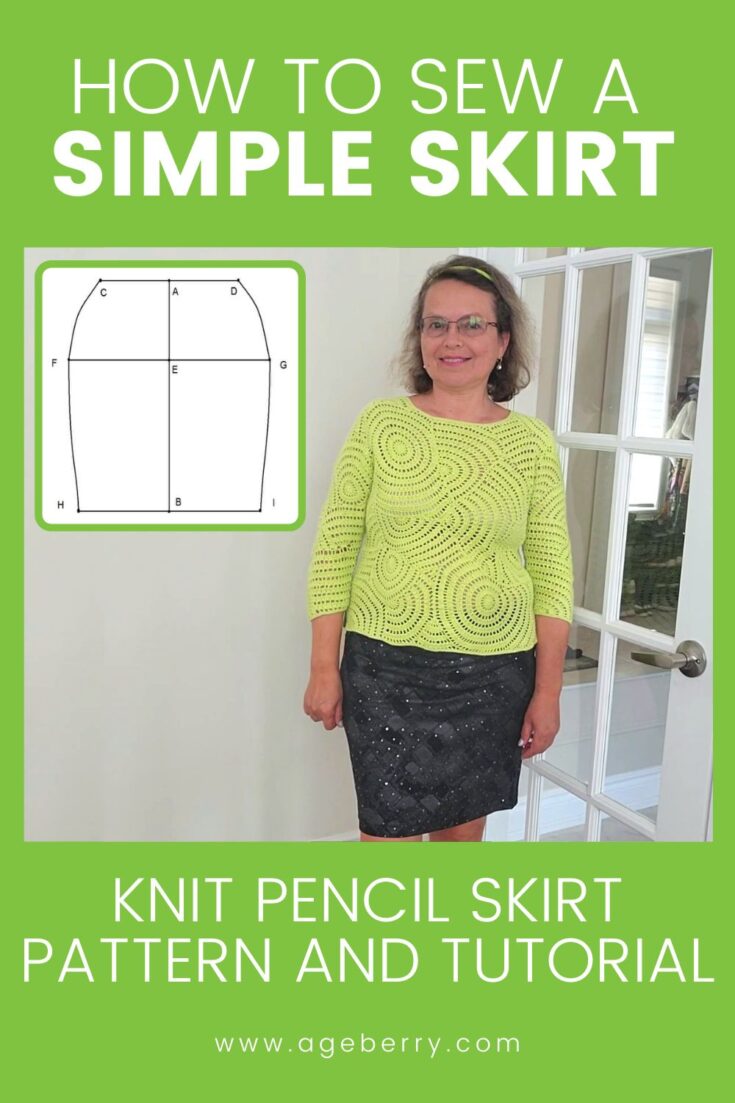
So, take a piece of paper (I use vellum paper for my patterns) 1-yard x 1 yard approximately and place it on a table. We are going to make just one pattern piece that will be the front and back of the skirt.
How to make a pencil skirt sewing pattern
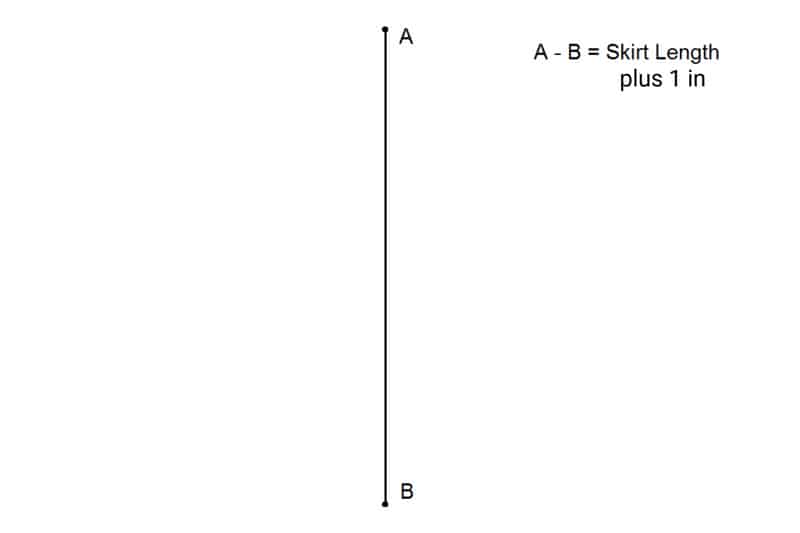
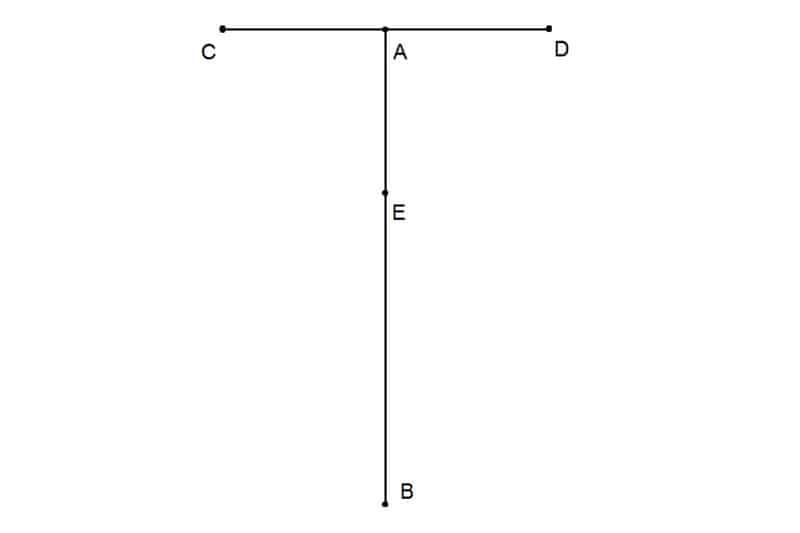
Draw a vertical line in the middle and mark points A and B, the distance AB is equal to your desired skirt length plus 1 inch for a hem. The length of a pencil skirt can vary – below the knee, above the knee, midi, mini, etc. But this pattern is NOT GOOD for a maxi skirt.
Draw a perpendicular line from the point A and find points C and D. The line CD is your waistline.
Distance CA is equal to AD. Calculate the distance CD like this: your waist measurement divided by 2 MINUS 1 3/16 in (or 3 cm).
Why do we need to subtract this amount? Because we are making a pencil skirt from KNIT fabric that is stretchable. It’s called “negative ease”. We don’t want a loose-fitting skirt in this case.

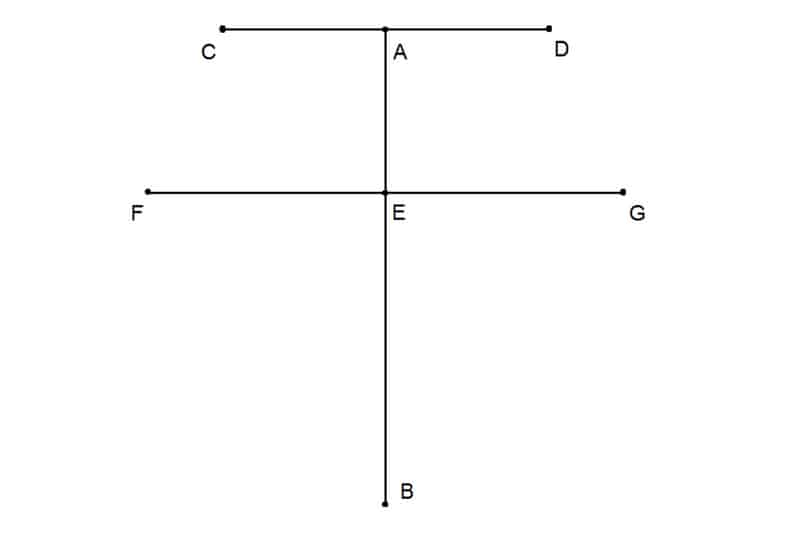
Find a point E on line AB. Distance AE is equal to your waist to hips measurement. Usually, it’s between 7 and 9 in, it’s bigger for tall people usually.
Draw a perpendicular line from the point E and find points F and G. The line FG is your hipline. Distance FE is equal to EG. Calculate the distance FG like this: your hips measurement divided by 2 MINUS 1 3/16 in (3 cm).
Draw a perpendicular line from point B and find points H and I. This will be your hemline. The distances HB and BI are equal and HI is equal to HIPS divided by 2 MINUS 2 ⅜ in (6 cm).
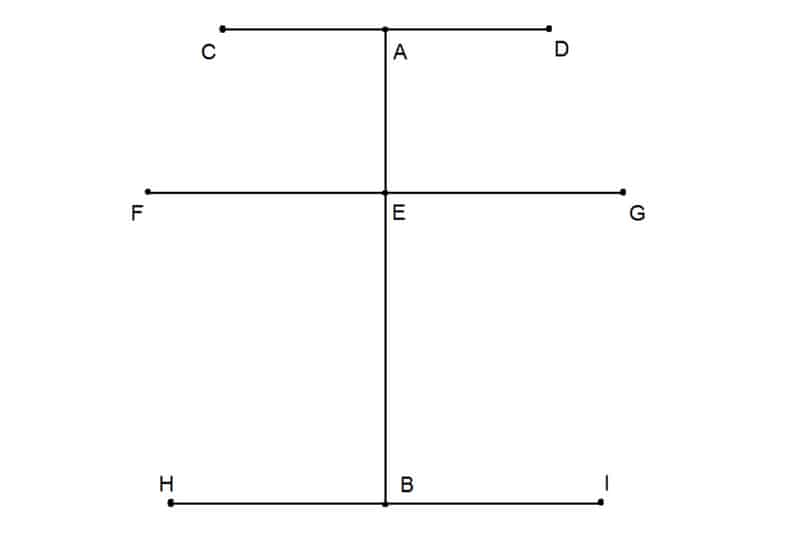
Now connect points CFH and DGI with smooth curved lines. I am usually using a French curve ruler but you can draw the lines freehand. Just make sure they are completely symmetrical.
Cut your paper pattern. It’s the same for the front and back. All seam allowances are included, don’t add any seam allowances to the pattern.
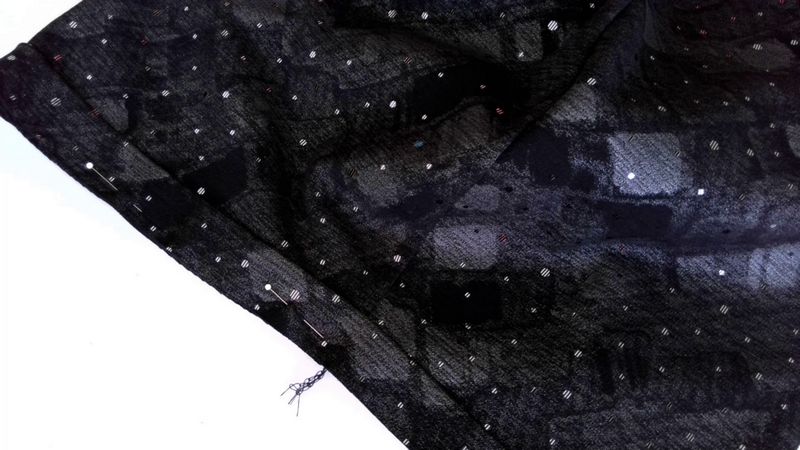
The next step is to choose the knit fabric. First, determine how stretchy it is. It has to have at least 25-30% stretch (you can read how to calculate it in this article) – in other words, it better be very stretchy. But it’s not a problem, most knit fabrics are very stretchy. We just made the same pattern for the front and back of the skirt, and we didn’t make any darts to accommodate curves – but with knit fabric, we don’t need to.
The fabric should have good recovery – in other words, it should return to its original size after you stop stretching it. If it doesn’t, it won’t when you wear it either, meaning it may quickly start to look stretched out and misshapen.
Choose a medium or heavy-weight knit fabric for the skirt – some kind of stable stretch jersey. Thin lightweight knits (like silk or rayon) are not really suitable for this pattern unless you want to make it an underskirt to wear under dresses or skirts.
Also, think about how you would style your skirt, how it would work with your wardrobe, and choose a fabric that will be in harmony with most things in your wardrobe.
Let’s cut the fabric now.
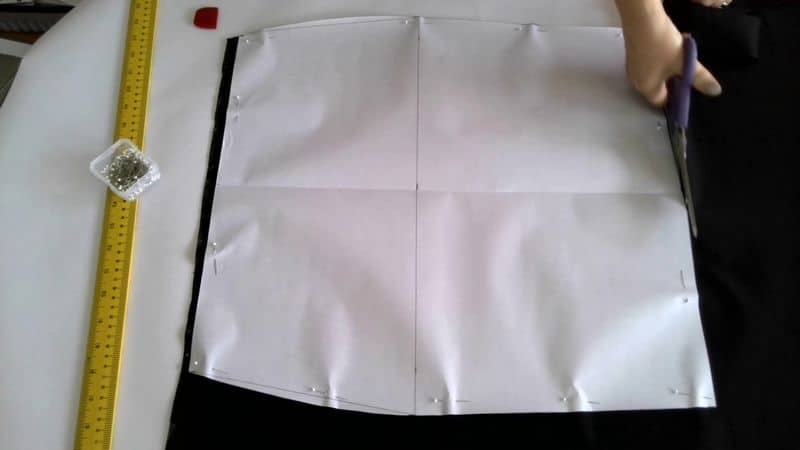
Place the fabric right sides in, draw a line with a fabric marker perpendicular to the selvage and pin your pattern to the fabric. Make sure the line AB is PARALLEL to the selvages. Cut around the pattern using fabric shears. You will have 2 pieces for your skirt – the front and the back. They are equal.
Cut a skirt waistband – it’s just a long narrow rectangle 2 ¾ in (7 cm) by YOUR WAIST MEASUREMENT MINUS 2 ⅜ IN (6 CM).
I prefer to sew a waistband for inserting elastic. I think this way I can adjust the elastic better and I can even change it, in case this becomes necessary.
Now we need to sew a few seams – and we are done.
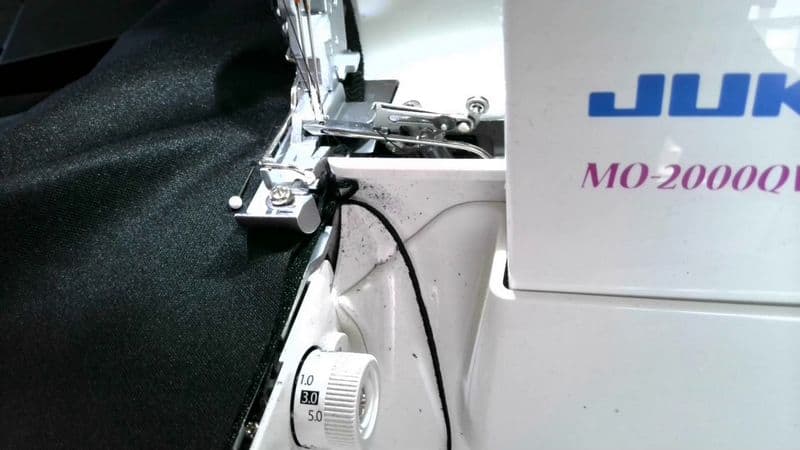
First, prepare your serger – do you have a special serger table to put it on? Use wooly nylon threads (matching colors) for the loopers (it’s better for very stretchable seams). Insert 2 ballpoint needles. Set the serger for 4 thread 2 needles stitch.
Test how your serger sews the fabric you are using for the skirt. Make necessary adjustments.
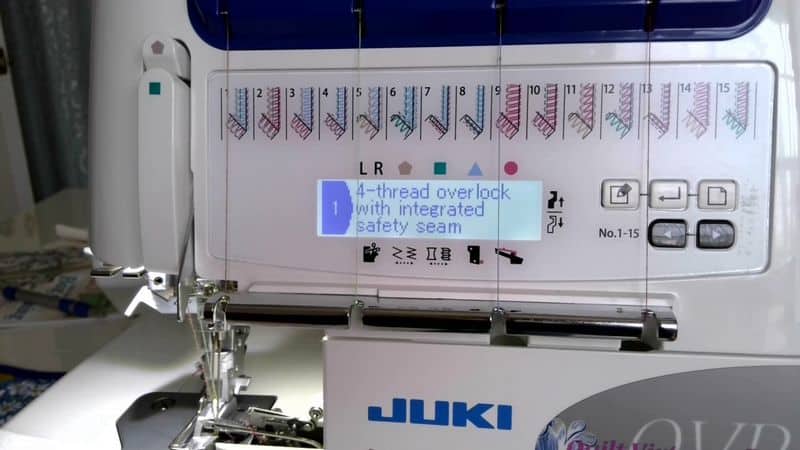
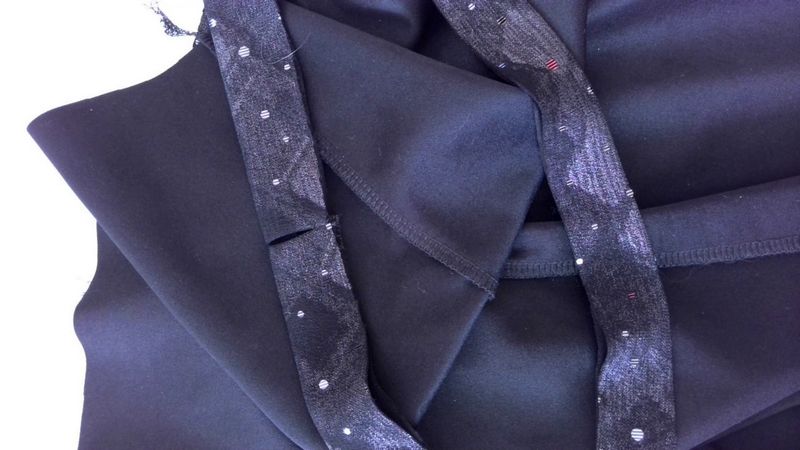
The skirt front and back pieces are already on top of each other with the right sides together after you cut them, right? Pin side seams of the skirt and stitch them with the serger. Don’t leave any seam allowances. Let your serger knife go 1 millimeter from the fabric edge.
Press the seams on one side.
Next, make the skirt waistband.
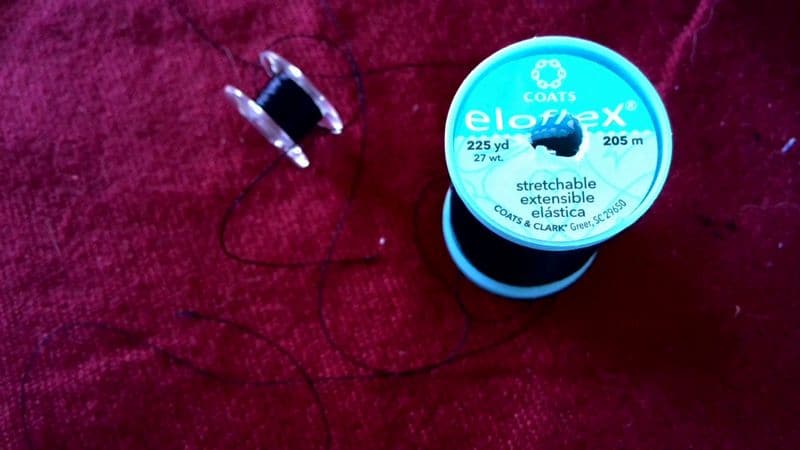
Prepare your sewing machine – I advise you to use Eloflex thread in the needle and in the bobbin. If you want to know what the Eloflex thread is check out my review of that thread.
The thread is specifically designed for knits so that it stretches together with the fabric. But have in mind, that not all sewing machines can sew well with Eloflex in the needle. Use Eloflex at least in the bobbin if your sewing machine refuses to sew with this stretchable thread.
If you are going to use regular sewing thread set your sewing machine for special stitches for stretch fabric (like a small zigzag).
Insert a ballpoint needle.
Stitch the short ends of the waistband leaving ¼ “ seam allowances. But leave a hole in the seam for inserting elastic. Measure how wide is your elastic and make sure the size of the hole is enough for the elastic to fit.
Press the seams open and fold the waistband in half lengthwise and press.
Pin the waistband to the skirt’s right sides together. The side seam of the skirt and the waistband should match.
Stitch the waistband to the skirt on your serger. Press the seam allowances facing downwards towards the hem of the skirt.
Measure elastic around your waist (make it not too tight) and insert elastic into the waistband. Overlap the ends of the elastic about ½ inch and sew the overlapping ends together.
Now we have to finish the hem.
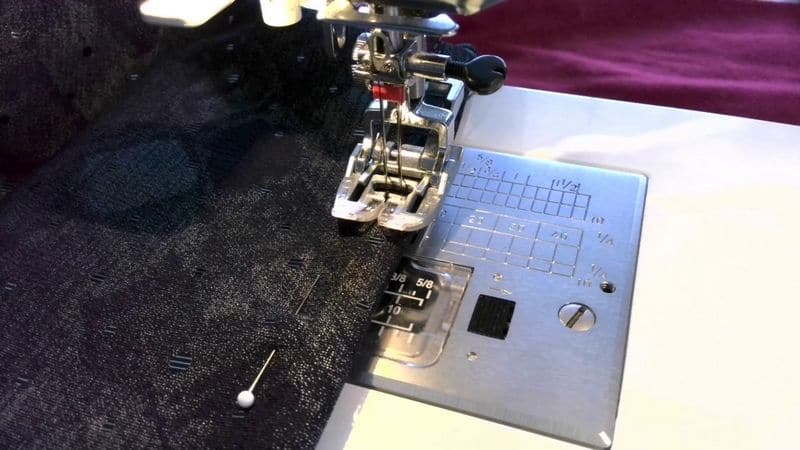
We left 1 inch for the hem allowances so measure 2 inches from the edge on the wrong side of the skirt, fold the hem and stitch on a regular sewing machine using a twin needle.
I have a detailed tutorial on sewing with twin needles – check it out if you need to know how to do it. Use Eloflex thread (in the bobbin especially) to sew the hem – you will need two spools and the bobbin.
Press the hem and be careful not to stretch the fabric.
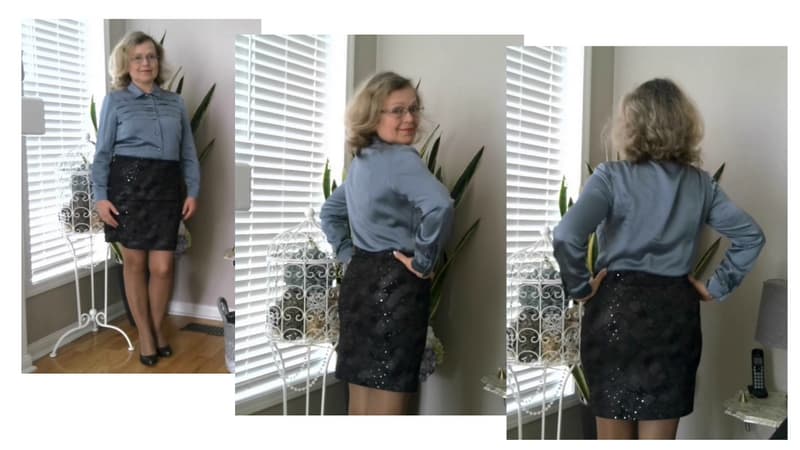
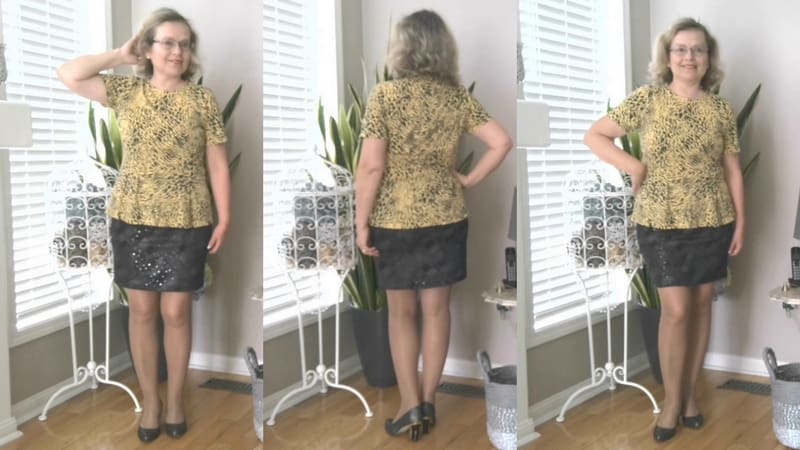
The skirt is ready!
Now try it on – does the skirt fit well? If it does – then you are lucky and you can make a few more from different fabrics.
If it doesn’t (well, this can happen also, everybody is different and our curves are different) then don’t throw it away – you can still wear it with long tunics and cardigans because problems with fit happen usually in the upper part of the skirt.
The skirt is usually very comfortable to wear. I made a few of them and they fit me well. And I know maybe 50 women who made it and liked it.
You can also watch my YouTube video tutorial on how to sew a simple skirt and make a knit skirt pattern.

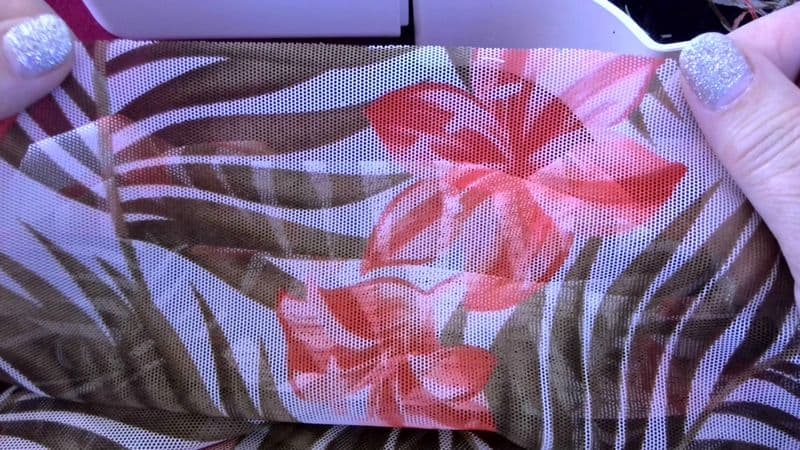
By the way, you can use this pattern to make underskirts.
I really like to use this easy pattern to make underskirts from compression fabric – it’s called “power mesh”. Usually, power mesh fabric is sold in black, white, or nude colors but I bought in New York power mesh fabric with prints, and I used it to make an underskirt to wear under not lined dresses and skirts (sometimes even instead of latex shapewear).


This underskirt will smooth you out under your dresses and skirts and even will help to hide a tummy a little and make you look thinner. The big plus of this underskirt – it will hide your underwear lines when you are wearing tight-fitting skirts or dresses.
Power mesh is a comfortable, very lightweight breathable fabric. So make yourself an underskirt using this pattern.
But if you want a perfectly fitting skirt from woven fabric then check out my tutorial on making a pencil skirt pattern.
Want to improve your sewing skills?
Get my detailed guide on SEWING MACHINE TENSION ADJUSTMENTS free!
Subscribe to my weekly newsletter with sewing tips and tutorials, free sewing patterns, printable PDFs, and other useful content and you’ll find the eBook in your inbox.
Subscriber exclusive offer.
Don’t miss the free HELPFUL eBook!
Did you find this tutorial helpful? If so, save this pin (see below) on your sewing board so you can come to this tutorial later when you are ready to sew your own knit pencil skirt, and follow me on Pinterest for more tips, tutorials, and inspiration!
latest posts
- What Do You Call a Person Who Sews? I Asked My Readers and Got 1,408 Opinions
- DIY Round Purse: PDF Sewing Pattern and Detailed Instructions
- Mini Wonder Clips By Clover: Useful Sewing Tool Or Just Another Notion?
- Non-Slip Grips For Quilting Rulers: A Small Notion With A Useful Job
- Fabric Eraser for Sewing: What It Removes and When to Use It
- What Is The Best Thread For Sewing Machine Projects? Let’s Find Out!
- Butterfly Quilt Block Tutorial – Foundation Paper Piecing
- How To Sew Quilt Squares So The Corners Match
- Sewing With Fork Pins: How They Help With Pattern Matching, Slippery Fabric, And Seams
Well done please design more garments
Do you have any other skirt patterns?
I have indeed, not one, but many. Follow this link for a search of the site for “skirt”. You can also click the hourglass symbol on the top right of the screen and search for anything you might want or need.
Can you sew this with a regular sewing machine? I love the simplicity of the pattern but don’t have a serger machine. Thanks
Probably yes. You would need to use the stretch stitches of your sewing machine, appropriate needles and thread. I am talking about all these in these articles: Types Of Stretch Stitches On A Sewing Machine And When To Use, The Ultimate Guide to Stretch Needles, Stretch Thread for Sewing