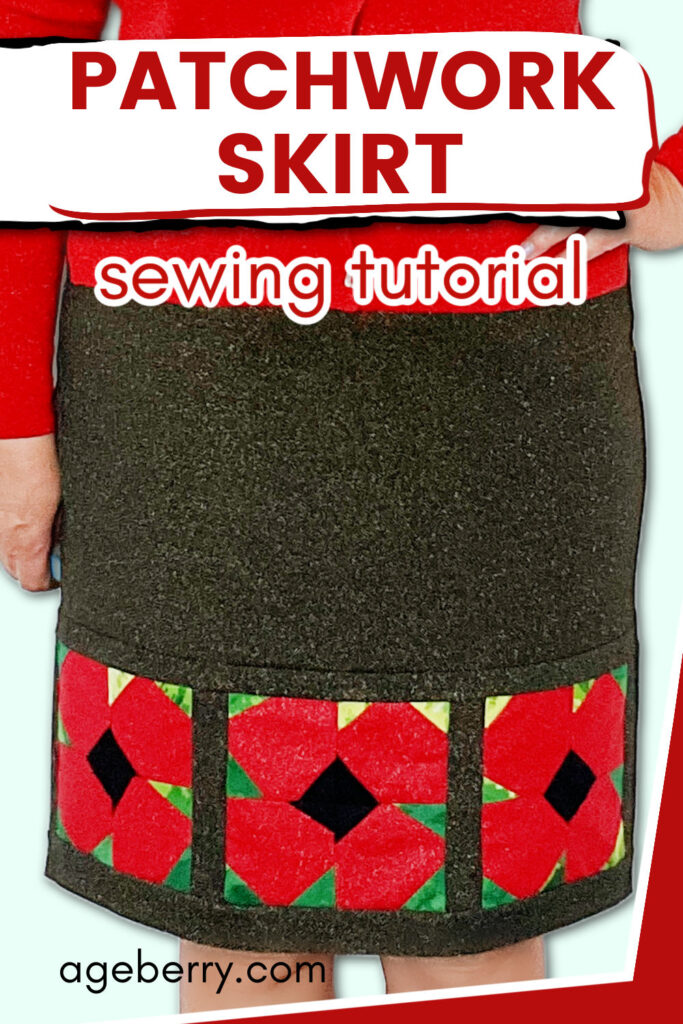
Patchwork Skirt DIY: A Fun Sewing Project for Any Skill Level
A patchwork skirt is an interesting way to blend quilting and garment sewing into one project. It allows you to showcase beautiful fabric scraps and quilting skills while making a stylish and unique piece of clothing.
Patchwork skirts have remained popular because they offer a way to personalize clothing with color, pattern, and craftsmanship. They also provide a sustainable way to use up leftover fabric, reducing textile waste.

The main fabric of this skirt is stable knit and has some stretch, so it’s comfortable to wear and holds its shape well. A zipper isn’t needed because the knit fabric has enough give for an easy fit.
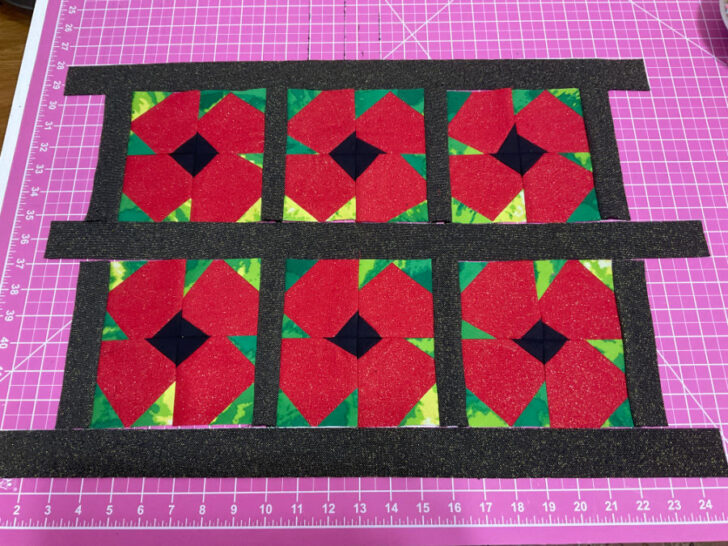
The bright red flowers with black centers stand out against the darker fabric, and small green and yellow details add extra color. Narrow fabric strips between blocks frame the design neatly and give the patchwork a clean, structured look.
If you love both sewing and quilting, this skirt is a perfect project to try. It’s a great way to use patchwork in a way that’s fun and wearable. The design is simple, so you don’t need advanced skills to make it, and it’s easy to adjust to your own size and style. Whether you choose bold red blocks like mine or a completely different color scheme, you’ll end up with something beautiful and unique.
So, take a look at this poppy flower block and let it inspire you to pick up your fabric scraps and start sewing outside the lines!
I intentionally made the black centers of each flower irregular and distinct. This approach celebrates the uniqueness of each piece, much like how no two flowers in a field are exactly alike. Each block becomes a one-of-a-kind creation. I think this is the essence of true art – to mirror the imperfect yet stunning variations we can find in nature.
What You’ll Need
- Stable knit fabric for the skirt (a medium-weight knit that holds its shape well)
- Patchwork pieces (poppy blocks measuring 5.5 inches square)
- Coordinating fabric strips (1.5 inches wide)
- Skirt pattern (pencil skirt shape)
- Elastic for the waistband
- Piece of lining for the skirt (½ yard)
- Matching thread
- Serger (optional but recommended for knits)
- Regular sewing notions
Step 1. Make the Patchwork Pieces
Each poppy block is 5.5 inches square. You will need three blocks for the front and three for the back.
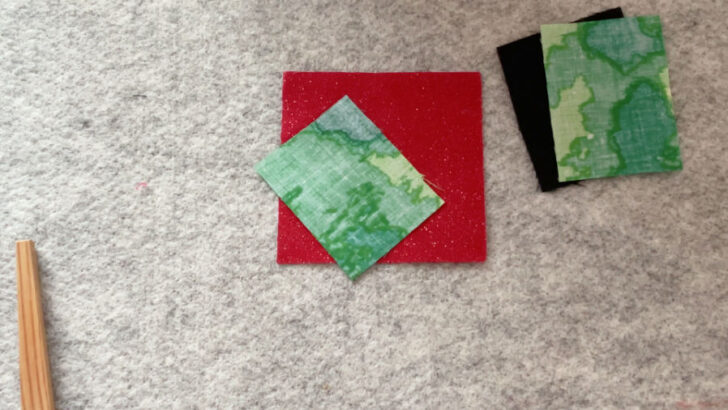
#1. Cut the Red Squares
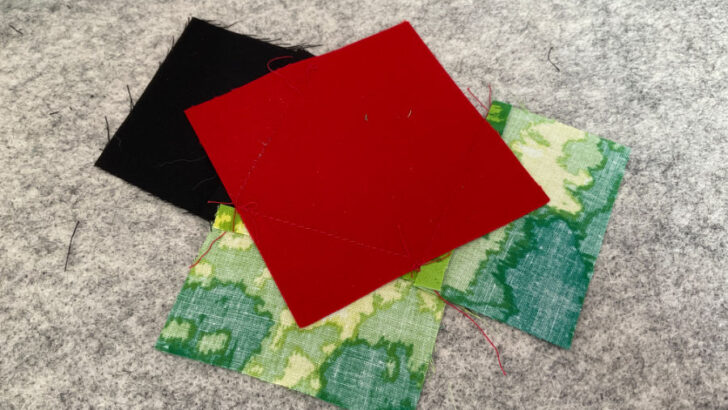
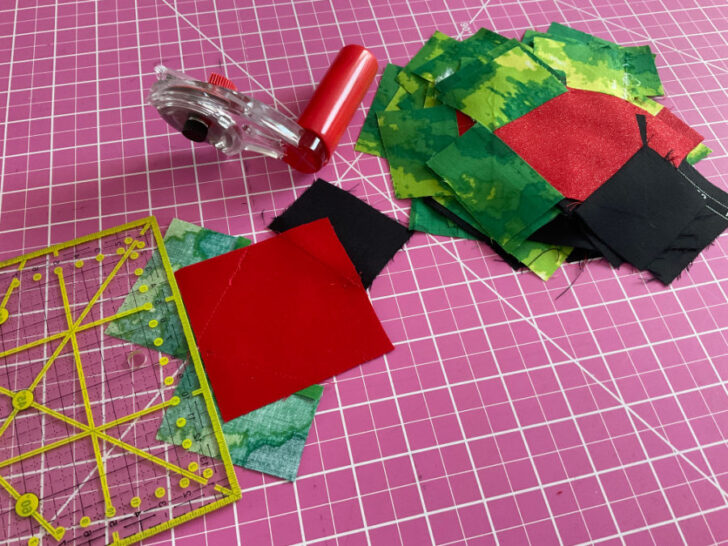
Begin by cutting squares from red fabric. You need 24 squares for the skirt. These will serve as the petals of the poppy. A rotary cutter can provide precision, but if you have an Accuquilt GoMe machine, you can cut multiple identical squares quickly and efficiently. The cut (unfinished) squares in this block are 3 1/4 inches.
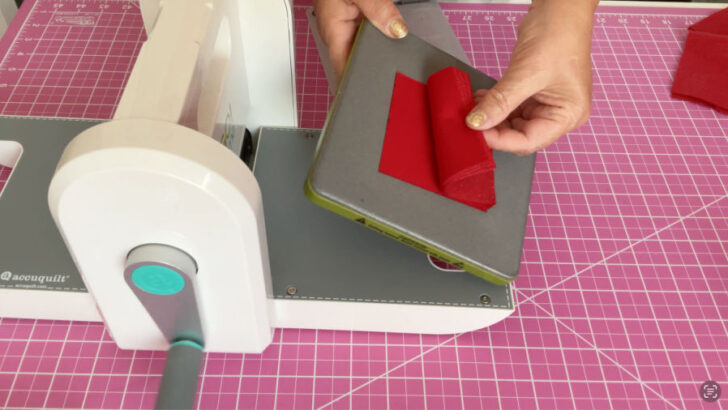
✅ Related tutorial: How to cut fabric for quilting with modern fabric cutting machines: AccuQuilt and Cricut
#2. Cut the Green Pieces
Cut pieces (they look like rectangles) from green fabric to represent the leaves. You will need 8 green pieces for each poppy block, so 48 pieces total. Precision isn’t crucial here; use any scrap pieces you have. In this example, they are approximately 2 x 2 3/4 inches. The beauty of this patchwork is its flexibility and the unique charm that comes from these variations.
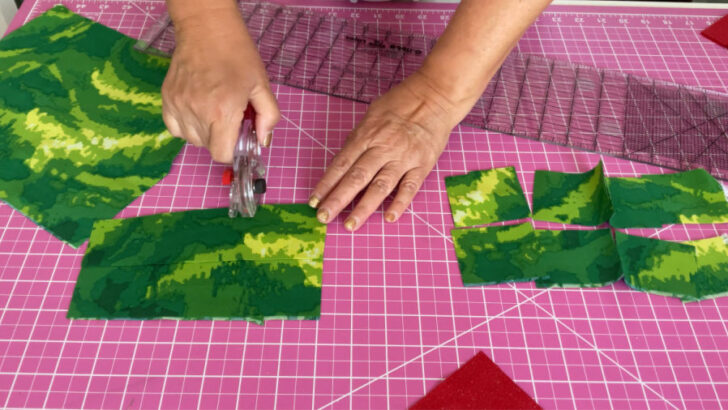
✅ Related tutorial: How To Accurately Cut Fabric For Quilting With A Rotary Cutter
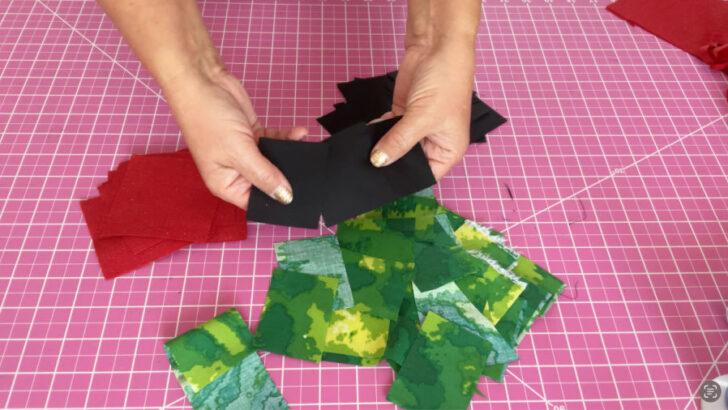
#3. Cut the Black Center Pieces
For the center of the poppy, cut four pieces from black fabric for each block, so 24 pieces total. It’s better to use quilting cotton fabric but I didn’t have it on hand so I used 100% wool fabric scraps.
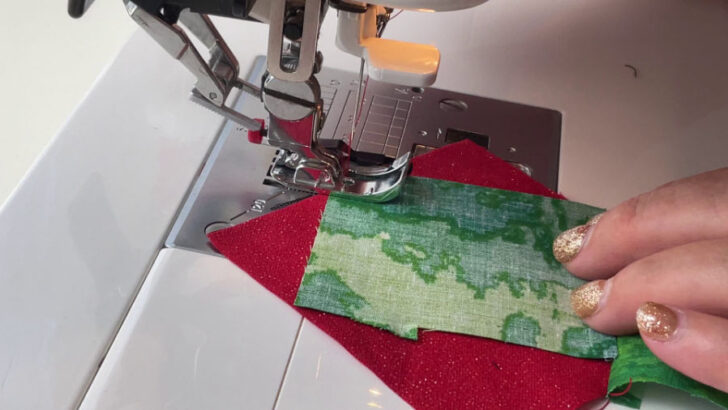
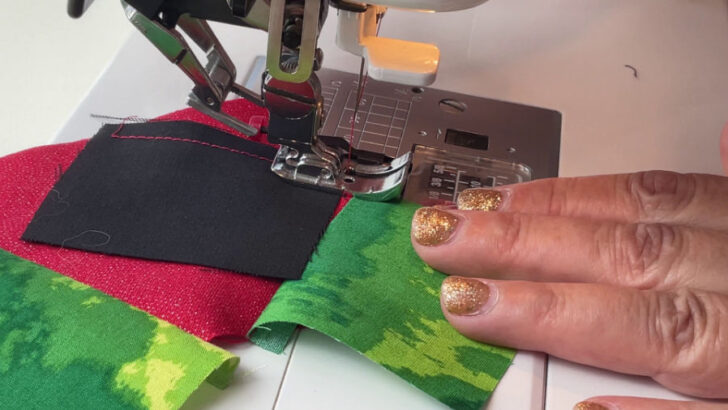
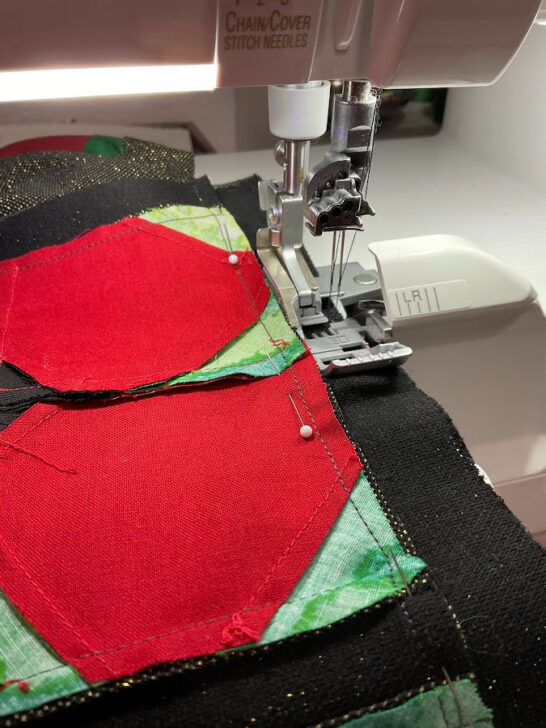
#4. Assemble the Petals and Leaves
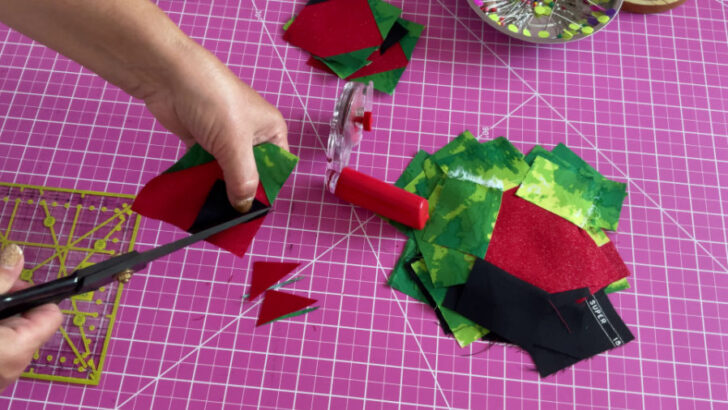
Place two green rectangles on each red square and stitch them to create the leaf effect, covering the corners of the square. There’s no specific pattern. Stitch a black piece to the third corner for the flower’s center. The placement doesn’t need to be exact, so feel free to arrange them as you like. Check the images below to see how I did it.
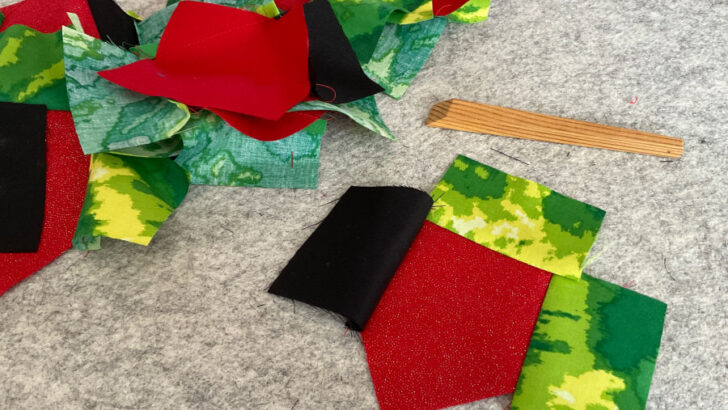
#5. Press the Assembled Pieces
After stitching, the shapes will look awkward, but that’s fine. Press the pieces. I used my wool pressing mat and a mini iron to flatten the seams and give them a neat finish.
✅ Related tutorial: Wool Pressing Mat: How to Use, Pros and Cons, Best Brands, Sizes
✅ Related tutorial: Mini Irons For Sewing And Quilting
#6. Trim to Square
Trim the irregularly shaped pieces back into squares, aligning the edges with the original red squares. Use a rotary cutter for accuracy. Trim 3 corners of the red square so that the green and black fabrics now form the new corners.
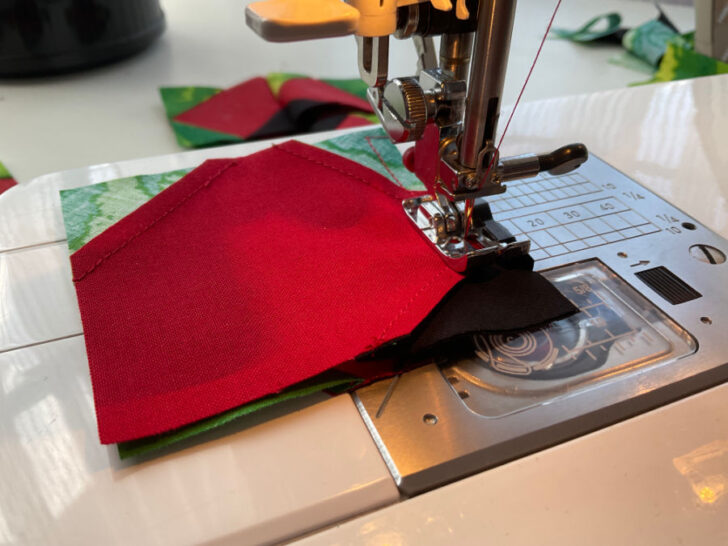
#7. Sew the Blocks Together
Arrange the four squares so the black fabric is in the center, resembling a poppy’s dark core. Sew the squares together in pairs, then join the pairs to form a complete block.
#8. Final Press
Give your new block a final press to sharpen the edges and smooth any remaining wrinkles, ensuring your poppy flower block looks as beautiful as possible.
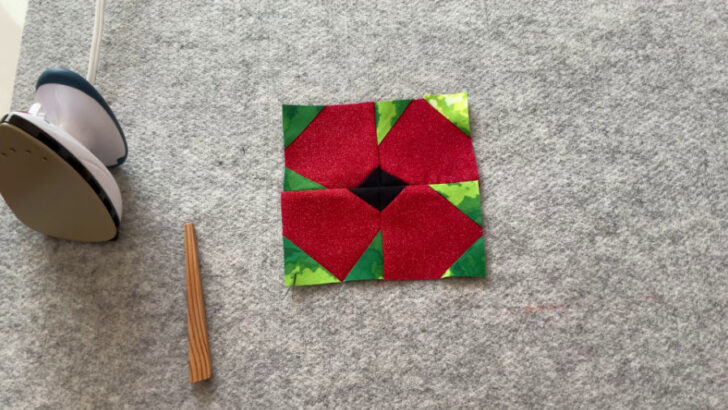
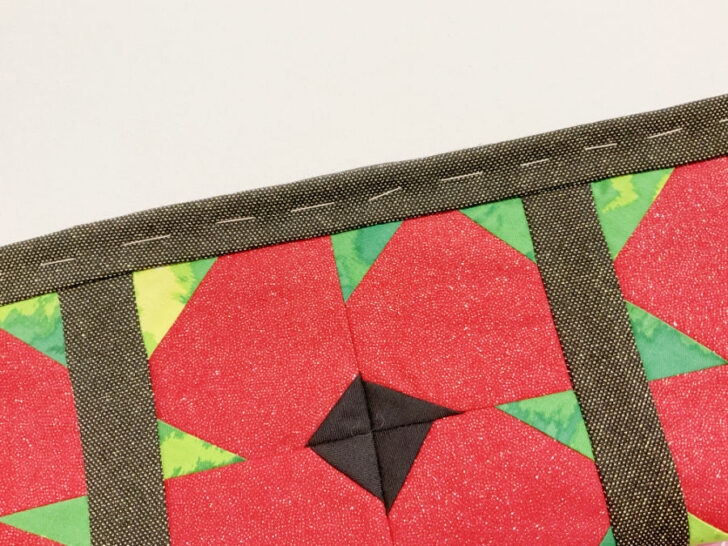
And below is a close-up of a poppy quilt block used in this patchwork skirt. You can see four red fabric pieces forming the petals of the poppy, with a small black square in the center that creates a striking contrast. Surrounding the petals, small green and yellow fabric triangles serve as accent details, resembling leaves. The seams are carefully sewn, with precise intersections where the fabric pieces meet.

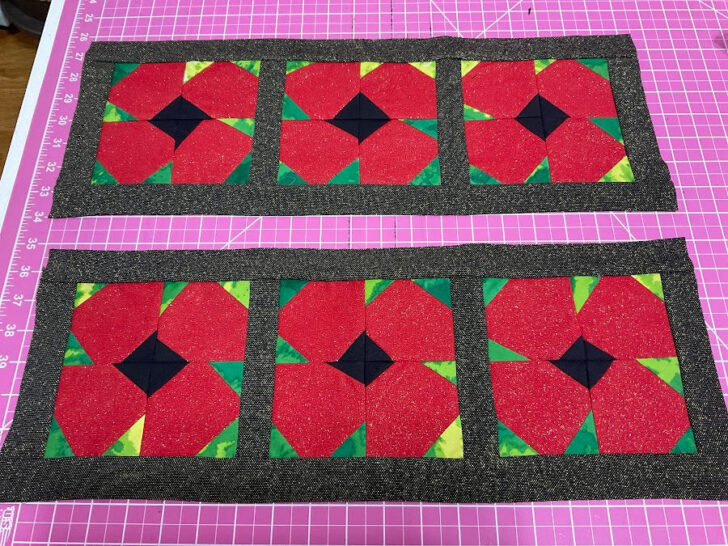
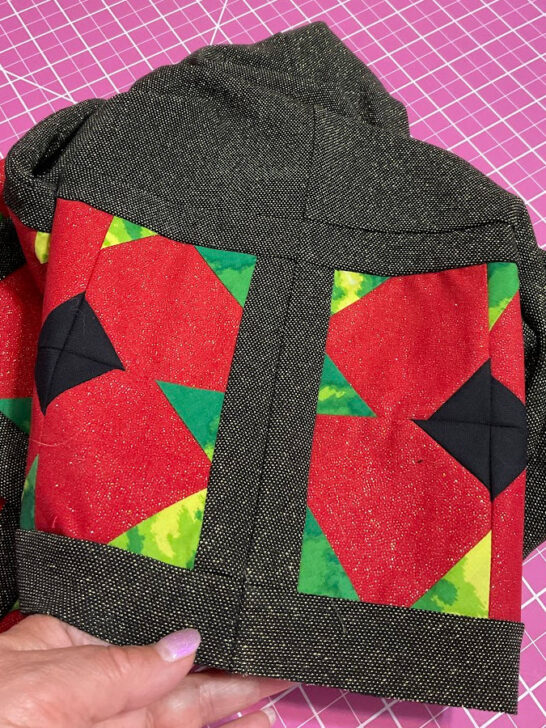
Step 2. Assemble the Patchwork Panels
Once you have six blocks, arrange them in two rows of three – one for the front and one for the back.
- Attach fabric strips (1.5 inches wide) between the blocks and at the top and bottom to create a finished panel. The sewn width of the strips is 1 inch. The seam allowances are ¼ inch.
- Press all seams to one side for a smooth look.
- Repeat the process for the back panel so you have two identical patchwork sections.
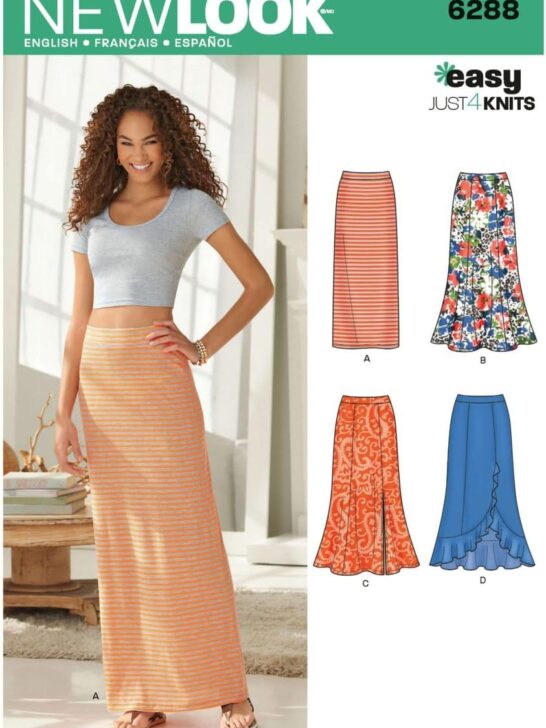
Step 3. Prepare the Skirt Pattern
A pencil skirt has a simple, straight cut that follows the body’s shape. If you don’t have a pattern, you can easily create one using your own measurements. I have a detailed tutorial on how to draft a perfect pencil skirt pattern to get a custom fit, so be sure to check that out – DIY pencil skirt: how to make a pencil skirt pattern.
If you prefer using a commercial pattern, New Look 6288 is a great option. It’s designed for knit fabrics and includes multiple skirt variations. View A works well for this project because of its simple, straight cut. You can find this pattern on Amazon.
Whichever method you choose, make sure to adjust the length. The patchwork section is 7.5 inches high, so you need to subtract that from your total skirt length before cutting the main fabric. For example, if you want your finished skirt to be 25 inches long, cut the main fabric at 17.5 inches.
Using a commercial pattern saves time, but drafting your own allows for a fully customized fit.
Either way, once the pattern is ready, you can move on to cutting the fabric.
If you are using a commercial pattern like New Look 6288, follow the cutting lines for the skirt variation you chose.
If you drafted your own pencil skirt pattern, use it to cut out the front and back pieces.
Step 4. Attach the Patchwork Panels
When the main fabric pieces and the patchwork sections are ready, it’s time to put them together. The patchwork panels will be sewn to the lower edge of the front and back skirt pieces.
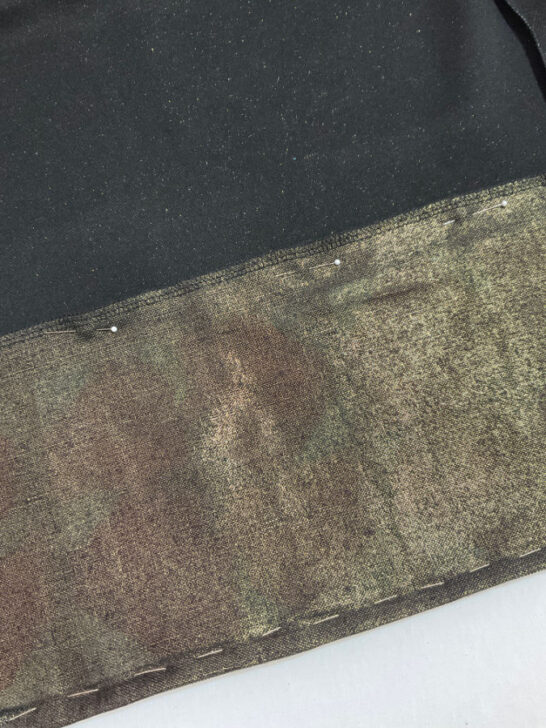
Lay the front skirt piece flat with the right side facing up. Take the front patchwork panel and place it along the lower edge of the skirt piece, right sides together. Make sure the edges line up evenly.
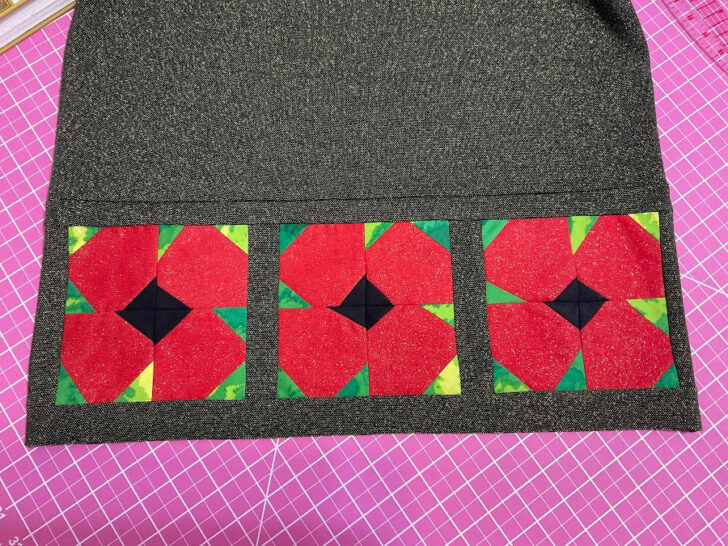
Repeat the same process for the back skirt piece and the second patchwork panel.
Use pins or fabric clips to secure the panels in place.
Ensure fabric strips that you used to frame the patchwork match up neatly at the sides.
Sewing the panels to the skirt can be done in different ways, depending on the tools you have.
- Straight Stitch – If your main fabric is stable knit and does not stretch much, a regular straight stitch works well. Use a 3.0 mm stitch length for a secure seam.
- Stretch Stitch – If you are working with a knit fabric that stretches more, use a stretch stitch (such as a narrow zigzag or a lightning stitch) to allow some flexibility in the seam.
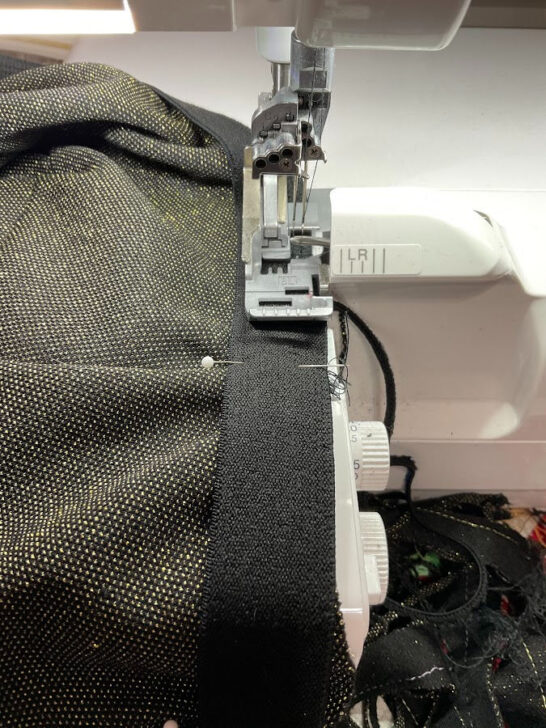
- Serger/Overlock Stitch – If you have a serger, this is the best way to attach the patchwork panels. Use 4 thread serger stitch.
Sew with a 1/4-inch seam allowance, keeping the edges aligned as you go.
Once the panels are sewn in place, press the seam allowance upward toward the main skirt fabric. This helps the patchwork section lay flat. If the seam feels bulky, you can topstitch along the skirt side of the seam to hold it in place, but this is optional.
At this point, the patchwork panels are securely attached, and the skirt is starting to take shape.
Next – sew all the seams to complete the main skirt construction.
When sewing the side seams, it’s very important to match all the fabric strips that frame the patchwork. These strips create clean, structured lines in the design, and if they don’t align properly at the sides, the finished skirt won’t look as polished. The goal is to have the strips meet exactly in the middle where the front and back panels join.
Taking the time to match the seams perfectly makes a huge difference. Even a small misalignment can be noticeable, especially when working with bold colors or geometric patterns. Instead of rushing through this step, slow down and pin carefully before sewing.
I have a detailed tutorial on how to match seams perfectly, which covers step-by-step techniques to get flawless alignment every time. Be sure to check it out if you want to master this skill – How to Match Seams Perfectly: Step-by-Step Tutorial.
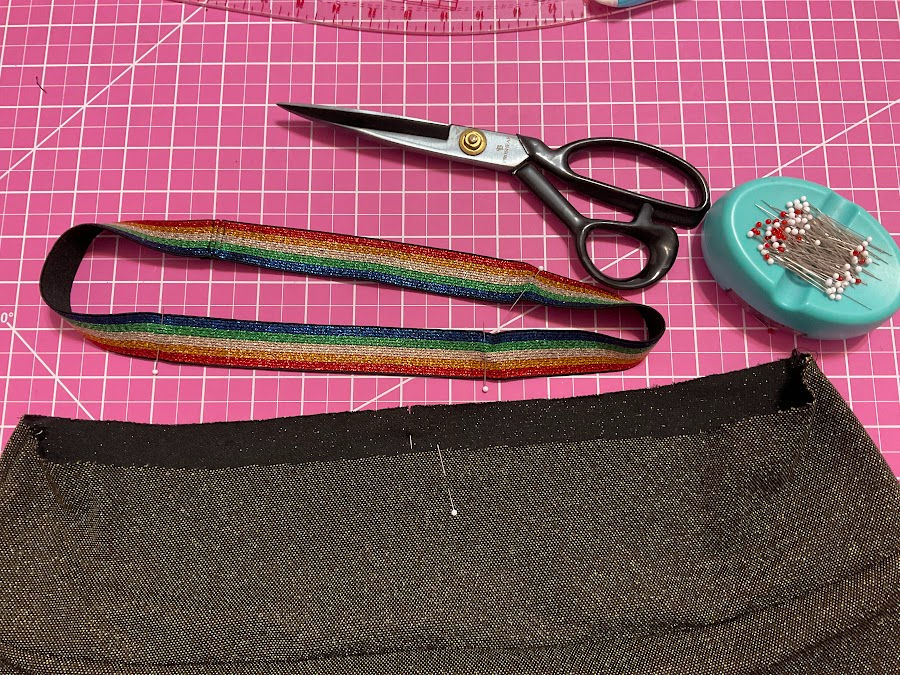
Step 5. Sew the Waistband
The waistband for this skirt is made with elastic, which keeps it comfortable and easy to wear. There are many types of elastic available now, from plain black and white to decorative styles with metallic threads, prints, or soft finishes.
I chose a 1-inch-wide elastic with red, green, gold, and blue metallic threads. It adds a subtle decorative detail that looks beautiful.
#1. Measure and Cut the Elastic
Wrap the elastic around your waist at the point where you want the skirt to sit. It should feel snug but not too tight.
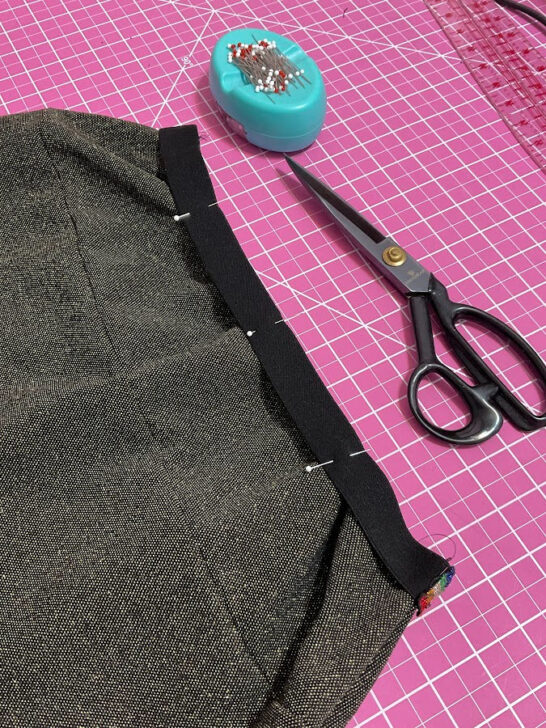
#2. Join the Ends of the Elastic
Since this elastic is visible and not enclosed inside a fabric casing, it needs a clean seam.
Place the ends of the elastic right sides together. Align the edges carefully so they match perfectly.
Sew the ends together using a straight stitch.Seam allowances are about ⅜ inch.
Press the seam open with your fingers. To keep it flat and prevent bulk, stitch down each seam allowance close to the edge. This keeps the seam neat and helps the waistband lay smoothly against the body.
#3. Mark the Elastic and Skirt Waist
To attach the elastic evenly, divide it into eight equal sections:
- Use the seam as the center back.
- Fold it in half and mark the center front.
- Fold again to find the side quarter points, then fold once more to create eight evenly spaced marks.
Do the same with the skirt waist, marking the center front, center back, and quarter points. These marks will help align the elastic evenly around the skirt.
#4. Attach the Elastic to the Skirt
Place the elastic on the outside of the skirt, matching the markings on the elastic with those on the fabric.
Pin or clip the elastic to the raw edge of the skirt, keeping the top edges aligned.
Since the elastic is slightly smaller than the skirt waist, it will need to stretch slightly as you sew.
#5. Sew the Elastic to the Skirt
You can attach the elastic using either a serger or a zigzag stitch on a regular sewing machine.
- Serger: A serger trims the fabric and secures the seam in one step. If using a serger, be careful not to cut into the elastic.
- Zigzag Stitch: If using a regular sewing machine, set it to a medium-width zigzag stitch. Gently stretch the elastic as you sew to match the fabric.
Sew all the way around, making sure the elastic is evenly stretched between the pinned sections. This will ensure a smooth, even fit without any puckering.
After sewing, flip the elastic upward so it sits flat against the skirt. If you want extra security, you can topstitch along the lower edge of the elastic using a stretch stitch or another row of zigzag stitching.
The skirt is almost done—just the hem is left to complete the look.
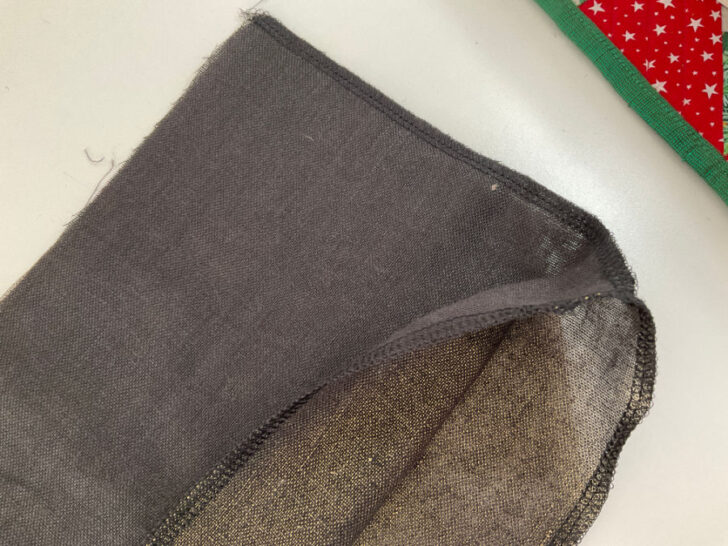
Step 6. Make the Hem with a Partial Lining
Since the patchwork section has unfinished seams that might unravel over time, adding a partial lining is the best way to keep everything neat and secure.
Instead of lining the entire skirt, this lining only covers the patchwork panel and creates a clean hem at the same time.
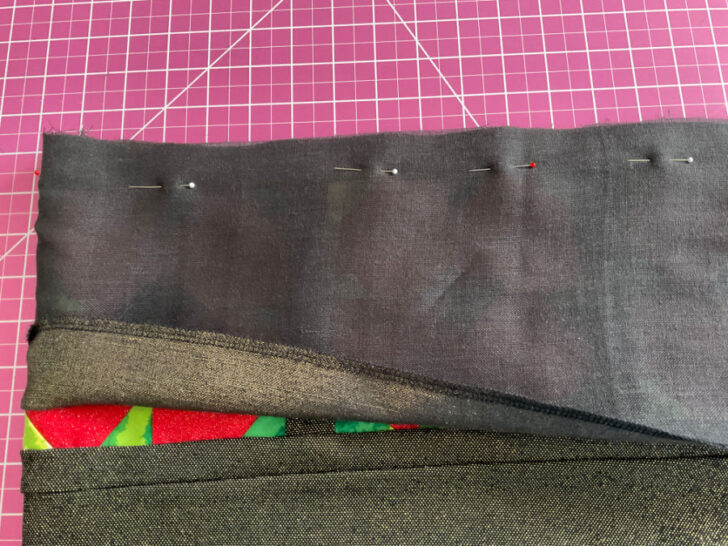
#1. Cut the Lining Pieces
Cut two pieces of lining fabric, one for the front and one for the back of the skirt. Each piece should be the same size as the patchwork panel—7.5 inches high and as wide as the skirt front and back. Use a lightweight fabric that won’t add bulk but will still provide enough coverage. You can use ¼ inch seam allowances if using a serger or ½ inch if using a sewing machine.
#2. Sew the Lining Side Seams
Place the front and back lining pieces right sides together and sew the side seams. This creates a tube that matches the width of the skirt’s patchwork section. Press the seams for a smooth finish. Finish one of the row edges of the lining.
#3. Attach the Lining to the Hem
Place the lining and the skirt hem right sides together, aligning the raw edges.
Sew around the hem with a ¼-inch seam allowance. This secures the lining to the skirt.
Press the seam, then flip the lining to the inside of the skirt.
#4. Secure the Lining to the Patchwork Panel
Smooth the lining upward, covering the patchwork section completely.
Press well so the lining stays in place.
Using a matching thread, hand-stitch the upper edge of the lining to the patchwork panel. Small, nearly invisible stitches work best to hold it securely without showing on the outside.
The partial lining not only finishes the hem beautifully but also hides any raw edges, keeping the inside of the skirt as polished as the outside.
Once this step is done, the skirt is complete and ready to wear.
Did you enjoy this tutorial? If you did, don’t forget to bookmark this pin (see below) on your sewing Pinterest board! That way, you can easily return to this guide on patchwork skirt DIY whenever you’re ready to make it. Plus, make sure to follow me on Pinterest to stay updated with more sewing advice, step-by-step guides, and creative inspiration!
latest posts
- What Do You Call a Person Who Sews? I Asked My Readers and Got 1,408 Opinions
- DIY Round Purse: PDF Sewing Pattern and Detailed Instructions
- Mini Wonder Clips By Clover: Useful Sewing Tool Or Just Another Notion?
- Non-Slip Grips For Quilting Rulers: A Small Notion With A Useful Job
- Fabric Eraser for Sewing: What It Removes and When to Use It
- What Is The Best Thread For Sewing Machine Projects? Let’s Find Out!
- Butterfly Quilt Block Tutorial – Foundation Paper Piecing
- How To Sew Quilt Squares So The Corners Match
- Sewing With Fork Pins: How They Help With Pattern Matching, Slippery Fabric, And Seams