Time-Saving Sewing Shortcuts That Help You Sew Smarter, Not Harder
Sewing shortcuts are the little techniques, habits, and tools that help you sew more efficiently – without giving up quality or precision. They’re not about rushing through a project or skipping important steps. Instead, they’re about using your time wisely, choosing tools that simplify the process, and working in a way that helps you keep sewing with less frustration.
Why do sewing shortcuts matter? Because most of us don’t have endless hours to spend at the machine. We plan multiple projects, we juggle our time, and we want results that look polished – without unnecessary stops and starts. A good shortcut doesn’t just save time. It helps you stay focused and make better use of the tools and materials you already have.
In this article, you’ll find sewing shortcuts that are practical, easy to apply, and based on real sewing experience. Some involve tools, others are just smarter ways to approach familiar tasks. All of them are here to help you sew more smoothly – from start to finish.
Section 1: Setup & Planning Shortcuts That Pay Off Later
Good sewing starts before the first stitch. A little thought and organization at the beginning of a project can save a lot of time and prevent common mistakes. These shortcuts help you stay focused, avoid backtracking, and keep everything you need right where you need it.
Batch Similar Tasks Together
Instead of completing one piece from start to finish, try grouping your steps by type. Cut out all your fabric first. Then do all the pinning. After that, move to the sewing machine. Batching lets you stay focused on one motion or tool at a time, which can improve speed and reduce the chances of making a mistake mid-project.
Pattern companies often break the instructions into small sections for clarity, but that doesn’t always make the most sense during actual sewing.
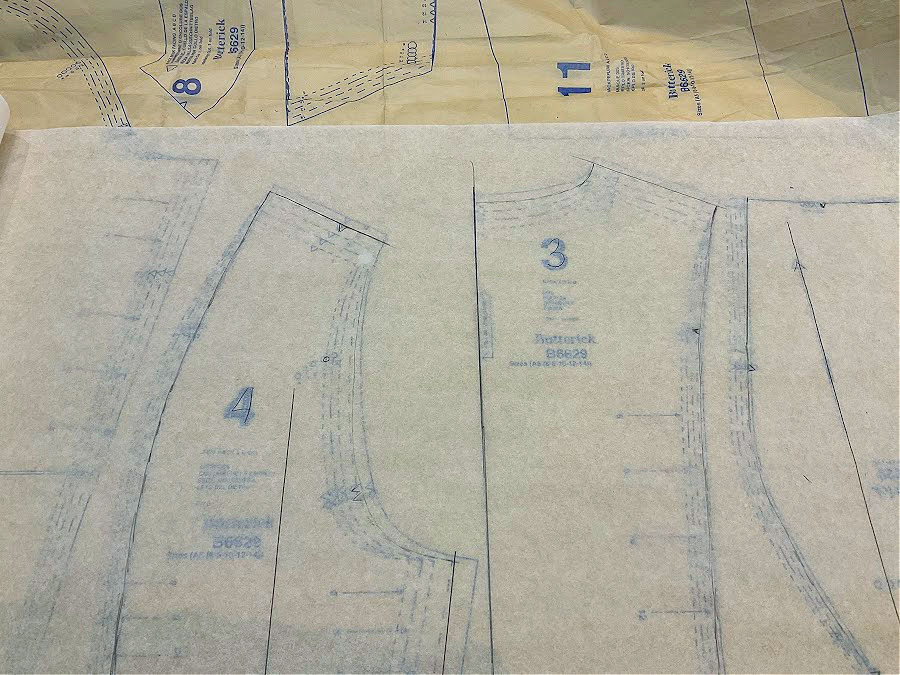
Take Butterick B6629 as an example.
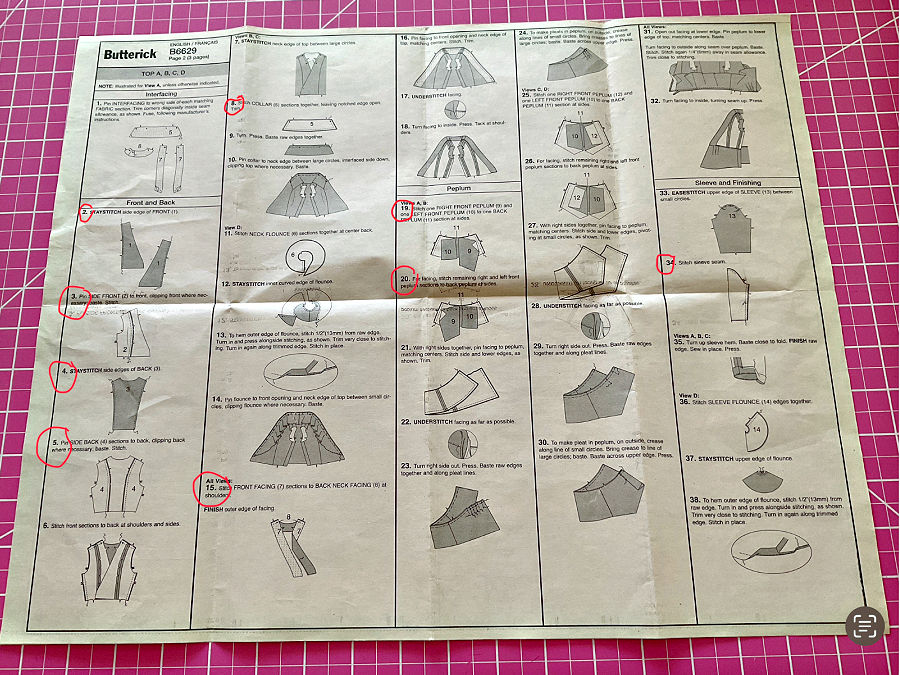
The instructions suggest you do steps in this order:
#2, 3, 4, and 5 – that is, staystitch the front, then attach side fronts, staystitch the back, and then attach side backs. It’s logical on paper, but it breaks up the staystitching and adds more time switching between tasks.
Instead, I find it much more efficient to do the staystitching at once – step #2 and #4. Then I move on to sewing the side panels- #3 and 5 – right afterward while the pieces are still fresh in my hands.
While I’m at it, I also take care of a few other steps that make use of the same tools and setup:
- Step #8 – Stitching the collar pieces together
- Step #15 – Stitching the front facing to the back neck facing
- Steps #19 and 20 – Sewing the peplum sections
- And #34 – Sewing the sleeves
By doing all of this in one batch, I minimize machine setup changes and make better use of my time at the sewing machine and pressing station. It also gives me more finished components ready to assemble later, which makes the final construction smoother.
Note: Some of the links on this page are affiliate links. This means I will receive a commission if you order a product through one of my links. I only recommend products I believe in and use myself.

By the way, I used this pattern Butterick B6629 to make a dress, and I shared the full process in two detailed tutorials. If you’re curious about the pattern, construction steps, or how I approached different parts of the garment, you can find all the details here:
A Guide to Choosing the Right Sewing Pattern for Your Body
How to Sew a Dress Using a Pattern: A Step-by-Step Guide
These guides walk through the sewing steps with photos and explanations, so you can follow along or see how this pattern might work for your next project.
Prepare Extra Bobbins Before You Start
There’s nothing more frustrating than running out of bobbin thread in the middle of a long seam – especially if you’re working with dark fabrics and don’t notice right away. To avoid interruptions, wind two or three bobbins in the color you plan to use before you start sewing. Having them ready saves time and keeps your sewing flow uninterrupted.
You can also use prewound bobbins, which are a great shortcut, especially for quilting or embroidery. These bobbins come already wound with thread and are available in many standard sizes (like Class 15 or L-style) to match different machines. They’re most commonly filled with 60-weight polyester thread, which is strong, fine, and ideal for both machine embroidery and piecing.
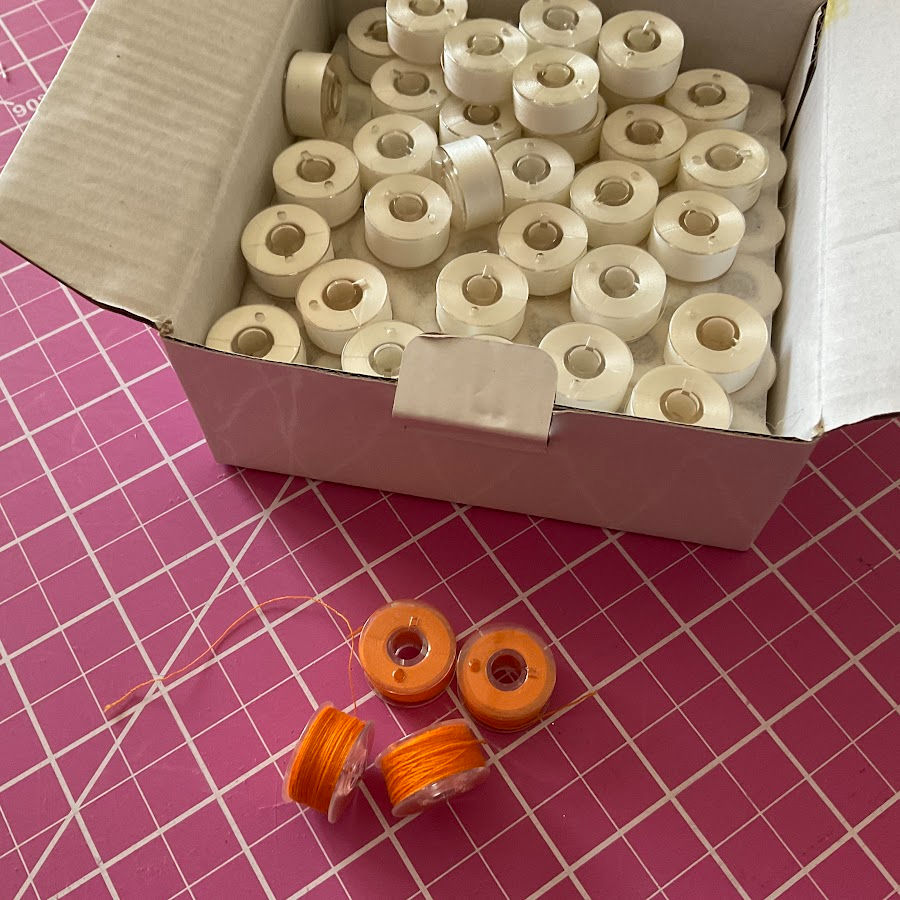
Prewound bobbins are available in white, black, and neutral gray, but you can find them in other colors as well. Some are designed for embroidery machines and may have a plastic core, while others come on cardboard cores and are compatible with regular sewing machines. If you do a lot of stitching with neutral threads, keeping a box of prewound bobbins on hand can save a surprising amount of time – not to mention the wear and tear on your bobbin winder.

Just check your machine manual to make sure the type of prewound bobbin you use is compatible with your model. Many home sewing machines handle them well, especially for straight stitching, piecing, and light embroidery.
More prewound bobbins at Amazon here: Amazon.com : prewound bobbins
Keep a Project Basket or Tray Nearby
Use a shallow bin, basket, or tray to hold everything for your current project. Include fabric pieces, thread spools, interfacing, pattern pieces, and any specialty tools or notions. It’s an easy way to avoid misplacing pieces or having your work spread across the sewing room. Everything stays together and moves easily from table to machine.
I found recently (but I did not buy) a low profile storage box at Ikea, TROFAST. If you have an Ikea nearby, check it out. I am quite a fan of Ikea myself!
✅ Related tutorial: IKEA Sewing Room Ideas for small spaces
Use Checklists for Multi-Step Projects
Sewing projects and quilts often involve dozens of small steps, and it’s easy to lose your place – especially if you stop mid-project and come back days (or weeks) later. A printed or handwritten checklist can help you stay focused and reduce the chance of skipping a step or sewing something out of order.
For example:
- A quilt may require piecing individual blocks, assembling rows, adding sashing and borders, layering with batting and backing, quilting, binding, and labeling.
- A zippered tote bag could include cutting main fabric, interfacing, lining, sewing pockets, inserting zippers, assembling panels, boxing corners, attaching straps, and finishing seams.
A checklist helps break these large projects into manageable pieces. You can write your own as you follow a pattern, or create a general version for repeat projects.
You can even laminate it and check off each task with a dry erase marker so it’s reusable.
Here is an example for a pencil skirt project:

✅ Related tutorial: How to make a pencil skirt pattern
Reuse Your Adjusted TNT (Tried and True) Patterns
Once you’ve taken the time to adjust a pattern so it fits you well and works with your sewing style, don’t let that work go to waste. A TNT pattern is one you’ve already sewn, tweaked, and trust. It’s the kind of pattern you can go back to again and again – for clothes, gift sewing, or quick wins when you don’t want to start from scratch.
Instead of cutting directly from the tissue in the pattern envelope, trace your size onto medical exam paper or another semi-transparent material.
This allows you to preserve the original in case your size changes or you want to make it for someone else. Medical paper is lightweight, see-through, and easy to store. It’s also ideal if you need to make multiple versions with slight changes.
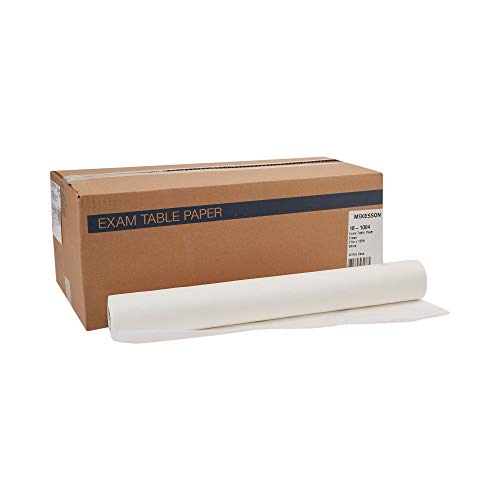
If you’ve made adjustments – whether it’s shortening a sleeve, reshaping a neckline, or doing a full bust adjustment – save that adjusted version and label it clearly. Include notes like fabric type used, size, modifications made, or even which sewing machine needle worked best. That way, when you come back to the pattern later, you won’t need to re-figure it all out.
Reusing a pattern that already works saves time on fitting and increases the chances of a successful outcome.
Group Projects by Thread Color
Switching thread – especially when it includes winding bobbins, rethreading a serger, or adjusting tension – can take more time than you realize. If you’re doing it several times in a day, it breaks your rhythm and slows down your progress. That’s why grouping projects by thread color is such a useful shortcut.
Most of us don’t sew just one project and then stop for a year. We plan ahead. I usually have several projects lined up – sometimes two, sometimes even five. If you’re sewing regularly, planning them around thread color can save more time than you’d expect.
For example, if two garments call for white thread, sew them back-to-back.
This is especially useful if you’re working with a serger. Changing serger thread and adjusting tension is not quick – and if you can avoid doing that multiple times in one session, you’ll get more sewing done with fewer interruptions. Even when working with a regular sewing machine, switching top thread and bobbin and checking stitch balance takes time. When you batch your projects by thread color, you reduce those stops, and the time saved adds up fast.
Keep a Few Neutral Threads That Work for Almost Everything
If you don’t want to switch threads for every single project, you don’t always have to. There are a few thread colors that blend well with many fabrics – especially in seams where the stitching won’t show.
The four most useful colors are:
- Medium grey – blends well with both light and dark colors
- Beige or taupe – ideal for earth tones, warm colors, and lighter prints
- White or dark navy blue – choose based on whether you tend to sew lighter or darker fabrics
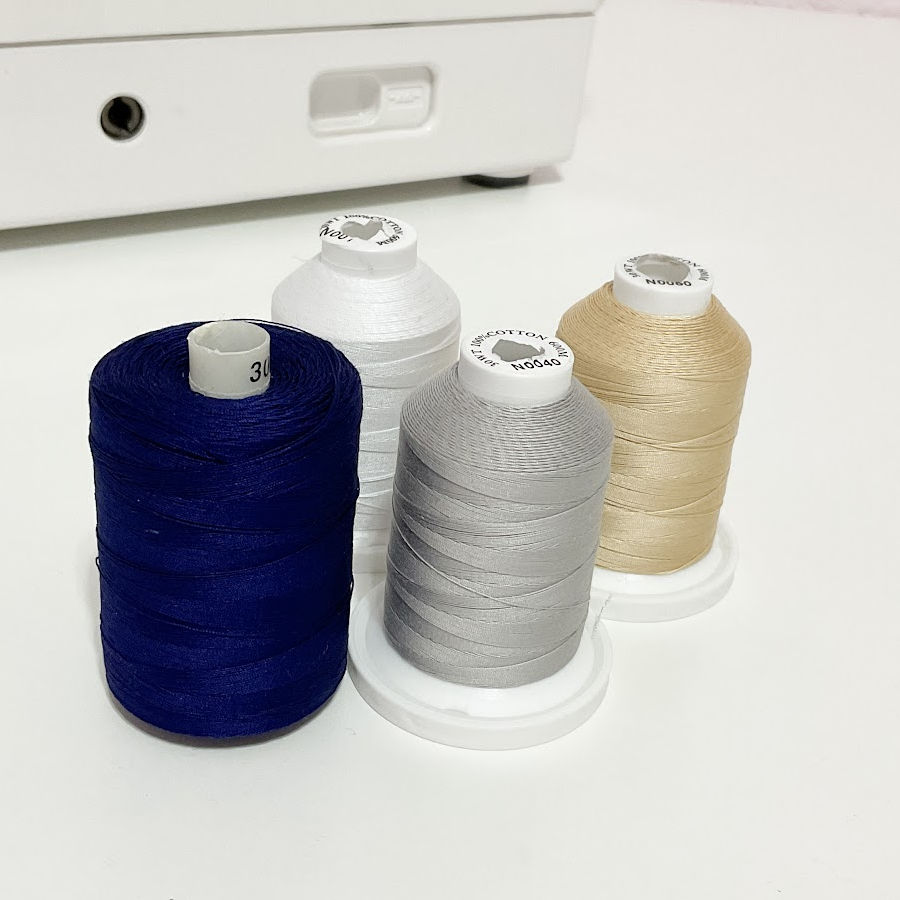
Grey is especially handy because it works with almost anything and rarely looks out of place, even on multicolored prints. Beige is gentle enough to disappear into many warm-toned fabrics, and white or navy blue can be used when the contrast won’t matter.
This shortcut is especially helpful if you use a serger. Changing all four threads (or even just two) on a serger is time-consuming. If you choose a neutral thread set – like all gray, or beige loopers with a matching needle thread – you can finish seams on a wide range of garments without needing to rethread for each one.
By sticking with a few versatile neutrals, you can move from one project to the next with less setup and still get a nice finish inside your garments.
Keep Essential Tools Within Arm’s Reach
Store your most-used tools – scissors, snippers, seam ripper, pins, measuring tape – close to your sewing machine. You can use a magnetic strip, pegboard, tool caddy, or even small jars. Keeping these items within easy reach helps maintain your rhythm and saves time spent hunting through drawers or bins.
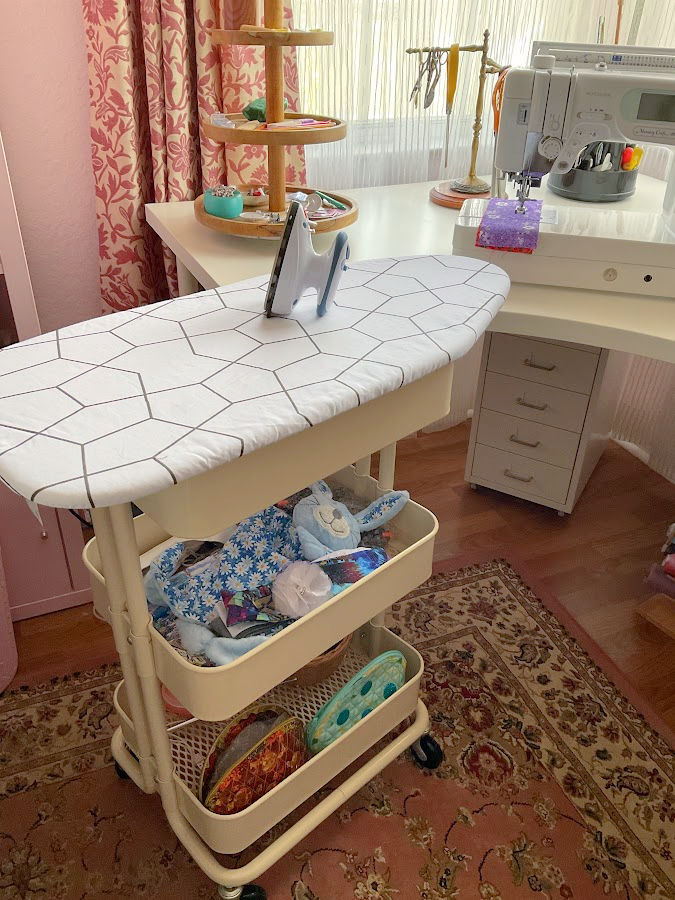
One solution I really like is my three-tier lazy Susan. I use it to organize and rotate through the tools I reach for constantly – small scissors, thread snips, markers, small rulers, clips, and more. Because it has multiple levels, it holds a surprising amount without taking up too much table space. And since it spins, I can find what I need quickly without digging around.
Here’s how it looks in my sewing space.
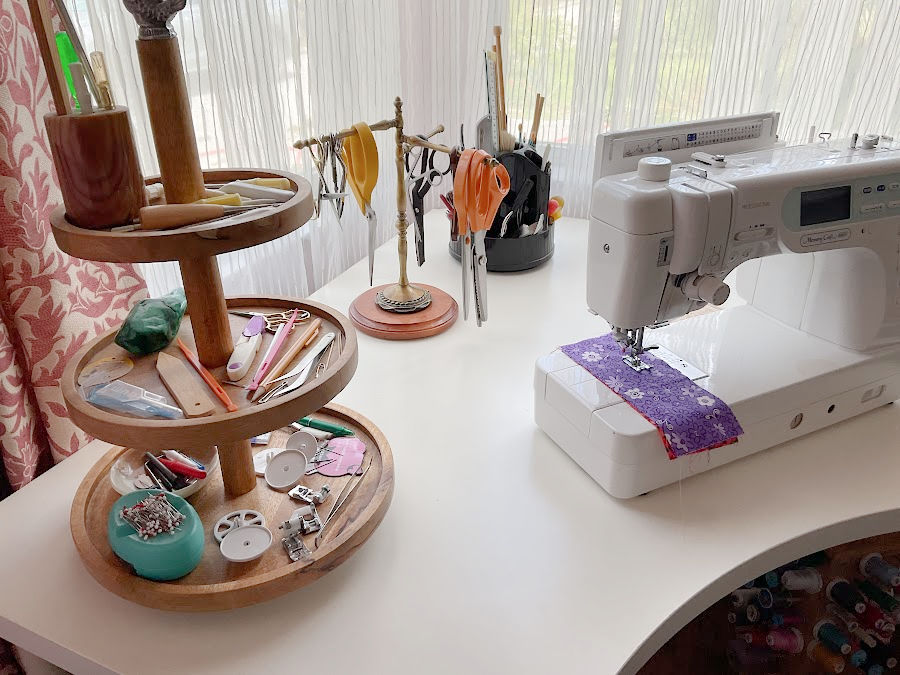
It’s simple, functional, and helps keep my tools tidy and easy to grab while I sew.
Create a Mini Pressing Station Beside Your Machine
Pressing isn’t optional – it’s a key part of sewing. For clean seams, accurate construction, and a professional-looking finish, almost every seam needs to be pressed before moving on to the next step. That means you’re going back and forth between your machine and ironing board constantly.
To save time and effort, set up a mini pressing station right next to your sewing machine. Use a small ironing board or a heat-resistant pressing mat, and pair it with a mini iron. This setup lets you press each seam immediately, without stopping your flow or walking across the room. You’ll end up pressing more consistently and working more efficiently – without sacrificing the quality of your project.
Keep a Fabric Swatch Notebook
Choosing the right fabric is one of the hardest parts of starting a project. You want the weight, color, and fiber content to work with your pattern – and that means pulling out fabric, checking labels (if you still have them), and trying to color match by memory. It takes time. And it often leads to dragging down bins from shelves or unfolding yardage just to figure out what you have.
A fabric swatch notebook simplifies all of this. Cut a small square from each fabric in your stash and tape or staple it to a notebook page. Next to each swatch, write down useful details: fiber content, width, stretch, where you bought it, if it’s been prewashed, and how it should be cared for. If you’re not sure of the exact fiber, a simple burn test or fabric reference chart can help you make a note for future use.
Instead of climbing a ladder to peek into the top shelf or rummaging through three plastic bins, you can sit at your sewing table and flip through your swatch book.
It also helps with color matching. You can hold a thread card or button next to the swatch and make your decisions right away – without unfolding yards of fabric.
This kind of notebook becomes even more helpful over time, especially when you forget if that lovely piece of fabric was 100% cotton, a cotton-poly blend, or something more delicate. Knowing the fiber content also helps you figure out how to wash it and whether it’s suited to a specific garment or technique.
Having that information in front of you means fewer interruptions, fewer mistakes, and more confidence when starting something new.
Keep Your Sewing Space Well-Lit
Good lighting might not feel like a shortcut – but it absolutely is. When your sewing area is well-lit, you can thread needles faster, spot mistakes before they grow, and see your seam lines clearly as you stitch. That means fewer corrections, fewer skipped stitches, and a lot less eye strain.
Natural light is ideal during the day, but for evening sewing or cloudy days, a good task light is essential.
If you’d like to see what types of lights work well in a sewing room – and how to improve your setup – I’ve shared more suggestions in this post – Sewing room lighting ideas

Keep Your Sewing Machine Manual Close
It’s easy to forget where your machine manual is – until you need it. Whether you’re troubleshooting skipped stitches, changing tension settings, adjusting stitch width, or figuring out how to clean a bobbin case, the manual usually has the answer.

Keeping it close – either in a drawer near your machine, in a binder, or even as a bookmarked digital copy on your tablet – can save you a lot of time searching or guessing. Instead of trial and error, you can go straight to the instructions and get back to sewing faster.
Even if you’ve been using your machine for years, there are always features or settings you might not use often. Having the manual nearby helps you take advantage of them without delay.
Section 2: Tools That Do the Work for You
There are plenty of tools that make sewing faster, smoother, and more accurate – and many of them aren’t expensive at all. Some of the best shortcuts come from using the right tool for the job. Instead of struggling to make something work, let the tool do the heavy lifting for you.
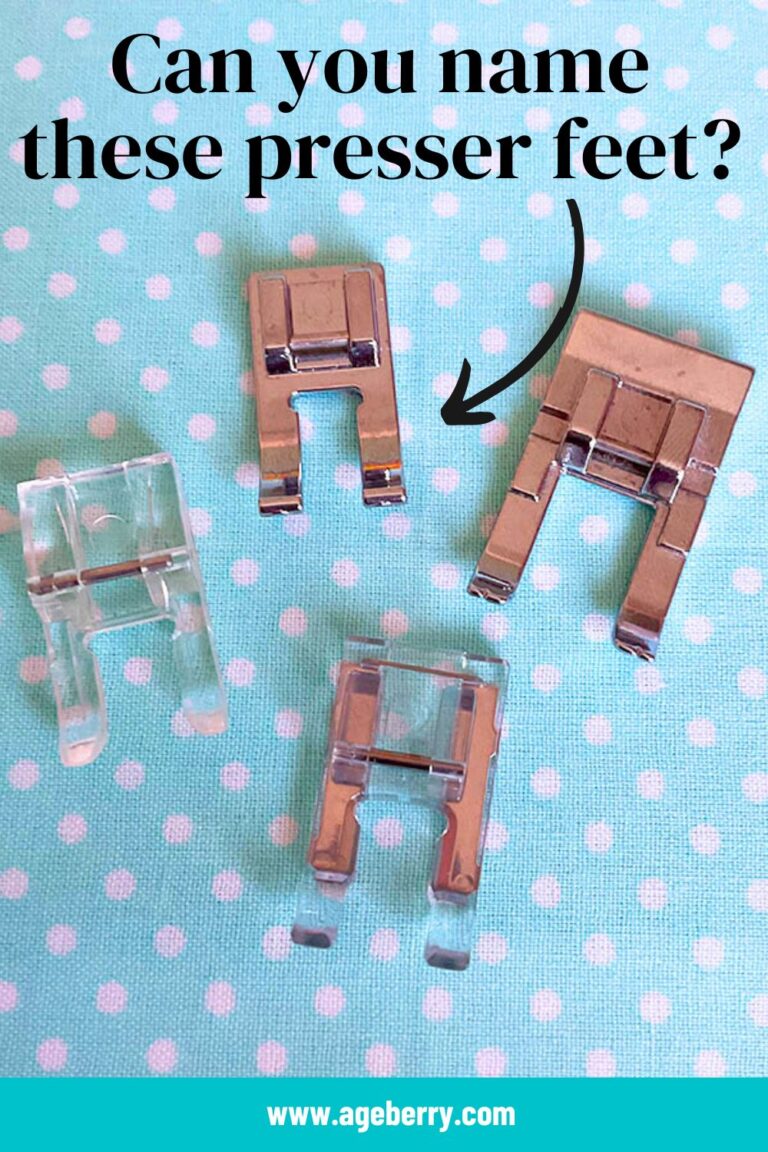
Use Specialty Presser Feet to Speed Up Tasks
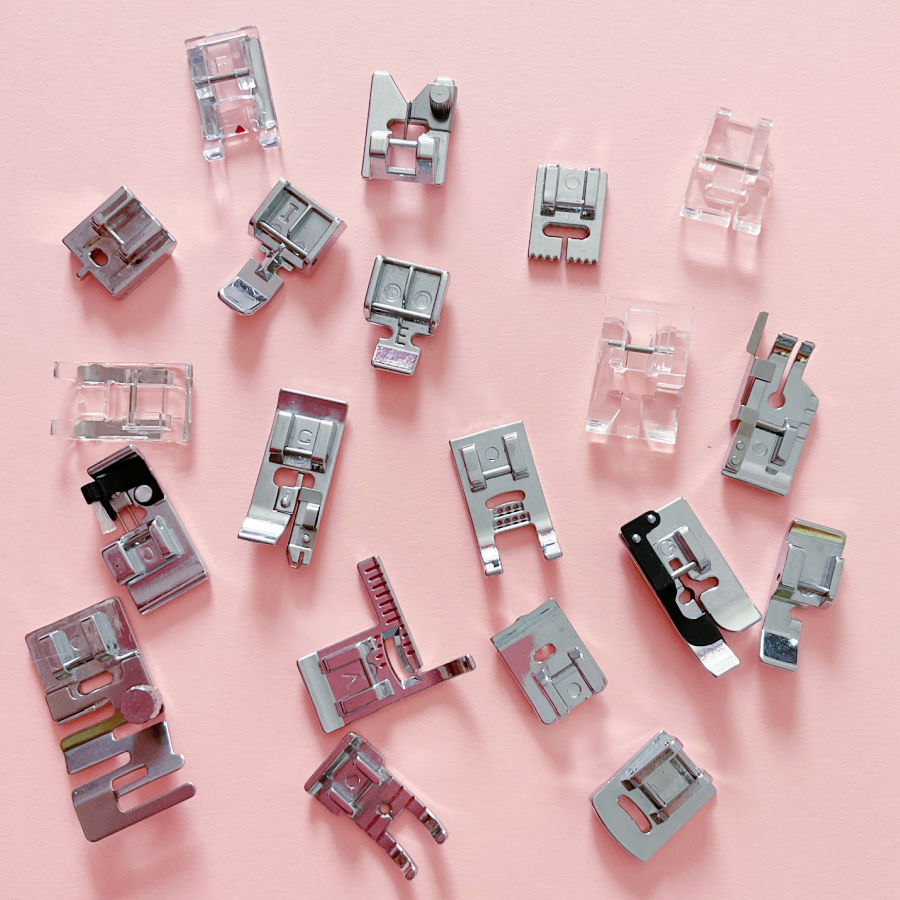
Your sewing machine can do a lot more than straight stitching if you take advantage of the presser feet it came with (or add a few more). These feet are designed to solve specific sewing challenges – quickly and cleanly.
- Want to sew a hem that looks almost invisible from the outside? Use a blind hem foot.
- Sewing multiple layers or working with slippery fabrics? A walking foot prevents shifting.
- Installing a zipper? A zipper foot lets you sew right up against the teeth.
- Adding elastic? An elastic foot feeds and stretches the elastic evenly as you sew.
- Adding buttons? Use a buttonhole foot to make buttonholes.
There are many other presser feet that can help speed up your sewing and improve accuracy. I have many tutorials that explain how to use many of them and what they’re best for. You can find them at this link – Sewing Machine Presser Feet.
These specialty feet aren’t just nice extras – they’re real time-savers and make your stitching more accurate with less effort.
Use Seam Guides for Straight Topstitching
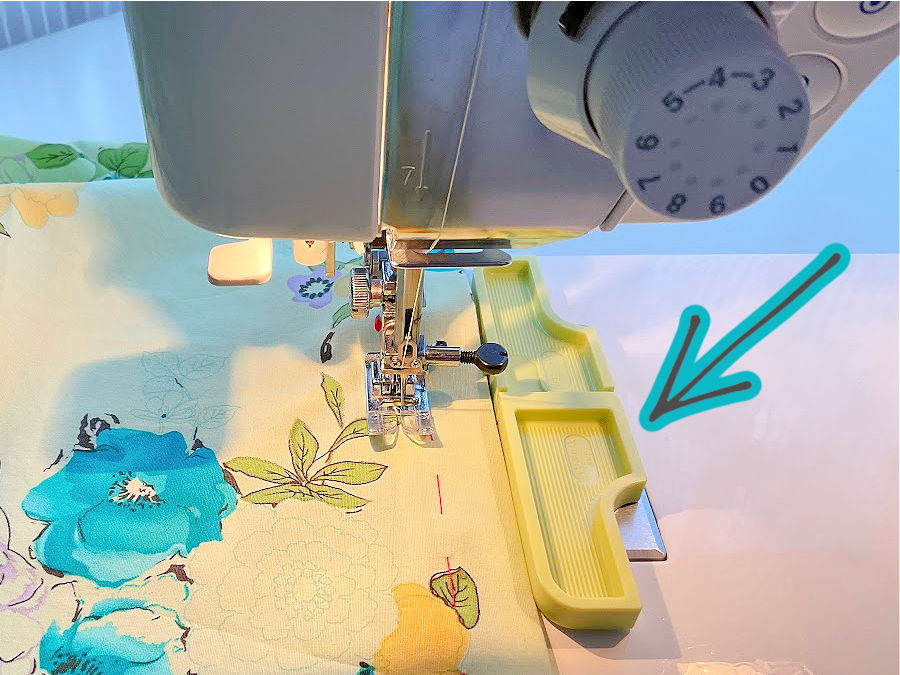
Keeping topstitching straight by eye alone isn’t always easy. A magnetic seam guide, adjustable edge guide, or even painter’s tape placed on the machine bed can give you a visual guide to keep those topstitching lines even – without having to constantly stop and measure.
If you’d like to learn more about different types of seam guides and how to use them, I have a detailed tutorial that covers the options and helps you choose what works best for your projects – Seam Guide Tutorial – all you need to know about how to sew a straight line and keep seam allowances equal

Choose the Correct Needle for the Fabric

Using the right needle isn’t just about avoiding skipped stitches – it can speed things up too. When your machine is working smoothly, you sew faster. For knits, use a stretch or ballpoint needle. For denim, use a jeans needle. For lightweight silks and chiffons, a microtex needle gives the cleanest results. A universal needle works for many projects, but matching the needle size to the fabric type and weight keeps things moving without fuss.
Not sure which needle to use? Check out my tutorial 19 Types of Sewing Machine Needles and What They’re Used For – it breaks down the differences and helps you choose the right one for your fabric and project.
Use the Right Thread
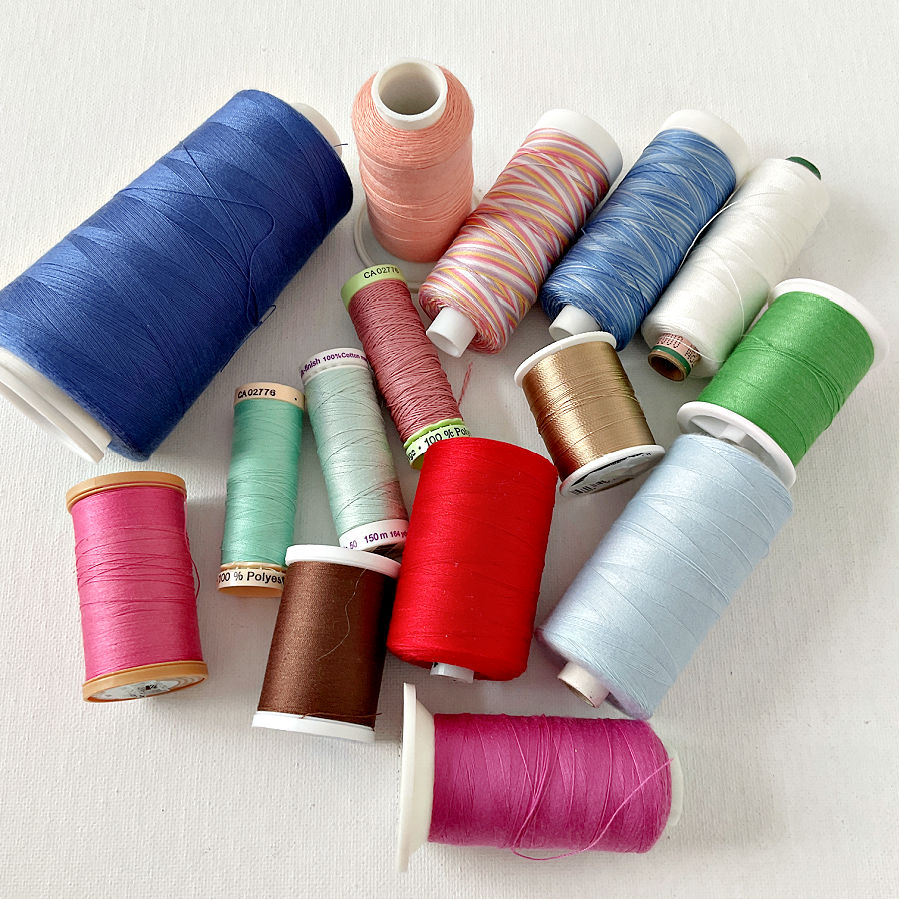
Just like with needles, using the correct thread for the fabric helps prevent breakage, bunching, or puckering. Polyester thread works for most general sewing. Cotton thread is best for natural fabrics and quilting. Fine thread is ideal for delicate seams, while heavy topstitching thread adds structure and contrast. When you don’t need to stop and troubleshoot your stitch quality, you move through your project faster and with better results.
✅ Related tutorial: Sewing thread types and uses
I have a number of articles on thread; after all, thread is one of the most important things in sewing, together with the needle and fabric: Sewing Thread – Ageberry: helping you succeed in sewing
Use Sharp, High-Quality Scissors

Dull scissors make cutting harder than it needs to be. They can snag fabric, leave uneven edges, and slow you down with every snip. A good pair of fabric-only shears makes a noticeable difference—cutting becomes quicker, smoother, and more accurate.
There are also many types of scissors used in sewing, and having the right one for each task can save time and improve your results. Use dressmaker’s shears for cutting out pattern pieces, small snips or embroidery scissors for trimming threads, and pinking shears to finish raw edges. Keep a separate pair just for paper patterns, so your fabric scissors stay sharp longer. Matching the right scissors to the job keeps your workflow efficient and your fabric in better shape.
Want to read more about cutting tools for sewing? I have a detailed guide here: Cutting Tools For Sewing: The Ultimate Guide – it walks you through the options and when to use each one.
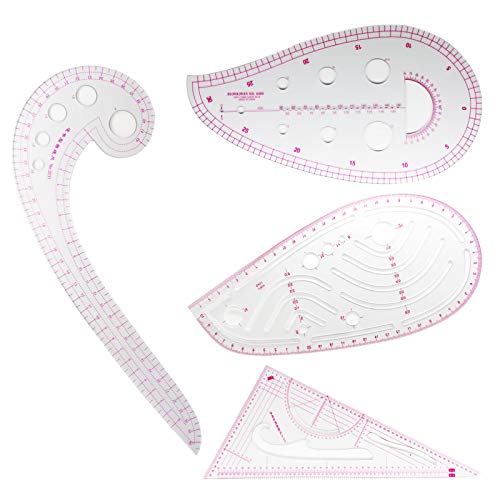
Use Helpful Rulers for Accurate Cuts and Seam Allowances
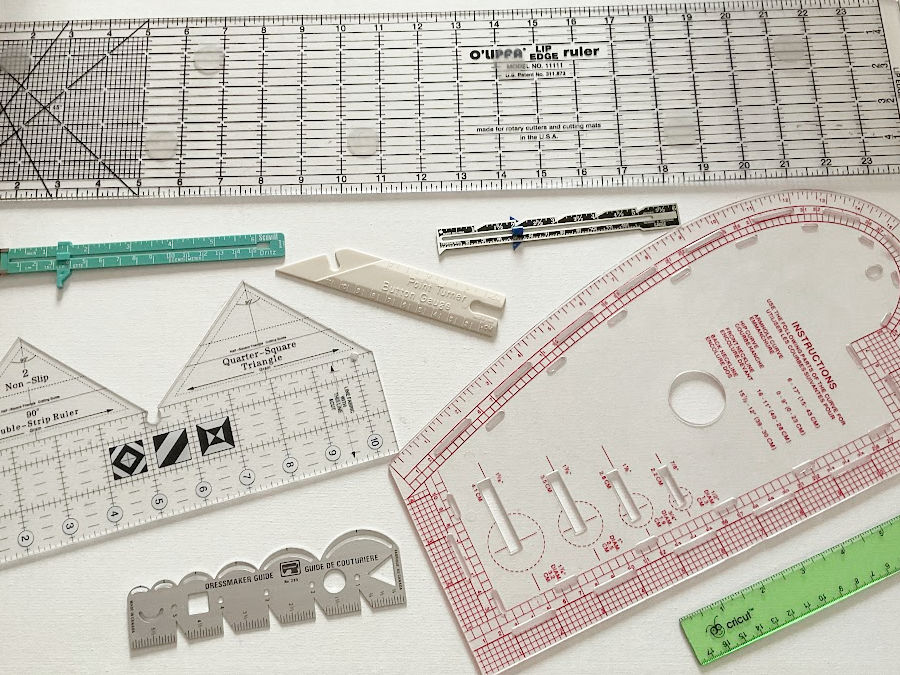
Clear acrylic rulers, seam gauges, hem guides, and French curves all help you measure and mark faster and with better accuracy. A clear ruler with grid markings is especially helpful for cutting straight lines and aligning fabric on grain. The less time you spend checking and rechecking measurements, the more time you can spend sewing.

Use the Right Pins (or Skip Them)
Choose pins that match the fabric and task. For example, Magic Pins have heat-resistant heads that you can press over – so you don’t have to remove them before ironing. And in case you wonder, they are available in various colors, to make them visible on any kind of material.
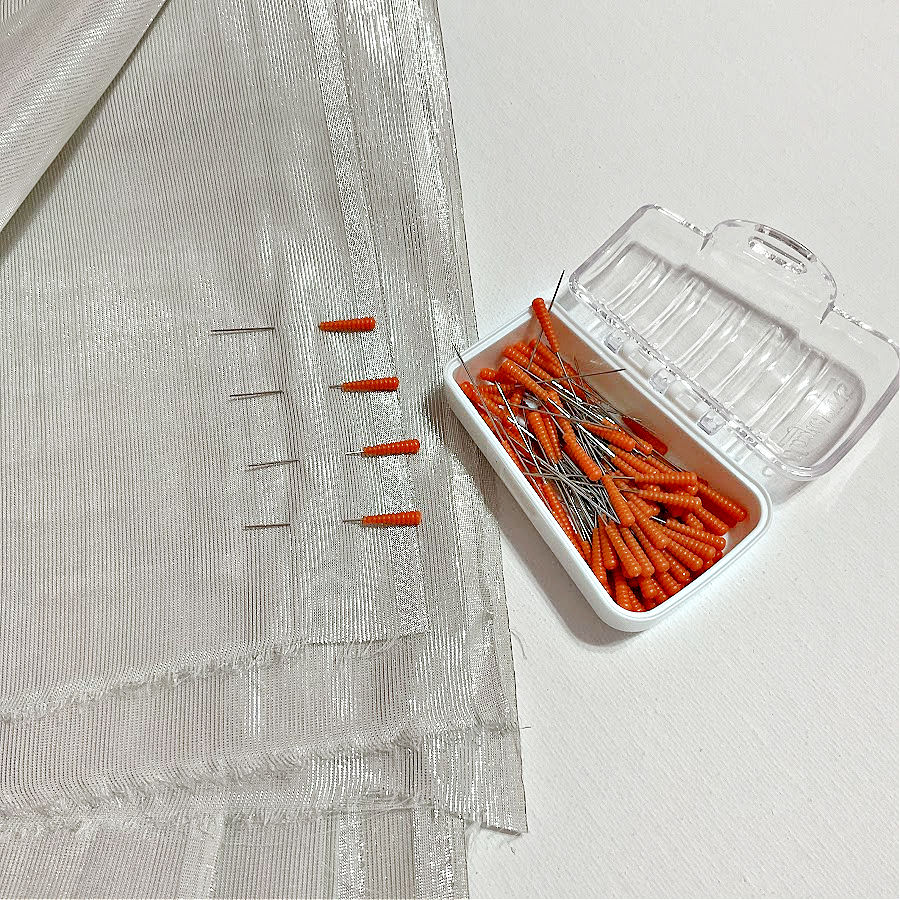
Use fine pins for delicate fabrics and thicker pins for heavier layers. Better pins glide in and out more easily, which makes pinning and unpinning go faster. And in some cases, you can skip pins altogether and use clips.
Use Clips to Hold Fabric Layers
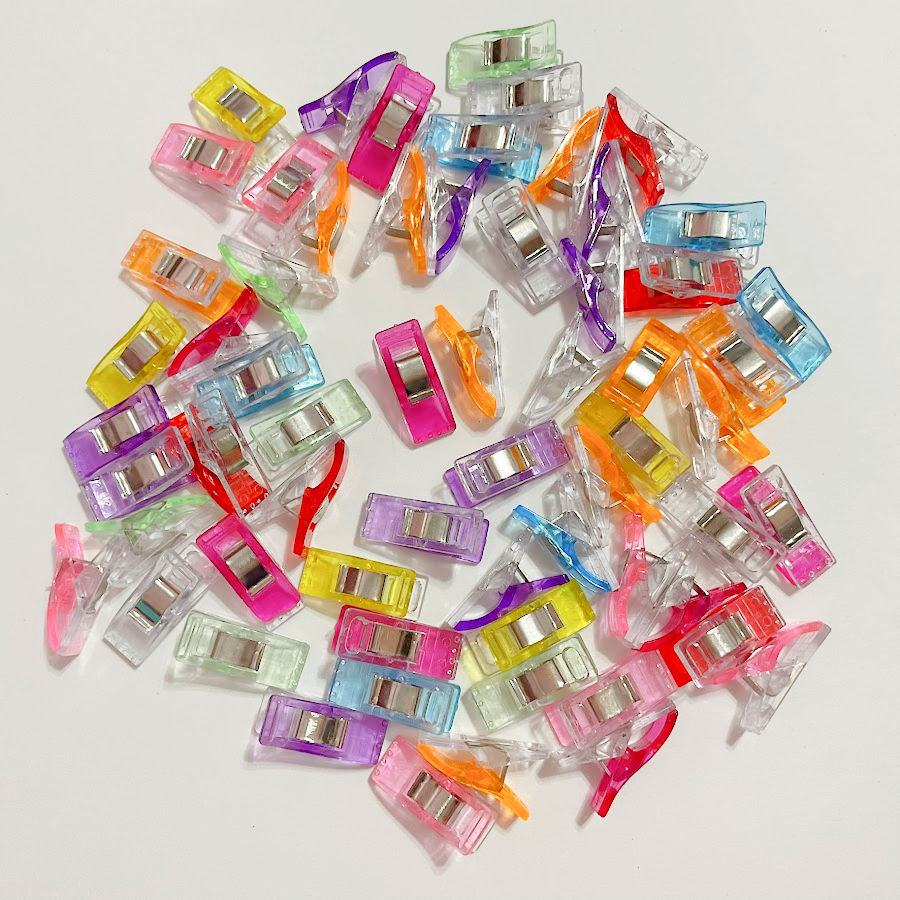
Fabric clips are great for projects where pins don’t work well – like vinyl, leather, cork, or thick seams. They’re faster to place, don’t distort the fabric, and are easier to remove as you sew. Use them for bag making, hems, and seams where bulk or pinholes are a concern.


Use a Cordless Iron at Your Sewing Table
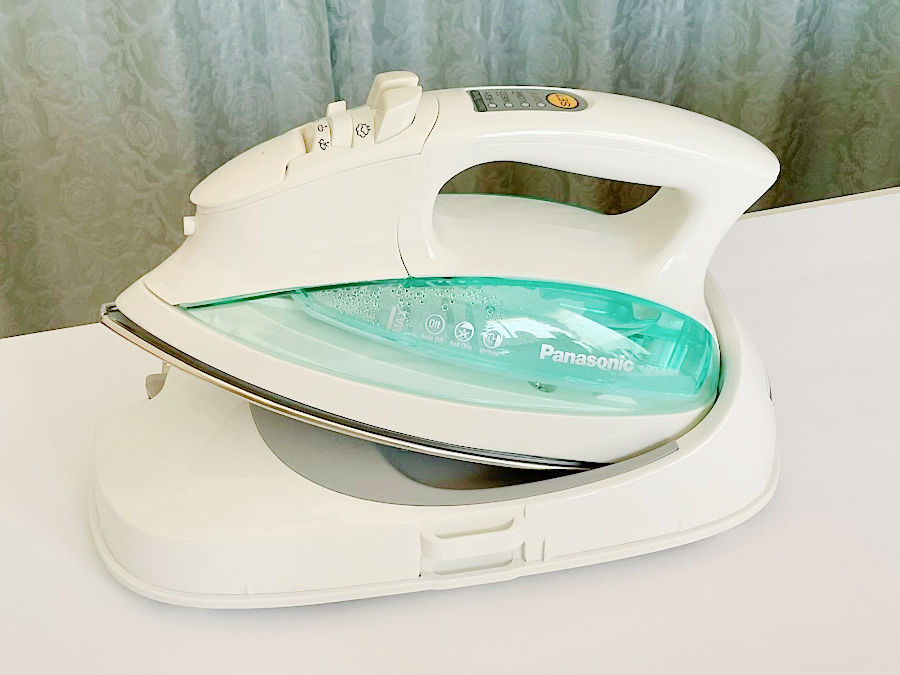
A cordless iron, like the Panasonic model, heats up fast and moves freely without a cord getting in your way. It’s perfect for a small pressing station next to your machine. You can press seams as you sew without waiting for a full-size iron to heat up or walking back and forth across the room.
Use a Rotary Cutter and Cutting Mat Instead of Scissors
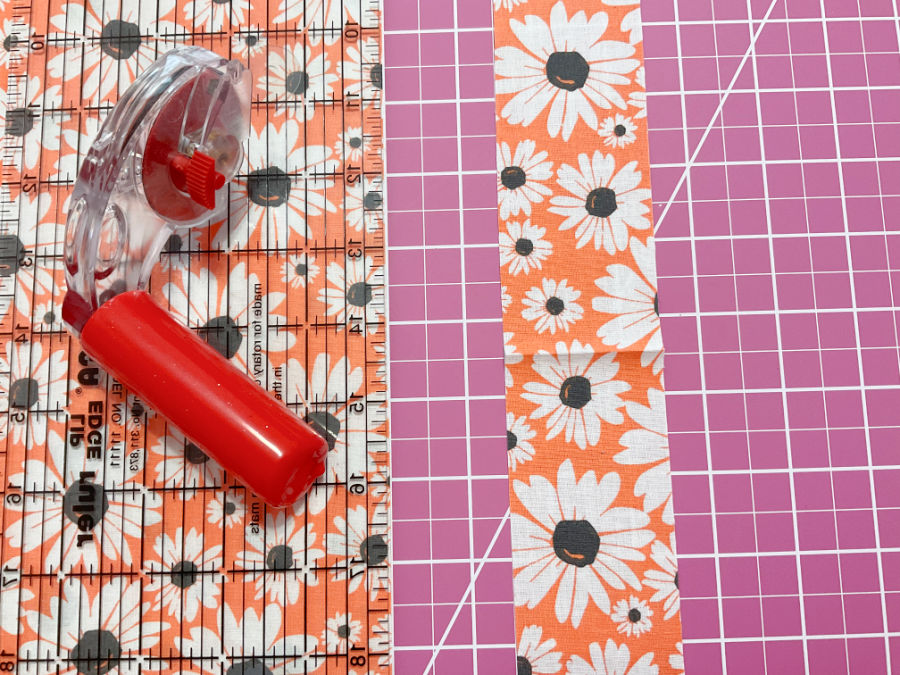
For many sewing tasks, especially cutting straight lines or curves on quilting cotton, a rotary cutter and self-healing cutting mat are faster and more precise than scissors. Pair it with a clear ruler, and you can cut layers of fabric cleanly and quickly, without shifting.
Buy a Serger/Overlocker to Combine Steps and Save Time
A sewing machine can do a lot – but a serger is built for speed. It doesn’t just finish edges. It trims, sews, and overlocks the seam all in one pass. That means fewer trips to the scissors, fewer fraying edges to manage, and no need to go back and tidy up seam allowances.
If you’re sewing garments, this saves real time.
Sergers are also essential for sewing knit fabrics. They create stretchy seams that won’t pop during wear.
✅ Related tutorial: All About Sergers / Overlock Machines
Section 3: Construction Techniques That Save Time Without Mess
Use Chain Piecing
Chain piecing is a smart shortcut that can be used in quilting. The idea is simple: instead of cutting thread and lifting the presser foot after every seam, you sew one piece right after another in a continuous line. This minimizes thread waste, speeds up sewing, and keeps your workflow uninterrupted.
Chain piecing is often used to join squares, half-square triangles, or strips. You sew through one pair, then feed the next in without stopping. Once you have a long chain of stitched units, you clip them apart with scissors.
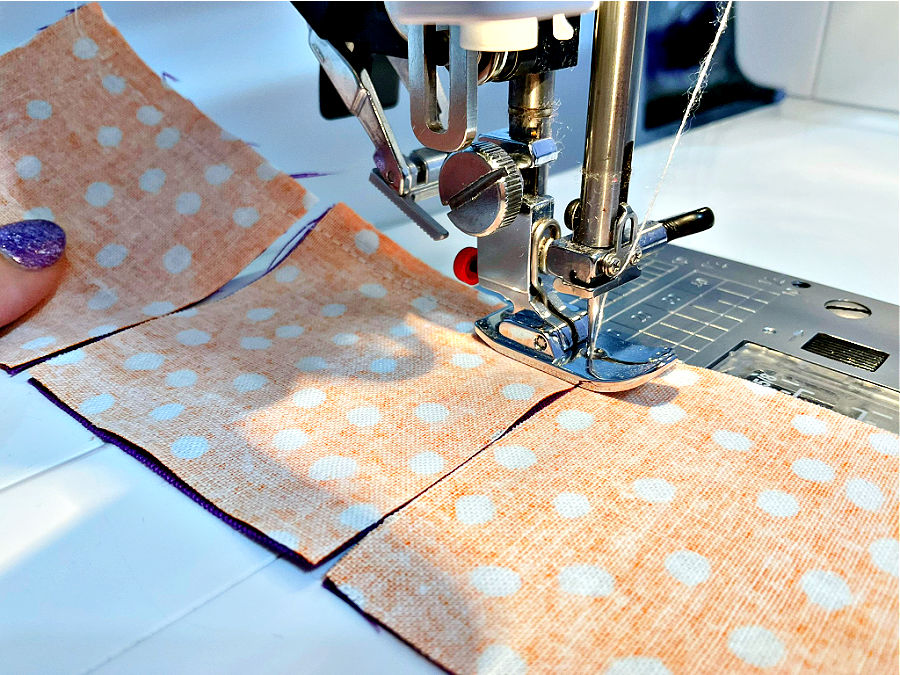
It saves time because you’re not constantly starting and stopping. You don’t need to backstitch every seam. And you don’t have to reset your hands or realign your fabric every time.
Use Ban-Roll Tape or Buckram Fabric for Great Narrow Hems
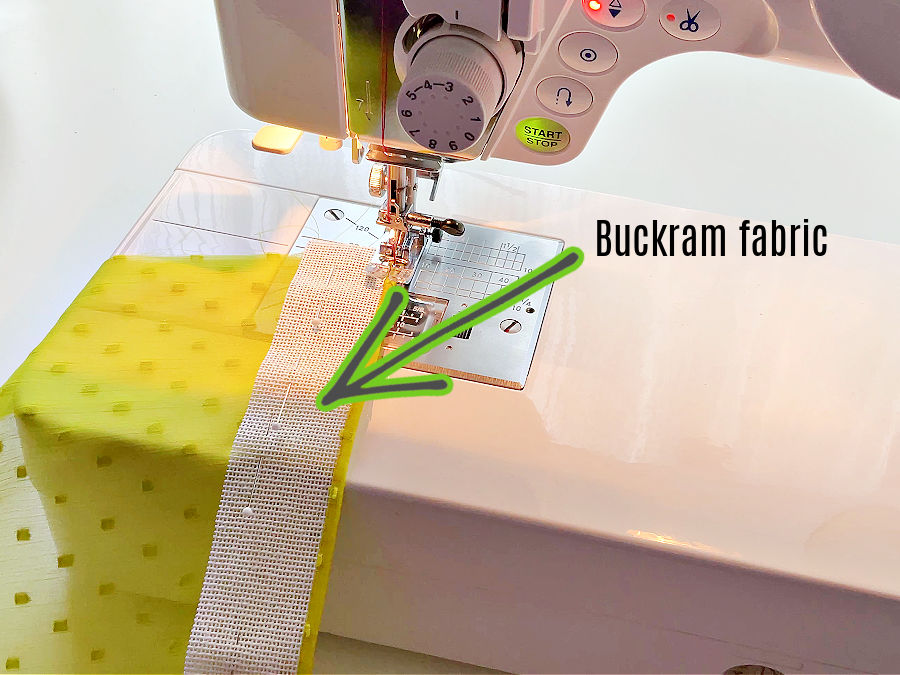
Narrow hems on lightweight or slippery fabrics like chiffon, voile, or organza can be time-consuming and difficult to sew cleanly. Pressing such fine hems evenly, without stretching or distortion, is a challenge even for experienced sewists. That’s where Ban-Roll tape and buckram fabric come in – and they make hemming much faster.
Ban-Roll tape is a woven waistband interfacing with vertical threads that can be removed to expose a fine mesh edge. After pulling out a few threads, you place your fabric edge over the tape and stitch along the open grid. The tape provides structure, helps the fabric fold precisely, and keeps it from shifting while you sew. Once the hem is complete, the tape slides right out – leaving a narrow, even edge without needing to press or fold anything by hand.
Buckram works in a similar way. Both tools act as hemming aids, giving you a shortcut to a polished finish without fussy measuring, pressing, or distortion. And the beauty of it? You can reuse the ban-roll or buckram piece!
Here are my detailed tutorials for using this technique:
Narrow hem tutorial: how to make a narrow hem using a Ban Roll tape
From Frustration to Finesse: A Foolproof Method for Hemming Chiffon and Sheer Fabrics


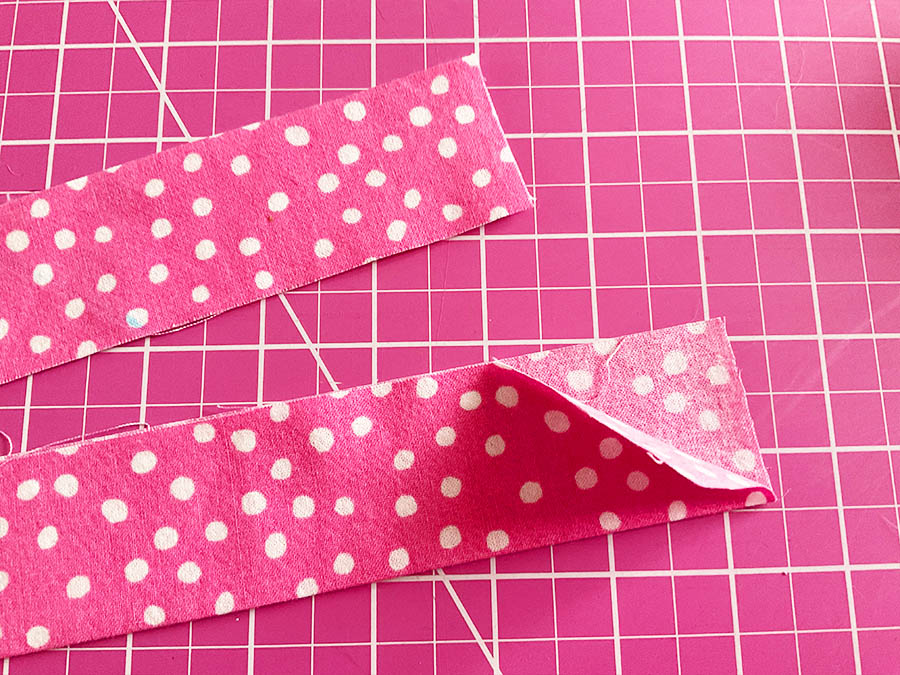
Use Pinking Shears on Curved Seams Instead of Clipping
Sewing curved hems or seams usually means stopping to clip or notch the seam allowance so the fabric lays flat when turned. This step is important – but it can be tedious, especially on tight curves or long hems.
That’s where pinking shears come in. Instead of clipping one snip at a time, I trim the entire curved seam allowance using pinking shears. The zigzag edge naturally reduces bulk and helps the curve stretch and ease smoothly when turned right side out. No need to measure or cut individual notches. It’s one continuous cut that saves time and gives a clean, even edge.
You can see how well this works in the photos here. The fabric curves nicely without puckering, and the finished hem sits flat without extra pressing or fuss.
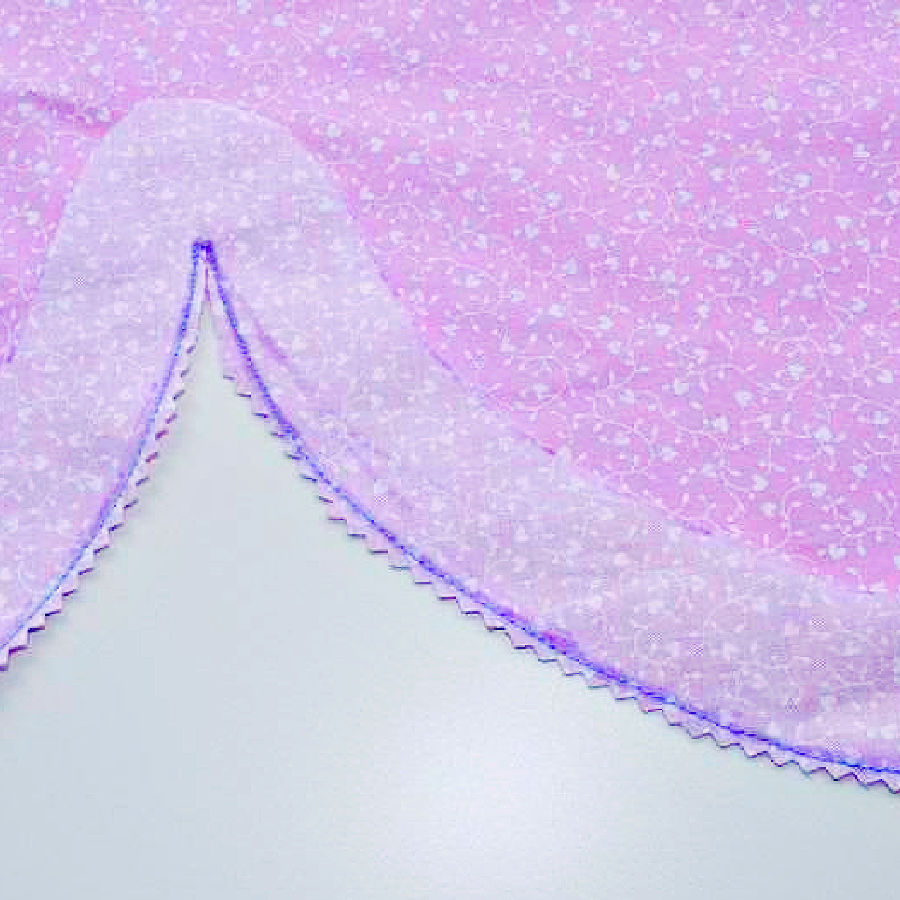
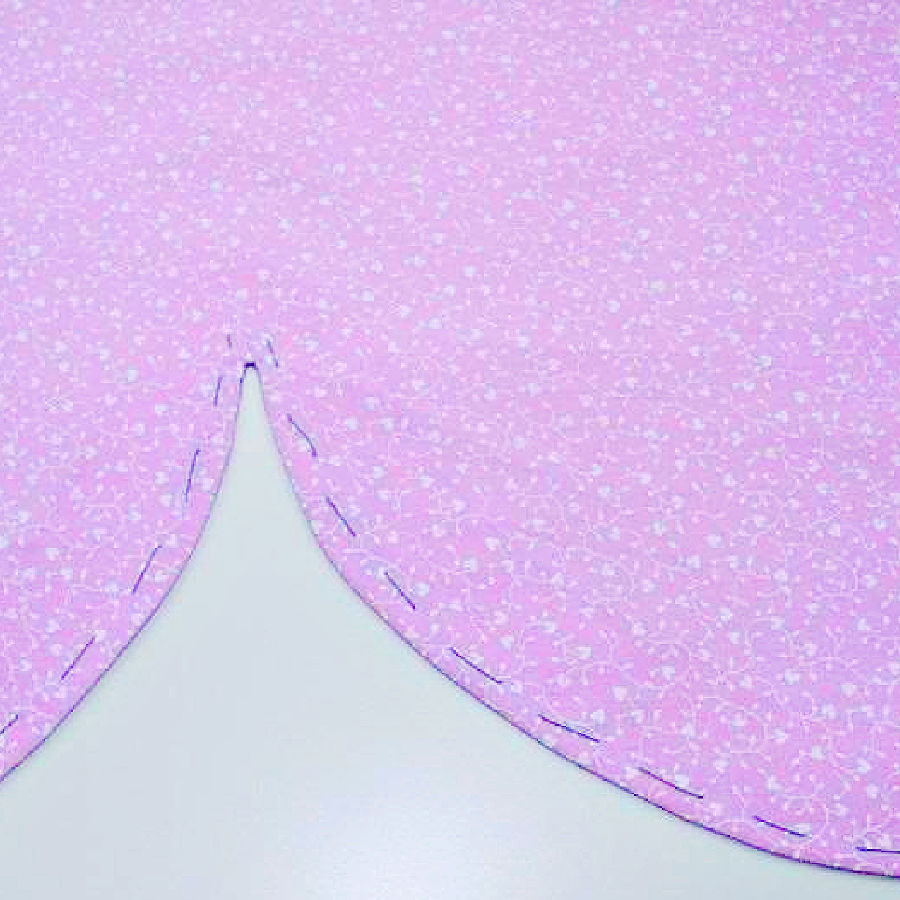
This method is especially helpful on curved hems, necklines, and facings where precision matters – but you don’t want to waste time clipping every few millimeters.
It’s a small shortcut that makes a big difference in speed and finish.
Use Double-Sided Wonder Tape for Sewing Zippers
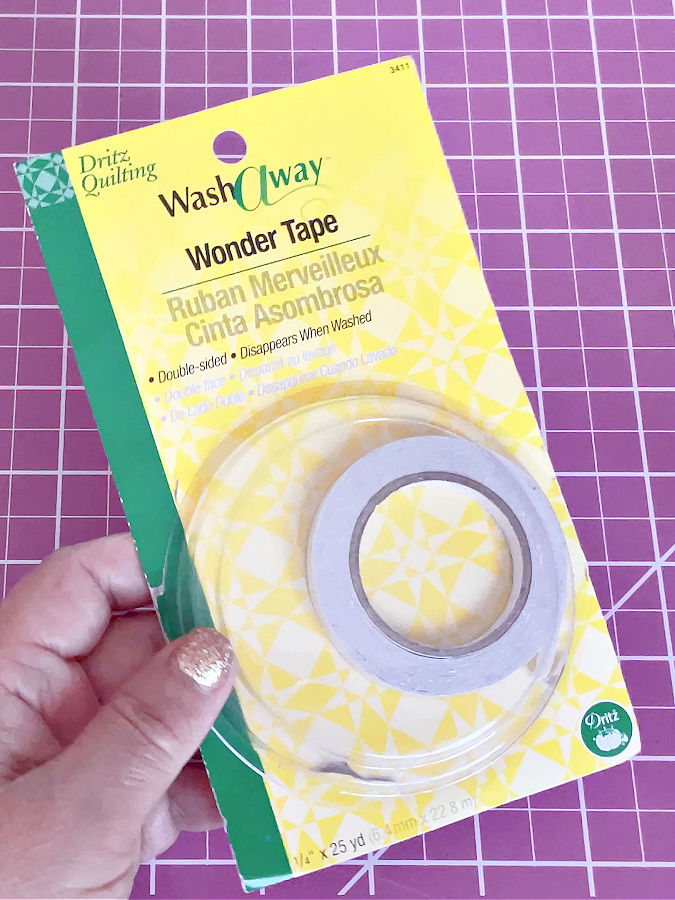
Zippers can be tricky to position accurately, especially if you’re working with an invisible zipper or a slippery fabric. Instead of spending extra time pinning, basting, and repinning – or unpicking crooked seams – use double-sided Wonder Tape.
This tape holds the zipper exactly in place while you sew. It’s thin, doesn’t gum up your needle, and washes away after sewing. It eliminates the need for pins, which can distort the zipper placement, and it lets you focus on stitching rather than constantly adjusting the fabric.
I use it especially for invisible zippers, and it saves time while giving clean, precise results. You can see the full step-by-step process in my tutorial here:
How to put in an invisible zipper using Wonder tape for sewing
Use Your Sewing Machine for Basting Instead of Hand Stitching
Basting is a temporary stitch that holds fabric in place before final sewing. It’s often recommended to be done by hand – but that takes time, especially on long seams or when working with layers that shift.
A much faster way is to use your sewing machine’s longest straight stitch. This is usually around 4.0 to 5.0 mm in length. You will also need to put thread tension to 0. It creates loose, temporary stitches that are easy to remove and perfect for testing fit, holding zippers, easing sleeves, or positioning pleats and gathers.
I also have a full tutorial that walks through how and when to use basting stitches:
Basting Stitch: Why, When And How To Baste In Sewing
Skip Seam Finishing on Fabrics That Don’t Fray
Not every seam needs to be finished. If your fabric doesn’t unravel, you can skip the extra step of overlocking, zigzagging, or binding the edges—and that saves both time and thread.
Some fabrics are naturally resistant to fraying, even if they’re known for being tricky to sew. Materials like spandex, velvet, velour, faux suede, fur, and vinyl usually hold their edges without any finishing at all. The same goes for felt and fleece, which are stable and don’t require edge treatment.
For projects made with these fabrics, you can sew the seams and move right on—no extra work needed. Another option is to cut your pattern pieces with pinking shears. The zigzag edge helps limit fraying on woven fabrics and gives you a neat, finished look without adding extra steps. It’s a simple shortcut that works especially well for quick garments, costumes, or craft projects.
Fold Fabric Right Sides Together Before Cutting
When you’re preparing to cut fabric, folding it with right sides together (wrong sides facing out) can save a step later. Most pattern instructions call for sewing pieces with right sides together, so by folding this way at the start, you’re already halfway there.
This is especially helpful for pieces that are cut on the fold or in mirrored pairs – like collars, back bodices with center seams, facings, or cuffs. Once cut, these pieces are already matched up and aligned correctly, so you can go straight to pinning or basting without needing to flip and reposition them.
It makes the transition from cutting to sewing faster and more efficient.
Use Fabric Glue for Fast, Fuss-Free Assembly
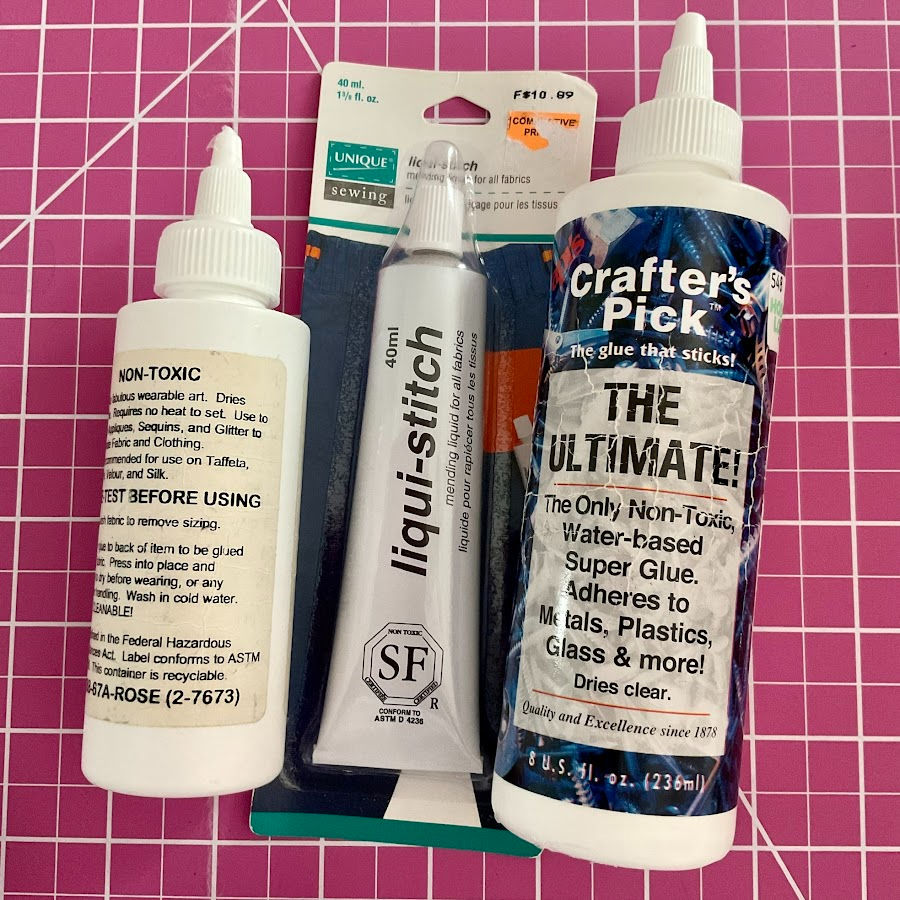
Fabric glue can be a real time-saver, especially when you need to hold something in place temporarily or avoid extra stitching. It’s used for hems, appliqué, trims, and many craft projects before sewing. Instead of pinning or basting, just apply a small amount of glue and let it hold the fabric steady while you sew.
There are different types of fabric glue available – some are washable, others are heat-set or designed for no-sew projects. The key is choosing the right kind for your fabric and the job you’re doing.
If you’re curious about which fabric glues are best, I’ve put together a detailed guide here:
The Best Fabric Glue Options For All Your Sewing Projects
Use Patterns That Include Seam Allowances
One easy way to save time during both cutting and sewing is to choose patterns that already have seam allowances included. This eliminates the need to measure and add seam allowances manually to every edge before cutting. That step can be tedious and time-consuming – especially when working with detailed garments or curved pieces.
When seam allowances are built in, you can cut the fabric exactly as shown on the pattern and start sewing right away, following the standard seam width noted in the instructions.
Most commercial patterns come with seam allowances included, but some indie or European patterns do not – so always check before printing or cutting. When you stick to patterns with seam allowances already added, you streamline the entire prep process and can get to the fun part – sewing – a lot faster.
Pre-Fold and Press Binding Strips, Waistbands, Neckbands, and Cuffs Before Sewing
If your project includes a binding, waistband, neckband, or sleeve cuff, take a moment to fold and press it into shape before attaching it to the garment.
When the band is already folded evenly, it’s easier to line it up with the garment edge and sew it accurately. Pressing also helps the fabric “remember” the shape. It’s easier to stretch evenly, match notches, and avoid twisting or stretching one side more than the other.
You don’t have to stop mid-seam to adjust folds or wonder if both sides are matching. Pre-folding also helps control stretch – especially with knit neckbands – and gives you a neater, more balanced finish.
Use Corner Templates for Sharp, Consistent Corners

Getting perfect corners – on collars, cuffs, pockets, or plackets – can be tricky, especially if you’re eyeballing the turn or guessing the angle. Instead, keep a corner template made from cardstock at your sewing table.
This template can be as simple as a square or rounded corner cut to your preferred dimensions. When it’s time to sew, place the template on your fabric and stitch around it, using it as a guide for clean, even turns. It helps you hit the same angle every time – without needing to mark each corner individually.
After stitching, you turn the corner right side out, and it already has the shape you were aiming for. This shortcut eliminates uneven points, crooked seams, and time spent correcting one side to match the other. It’s especially helpful for repeat projects, where having matching corners really matters.
———————
I could keep writing – and writing – about sewing shortcuts, because I’ve tried and used so many over the years. But this post is already long enough, so I’ll stop here for now. I hope you’ve found a few new ideas to try in your own sewing space – and if you have a favorite shortcut that works for you, I’d love to hear about it!
Did you find this tutorial helpful? If so, save this pin (see below) on your sewing board so you can come to this tutorial later when you need this information, and follow me on Pinterest for more tips, tutorials, and inspiration!
latest posts
- What Do You Call a Person Who Sews? I Asked My Readers and Got 1,408 Opinions
- DIY Round Purse: PDF Sewing Pattern and Detailed Instructions
- Mini Wonder Clips By Clover: Useful Sewing Tool Or Just Another Notion?
- Non-Slip Grips For Quilting Rulers: A Small Notion With A Useful Job
- Fabric Eraser for Sewing: What It Removes and When to Use It
- What Is The Best Thread For Sewing Machine Projects? Let’s Find Out!
- Butterfly Quilt Block Tutorial – Foundation Paper Piecing
- How To Sew Quilt Squares So The Corners Match
- Sewing With Fork Pins: How They Help With Pattern Matching, Slippery Fabric, And Seams