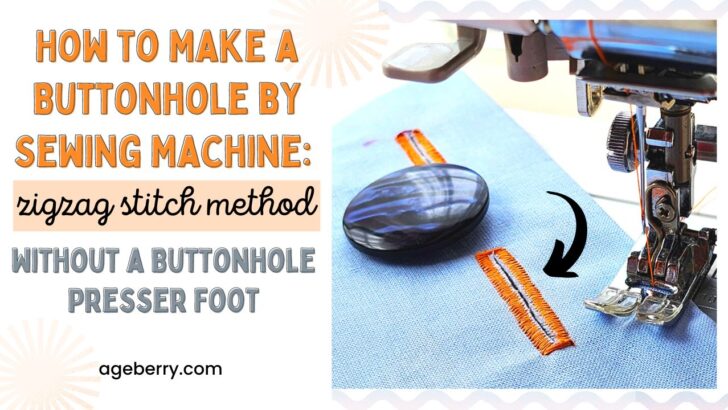
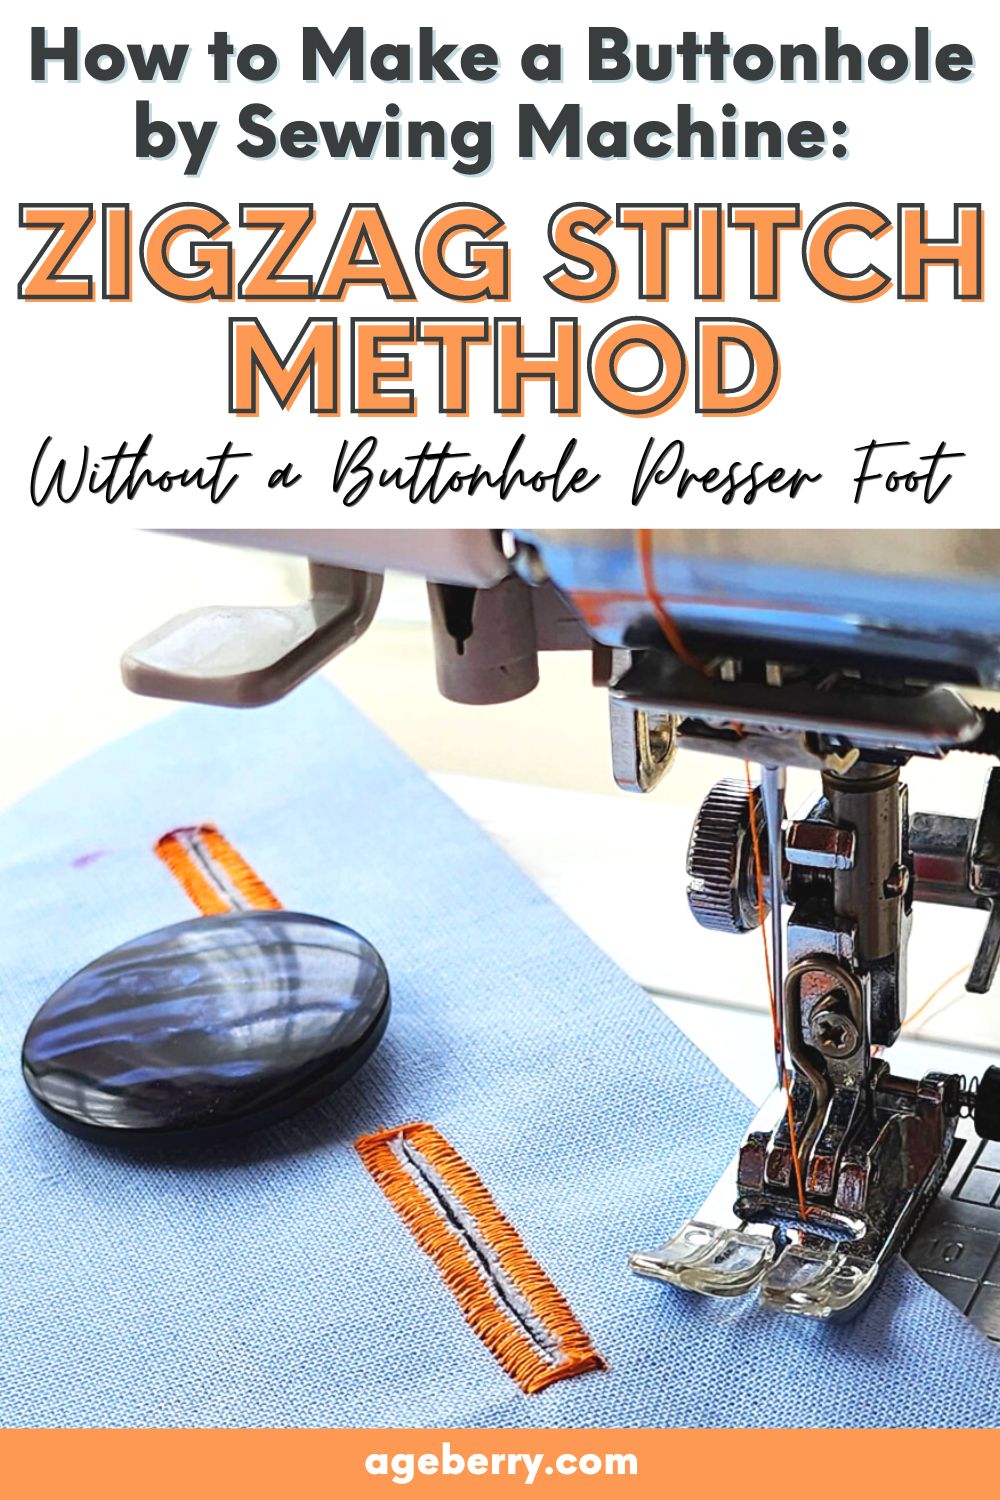
How to Make a Buttonhole with a Zigzag Stitch without a Buttonhole Foot
If you have ever sewn a garment, you probably needed to make a buttonhole. Making a buttonhole is in fact one of the first “specialized” things I learned when I started to sew. Of course at that time I did not have a sewing machine with a buttonhole attachment. My first machine didn’t even stitch a zigzag. So in the beginning I had to do all the buttonholes by hand.
But as soon as I got a machine that could do zigzag, making a buttonhole became much easier. This article will show how to make a buttonhole using only the zigzag stitch on your sewing machine, without any buttonhole foot. You may ask a very legitimate question: why bother with the zigzag, if we now have the buttonhole foot for (almost) every sewing machine? There are multiple reasons why you need to know this:
- Your machine might not have the foot.
- You lost it and you need the buttonhole NOW (happened to me 🙂)
- The button is too large for the foot. This happens very often with large or weirdly shaped buttons, like coat buttons.
- For some reason, the scrap test buttonhole just does not come out right with the foot.
I did not even realize I missed this until I have received the following question from one of the readers:
“Hi Olga: The buttons I’m using are larger than the buttonhole attachment for my sewing machine. Do you have a tutorial on how to use the zigzag stitch to make buttonholes?”
Did this bring back a bunch of memories! Yes, you can make a buttonhole using the zigzag stitch on your machine, and that is exactly what I did long ago, before the buttonhole foot was common. Not having done this for a long, long time I did not think about writing an article. This article will attempt to fix this omission.
I have published previously articles about buttonholes, like Buttonhole Presser Foot 101: What it’s And How To Use A Buttonhole Foot, Sewing Machine Buttonhole Troubleshooting, How to sew a buttonhole by hand. I think this article will fit well in this series and perhaps will come in handy if the necessity presents itself.
So, how do we use the zigzag function of our sewing machine to make custom buttonholes, without using the buttonhole foot?
Note: Some of the links on this page are affiliate links. This means I will receive a commission if you order a product through one of my links. I only recommend products I believe in and use myself.
Materials and Tools Required For Making Buttonholes Without A Buttonhole Attachment
Buttons
Before starting any buttonhole you must know exactly the buttons you are going to use. Do not think that “I will find appropriate buttons after, I will just make the buttonhole about that large”. Find the buttons first, see how they match the fabric (arrange them in a row on the fabric). You won’t be sorry.
Sewing Machine
The only feature you need on the sewing machine is the zigzag stitch. You will need a relatively small size stitch, 2-3 mm in width and about 0.4mm in length. This should not be a problem, most modern machines can do this. Part of the procedure will be to find the best settings for your buttonhole.
Here is a list of sewing machines that are available now and I think you should consider if you are in the market for one. Remember, when you buy a sewing machine, especially a high end, expensive one, always think about where you will service it, so consider local sewing machine dealers.
Thread
The thread color should match or complement the color(s) of your fabric. Some buttonholes will never be used, or may be seldom used, like the topmost buttonhole on a jacket or shirt. You have to think the buttonhole must look good both with, and without a button so thread color is very important.
Sometimes I like to use a slightly darker shade, it works well to hide the thread. I know it’s a paradox, but if you have a light green fabric, for example, and a light green thread, even if the exact same shade, the thread is more visible than if you use a slightly darker shade. Not a different color, just a slightly darker shade.
It’s essential to use a type of thread that is strong enough to withstand regular use. Polyester all-purpose thread is a suitable option for most fabrics. But I like to use 100% cotton machine embroidery thread for buttonholes on lightweight and medium weight fabrics.
I like and use New Brothread Multi-Purpose 100% Mercerized Cotton Threads; it’s not expensive but even if it was, it would be worth it. Their threads seem higher quality than others, smooth and soft and at the same time durable. They sell them in sets of various shades so you can probably find a set that you like. Even if you use them on an embroidery machine at high speed, they won’t break or fray, and I say that from experience.
 Each Spool for Quilting, Serger, Sewing and Embroidery - 16 Pastel Colors")
 Each Spool for Quilting, Serger, Sewing and Embroidery - 24 Basic Colors")
 Each Spool for Quilting, Serger, Sewing and Embroidery - 16 Variegated Colors")
I suggest winding the bobbin with the same kind of thread used for the top. Do not use a different thread for the bobbin.
✅ Related tutorial: How to thread a bobbin
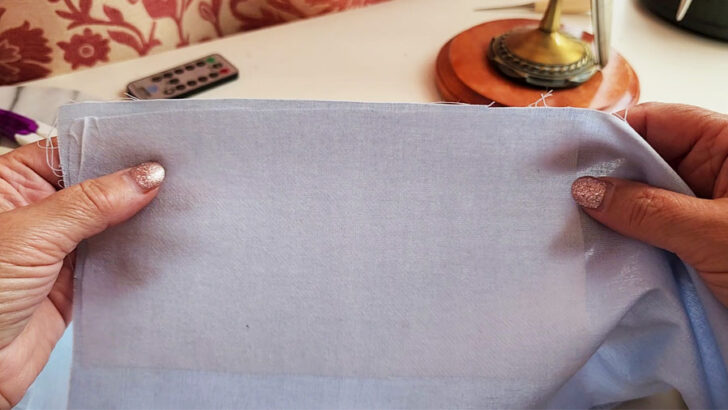
Interfacing
Using fusible interfacing (find it here at Amazon) will stabilize and strengthen the buttonhole area. This is particularly important for lightweight delicate fabrics. The stitch for the buttonhole is a very dense zigzag and may break the fabric. In fact, this is true even if you use a buttonhole foot.
✅ Related tutorial: How To Use Fusible Interfacing (Video + Tips And Tricks)

Iron-On Fusible Interfacing Medium Weight
Scissors
A pair of sharp scissors will be necessary for cutting the buttonhole opening after sewing. I like to use my duckbill scissors. Some people like to use a specialized buttonhole cutter or a seam ripper for cutting the buttonholes. This is in fact a VERY important step because careless cutting may destroy the stitches. Be very, very careful when cutting.
✅ Related tutorial: Duckbill Scissors: What They Are And How To Use Them
Marking Tools
Before stitching, you will need to mark the position of the buttonhole using some kind of marker. I like to use a marking pen with a slightly thicker tip. There are different sizes of tips available, I recommend a pen with a tip width of about 1 mm. Avoid using markers with very thin tips for marking buttonholes. Such markers will make it difficult to sew buttonholes correctly because you will need space between stitches when cutting the buttonhole open.
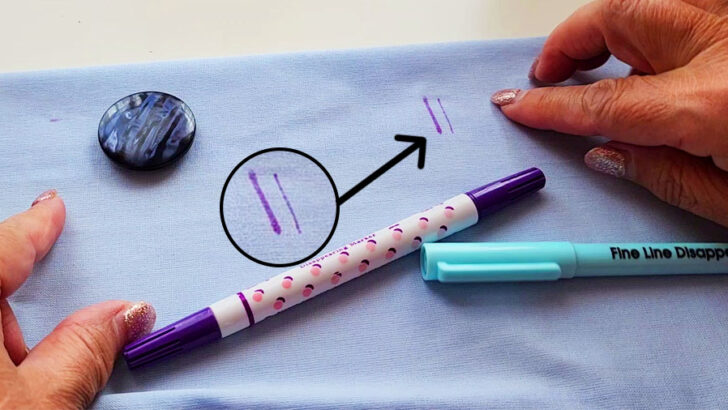
Also, consider the type of fabric you are using. Some markers are not suitable for use on certain fabrics, such as silk or velvet. Choose a marker that is compatible with the fabric you are working with. You don’t want the marks to be seen after the buttonhole is finished.
✅ Related tutorial: Your Guide For Choosing The Best Quilt Marking Pens For Every Project
Preparation Steps For Making Buttonholes With A Zigzag Stitch
Fusing interfacing
Apply fusible interfacing to the wrong side of the fabric where the buttonhole will be placed. I think this is self explanatory, if you need more details, please refer to the article I mentioned before.
Marking the Buttonhole
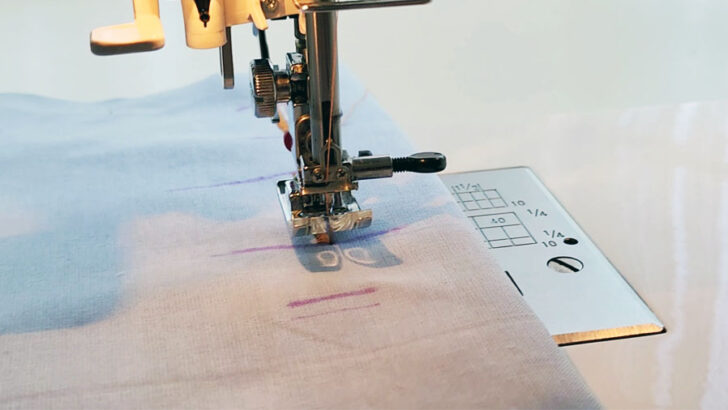
Before actually sewing a buttonhole with a zigzag stitch, you need to carefully measure and mark the buttonhole on the fabric. Determine the placement of the buttonholes. You need to determine how far from the edge of the fabric and how big should the buttonholes be (length).
Obviously, the placement of the buttonholes depends on the type of garment, the pattern, the fabric, the size of the button, the intended use of the garment, etc. I do not believe there is a general rule for buttonhole placement. The only rule I see is that the final product must look good 🙂.
If you are using a commercial pattern, you can usually find buttonhole markings printed directly on the pattern. These markings will be labeled as small circles or lines and may be accompanied by a number. They will typically correspond to the size of the button being used.
If you are creating a custom pattern, you will need to add buttonhole markings manually. One common method is to lay the pattern flat and mark the center front line. Place the highest and lowest buttons on the pattern. Then measure the distance between them. Divide this distance by the number of buttons to be used minus one, and the resulting measurement is the distance between each button and buttonhole. Always place buttonholes at equal intervals.
What is the distance from the edge of the fabric to the buttonhole? As I said, no fixed rule. Generally, the buttonhole should be placed about 1/2 to 3/4 inch from the edge of the fabric. However, this distance may vary depending on the thickness and stability of the fabric and on the size of the buttonhole. For thin or delicate fabrics, where buttons are generally small, the buttonhole might be placed closer to the edge.
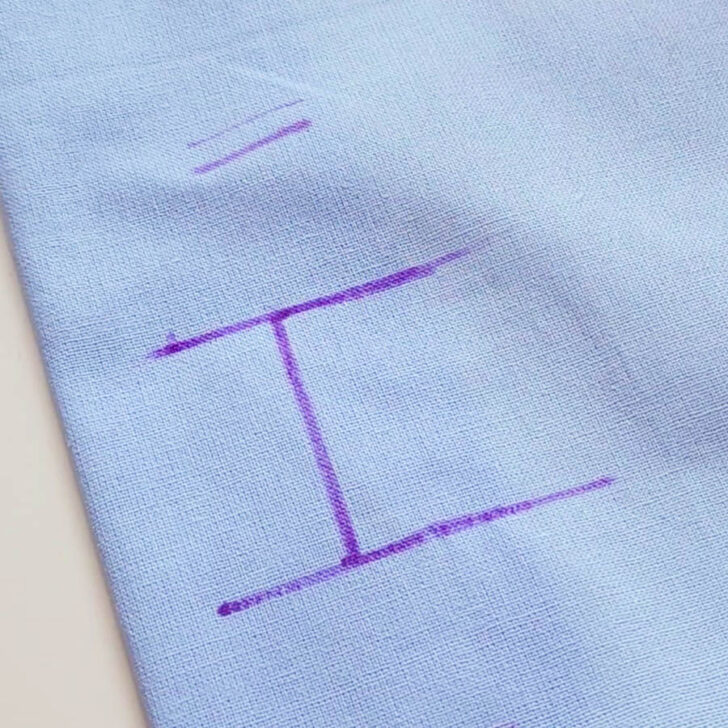
Once you determine where you want the buttonhole, mark the ends of the buttonhole at a distance slightly larger than the button diameter. Use a ruler to measure the diameter of the button, then add a small allowance (around 1/8 inch, or 3mm) for the buttonhole opening. Add half of this at each end.
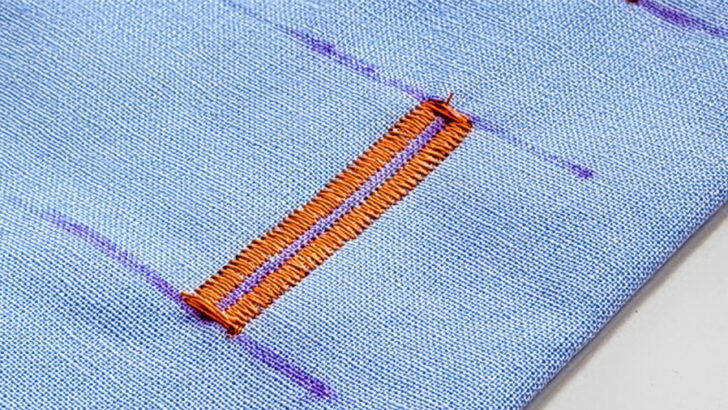
Then draw a line exactly where the buttonhole opening will be marking the center of the buttonhole. This line will be about 1mm thick (remember the marker we used?) and we will stitch in the next step left and right of this line, leaving the line between the stitches.
Important: Make sure the lines are straight.
Setting the Stitch
Next, set the sewing machine to a zigzag stitch. Adjust the width and length of the stitch according to the buttonhole size and fabric type.
For most buttonholes, a stitch width of 2 to 3 mm and a stitch length of 0.4 mm works well. This translates into a setting of 2 or 3 for the stitch width on the sewing machine. Thicker fabrics might require wider stitches, while finer fabrics might need narrower stitches. It’s a good idea to test different stitch settings on a scrap piece of fabric first.
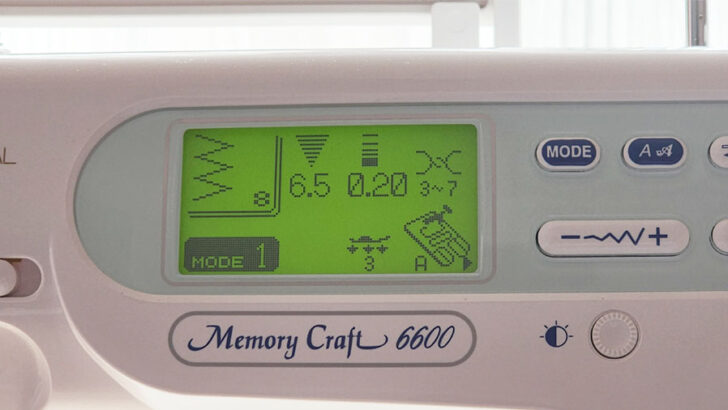
For the stitch length some machines (like my Janome 6600) have the length selectable in 0.1 mm increments and they use a screen to show this. Some machines have a fixed range of widths, for example the well reviewed Singer 4011 mechanical machine has 0.5 mm as the smallest zigzag length. Read the manual for your machine for specifics.
✅ Related tutorial: Best Mechanical Sewing Machine For Your Needs In 2023
In my case, the sewing machine settings I use are these – zigzag width 3 (3mm), length 0.4 (0.4mm).
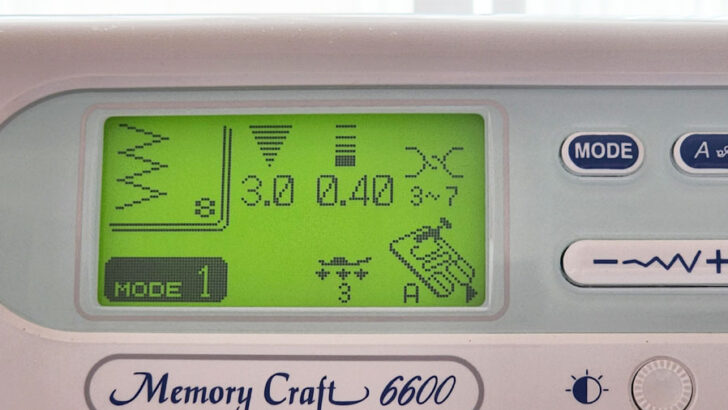
I tried a different zigzag length (0.6) first but that was not satisfactory so I reduced it to 0.4mm.
I also needed to adjust the tension for the zigzag. Given that the stitch is quite dense, the upper thread tension I had used before to sew something else (setting 2 on my machine) was too low so I ended up with a setting of 3. This was done by trial and error, I tried setting 4 but that was too high. Obviously, the actual setting on your machine might be different, it will depend on the machine, the material, the thread. Play with it until you are satisfied but have in mind that a slightly looser top thread tension will make your stitching nicer.
✅ Related tutorial: Sewing Machine Tension Adjustment
Keep in mind that some fabrics, such as thicker or stretchy materials, may require additional considerations when creating buttonholes.
Sewing the Buttonhole
Make sure to follow each step carefully and don’t forget to practice the technique on a scrap piece of fabric before attempting it on the final project.
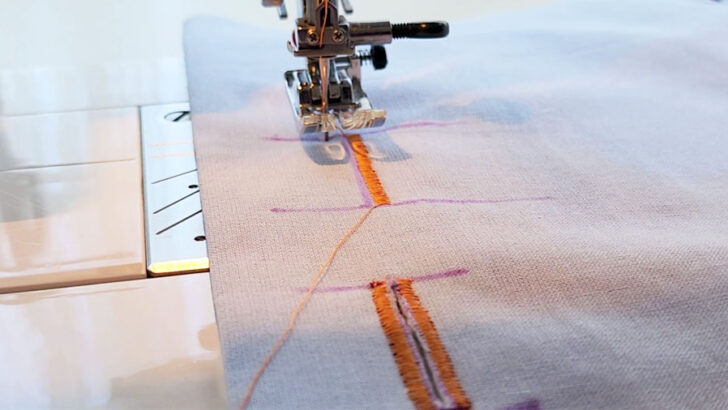
We have now reached the point where we can actually sew the side zigzag stitches for the buttonhole.
I am starting with the stitch to the left of the center line I drew before. This is a personal preference, you can equally well start on the other side.
I am starting with the needle in the rightmost position, close to the line. Sew slowly guiding the fabric under the needle in a straight line.
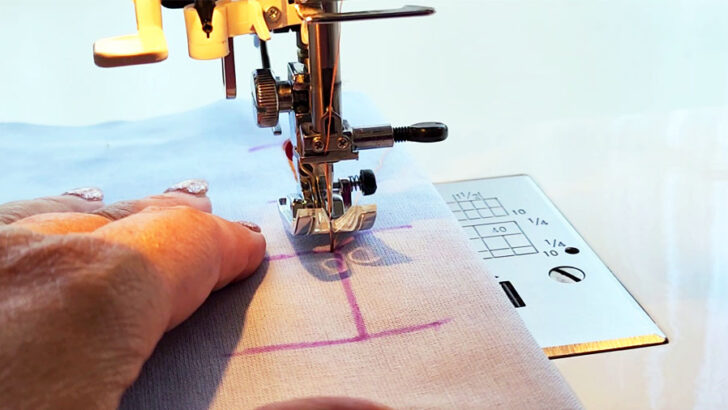
I sew until the marked end line making sure the center line I marked is visible all the time and is not covered by the zigzag stitches.
When I reach the end, I leave the needle down on the right, raise the foot, turn the fabric around, lift the needle and carefully reposition the fabric (move a little to the right) so the new seam will again be on the left of the center buttonhole line I marked. Then I lower the foot and stitch, again making sure I keep the marked line outside of the stitches.
Continue sewing until you reach the starting point of the buttonhole, raise the needle and cut the thread.
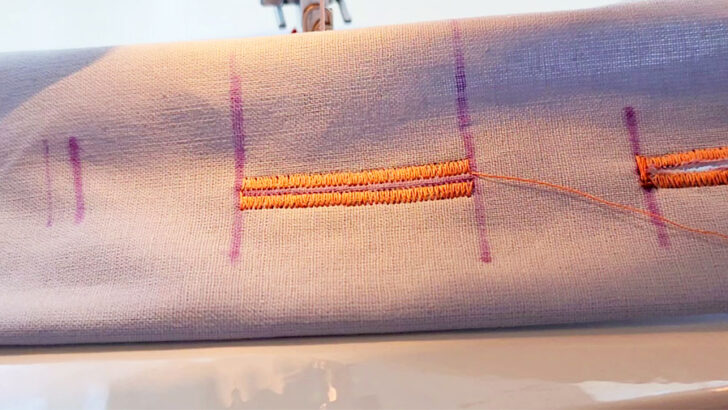
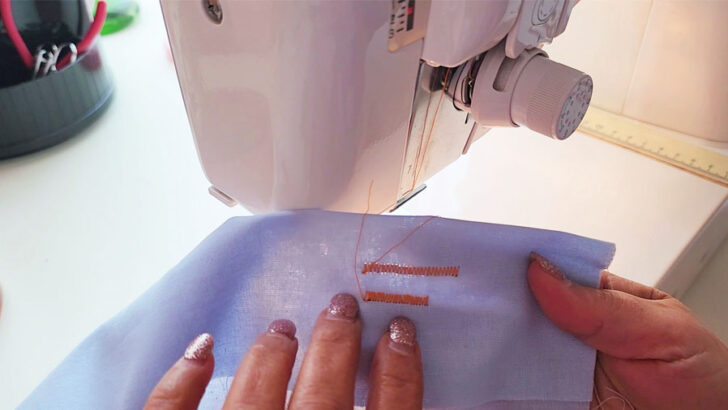
After sewing the zigzag stitches on both sides of the buttonhole, it’s time to make the top and bottom bar tacks. These are essential for ensuring that the buttonhole will not fray and will appear neat and professional.
To secure the ends of the buttonhole with the top and bottom bar tacks, set your sewing machine to a wider zigzag stitch and adjust the stitch length to a shorter setting.
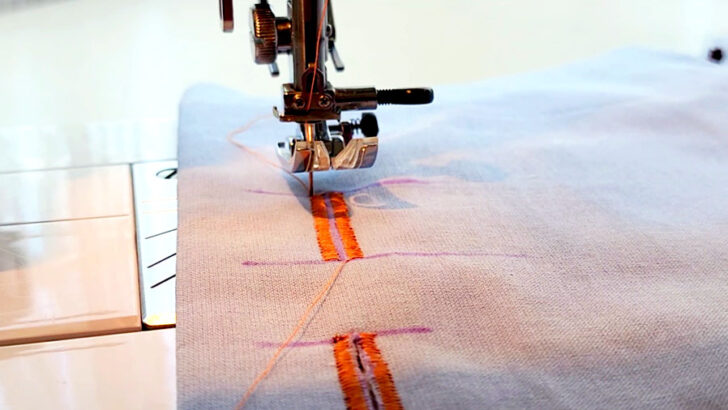
The securing stitches should cover both sides of the buttonhole, so I will set the zigzag stitch width to 3mm+3mm+0.5mm (the width of the left and right stitches, plus a little in between for the buttonhole opening) and I sew a couple of stitches at each end of the buttonhole. This secures (and finishes) the buttonhole. We want the securing stitches to be almost in place, so I will set the zigzag length to the smallest value my machine allows, which is 0.2mm. Your machine might be different but I find that a length of 0.2 is good.
I suggest five to seven securing stitches. Make them at a very low speed. You can even move the needle manually if necessary if your machine does not allow very slow speed.
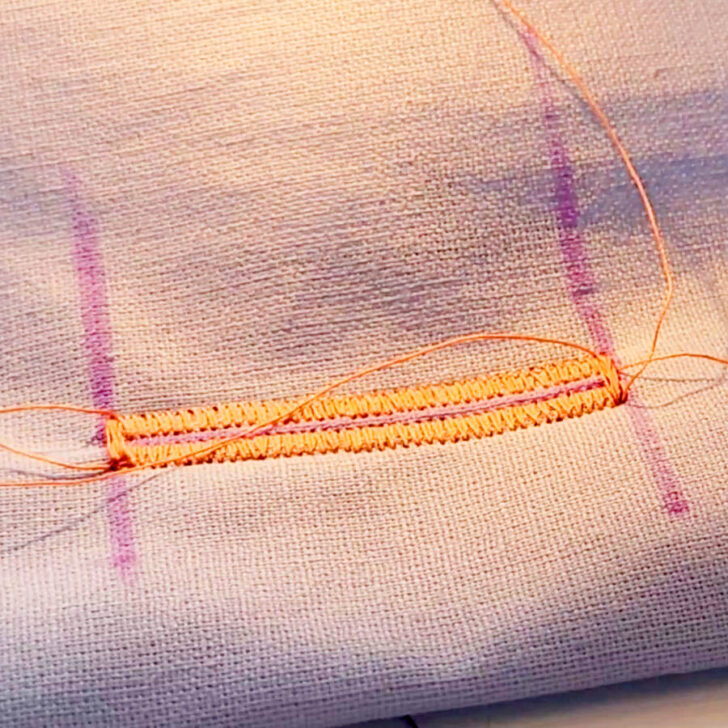
My sewing machine settings for the secure stitches: width 6.5mm, length 0.2mm.
Opening the Buttonhole
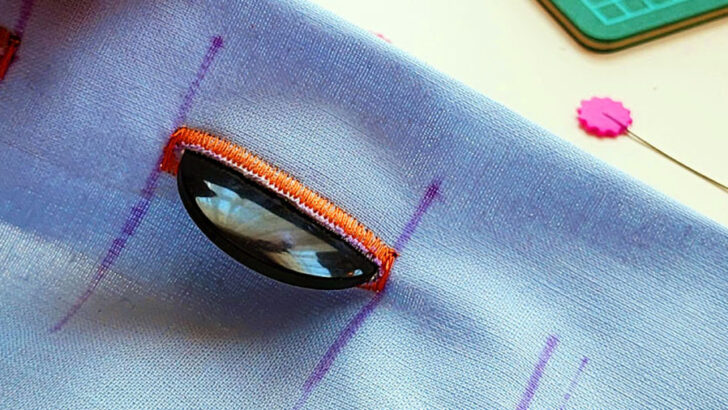
Once finished stitching, the next step is to open the buttonhole (cut the fabric between the stitches). This process requires precision and care to prevent damage to the stitches and fabric.
Before opening the buttonhole, place a pin at each end of the buttonhole to prevent accidental cutting beyond the stitches. This will act as a safeguard against ruining your work. The pin should be in a place before the stitches so in case your hand slips it will act as a stopper for the scissors or cutter or whatever you use to open the buttonhole.
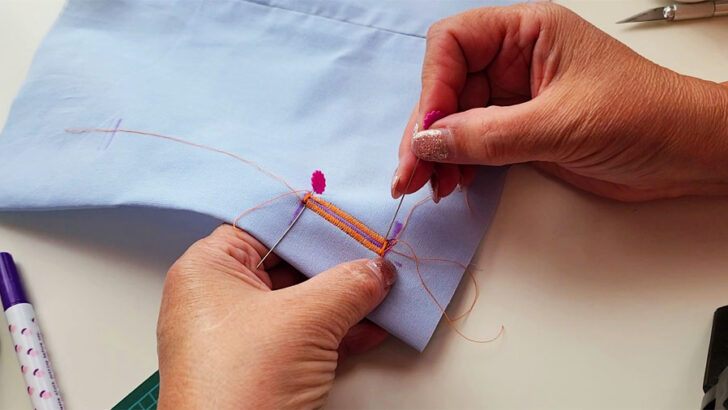
Next, choose a sharp pair of small scissors, utility knife or a craft knife for the task. Or even a sharp seam ripper. Carefully insert the pointed end of the knife or the tip of the scissors in the center of the buttonhole between the stitches you have just sewn. Gently push the knife or scissors through the fabric, cutting along the center of the buttonhole until you reach the ends. The pins you placed earlier will stop you from cutting beyond the stitched areas.
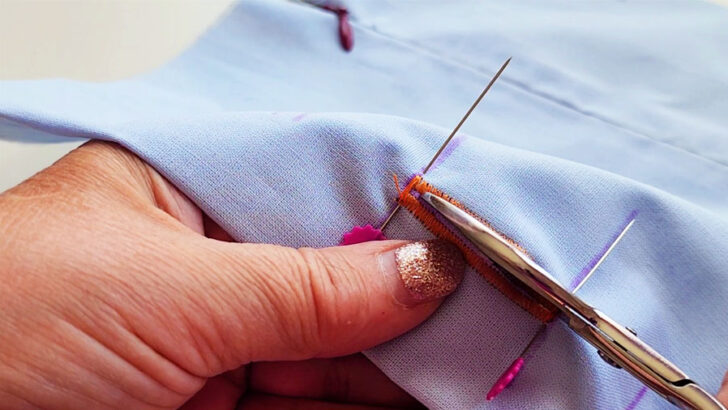
Ensure you do not accidentally cut through the zigzag stitches or the bar tacks while doing this.
After opening the buttonhole, inspect the stitches and fabric for fraying. If necessary, cut frayed threads from the material.
When done correctly, your buttonhole will be well-formed, functional, and sturdy.
Troubleshooting and Tips
Before starting to work on your project, practice on scrap fabric to familiarize yourself with the process. This is not specific to buttonholes, it’s general good advice for any operation. Test before you actually do it.
If your fabric is slippery and flimsy you can secure the layers with pins to prevent shifting while sewing .
While sewing it’s essential to move at a slow and steady pace, paying close attention to the stitches and alignment. Speed in this case is not your friend.
If you encounter problems with the sewing machine or the quality of the buttonhole, consider the following troubleshooting tips:
- Ensure that the sewing machine’s tension settings are appropriate for the fabric being used. Too much or too little tension can cause puckering or loose stitches.
- Check that the bobbin is properly threaded and has no knots or tangles. This can help prevent skipped stitches and maintain even tension throughout the buttonhole.
- Use fusible interfacing for the fabric to provide extra support, reducing the likelihood of puckering or distortion in the buttonhole stitches.
What if you accidentally cut the stitches while opening the buttonhole? Don’t despair. Get a needle and fix the problem manually. Removing the stitches at this point is not an option, but fixing it manually will definitely resolve the problem.
What do you think? Do you believe you will be able to make a buttonhole without using the specialized foot? Well, I have a secret I want to share with you: there is only one way to find out. Try it out!
Did you find this tutorial helpful? If so, save this pin (see below) on your sewing board so you can come to the article later when you need this information on how to make buttonholes with a zigzag stitch without a buttonhole attachment , and follow me on Pinterest for more tips, tutorials, and inspiration.
latest posts
- Butterfly Quilt Block Tutorial – Foundation Paper Piecing
- How To Sew Quilt Squares So The Corners Match
- Sewing With Fork Pins: How They Help With Pattern Matching, Slippery Fabric, And Seams
- How Much Fabric Do I Need? 21 Helpful Tips For Calculating Fabric Yardage
- Easy Simple Sewing Project: Fabric Jar Opener
- DIY Oven Mitts: Step-by-Step Sewing Tutorial
- Easy DIY Potholder: New Design
- Tailor’s Clapper: What It Does, Why It Works, And How To Use It Right
- Heat Resistant Batting for Sewing: What It Is, How It Works, and What Makes a Difference