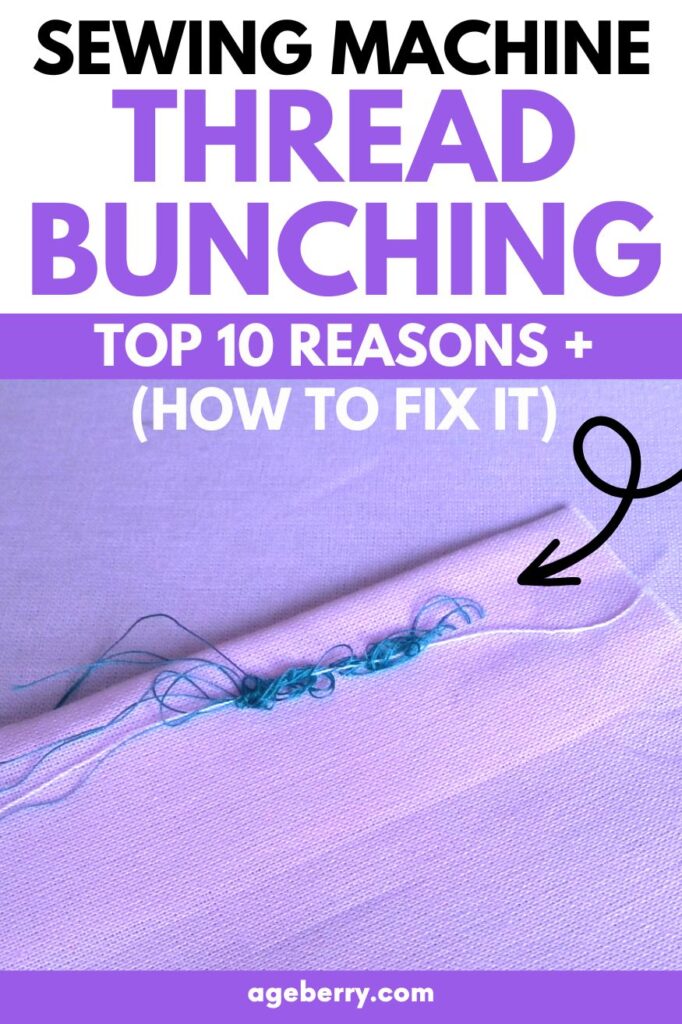
Sewing machine thread bunching: Top 10 reasons (+ How to fix it)
Here are 10+ common problems that cause your sewing machine thread to bunch up under the fabric, plus their solutions so you can figure out and solve the issue.
Spending the afternoon in a sewing groove is a great way to spend the day—until you discover that your thread is gathering into a tangled mess under your fabric, that is.

Thread bunching is a common (and maddening) problem for sewists. Although beginners have to deal with this issue more frequently, it can also strike experienced sewists. I’ll be honest, it’s happened to me more times than I’d like to admit!
Thankfully, if you know what to do, you can typically fix this problem without needing the help of a service professional.
Let’s troubleshoot how to untangle the problem.
What is Sewing Machine Thread Bunching?
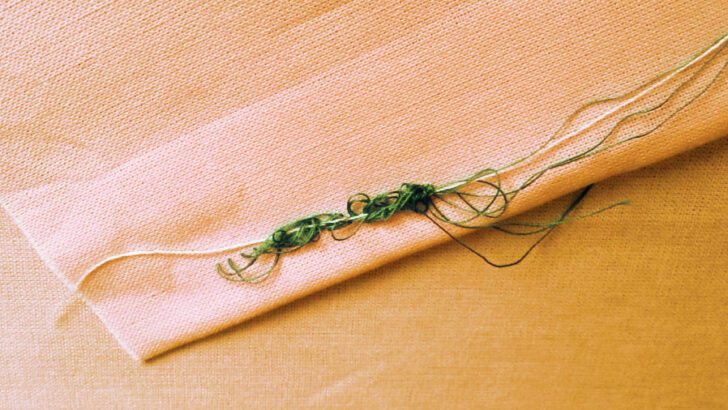
That crazy-looking tangle of thread under your fabric is thread bunching (or thread jamming). You’ll also frequently hear the issue referred to as “birdnesting” because the tangled thread resembles a bird’s nest.
But no matter what you call it, thread bunching on the bottom of your material means there’s a problem you need to address.
This problem is often seen in the form of small knots or loops of thread appearing on the underside of the fabric. These loops are unsightly, weaken the seam, and can cause the fabric to pucker.
Thread jamming is one of the most common sewing machine problems and frustrations for sewists, especially beginners. So if you ask yourself, “why does my sewing machine keep bunching the thread?” you’re not alone!
Many sewists find this to be a significant annoyance; it also puts a damper on the creative process and sucks the fun out of sewing if it happens regularly! Not only do you have to untangle the thread, but you also have to figure out what’s causing the problem and fix it. All of that takes time before you can get back to sewing.
If you’re experiencing thread bunching and starting to lose your cool, stop sewing, pause, and take a deep breath. Yep, it’s frustrating, but there’s usually a fix that you can do yourself.
Why is the thread bunching under the fabric? Similar to sewing machine thread that keeps breaking, this problem can have many potential causes.
Many sewists will say it’s a tension problem, and it often is. However, several other reasons can be the culprit, including incorrect threading, broken or wrong needle size, bobbin problems, and more. Thus, this problem can be time-consuming to fix because sometimes it requires some trial and error until you get it right.
Let’s cover the most common reasons why your thread keeps jamming in the sewing machine and how to solve them.
#1. Your Top Thread Is Threaded Wrong
Many sewing problems start and end with improper threading because it impacts your thread tension. Threading your machine properly is necessary to create even stitches as you sew, which is the overall goal and way to prevent birdnesting.
Unfortunately, threading issues can happen to any sewist. So, don’t assume that because you’re an experienced sewist, you’re exempt from incorrectly threading your machine.
If you’re encountering this problem and wondering, “why does my thread keep bunching?” the first item on your troubleshooting list is rethreading both the upper and lower threads. You’d be amazed at how many sewing machine issues are resolved simply by rethreading the machine.
Solution: If the thread bunching happens on the bottom of the material, it’s a top thread problem. Rethread the upper thread (and don’t forget to raise the presser foot while you do it so that the thread can slip down between the tension disks). If that still doesn’t solve the problem, move on to suggestion #2.
✅ Related tutorial: How to thread a needle on a sewing machine
#2. Your Thread Tension Is Wrong
Thread tension is the balance between the upper and lower stitches (so they interlock correctly and look the same on the top and bottom of the material). Make sure you’re using the same weight thread for both your top thread and your bobbin, or the tension will be uneven, and you’ll get thread bunching under your fabric.
Upper thread tension that’s too loose (or bobbin tension that’s too tight) will cause birdnesting on the bottom of the material because the thread falls to the bottom and isn’t pulled tightly enough to interlock the threads together correctly.
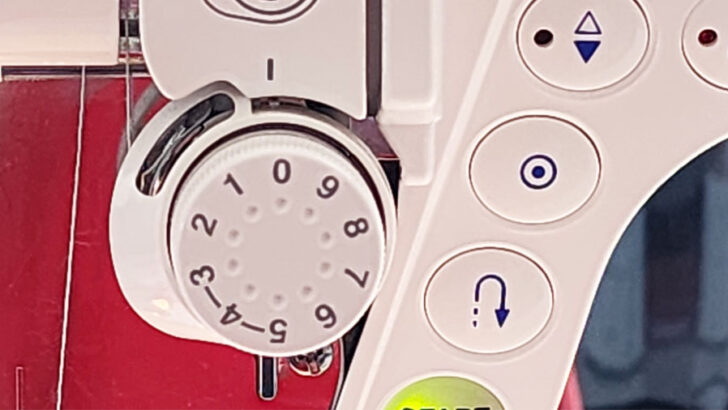
On the other hand, if the upper tension is too tight, the opposite can happen, and the bobbin thread (on top of the material) can bunch up.
There are a few factors that can throw your tension out of balance:
- Using different thread weights for the top and bobbin
- Changing from one fabric weight to another
- Using a different size or type of needle
Solution: Try adjusting your upper tension dial to even out the tension. Most machines have factory-set bobbin tension, and manufacturers recommend leaving that alone.
✅ Related tutorial: Sewing machine tension guide: everything you need to know about the bobbin tension
If that adjustment doesn’t work (for example, the thread wasn’t threaded in between the tension disks), try rethreading your machine, following the correct path for your sewing machine.
And if you still can’t get the tension where you need it to be, you can try changing the upper thread to a heavier-weight thread to increase tension.
Make sure to test your tension by sewing a few stitches on a piece of scrap fabric before going back to your project.
Note: The manufacturer-set bobbin tension can loosen over time with regular sewing. If you try all these suggestions and still can’t get your tension setting correct, you may need to have a professional adjust your bobbin tension.
#3. There’s A Problem With Your Needle
The needle is essential to the quality of your stitches. It should be straight, smooth, and sharp in order to produce professional-looking stitches. Needles can dull, bend, break, or become damaged (develop burrs) with use, which can cause the thread to pull unevenly and lead to bunched-up stitches.
✅ Related tutorial: 19 Types of Sewing Machine Needles and What They’re Used For
Additionally, your needle needs to be the correct size and shape for your fabric and thread. For example, a needle that’s too small for your fabric can lead to skipped stitches and thread bunching.
✅ Related tutorial: Sewing Machine Needle Sizes Explained
Solution: Inspect your needle to ensure it’s not bent, damaged, or broken. Always use high-quality needles, check them frequently, and replace them often. If you notice your needle becoming dull, replace it as soon as you see it to prevent damaging your fabric and thread bunching.
Also, ensure that your needle is properly threaded and consult your user manual (if needed) to make sure you’re using the correct needle and thread for the material you are sewing.
Check any adjustments you make to your needle and thread by sewing a test piece to get your settings correct before moving back to your project.
✅ Related tutorial: Sewing thread types and uses
#4. You Have Lint In The Bobbin Area
Over time, tiny pieces of dust and thread bits collect under the needle plate as you sew. If not cleaned out regularly, this lint build-up can prevent your thread from feeding as it should or your needle from forming stitches properly.
As a result, you can end up dealing with thread that keeps jamming in the bobbin area and thread breaks.
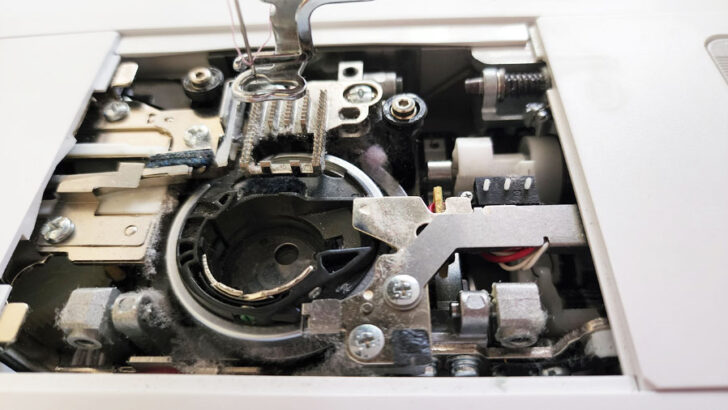
Solution: Frequently dust underneath your sewing machine throat plate to remove dust, dirt, lint, and debris. Make sure to pull the bobbin out and clean the bobbin case thoroughly on a regular basis.
✅ Related tutorial: Choosing a Mini Vacuum for Sewing Machine
#5. Your Bobbin Is Not Inserted Correctly
If you have rethreaded your machine, adjusted tension settings, and checked your needle but are still dealing with maddening birdnesting, it’s time to check your bobbin underneath the throat plate.
If it’s inserted backward or dislodged while you are sewing, the bobbin thread won’t feed through the machine correctly as it sews, causing it to bunch.
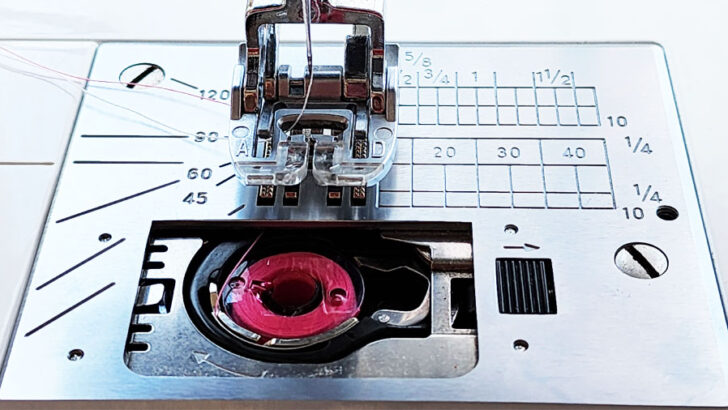
Solution: Remove everything from the bobbin area, inspect the bobbin for damage, and clean out any lint. As you replace everything, make sure to insert the bobbin case correctly and thread your thread.
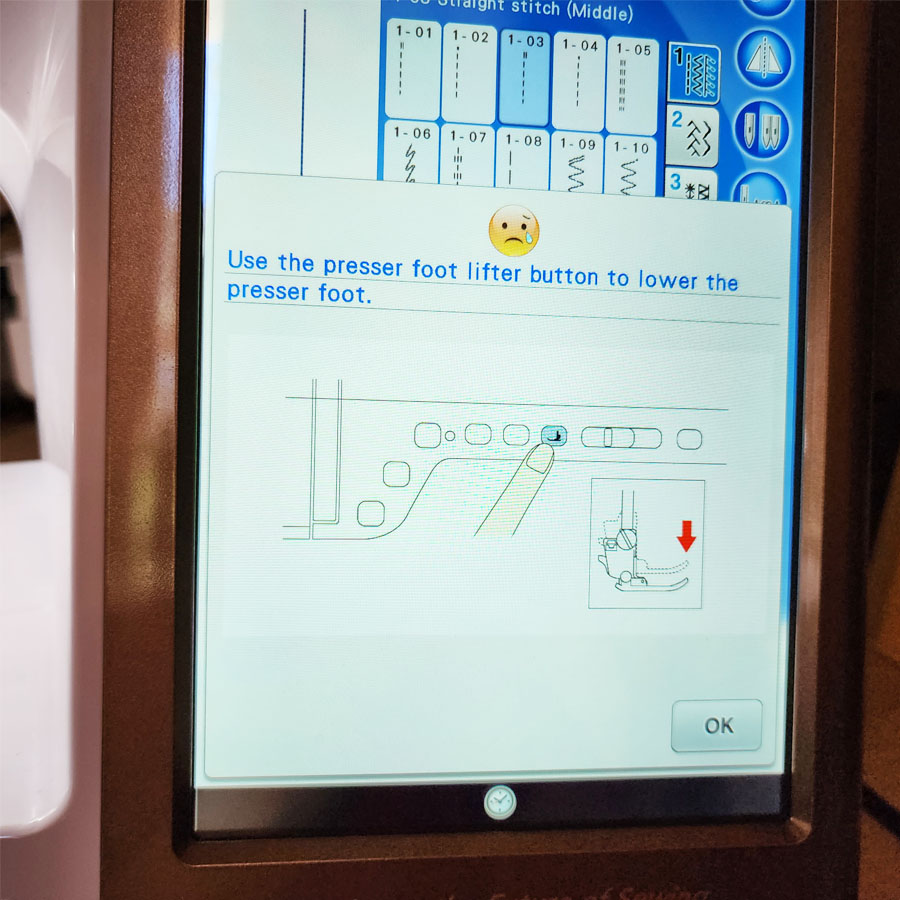
#6. You Forgot To Put The Presser Foot Back Down
We’ve all done it! You lift the presser foot to rethread your machine or remove your project from the machine but forget to put it back down when you start sewing again.
A raised presser foot means there’s no pressure in the upper thread because the tension disks are wide open. Since there’s no tension, the upper thread gets pulled underneath the fabric, and you get to deal with untangling a thread bunching problem.

Solution: Check your presser foot and lower it each time you start stitching. Sew a test piece to make sure all your other settings (ex: tension) are correct. This test can be especially helpful if you recently changed your thread type, needle, or material thickness.
Note: Many computerized sewing machines have a helpful feature that won’t allow you to sew if the presser foot is raised. So if you’re in the market for a new sewing machine and want that feature, it’s a question worth asking as you shop!
#7. Your Thread Tails Are Too Short
If you start sewing with thread tails shorter than 2-3 inches, the machine can suck them down underneath the throat plate as you sew and create thread bunching under the fabric. This is especially easy to do if you use the thread cutter tool on your machine.
Solution: Always have thread tails at least 3-4 inches long when you start to sew. If they’re shorter than that, simply (and gently) pull the tails until they are that length before adding your material to the machine.
Also, right before you start sewing, brush your tails backward out of the machine and away from your immediate sewing space so they are out of the way and less likely to cause any problems.
#8. Your Feed Dogs Are In The Lowered Position
Your feed dogs are the little teeth that stick up from the throat plate under the presser foot. They have the important job of pulling the fabric through at the correct pace while you sew.
Some machines make it possible for you to lower your feed dogs to sew delicate fabric or sew freehand. However, if you forget to raise them and they aren’t up when you start sewing, they can’t feed your material through the machine, which will cause your stitches to form in one spot and jam up.
Solution: This is a simple and easy solution! Check the position of your feed dogs and raise them back up if they are lowered.
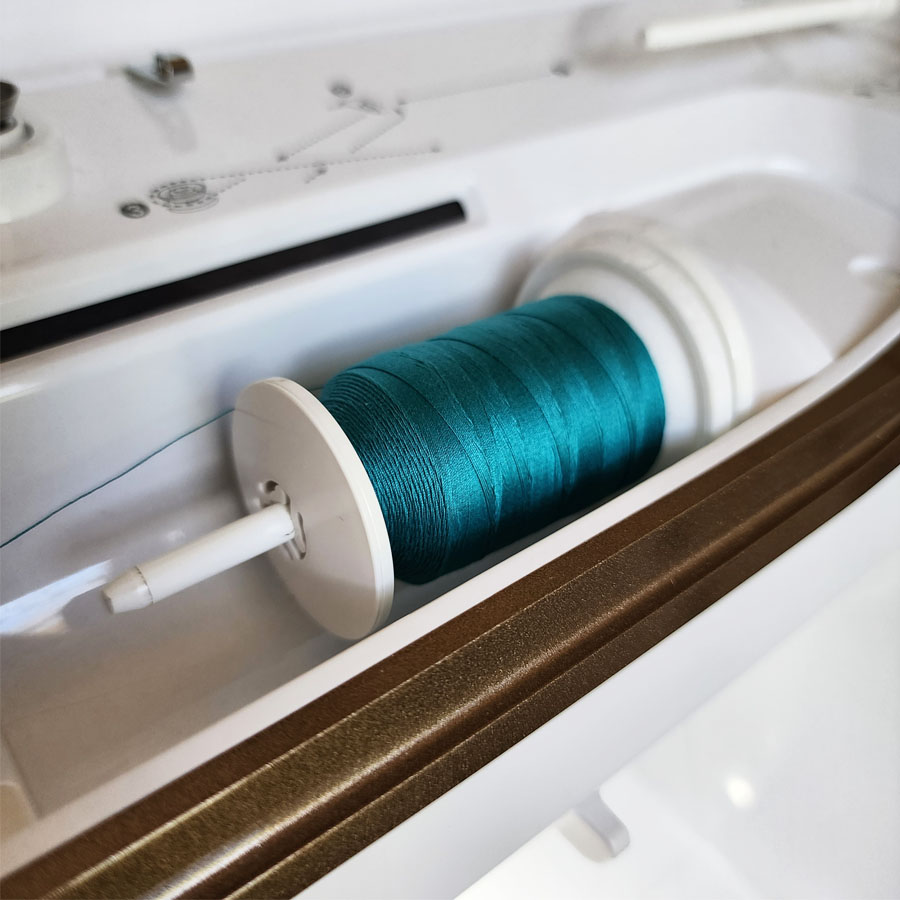
#9. Your Spool Cap Is Missing Or Not Secure
The spool cap holds your thread in place so that it can feed through the machine correctly. If it’s missing or not securely positioned, your spool can vibrate or bounce while you sew. That will cause the thread to feed through your sewing machine unevenly, leading to birdnesting under your fabric.
Solution: Check your spool cap and ensure that it’s installed so that it holds your spool of thread firmly in place (without being too tight).
#10. Your Sewing Machine Needs Cleaning Or Maintenance
Like anything else, your sewing machine will get dusty over time. Plus, it collects bits of threads and lint from use which can lead to thread bunching.
Regular maintenance (cleaning, oiling, needed repairs) is essential to help maintain optimal functioning and performance.
Solution: If you have tried all of the possible causes and solutions above, try cleaning and oiling your machine to make sure it’s operating smoothly.
Useful Info – Sewing Machine Troubleshooting
If you own a sewing machine long enough, you’re going to have to figure out how to troubleshoot your sewing machine at some point or another. While some sewing machine problems are preventable, others are inevitable. Learn how to troubleshoot your sewing machine with my printable PDF eBook. Whether you use a traditional sewing machine or a modern computerized one, work through this ebook before thinking about a replacement or going to a service center.
In conclusion: Sewing machine thread bunching is definitely a frustrating problem, but the good news is that a little knowledge can go a long way toward helping you solve (and prevent) thread jamming issues. I hope this troubleshooting tutorial helps you get back to humming along with your next sewing project!
✅ Related tutorial: Troubleshooting Common Sewing Machine Problems
Was this guide helpful to you? If the answer is yes, save this pin (see below) to your sewing board on Pinterest for future reference on how to resolve sewing machine bottom thread bunching. Plus, don’t forget to follow me on Pinterest for additional advice, how-tos, and creative inspiration!
latest posts
- Corset Pressing Board for Sewing: What It Does and How I Use It
- 7 Essential Tools and Settings for Sewing Denim on a Regular Sewing Machine
- That Purple Thang: 10 Smart Ways to Use This Weird Little Tool
- 20+ Reasons Your Sewing Machine Thread Keeps Breaking (+ Solutions)
- Dresden Plate Quilt Block: 4th of July Fireworks
- How To Sew Curves the Easy Way Using a Curve Master Presser Foot
- 30 Sewing Hacks That Turn Ordinary Items into Useful Sewing Tools
- Seam Allowances in Sewing Patterns: What They Are and How to Use Them
- What Do You Call a Person Who Sews? I Asked My Readers and Got 1,408 Opinions