
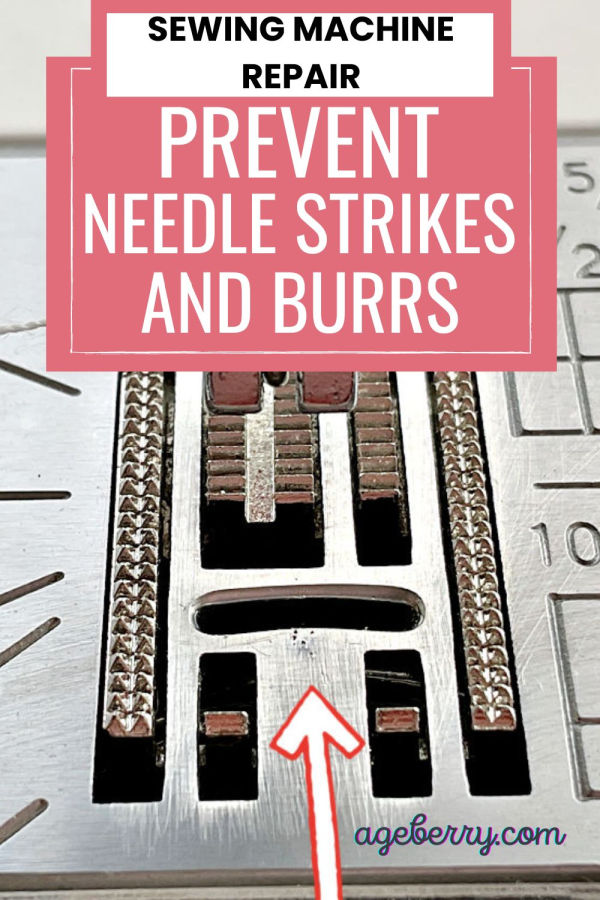
How to Prevent Needle Strikes and Burrs on Your Sewing Machine
Yesterday, as I was attaching elastic to a skirt waistband, I suddenly heard a loud noise – bam! The sewing machine needle broke. Confused and a bit startled, I inspected my machine and discovered a few burrs on the needle plate. What could have gone wrong? Determined to find an answer, I did some research on sewing machine repair. Here is the tutorial I wrote to help you navigate this problem, should you ever encounter it.
What are Needle Strikes and Burrs
A needle strike occurs when the sewing machine needle hits the needle plate or another hard surface (a presser foot, for example) instead of passing cleanly through the fabric and the designated needle hole. When a needle strike happens, it can cause a broken needle and a burr on the needle plate.
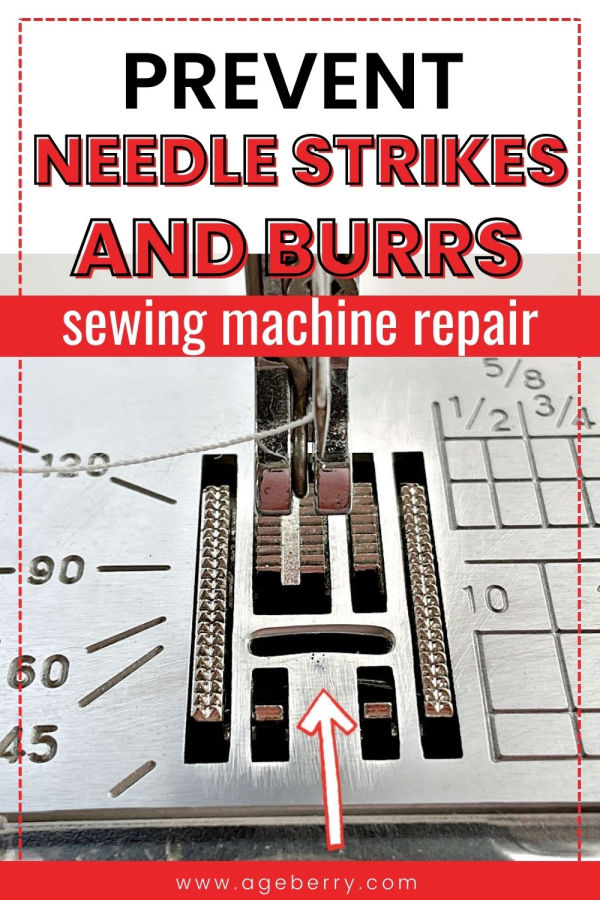
Burrs are small, rough edges or projections that form on the needle plate after a needle strikes the metal surface with enough force. These tiny rough edges can cause some problems with your sewing machine’s performance. Burrs can be sharp and may catch on the thread or fabric, leading to thread breakage, skipped stitches, or even fabric damage.
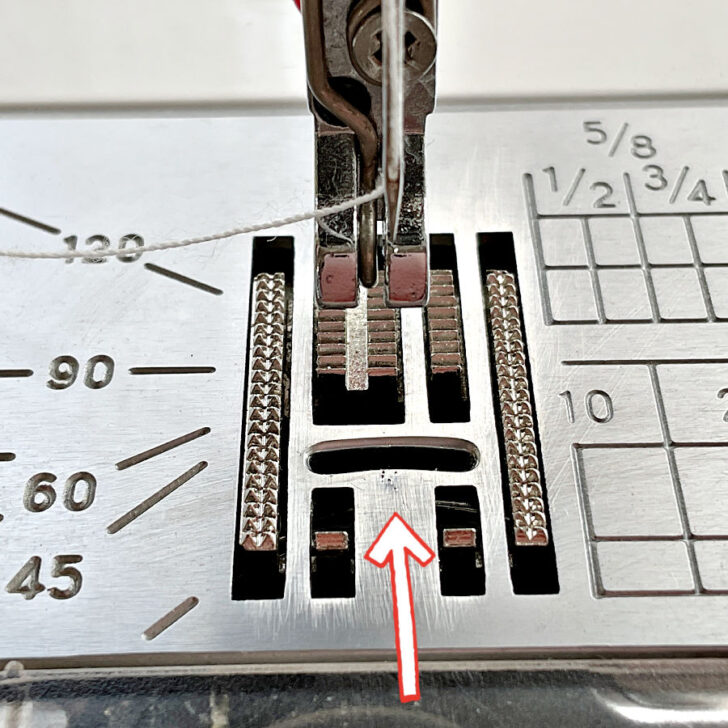
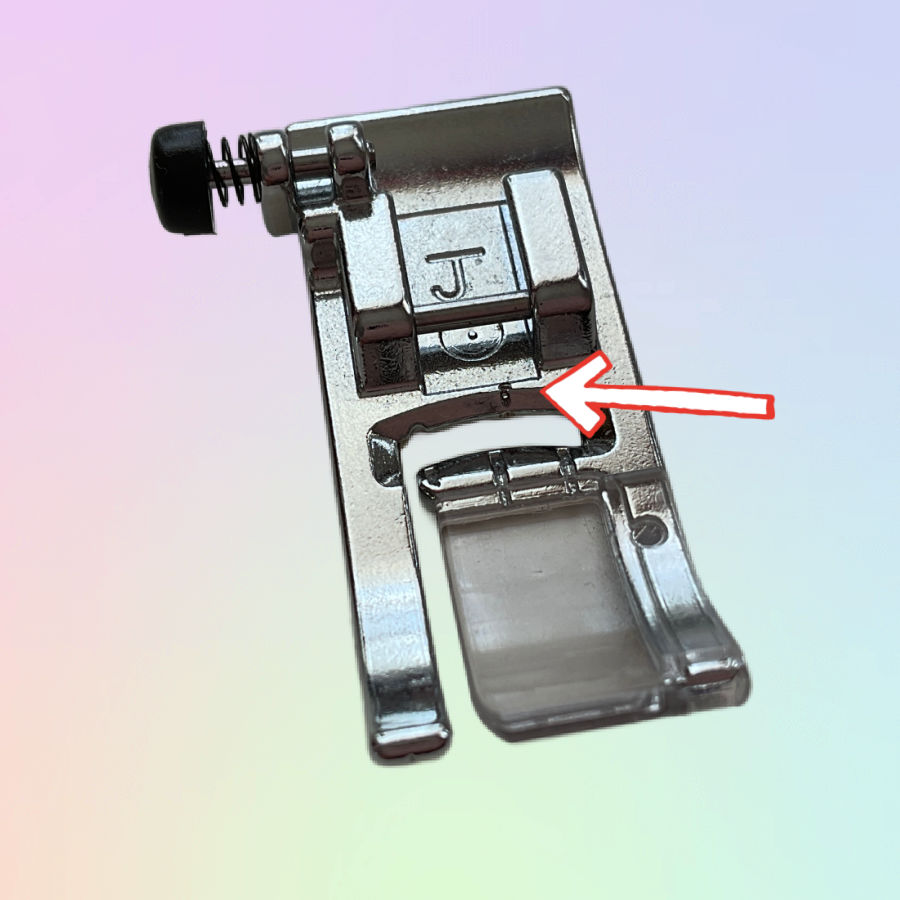
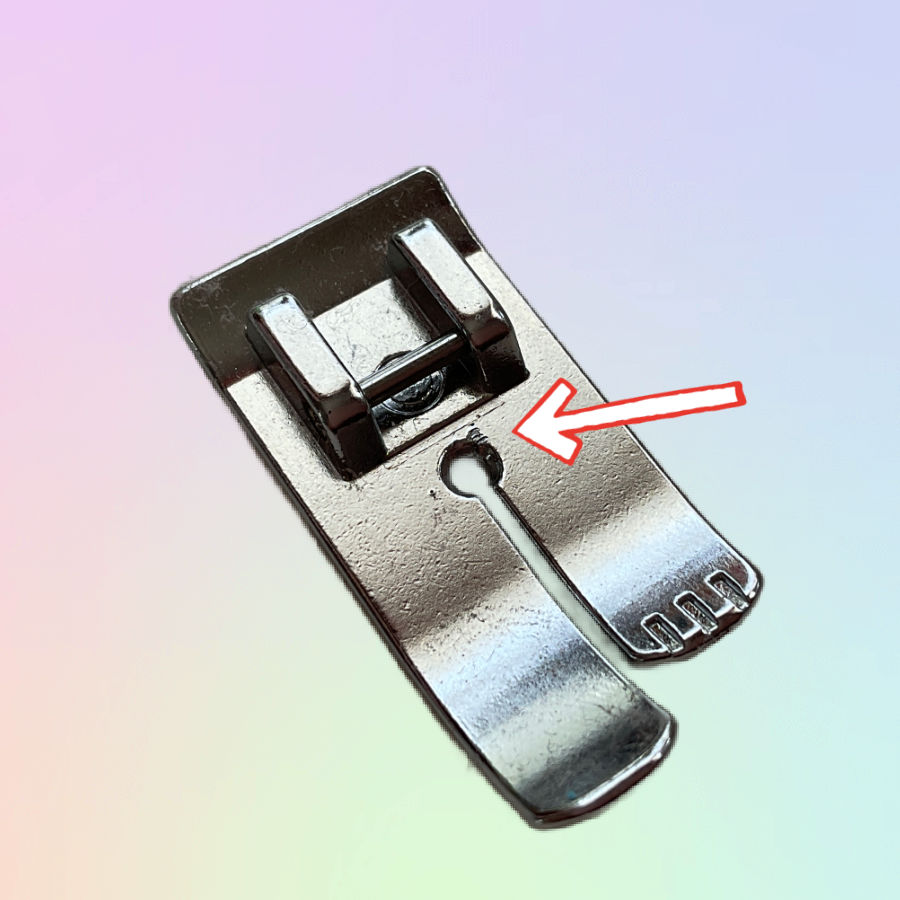
After the incident with my throat plate, I decided to inspect all my presser feet. Sure enough, I found a few presser feet with visible burrs. These burrs likely resulted from the same issues that could damage my needle plate.
Sewing Machine Troubleshooting: Causes of Needle Strikes
If you sew, it is not a matter of “if” you will suffer needle strikes. It is a matter of “when”. But what can cause a needle strike?
Incorrect Sewing Machine Needle Installation
How to Properly Insert a Needle
I am sure you know how to properly insert a sewing machine needle. But we all make mistakes sometimes because we are in a hurry, or just not attentive enough. Here’s a quick refresher to ensure you avoid any issues
- Turn off the machine before changing the needle to avoid accidental injury.
- Loosen the needle clamp screw using your fingers or the appropriate tool.
- Hold the needle with the flat side facing the back of the machine and insert it into the needle clamp as far as it will go.
- Securely tighten the needle clamp screw to hold the needle in place.
Common Mistakes During Installation
Despite knowing the correct steps, it’s easy to make mistakes, especially when we’re in a rush or not paying full attention. These are some common errors that can occur during needle installation.
- Incorrect orientation – inserting the needle with the flat side facing the wrong direction.
- Not inserting fully – failing to push the needle all the way up into the needle clamp.
- Not tightening the needle clamp screw enough, causing the needle to wobble or fall out during sewing.
So, I discovered that the recent burr on my needle plate was caused by a loose needle. Somehow, I hadn’t tightened the screw holding the needle properly. Because of this, the needle shifted while I was sewing, stroked the needle plate and created a burr. From now on, I’ll make sure to always check that the needle is securely tightened to prevent this kind of damage.
✅ Related tutorial: How to thread a needle on a sewing machine
Bent or Damaged Sewing Machine Needles

A bent or damaged needle is more likely to hit the needle plate or a presser foot.
But how do you identify a bent needle? They say visual inspection, but if it’s bent just a little, you might not be able to see it with the naked eye. So, how do we determine if a needle is bent?
One effective method is to roll the needle on a flat surface. Remove the needle from the machine, place it on a flat, smooth surface (a table for example), and gently roll it. If the needle is bent, you’ll notice it wobbling or not rolling smoothly.
Another technique is to use a magnifying glass. Under magnification, even slight bends or irregularities in the needle will become more apparent. This can help you catch minor bends that might not be visible to the naked eye but can still cause sewing issues.
✅ Related tutorial: 19 Types of Sewing Machine Needles and What They’re Used For
But let’s be realistic – do we always use a magnifying glass to check every needle we insert? Of course not. Who has time for that? Instead, we often do it backwards: we start by noticing sewing issues. Frequent thread breakage, skipped stitches, or unusual noises can indicate a damaged needle. Only then do we check the needle. But by that point, it might already be too late.
Note: Some of the links on this page are affiliate links. This means I will receive a commission if you order a product through one of my links. I only recommend products I believe in and use myself.


Fabric Pulling and Handling
Sometimes, when we sew thick fabric like denim or a quilt block with batting, or when we attach elastic, the sewing machine may struggle to feed the fabric and we may try to push the fabric through. But the needle can still be in the fabric. So the needle will be forced to move sideways or at an angle instead of moving straight up and down. This unintended movement can cause the needle to miss the needle plate hole and strike the plate instead.
Proper fabric handling techniques can help prevent needle strikes.
- Allow the feed dogs to move the fabric through the machine. Avoid pushing or pulling the fabric manually.
- Ensure you are using a needle and presser foot appropriate for thick materials. A walking foot can help feed thick fabrics more evenly.
- Increase the stitch length to help the machine feed the thick fabric more effectively.
- For particularly thick sections, use the handwheel to manually guide the needle through the fabric slowly and carefully.
- The black button on the side of an all-purpose presser foot can be engaged to level the foot when sewing over thick seams. This helps maintain even pressure and prevents the needle from shifting, reducing the risk of needle strikes.
Sewing Over Pins or Zipper Teeth
Another common reason for needle strikes is sewing over pins or zipper teeth. When the needle encounters a hard object like a pin or zipper teeth, the impact can force the needle to veer off course. Even a slight shift can cause the needle to miss the needle plate hole and strike the plate itself, leading to broken needles, burrs on the needle plate, and potential damage to your fabric and machine.
Preventing Needle Shifting
- Always remove pins as you approach them. Use a pincushion or magnetic pin holder and keep them handy and easily accessible.
- Choose zippers with plastic or nylon teeth instead of metal ones, as they are less likely to cause needle shifting.
- When sewing over zippers, especially those with metal teeth, use the handwheel to manually guide the needle slowly. This allows you to carefully navigate the teeth without causing the needle to shift.
- A zipper foot provides better visibility and control when sewing close to zipper teeth, reducing the risk of hitting them.
✅ Related tutorial: The Invisible Zipper Foot: What It Is And How To Use It
Feed Timing is Off
Feed timing refers to the synchronization between the needle’s movement and the feed dogs. The feed dogs rise, move forward, and drop in a cycle that must be perfectly timed with the needle’s up-and-down motion. This synchronization ensures smooth and even stitching.
Incorrect feed timing can cause the needle to hit the fabric at the wrong moment. If the needle remains in the fabric while the feed dogs move it, the needle can become bent. This misalignment increases the likelihood of the needle striking the needle plate in subsequent steps, leading to burrs and sewing issues.
Signs of Incorrect Feed Timing
- Skipped Stitches
- Uneven Stitches
- Fabric Puckering
- Needle Strikes
Adjusting feed timing typically requires professional servicing, as it involves precise calibration of the machine’s internal components. However, regular maintenance and proper use can help maintain correct feed timing. Here are some tips.
- Keep your sewing machine clean and well-oiled to ensure smooth operation.
- Ensure you are using the appropriate needle and thread for your fabric type.
- Let the feed dogs move the fabric naturally, and avoid pushing or pulling it through the machine.
Using an Inappropriate Presser Foot
Another common reason for needle strikes is using an inappropriate presser foot for your machine. While a presser foot might fit your machine, it doesn’t necessarily mean it’s the right one for your specific sewing task. When you start sewing, the needle might hit the presser foot, leading to needle strikes and potential damage.
Each presser foot is designed for specific functions and fabric types. Using the wrong one can misalign the needle and the foot, causing the needle to strike the foot instead of passing through the hole. This misalignment can be particularly problematic with specialty feet, such as zipper feet, overcasting feet, or straight stitch feet, which have unique shapes and clearances.

How to Choose the Right Presser Foot
- Ensure the presser foot is compatible with your sewing machine model. Refer to your machine’s manual or the manufacturer’s guidelines.
- Use the appropriate presser foot for the specific sewing task. For example, use a zipper foot for inserting zippers and a walking foot for quilting.
- After attaching a new presser foot, manually turn the handwheel to lower the needle slowly. This helps ensure the needle clears the foot without striking it.
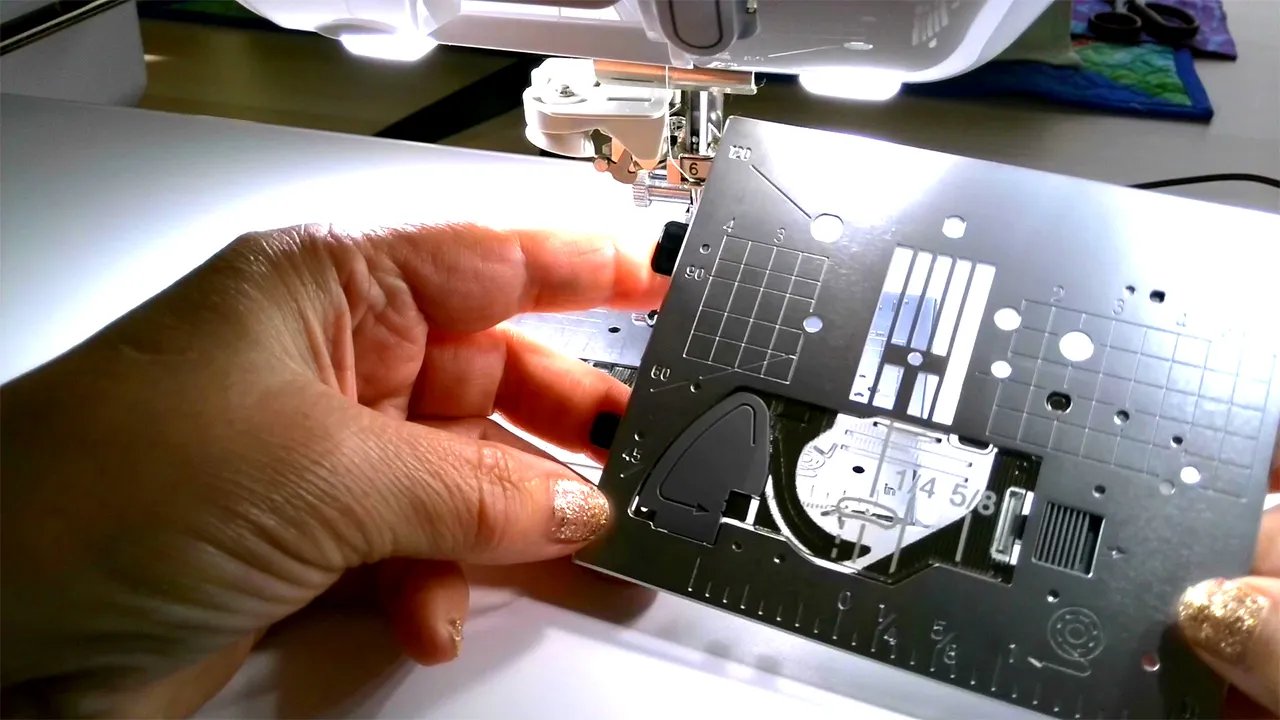
Using an Inappropriate Throat Plate
Have you ever used the straight stitch plate? I am talking about it in my article Types of Sewing Machine Stitches: Unraveling the Mysteries of the Straight Stitch. This is a plate with a very small hole for the needle, intended only for straight stitches where the small hole will prevent the material from being pulled under the plate.
If you have used such a throat plate and forgot to change it, the first time you select a zigzag stitch you will definitely encounter the issue. The image below shows the problem, you can see that the needle can not move from the center position at all when using such a plate, the needle hole in the plate will not allow this.
Thread Jams Leading to Needle Strikes
Another common reason for needle strikes is when the thread on your sewing machine gets stuck.
When the thread gets tangled or stuck, it disrupts the normal sewing process. The tension created by the jam can pull the needle out of alignment. As the needle is forced to move in an unintended direction, it may bend and hit the throat plate instead of passing through the needle plate hole.
Even when my sewing machine is threaded correctly and I use high-quality thread, I encounter thread jams sometimes.
When the thread unwinds from the spool, it can sometimes loop around the thread guides or spool pins. This tangling creates tension and can cause the thread to get stuck, leading to several issues.
Fixing Burrs on the Needle Plate
I found out that one of the easiest ways to remove burrs from the needle plate is by using fine sandpaper or a nail file. Just gently rub the affected area until the burrs are smoothed out. Be sure to clean the plate afterward to remove any residue. Use a sandpaper with a proper grit, 150 at least (very fine). You can use also an abrasive sponge if you have access to the area.


My husband said that in his opinion, emery cord would be even better for hard to reach places. It’s a type of abrasive cord used for smoothing and polishing hard-to-reach areas, particularly in metalworking. It is made from a flexible material coated with abrasive particles, typically emery, which is a dark granular mineral composed of corundum and iron oxide.

To use emery cord, you typically wrap it around the area you need to smooth or polish and then pull it back and forth to create friction. This action removes burrs from the surface, smoothing out imperfections and creating a polished finish.
So, I look at the small burrs on my needle plate and wonder – do I really need to repair it? They say that small burrs can still cause issues such as snagging and breaking the thread or disrupting the smooth movement of fabric, especially delicate fabric.
I can smooth these small burrs out, but I’m worried that doing so might dull the shine of my throat plate or even cause more damage. I’m not very comfortable with the idea of fixing it myself – I would prefer a professional repair. Or maybe I should buy a new throat plate for my model. However, I’m curious to see if these small burrs will actually cause any issues with my projects. For now, I might just leave it alone and monitor if it affects my sewing.
If you found this guide helpful, don’t forget to save the pin provided below to your sewing board on Pinterest. This way, you can easily return to this guide whenever you need this information on sewing machine repair. Following me on Pinterest will keep you updated with more useful tips, tutorials, and inspiration for all your sewing projects.
latest posts
- What Do You Call a Person Who Sews? I Asked My Readers and Got 1,408 Opinions
- DIY Round Purse: PDF Sewing Pattern and Detailed Instructions
- Mini Wonder Clips By Clover: Useful Sewing Tool Or Just Another Notion?
- Non-Slip Grips For Quilting Rulers: A Small Notion With A Useful Job
- Fabric Eraser for Sewing: What It Removes and When to Use It
- What Is The Best Thread For Sewing Machine Projects? Let’s Find Out!
- Butterfly Quilt Block Tutorial – Foundation Paper Piecing
- How To Sew Quilt Squares So The Corners Match
- Sewing With Fork Pins: How They Help With Pattern Matching, Slippery Fabric, And Seams


Do not be afraid! I use a nail file on many things to remove burrs and other little metal tags from metal. Just rub the file over the burr, slowly and carefully, feeling the burr with your finger every 5-6 filing strokes to feel how much more you have to do. I have used a sanding sponge, but that item is much bigger and hard to handle. The nail file is perfect. I’ve even used a file to take a burr off of the end of a sewing needle. The burr probably was the product of a plate strike!
Thank you for the tip; I don’t use metal nail files myself, probably that is why it did not occur to me. I use the foam pad for my nails, very similar with sanding sponges, only shaped differently. But I am curious: how did the needle perform after the operation? I would have thrown it away.
Sorry, forgot to add: be sure to sand with the grain of the plate; if you don’t see a brain sand in the direction that the fabric moves over the plate, usually front to back. And, thank you Olga! Great article!!
Sorry again. Grain, not brain. But also: I bought the Madame Sew Feet Set, and it is amazing. I’ve used several of the feet, and expect to use a couple more. Price is quite reasonable.
I agree about Madam Sew feet, they are useful. I also caught a 50% off sale at the time I bought the set, the price was at that time really good.
Probably most people know this but if you want to check your needle or burrs or anything else under magnification, you don’t need to find a lens. You can just use your phone’s camera. It does take a second to find the focus.
Thank you for the tip; did not think about that!