Mastering Understitching: Tools, Techniques, and Troubleshooting
Understitching might not get much attention in most sewing tutorials but despite its awkward name, it’s here to save your projects. And yet, despite showing up regularly in garment and bag patterns, many sewists either skip it or aren’t sure why it matters. Is it decorative? Is it optional? What happens if you leave it out?
In this guide, we’ll walk through everything from the tools and stitch settings to where it matters most, what to avoid, and how to fix it when it goes wrong. Whether you’ve skipped it before without knowing or tried it and weren’t sure it worked, this is your one-stop breakdown for getting it right.

What is Understitching and What It Does
Understitching is one of those quiet sewing techniques that doesn’t scream for attention but makes a world of difference in how your garment looks and behaves. It’s not decorative. You won’t see it when the garment is finished (at least, you’re not supposed to). But skip it, and you might find your neckline or armhole facing flopping out like it’s trying to escape.
So what exactly is it?
Understitching is a line of stitching sewn close to the seam line on the facing or lining side of a garment. It goes through the facing and the seam allowance but not the garment fabric. This helps the facing stay tucked inside where it belongs, instead of rolling out and showing from the outside.

Here’s the effect in real life: you’ve finished sewing a neckline, pressed it nicely, and moved on with your life. But the next time you wear the garment, the facing starts peeking out. Not ideal.
That’s where understitching comes in. It holds the facing in place.
This simple line of stitching:
- Keeps facings and linings from flipping to the outside
- Helps seams lie flat without added bulk
- Makes the garment easier to press and wear
Next, we’ll look at where understitching really matters most — and why skipping it in those places can unravel your hard work.
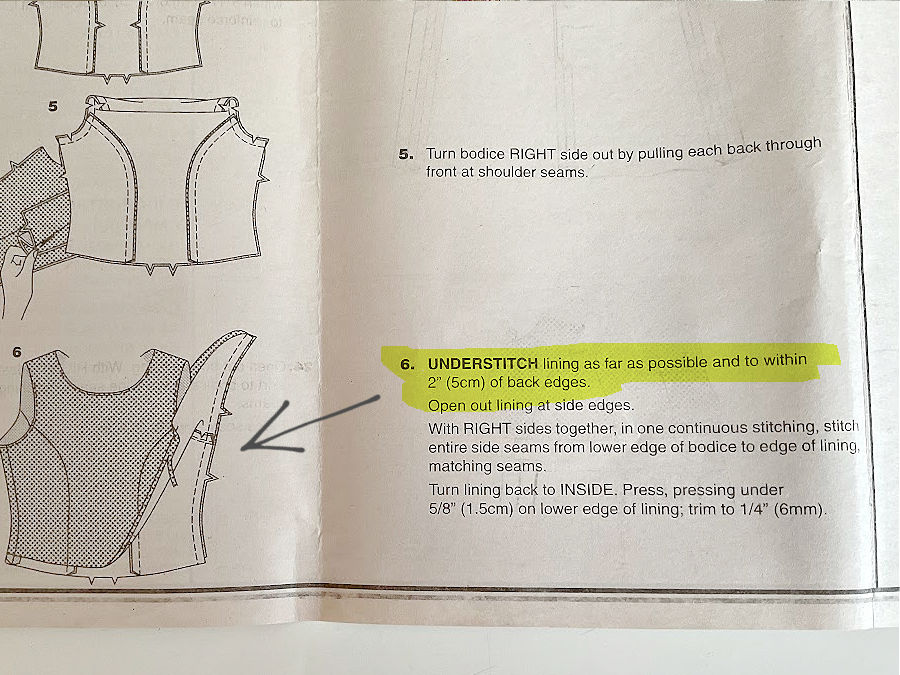
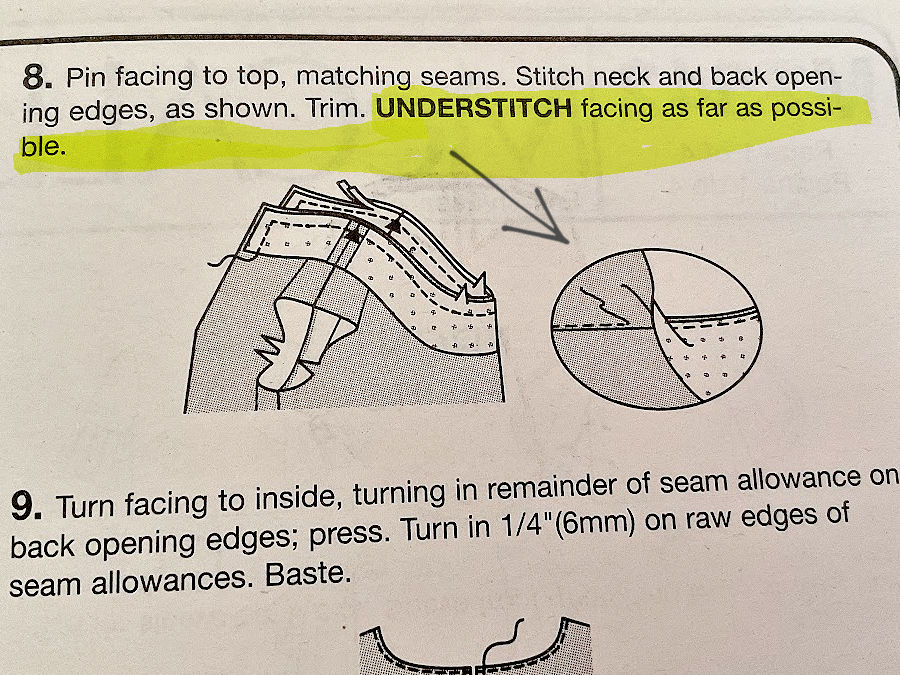
Sewing patterns are very direct when understitching is needed. You’ll often see instructions like “understitch facing as far as possible” or “understitch lining within a few inches of the opening.” That wording isn’t decorative — it’s telling you that the edge won’t behave properly without it. Patterns don’t usually explain why understitching matters; they simply assume you know how to do it and when to stop.
Where Understitching Matters Most (and Why)
Some parts of a garment are more prone to stretching, shifting, or showing the wrong layers. That’s where understitching earns its keep. It’s not needed everywhere, but in these spots, it makes a clear difference in how your project looks and wears.
Necklines
Curved and V-shaped necklines tend to roll outward, especially after a few washes or hours of wear. A facing that won’t stay put can ruin the look of an otherwise clean finish.
Best places to understitch:
- Round necklines with a facing
- V-necks with a facing (stop the understitching just before the point — don’t stitch through it)
Understitching keeps the edge flat and the facing on the inside where it belongs.
Armholes
Armholes move constantly. Every lift, reach, or stretch pulls on the edges. That makes them a common trouble spot for facings or linins to creep out.
Waist Facings and Skirt Waistlines
A waistband facing that flips up is uncomfortable and distracting.
Understitching helps it lie smooth against the body. It reduces bulk and keeps the inside edge from shifting or curling as you wear the garment.
Pocket Openings
Pockets get tugged and used often. Understitching along the pocket edge keeps the seam allowance flat and holds the pocket liningin place. It also helps prevent stretching and warping over time.
Bag Openings, Tote Tops, and Zipper Facings
Totes and bags see a lot of handling. Every time you reach in, the edge gets pulled. Understitching helps hold the top edge in place without adding visible stitching.
The same applies to zipper facings on pouches or garment openings. Understitching keeps the fabric from catching in the zipper or folding awkwardly around it.
How to Do Understitching (Step-by-Step)
Understitching isn’t hard, but it works best when you follow the process carefully. Each step helps set up the next, and skipping one usually leads to crooked seams or uneven edges.
I have to show you what happens before understitching but affects the final result.
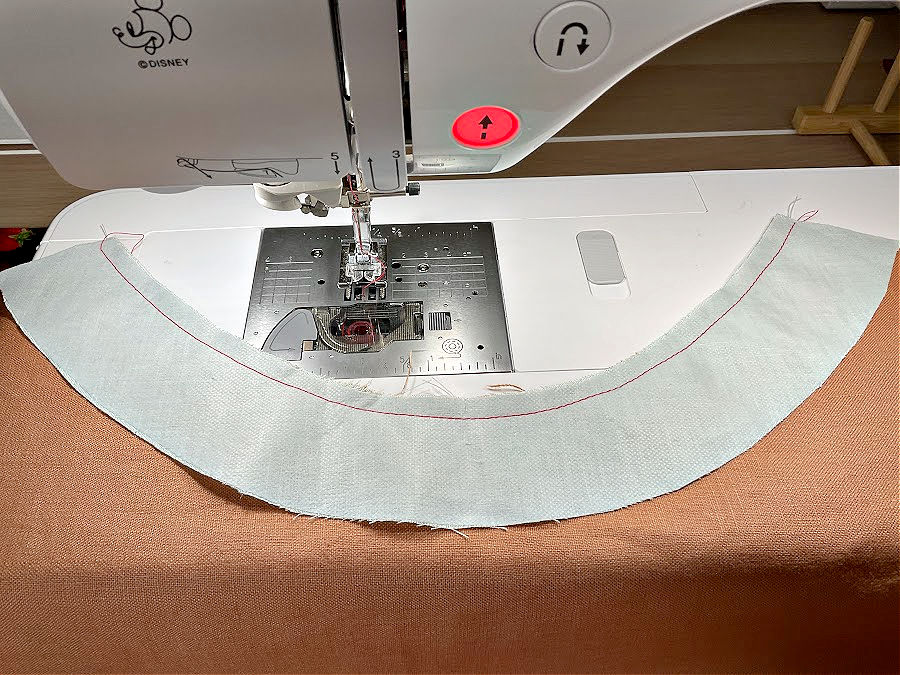
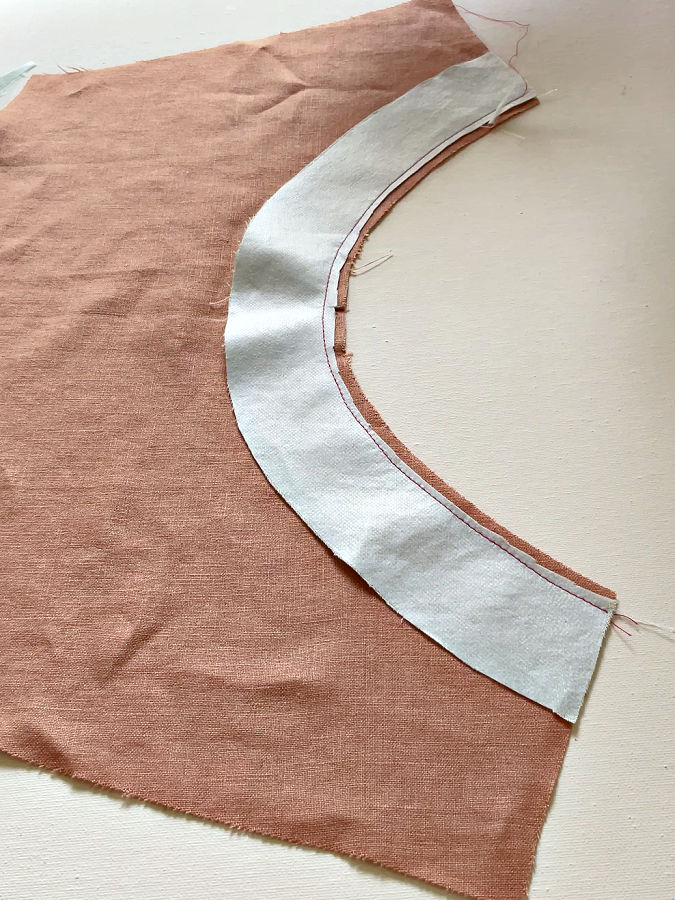
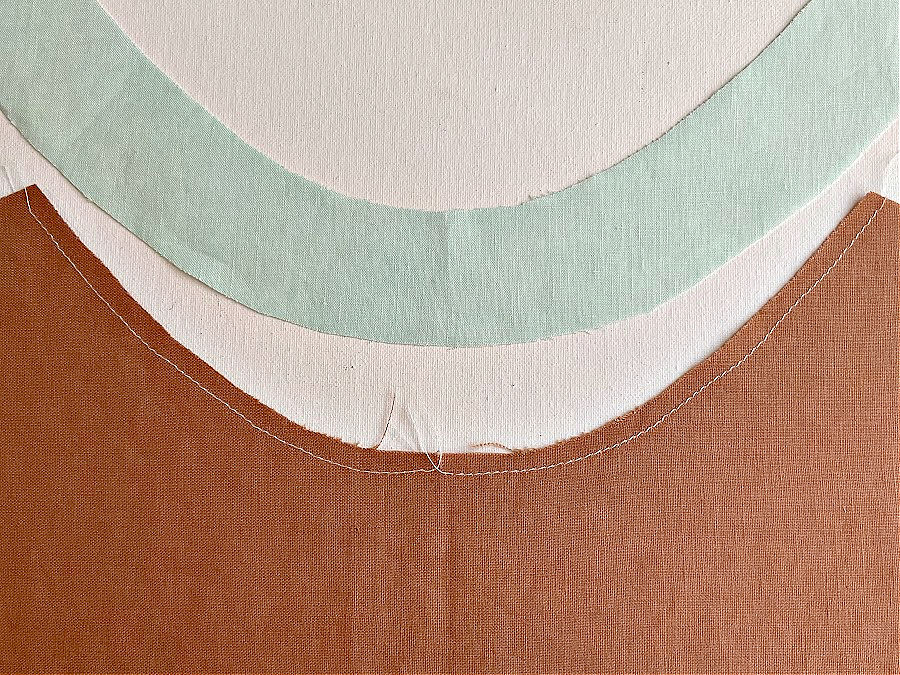
For this understitching example, I used two pieces of linen left over from a skirt and top I made for my daughter. She loves linen and reaches for it whenever she can. I don’t share that enthusiasm — linen wrinkles easily and always looks a bit rumpled no matter how carefully it’s pressed — but it works well for demonstrating construction details. The fabrics don’t match, and that’s intentional. The colors were chosen simply to make the facing, seam allowance, and stitching easy to see in the photos.
Step 1: Sew the Seam as Instructed
Use the exact seam allowance listed in your pattern. Understitching only works well when the seam line is accurate. Don’t eyeball it. A well-stitched seam keeps the edge from twisting or pulling later.
Press the seam flat. Don’t skip this step.
Step 2: Grade the Seam Allowance (When Needed)
Grading means trimming the seam allowance layers to different widths. The idea is simple: thinner layers lie flatter. But you don’t always need to grade — only when the fabric or seam thickness makes it necessary.
Here’s how to know when it is needed:
Grade the seam allowance when:
- You’re sewing with heavy fabrics (like denim, wool, canvas, or upholstery fabric)
- The seam will be pressed to one side and stitched down (like in understitching)
- The seam has curves, and you want to reduce bulk to help it lie flat
How to grade:
- Trim the seam allowance on the garment side to about ¼ inch
- Trim the seam allowance on the facing or lining side even narrower, about ⅛ inch
This staggered trim creates a tapered edge that presses down smoothly without ridges.
This image shows graded seam allowances, but for this lightweight linen fabric, grading isn’t necessary, so I did this as an example only.
In this case, I trimmed both seam allowances evenly (the image below shows the final result in this case).
When grading is not necessary:
- You’re working with very lightweight fabrics like voile, lawn, silk, or lightweight rayon
- Both layers are thin and won’t create noticeable bulk
- You plan to finish the seam another way (like pressing it open or enclosing it fully)
- The seam won’t be understitched or pressed to one side
In lightweight sewing, grading can sometimes make the edge less stable. In those cases, leave the seam allowances even and let pressing do the work.
Understitching works best when the seam allowance lies flat and smooth under the presser foot. Grading reduces bulk, which helps your stitching stay even and close to the seam line — especially around curves.
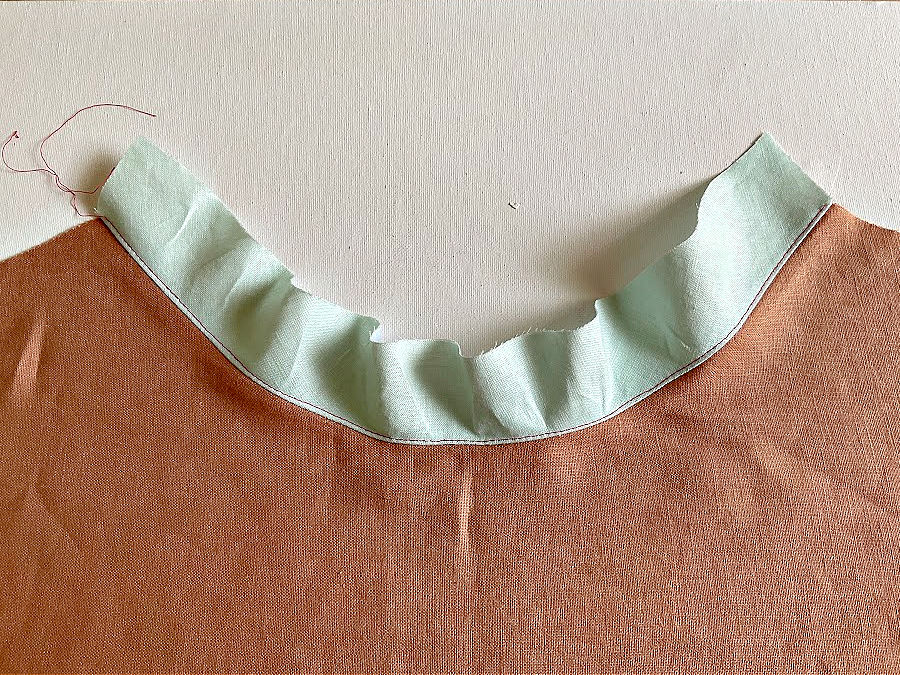
Step 3: Clip or Notch Curves
This is not optional. Curves need to release tension to lie flat.
- Inward curves (like a neckline in our example): Clip small snips into the seam allowance, close to but not through the stitching.
- Outward curves: Notch small wedges out of the seam allowance.
Both clipping and notching allow the seam to spread or contract as needed.
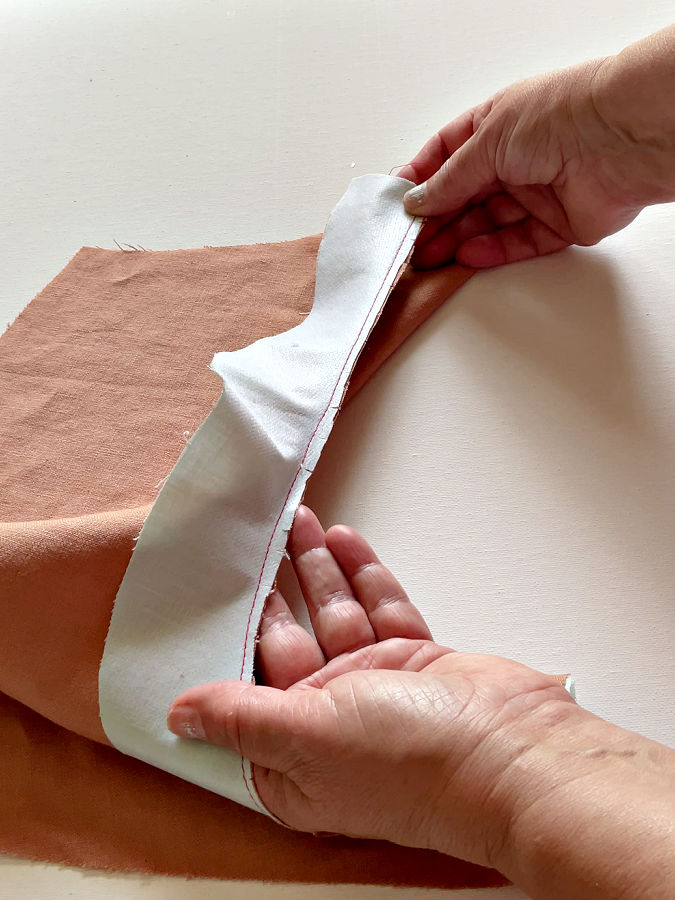
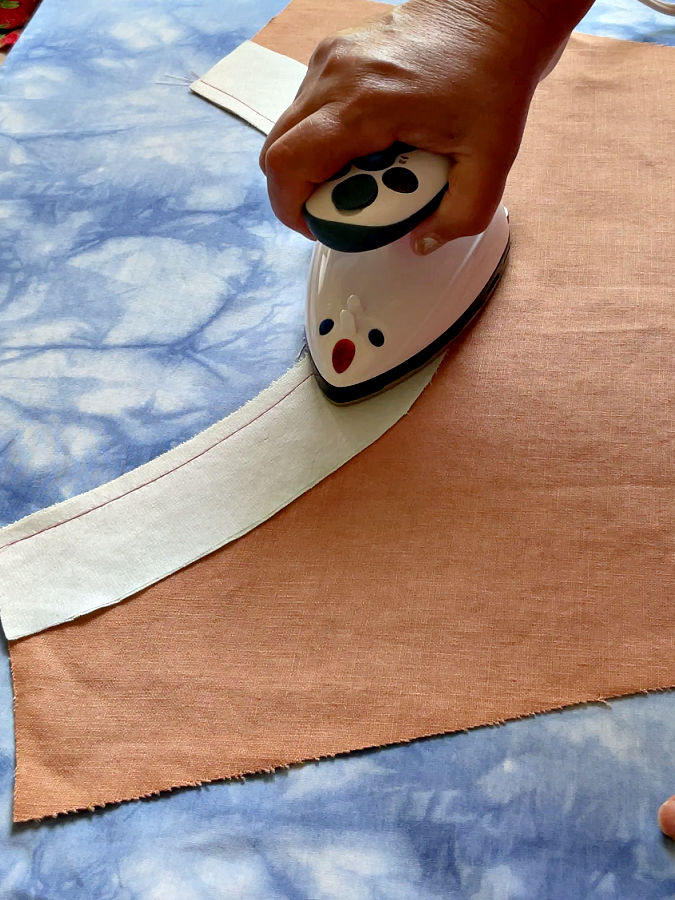
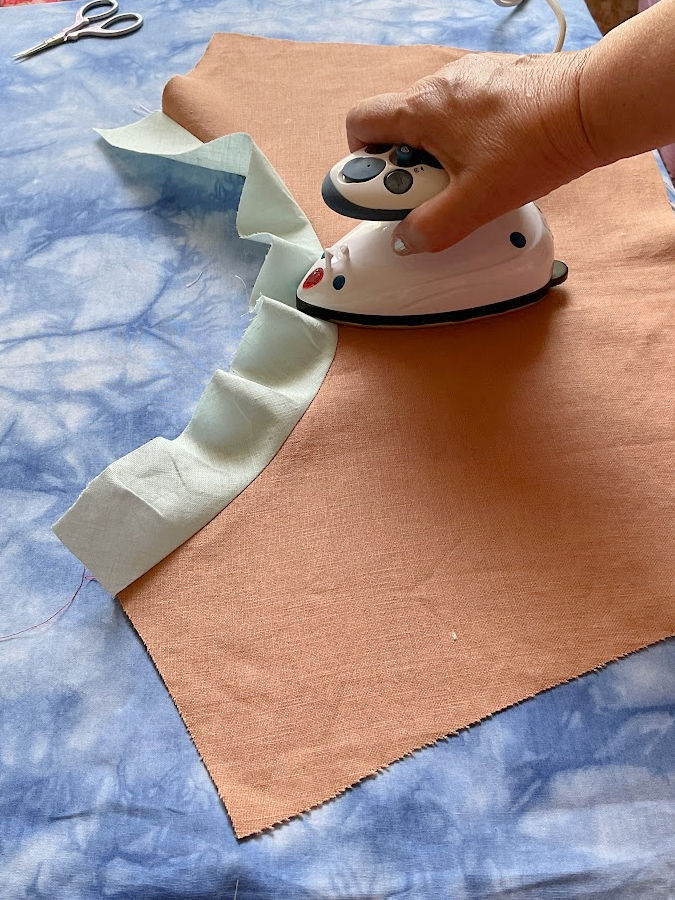
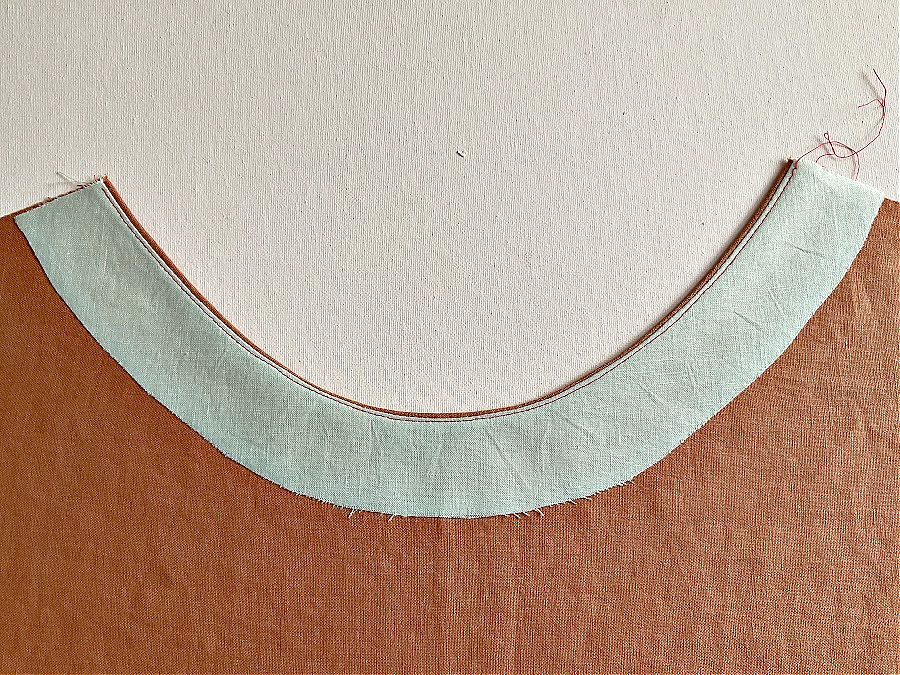
Step 4: Press the Seam Allowance Toward the Facing or Lining
Press the entire seam allowance toward the facing or lining.
This step sets you up for a clean, controlled understitch.
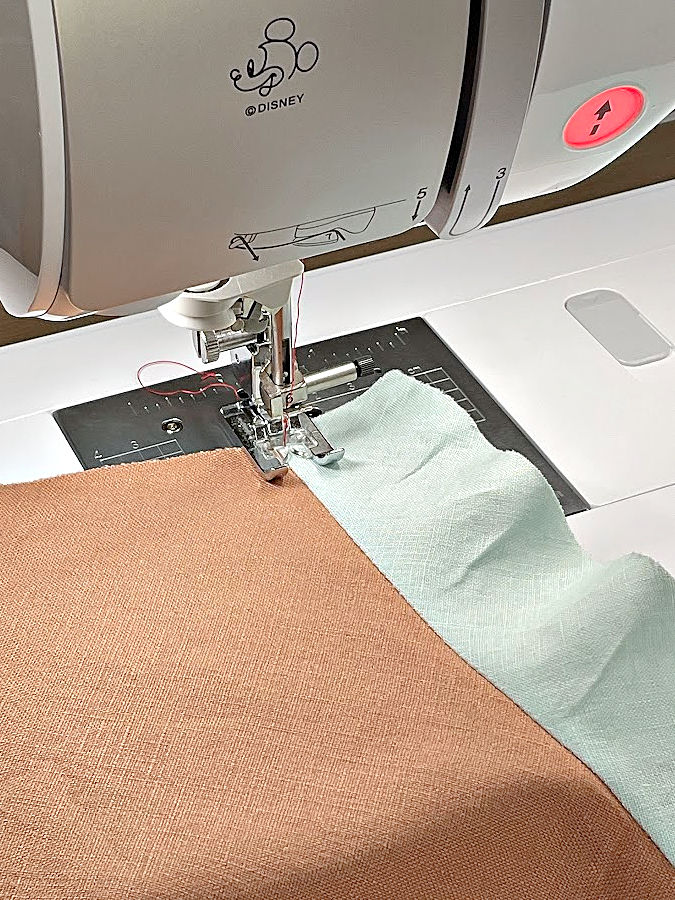
Step 5: Understitch from the Right Side of the Facing or Lining
Now stitch through the facing and the seam allowance underneath it. Don’t catch the garment fabric.
How close to the seam line? Aim for 1/16″ to 1/8″. The closer, the better — just stay off the actual seam.
Sew slowly, and keep the edge smooth as you go. If it starts to ripple, stop and fix your pressing before continuing.
Step 6: Stop Where It Becomes Awkward
There’s no prize for pushing past tight corners. Understitching works best in the straight or gently curved sections. In our example we could go from one end to another but this is not always possible.
Common stopping points:
- Near shoulder seams on a neckline
- Near the underarm on an armhole
- Before a zipper or bulky edge
If your pattern says “understitch as far as possible,” that means: go until the fabric won’t stay flat under the presser foot, then stop.
Note: Some of the links on this page are affiliate links. This means I will receive a commission if you order a product through one of my links. I only recommend products I believe in and use myself.
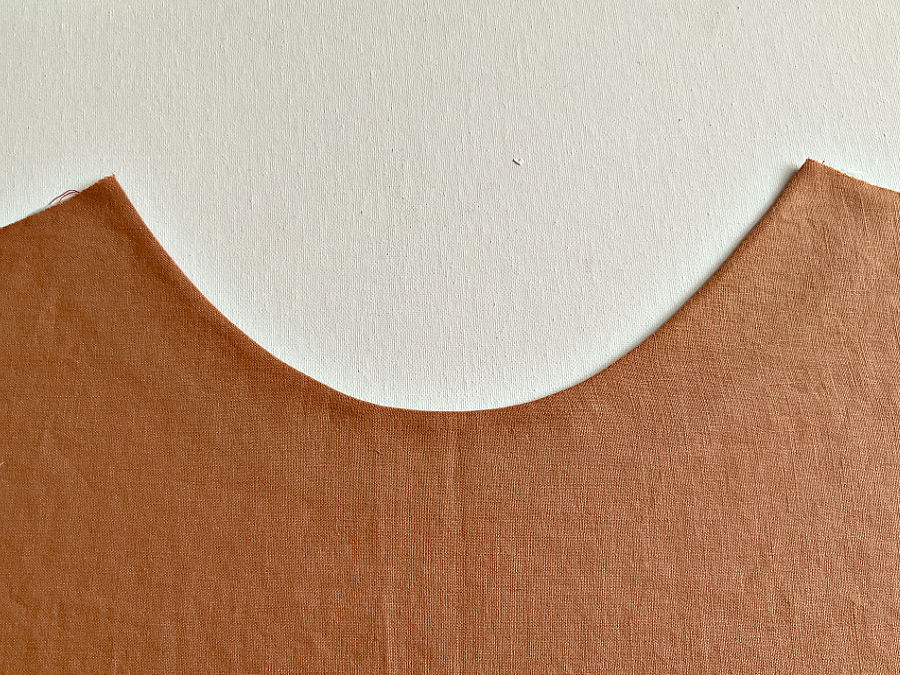
Step 7: Final Press and Roll the Edge Slightly Inward
After stitching, press the seam again. This time, press the seam line so it rolls just slightly to the inside. It helps hide the facing or lining edge from view.
A well-understitched seam will sit flat, stay in place, and keep the inside layers out of sight.
Stitch Settings That Make Understitching Work
Understitching only needs one row of stitching, but that row has a job to do. The right settings help it stay flat and avoid puckering — especially on curves or tricky fabrics.
Stitch Length
Default range: 2.5 mm to 3.0 mm. This works well for most standard seams on woven fabrics.
When to shorten:
- Tight curves (like necklines on children’s clothing or small V-necks)
- Slippery or fine fabrics (like silk or lightweight rayon)
Shorter stitches give you more control and reduce gaping around curves. Try 2.0 to 2.2 mm if the seam won’t lie flat.
Needle Choice
For most wovens: Universal 80/12. It handles cottons, linen, poplin, and other medium-weight fabrics.
When to switch:
- Microtex (sharp) for tightly woven or slippery fabric. It creates clean holes in silk, taffeta, or fine lawn.
- Ballpoint for knit fabrics. If your project has a knit facing (like on a knit dress), a ballpoint needle avoids skipped stitches and fabric snags.


Thread and Tension
Thread: Use standard all-purpose polyester thread. It’s strong and smooth, and it holds up well through repeated pressing. Always use quality threads, they shed less and last longer.


Tension: Start with your machine’s default setting. If you notice puckering or tunneling (where the seam looks raised), adjust in small steps — usually lowering the tension slightly. Always test on a scrap first, especially if you’re working with lining or thin fabrics.
✅ Related tutorial: Most Common Sewing Machine Tension Problems (+ Solutions)
Presser Foot Tips
Standard presser foot: Works fine for most cottons, linens, and basic woven fabrics.
Walking foot: Useful when one layer feeds faster than the other — common with thick facings, spongy knits, or anything with texture. It helps the layers move evenly through the machine.
Edge-stitch foot: This foot has a guide blade that rests along the seam. It makes it easier to keep your stitching an even distance from the seam line — especially helpful on long curves or very visible areas.
Understitching vs. Topstitching vs. Staystitching
These three techniques all involve sewing near a seam, but each one has a different purpose. They’re not interchangeable — and knowing when to use which one can make or break a clean finish.
Understitching
- Purpose: Keeps facings or linings from rolling to the outside of the garment.
- Where it goes: On the inside of the garment, stitched through the facing (or lining) and the seam allowance.
- Visible from the outside? No.
- When to use it: After sewing and pressing a seam with a facing. You’ll see it inside necklines, armholes, waistbands, and pocket openings.
- Key point: It’s not decorative. It holds layers in place and helps the edge roll inward.
Topstitching
- Purpose: Adds structure and visual detail.
- Where it goes: On the outside of the garment, usually stitched close to a seam or garment edge.
- Visible from the outside? Yes — it’s meant to be.
- When to use it: To flatten seams, reinforce areas (like pocket edges), or add a design element. You’ll see topstitching on jeans, shirts, bags, and some waistbands or collars.
- Key point: It’s a visible stitch, so thread color and spacing matter. Use topstitching thread or a slightly longer stitch length for a clean look.
✅ Related tutorial: How To Topstitch | 17 Topstitching Tips Every Beginner Should Know
Staystitching
I staystitched the neckline for my example just inside the seam allowance to prevent stretching before attaching the facing.
- Purpose: Prevents stretching on curved or bias edges before the pieces are sewn together.
- Where it goes: Inside the seam allowance, usually ⅛” from the edge.
- Visible from the outside? No — it’s temporary and gets enclosed in the final seam.
- When to use it: On necklines, armholes, and any unstable edges before joining pieces. You do this right after cutting and before any seam construction.
- Key point: It’s a stabilizing stitch, not a permanent seam. Use it early to keep curves from warping.
✅ Related tutorial: Stay Stitching 101: Essential Techniques for Fabric Stabilization
Quick Summary:
- Understitching: Keeps facings and linings inside
- Topstitching: Adds structure and style on the outside
- Staystitching: Stops stretching before you sew anything else
Each one supports your sewing in a different way. Using them in the right places leads to smoother edges, cleaner seams, and fewer fitting surprises.
Where Understitching Is Not Necessary
Understitching is helpful in many places, but it’s not a rule for every edge. Some seams don’t need the extra control, and in other cases, the construction method makes understitching impossible or irrelevant.
Flat-Bound or Bias-Bound Edges
Edges finished with bias binding or flat binding don’t need understitching. The binding wraps the raw edge completely and is topstitched or stitched in the ditch.
Instead: Make sure your binding is well-pressed and securely stitched. Understitching would serve no purpose here.
Enclosed Seams (Like Reversible Garments)
Not all garments need understitching—reversible pieces are a perfect example. Since both sides are meant to be seen, there’s often no facing involved, and that means no understitching needed.
Want to try a fun and practical reversible project? Check out my Japanese-style reversible apron tutorial—it’s beginner-friendly, functional, and completely understitch-free.

Facings That Will Be Topstitched
Some facings are designed to be finished with visible topstitching around the neckline or armhole. In those cases, topstitching takes over the role of securing the edge.
Instead: Press the edge carefully and topstitch through all layers for a clean, visible finish. You don’t need both.
Stable Fabrics with Minimal Movement
On very stable fabrics with straight seams, the facing may stay in place without extra help. If the edge isn’t under stress and holds its shape well, understitching might not be necessary.
Instead: Use discretion. If the seam lies flat and doesn’t shift with wear, it may not need reinforcement.
Understitching is a helpful tool — but it’s not mandatory in every seam. The key is knowing when it adds value and when it’s just extra work without a real benefit.
Knit Fabrics (and Why Understitching Usually Isn’t Needed)
Facings in knit garments are not common. Most knit patterns are designed to be finished with knit bands or bindings instead. These finishes stretch with the fabric, stay in place better, and suit the casual nature of knits.
Because of this, understitching isn’t usually part of sewing with knits. A knit band that’s sewn and topstitched won’t need help staying put. It stretches with the garment and holds its shape through movement and washing.
If a knit pattern uses a separate facing instead of a band — and the fabric is slippery, thin, or rolls easily — a row of understitching can help control the edge. In that case, use a ballpoint needle and keep the seam flat with good pressing.

✅ Related tutorial:
All About Sewing Knit Fabric
But in general, if you’re sewing with knits, focus on good band construction, edge pressing, and topstitching where needed. Understitching belongs more in the woven world.
Understitching Troubleshooting: Common Problems and What to Do
Even though understitching is a simple technique, things can still go wrong. Here’s how to handle the most common issues that come up — and what to do differently next time.
Why Does My Fabric Pucker When I Understitch?
Puckering usually means something isn’t lying flat under the presser foot.
What to check:
- The seam allowance may not be fully pressed toward the facing or lining.
- The curve wasn’t clipped or notched enough.
- The stitch length is too short for the fabric.
- Tension may be too tight.
Why Does My Neckline Ripple After Understitching?
This usually happens on tight curves or with unstable fabrics.
What to check:
- The neckline may not have been clipped deeply enough.
- The fabric may have stretched while stitching.
- The stitch line might be too far from the seam or uneven.
How to fix it: Steam the neckline and press it over a tailor’s ham. Let it cool completely while shaped. If the fabric is too stretched to recover, you may need to resew — but re-pressing sometimes saves it.
My Understitching Shows on the Right Side. How Do I Fix That?
This usually means the seam line didn’t roll far enough to the inside after stitching.
How to fix it: Give the seam a second press, rolling the edge slightly toward the wrong side. Use your fingers to roll and shape the edge before applying the iron. If needed, re-press over a ham or sleeve roll.
If it still shows, and the stitch is very visible, you can unpick it — but only if the fabric allows (see next tip).
I Stitched Too Far from the Seam Line. Do I Redo It?
If you stitched more than ⅛ inch from the seam and it’s not holding the facing in place, it may not be doing its job.
What to do:
- If the fabric is stable and the edge stays flat, leave it.
- If the facing rolls out or the seam edge feels loose, it’s worth redoing. Unpick carefully and understitch again, closer to the seam (about 1/16″ to ⅛”).
I Unpicked Understitching and Now I See Needle Holes. What Now?
Needle holes are most visible in delicate fabrics like silk, taffeta, or faux leather.
How to fix it:
- Press the area with steam and a pressing cloth. The holes may shrink or close.
- Gently rub along the holes with the blunt side of a pin or fingernail to shift the fibers back into place.
- If the holes remain visible, avoid restitching in the exact same spot. Move the new stitch line slightly closer to the seam.
If the holes are too noticeable and the fabric is damaged, consider using a different finish like a narrow topstitch or adding trim to hide the edge.
────────── ✦ ──────────
Sometimes it’s easier to see than read. I made a quick Facebook video demonstrating understitching — watch it here.
Did this tutorial change the way you think about understitching? Save this pin to your sewing board so it’s easy to find when you’re ready to try it out. And don’t forget to follow me on Pinterest for more sewing tutorials, tips, and creative inspiration!
latest posts
- Butterfly Quilt Block Tutorial – Foundation Paper Piecing
- How To Sew Quilt Squares So The Corners Match
- Sewing With Fork Pins: How They Help With Pattern Matching, Slippery Fabric, And Seams
- How Much Fabric Do I Need? 21 Helpful Tips For Calculating Fabric Yardage
- Easy Simple Sewing Project: Fabric Jar Opener
- DIY Oven Mitts: Step-by-Step Sewing Tutorial
- Easy DIY Potholder: New Design
- Tailor’s Clapper: What It Does, Why It Works, And How To Use It Right
- Heat Resistant Batting for Sewing: What It Is, How It Works, and What Makes a Difference