If you’ve ever encountered problems with your sewing machine bobbins, you know just how much they can make you want to pull your hair out! I’ve put together a bobbin problem troubleshooting post to offer solutions to common issues sewists face with their sewing machine bobbin.
Table Of Contents
- Bobbin winder stopped working (bobbin winder not working, bobbin not winding, bobbin stopped winding)
- Bobbin winds unevenly
- Sewing machine not picking up the bobbin thread
- Thread bunching up, looping, and tangling
- Bobbin keeps popping out
A quick note: the solutions I offer in this post are based on experience, not theory.
However, before we jump into problems, let’s cover a few sewing machine bobbin basics first, so everyone is on the same page.
A bobbin is a small spool of thread that sits in a compartment underneath the stitch plate and is a crucial part of the stitch creation process. Your sewing machine interlocks thread from the top spool with thread from the bobbin to form a complete stitch.
What is a bobbin winder?
Nearly every sewing machine has a bobbin winder that takes thread from the large spool and winds it (or loads it onto) the small bobbin spool. You can buy a free-standing bobbin winder if you don’t have a bobbin winder on your sewing machine.
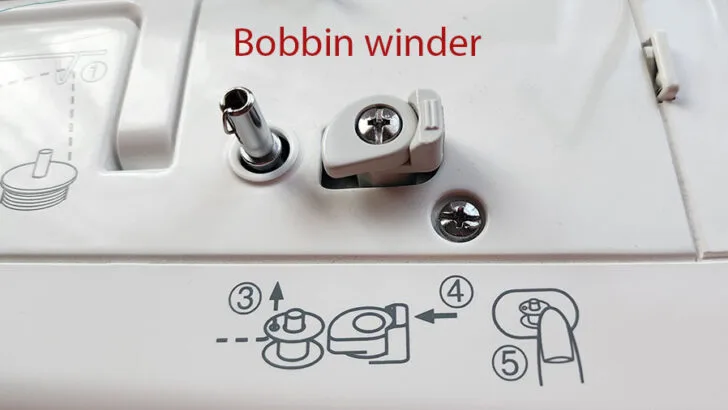
There are a couple of other parts of the bobbin winder you need to know.
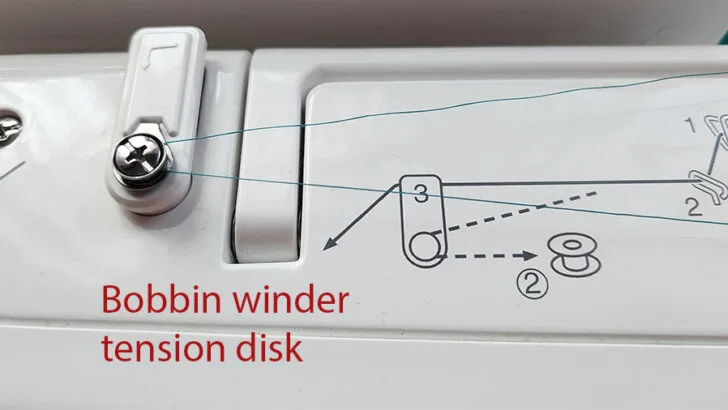
Bobbin Winder Tension Disk
This guide looks a little like a button and maintains tension as you fill your bobbin to help prevent knotted or tangled thread.
Bobbin Winder Stopper
The bobbin winder stopper is a short “arm” that, when locked into place, will stop the bobbin once it’s complete. The bobbin winder stopper will keep the bobbin from spinning once it’s full. This is a helpful feature because it ensures that your bobbin is correctly wound and prevents the thread from getting tangled.
To use the bobbin winder stopper, simply lock it into place before you start winding the bobbin. Once the bobbin is full, the stopper will automatically stop the winding process. Then, you can simply remove the bobbin and continue with your sewing project.
And perhaps it is useful to talk a little about the bobbin thread.
✅ Related article: Bobbin Thread 101: Answers to Your Frequently Asked Questions
Sewing Machine Bobbin Problems And Solutions
If you’re a new sewist, you may not experience any of these sewing machine bobbin winding problems the first time or two that you wind a bobbin. However, if you wind enough bobbins, you will experience one or more of these issues sooner or later.
Look below to find the problem(s) you’re experiencing, and you’ll notice the corresponding bobbin winding problems solutions offered for each situation.
1. Bobbin Winder Stopped Working
The bobbin not winding or the bobbin stopped winding are two examples you might see. Logically, the next question that comes to mind would be, “why isn’t my bobbin spinning?” Unfortunately, it seems that a bobbin winder not working is a common problem with computerized machines. And there can be several reasons why your machine bobbin winder won’t spin.
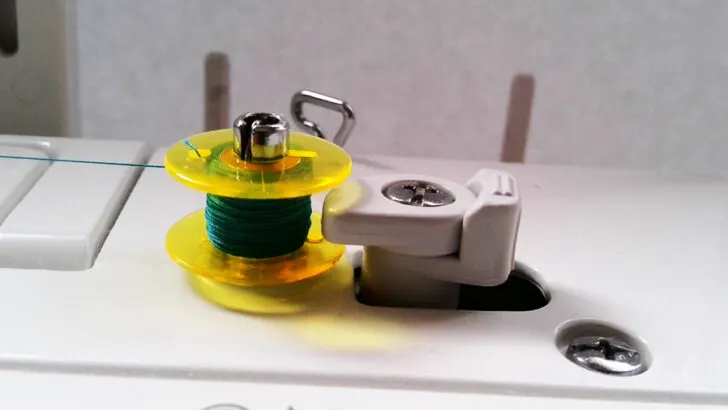
If your bobbin won’t wind, follow the steps below to resolve this issue.
- Verify that you are using the correct size bobbins.
- Check if you aligned the groove in the bobbin with the spring on the bobbin winder shaft and pressed down on the bobbin until it snapped into place.
- Check if the thread is passed through the bobbin winding guide correctly.
- Investigate whether there are scratches or other defects on the bobbin. Replace the bobbin if in doubt.
- Make sure that the bobbin winder is engaged.
- The thread might be wound so tightly on the bobbin that it prevents removing it from the winder. Unwind the bobbin if it is stuck on the bobbin winder.
- Check under the small bobbin pin. It can be hard to see under there, but a small flashlight helps. Having some thread wrapped around the pin that holds the bobbin could keep the bobbin winder from spinning. If you find some, carefully use tweezers to unwind and pull out the thread, so it doesn’t fall inside the machine.
Helpful Tools For Sewing Machine Bobbin Problems
Once I tried to wind a bobbin with invisible thread to make a blind hem. Hems look fantastic with this thread because it really is invisible! But after this, my bobbin winder stopped working, and at that time, I didn’t know how to fix the problem, so I had to go to a sewing repair shop.
While the machine was in the shop, I bought a Sidewinder, which is a stand-alone bobbin winder. It works with batteries or a power supply. It’s not perfect, but I like it! I had to keep an eye on it though because sometimes I’ll notice the bobbin not winding evenly.
But I do find it helpful overall because I use it to wind bunches of bobbins and have them ready ahead of time.
A much better alternative than to use my beloved (and expensive) Janome 6600P.
Note: Some of the links on this page are affiliate links. This means I will receive a commission if you order a product through one of my links. I only recommend products I believe in and use myself.
Here is a link to Amazon for Sidewinders – the models might be slightly different than the one I am using.
2. Bobbin Winds Unevenly
If the bobbin is loosely wound or the threads crisscross, it will cause uneven tension, resulting in stitch irregularity, thread jams, and even breaking thread.
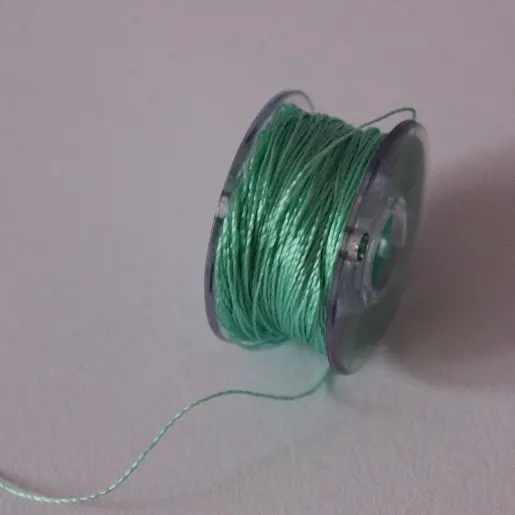
There could be a couple of reasons why your bobbin is winding unevenly.
- Verify you are using the correct type of bobbin for your machine.
- If the thread gets caught or tangled while you are winding the bobbin, the bobbin could be wound unevenly.
- When winding the bobbin, feed the thread through the winding tension disks so the thread has proper tension and the threads lie next to each other.
- If everything is correct, but you still have a glob in the center or tapered ends, you can use your finger to help the bobbin fill evenly.
3. Sewing Machine Not Picking Up The Bobbin Thread
- First, check if you used a bobbin that’s meant for your machine.
- Verify the bobbin-winding spindle has been pushed back to the initial position for sewing after the bobbin winded. If it is not in the correct position, the needle will not go down and pick up your bobbin thread.
- Ensure that your needle is set in the slot correctly. You want it completely up into the needle shaft, with the flat side of the needle toward the rear of the machine.
- Maybe your needle is too big, too small, or defective? If a needle bends, change it out for a new one. On the other hand, if you have a new needle installed, automatically exclude it as a reason. Re-threading the needle is also something you should automatically try doing.
- Be sure the bobbin thread coming out from the bobbin case is reasonably long (about 3-4 inches).
- Pull back the bobbin thread & top thread before starting sewing (for most sewing machines).
- Also, make sure your bobbin is inserted correctly (counterclockwise). Inserting the bobbin turned in the wrong direction is a common mistake.
How To Insert A Sewing Machine Bobbin Video Tutorial
The video below shows the process of inserting the bobbin into the sewing machine. Most modern sewing machines are top-loading like this one and do not have an extra bobbin case.
If you investigate all these potential causes and your machine still doesn’t pick up the thread, you may need to have it repaired for timing in a sewing service center. The needle thread is not meeting the bobbin thread in time to form a stitch if the timing is off.
4. Thread Bunching Up, Looping, Or Tangling
“Birdnesting” is when the thread bunches up on the underside of your fabric, like in this image. Unfortunately, there can be many reasons that this happens
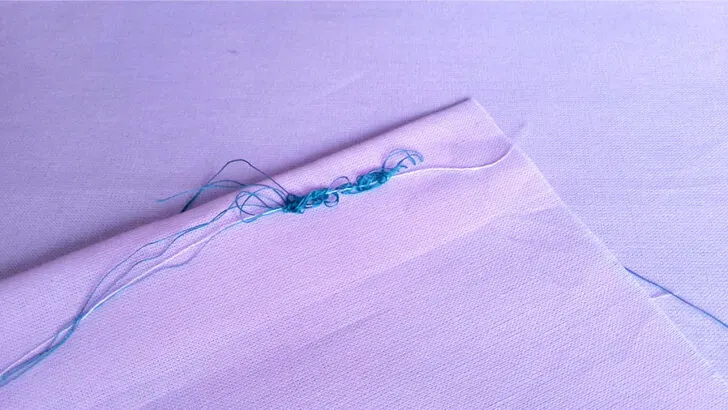
Sometimes we have tangles and bunches of thread in the bobbin area. You will probably notice the sewing machine locks up, and you may hear a rattling noise. Stop the machine immediately, but don’t panic.
First, cut through all the extra thread to get your material free. Try not to cut the fabric. It may be difficult, but be patient and don’t pull the material out with force. You can damage your sewing machine if you try to force the fabric out.
Remove all the cut thread bits, open the bobbin holder cover, and ensure nothing is in the bobbin case or around it.
If you want to find out the cause of the problem, consider the following issues and how to resolve them.
Needle Tension
The most common reason for birdnesting is needle tension. Your upper thread tension may be too loose if you get thread bunching under your fabric. So check if the thread is properly going through the tension disks. If everything is correct, try tightening the upper tension to solve the problem.
Pro Tip: Only adjust your tension a little bit at a time.
✅ Related tutorial: Sewing machine tension guide: everything you need to know about the bobbin tension
Check Needle Threading
Verify if your needle is threaded correctly. Does it go through the thread guide? Through the tension disks? Rethread the machine to see if it solves your problem.
Double-Check Your Bobbin
Verify if your bobbin is threaded and inserted correctly. This is one of the most common sewing machine bobbin problems.
✅ Related tutorial: How to thread a bobbin
Check Thread Weight
Birdnesting may also happen if you use different types of threads in the needle and the bobbin. It’s perfectly normal to do so, but if the difference in thread weight and fiber is too big, it may be the reason for thread bunching.
✅ Related tutorial: Sewing thread sizes and how to choose
Use High-Quality Thread
Use good quality thread. If the thread has knots and loose fibers coming out, then change it because it WILL cause a problem.
Check Your Presser Foot
Don’t sew with the presser foot up. Everybody does this from time to time, especially with heavy fabric. Always put your presser foot down to avoid bunching.
Match Your Needle To Your Fabric
Make sure you are using the proper needle for the fabric you are sewing.
✅ Related tutorial: 19 Types of Sewing Machine Needles and What They’re Used For
Verify Your Needle Isn’t Bent
Also, double-check that the needle is not bent. The needle can bend if you pull the fabric instead of guiding it through the feed dogs as you sew. And that will lead to many different sewing machine problems.
Useful Info – Sewing Machine Troubleshooting
If you own a sewing machine long enough, you’re going to have to figure out how to troubleshoot your sewing machine at some point or another. While some sewing machine problems are preventable, others are inevitable. Learn how to troubleshoot your sewing machine with my printable PDF eBook. Whether you use a traditional sewing machine or a modern computerized one, work through this ebook before thinking about a replacement or going to a service center.
Regularly Clean And Maintain Your Sewing Machine
Frequent cleaning and dusting will prevent many problems. Make sure to dust underneath the throat plate, in the bobbin case, and along the thread path.
I recommend having a small but powerful handheld vacuum cleaner. It works great! I have an older vacuum model that’s corded, but there are cordless alternatives now that are much easier to use.
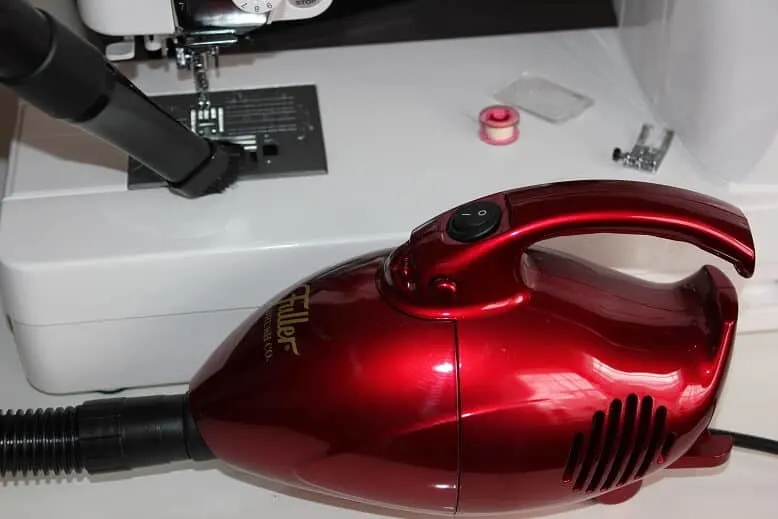
Proper maintenance takes only minutes and can save you a multitude of headaches.
✅ Related tutorial: Choosing a Mini Vacuum for Sewing Machine
Helpful Tool To Clean The Bobbin Case if You Have Problems With Bobbins
Check Your Feed Dogs
If your fabric is not feeding through your machine, you will get bunched-up thread under your material. Make sure your feed dogs are not down.
There is a lever on your sewing machine to disengage the feed dogs for quilting and free-motion sewing. If you have disengaged them recently to do those tasks, ensure that your feed dogs are up again for all other sewing purposes.
Use Longer Thread Tails
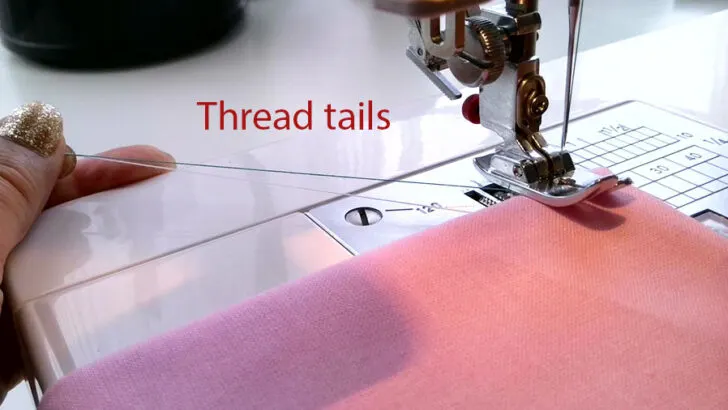
A common cause of problems is working with thread tails that are too short.
If the thread tails from your bobbin and needle are less than two inches long, your sewing machine may pull them into your sewing machine, causing thread bunching.
To avoid this problem, you can hold the thread ends until you have sewn a couple of stitches. Another option is to make sure that your thread tails are at least three inches long before you begin sewing.
Are You Using A Spool Cap?
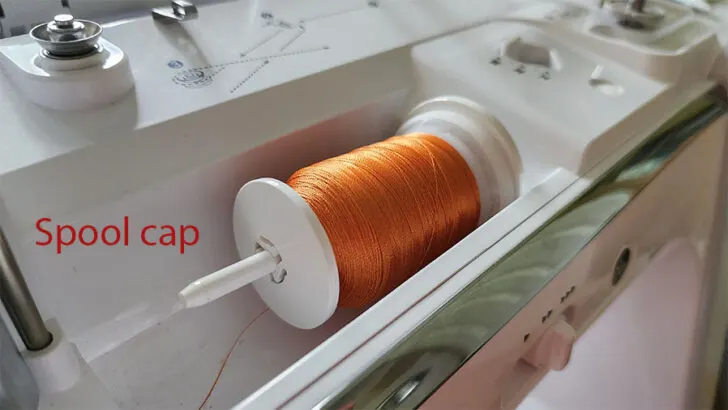
Spool caps keep your spool of thread from getting out of control. If you don’t use one, your thread spool may spin too quickly, or the thread might snag.
Always use a spool cap to avoid bunching or looping thread, especially if you have a horizontal spool pin.
Build Up Of Lint
Sometimes birdnesting happens not at the beginning but in the middle of stitching. One minute, the machine is sewing just fine. The next minute, your sewing machine has locked up, and you see thread bunching under your fabric.
Since it didn’t happen immediately, you know you don’t have threading or tension problems, so don’t change anything during stitching. In this case, the most likely reason for thread bunching is a build-up of lint inside your sewing machine.
✅ Related tutorial: Care Of Sewing Tools And Equipment
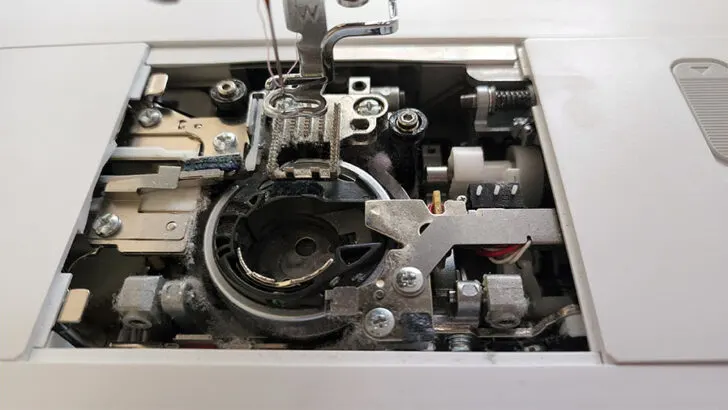
Proper cleaning and dusting can prevent thread bunching. Clean the bobbin case, underneath the throat plate, along the thread path. Use a special brush or a small (but mighty) vacuum cleaner to remove the tiny bits of lint.
Don’t simply blow compressed air to clean the inside of your sewing machine because it can drive dust and lint further into the mechanism. The dust is supposed to come out, not go further inside the machine.
5. Bobbin Keeps Popping Out
There could be several reasons why your bobbin and the bobbin case will not stay in the machine (if you have a top-loaded machine).
- Make sure you are using the correct bobbin for your machine.
- Also, make sure the bobbin was inserted correctly. Re-install the bobbin, if necessary.
- It can happen when the bobbin case is not correctly/securely placed. Sometimes this happens after you’ve taken it all apart to clean or clear a jam.
- Remove the plastic bobbin case and see if it has any rough chips or needle holes. If it does, replace it.
- Inspect your plastic bobbin for cracks or damage. Is it out of proper round shape? If the thread catches a rough edge, it can pop the bobbin out, so don’t use bent or broken bobbins. Try a different bobbin with a new thread and see if that helps.
- Verify if the bobbin has been wound correctly and is not too tight.
- You can have a broken needle tip somewhere in the bobbin area. It can even end up under the bobbin case. So clean your machine regularly and thoroughly.
- If the upper thread tension is too tight, the thread may loop around the shuttle case and pop the bobbin off.
- Try a different thread because low-quality threads can cause that as well.
Is your sewing machine acting up? I created the ultimate troubleshooting guide to help you out and compiled a detailed list of solutions to common sewing machine problems. Many of these problems can be solved with some basic troubleshooting or maintenance. Is your thread getting tangled or breaking? I’ll walk you through the steps to fix it. Are you struggling with tension settings, broken needles, or jammed threads? I have tips for that too. Don’t let sewing mishaps get in the way of your creative flow. Check my guide and show your sewing machine who is the boss – Troubleshooting Common Sewing Machine Problems (+ Solutions)
Useful Info – Sewing Machine Troubleshooting
If you own a sewing machine long enough, you’re going to have to figure out how to troubleshoot your sewing machine at some point or another. While some sewing machine problems are preventable, others are inevitable. Learn how to troubleshoot your sewing machine with my printable PDF eBook. Whether you use a traditional sewing machine or a modern computerized one, work through this ebook before thinking about a replacement or going to a service center.

Did you find this tutorial helpful? If so, save this pin (see below) on your sewing board so you can come to this tutorial later when you have sewing machine bobbin problems and need to find a solution, and follow me on Pinterest for more tips, tutorials, and inspiration!
I hope these sewing machine bobbin problems and solutions help you troubleshoot any issues you run into with your bobbin not spinning! I’ve covered everything I can think of and have experienced so far.
✅ Related tutorial: Troubleshooting Common Sewing Machine Problems
latest posts
- Knot a Problem: Easy Ways to Secure Short Thread Ends
- Ever Tried This on Your Serger? This Differential Feed Feature Will Amaze You
- Ditch My Sewing Machine? Not in This Lifetime!
- Adorable DIY Needle Book | Easy Tutorial for Beginners
- Master the Seam Ripper: Your Ultimate Guide to Precision Stitch Removal
- Think You Know Zippers? This Installation Guide Might Surprise You
- Why Does Your Seam Ripper Have a Red Ball? Discover Its Purpose!
- Topstitching Troubles? This Simple Trick Will Turn It Around Instantly!
- How to Sew Shirring: A Step-by-Step Guide to Elastic Thread Gathering


