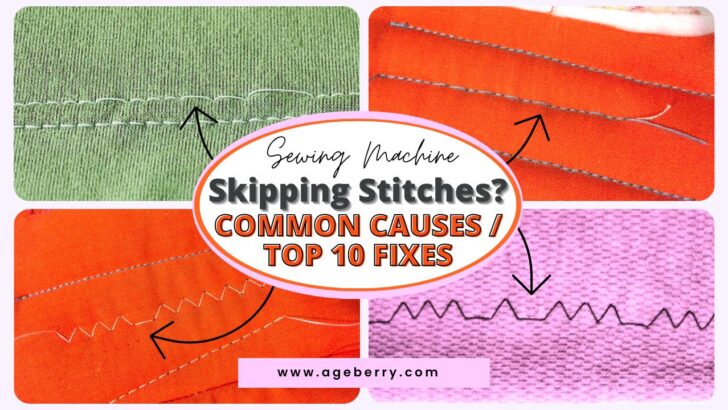
Sewing Machine Skipping Stitches? Common Causes / Top 10 Fixes
Sewing is therapeutic for so many people. But sometimes when your sewing machine is skipping stitches it can make you want to pull your hair out! How can something so meditative and mindful provoke so much frustration? I’m here to help you find peace with your sewing machine—sometimes it just takes a few simple adjustments.
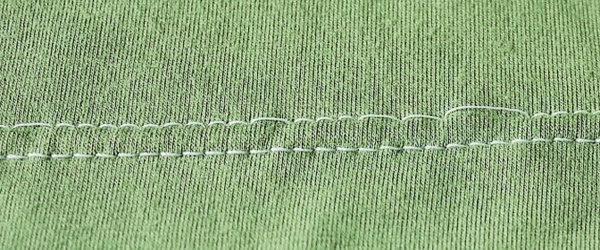
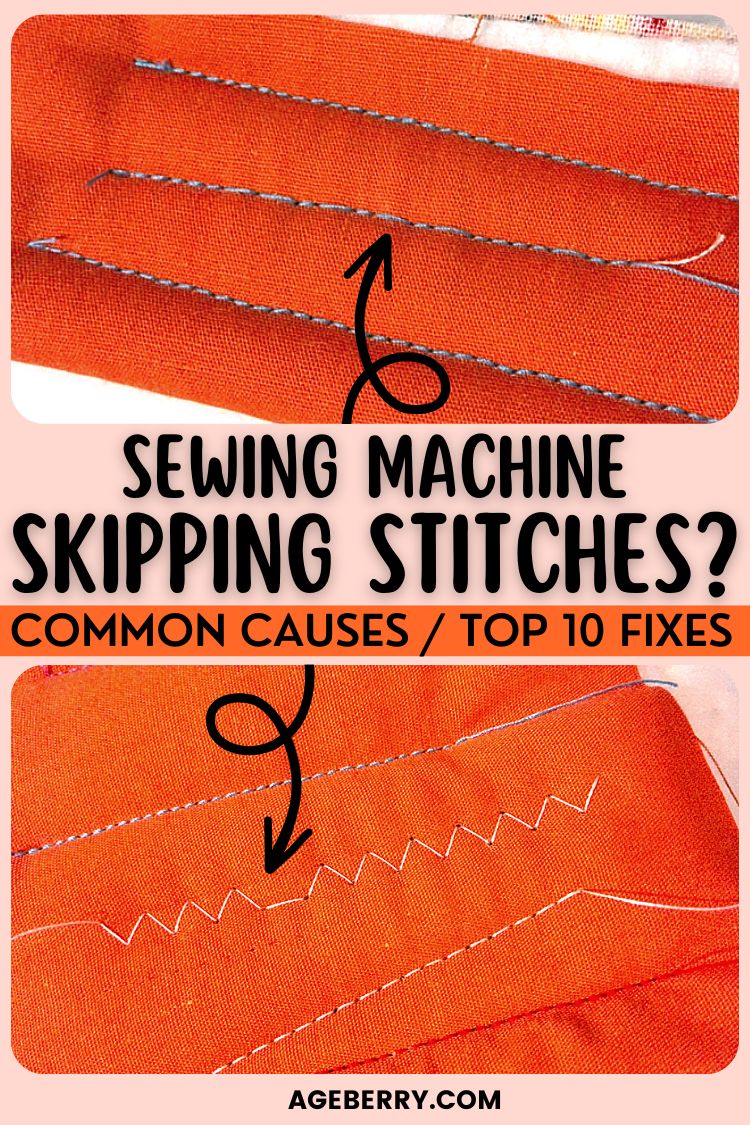
Have you ever sat down to mend a seam and discovered that some of your stitches were longer than others? Instead of a regular, even line of stitching, you’re met with some lengths of thread that are longer than others, skipping across the fabric instead of anchoring it together. These longer stitches are called “skipped stitches.” They’re frustrating and annoying, and they happen to even the most experienced seamstresses!
Finding out what is causing the problem can be frustrating. I’ve been there! But thanks to dedication or sheer stubbornness, I never gave up.
Sometimes the issue is a simple fix – so simple, it’s embarrassing. At one point, I took my machine to a shop, unable to figure out why the machine was sewing so unevenly. I replaced my needle, re-threaded the entire machine, and cleaned and oiled everything. The machine technician gently pointed out that I had installed the needle incorrectly. I wasn’t at all new at sewing at that point; I just overlooked a very, very basic step, something I’d done properly hundreds of times before. Those face-palm moments can happen to absolutely anyone, and it’s embarrassing when they do!
Sewing machines have come a long way over the years, and nowadays they are more resilient than ever. While there are still a dozen things that can cause a machine to skip stitches, many of these issues are caused by something on the user’s end.
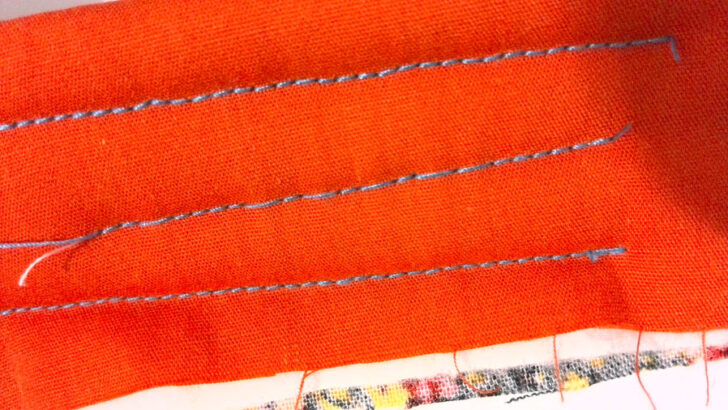
When preparing this tutorial, I tried to force two of my sewing machines into making errors, but I couldn’t. Even when going out of my way to use a bent needle, a dull needle, overly fluffed bobbin cases, and incorrect settings and threads, the machines still ran perfectly and managed to sew without skipping a stitch.
That being said, I have had experiences before with skipped stitches so I do have some photos that show what this looks like. Nonetheless, with today’s technology and quality needles, skips in stitching are not as much of an issue for many sewers as they used to be.
So here is the list of things that can cause sewing machines to skip stitches.
Common Causes of Sewing Machine Skipping Stitches
- Having the wrong settings for the fabric you are using
- Incorrectly threading the machine
- Incorrectly winding the bobbin
- Dirt accumulation
- Thread type and quality
- Worn, damaged or wrong needle
- Sewing very fast
- Improperly installed or wrong presser foot
- Thread tension problems
- Incorrect stitch length settings
- Pulling fabric when sewing
- Broken timing
How to Fix Sewing Machine Skipping Stitches
When our sewing machines start to develop problems like skipping stitches, jamming, and breaking threads and needles, it can be disheartening. Just when you thought you could tackle a project, problems arise that make creative endeavors feel far from achievable.
If this is something you’re facing with your existing machine then it may be time to invest in a modern model that won’t let you down.
Modern machines are designed for all types of fabric and will easily handle even the most intricate stitches without issue.
However, if you find yourself in the unfortunate position of having a modern machine that is skipping stitches, don’t panic! There are simple steps you can follow to solve the issue, without having to take your machine to a repair shop.
Step #1: Prepare a Fabric Test Swatch
Use the same fabric you were using for the project when your machine skipped stitches. If you were using interfacing or stabilizer, use the same weight. If you were using different fabrics or the same top and bottom fabric, replicate that with your test swatch.
Step #2: Change the Needle
Change your needle! Never overlook the power of a fresh, sharp needle. This isn’t a minor detail; it can make a world of difference! Worn, damaged, or poorly chosen needles cause the majority of issues with sewing machines skipping stitches. Worn needles don’t penetrate the fabric properly and cannot connect with the bobbin thread to make the stitches evenly every time; this creates those annoying gaps.
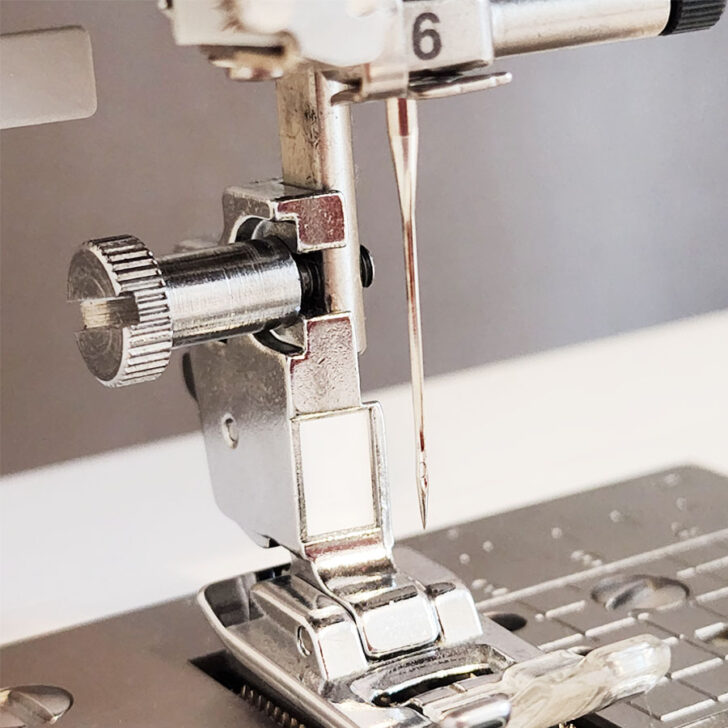
Over time, needles get dull, even though they still seem sharp. Micro-scratches and wear can affect how evenly your machine sews. And humidity in your environment can also cause some needles to rust.
Sewing heavy fabrics can also cause damage to your needles. If you sew over straight pins (which I don’t recommend), your machine’s needle might become a bit bent or dull. Another thing I learned was that using the wrong thread weight with the wrong size needle is a definite NO-NO!
✅ Related tutorial: Sewing thread sizes and how to choose
There’s no such thing as one needle that works for every project. Choose the right needle for your fabric, and you’ll have a much better experience. Using a ball-point needle on satin fabric instead of using a sharp point or using a universal needle instead of a stretch needle on jersey fabric could create skipped stitches, too.
✅ Related tutorial: The Ultimate Guide to Stretch Needles
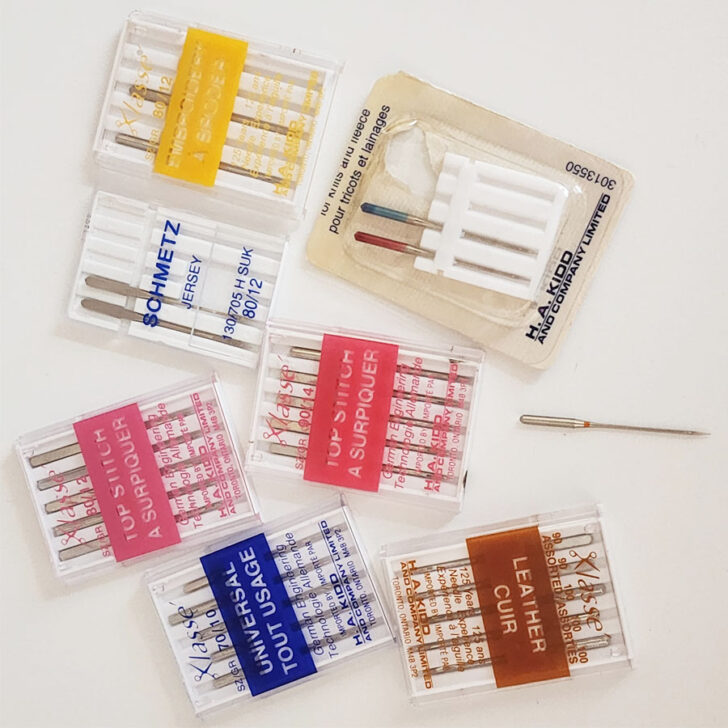
Sewing with double needles (sometimes called twin needles) poses unique challenges as well. I have written a tutorial about these issues that will help you understand more about diagnosing skipped stitch problems with twin needles that I think will help you. You can find it here.
Make a couple of seams on your test swatch. Did changing your needle help? If not, move on to step 3.
Step #3: Re-thread the Upper Thread
Re-thread your machine. Simply missing a thread guide or installing the thread spool incorrectly can cause tension issues. Those tension issues can lead to uneven stitching patterns and stitch lengths. I have done this myself. I would guess that even professional seamstresses have done this more than once.
✅ Related tutorial: How to thread a needle on a sewing machine
Make a couple of seams on your test swatch. Did this help? If not, move on to step 4.
Step 4: Check the Bobbin
It is easy to find out if your bobbin is the problem.
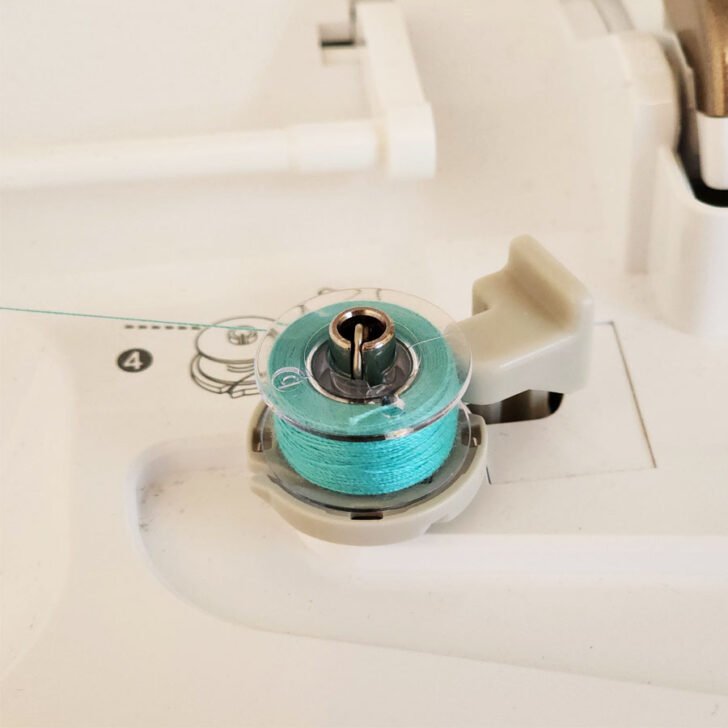
Simply pull the bobbin out and take a look! If you see the thread is loose or there are knots in the thread, your bobbin is NOT winding properly. Another indication that the tension is off, is that the thread is coming off unevenly – one side of the spool has more thread on it than the other.
✅ Related tutorial: Common Sewing Machine Bobbin Problems And Solutions (+Videos)
If you have an extra bobbin, rewind the thread. Otherwise…
- Check to see if your bobbin is cracked or damaged. If so, replace it
- Look for loose threads in the casing or casing area
- Verify you have the right size and type of bobbin for your machine
- Review your bobbin installation instructions – no judgment here, we can all have a senior moment even in our 20s! It’s particularly easy to miss-thread the bobbin when you use a few different machines for your projects. Ask me how I know!
Make a couple of seams on your test swatch. Did this help? If not, move on to step 5.
Step #5. Clean the Machine
Clean under the throat plate and between tension disks. If you are not sure where these parts are located, check your machine’s operating manual.
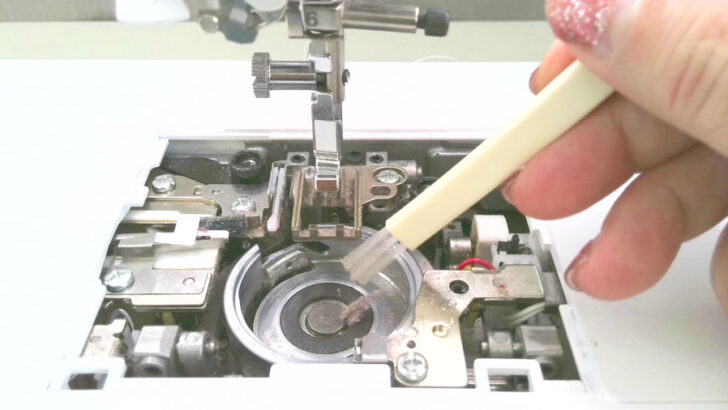
By the way, I wrote an article recently about a nifty gadget that radically simplifies sewing machine cleaning. It’s a mini sewing machine vacuum that makes it so much easier to clean up the dust and thread fragments in those hard to reach places! Check it out here.
I have found that it’s good practice to remove loose threads, dust and other sewing bits and pieces every five to ten days of sewing. Twice a month is a good rule of thumb for most active crafters, unless you are sewing daily with fabric that frays excessively or with heavy materials like denim. In that case, you’ll likely want to clean your machine more often.
✅ Related tutorial: Care Of Sewing Tools And Equipment
Make a couple of seams on your test swatch. Did this help? If not, move on to step 6.
Step #6: Check the Thread
Does your thread break easily by hand? Is this thread rated for the type of fabric you are using? Was it designed for the machine you are using? For example, serger thread and embroidery thread are not good for a regular sewing machine.
Both upper and bobbin thread quality, type and style affect stitch quality. My experience has taught me that choosing the right thread weight for the fabric I use is vital for making smooth, straight lines and maintaining evenly spaced stitches. Inexpensive or low-quality thread often breaks, and some inexpensive threads do not hold tension as well as higher quality threads.
Be sure you are using the right type of thread for your machine and your project.
✅ Related tutorial: Sewing thread types and uses
Make a couple of seams on your test swatch. Did checking and/or changing the thread help resolve the problem? If not, move on to step 7.
Step #7: Check the Presser Foot
An improperly installed presser foot can cause skipped stitches. Improper installation means that the presser foot does not contact the fabric at the right angle or pressure, so it cannot pull it through at the right speed to make evenly spaced stitches.
Refer to your sewing machine manual and reinstall your presser foot. Then, grab your test swatch and make a couple of seams to see if it solves the issue.
Still having problems? Your presser foot may be damaged. Or you may need to adjust your tension settings for the fabric you are using. Maybe you need a new attachment? I wrote an article about a walking foot that I really like that you might enjoy adding to your tool box. For now, if you still have skipped stitches, move on to step 8.
Step #8: Adjust the Tension
If your tension is too tight or too loose, it may be causing skipped stitches, and the right tension setting will depend on the fabric you’re using. Usually, you only have to adjust the upper thread tension.
✅ Related tutorial: Sewing Machine Tension Adjustment
Depending on the brand and age of your machine, you may have a button or a dial on your machine to adjust your upper thread tension. Normally, you will use the button/dial to adjust the tension.
If you have a digital machine, you will push the plus sign (+) for higher or the minus sign (-) for lower. Adjust the tension one number at a time and sew several seams to test your new tension setting. This may be all it takes to correct your issues. If not, move on to correcting the bobbin tension.
Adjusting the bobbin tension can be a bit more complicated, but don’t panic! I have written a step-by-step article dedicated to showing you how to adjust the bobbin tension.
Make a couple of seams on your test swatch. Did checking and/or changing the thread help resolve the problem? If not, move on to step 9.
Step #9: Check Other Sewing Machine Settings
If your machine is still skipping stitches, there are three more settings you should check: stitch length, stitch width (if using zig-zag) and stitch style.
Setting stitch lengths too short for heavy fabrics or too long for lightweight and sheer fabrics definitely causes the potential for skipped stitches. I have seen this come up many times in the past in my comment sections.
I have learned that thicker, heavier weight, threads need a longer stitch setting than lightweight threads over the years. So, the correct stitch length must consider not only the fabric type, but also the needle type and thread type and weight as well. Sewing is an art. Just like Pablo Picasso used different textures and colors to bring his masterpieces to life, a person who sews must bring many elements together to create their own works of art.
✅ Related tutorial: What is the stitch length and how to adjust it for different fabrics – a sewing tutorial
Make a couple of seams on your test swatch. Did checking and/or changing the thread help resolve the problem? If not, move on to step 10.
Step 10: Check How You Sew
Are you sewing too fast? Pulling your fabric? Slow down. Your machine feed dogs are designed to drag the fabric along at the precise speed necessary to make evenly spaced stitches. When you hold the fabric tightly from behind and or pull the fabric from the front, you disrupt this process. Disrupting the process typically results in either skipped stitches or puckering. Either way, your seams will look untidy. If you pull too hard, your thread will break.
Note: Some of the links on this page are affiliate links. This means I will receive a commission if you order a product through one of my links. I only recommend products I believe in and use myself.
If the problem is not solved – go to a repair shop. You probably have an issue that requires an experienced sewing machine professional to fix.
If your sewing machine isn’t working properly and you’re finding yourself struggling with it, you may want to consider the second option – investing in a reliable new machine. Though it may be more costly upfront, new machines are often worth the investment because they can provide years of reliable use.
Plus, technology has vastly improved over the years and modern machines are designed to be more resilient to the problems that plagued older models. So if you find yourself on the fence about whether to fix or replace your sewing machine, opt for the latter if possible – you’ll have a reliable piece of equipment that will last for years to come. It’s important to invest in a good-quality machine though–avoid the cheapest ones as they will usually cause more headaches down the line.
✅ Related tutorial: Best sewing machine for intermediate or advanced sewists: tips from the experts
You have worked your way through most of the common reasons that cause sewing machines to skip stitches. And, along the way, you have learned some skills that will help you become a better, more confident sewist – so, I hope that you won’t feel like this experience was wasted! For me, everything I learn helps me. There’s nothing like having the confidence to adjust your machine and diagnose issues on your own. I hope that it helps you, too.
Before I close, here are a few of the most commonly asked questions I hear about sewing machine skipped stitches and my answers based on my experiences.
Is your sewing machine having difficulty navigating thicker fabrics like fleece, felt, leather, and pleather? If your regular stitches are holding up but start to skip on thick fabric, the problem may be that the fabric is too thick for the machine to regularly make a normal thread loop for the hook tip to catch. If there is no loop the machine will skip the stitch.
Increasing your presser foot pressure can help prevent this issue from occurring. Many sewing machines have a regulator that allows you to adjust the pressure according to the type of fabric being used. With the presser foot pressure adjusted correctly, you will experience fewer skipped stitches.
The next reason is an incorrect needle/thread combination – for example, you installed the correct needle (like a leather needle, fleece needle, etc.) and its size is also appropriate for the fabric thickness – size 90/14 or 100/16 but the thread you are using is too thin for the needle (and the fabric). So use thicker thread (size 30).
There is also another reason. It is important to ensure the fabric under the presser foot of your machine is consistent in thickness to get proper stitches. However, this can be difficult with thick fabric – when hemming jeans for example – since you will have three layers of fabric around the hem but double that amount at the side seams. If you fail to adjust for this difference in fabric thickness, your machine may either skip stitches or sew many small ones together in one place.
There is a unique tool to solve this problem. It has different names. You can find it on Amazon as Bulky Seam Aid or as Dritz 915 Jean-A-Ma-Jig, or you can buy the tool from MadamSew, where it’s called Bulky Seam Jumper.
I have a Short YouTube video on how to use this tool – check it out here.
One of the reasons you see skipped stitches when sewing with stretch fabrics is the presser foot design. The wide opening in the presser foot allows the fabric to move up and down while the foot drags the fabric along. This motion prevents the hook from catching the thread and completing the stitch, creating that gap.
If you want to use a regular straight stitch when sewing stretch fabric, use a walking foot or a presser foot with a small round hole – this eliminates this problem. I have also heard that taping over the hole in the pressure foot will help to solve this problem. But I think the tape solution might leave a residue on your needle which might create problems of its own, so I am not sure this is a good idea. But make sure you are using special stretch thread in the needle and in the bobbin like Eloflex, otherwise, it’s not advisable to use a regular straight stitch.
Another reason for skipped stitches on stretch fabric might be the wrong type of needle. Using a special stretch needle will usually eliminate the problem but only if you are using special stretch stitches on your sewing machine created to sew stretch fabric.
Sewing stretchy knits on a regular sewing machine can often be a challenge and the resulting skipped stitches are an unfortunately common outcome. What many people don’t know is that knits work differently than woven fabrics, so you need to adjust your sewing techniques or risk ending up with messy stitches. The machine skips stitches if you don’t use a special stretch needle created to sew knits, if you use just a regular presser foot (use a walking foot or a roller foot for knits), if you don’t stabilize knit fabric with fusible interfacing for knits and if you don’t use special stretch stitches of your sewing machine created specifically for sewing knits.
Also, often knits fabric goes up and down under the presser foot (with the needle movement) so much that the thread doesn’t make a loop for the hook tips to catch. It’s called “flagging” and this is one of the reasons for skipped stitches on knits.
To solve this problem,
use a stretch needle (the correct size for the fabric!)
use fusible interfacing to stabilize knit fabric
use a walking foot or a roller foot
use special stretch stitches
But the best fix by far is using a serger or a coverstitch machine.
Is your sewing machine skipping zigzag stitches? It’s often caused by the same reasons as skipped straight stitches:
#1. Having the wrong settings for the fabric you are using
#2. Incorrectly threading the machine
#3. Incorrectly winding the bobbin
#4. Dirt accumulation
#5. Thread type and quality
#6. Worn, damaged or wrong needle
#7. Sewing too fast
#8. Improperly installed or wrong presser foot
#9. Thread tension problems
#10. Incorrect stitch length settings
#11. Pulling fabric when sewing
#12. Broken timing
Skipping stitches is a common problem with double needles when they become dull or the upper tension is too weak. Change the needle, and increase upper tension.
Use a walking foot for avoiding problems with the twin needles.
The other reason for skipping stitches is that the needle does not fit the material. Remember to use different types of twin needles. For example, a stretch double needle is not suitable for all materials; on some, it may begin to skip stitches. There are special twin needles for knit fabrics, woven fabrics, jeans, for decorative embroidery stitches.
To get a neat and even stitch with a double needle, the threads on both spools should be the same quality and thickness.
Insert the needle correctly. Check that threading is correct. Check your bobbin if it’s filled and inserted correctly.
You need to work with a double needle at a reduced speed. Do not sew too fast: for beginners, speed greatly affects the quality of the stitch.
Learn more about sewing with twin needles in my tutorial Twin needle sewing machine – everything you need to know about sewing with a twin needle
Is your sewing machine skipping decorative stitches? It’s often caused by the same reasons as skipped straight stitches:
Having the wrong settings for the fabric you are using
Incorrectly threading the machine
Incorrectly winding the bobbin
Dirt accumulation
Thread type and quality
Worn, damaged or wrong needle
Sewing too fast
Improperly installed or wrong presser foot
Thread tension problems
Incorrect stitch length settings
Pulling fabric when sewing
Broken timing
Also, your fabric may be too thick for the stitch design you have chosen. Try another stitch design, perhaps a simpler stitch pattern, and see if that makes a difference.
Is your sewing machine acting up? I created the ultimate troubleshooting guide to help you out and compiled a detailed list of solutions to common sewing machine problems. Many of these problems can be solved with some basic troubleshooting or maintenance. Is your thread getting tangled or breaking? I’ll walk you through the steps to fix it. Are you struggling with tension settings, broken needles, or jammed threads? I have tips for that too. Don’t let sewing mishaps get in the way of your creative flow. Check my guide and show your sewing machine who is the boss – Troubleshooting Common Sewing Machine Problems (+ Solutions)
Useful Info – Sewing Machine Troubleshooting
If you own a sewing machine long enough, you’re going to have to figure out how to troubleshoot your sewing machine at some point or another. While some sewing machine problems are preventable, others are inevitable. Learn how to troubleshoot your sewing machine with my printable PDF eBook. Whether you use a traditional sewing machine or a modern computerized one, work through this ebook before thinking about a replacement or going to a service center.
Did you find this tutorial helpful? If so, save this pin (see below) on your sewing board so you can come to this tutorial later when you need this information on sewing machine slipping stitches, and follow me on Pinterest for more tips, tutorials, and inspiration!
latest posts
- Butterfly Quilt Block Tutorial – Foundation Paper Piecing
- How To Sew Quilt Squares So The Corners Match
- Sewing With Fork Pins: How They Help With Pattern Matching, Slippery Fabric, And Seams
- How Much Fabric Do I Need? 21 Helpful Tips For Calculating Fabric Yardage
- Easy Simple Sewing Project: Fabric Jar Opener
- DIY Oven Mitts: Step-by-Step Sewing Tutorial
- Easy DIY Potholder: New Design
- Tailor’s Clapper: What It Does, Why It Works, And How To Use It Right
- Heat Resistant Batting for Sewing: What It Is, How It Works, and What Makes a Difference