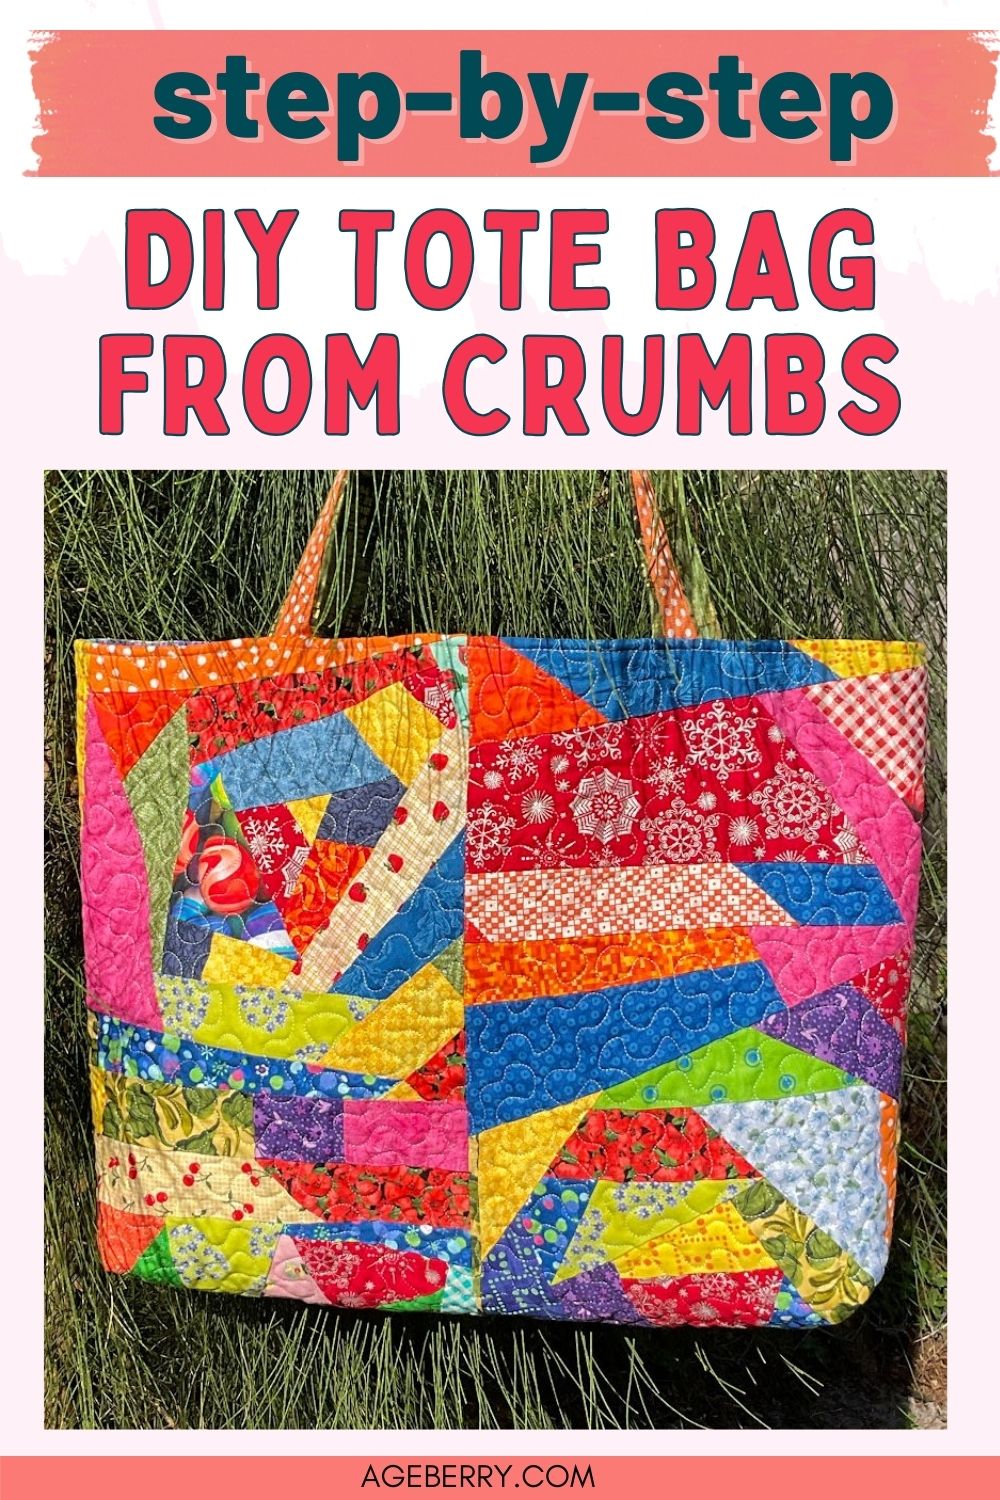
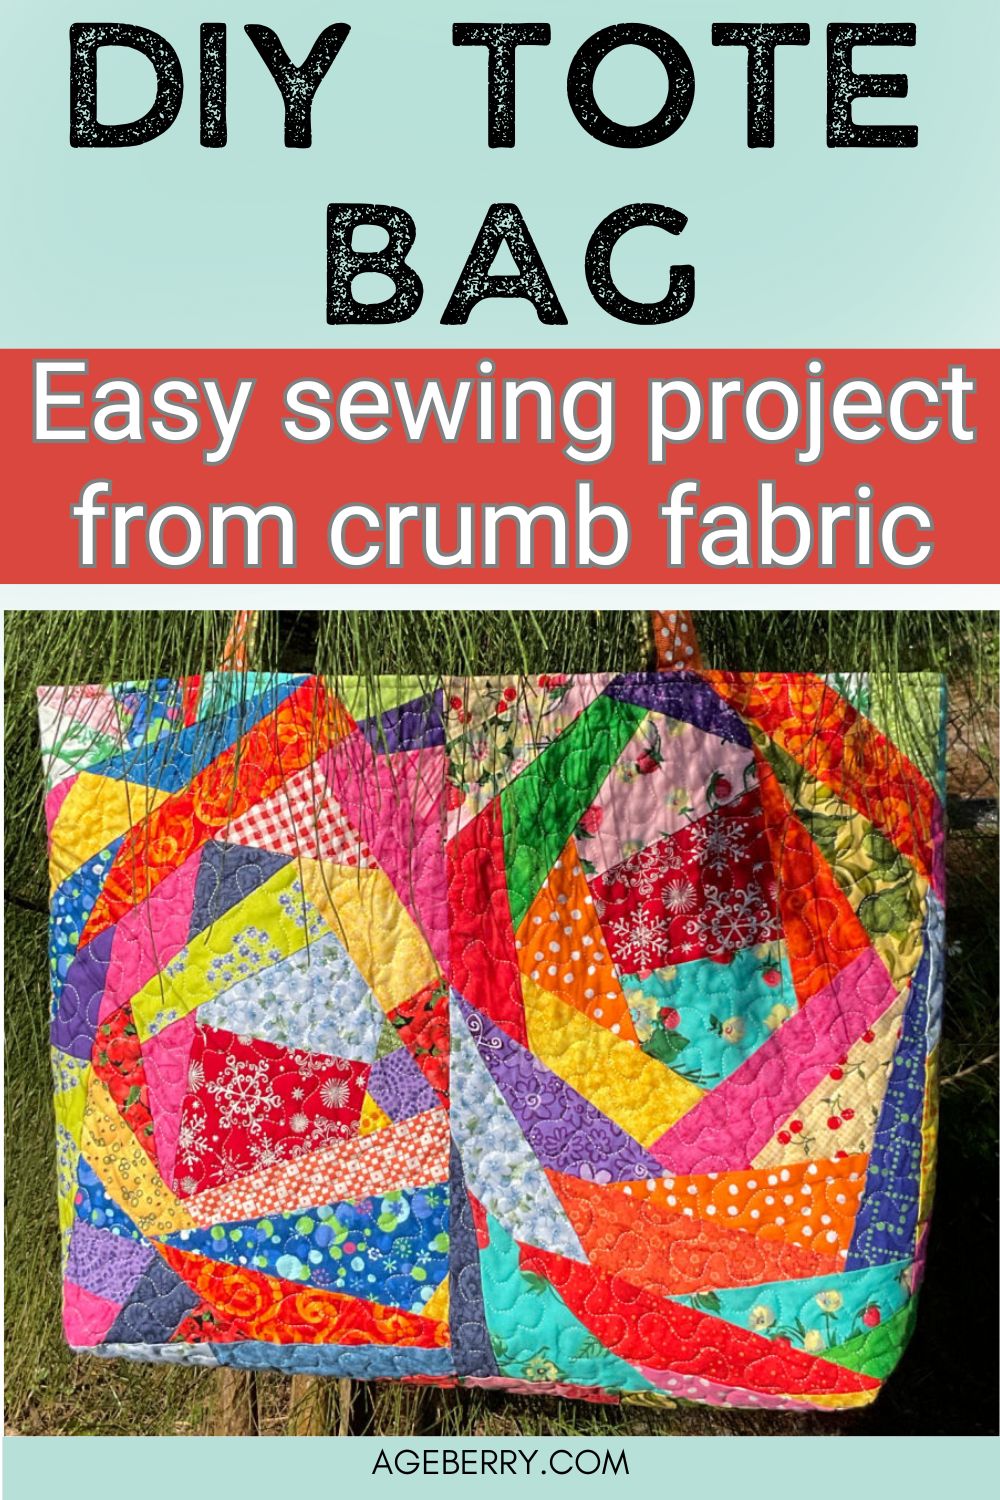
DIY Tote Bag Tutorial: How to Sew a Lined Bag with Boxed Corners
So there I was, facing a crisis of epic proportions: I needed a tote bag. Not a thrilling start, I know. But stay with me.
Four days a week, I drag myself to the gym for a pool class. I’m carrying a towel, a swimsuit, a water bottle, a change of clothes, and the sincere hope that my bag won’t give up under the weight of wet spandex.
Here’s where things get spicy: gym tote bags are where style goes to die. They all look like they were adopted from the same big-box bin. Charcoal grey, faded black, maybe a brave floral print if someone was feeling wild at checkout.
Meanwhile, the towels are fun, the swimsuits are colorful… but the bags? Mass-produced blah.
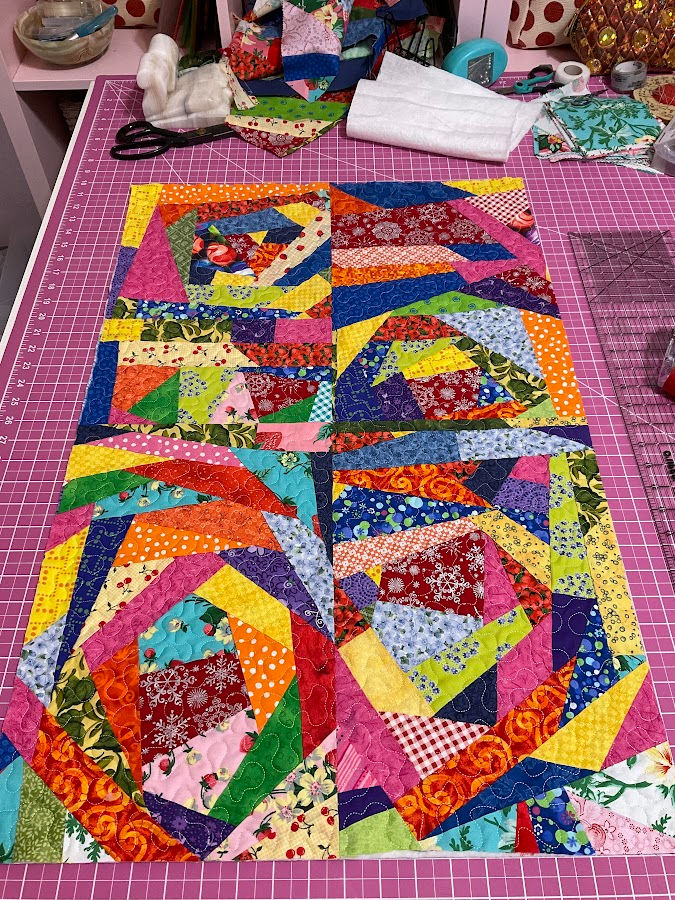
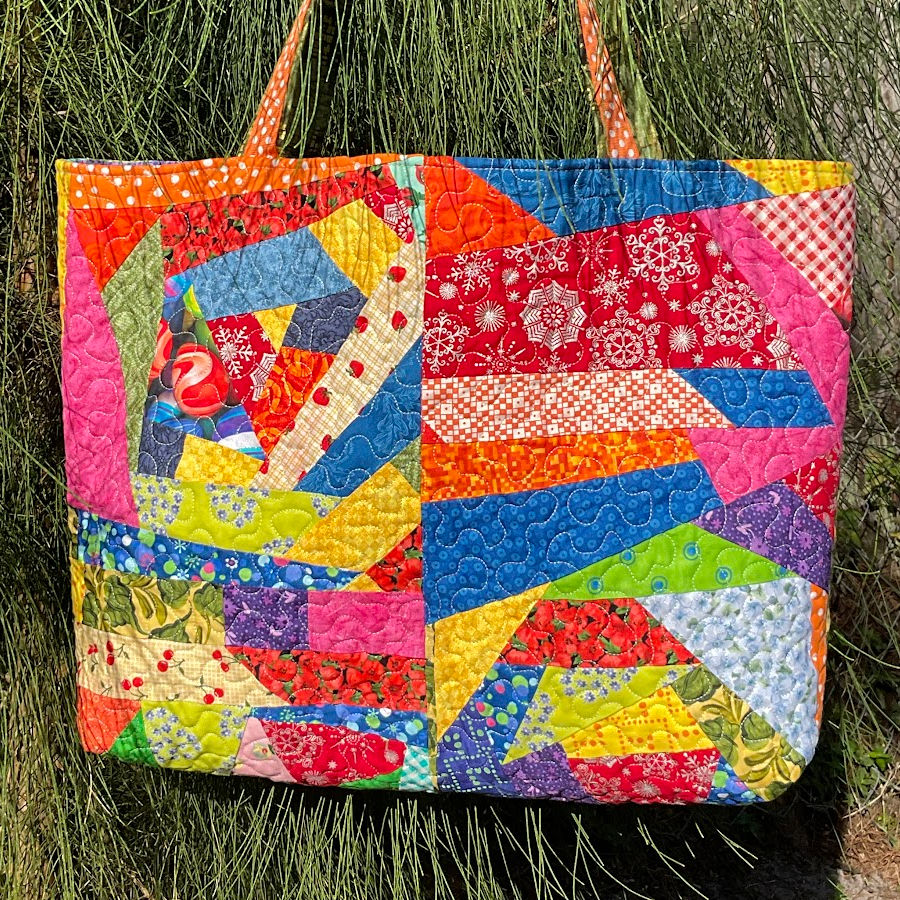
That’s when I snapped. Time for a revolution. A fabric revolution. I made my own tote bag. Bright, scrappy, and the best thing? It did not cost a thing. I made it from my crumb fabric, all the tiny fabric leftovers that normal people throw away but sewists hoard like treasure.
If you’re new to crumb quilting, don’t worry. I explained the whole process in this tutorial – Crumb Quilt Tutorial: Easy Ideas for Making Fabric from Scraps.
This bag isn’t complicated. You don’t need to be a sewing wizard. If you can sew a straight-ish line and operate an iron without fear, you can make this. This is the kind of project that makes people think you’re a talented crafter.
So yes, this is technically a tote bag tutorial. But it’s also a tiny stand against boring bags.
Note: Some of the links on this page are affiliate links. This means I will receive a commission if you order a product through one of my links. I only recommend products I believe in and use myself.
1. Materials You’ll Need (No Fancy Stuff, Just the Essentials)
Before we get into the stitching part, let’s talk about what you’ll need to make your gloriously not-from-Target tote bag.
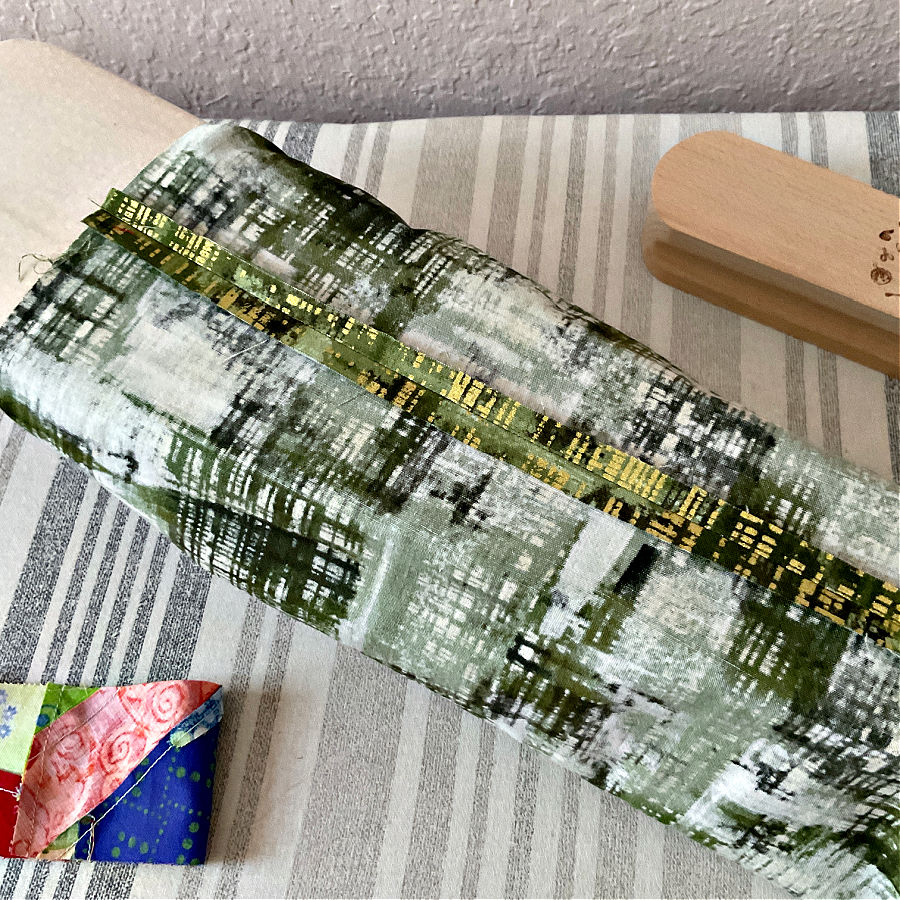
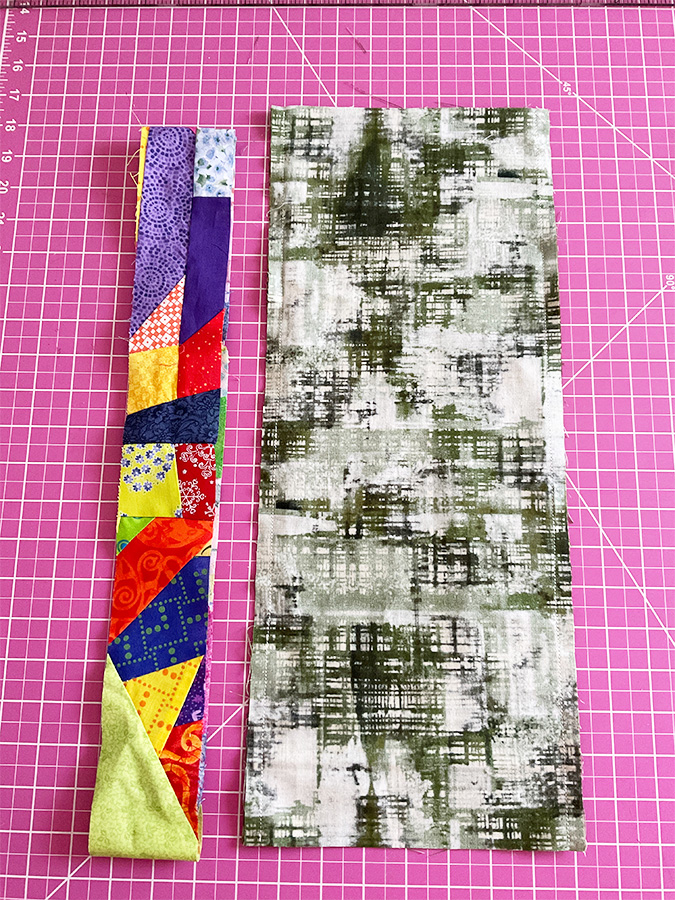
- Crumb Quilt Panel
This is the star of the show. Crumb quilting is basically what happens when you can’t bring yourself to throw away even the tiniest fabric scraps. You sew those bits and bobs together like a jigsaw puzzle with no rules. Chaos meets charm, and the result is a unique, scrappy fabric that tells its own story. If you’ve never made crumb fabric before, don’t worry— I walk through it step by step in this tutorial – Crumb Quilt Tutorial: Easy Ideas for Making Fabric from Scraps
- Lining and Pocket Fabric
Yes, it hides inside the bag, but that doesn’t mean you should grab just anything. Crumb quilts usually include a confetti explosion of color, so technically, any lining could work. But your tote is going to be hauling stuff—books, water bottles, lunch, maybe even the occasional rogue snack. That lining will get dirty. So instead of using something light and lovely, go for a darker quilting cotton. Think navy, forest green, chocolate brown. It still looks good, but it forgives the mess. Very important.
The lining doesn’t have to be a solid color. I used a dark green fabric with a subtle print, and it worked very well. Solid colors can feel flat, especially next to crumb quilting. In my case, I used the same fabric for the lining that I had already used as the backing for the quilted crumb panel.
- Handle Fabric
Your handles will carry the whole weight of this operation, so choose wisely. Go for cotton that feels durable in your hands, or a canvas if you want something that says “yes, I can hold three books and a damp towel.” If it frays just from you looking at it, skip it. You want stylish, yes, but also strong.
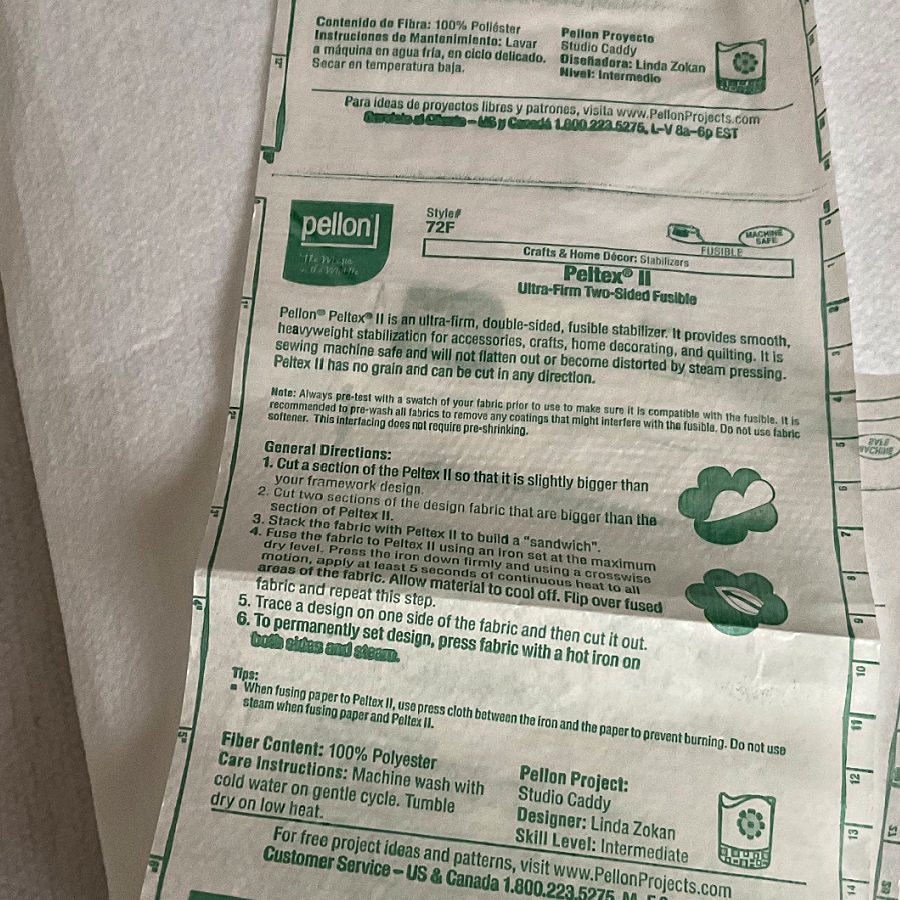
- Double-Sided Fusible Stabilizer
I used Pellon ultra-firm double-sided fusible stabilizer because it adds structure and sticks where you want it—no floppy straps allowed.
✅ Related tutorial: How To Use Fusible Interfacing

- Strong Ribbon (Optional, but Fun)
Think of this as handle armor. It adds another layer of reinforcement and makes your bag look a little more polished. You can skip it if you’re going for a soft or minimalist vibe, but if you have a ribbon stash begging to be used, this is your moment.
- Basic Sewing Tools
You’ll need the usual suspects: fabric scissors, matching thread, pins or clips, an iron, and a safety pin for sneaky threading jobs. A seam ripper for moral support is optional, but you’ll probably reach for it once. Or twice. A measuring tape and some patience will help, too. Ok, a lot of patience.
That’s it! Nothing fancy, but everything with a purpose. I always suggest use good quality notions, it saves a lot of time and aggravation. Sometimes even saves money!


2. Cutting Instructions
Here’s where the measuring tape comes out and the fabric starts to look like a plan. Don’t worry, we’re not drafting blueprints for a cathedral—we’re just slicing some rectangles. If you can measure a pizza box, you can do this.
- Outer Bag:
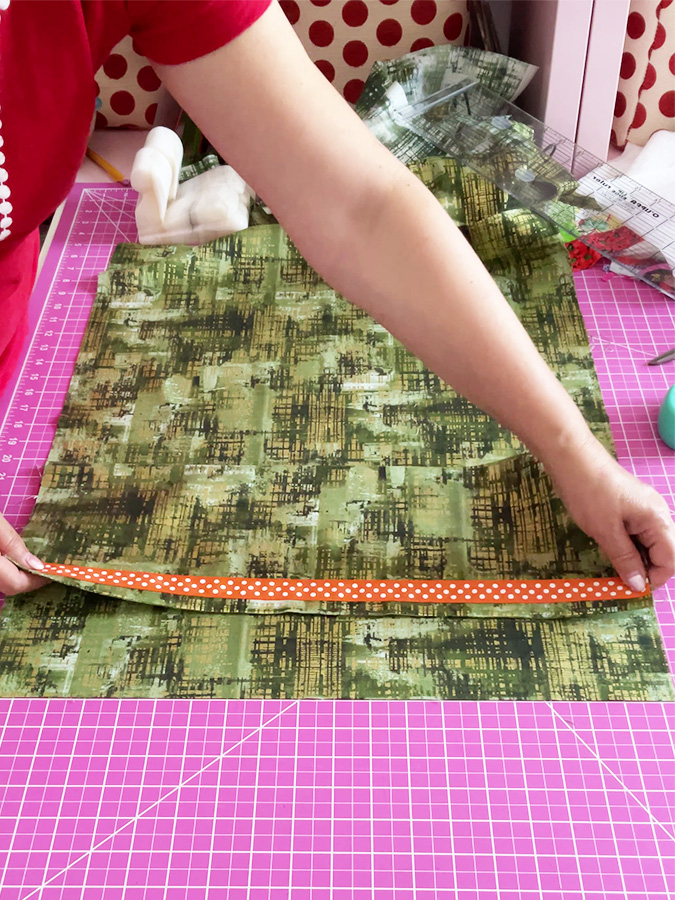
You’ll need one rectangle measuring 21” x 31”. This is the body of the tote—the part that proudly shows off all those stitched-together scraps you refused to throw away. It sets the tone for the whole bag. - Handles:
Cut two strips, 26” long and 3” wide. These will turn into your sturdy shoulder straps. We’ll fold, fuse, and reinforce these later into something that can handle real-life tote duty. - Lining:
Here’s where things get clever. Originally, my lining was cut the same size as the outer bag. But fabric inside bags has a sneaky habit of puffing up and wrinkling. So we trick it. Cut your lining at 20¼” x 30¼”— just a little smaller than the outer piece. This helps it stay tucked neatly inside. - Facing Strip (Optional but Delightful):
To add a surprise peek of crumb fabric at the top edge of the lining, cut a 40.5” x 2.5” strip. It peeks over the top just enough to say, “Yes, I even coordinated the inside.” - Pockets:
Cut one piece 16” x 21” from the same fabric as the lining. This will become a handy trio of inner pockets. Once folded, sewn, and divided, it gives you compartments for keys, lip balm, or whatever small thing you don’t want to lose in the abyss of tote space.
- Stabilizer strips:
Cut two strips, 24” long and 1 1/16” wide.
Now your fabric pieces are cut, stacked, and ready for their big debut. This is the calm before the sewing storm. And honestly? It’s the most organized your project table will look for a while.
3. Making the Outer Bag (Or, the Birth of the Crumb Tote)
This is where your crumb quilt stops being a flat rectangle and starts its transformation into something you can actually put stuff in.
Step 1: Fold and Sew the Sides
Take your crumb quilt rectangle and fold it in half with right sides together—so the pretty side is on the inside for now. You should now have a rectangle with the fold at the bottom and raw edges at the sides.
Sew both side seams using a ⅜” seam allowance (or whatever works for your crumb piece and stitching style). Don’t sew the top—just the two sides. The bottom is of course the fold of the initial rectangle.
Not very exciting yet, but hang tight.
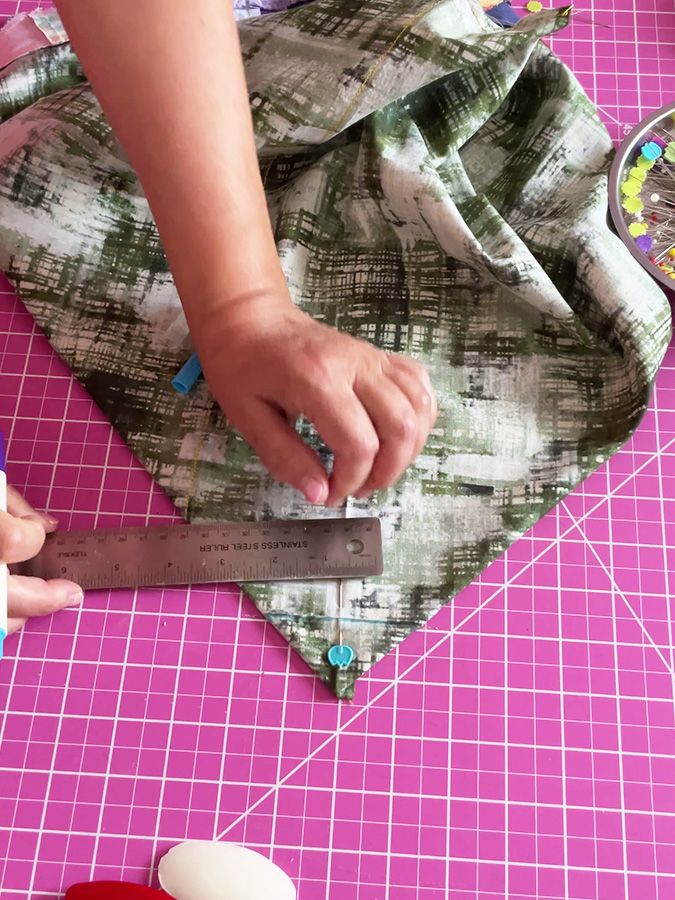
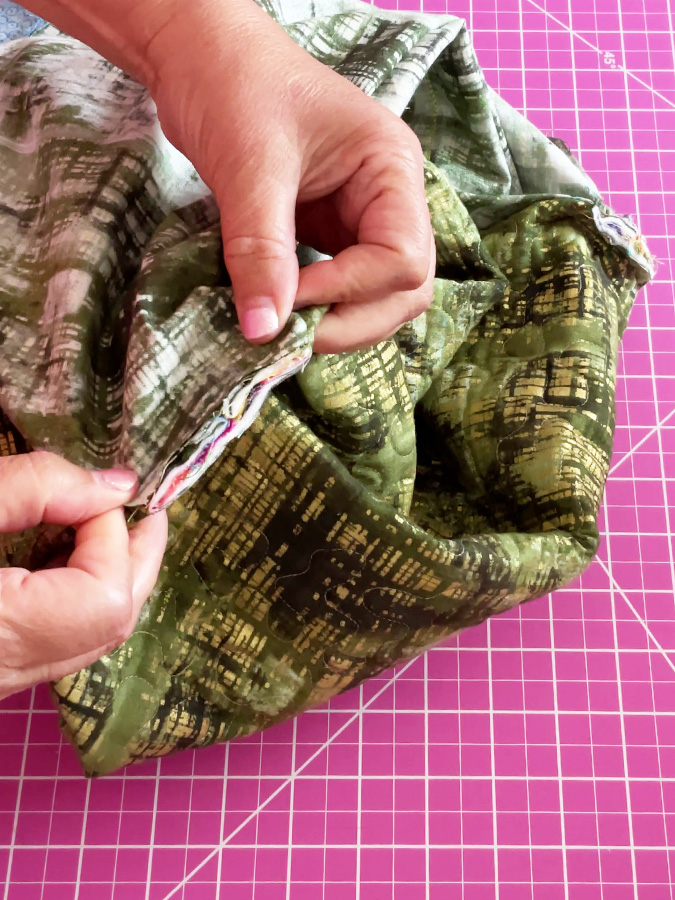
Step 2: Box the Corners (a.k.a. Give the Bag a Bottom)
This part gives the bag its shape—and its ability to hold more than one awkwardly shaped item at a time.
Here’s how you do it.
Starting at one bottom corner of your tube, pinch the fabric so the side seam lines up exactly with the bottom fold. The point here is to align the side seam with the bottom fold line. You can do that one side seam at a time.
Use your fingers to flatten this corner into a triangle. The seam line should run straight down the bottom fold line.
From the tip of the triangle, measure 1½” up along the seam.
At that point, draw a line perpendicular to the seam. It will be 3″ long (it will be 1½” on each side of the seam).
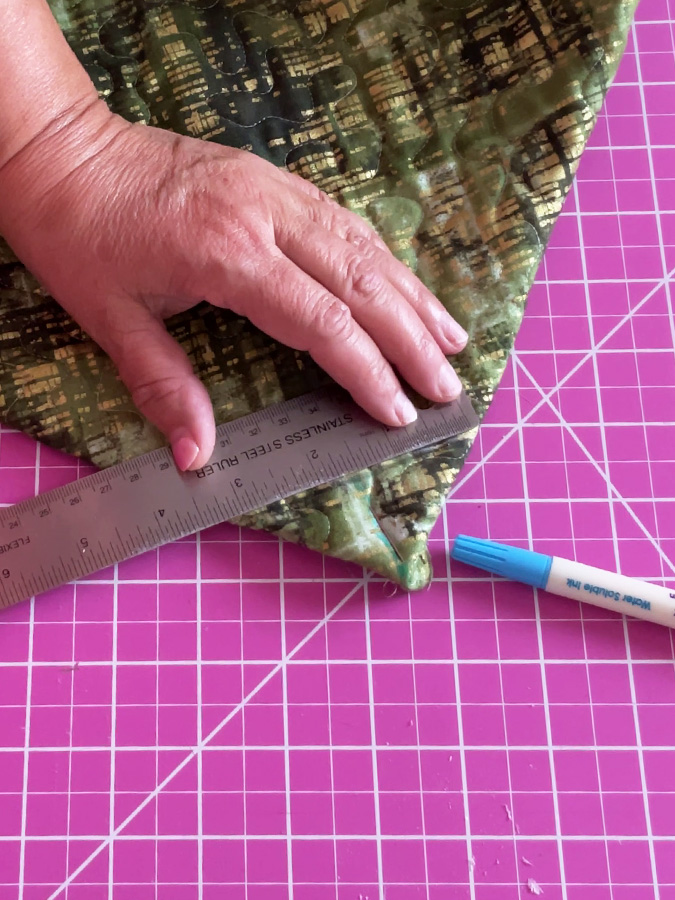
Double check that the bottom fold and side seam line up perfectly. This is the time to bring out pins and boss those seams into alignment.
Sew directly on that marked line. Make sure your stitch line is straight across and perpendicular to the seam—no slanted mystery seams here.
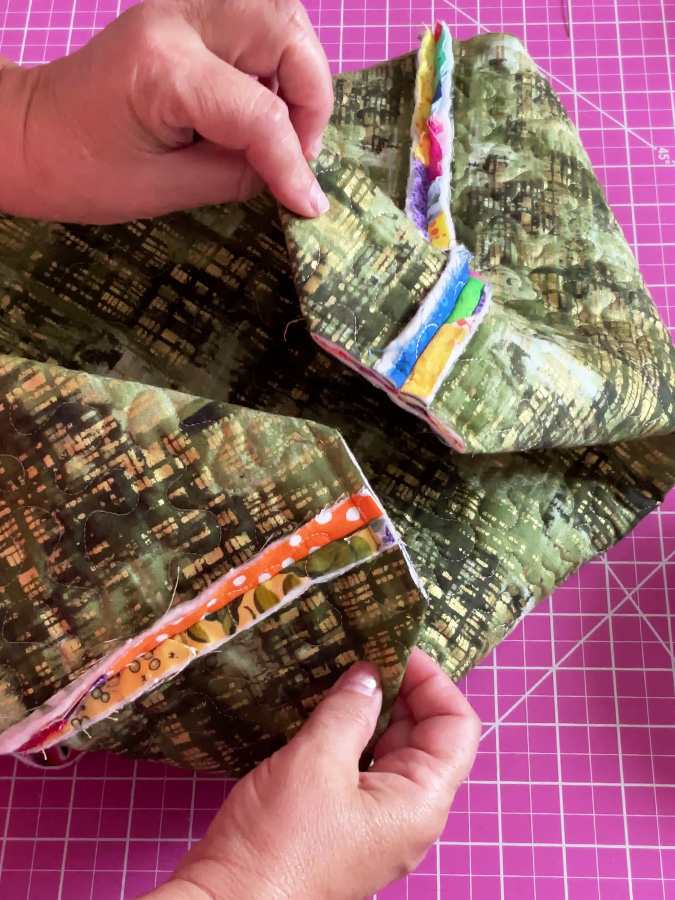
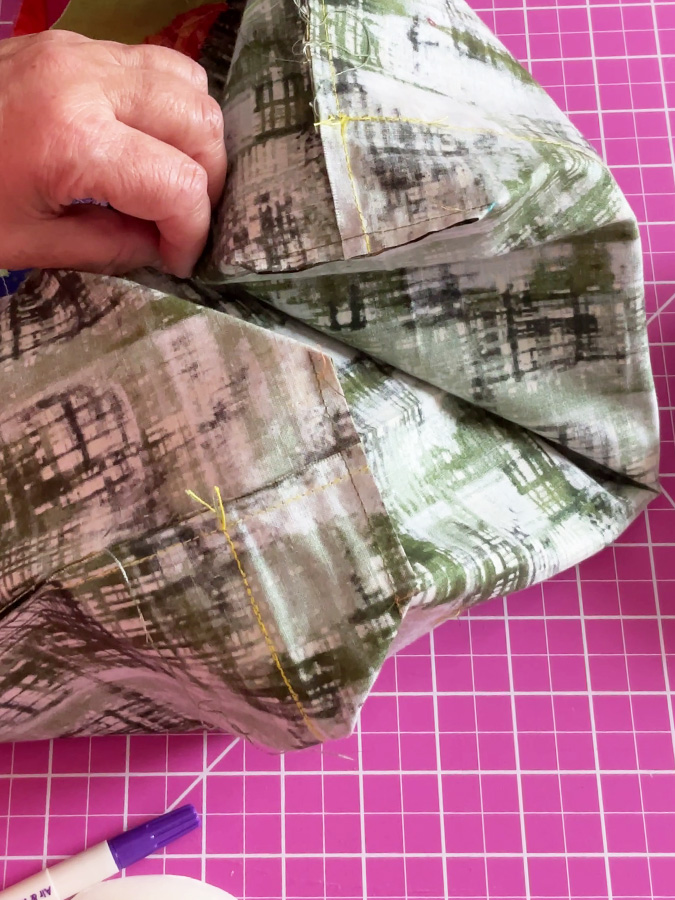
After sewing the corner seam, trim off the triangle, leaving a ½” seam allowance.
Repeat on the other side, and that’s it —you’ve boxed your corners.
Now your crumb tote has a real bottom. The future bag is still inside out at this point.
4. Pockets
Every great tote bag needs at least one pocket. This one gets three. Because while the outside says “fun and scrappy,” the inside says “I like to be organized.”
Here’s how to whip up the inner pocket panel.
Step 1: Make the Pocket Tube
Take your 16” x 21” pocket fabric and fold it in half, right sides together, so the 16” sides meet. You’ll now have a folded piece that measures 8” x 21”.
Sew along the long edge to create a tube. No need to sew the short ends. Press the seam open so the pockets lie flat and don’t create extra bulk later.
Turn the tube right side out and press it flat, placing the seam along the bottom edge so it disappears into the fold.
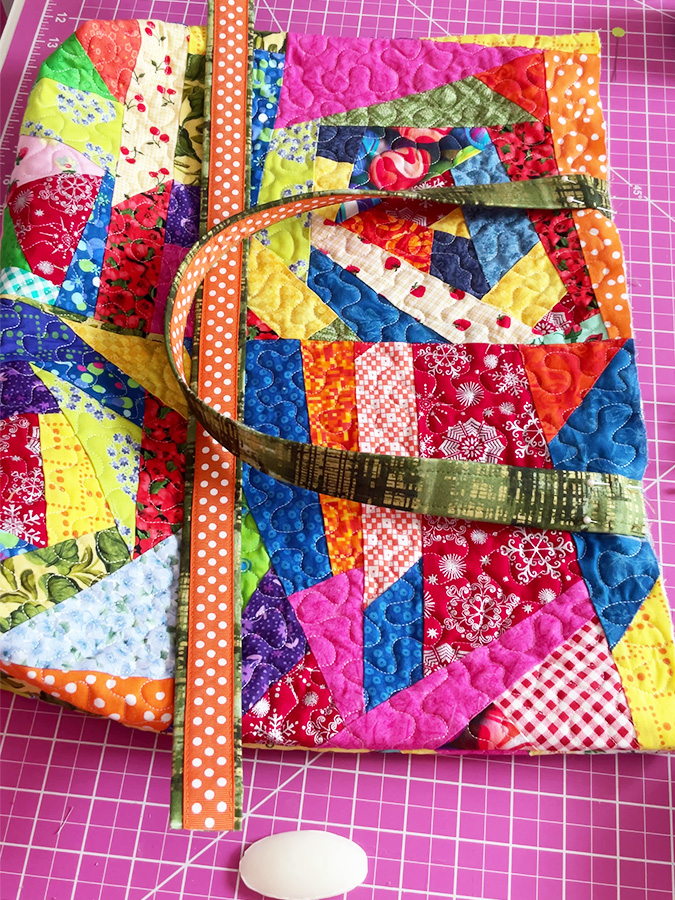
Before attaching the pocket to the lining, sew the same ribbon used for the handles along the top edge of the pocket tube. This adds structure, helps the pocket hold its shape, and quietly ties the inside of the bag to the handles on the outside. I like to use a fabric glue stick to baste the ribbon in place first. It holds the ribbon exactly where I want it, doesn’t gum up the needle, and keeps everything from shifting while I sew.


✅ Related tutorial: How to Use Fabric Glue: an Essential Guide for All Skill Levels
Step 2: Place the Pocket on the Lining
Lay your lining fabric flat, right side up. Now decide where you want the pocket to go. Here’s a good rule: don’t place it too high. If it’s too close to the top edge of the lining, everything will tumble out the second you lay the bag on a table.
A good spot is usually 3 to 4 inches from the top edge of the lining. That way, things stay put—even when your tote is taking a nap on the kitchen counter.
Pin the pocket panel in place.
Stitch along the bottom edge of the pocket to secure it to the lining.
Step 3: Divide Into Three Pockets
Now for the fun part: custom pockets.
Use a ruler to measure out the spacing. Three pockets across a 21″ panel gives you divisions about 7 inches apart. But feel free to mix it up depending on what you plan to stash—maybe one wider, one narrow, one medium. Or even more divisions, for more small pockets – it’s up to you.
Pin along your chosen lines first to test the spacing. Slide your hand in and imagine grabbing your keys, tissues, a mini tape measure, or a snack you forgot about. Adjust as needed.
Once the layout feels right, sew straight down from the top of the pocket to the bottom edge to divide it into sections. Backstitch at the top of each line—these areas take a lot of stress over time.
Just like that, your lining now has some built-in organization.
5. Lining the Situation (Literally)
The lining gets almost the same treatment as the outer bag, with one very important difference that deserves its own paragraph. Possibly two.
Start by folding the lining fabric right sides together, just like you did with the crumb quilt piece. Sew the two side seams. At this point, everything feels familiar and comfortable. This is exactly where confidence sneaks in and causes trouble.
The Turning Opening (Please Read This Part)
You must leave a small opening in one side seam. About 4–5 inches is plenty. This opening is how the entire bag will eventually turn right side out.
And yes, I forgot.
Completely forgot.
The last time I made a tote bag was seven years ago, which is apparently long enough for this critical step to fall out of my brain entirely. So I happily sewed the lining into a perfect, sealed tube and admired my work… right up until I remembered that bags do not turn themselves inside out through sheer determination.
So leave the opening. Future-you will appreciate it. Past-me would have, too.
Box the Lining Corners
Now box the corners the same way as the outer bag.
Flatten one bottom corner so the side seam lines up with the bottom fold. Pin carefully so everything stays aligned. Sew a straight seam across the corner using the same seam length you used for the outer bag. Keep the seam perpendicular to the side seam so the bottom sits flat later.
After sewing, trim off the excess fabric, leaving a seam allowance. Repeat for the second corner.
At this stage, the lining should look like a bag, just slightly smaller and still inside out—with one very intentional hole in the side seam. This is exactly where you want to be before moving on.
6. Handles That Mean Business
These handles are doing a lot of heavy lifting—sometimes literally—so this is not the place for flimsy fabric that gives up halfway through the day. These are sturdy, structured, and still nice to look at.
Step 1: Sew the Fabric Tube
Take each handle strip and fold it right sides together along the long edge. Sew the long seam to create a tube. This step is straightforward and mercifully drama-free.
Open the seam allowances right away to reduce bulk. I finger-press them open using a wooden finger presser. This keeps the handle smooth and flat without introducing heat at this stage, so don’t use the iron yet.
Turn the tube right side out using a safety pin. This part is uneventful. The tube is wide enough that everything slides through easily, with no wrestling. Sometimes sewing just cooperates, and this is one of those moments.
Press the tube flat with the seam centered. The pieces of interfacing are not used yet.
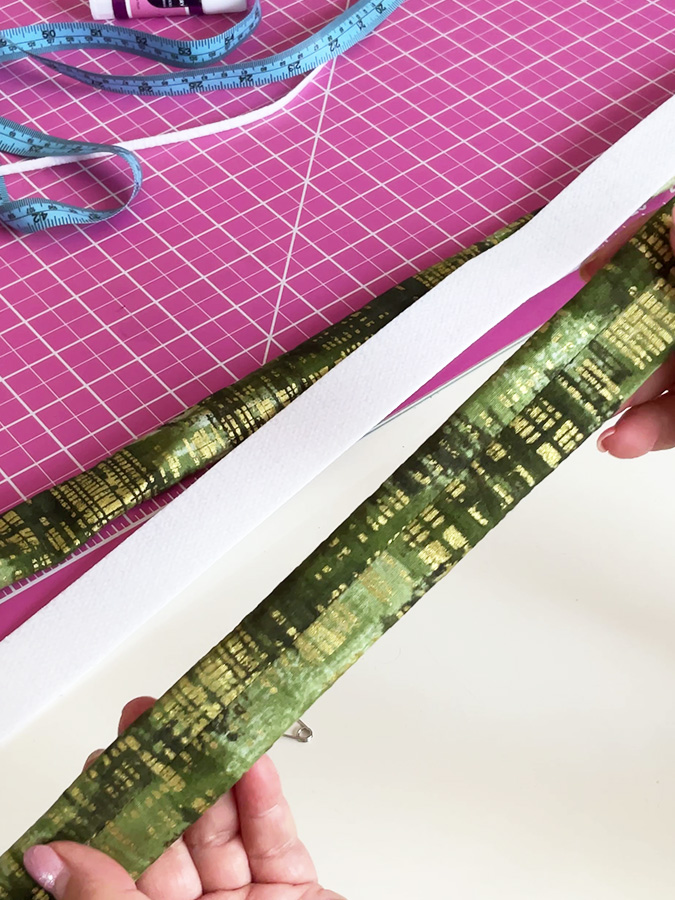
Step 2: Add the Interfacing (The Backbone)
Cut the double-sided interfacing strip 1⅛” wide. The finished fabric tube measures about 1¼” wide, and making the interfacing slightly narrower helps it slide in easily and sit flat inside the handle without creating stiff edges.
Cut the interfacing two inches shorter than the handle, leaving about one inch free at each end (24”). This small detail makes a big difference later, since it keeps the ends flexible and easy to sew onto the bag—no bulky layers fighting your machine right where precision matters most.
Attach a safety pin to one end of the interfacing and slide it into the fabric tube. This step went in easily for me, and with the right interfacing width, it should behave nicely for you as well.
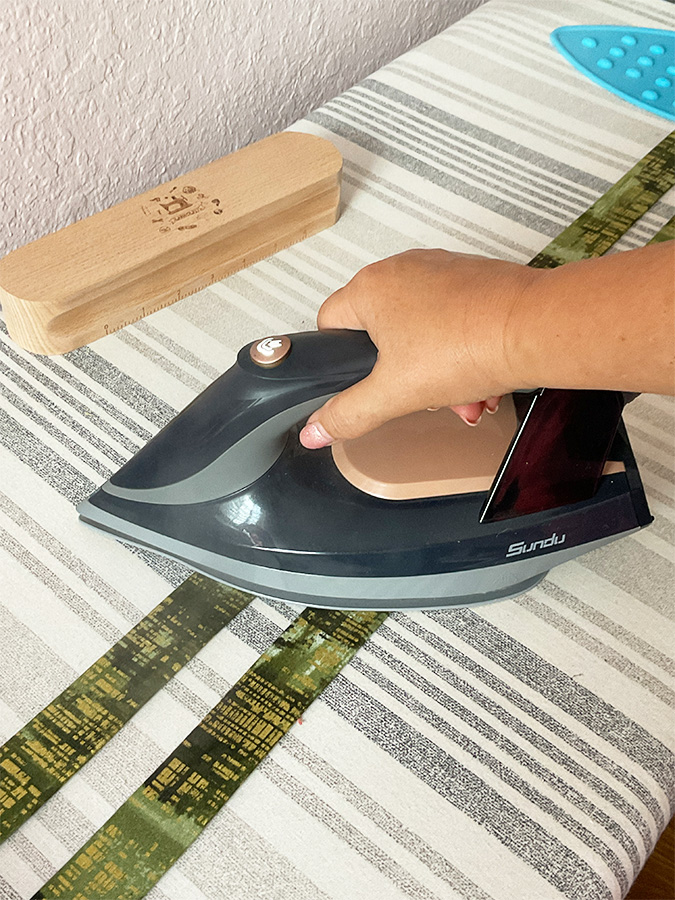
Once the interfacing is fully inside and sitting flat, press the handle with a hot iron to activate the fusible layer. Take your time here. You want the interfacing fully bonded so the handle keeps its shape.
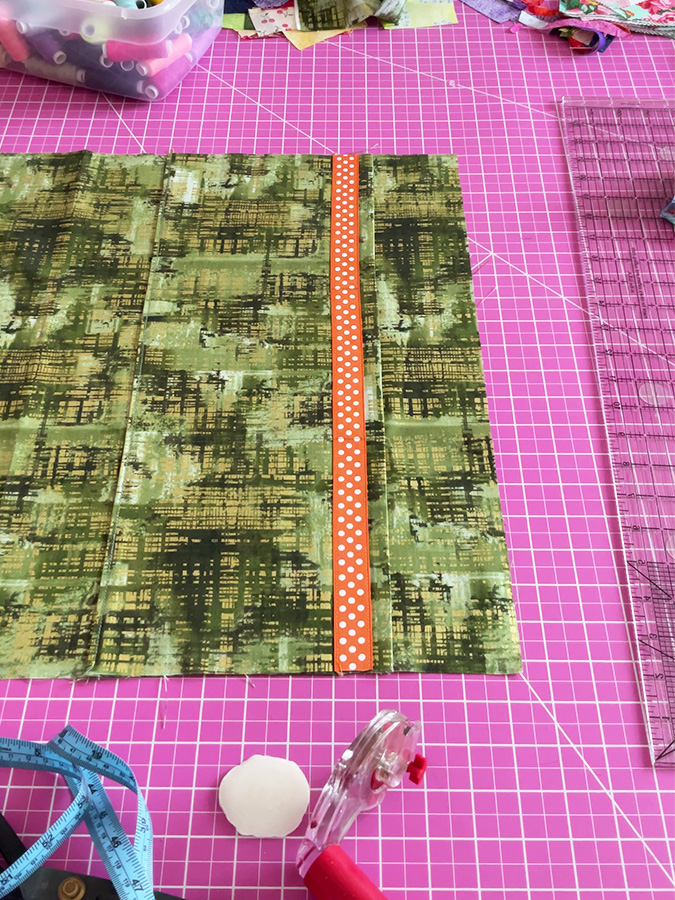
Step 3: Ribbon for Strength and Style
Lay the ribbon centered on top of the handle and pin it in place. Then stitch along both long edges of the ribbon.
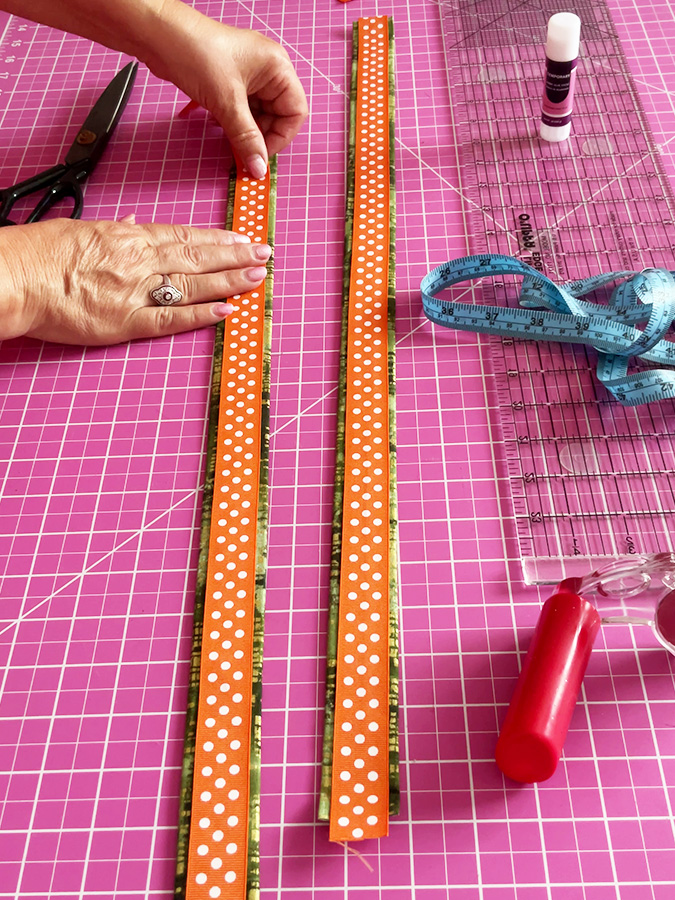
This step does two things at once: it reinforces the handle so it can carry real weight, and it adds a finished, intentional look. Practical and decorative is always a good combination.


When you’re done, these handles feel solid in your hands. These are not delicate spaghetti straps. These handles mean business.
Finish by pressing the handles well so they’re crisp, flat, and ready to be attached to the bag.
7. Attach the Handles (Straight and Not Twisted, Please)
Now it’s time to give the bag something to grab onto.
Lay the outer bag flat with the right side facing up. Find the side seams and measure in about 43/4 inches from each one along the top edge. This spacing works well for a comfortable shoulder carry without pulling the bag inward.
Pin one end of each handle at those marks. Each handle has about 1 inch of fabric left free at both ends (with no interfacing there on purpose). Since the bag has a ½-inch seam allowance, trim the handle ends down to ½ inch, then line up the raw edges of the handles with the raw edge of the bag before stitching.
The handles should point downward into the bag (the ribbon facing towards the bag).
Make sure the handles are not twisted. This is one of those things that looks fine until it very much isn’t.
Once everything is aligned, stitch each handle end in place. Reinforcement stitching will come later when the lining joins the party.
At this stage, the bag finally starts to look like a bag.
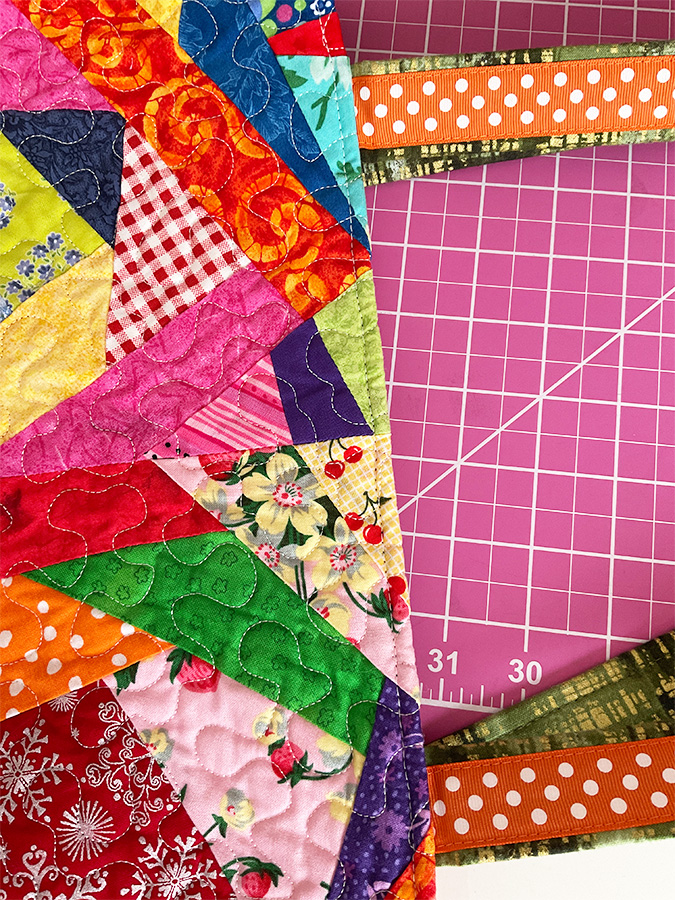
8. The Crumb Fabric Facing (The Detail I Almost Skipped)
Right when I thought I was done cutting and sewing the lining, I remembered something important. The very top of the lining is visible from the outside once the bag is finished. And plain lining fabric there felt like a missed opportunity—especially when I still had crumb fabric leftovers on the table.
So this step moved up in importance very quickly. That said, this step is completely optional. You can keep the lining as is and skip the crumb fabric facing if you prefer a simpler finish.

Why Add a Crumb Fabric Facing
This narrow strip sits right at the top of the lining and peeks out when the bag is finished. It ties the inside to the outside and makes the whole bag feel intentional.
And yes, this came from leftover crumb fabric after cutting the four rectangles for the outer bag. Scraps doing useful work again.
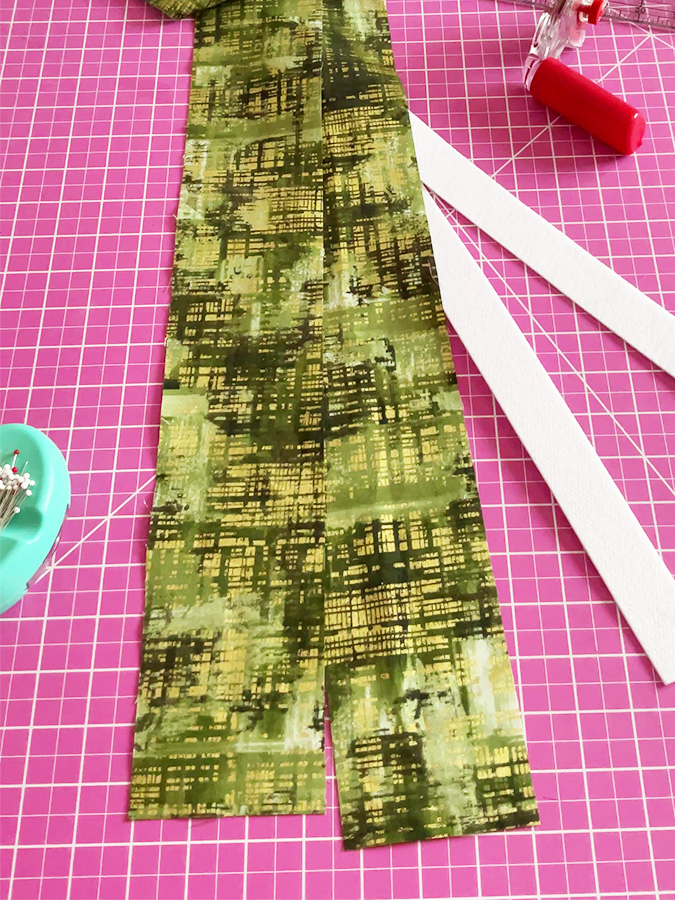
Sizing the Facing Strip
After sewing the outer crumb fabric panels together, the top edge of the bag measured exactly 40 inches.
So I cut my crumb fabric facing to match:
- 40.5” wide
- 2.5” long
Sewing the Facing into a Loop
I sewed the short ends of the crumb strip together to form a continuous loop exactly 40” in length.
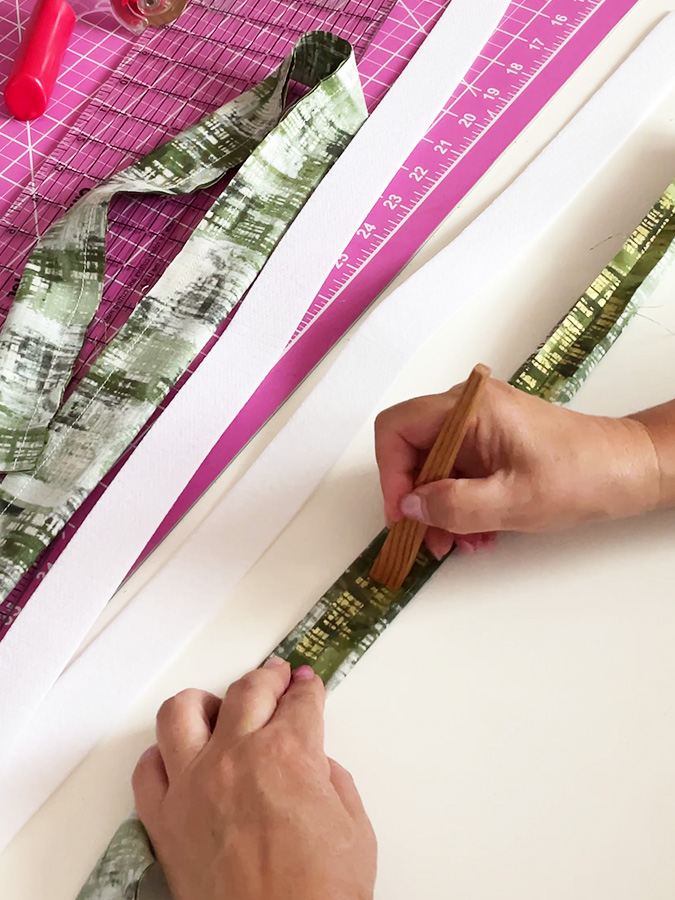
Preparing the Lining
Before attaching the facing, I trimmed 2 inches off the top of the lining. This makes room for the crumb fabric strip so the final lining height stays correct.
At this point, the top edge of the lining measured about 38.5 inches, which is smaller than the crumb facing loop. That difference matters in the next step.
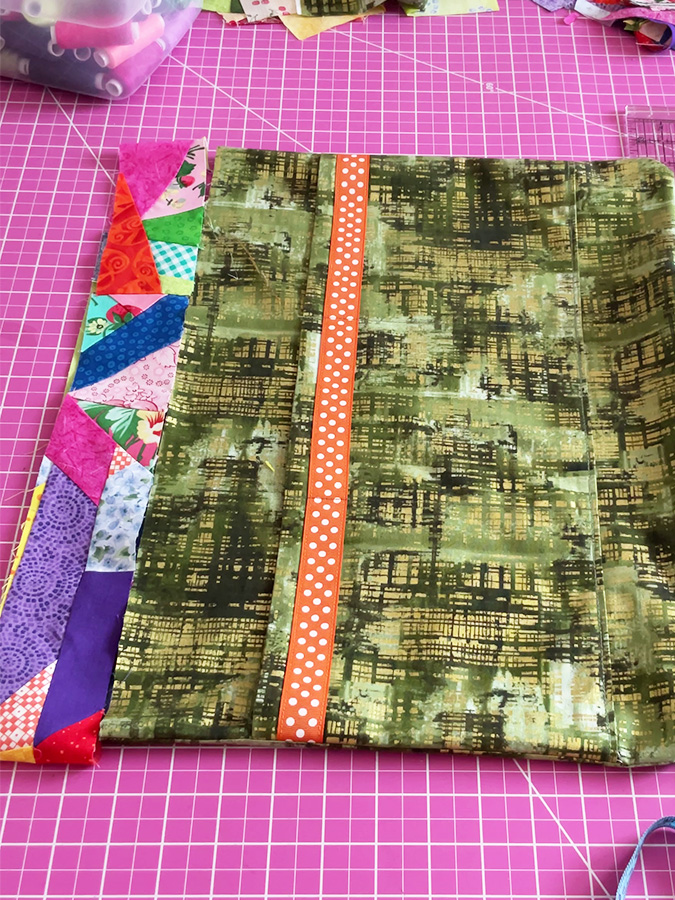
Attaching the Facing
Pin the crumb fabric loop to the top edge of the lining, right sides together, using a ½-inch seam allowance.
Because the crumb strip is wider than the lining, you’ll need to ease the facing slightly as you sew. This just means gently distributing the extra length as you pin and stitch—no pleats, no stretching, just patient adjusting.
Take it slow and let the fabric settle where it wants to go.
Once sewn, press the seam toward the lining. That crumb fabric strip now sits exactly where it belongs—right at the top, ready to show off once the bag is finished.
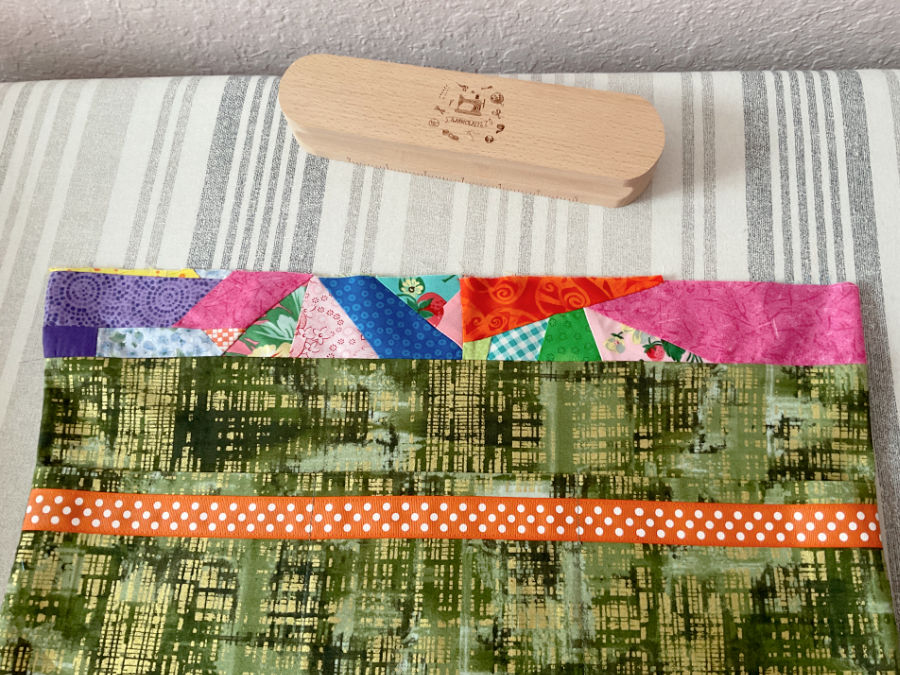
This little detail doesn’t take long, but it makes the lining look finished instead of forgotten. And it uses up more crumb fabric, which always feels like a win.
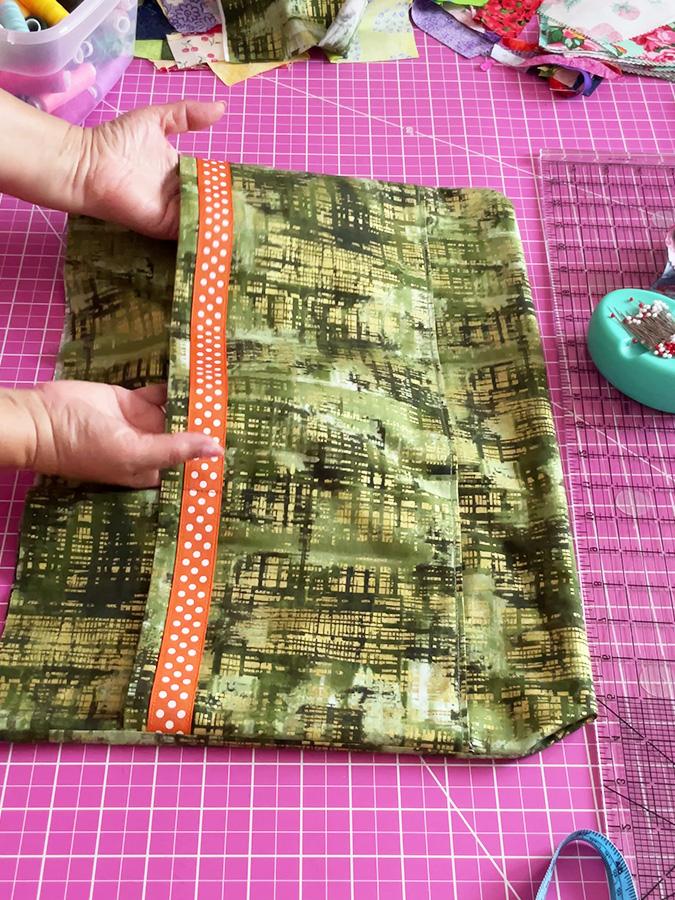
9. Joining the Lining and the Outer Bag
This is the moment where everything finally comes together.
Turn the outer bag inside out (right side in). Leave the lining right side out. Now slide the lining down into the outer bag so the right sides are facing each other. The lining should sit neatly inside, with the top edges aligned.
Take a moment to smooth everything out. Make sure the side seams of the lining line up reasonably well with the side seams of the outer bag. Perfection isn’t required, but chaos is not invited here.
Now check the handles. They should be tucked inside the bag, sandwiched between the lining and the outer bag, with only the sewn ends visible. This is another good pause-and-look moment. Handles have a talent for sneaking out of position when you’re not watching.
Pin all the way around the top edge, securing the lining, outer bag, and handle ends together.
Sew around the entire top edge using ½ inch seam allowance.
Once this seam is done, the bag is officially one piece. Still inside out, still mysterious—but fully assembled.
10. Securing the Boxed Corners (So the Lining Stays Put)
This step is optional—but once you do it, you’ll never skip it again. It solves one of the most common tote bag annoyances: the lining trying to climb out of the bag every time you use it.
At this point, the lining and outer bag are already sewn together at the top, and the bag is still inside out.
Why This Step Works
Both the outer bag and the lining already have boxed corners. By stitching those corners together at the seam allowance, you quietly anchor the lining to the bag. Nothing shifts. Nothing balloons. Nothing makes a break for freedom later.
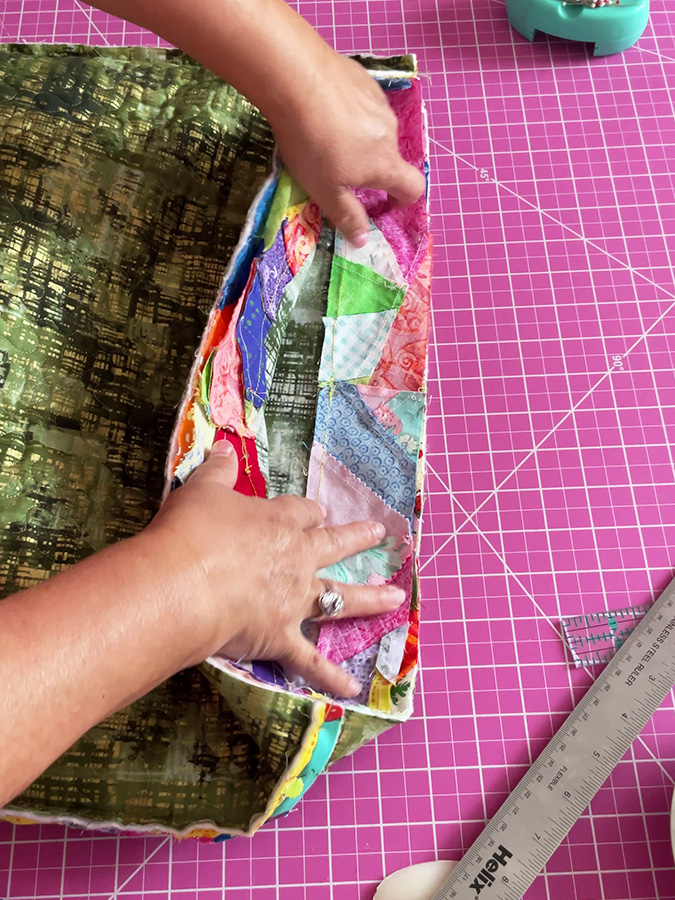
Separate the Lining and Outer Bag
First, gently pull the lining out of the outer bag so the two layers are separated. You want the lining and the outer bag to be fully visible as two separate “bags,” connected only at the top seam.
Lay everything flat so you can clearly see the boxed corners of both layers.

Match the Corresponding Corners
Pick one corner of the outer bag and find the matching corner of the lining. These are the coordinating corners that will sit on top of each other once the bag is turned right side out.
Line them up so:
- The boxed corner seams match
- The seam allowances are aligned
- Nothing is twisted
Pin through the seam allowances only.
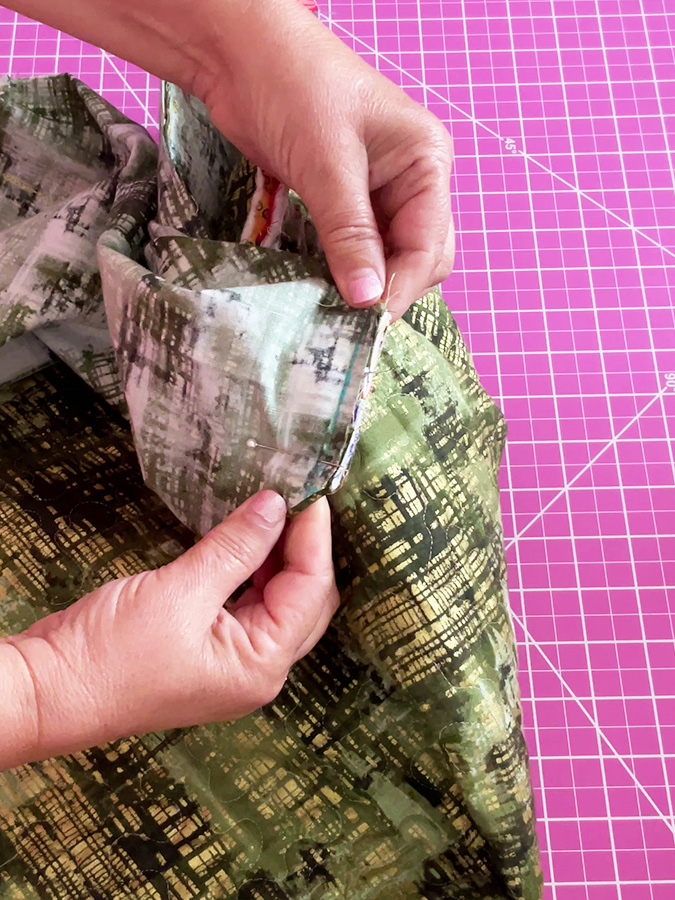
Sew the Corners Together
Sew a short line of stitching through the seam allowances of both layers, close to the existing boxed-corner seam. You are not sewing through the body of the bag—just anchoring the two seam allowances together.
Repeat this process for the second coordinating corner.
Why This Works
By connecting the boxed corners this way, the lining becomes anchored at the bottom of the bag. It stays neatly inside, sits flat, and doesn’t pull upward every time you reach inside.
11. The Big Reveal (Featuring the Seam Ripper)
This is the moment when you look at what’s on your table and think: Is this floppy quilted rectangle seriously supposed to become a bag?
Yes. Somehow. We are very close.
Turning the Bag Right Side Out
In a well-planned world, you would now reach into the lining opening and turn the bag right side out in one smooth, satisfying motion.
In my world, there was no opening.
Because I forgot to leave one.The last tote bag I made was seven years ago, which is apparently long enough for this step to completely disappear from memory. So instead of a smooth turn, this is where the seam ripper enters the scene.
✅ Related tutorial: Why Does Your Seam Ripper Have a Red Ball? Discover Its Purpose!
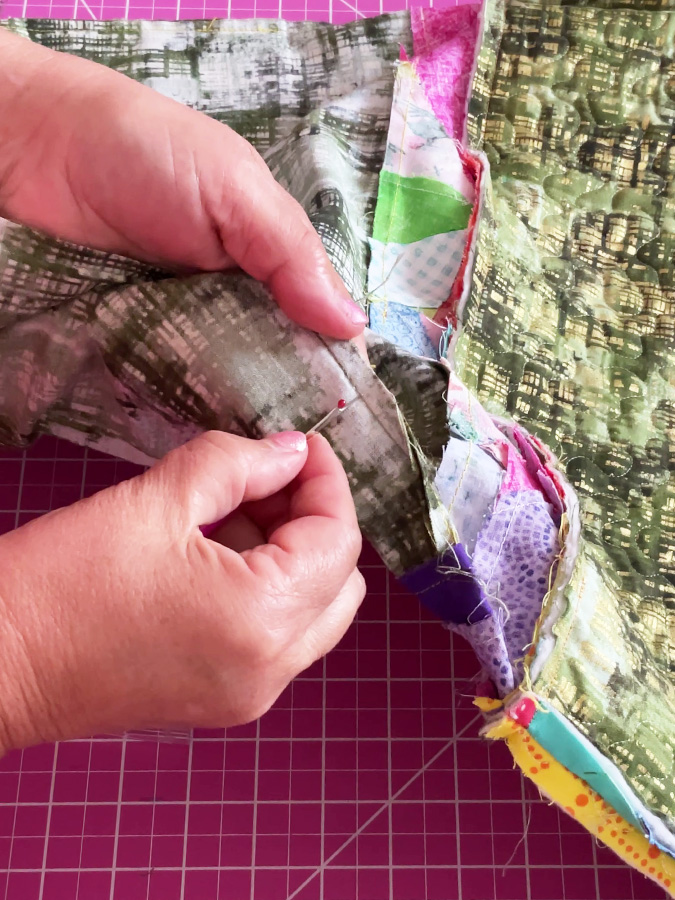
If this happens to you, don’t panic. Open up a section of the lining side seam, just large enough to turn the bag comfortably. This is not a failure. This is a correction.
Pull the bag right side out through the newly created opening. Take a moment to admire the fact that it worked after all.
Close the Lining Opening
Once the bag is right side out, fold the raw edges of the lining opening inward and press them flat.
Close the opening with a neat ladder stitch (invisible stitch, blind hem stitch) by hand for an invisible finish. If you prefer using the machine, a careful topstitch works too—just keep it straight and close to the edge.
✅ Related tutorial: Invisible Stitch Tutorial: How To Fix A Tear (+ Sewing “Blind” Hems)
Topstitch the Bag Opening
Push the lining fully inside the bag and smooth everything out around the top edge. Make sure the crumb fabric facing sits evenly.
Topstitch all the way around the top edge of the bag. This step gives the bag a clean, finished look.
And just like that, the bag is done.
12. Final Thoughts
This is the fun part, because the bag is finished—but it doesn’t have to be done.
You can leave it exactly as it is, or you can keep going. Add a label or a monogram on the inside. Tie on a charm, a key ring, or anything that makes the bag feel even more like yours. Make a matching pouch or a wallet. Crumb projects rarely feel finished in a strict sense, and this bag leaves plenty of room for small additions.
As for how to use it, this tote is flexible:
- A sewing tote that carries projects and fabric
- A grocery bag that never gets mixed up with anyone else’s
- A gym bag for towels, swimsuits, and all the things that need their own space
- Or a very clear “yes, I made this” bag that shows off your crumb quilting in public
This bag started as crumbs and ended up stealing the show. And if that isn’t a good reason to save those tiny fabric pieces, I don’t know what is.
Did this tutorial inspire you to give a new life to your fabric crumbs? If you’d like to make this tote bag, save this pin to your sewing board on Pinterest so it’s easy to find when the time is right and follow me on Pinterest for more tips, tutorials, and inspiration!
latest posts
- Butterfly Quilt Block Tutorial – Foundation Paper Piecing
- How To Sew Quilt Squares So The Corners Match
- Sewing With Fork Pins: How They Help With Pattern Matching, Slippery Fabric, And Seams
- How Much Fabric Do I Need? 21 Helpful Tips For Calculating Fabric Yardage
- Easy Simple Sewing Project: Fabric Jar Opener
- DIY Oven Mitts: Step-by-Step Sewing Tutorial
- Easy DIY Potholder: New Design
- Tailor’s Clapper: What It Does, Why It Works, And How To Use It Right
- Heat Resistant Batting for Sewing: What It Is, How It Works, and What Makes a Difference