
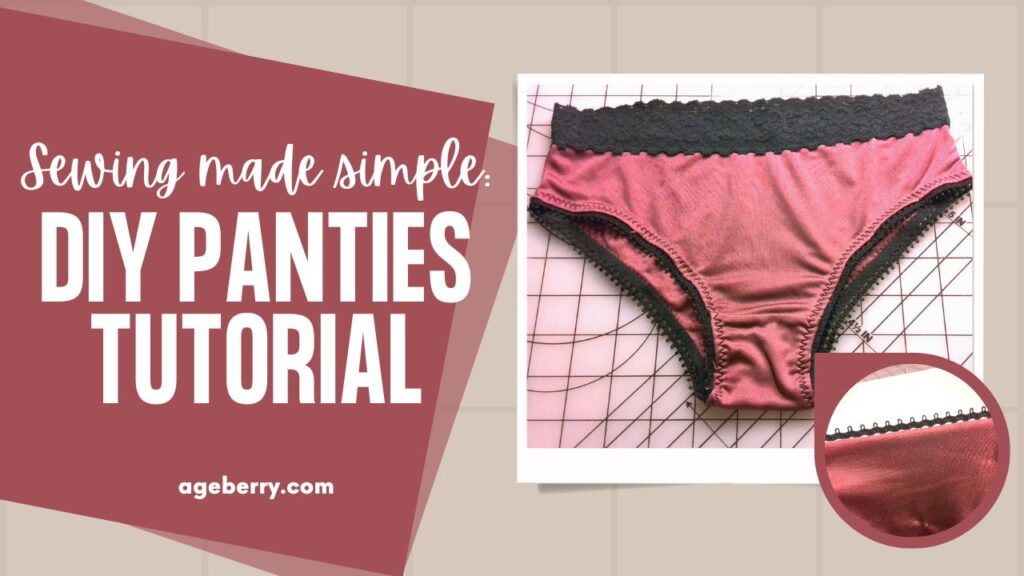
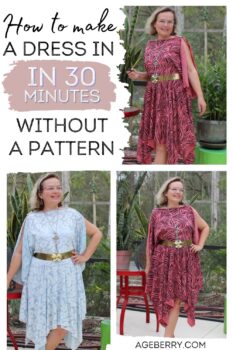
Sewing Made Simple: DIY Panties Tutorial (plus How to Sew Knits and How to Attach Elastic)
In this sewing tutorial, I will show you how to sew underwear/panties. This sewing project is quite easy and fast but there can be some small difficulties where you can get stuck (for example, while attaching elastic). You are going to learn some techniques on how to sew with knit fabric, how to make a pattern from ready-made clothes, how to sew elastic, etc.
Note: Some of the links on this page are affiliate links. This means I will receive a commission if you order a product through one of my links. I only recommend products I believe in and use myself.
I have never tried sewing underwear before but recently I made a few panties for my daughter and would like to show you how to do it. I guess you are wondering – why should I bother making panties if I can easily buy them? Well, the answer is SIMPLE: I made underwear from 100% SILK fabric and from ORGANIC cotton. And I advise you to do the same.
✅ Related tutorial: Organic fabric benefits
For this DIY panties tutorial, we’ll need
Knit fabric – use 100% silk jersey or organic cotton (if you can’t find 100% silk jersey)The underwear MUST be comfortable for the skin. Not many fabric stores sell 100% silk jerseys. I found it online in this store moodfabric.com. It’s a bit pricey but the fabric is gorgeous and feels super soft next to the skin.
Elastic trims – use picot edge elastic or stretchy narrow lace (for the leg openings) and wide elastic for the waistband.
What is Picot elastic?
Picot edge elastic is a very soft and thin elastic specially made for underwear. It’s usually 4-7 mm wide and comfortable for the skin. It has one decorative picot edge (that’s going to be visible on the right side of the garment) and one straight edge (for easy stitching).
How do you measure the elastic you need for the project?
I just check the length against my body: I wrap the elastic around my hips (or waist) and my leg (exactly around areas of the body where it will go) and try to see at what length I would be more comfortable so the panties stay put but don’t make an indentation in my skin.
Some types of elastic are quite hard and you will need to stretch it less but the picot edge elastic for underwear is soft and thin so I tend to stretch it more.
But be careful and don’t overstretch it also – the rule of thumb is to cut the elastic so it’s only 1 or 2 inches shorter than you do not stretch measurements. If you make it tighter you may end up with very uncomfortable panties. But also add some seam allowances to the elastic (about 1cm or 3/8” on each side).
Jersey or ballpoint sewing machine needles (for knits)
Threads of matching colors – I used the ELOFLEX thread (you can find my review of this type of thread here)
Old panties (that you liked to wear and can cut for making a pattern)
✅ Related tutorial: The Ultimate Guide to Stretch Sewing Machine Needles
STEP 1
How to make an underwear pattern
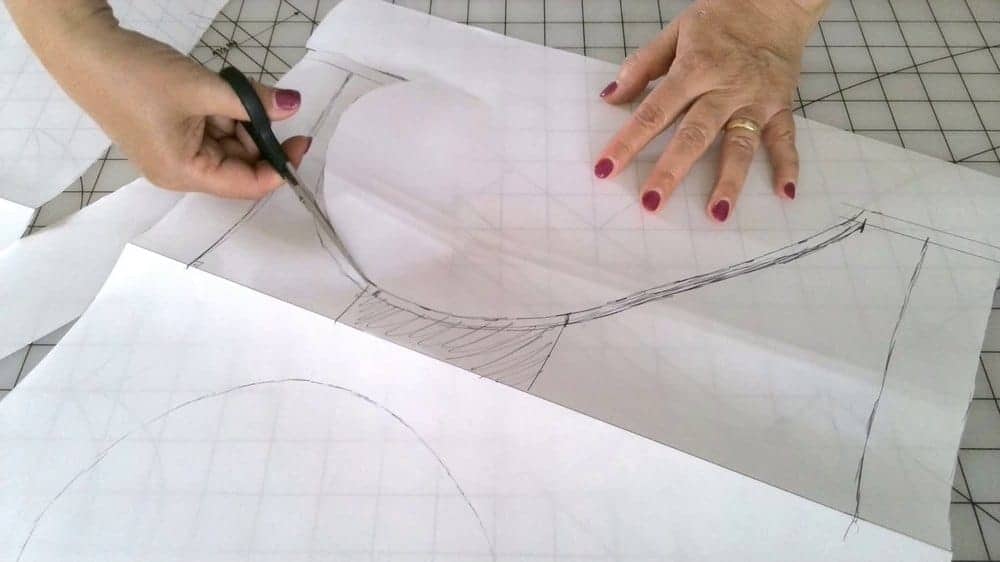
Cut your old panties: first, cut away the elastic trims, then cut the side seams.
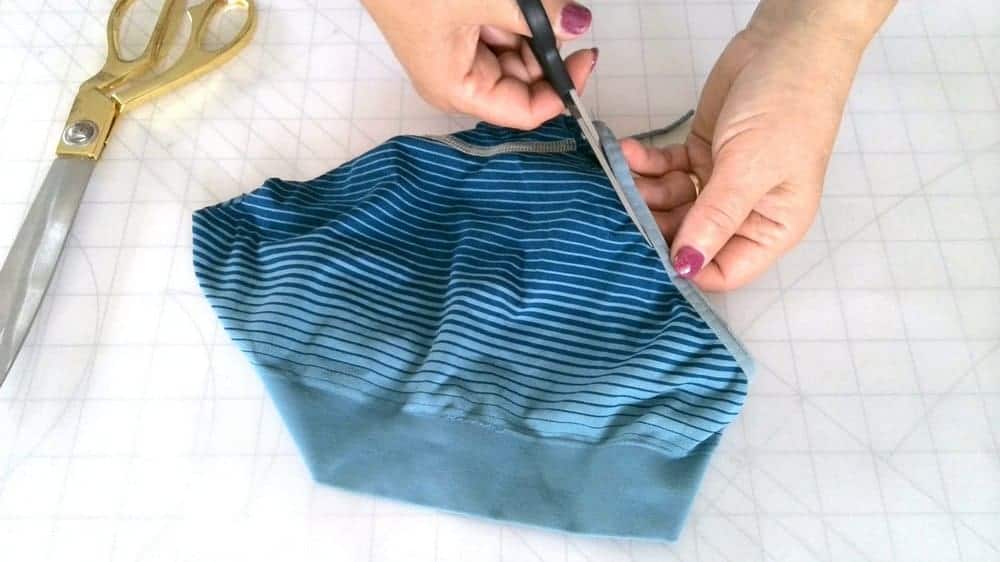
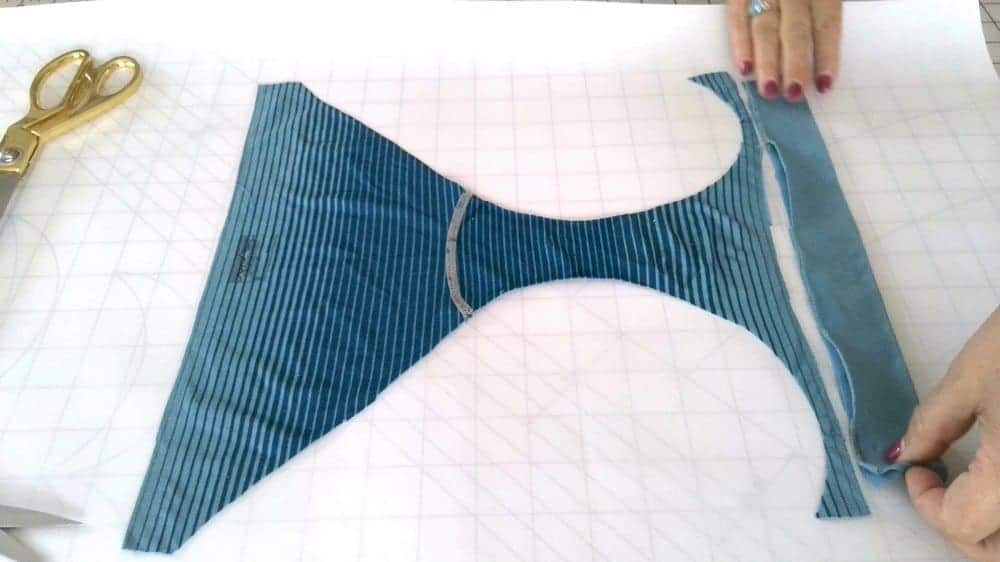
Fold this piece in half lengthwise – very important! The Left and right parts must be identical when you are making a pattern.
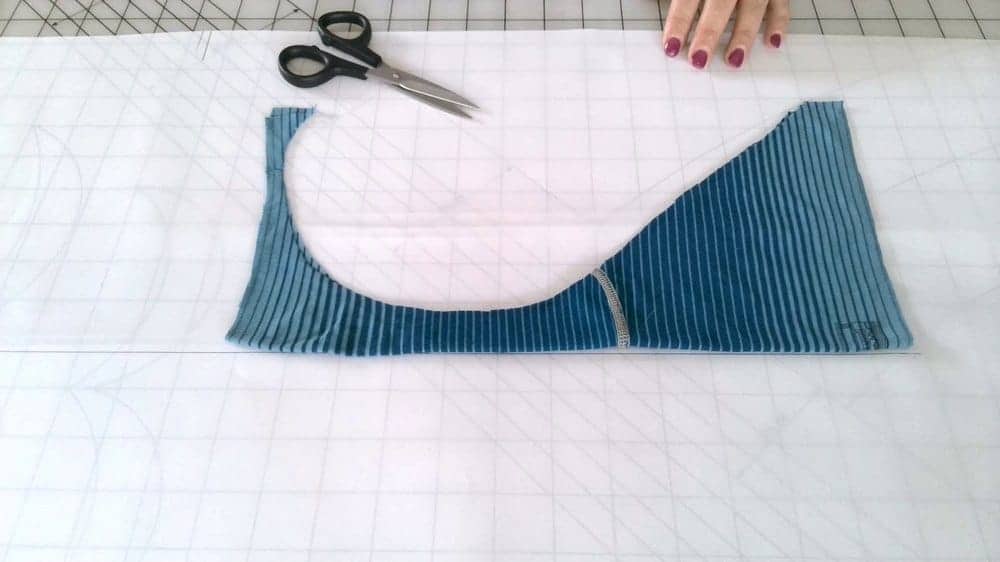
Draw a line on a piece of paper – this will be the grain line and the centerline of the pattern.
Place the folded piece on the paper with the fold along the line.
As you can see the old panties were pretty much out of shape and it wasn’t easy to place them properly. But I managed.
Now draw the pattern. I decided to use ⅜ in (1 cm) seam allowances. And I wanted the panties to be a little higher so I added an inch at the top (in the front and back). Mirror the pattern so that you have the whole pieces (not just halves) and just cut in a single layer.
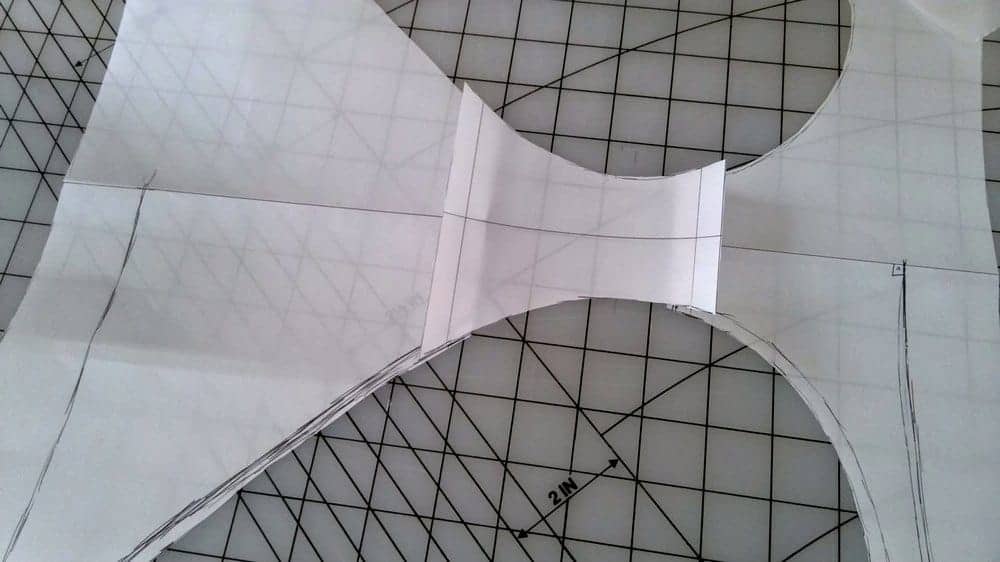
When working with knits I prefer not to cut fabric on the fold – it’s easier.
There are different ways to sew a crotch/gusset ( a piece of fabric for the crotch and the crotch lining to strengthen this part of the panties). I decided that I would like to make it as a separate pattern piece.
So, I have now 3 pattern pieces for the panties: back, front, and a gusset/crotch.
STEP 2
Prewash your fabric
It was the first time I used 100% silk jersey (for lingerie) so I thought I MUST prewash the silk fabric. I put the silk and organic cotton in the washer (in hot water) and left it there for a few minutes (I didn’t make any washing circle though, just a few minutes in hot water and then – one rinse). I didn’t notice any shrinkage of the fabric though.
STEP 3
How to lay out a pattern on knit fabric
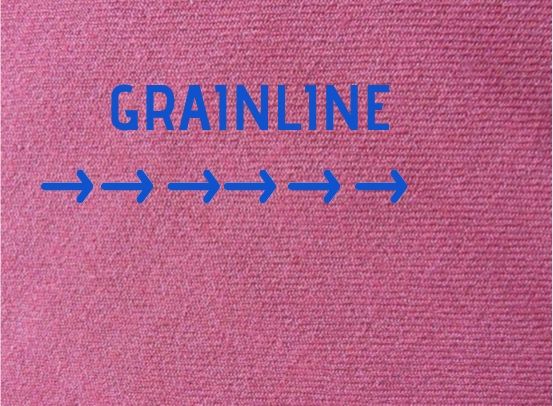
Before placing the pattern pieces you have to find a grainline.
But here is the question – how to find a grainline on knit fabric? It’s a little bit tricky but you have to do it right. Otherwise, the seams can get twisted.
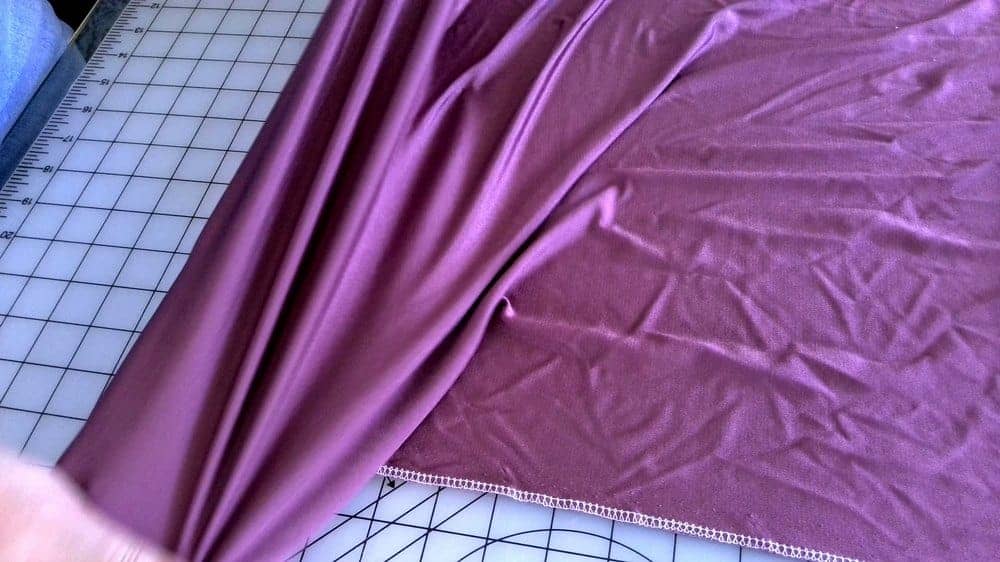
But before finding the grainline you have to know how to tell the right side of the knit fabric because the grainline will be visible (well, barely visible) only on the right side for most knits (there are exceptions, of course). Usually, on the right side, you can see tiny little lines (called sometimes “ribs”) that go parallel to the selvage. You can see it in the images below.
So, lay down the fabric, make sure there is no distortion and each “rib” is in a straight line.
Find out where you want to place the center line on the fabric, and trace down one of the “ribs” (I use my disappearing ink marker, but you can do it with pins or even basting thread).
After you found the grainline place the pattern pieces on the fabric and cut: 1 front piece, 1 back piece, and 2 gusset/crotch pieces.
For the silk fabric use only very thin special pins that don’t make holes in delicate silk.

STEP 4
Stitching pieces together
There are only 4 seams to be made and it can be done in 5 minutes, really. But ONLY with the right tools.
I prefer to use 2 needles and 4 thread serger stitches. Test on a scrap before stitching the panties. Serger sews the pieces and finishes raw edges at the same time and we always have a nice clean finish.
It can certainly be done with a regular sewing machine but you MUST use special types of stitches for KNITS so the fabric keeps its stretchiness and thread doesn’t “pop” when the fabric is stretched. Use a special zigzag stitch – you can see it in the image below.
✅ Related tutorial: Types Of Stretch Stitches On A Sewing Machine And When To Use Them
But if you use the regular sewing machine you will have to leave the raw edges on the side seams unfinished.
Also, your sewing machine can “eat” the fabric (especially the thin silk jersey) – you can see it disappearing under the throat plate. There are many reasons for this happening but I would advise you to check 6:
- Did you use a special jersey/ballpoint needle?
- Is your stitch length too small for the knit fabric?
- Did you change the foot pressure for thin fabric?
- Did you thread the machine correctly?
- Did you clean the bobbin case?
- Did you hold onto the thread tails when you began stitching?
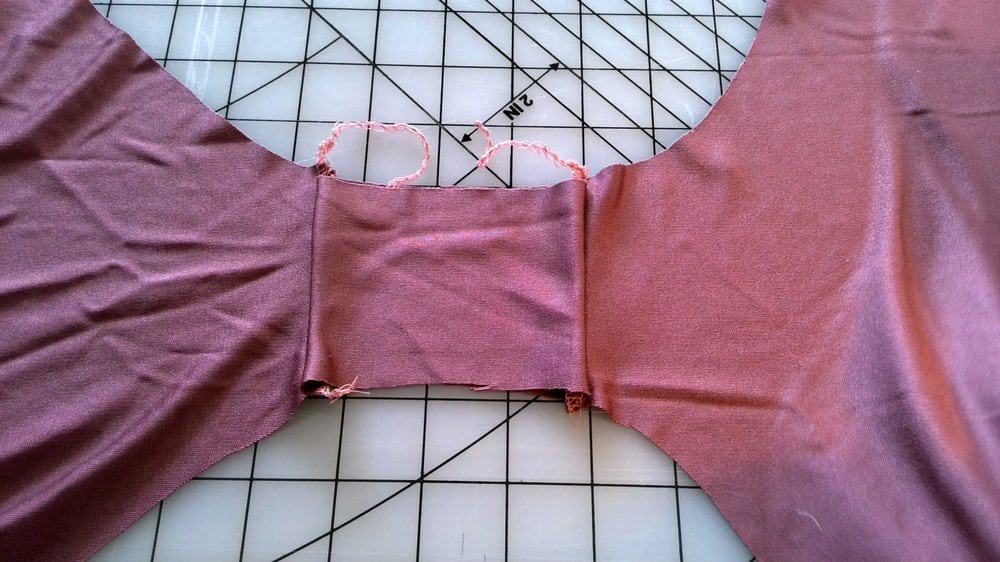
Place the back piece right side up on a flat surface and then place it between two gusset/crotch pieces. The right side of the back piece goes to the right side of one crotch piece, and the right side of another crotch piece goes to the wrong side of the back piece. Pin all 3 layers together and stitch.
Now let’s connect the crotch pieces with the front.
Roll the back piece between the two crotch pieces and place the front piece between the two crotch pieces and stitch.
Turn the gusset/crotch inside out – you will see that crotch seams are hidden inside. Press these seams to smooth them out.
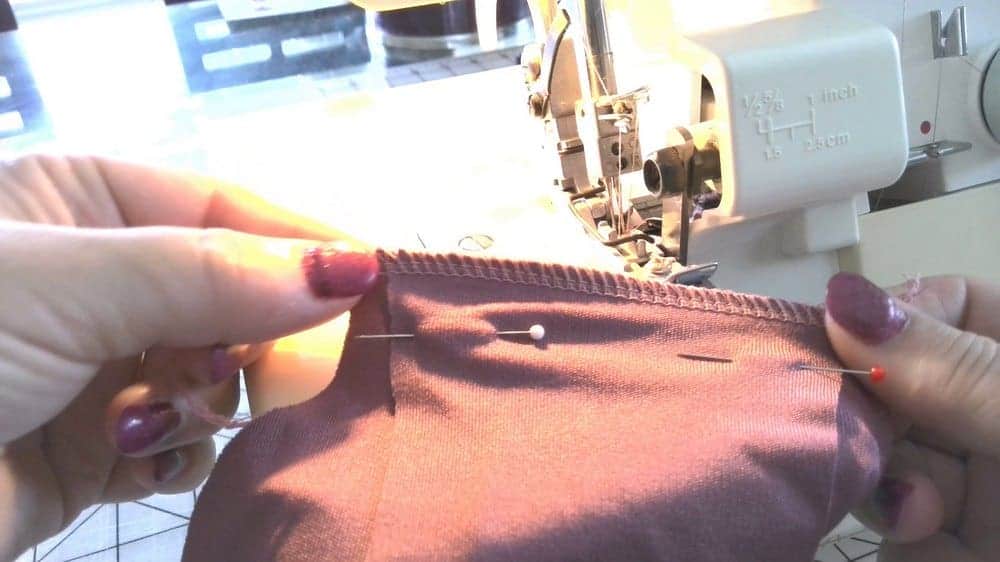
After all the pieces are stitched together I prefer to finish raw fabric edges with 1 needle 3 thread overlock stitch ( on my serger). This will also stitch together the sides of the crotch pieces and trim the fabric that stuck out from the seams.
But this is completely optional. I made 3 pairs of panties from silk (for my daughter) and only did it for two of them, so in the images below you may see it is not finished.
STEP 5
How to sew elastic in underwear
Sewing elastic is not difficult or long. But again, there are different ways to do it and some points to consider.
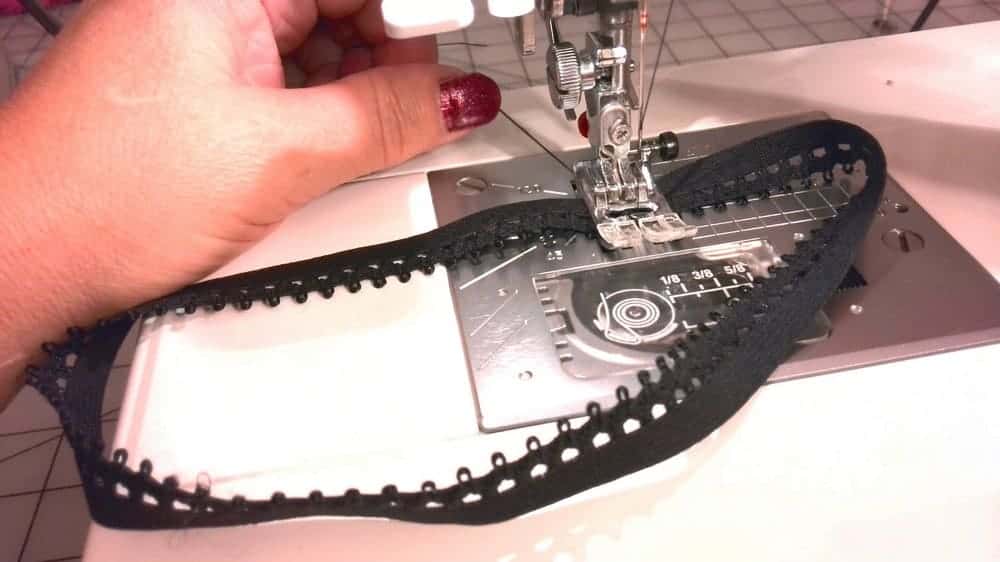
Overlap the ends of elastic and make a very close zigzag stitch to connect both edges. Trim the seam allowances close to the stitching.
Divide the elastic into 4 equal sections and make 4 equally spaced marks on the elastic (with pins or a fabric marker) – center front, center back, and 2 sides.
Make 4 equally spaced marks on the panties the same way and mark them with pins or a fabric marker.
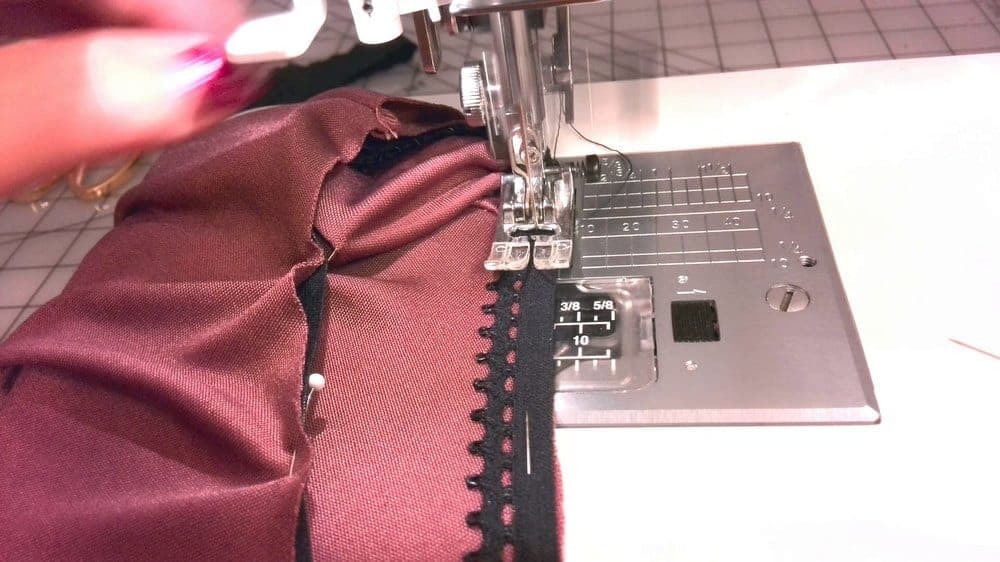
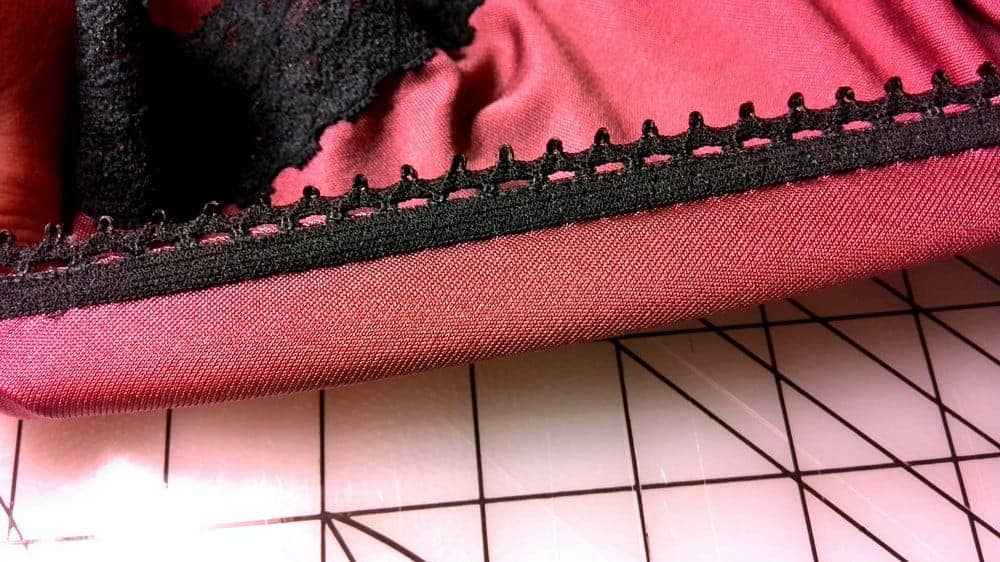
First, I prefer to attach the elastic to the leg openings.
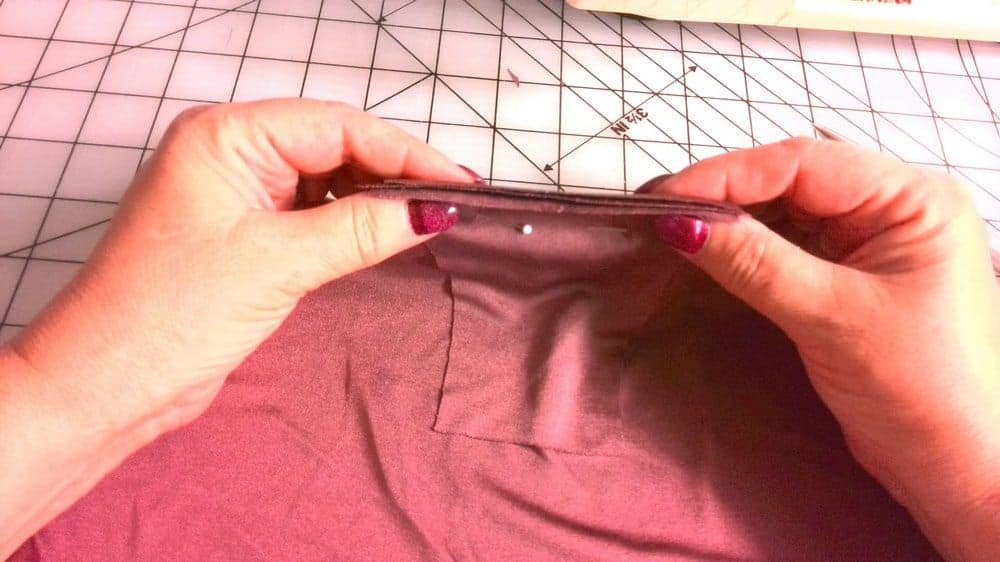
Starting somewhere on the back (a little above the crotch), place the join of elastic to the edge of fabric right sides together. Align the edge of the elastic with the edge of the fabric. Pin elastic to the fabric first in 4 marked points. And after that pin 4 more times between those 4 points.
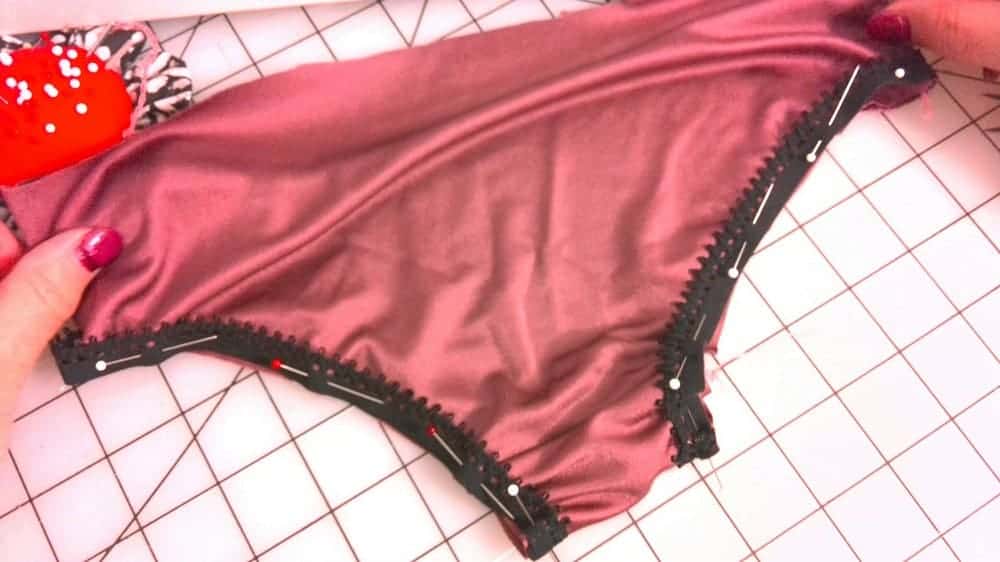
After that, you can stitch the elastic to the fabric using the regular sewing machine – with a special stretch zigzag stitch. Try to make the stitch closer to the picot edge but don’t sew on the picot edge at all. Stretch the elastic slightly while sewing, but try NOT to stretch the fabric under it. It’s better to sew slowly.
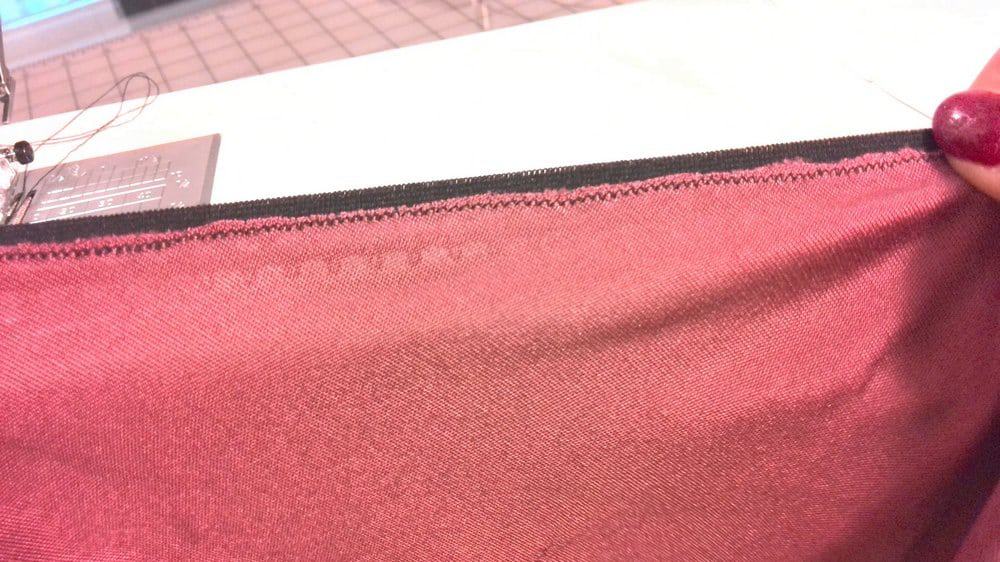
In the image below you can see what it looks like on the wrong side of the panties. It doesn’t really look pretty yet, right? I made 3 pairs from this silk jersey fabric and I didn’t manage to make this seam nicer. But you know what? IT DOESN’T MATTER MUCH. This seam will be completely hidden (not visible at all). So don’t worry if it’s like this.
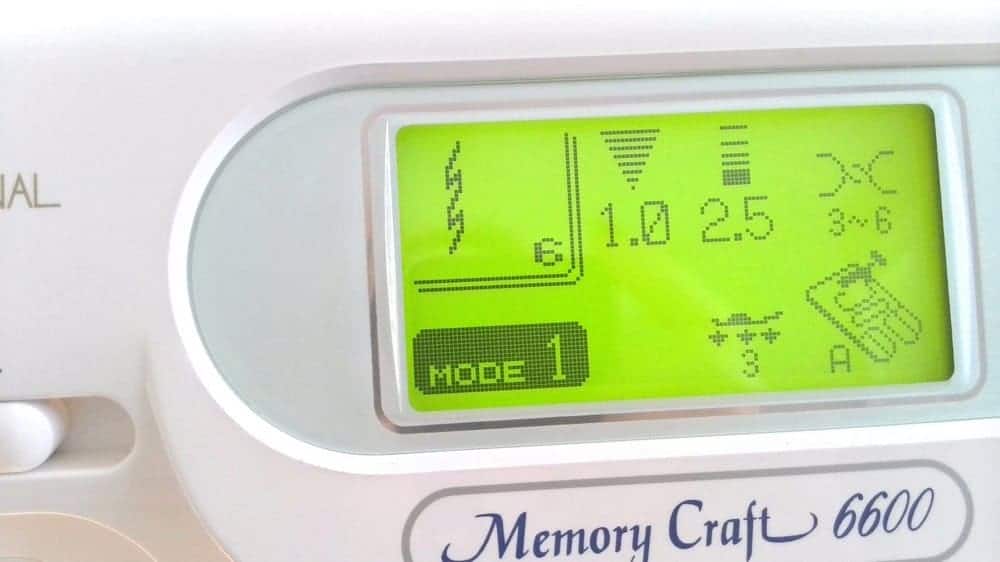
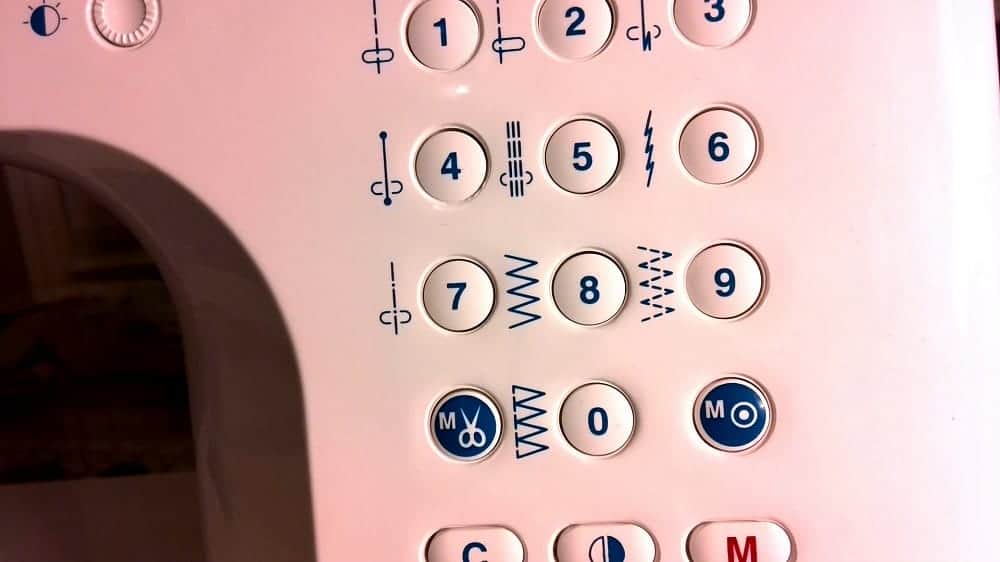
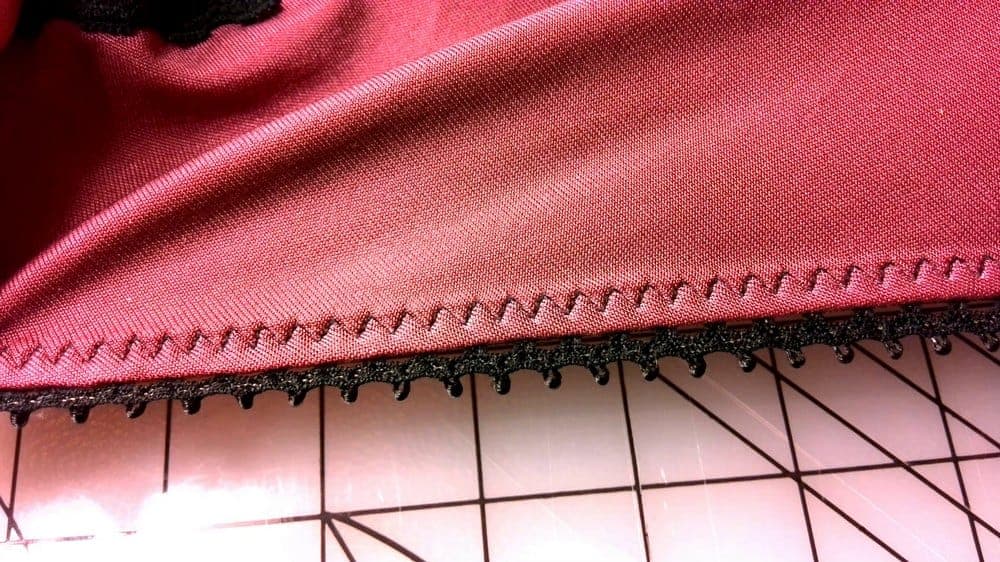
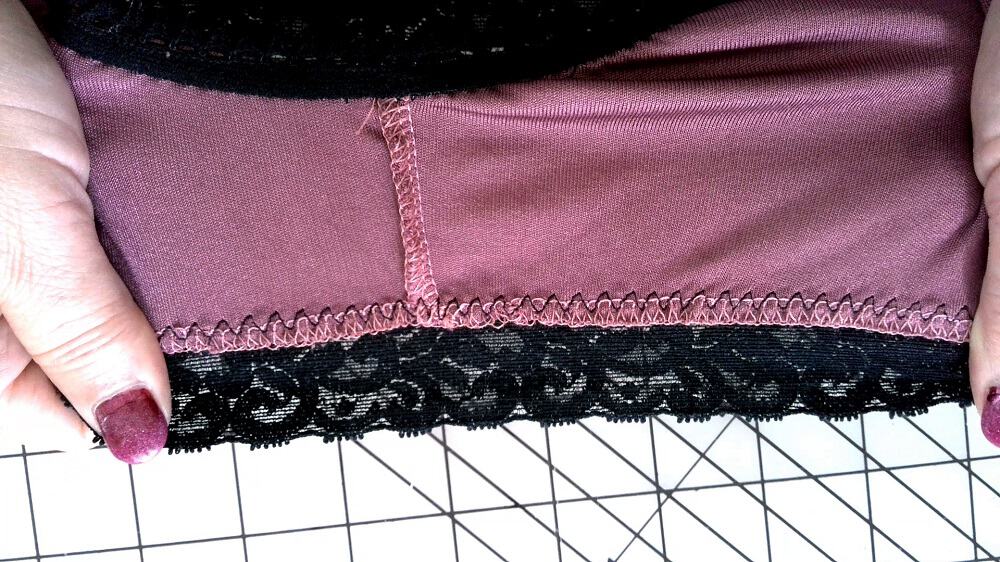
Fold attached elastic toward the wrong side and make another zigzag stitch on the right side of the panties using 3 STEP ZIGZAG stitch with width 5 and length 1 – 1.5. On my Janome 6600P sewing machine this is number 9 stitch.
While stitching stretch the fabric slightly. When stitching I try not to look at the needle – I look at the marks on the presser foot to make nice stitches. These stitches will be visible on the right side of the panties, so try to keep them as neat as possible.
Repeat this for another leg opening.
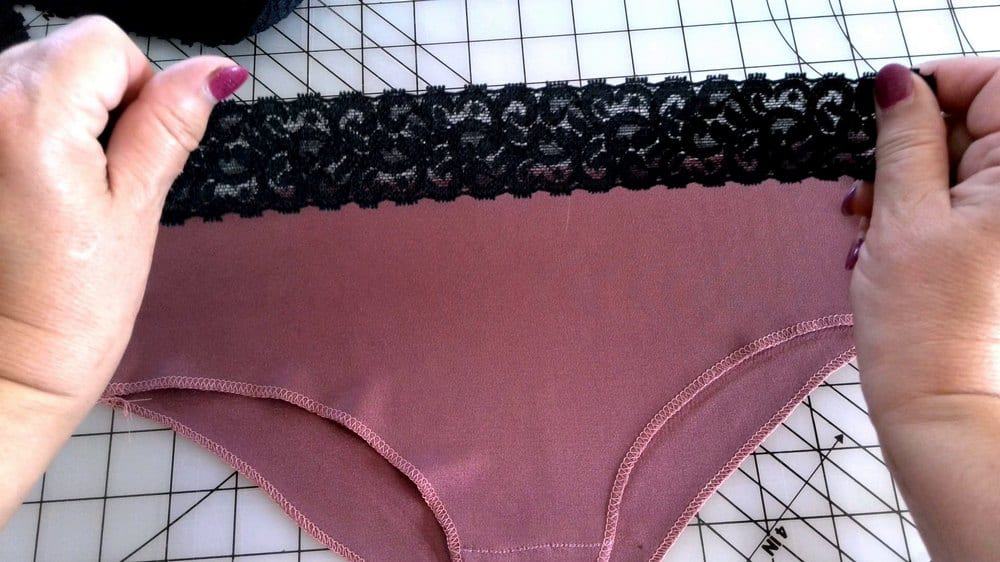
You can use the same elastic for the waistband – so just repeat the same method for the waistband.
Or you can use different elastic (like I used this wide lace elastic).

I just attached this wide elastic lace with a 3-step zigzag stitch.
Did you find this tutorial helpful? If so, save this pin (see below) on your sewing board so you can come to this tutorial later when you are ready to sew your own underwear, and follow me on Pinterest for more tips, tutorials, and inspiration!
Ready to take the next step in your sewing journey? Check out more step-by-step tutorials from my site and don’t forget to share!

latest posts
- What Do You Call a Person Who Sews? I Asked My Readers and Got 1,408 Opinions
- DIY Round Purse: PDF Sewing Pattern and Detailed Instructions
- Mini Wonder Clips By Clover: Useful Sewing Tool Or Just Another Notion?
- Non-Slip Grips For Quilting Rulers: A Small Notion With A Useful Job
- Fabric Eraser for Sewing: What It Removes and When to Use It
- What Is The Best Thread For Sewing Machine Projects? Let’s Find Out!
- Butterfly Quilt Block Tutorial – Foundation Paper Piecing
- How To Sew Quilt Squares So The Corners Match
- Sewing With Fork Pins: How They Help With Pattern Matching, Slippery Fabric, And Seams


I myself have had years of experience with the production of underwear, having done it professionally for about 10 years on an industrial level, and can say that your ‘How to sew underwear’ tutorial was spot on. The only difference was how you attached the waste elastic. We always closed the right side after the leg elastic was added. Then the waste elastic was sewn to the fabric, finishing off the garment by stitching the left side closed. Either way is fine, and I would suggest using the way that works best, and is easiest for home sewing.
I am far from perfection here! Thank you for the input, I know there is always more to learn.
How is it that when I sew FOE on the waistband of my panties, my elastic stretches horribly out of shape. I don’t know if I am over stretching the elastic or what. If I don’t stretch the elastic, it does not fit and is too baggy. You know those seams on the neckline of homemade t-shirts that have been sewn by a beginner sewist?
Well, my pantie elastic looks like that. What am I doing wrong?
I assume FOE means Fold Over Elastic; I was not familiar with the abbreviation. It is difficult to make a judgement without actually seeing the result, but I’ll give you my best guess. I suggest for this elastic use a stitch that your machine has for stretch fabric, also use a stretch thread if available (beware it has to be for a regular sewing machine, not for serger) and perhaps use a twin needle to sew the elastic. Also try to increase a little the stitch length while sewing elastic, try also to reduce the tension in the thread a little to make it pull less on the elastic. Again, all these are just guesses.
In the measurement advice for elastic, you have this in parentheses: “(about 1cm (38”) on each side). ” I think you meant the seam allowance should be 1cm (3/8″) instead. Just thought I should let you know…
Thank you. I corrected the error.
Thank you so much for this pattern I really appreciate your time and advise.
I love this tutorial Olga. I’ve been sewing for over 60 years and also began making my own panties several years ago. Commercially made panties are either so shoddy that they fall apart after 4 or 5 washings, or the serged seams are thick and have knotted sorts of seam ends. This thickness digs into my skin and leaves marks – very uncomfortable, which is why I began making my own. I have a pattern which fits me perfectly and as much as I love the feel of silk, I still prefer soft cotton knits, as long as they’re lightweight. I perspire a lot and cotton just works better for me. I LOVE the pretty trims available for this purpose but unfortunately, they always feel scratchy. Wish I didn’t have such sensitive skin, but with contrasts and pretty prints, I can make lovely comfortable panties.
When I first began making them, the method for sewing the crotch seams confused me; your explanation does not. It’s very clear, so I’m saving your instructions to Pinterest for any time I think I need a refresher. At my age, sometimes the old brain cells are a little slow!😏
Interestingly, I use a large Brother machine too, an “ancestor” of your Luminaire. It’s an Innovis VQ3000 designed for all types of sewing and especially quilting as it has a huge harp space like the Luminaire. I love it. It’s easy to use and has served me well for years. I use its stretch stitch for panty seams and they turn out super soft – heaven! The only thing it doesn’t do is embroider, which isn’t my thing anyway. My Innovis has twin needle capability also, which I’m sure you know is great for hemming knits. So who needs an expensive cover stitch machine – not me! It’s not as fast, but as a retiree, I don’t mind.
Thanks to you, I’ve learned something new today. Your technique of “trace down the rib” for the grainline is simply BRILLIANT! Thank you for passing it along.
Please keep making your marvelous tutorials.
Thanks a lot.
I’ve wanted to make panties for some time. Your easy-to-understand tutorial and wonderful illustrations have convinced me that it can be done easily and professionally. I’m impressed enough to give it a try. Thanks so much.
PS: How about a tut on bras?
I am usually against making stuff that you can easily buy, I made panties mostly because I wanted to exemplify the use of the serger. I will think about bras though, it is not easy to find cotton bras and I am all against polyester which is very common. However the problem is that there are only 24h in a day…