
Most Common Sewing Machine Tension Problems (+ Solutions)
Even the most experienced sewists may encounter tension problems with their sewing machines at some point. Sewing machine tension issues can be frustrating and may result in uneven stitches, thread and needle breaks, and other sewing problems.
Fortunately, sewing machine tension isn’t as intimidating as it seems, and it only takes a little knowledge and practice to become proficient in finding the correct settings.
This post covers common sewing machine tension issues to help you troubleshoot and fix likely problems. Let’s get to the top – and bottom – of sewing machine tension!
Sewing Machine Tension Basics
The term “tension” refers to the balance between the upper thread (also called the top thread or needle thread) and the bottom thread (known as the bobbin thread).
Think of it as a tug-of-war match between the upper and lower threads. If you want nice-looking stitches, neither side can “win” by pulling through to the other side.
Before we learn how to adjust the tension on a sewing machine or solve tension problems, we need to understand the essentials of sewing machine tension.
Your device creates tension through the collaboration of tension disks, thread guides, tension regulators, and (sometimes) bobbin case springs.
When you’re sewing, thread tension can change based on the material’s thickness, the type of thread you use, and the size of your needle (and needle hole).
I recommend that sewists ALWAYS test their tension on a scrap piece of material before beginning any new project. Do this by sewing a line of stitches about 6 inches long on a piece of scrap fabric that is the same (or closely matches) the material you plan to work with for your project.
When you’re testing, use a bobbin thread color that contrasts your upper thread so that you can clearly see and diagnose any tension problems. You need to see whether your bobbin thread or top thread is pulling through, and the easiest way to see that is with contrasting colors.
Correct Thread Tension
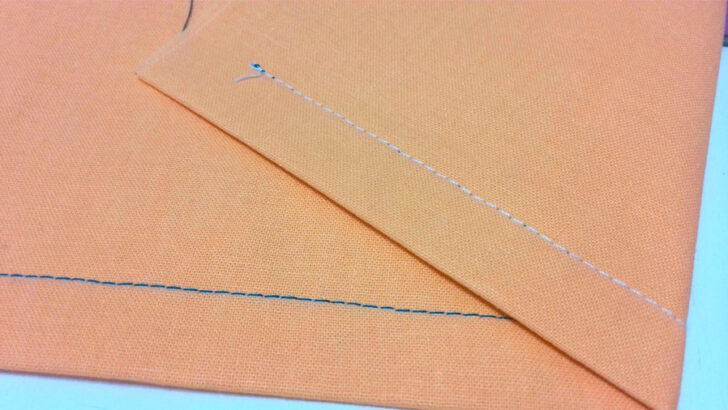
Correct thread tension results in stitches that look the same on both sides of the fabric and threads locked between two layers of fabric (for straight stitches).
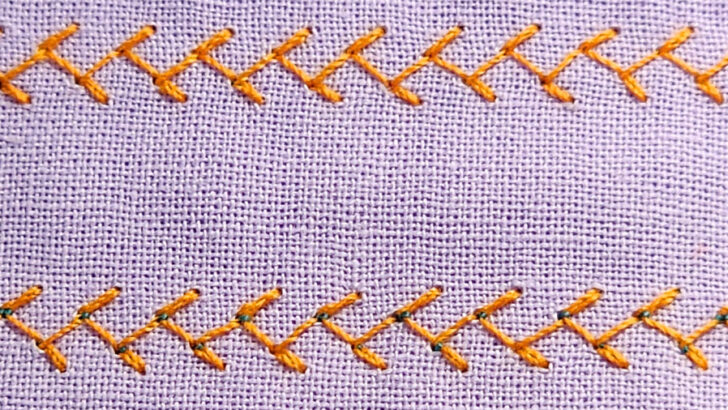
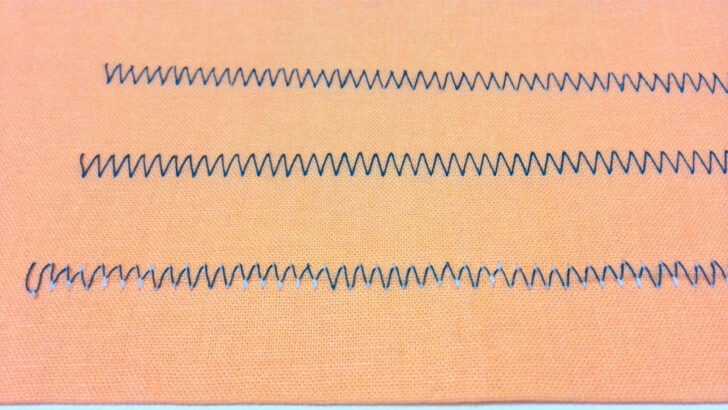
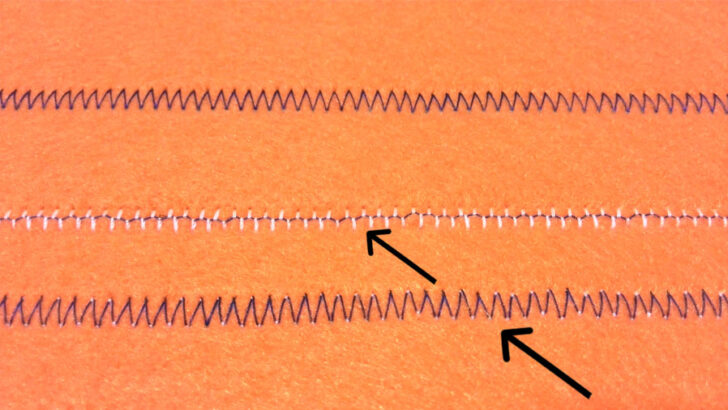
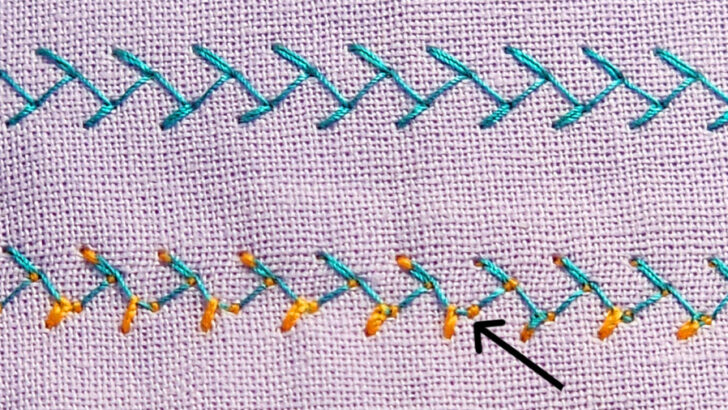
But for zigzag and some decorative stitches, the tension is correct if the bobbin thread does not show on the right side of the fabric, and the needle thread shows slightly on the wrong side of the fabric as you can see in the second row of stitches in this image (the green thread is the needle thread in this case).
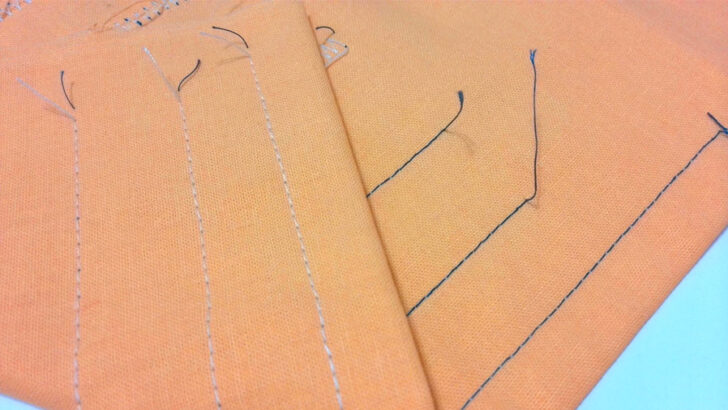
On the other hand, incorrect (or mismatched) tension can result in stitches that gather, pucker, or tangle. Or, worst case scenario, if your tension is very tight, it can cause your thread or needle to break.
Moreover, finding the right thread tension setting is essential for sewing strong and durable seams.
Finding the correct thread tension for your project is about finding harmony between the upper and lower threads so ideally, they interlock between the fabric layers.
Any imbalance between the pull on the two threads will cause one to pull the other through to the other side of the fabric, creating a poor-quality stitch that often doesn’t look good and is not strong enough.
Check out this sewing machine tension chart to learn more about thread tension and how it works. It shows layers of fabric (yellow and pink) with a straight stitch using white and black threads.
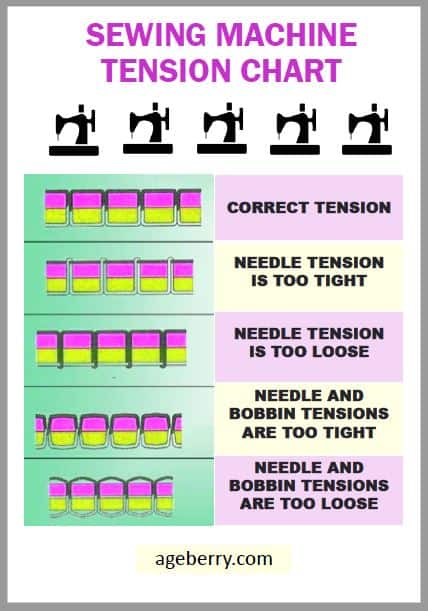
You can have this chart for easy reference by printing it as a PDF from my password-protected RESOURCE LIBRARY. If you are an email subscriber, my emails contain the password for the library. If you aren’t a subscriber, add your email address in the form below, and I will send the password to your email immediately.
Tension Mechanism On A Sewing Machine
The tension mechanism on a sewing machine is a system that controls the amount of tension applied to the thread as it moves through the machine. It ensures that the stitch is formed correctly, with the top and bottom threads interlocking in the middle of the fabric.
There are two types of tension mechanisms on a sewing machine: the upper tension mechanism and the bobbin tension mechanism.
The upper tension mechanism is located at the top of the sewing machine, just above the needle. It consists of a tension dial or knob, tension disks, and a tension spring. When the thread passes through the tension mechanism, the tension spring applies pressure to the tension disk, which creates resistance and controls the amount of tension on the thread.
The tension dial or knob is used to adjust the tension setting. Turning the dial or knob clockwise increases the tension, while turning it counterclockwise decreases the tension.
The bobbin tension mechanism is located inside the bobbin case, which holds the bobbin. It consists of a small spring that applies tension to the thread as it feeds through the case. The tension can be adjusted by tightening or loosening the screw on the side of the case.
Both the upper and bobbin tension mechanisms work together to create a balanced stitch.
Regular maintenance, such as cleaning and oiling the machine, can help ensure proper tension and prevent thread breakage.
Every sewing machine has a tension mechanism, although they can look different depending on the design of your device.
Some machines (usually mechanical ones) have a tension mechanism on the outside of the machine, but many of them have it locked away deep within the device where you can’t see it.
The disks move apart if you adjust your tension to a lower number (loosen it). Conversely, adjusting the tension dial to a higher number (tighten it) moves the disks closer together.
When you thread your device, the thread should sit correctly between the tension disks for your sewing machine to sew properly.
✅ Related tutorial: How to thread a needle on a sewing machine
Have you ever wondered why you get looped thread when you try sewing with the presser foot up? That’s because the tension disks open entirely when the presser foot is in the up position, so there is no tension on the needle thread. That particular sewing mistake may be frustrating, but the tension disks open when you lift the presser foot to allow you to get the thread between the disks.
Modern sewing machines don’t sew with the presser foot up, they will display a message – put down the presser foot! (something like this) so you may not know what it is if you sew with the presser foot up, but I experienced this on older machines – it’s not fun when there is no tension.
The tension mechanism also has a check spring that holds the disks together. If it gets damaged somehow, you’ll have erratic stitch quality. That means that instead of consistently loose or tight tension, it will be all over the place, causing some stitches to be too loose while others are too tight.
Unfortunately, if this check spring gets damaged, you can’t fix it yourself and will need to take your sewing machine to a service professional to fix it.
How To Adjust Tension On Different Sewing Machines
This process you use for adjusting your tension settings will vary depending on what type of sewing machine you have (mechanical vs. computerized) because the user interface for these mechanisms is different.
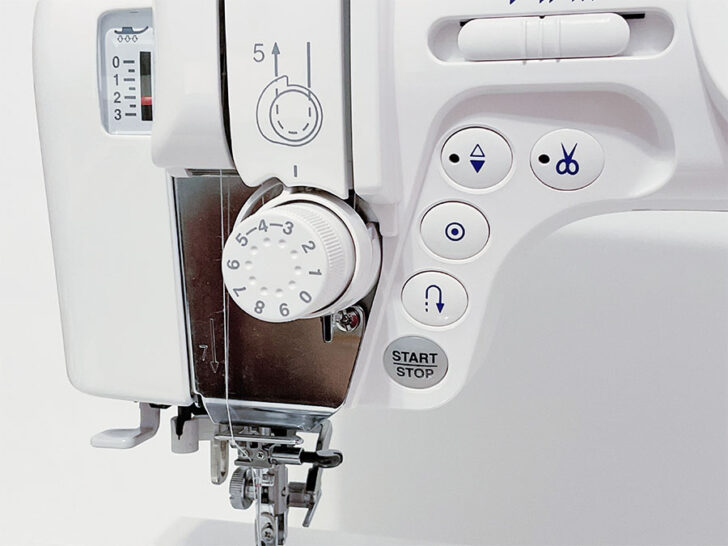
Mechanical machines have a knob or dial that you can turn with numbers that usually range from 0-9. Typically, your upper tension setting will be between 3 and 5, but you have more room for adjustment based on your project and materials.
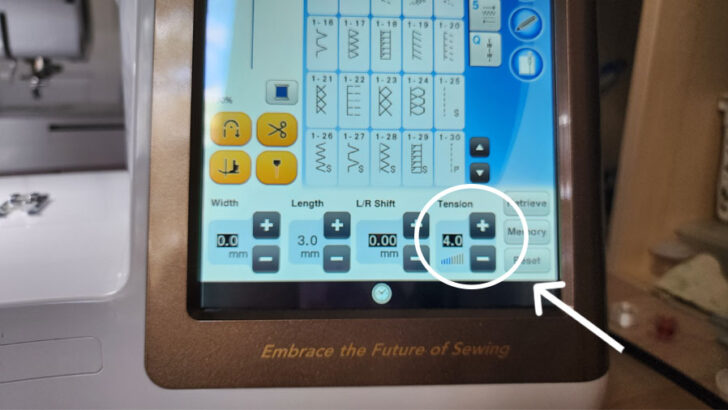
Computerized machines often have digital screens/keypads on the front of the device where you can push buttons to set the tension setting you want.
Some sophisticated machines have automatic upper-tension adjustments where the device will adjust its tension automatically based on the thickness of the material under the presser foot. Some machines may match the automatic tension adjustment on the stitch type rather than the material’s thickness.
As far as I know, the Janome DC5100 is a machine with this particular feature, although I have heard that some JUKI models also have it.
✅ Related tutorial: Sewing Machine Tension Adjustment
Thread Tension Is Too Tight
The needle thread pulls the bobbin thread through to the front when the tension is too tight. You may also notice skipped stitches or gathering or puckering fabric, which can also indicate that the balance is not quite right.
Decrease the tension by selecting a lower upper thread tension setting on the dial or your screen.
Thread Tension Is Too Loose
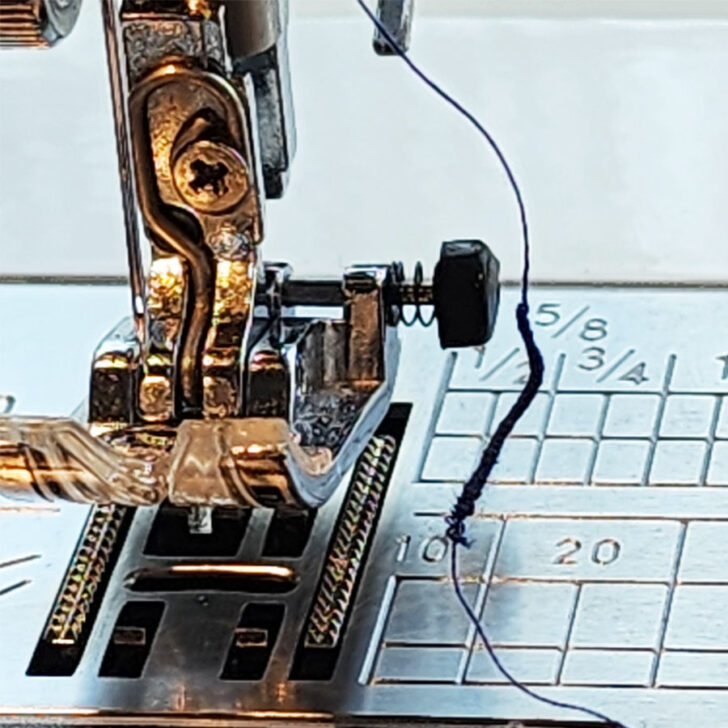
Flip your material over to the wrong side to take a look at what’s going on. When the tension is slightly too loose, some of that top thread will peek through the bottom. In more extreme cases, you’ll see loops and tangles of top thread (some people call this a bird’s nest) on the back of the material.
Sometimes, when you thread the machine, the thread can just miss sliding in the tension disks. If you suspect that’s what’s going on, rethread your machine and see if that corrects the problem.
To correct loose tension, increase the tension setting number on the dial or screen.
Loose tension may also happen if you thread the machine with the presser foot down so your thread goes on top of the tension disks instead of between them. When you thread your sewing machine, the presser foot needs to be up so the disks are wide open and the thread slides between them.
Bobbin Tension
Most home sewing and embroidery machines use a drop-in bobbin design. These bobbins are plastic. To use them, simply remove the cover to expose the bobbin case and drop in your threaded bobbin (with the thread coming off the bobbin toward the back of the machine).
For these devices, the bobbin case tension is set by the manufacturer, making it not necessary for you to adjust the tension for the bobbin thread. Adjusting the needle thread tension is all you need to do for these machines.
There is a workaround you can use, which is to adjust your bobbin thread weight. For example, use a lighter-weight thread when the tension is too tight. Or, if you think that your bobbin tension is too loose, swap out your bobbin weight thread (which is very fine) for a slightly heavier standard-weight thread.
Front Load Bobbin Cases
On the other hand, many older sewing machines and some newer models (ex: my Janome New Home 2212 and the Brother 1500) use a front-load bobbin case. If your device uses this type of bobbin (which is metal), you can easily adjust the tension.
First, ensure that your bobbin is loaded into the front load bobbin case correctly by holding the bobbin case so that you can see the bobbin and gently pull the thread. The bobbin is installed properly if the case turns in a clockwise direction.
Do a tension check. The standard advice is to use what some people call the yo-yo adjustment method. Hold your thread so that the bobbin is hanging down and bounce it. If it comes to a stop quickly, the tension is good. If the bobbin slides, it’s too loose.
I’ve tried this method and think it’s useless because my bobbin was constantly jumping out of the case!
However, if you need to adjust the tension of your front load bobbin case, look for the two screws on the side. You will adjust the BIGGER screw in small increments (turn left to loosen and right to tighten). Leave the small one alone because it will dismantle the entire bobbin case!
If you’re able to adjust the bobbin tension yourself, set the bobbin tension to the setting you need before adjusting your top thread tension. That will make your adjustments easier in the long run.
Many sewing machine manufacturers recommend only having the bobbin tension adjusted by a professional service center. Taking your machine in to be serviced regularly will help ensure your bobbin tension setting is correct.
✅ Related tutorial: Sewing machine tension guide: everything you need to know about the bobbin tension
Times When You May Need To Change Bobbin Tension
Although you can often fix any tension imbalances by adjusting the needle thread tension, here are a few scenarios where changing the bobbin tension could be necessary.
- When sewing extremely fine or thick thread.
- If you change out the top thread from regular weight to a more unusual thread weight (ex: metallic thread).
- When you use a twin needle. Check out how to use twin/double needles for more detailed information.
- While free motion or ruler quilting.
- If your bobbin thread repeatedly breaks (or you get skipped stitches) and you can’t figure out another reason for the sewing machine tension issue.
For more sewing machine bobbin information, check out how to thread/wind a bobbin if you suspect issues such as incorrect threading or winding. Then be sure to read my tutorial on sewing machine bobbin problems and solutions if you just can’t pinpoint the issue with your bobbin.
Lack Of Maintenance On The Tension Mechanism
As with anything that we use frequently, we need to perform specific maintenance tasks to keep our machines in good working order. Your device – specifically your tension mechanism – is one of those things that needs some regular attention.
Without consistent maintenance, your tension mechanism can be the reason for any sewing machine tension issues you may contend with.
Lack of regular maintenance can also mean that your bobbin tension is out of whack (it can gradually loosen with use even if you don’t adjust it).
Conversely, taking your machine in to be serviced regularly and periodically cleaning the tension disks will ensure that your tension mechanism operates as designed.
Clogged Or Dirty Tension Disks
Your tension mechanism can get clogged with dust and lint, but it needs to be clean to work correctly.
One common way this happens is that when we need to unthread our machine, we tend to cut the thread and pull the thread up and out of the machine backward towards the top spool.
Well, this is not a proper way to unthread your sewing machine.
Sewing machine manufacturers and technicians tell us to do it differently.
Put the presser foot up so the tension disks are open.
Lift the spool from the pin and go with the spool in the direction in which you threaded the machine until you reach a point where you can’t go anymore – usually after you pass the tension disks.
From here you can do it in different ways. For example, you cut the thread, take the thread out of the needle eye then pull the thread that’s left in the machine toward you and remove it.
Or you can take the thread out of the needle eye and pull the thread from this point because you already passed the tension disks.
Never pull the thread backwards on the newer computerized machines. Even some sewing machine manuals advise unthreading the machine like this.
The older machines might be more forgiving.
This is especially important for embroidery when we need to change the thread often. Why?
Well, they say that if you pull backwards the thread can easily get caught and affect the tension mechanism. You can actually mess up the things that control the thread feeding through the machine. Not to mention the lint that is carried back into the mechanisms.
And what if you have a caterpillar in the thread and you didn’t even notice it? If you pull the thread backwards and this caterpillar goes somewhere inside the machine you are out of luck and need to go to a technician.
Check my YouTube video on how to correctly unthread a sewing machine.

You might need to clean the tension disks if your tension mechanism gets clogged. If the tension disks are accessible, take a pipe cleaner, put a small amount of machine oil on it, and thread it between the tension disks. Gently slide it back and forth to get all the lint and dust out.
However, for many machines, you’ll need to go to a technician to do it.
Tension Problems For Different Threads
Sewing machine tension problems can occur when using different sewing threads due to their unique properties such as thickness, texture, and elasticity. Here are some common sewing machine tension problems and how they can be fixed when using different sewing threads:
- Thin threads: Thin threads, such as silk or polyester, can easily break, create loose stitches or even skip stitches if the tension is too tight. I usually reduce the upper thread tension when using thin threads.
- Thick threads: Thick threads, such as topstitching or decorative threads, can cause the machine to jam or create uneven stitches if the tension is too tight. I also reduce the thread tension when sewing with thick threads. Use a larger needle size to accommodate the thicker thread and adjust the stitch length accordingly.
- Stretchy threads: Stretchy threads, such as Eloflex, can cause the stitches to pucker or stretch out if the tension is too tight. To avoid this, reduce the upper thread tension.
- Metallic threads: Metallic threads can be tricky to work with because they are more delicate and prone to breaking. To avoid this, reduce the upper thread tension to almost 0 and use a larger needle size. Sew slowly and avoid using the backstitch function, as this can cause the thread to break.
- Embroidery threads: Embroidery threads can also cause tension problems if not properly adjusted. Don’t sew with embroidery threads and use them only for embroidery projects.
✅ Related tutorial: Sewing thread types and uses
Before troubleshooting thread tension problems, ensure you thread your machine correctly. You always want to make sure that the thread comes off the spool in the back instead of the front.
Also, always use good-quality thread because poor-quality thread will leave a bunch of lint in the tension mechanism and clog it up. A wax-coated thread will leave behind a wax coating on the tension disks, which is extremely difficult to clean out and probably needs to be done by a professional service center.
Since the tension disks create tension by squeezing the thread, various thread sizes and types will require different settings to balance the tension correctly.
Tension Problems For Different Fabrics
You’ll need to adjust your tension settings when working with various fabric weights. Think of basic cotton fabric as your baseline (where your tension dial will probably sit in the middle).
Sewing fine materials (ex: chiffon) may require a lower tension. Knit fabrics, such as jersey or spandex, can stretch if the tension is too tight. To avoid this, reduce the upper thread tension and use a smaller needle size. Use a stretch needle specifically designed for knit fabrics and adjust the stitch length accordingly.
✅ Related tutorial: How To Sew Knit Fabric | 23 Expert Tips For Beginners
It’s important to note that every sewing machine is different and may require some trial and error when adjusting tensions for specific fabrics. It’s always best to test on scrap fabric first before starting any project on new material.
Sewing Machine Tension Dial Not Working
If your sewing machine tension dial isn’t working, the most likely problem is that the tension disks are clogged up and need to be cleaned. After you take a pipe cleaner or a small brush and clean out the tension disks, clean the bobbin case as well to make sure that lint didn’t fall down in there.
Is your sewing machine acting up? I created the ultimate troubleshooting guide to help you out and compiled a detailed list of solutions to common sewing machine problems. Many of these problems can be solved with some basic troubleshooting or maintenance. Is your thread getting tangled or breaking? I’ll walk you through the steps to fix it. Are you struggling with tension settings, broken needles, or jammed threads? I have tips for that too. Don’t let sewing mishaps get in the way of your creative flow. Check my guide and show your sewing machine who is the boss – Troubleshooting Common Sewing Machine Problems (+ Solutions)
FAQs
I can’t tell you how often I see sewists online asking tension-related questions (it’s a lot!). Here, I’m answering a few that I’ve seen recently.
What tension should my sewing machine be on?
It’s important to note that this number will vary based on a few factors, including the type and thickness of the thread you’re using, the fabric you’re working with, and how often you use your machine. Tension settings (or tightness) can loosen with use, so a brand-new machine may need a tension setting of 3 or 3.5, while a much-loved and frequently used machine may need a standard tension of 4 or 4.5.
If you find that your machine needs a higher tension setting in order to achieve the ideal tension when working with typical (not abnormally heavy or thick) materials, that can be an indication that you need to clean your tension disks or get your machine serviced by a professional.
How do I set sewing machine tension?
This will vary a little depending on what type of sewing machine you have. Mechanical machines usually have a dial you can turn manually to the setting you want. Computerized machines often have a keypad where you push buttons to set the tension.
What is sewing machine automatic tension?
Some more advanced sewing machines have an automatic tension feature where the machine senses what type of material you’re using and automatically adjusts the tension to match that material. Some machines even have a sensor built into the needle plate that it uses to make the determination.
Many sewists experience stress and frustration when there’s an imbalance between the upper and lower thread systems of their sewing machine. I hope this post helps to troubleshoot any sewing machine tension issues you encounter and fix them!
Useful Info – Sewing Machine Troubleshooting
If you own a sewing machine long enough, you’re going to have to figure out how to troubleshoot your sewing machine at some point or another. While some sewing machine problems are preventable, others are inevitable. Learn how to troubleshoot your sewing machine with my printable PDF eBook. Whether you use a traditional sewing machine or a modern computerized one, work through this ebook before thinking about a replacement or going to a service center.
Did you find this tutorial helpful? If so, save this pin (see below) on your sewing board so you can come to this tutorial later when you are ready to troubleshoot sewing machine tension problems, and follow me on Pinterest for more tips, tutorials, and inspiration!
latest posts
- What Do You Call a Person Who Sews? I Asked My Readers and Got 1,408 Opinions
- DIY Round Purse: PDF Sewing Pattern and Detailed Instructions
- Mini Wonder Clips By Clover: Useful Sewing Tool Or Just Another Notion?
- Non-Slip Grips For Quilting Rulers: A Small Notion With A Useful Job
- Fabric Eraser for Sewing: What It Removes and When to Use It
- What Is The Best Thread For Sewing Machine Projects? Let’s Find Out!
- Butterfly Quilt Block Tutorial – Foundation Paper Piecing
- How To Sew Quilt Squares So The Corners Match
- Sewing With Fork Pins: How They Help With Pattern Matching, Slippery Fabric, And Seams


Thank you Olga! I couldn’t figure out why I had tension issues – and your post has solved it. I hadn’t understood that the tension on the bobbin case itself can be adjusted – problem solved!
Glad it was useful! Thanks!