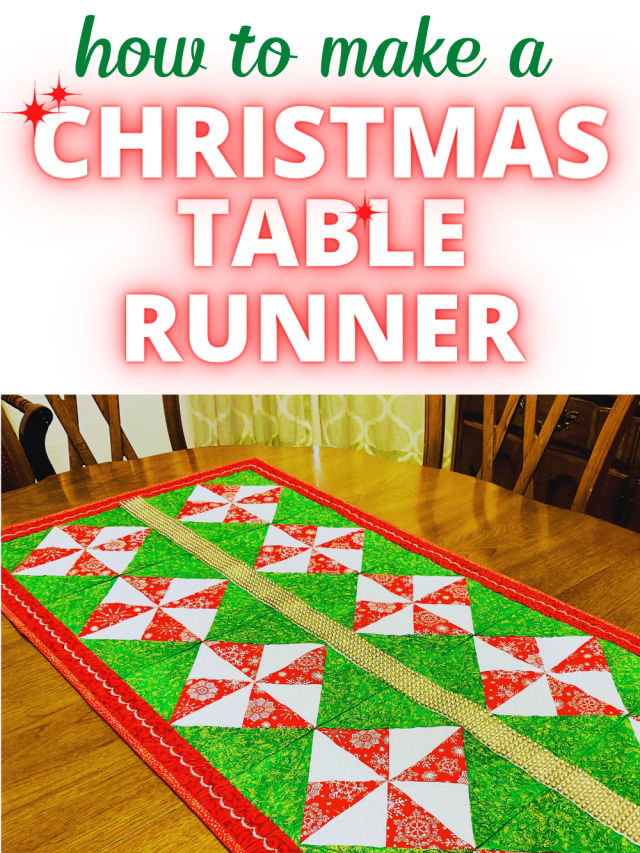
How To Make A Quilted Christmas Table Runner
The Quilted Christmas Table Runner is the perfect way to add some festive cheer to your home this holiday season. It’s an easy project and one that will bring joy to everyone who sees it!
This Christmas table runner can be made from your favorite Christmas fabrics and even a beginner quilter can make it! It’s easy to follow along with my step-by-step instructions and in no time at all, you’ll have a beautiful finished product! I have included templates that will help you get started. And if you want something extra special, why not embellish the center block with a sparkling ribbon?

The finished project measures 21 ½ x 53 inches which makes it suitable for most tables (it may hang over slightly on each side). I also include full-color photos throughout to guide you through every step of the process. And best of all – once completed this beautiful table runner will add warmth and cheer to your holiday season!
So what are you waiting for? Start making your very own Quilted Christmas Table Runner today!
Here’s What You’ll Need To Make The Quilted Christmas Table Runner
This table runner is fairly easy to create.
Fabric for the runner
For the pinwheel quilt blocks:
- red fabric 1 fat quarter
- white fabric 1 fat quarter
For the runner
- Green fabric ¾ yard
- Red fabric for the backing and for the border – 1 ⅝ yard
- Red fabric for the binding – ⅜ yard
- 2-inch strip of fabric 52 inches long to sew in the middle of the runner. I used white fabric but you can use whatever fabric you want.
Batting – I used fusible batting – 1-5/8 yards 44” wide
Sparkling ribbon for embellishment
Sewing essentials (sewing machine, pins, scissors, etc.)
Cut The Fabric For The Quilted Christmas Table Runner
Read the whole tutorial before cutting your fabric.
Seam allowances are ¼ inch for the whole project.
You will need
- 48 red half square triangles 3.5” side length
- 48 white half square triangles 3.5” side length – but DON’T CUT THEM YET! Check the instructions below on how to do it fast!
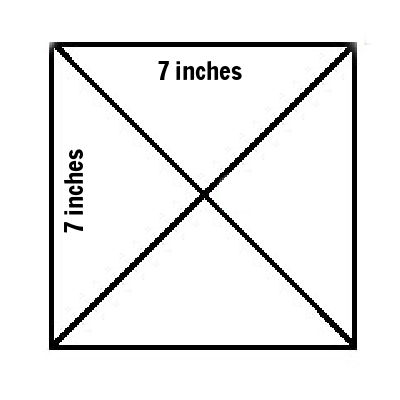
- Green triangles – first cut 12 squares 7” x 7” and then cut 4 triangles from these squares
- 1 white strip – 2” wide 52” long
- 2 red strips – 2” wide 52” long
- 2 red strips – 2’ wide 24” long
- 4 red strips – 2” wide for binding. I made my binding 2 in wide but I think a good width would be from 2 inches to 2 ½ in.
- Cut a piece of fabric for backing about 56” long and 25” wide.
- Cut batting 56” x 25”.
It’s recommended to prewash fabric for table runners before cutting because table runners need frequent washing. But I decided not to do it because I use quilted fabric with metallic accents and I am afraid these gold and silver sparks will look different after prewashing. They say that these sparks stay on fabric after washing so I would see in the future when I need to wash my Christmas table runner.
So basically the choice is yours in this matter.
You should, however, always iron quilting fabric before attempting to cut it. Ironing the fabric before cutting will help you avoid wrinkles and odd creases and get perfect pieces every time. Use steam if possible and make sure your iron on the wrong side of the fabric for better results. Nothing is worse than cutting all the pieces of your quilt pattern and finding one or two with weird creases that throw off the dimensions.
To cut larger pieces of fabric, such as half yards or bigger, you’ll need to fold them to fit your cutting mat. The right way to do this is to bring both selvages together. Place the fold closest to your body on the cutting mat. This means the selvage edges will be on the opposite side.
Once your fabric is positioned on your mat, use your acrylic ruler to measure and cut your strips. The pattern calls for triangles, but you need to cut strips of fabric first, then cut the strips into the squares and triangles needed.
Note: Some of the links on this page are affiliate links. This means I will receive a commission if you order a product through one of my links. I only recommend products I believe in and use myself.
Use the lines on your cutting mat as a guide. You’ll need your rotary cutter to make the actual cuts. I use a Martelli rotary cutter. This is a very special rotary cutter: it has an unusual shape. There are two versions: for the right hand and for the left. I use the right-hand version. I think it’s the best rotary cutter ever!
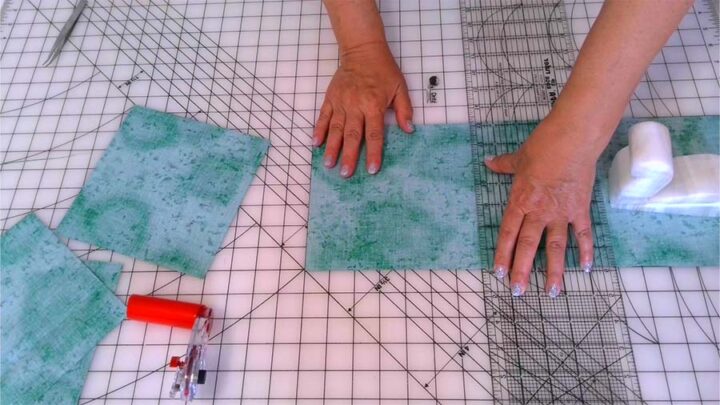
Hold your cutter perpendicular to your fabric and place it along the edge of the ruler. Carefully begin your cut at the fold closest to you and cut away from your body, toward the selvage. It may take some practice to get the cutting pressure just right, but if you’re using a new blade, it should take only one pass-through to completely separate your strip from the rest of the fabric. This leaves a clean, straight edge that’s easy to piece and sew.
Perfect squares and triangles begin with perfect strips. Use more than one point of vision on your cutting mat to help you align your ruler. Move your ruler in increments to cut the size squares required.
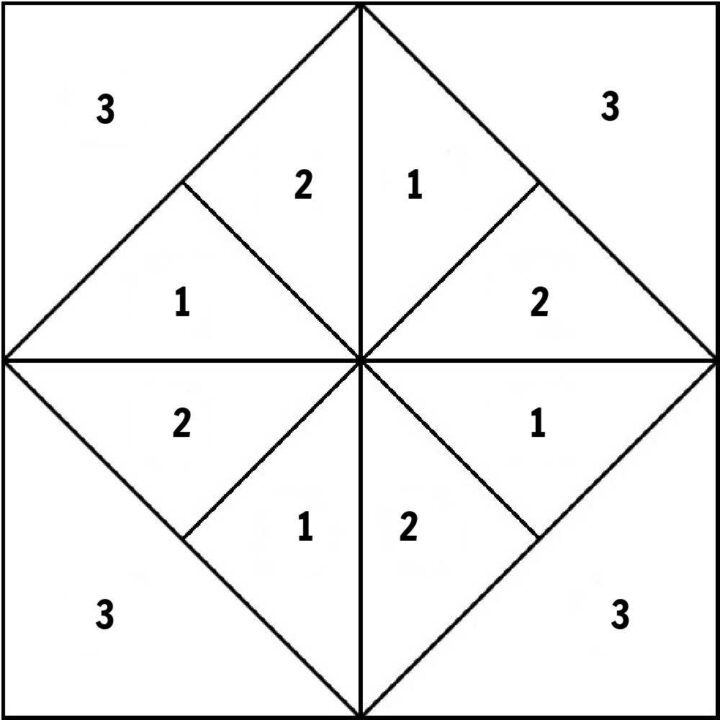
Here Is The Pattern Of The Quilt Block For The Quilted Christmas Table Runner
Making The Half Square Triangles For The Pinwheel Block
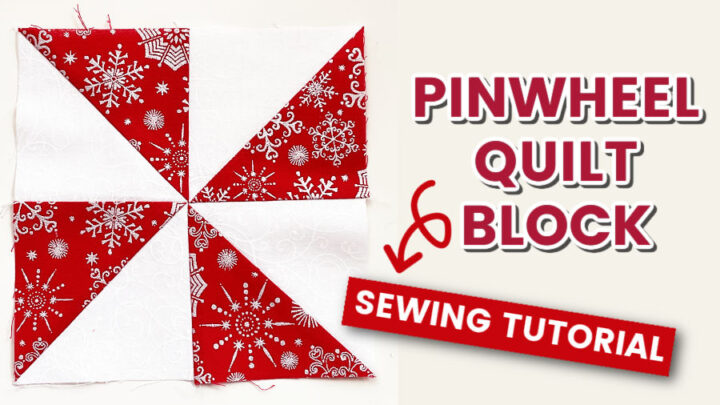
Of course, you can cut 96 half-square triangles and then sew them to make pinwheel blocks. But there are some methods to cut and sew them fast. I describe the process in detail in my tutorial Pinwheel Quilt Blocks.
In that tutorial, I try to cover everything you need to know to create perfect pinwheel quilt blocks using half-square triangles in alternating colors. I am showing how to create these blocks as well as discussing the following: what is a pinwheel quilt block, how to match points on pinwheel blocks, how to reduce bulk in pinwheel seams, and how to press a pinwheel quilt block.
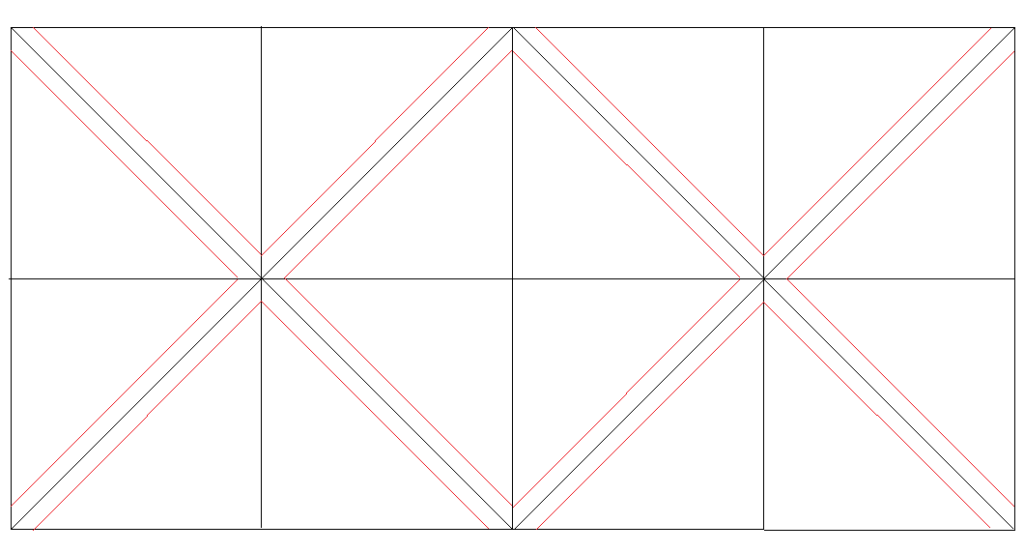
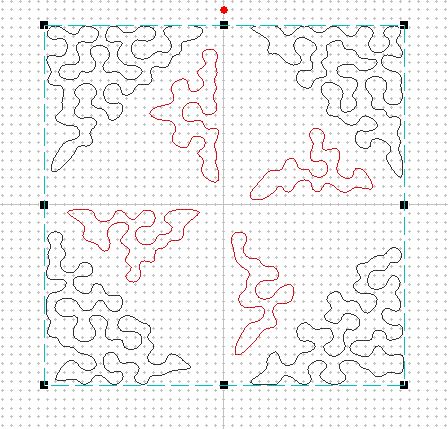
In that tutorial, I describe 2 ways of making 16 half-square triangles at once and they will be already sewn into 8 squares. Either way will give you great results. So, the first way – I use my Brother Luminaire embroidery machine. You can do it with Babylock Solaris as well.
I digitized this embroidery design myself and it works great as my template for making identical half-square triangles sewn into squares.

The second method is the manual one. You don’t need Brother Luminaire for this. Just use this template you see in the image below.
So check my step-by-step tutorial on how to easily make Pinwheel Quilt Blocks for the Christmas Table Runner.
How To Assemble The Quilted Christmas Table Runner
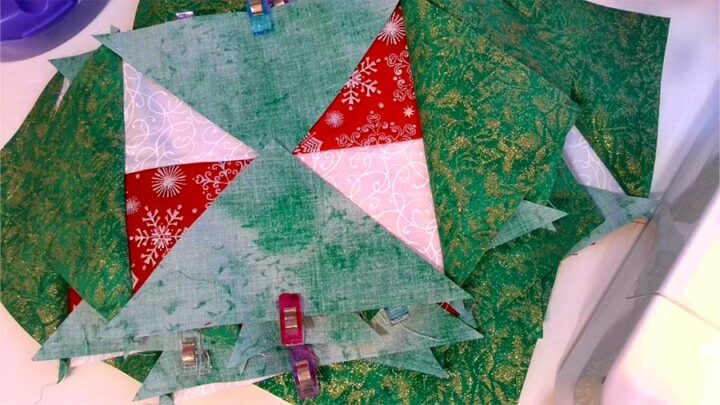
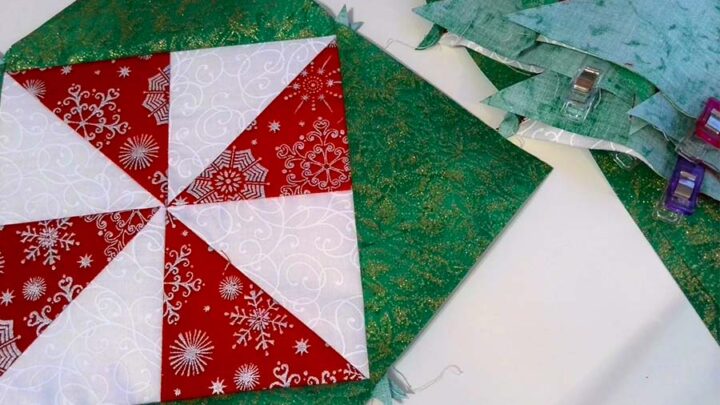
Sew two green triangles to the pinwheel block on the opposite sides. Finger press. Repeat for all pinwheel blocks.
Next, sew two green triangles to the pinwheel block on the other 2 sides. Finger press. Repeat for all pinwheel blocks.
Now you will have 12 new square blocks that have to be sewn together for the runner.
Sew together 6 square blocks first, making a row, and then the next 6 square blocks for another row. Match-up seams. Finger press and then press them with an iron. You have to be careful sewing these blocks together because the pinwheel’s corners must align perfectly. If they don’t align we will have problems in the next steps.
Sew together a white strip and one prepared row (which includes 6 pinwheels). The strip is one piece of fabric. This white strip is going to be in the middle of the runner. The corners of the pinwheels must align perfectly with the strip. If the squares are equal and you paid attention to the alignment when you sewed the pinwheels together, they will align without problems. If done properly, all these corners are going to be on the same line and they will align properly with the edge of the white strip.
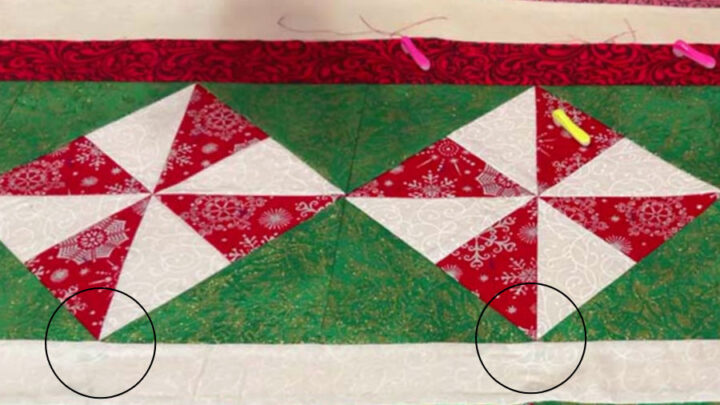
Next, sew the second row with pinwheels to the white strip. You need to be very precise with this step: pinwheel blocks MUST match as you see in the image below.
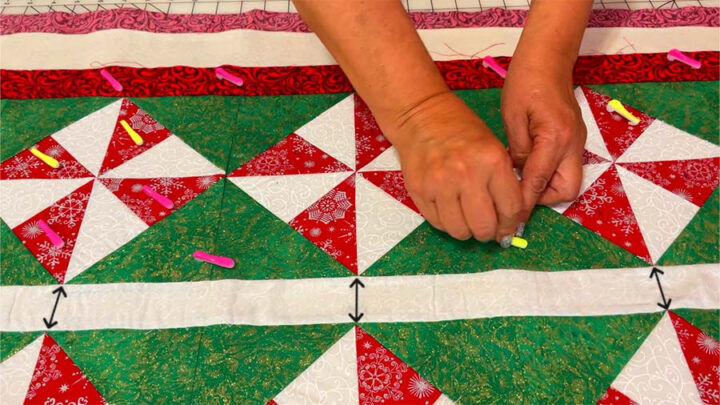
Sew the red border. Start with the 2 long strips and after that sew 2 short strips. Again the corners of the pinwheels must align perfectly. In my case, I did a pretty good job because all the corners aligned well, the expert one which is about 1/32” off as the image below shows. Fortunately, the error is not so visible so I don’t need to fix anything.
If the corners don’t align properly you will have to adjust the border slightly because if a corner is visibly cut it’s not beautiful. Fortunately, you can see if this is the case before you stitch the border.
✅ Related tutorial: In The Hoop Embroidery Project: Fabric Christmas Tree Baby Bib
Batting, Backing, And Basting The Quilted Christmas Table Runner
Prepare a quilt sandwich. A quilt sandwich is really just a fancy name for the layers that make up your project: the top, batting, and backing. All three must go into place correctly before quilting can begin!
Usually, the type of batting that you use will depend on what the project is. I wrote in detail on types of quilt batting in another tutorial on my site.
For example, if this project is a table runner, then this would require thinner batting than if it were a blanket.
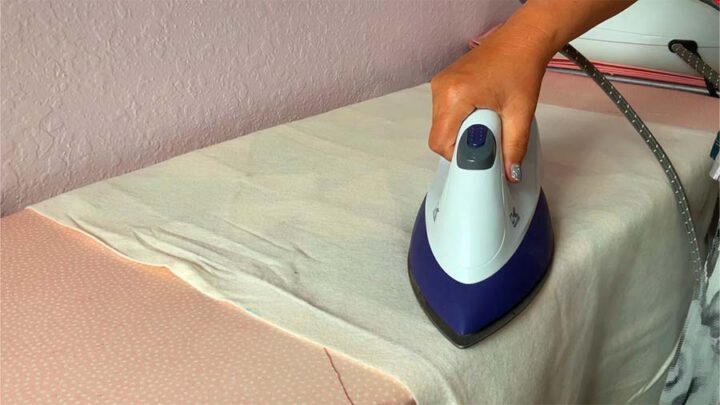
I decided to use fusible batting for this table runner because it’s easy to work with. It also makes the quilting go much faster! Just put the prepared top of the runner on the ironing board, place the batting on it (fusible side to the wrong side of the runner), and fuse the batting with a hot iron.
Next, we need to add backing to the table runner. Always cut your backing a little bigger than the quilt top if you are going to machine quilt.
Place the backing fabric on a cutting table right side down, and make sure you smooth it out. Then, layer your batting on top, and smooth out all wrinkles and folds. Last, place your quilt top, right side up. You should have extra inches of batting and backing on all sides of your quilt top to allow both to draw inward as you quilt.
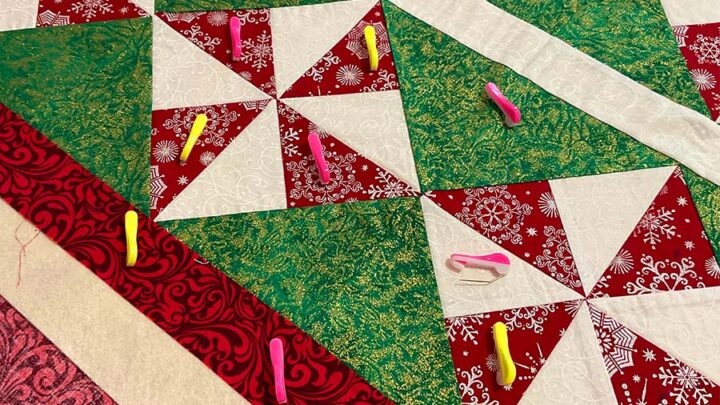
Now baste the quilt top to the batting and backing fabric. You can read my detailed tutorial on different ways to baste a quilt.
I decided to use both Clover Wonder pins and a basting gun.
You should baste in the areas that you won’t be quilting as a rule. Or you can take the pins out from the area you are quilting and keep pins in the surrounding areas.
Wonder pins are great for basting a quilt, I like them a lot. Very easy to apply, much easier than regular safety pins. Clover Wonder Pins are an innovative, yet simple solution for when you want to baste your quilting project fast. Look at their bright colors – it’s so easy to find them in the quilt and remove them when necessary! That plastic cover makes them easy to handle. The angled side will let you position them perfectly. I love how sharp their tips are as well.
But you need to remove the Wonder pins as you go to avoid sewing over them.
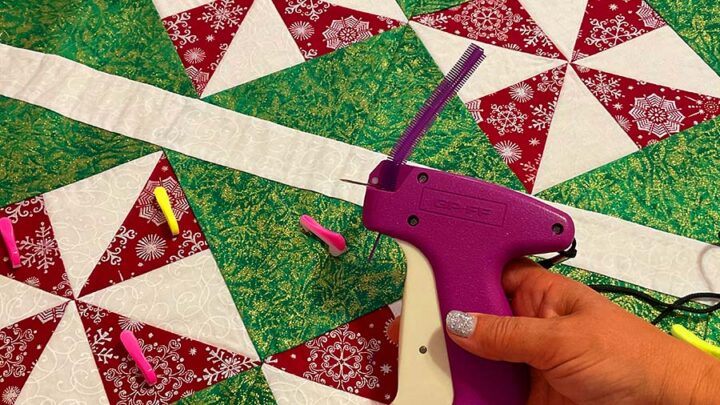
But I like the quilt basting gun more I think because it makes the process so much easier and faster. A quilt-basting gun like I have ( Quiltack basting gun) shoots tiny tags into place that hold your layers together quickly and efficiently without having to use spray or carefully pinning everything in place with safety pins!
Place tags all over the quilt so it lessens the likelihood of layers shifting around. Work from the center out to the borders on all sides.
Quilting The Table Runner
Once you have finished basting, you can quilt this table runner with free motion quilting or any other type of quilting.
But I like to use my Brother Luminaire embroidery machine.
Modern embroidery machines have changed the way we think about quilts, making it possible to create your own unique quilting designs in just minutes. Creating quilts has never been easier – modern sewing and embroidery machines are new wonders of the world!
This type of quilting is called “quilting in the hoop”. You will need multiple hooping to complete the quilting on this table runner.
I heard that it’s better to start quilting in the middle of your quilt.
Here is what I do step by step.
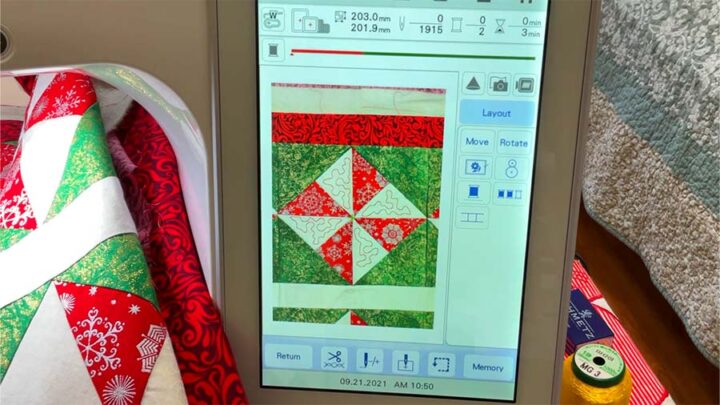
First, I digitize my quilting design using Palette 11 embroidery software. There are hundreds of quilting designs but I decided to go with simple stippling. This is the design for my quilted Christmas table runner.
Next, I load the design into my Brother Luminaire. I prepare enough bobbins with the same thread I use on top. For embroidery designs, I usually use pre-wound bobbins but for quilting, I like to use the same thread as I use on top, so I wound enough bobbins with this thread.
I use my magnetic embroidery frame – it’s perfect to use for the multiple hooping needed to complete the quilting on my table runner. I place the runner for machine quilting – one square block at a time.
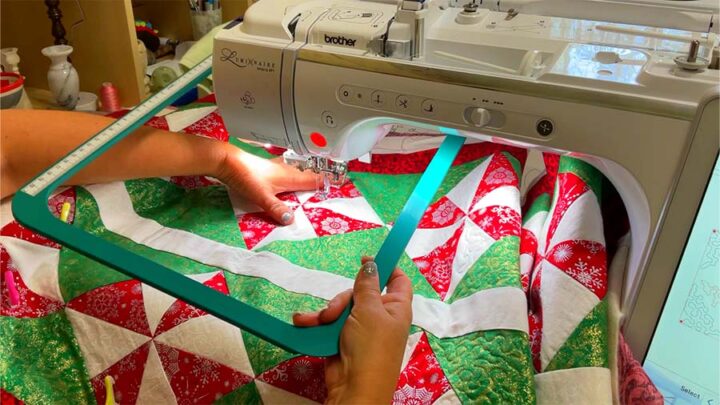
Next, I scan the quilt in my hoop and now I can position the quilting design on my square exactly as I want it.
The next step – start quilting the white triangles with white thread.
Next, change the thread to metallic gold and start quilting the bigger triangles.
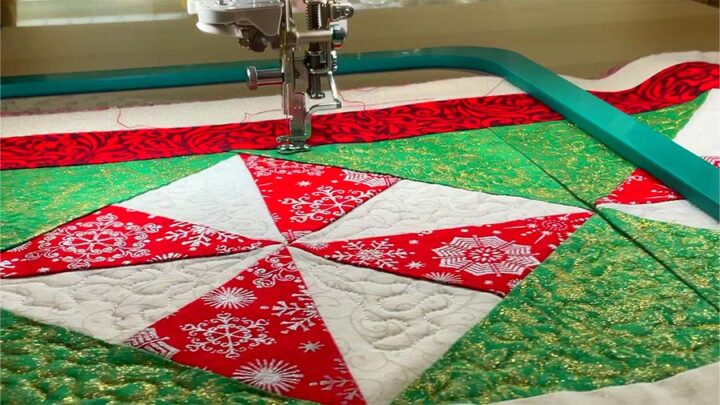
After the square is finished I need to reposition the quilt and repeat the process again.
I am sure a long-arm machine would quilt this table runner much faster but I am a beginner quilter and for my small projects my Brother Luminaire machine is enough even if it takes some time.
Finishing The Quilted Christmas Table Runner
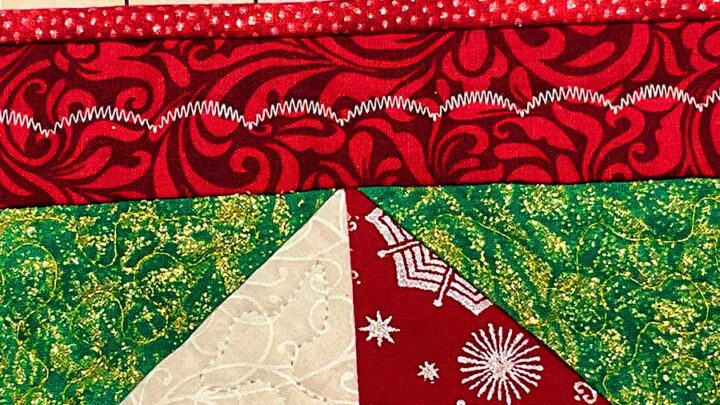
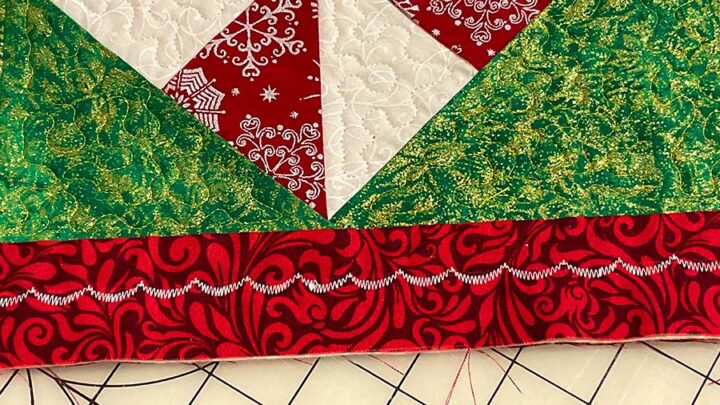
So, I have finished quilting the squares. Now I decided to put some decorative stitches on my quilt border. My machine has tons of them so why not use one for embellishing?
And here comes the binding.
I much prefer to bind a quilt by my serger and I described the process in my tutorial on how to bind a quilt by serger. But I know that not everybody has a serger. So I decided to bind my table runner using a regular sewing machine, my Janome 6600.
The first step is trimming the quilt. Well, this is easy to do. Just use your ruler and a rotary cutter. You have to trim all edges of your quilt cutting through all layers as straight as possible.
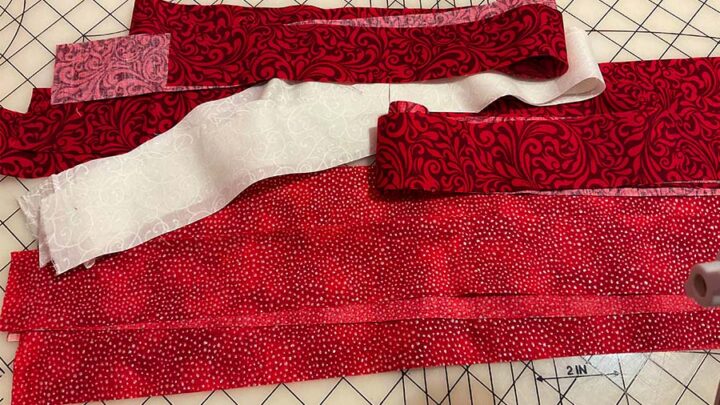
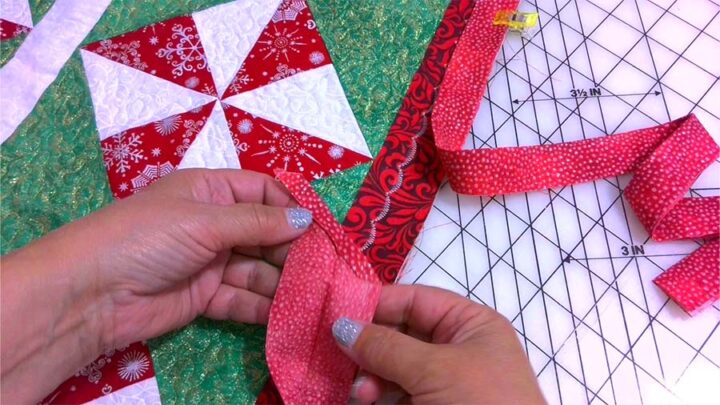
The next step is preparing strips for binding.
Sew them together to make a long strip of fabric and press the seams open. Make sure your final binding strip is long enough for your quilt. I cut one end of the binding strip diagonally as you see in the image. Fold ½ inch in and press. Ford the strip in half lengthwise wrong sides together and press.
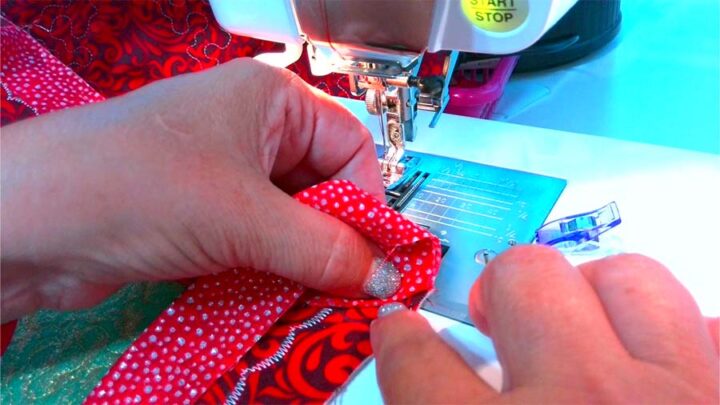
Insert a walking presser foot on your sewing machine. I forgot to do this and used a regular ¼ “ foot. It was manageable but I would have had fewer problems if I would use the walking foot.
Place the binding strip on a quilt matching raw edges.
Start on one long side of the runner. You can begin binding anywhere along the edge of the quilt except in a corner. Allow approximately 4-6 inches of the binding to be not sewn.
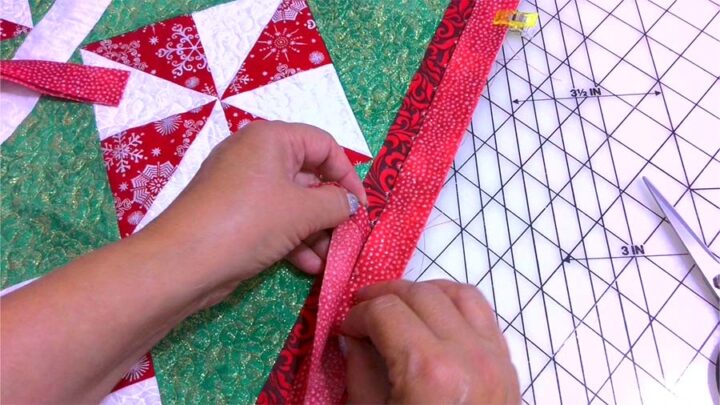
After you decide where to start, run the binding strip around the edges of the project to make certain that the binding seams don’t fall into corners. If you see it happens, readjust your starting point.
Start somewhere in the middle of a long side of the runner. Leave about 3-4 inches unstitched at the beginning.
Start sewing the binding to your project.
When you come to the first corner stop stitching ¼ in from the edge. Remove the quilt from under the presser foot. Fold the strip up diagonally to form a 45-degree angle and then fold the strip down, so that fold is even with the top edge. Start sewing again.
Continue around the entire quilt, repeating this at each corner. Stop approximately 5 inches from the beginning of the binding strip. Slip the end of the binding strip into the starting end enclosing raw edges. Trim the end of the binding strip. Stitch the final section of binding to the project.
Fold the attached binding to the back of the quilt. Form corners. They will be perfectly mitered. Sew the binding by hand on the back of the table runner.
Of course, you can make the final stitch by the machine. But I could never manage to do it perfectly straight. If I sew the binding on the right side of the quilt using stitch-in-the-ditch, then on the wrong side of the quilt the binding is not sewn straight and in some places, it’s not sewn at all. If I stitch the binding on the wrong side then the binding is stitched straight on the wrong side but the right side of the quilt is not looking good.
So I decided to use an invisible stitch and sew the binding in place by hand sewing. It doesn’t take that long and looks perfect on both sides.
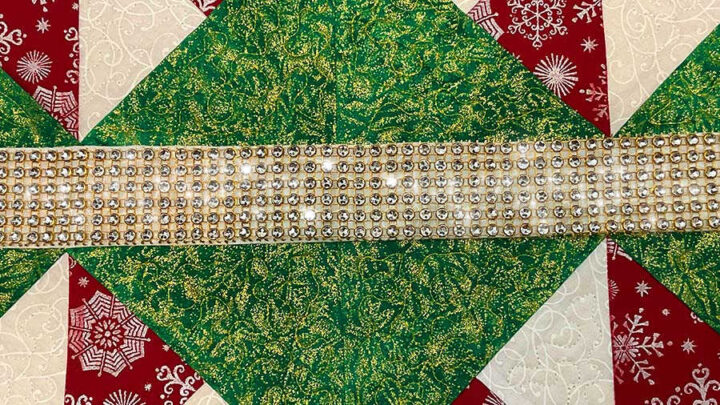
And the final step – I have decided to embellish my table runner with sparkling ribbon.
Did you find this tutorial helpful? If so, save this pin (see below) on your sewing board so you can come to this tutorial later when you are ready to make a quilted Christmas table runner, and follow me on Pinterest for more tips, tutorials, and inspiration!
latest posts
- What Do You Call a Person Who Sews? I Asked My Readers and Got 1,408 Opinions
- DIY Round Purse: PDF Sewing Pattern and Detailed Instructions
- Mini Wonder Clips By Clover: Useful Sewing Tool Or Just Another Notion?
- Non-Slip Grips For Quilting Rulers: A Small Notion With A Useful Job
- Fabric Eraser for Sewing: What It Removes and When to Use It
- What Is The Best Thread For Sewing Machine Projects? Let’s Find Out!
- Butterfly Quilt Block Tutorial – Foundation Paper Piecing
- How To Sew Quilt Squares So The Corners Match
- Sewing With Fork Pins: How They Help With Pattern Matching, Slippery Fabric, And Seams