How To Sew Curves the Easy Way Using a Curve Master Presser Foot
Ten years ago, I met a “Curve Master.” What was it? A sewing machine presser foot. The name sounded like a gymnastics champion – ‘Up next in the spotlight… Curve Master!’ – not something that lives in a notions drawer. I remember squinting at the odd little piece of plastic, and thinking, $50? This is definitely outside my sewing budget.
At the time, I was also actively avoiding any sewing pattern that involved curved seams. Drunkard’s Path blocks? Hard pass. New York Beauty? More like new level of frustration. I stuck to straight lines and right angles. The idea of smoothly sewing a curve felt like trying to get a cat to sit still – possible, maybe, but not something I was signing up for.
Fast forward to now – I stumbled upon that same Curve Master foot again. This time, it was on Amazon, and it wasn’t $50. It was $19. I added it to my cart before I could talk myself out of it, and a few days later, I was standing in front of my machine, curious and slightly amused. I tried it.
And guess what?
I like it. A lot.
Concave and convex curves can make even experienced sewists pause. The thought of clipping, pinning (and possibly crying) always held me back. But after some practice, I can say this with confidence: you can sew curves. Truly. Like most things in sewing, it just takes some patience and the right tools.
Note: Some of the links on this page are affiliate links. This means I will receive a commission if you order a product through one of my links. I only recommend products I believe in and use myself.
Now, maybe you don’t have the Curve Master foot (yet). That’s okay. This tutorial will still show you what it does and why it might be worth a spot in your sewing drawer.
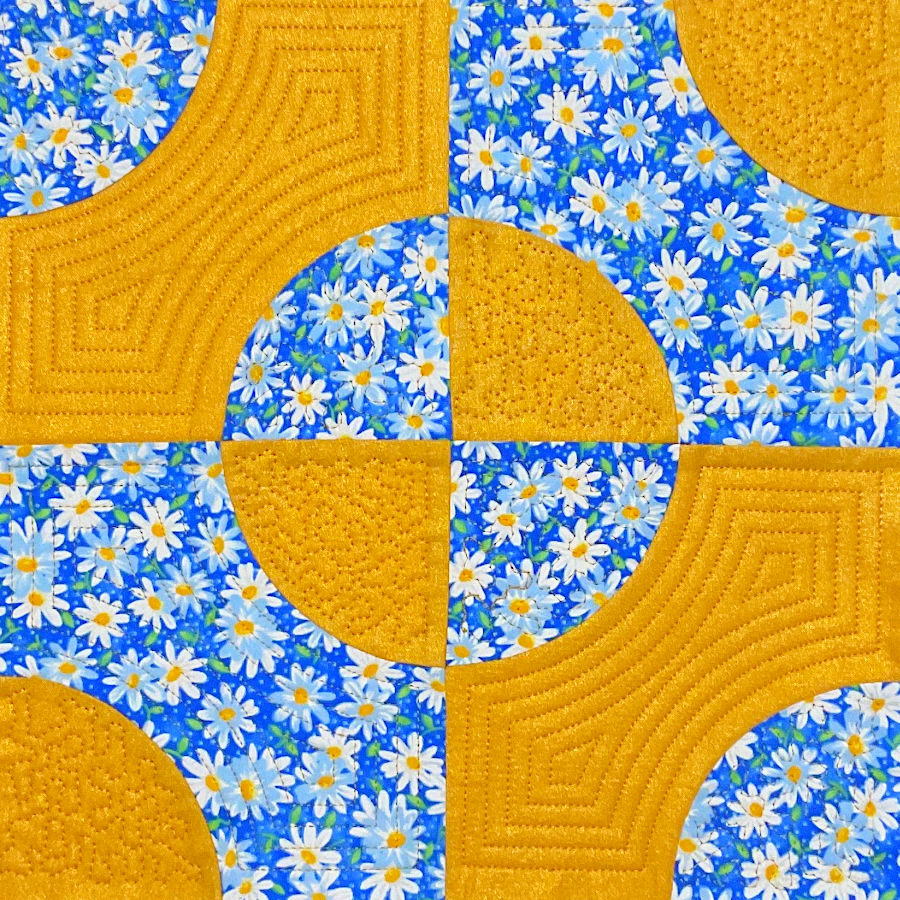
For inspiration, here is one of my own quilt block patterns: Christmas Lights. The red shapes look like little holiday lights, and the green curved sections remind me of garlands across a Christmas tree.
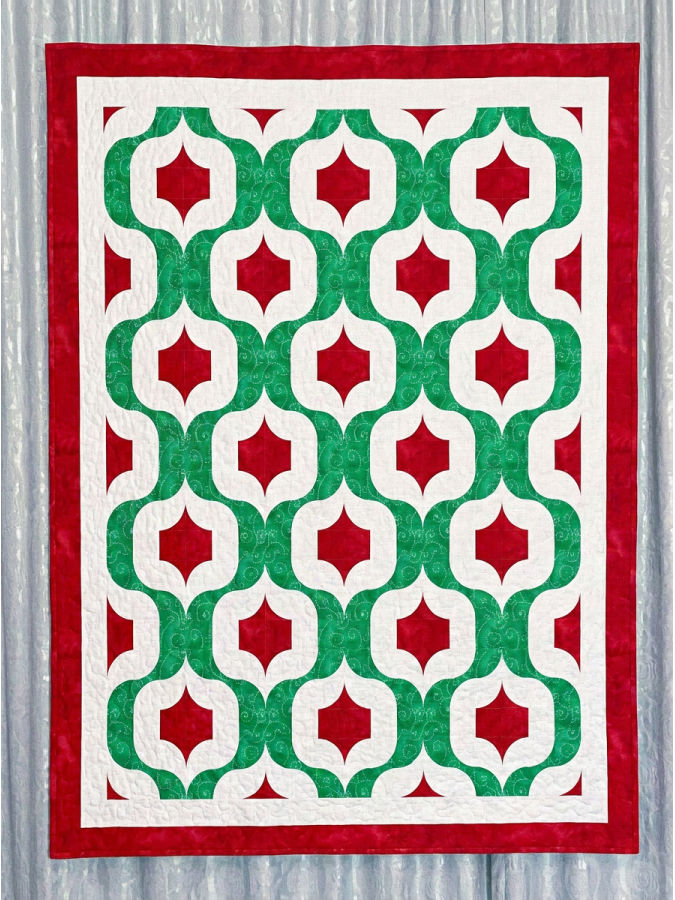
What’s especially exciting is that you can absolutely recreate this look using the Curve Master presser foot. Those gentle convex and concave curves? The foot handles them beautifully, no pinning or notching required. This quilt might be just the inspiration you need.
And yes, it’s easier than it looks.
The Christmas Lights quilt block pattern is available in my shop, so you can make your own version and put those curved seams to work.
And just so you know — curved piecing isn’t just for quilters. Concave and convex curves pop up all over the sewing world: center panels on tote bags, pillow designs, patch pockets, even fun little table runners or appliqué layouts.
So even if quilting isn’t your thing, knowing how to sew curves is a skill that opens up all kinds of creative options.


I also found the item on Amazon UK, use this link.
This foot is most helpful for matched curved pieces with a ¼” seam allowance. Think quarter-circle quilt blocks, Drunkard’s Path style blocks, curved piecing, small patchwork panels, and decorative curved inserts.
I would not use this foot for thick bulky seams, garment seams with a ⅝” seam allowance, very tight curves, or curves where you need to sew on a marked stitch line instead of along a raw edge.
So today, I want to show you how this funny little foot works. I’ll walk you through what it does, how to use it, and yes – a few quirks that might come up. Because it’s not perfect, but it is clever.
And curves? They’re not scary anymore. In fact, they’re kind of fun.
What Is the Curve Master Foot (Besides a Comically Confident Name)?
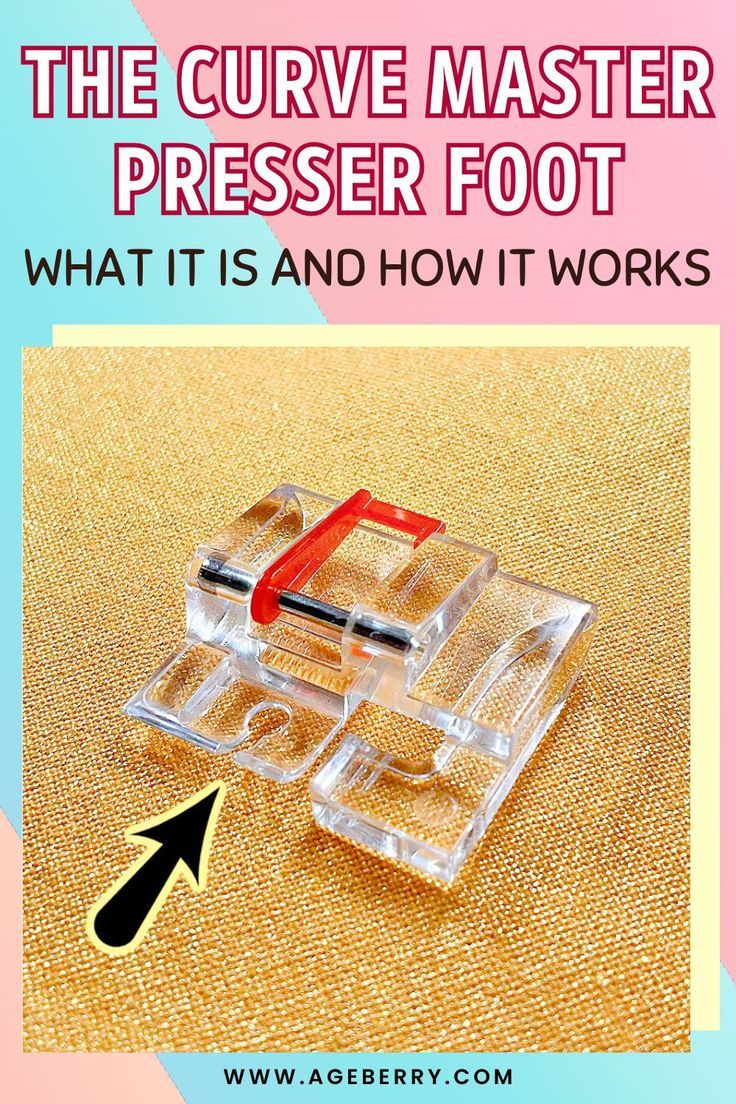
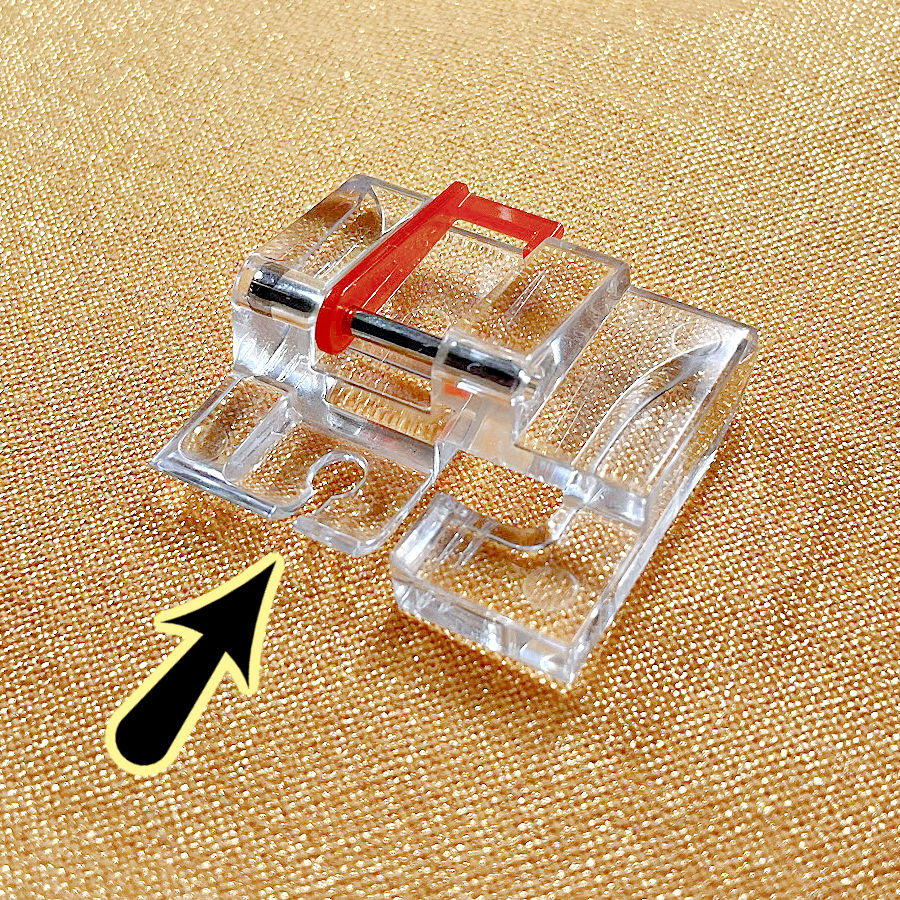
At first glance, the Curve Master doesn’t look all that special. But take a closer look, and you’ll notice something unusual right away — it’s wider than any standard presser foot you’ve likely used.
It has a transparent, blocky design with a distinct curve in its shape and a bright red piece across the top that holds the metal bar. The plastic is completely clear, which turns out to be helpful for keeping an eye on your fabric as you guide it through.
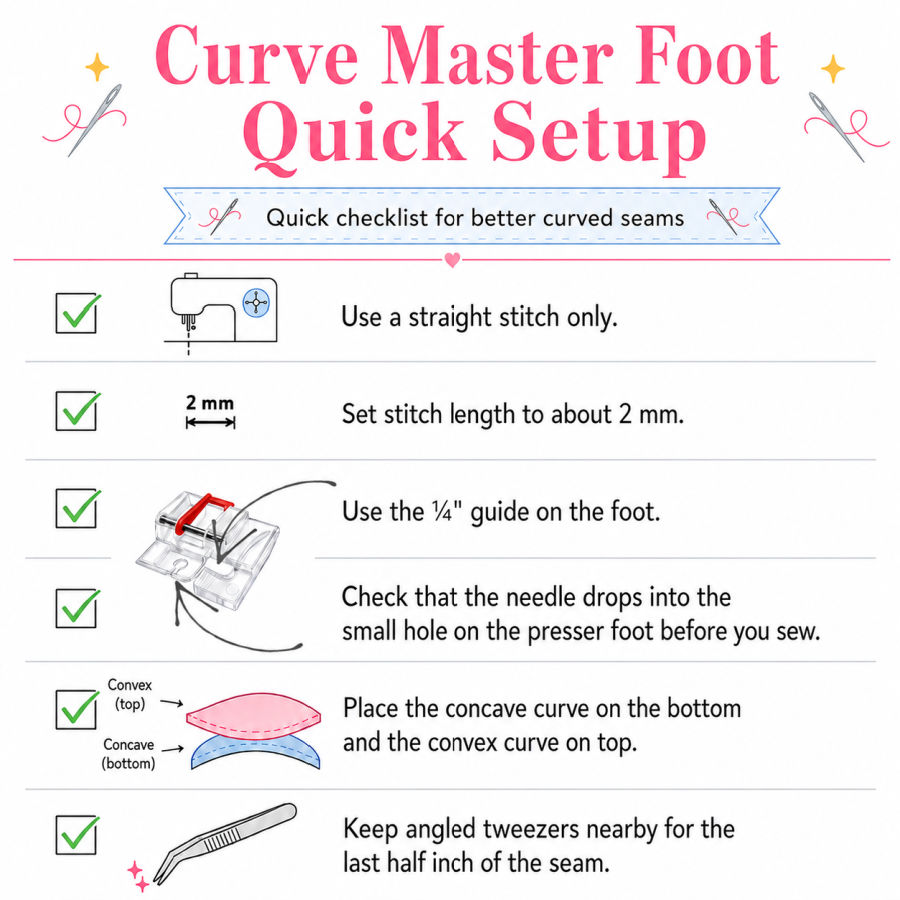
There’s a small circular hole in the foot — very small. That’s your clue that it’s meant strictly for straight stitching. If you try zigzagging with this foot, it’ll end in heartbreak (and possibly a broken needle). It’s designed for neat, even curved seams sewn with a straight stitch.
It’s a snap-on foot with a more or less universal fitting, so it works with most home sewing machines — as long as yours takes low-shank feet or has the right adapter.
✅ Related tutorial: Types of Sewing Machine Stitches: Unraveling the Mysteries of the Straight Stitch
The foot works on low shank machines right out of the box. If you have a high shank machine, you’ll need a little adapter. It attaches like any snap-on foot, though it doesn’t look or feel like any other snap-on you’ve used before.
Another standout feature? It sews consistent 1/4″ seam allowances. No guides, no markings to line up with — the shape of the foot itself takes care of that for you. And because it’s extra wide, it holds your fabric firmly while still giving you room to gently guide those tricky convex and concave edges together.
The real surprise? You don’t need pins. You don’t even need to clip the fabric. Just line up the edges and go. It’s basically magic, of the sewing kind.
The wide foot holds both layers steady. The slight tilt in its shape helps gently ease fullness where it’s needed. And suddenly, those once-scary curves turn into smooth, neat seams that look like you’ve been sewing them for years.
Any time you find yourself squinting at a curve and wondering if you really have to sew it — this foot steps in with a quiet “yes, you can.”
How to Use the Curve Master Presser Foot – Step-by-Step
Step 1. Attach the Foot
First things first — snap the Curve Master foot onto your machine. If you have a low shank machine, you’re good to go. It attaches just like a regular snap-on presser foot.
Using a high shank machine? You’ll need a little adapter, but once that’s in place, it fits perfectly. It might look wider and a bit clunky compared to your usual feet but don’t let the size throw you off.
Now here’s the important part:
Make sure the needle aligns with the center of the foot’s hole. On my Janome 6600, it didn’t. I had to move the needle just a bit to the left so it didn’t hit the side of the foot.
But on my Brother machine, it was right in the center with no adjustments. So before you start sewing, do a test stitch slowly to check where your needle lands. It only takes a second to check, but it can save your needle — and your nerves.
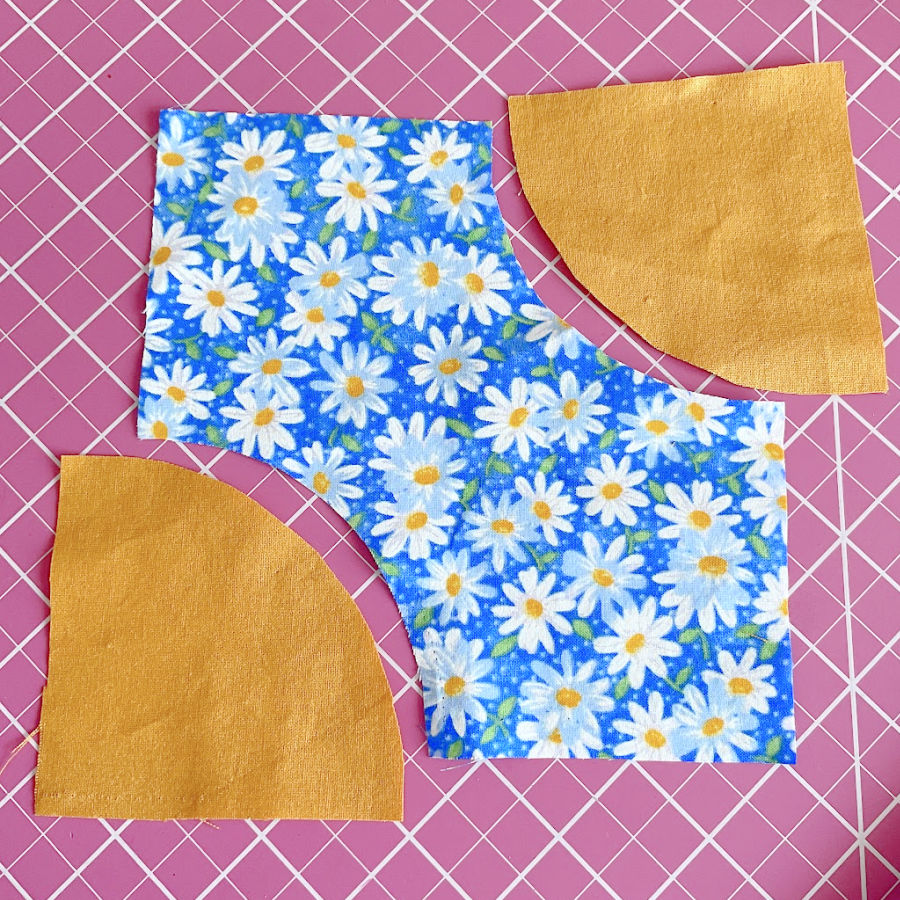
Step 2. Cut Your Fabrics with Matched Curves
I am making here a quilt block using quarter circles.
You’ll need two types of pieces: one with an inner (concave) curve and one with an outer (convex) curve. These are designed to nest together like they’re meant to be… because they are.
Accuracy matters here. These curved pieces should include ¼” seam allowances. That tiny margin makes all the difference when it’s time to sew the pieces together. If your curves are even slightly off, they won’t match up properly.
To make cutting easier and more accurate, use templates. I made this block using paired templates that match up perfectly and include the seam allowance already.
Want to make the same block? I have a printable PDF pattern available in my Resource Library, with all the pieces sized and ready to go.
Getting this part right really sets the stage for smooth sewing ahead.
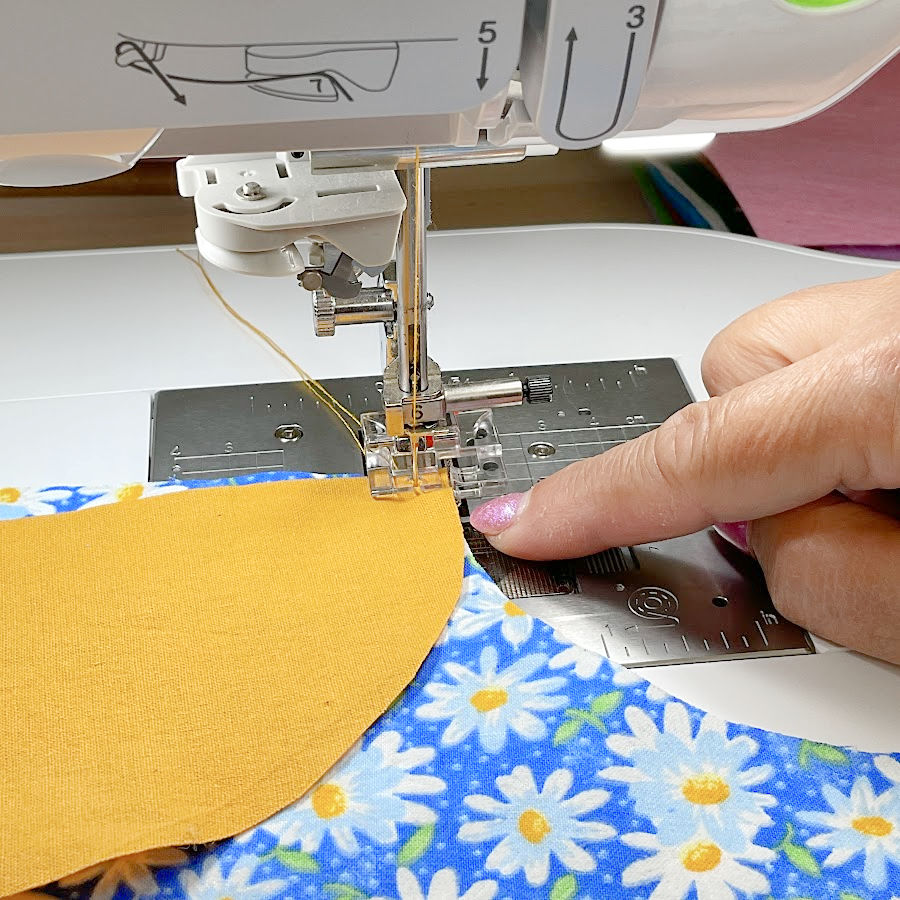
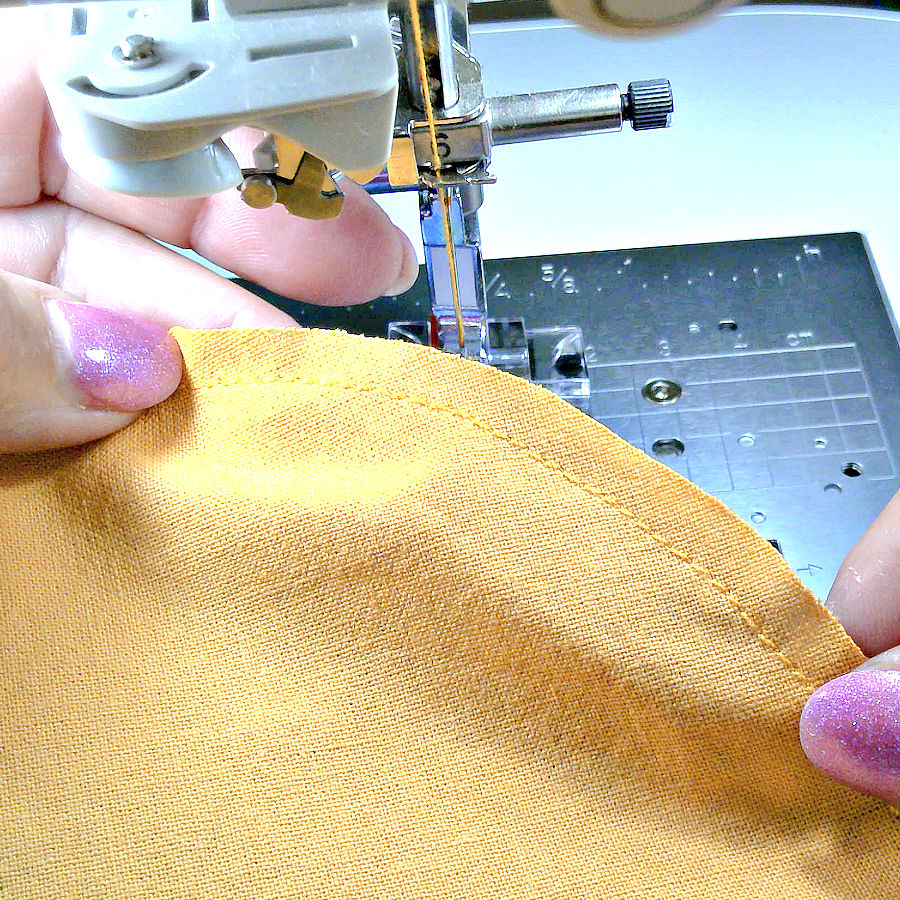
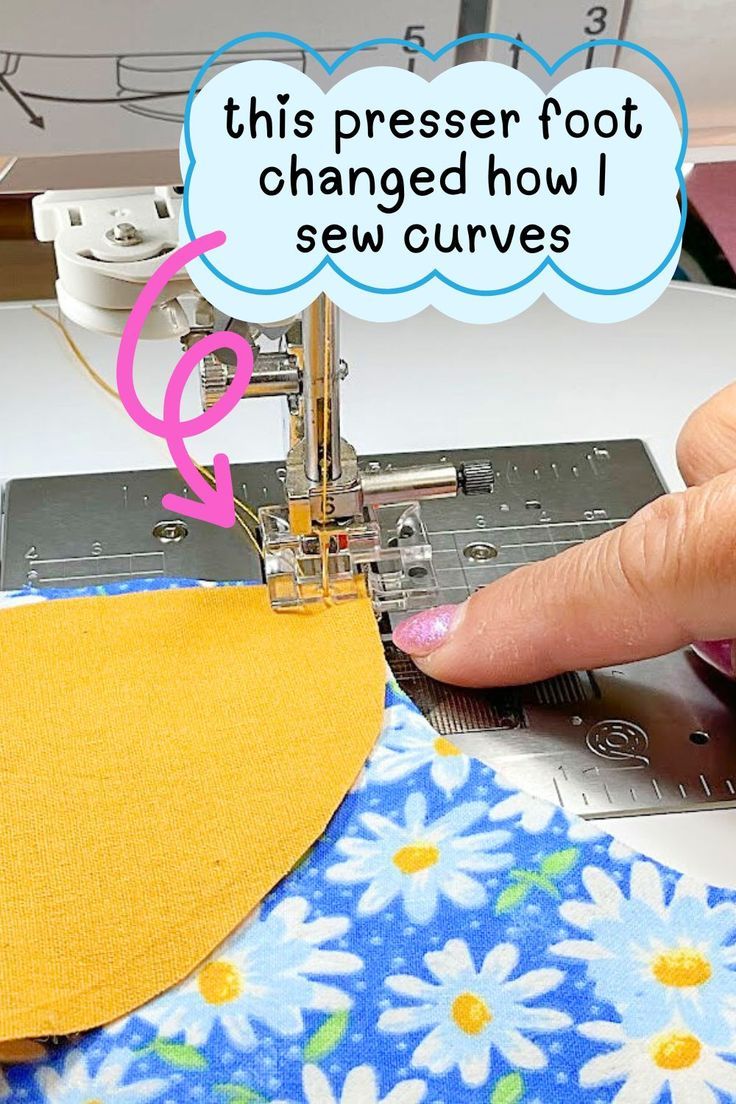
Step 3. Position the Pieces Under the Foot
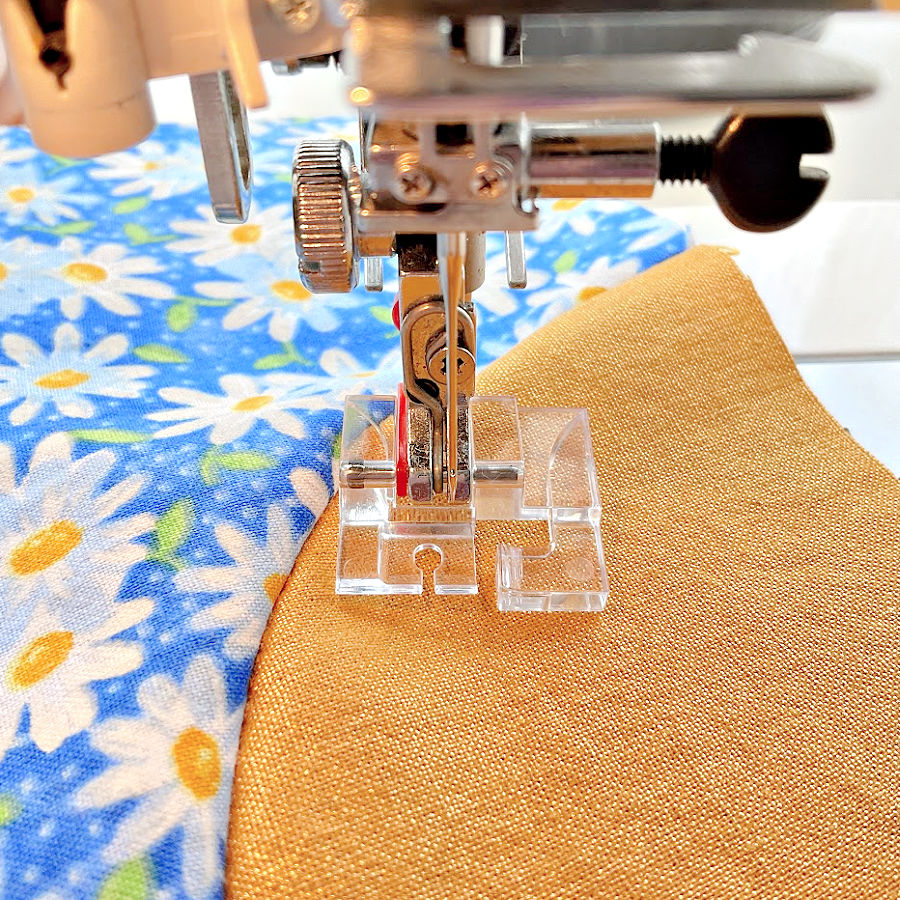
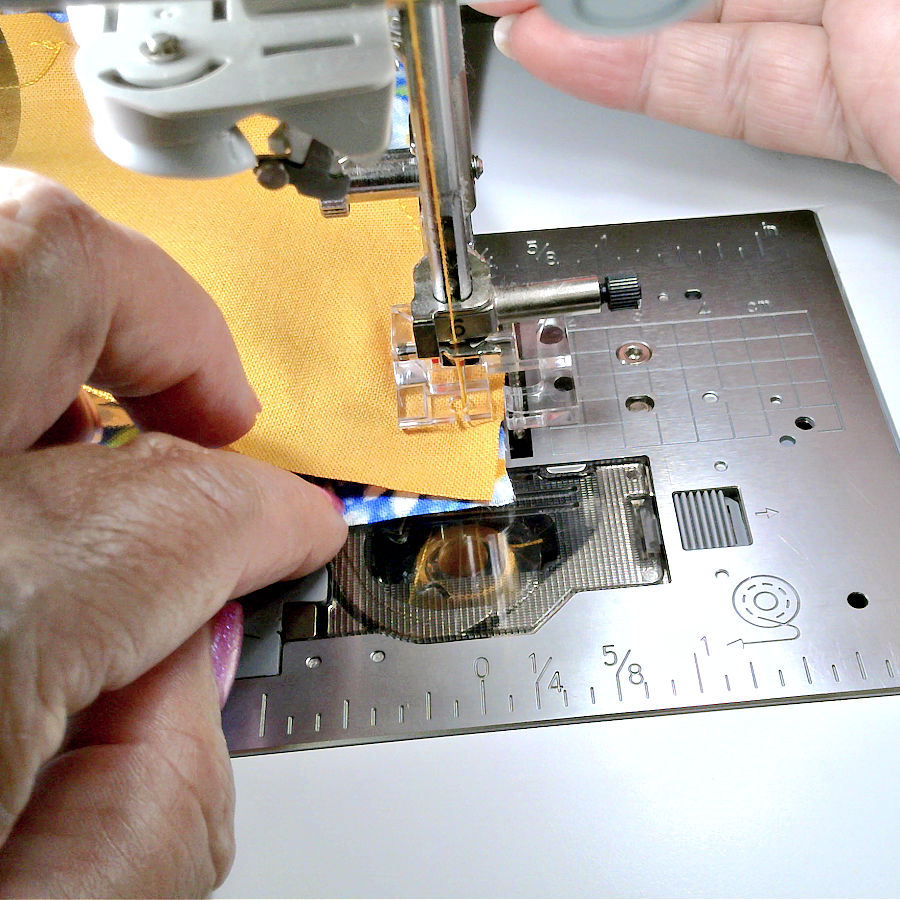
Place your pieces right sides together, with the concave piece (the one with the inner curve) on the bottom and the convex piece (outer curve) on top. Align the top left corners so that the raw edges meet cleanly at the very top. If they’re offset or mismatched here, it’ll throw off your whole seam. That little alignment is your launch point, and it sets the tone for how well the rest of the curve behaves.
Slide the layered pieces under the Curve Master foot, just far enough to start about two stitches in from the edge — that gives you room to backstitch and secure the seam. Don’t worry that the rest of the edges don’t line up yet — we’ll guide them into place as we sew.
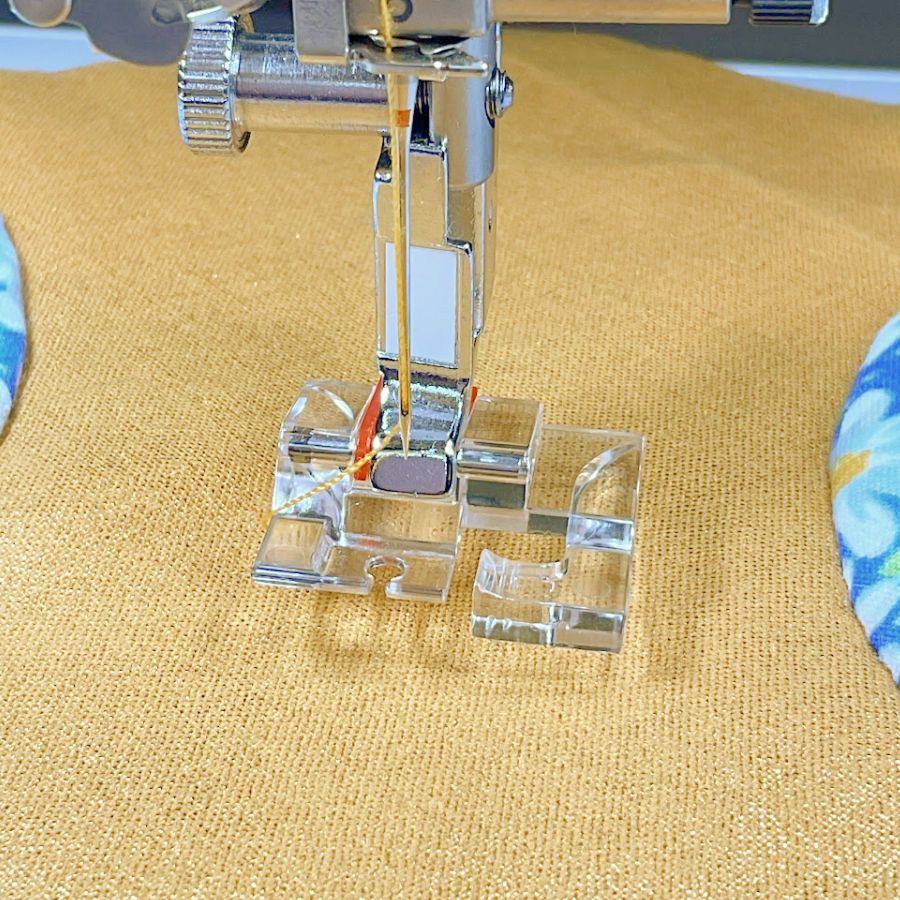
Step 4. Lower the Foot, Aligning Edges to the Raised Seam Guide
The Curve Master foot has built-in ¼” seam guide. Your fabric edges should line up just beside it — not pushed too hard, just resting lightly against it.
Now, before making any stitch, double-check this one thing:
Make sure your needle goes into the actual hole in the foot — not into the plastic. That hole is pretty small, and if your needle is even a little off, it can strike the edge and snap. Lower the needle slowly to check. If it doesn’t drop cleanly into the hole, adjust the needle position before you do anything else.
Here’s the order to follow:
- Lower the presser foot first. This holds your fabric exactly where you want it.
- Then lower the needle. That second step locks everything into place without shifting the fabric.
And now a little backstitching trick. Don’t start sewing right at the very edge. Begin about two stitches in, then backstitch to the edge, and sew forward again. This gives the start of your curve a cleaner look and helps the feed dogs catch both fabric layers more evenly.
Step 5. Start Sewing the Curve
I’ve read suggestions that say to hold the top fabric almost vertically while stitching — lifting it high and separating it from the bottom piece. But … that didn’t work for me.
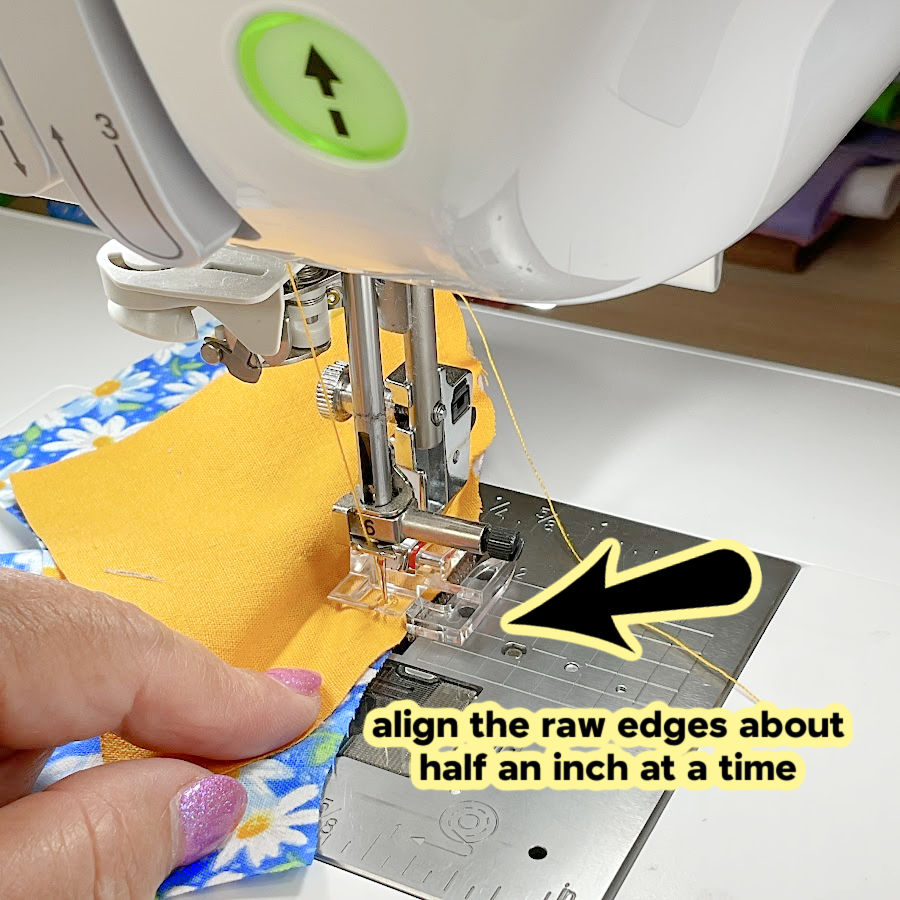
What did work was a much simpler rhythm: align the raw edges about half an inch at a time, sew a little, then pause to align the next half inch. That’s it. Nothing fancy. Don’t try to line up too much at once — curves don’t like being rushed or forced.
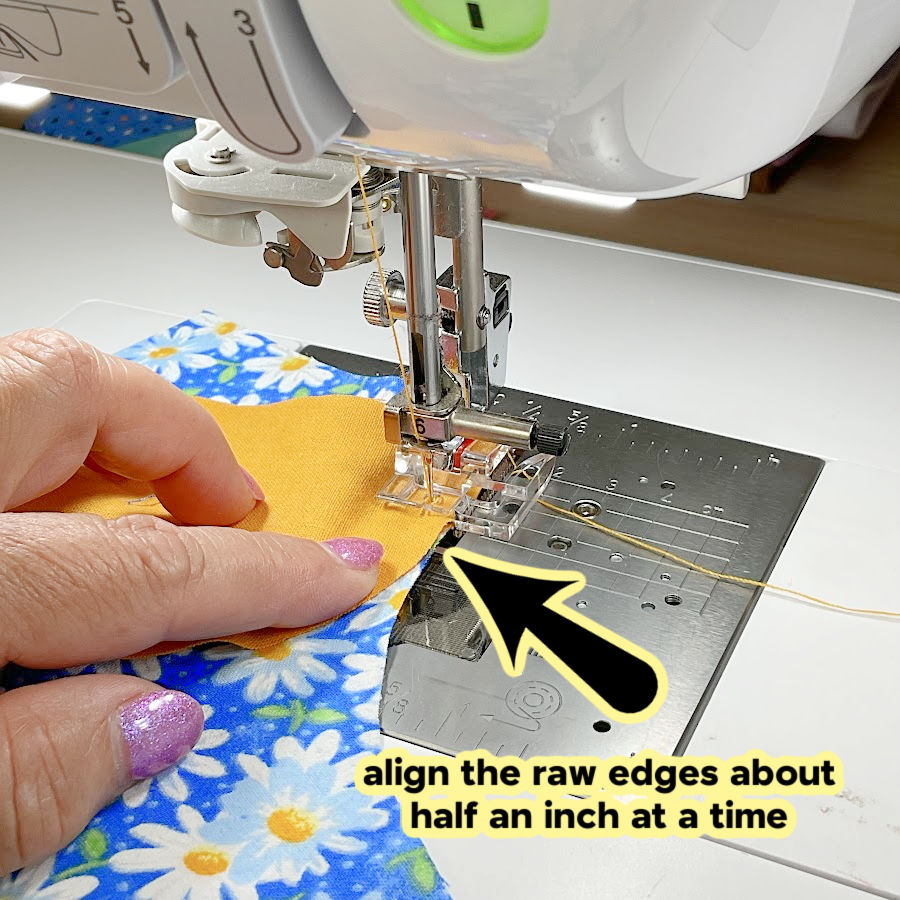
Keep your fingers close to the needle, guiding the fabrics gently as they move through the machine. You’re not pulling or stretching wildly — you’re just nudging the top fabric slightly to the right and the bottom fabric slightly to the left, keeping both edges in contact with the raised ¼” guide on the Curve Master foot.
And yes, it goes slowly… but not painfully slow. In fact, because you’re not using pins or notches, it feels surprisingly smooth. Just align, sew. Align, sew. The foot does the rest — it really does sew the curve like magic.
✅ Important: Close to the needle, but also away from it!
Here’s something else I noticed. Curved pieces are cut on the bias, or at least partially on the bias, so both the concave and convex shapes have a bit of stretch. That’s not a bad thing — it actually helps.
I gently stretched the top piece just a bit as I went. Not a tug, not a pull, just the tiniest stretch. Without that, I noticed the top piece sometimes ended up about 2 mm shorter or longer at the end of the seam.
This doesn’t always happen, and it depends on your fabric. Lightweight quilting cotton might not need any adjustment at all, but heavier cotton usually does. A little stretch evens everything out beautifully.
Just remember: keep both edges touching the ¼” guide. Stay relaxed. Let the curve unfold bit by bit under your needle.

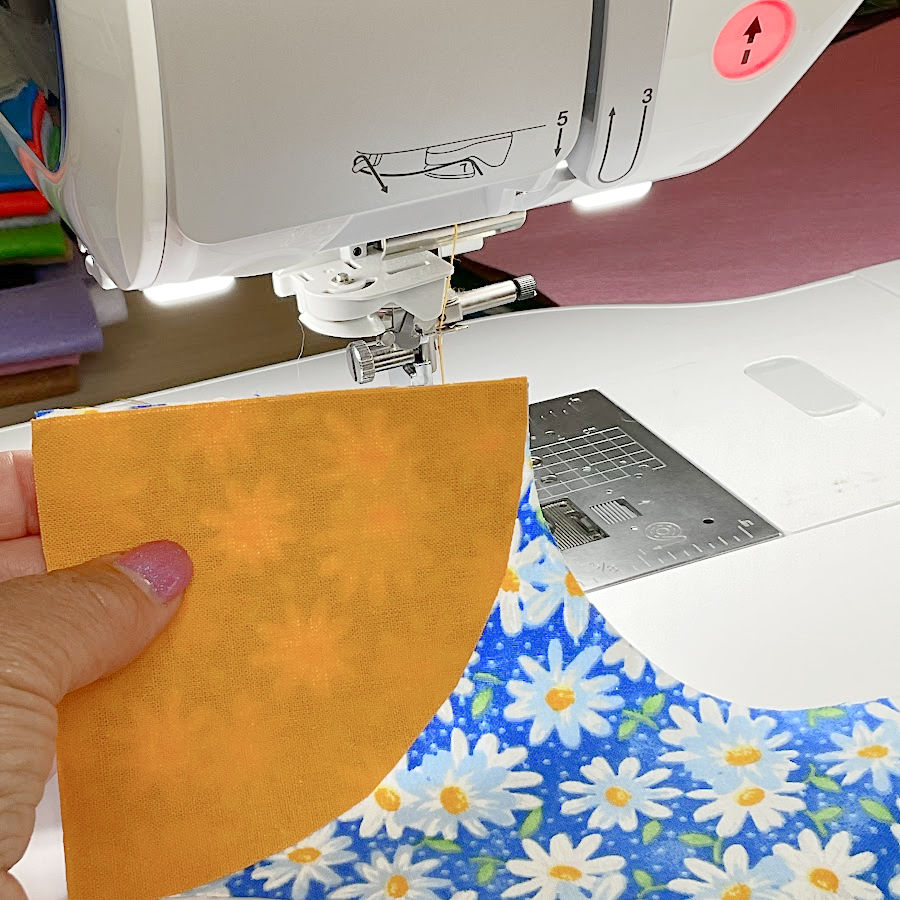
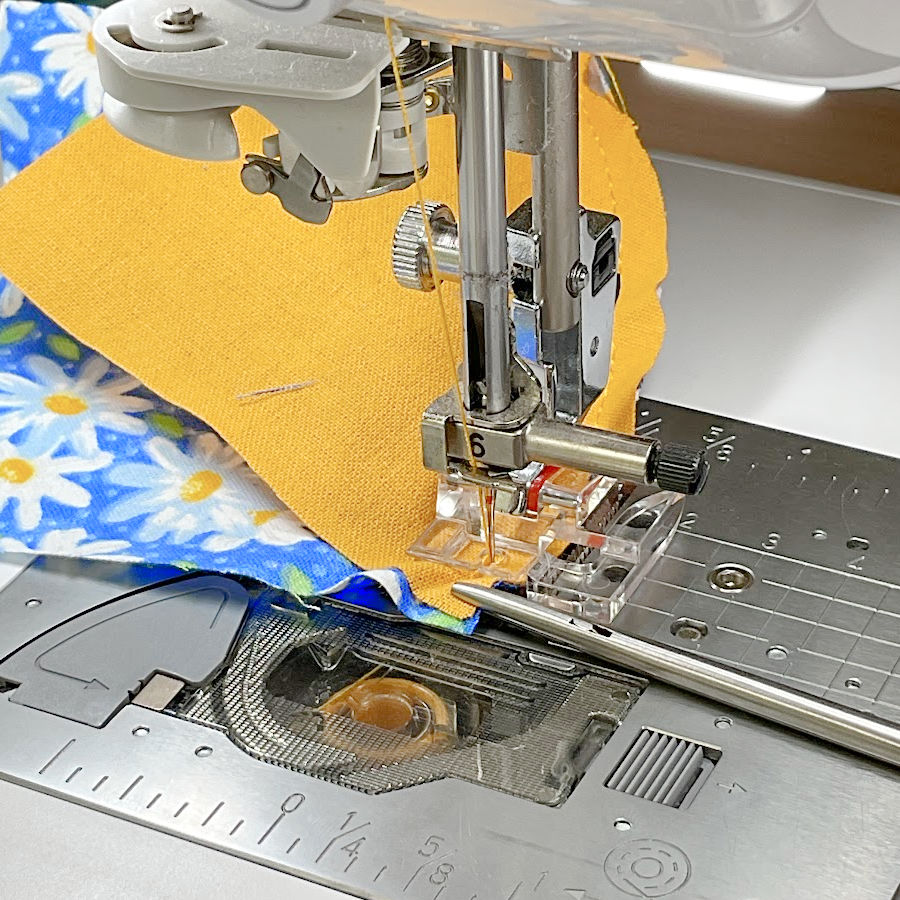
Step 6. Guide the End with Tweezers (or Whatever Works!)
As you near the end of your seam, things get a little trickier. The last half inch is where your curve loves to shift, and those edges try to wander apart. This is the moment where accuracy really matters — the edges of both pieces need to meet up just right.
You can use your fingers for most of the seam, but as you reach the end, tools definitely help.
Now, the official Curve Master foot (the brand name one) comes with a special set of tweezers. They’re long, curved, and designed to help you feed that curve right under the needle. I believe they’re called angled tweezers.
You use these tweezers during the last half inch of the seam — right when the curve gets tricky and your fingers don’t quite fit. That’s where the design of the foot helps you out.
There’s a small opening between the front toes of the foot and the raised ¼” guide. It’s just wide enough to let you slide angled tweezers in and hold the fabric steady, even as the needle gets close. That way, you can keep the edges aligned right to the very last stitch, without getting too close for comfort.
But my foot didn’t come with them.
They’re easy to find on Amazon though. In fact, I already have a pair at home… but couldn’t find them when I was sewing this block.

So I improvised. Regular tweezers? Worked fine. I also used a pair of medical-style scissors (the kind that look like tweezers with blades on the end), and those gave me enough control to guide the fabric right where it needed to go. I looked them up, the ones I have (and used, in the images) are called “alligator forceps”.
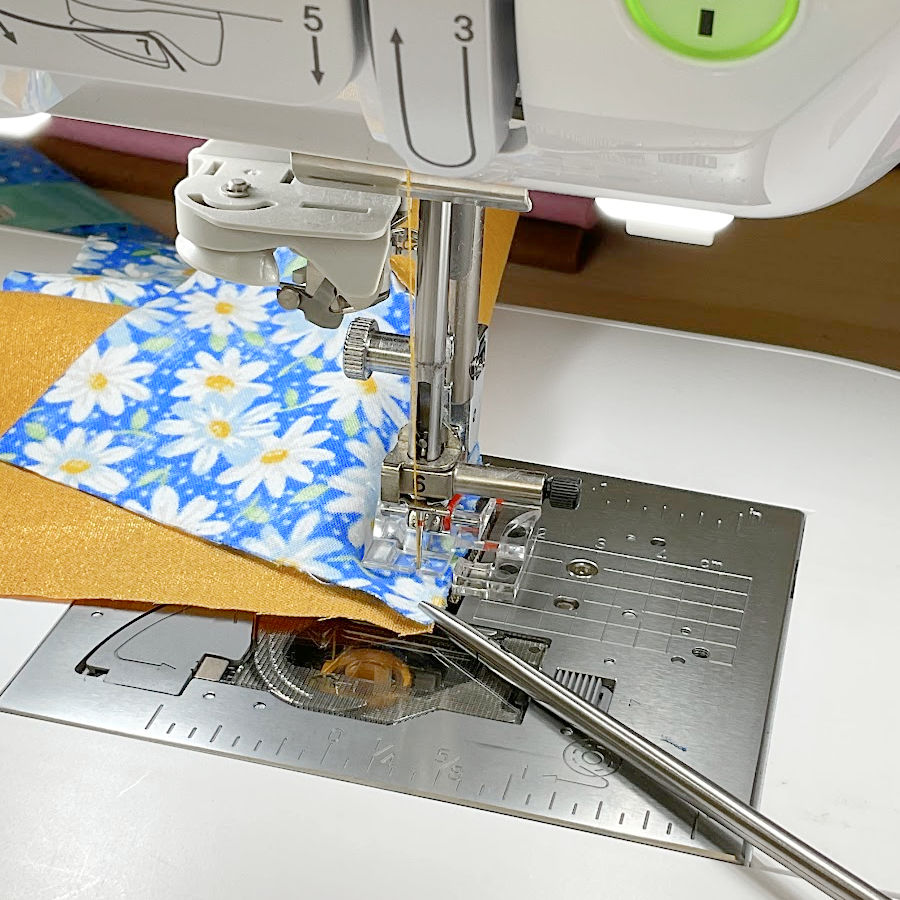
Whatever gives you fine control and keeps your fingers out from under the needle is fair game.
Just a reminder: don’t sew over your tweezers or scissors. Curves are tricky, but a broken needle is worse.


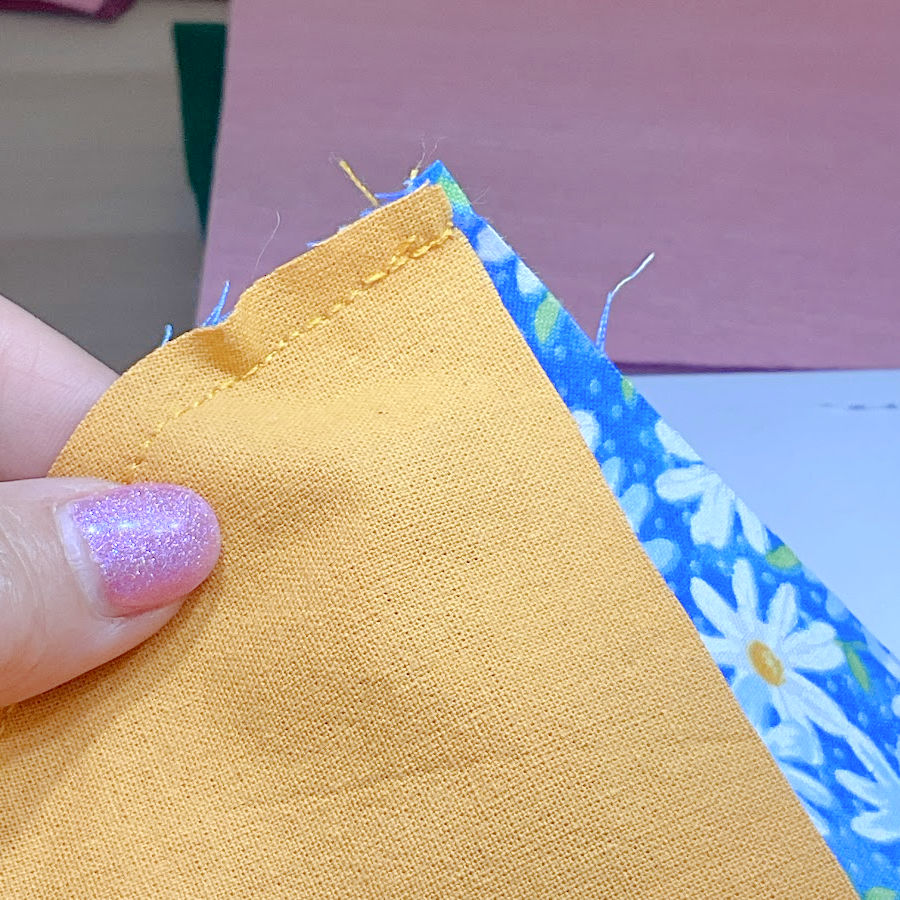
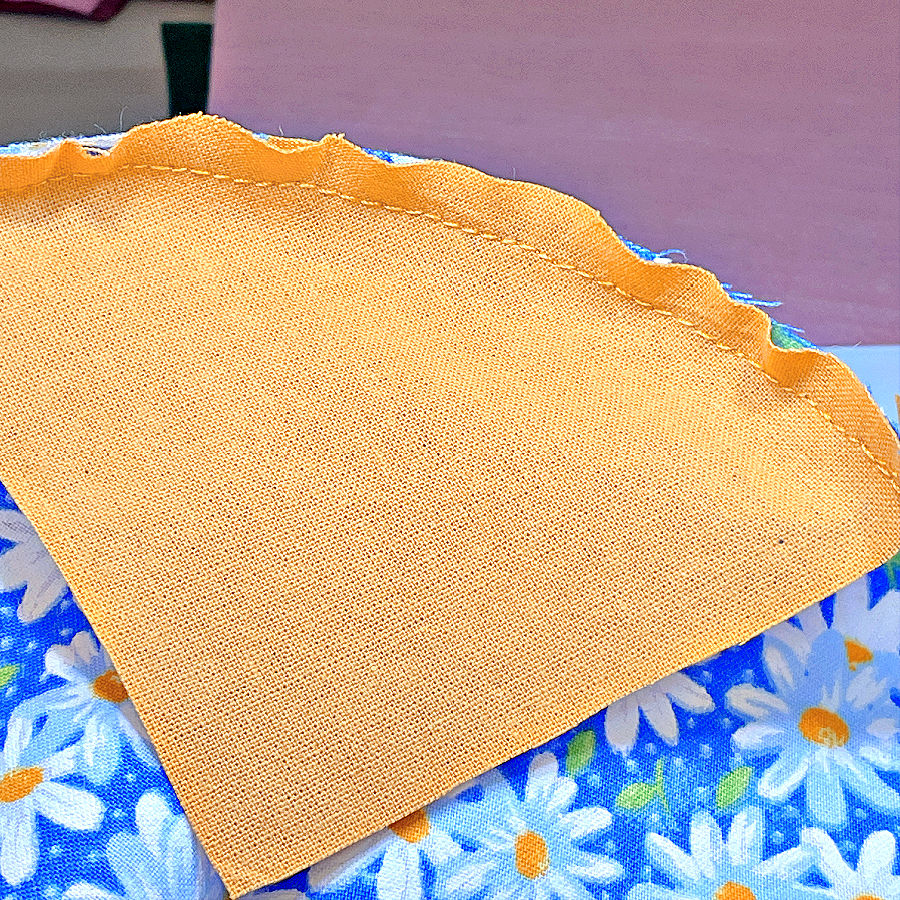
Step 7. Press the Curved Seam Toward the Convex Shape
Because of how the Curve Master guides the seam, everything lays pretty flat right out of the machine. You just need to encourage it a little.
First, fingerpress the seam toward the convex piece — that’s the one with the outward curve. Use your fingers to gently smooth it into place. This little step helps you shape the curve before bringing in the heat.
Then press with your iron.
The result? A smooth, pucker-free curve without the usual clipping and notching routine.
The Not-So-Magical Parts: What Could Go Wrong
Yes, the Curve Master foot is a clever little tool — but it’s not a miracle worker on its own. Like anything new in sewing, it takes a little practice. So before you cut into that precious fabric, try it out on some scrap curves first. Play around. Get a feel for how your fabrics behave under the foot.
Most people say the first block feels awkward, but by the second or third, things start to click. The sewing gets smoother. The curves behave. And the seams? Much more accurate.
Here are a few common hiccups you might run into (and how to handle them).
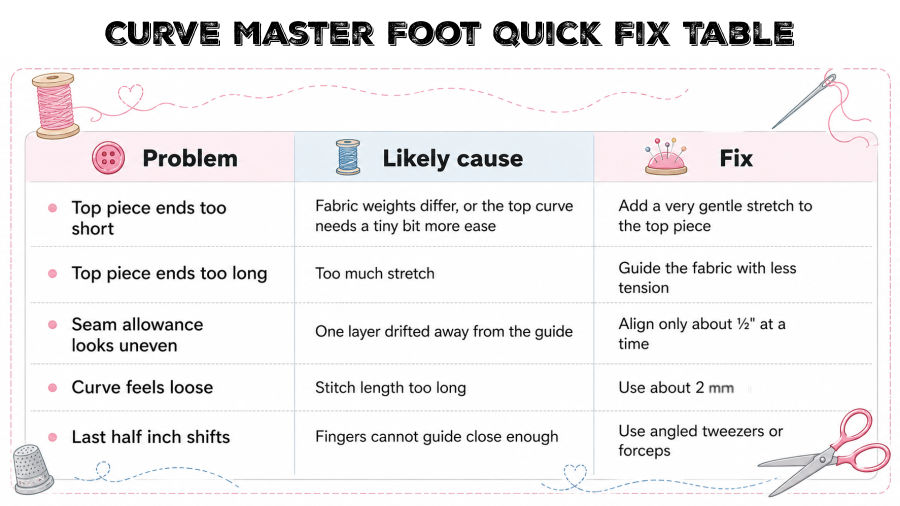
1. Seam Ends Don’t Line Up
You get to the end of your curve, and — surprise — the top fabric is either 2 mm too short or 2 mm too long. Annoying, but fixable.
Here’s what happened to me. I made this block using two different-weight fabrics. The daisy print was a lightweight cotton, and the yellow fabric (with that pretty metallic accent) was a bit stiffer. When I used the stiffer yellow as the convex piece, it came up short at the end of the seam. A gentle stretch fixed it. Just a little pull while sewing, and it matched up perfectly.
Then I flipped it and used the lightweight daisy fabric as the convex piece — I stretched it too much, and it ended up longer than the piece underneath. So it really is a trial-and-error thing. Different fabrics behave differently. Try them on scraps, and once you know how they act, you’ll know how to adjust.
2. Uneven ¼″ Seam Allowances
On my first try, I noticed something odd — the seam allowance on the convex (top) piece was just a little wider than ¼″, and the concave (bottom) piece was a bit narrower. Not by much, maybe a millimeter or two, but it made a difference.
Here’s the fix. Make sure both fabric edges are gently touching the seam guide on the foot — not pulled tight, just resting against it. And only for a short stretch — no more than half an inch at a time. Adjust as you go. That little check-in every few stitches keeps the seam allowance accurate on both layers.
3. Stitch Length Matters
I experimented with stitch length, and 3 mm was too long. The seams looked loose, and it was harder to keep the edges aligned.
Use a stitch length of about 2 – 2.5 mm. It holds the fabric more securely and helps the foot do its job. Anything longer, and the curve starts getting away from you.
4. Slow Down
This isn’t a race. The Curve Master works best at a slower speed — especially while you’re learning.
Going slow gives you time to keep the edges lined up, catch little shifts before they become big ones, and notice if your fabric needs a tiny stretch (or not). Once you’ve sewn a few blocks, you’ll naturally speed up. But for now? Take it easy.
Is It Worth It? My Honest Opinion
So after all that — the setup, the slow stitching, the slightly stretchy seams — was the Curve Master foot worth it?
Honestly? Yes.
Is it perfect? No. But for $19, it absolutely earns a spot in my sewing room.
Ten years ago, I passed on it at $50. That felt like a lot for a quirky little piece of plastic. But when I saw it again recently — and this time for a lot less — I gave it a shot. And I’m glad I did.
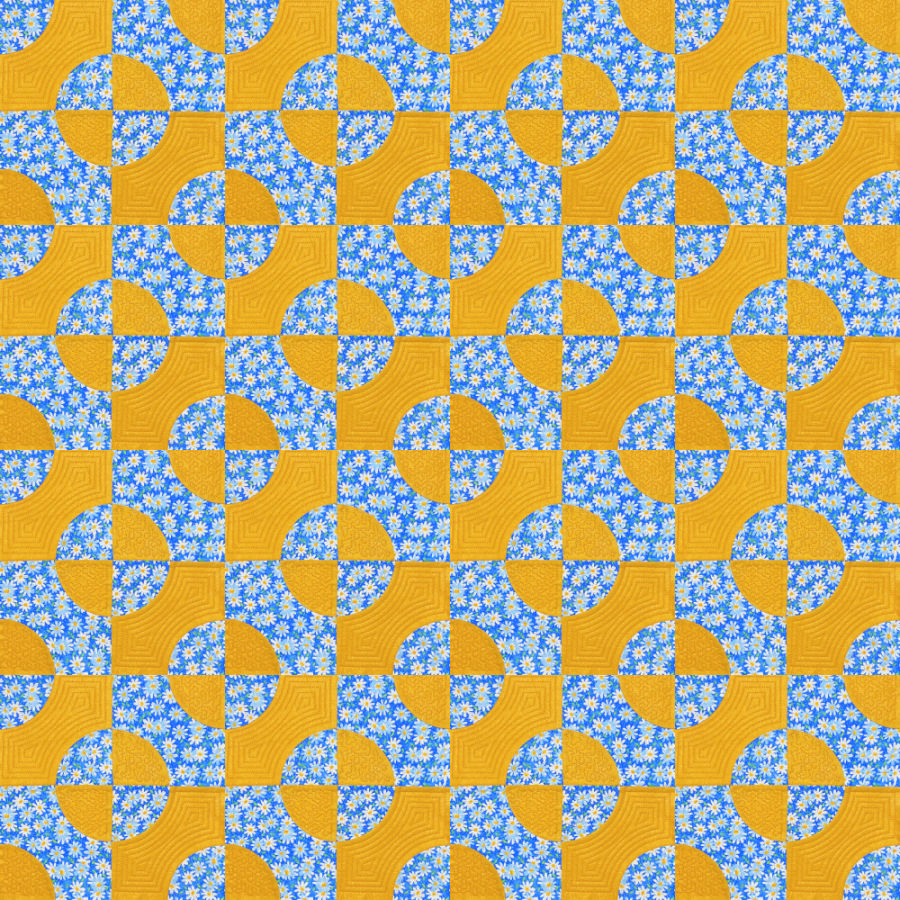
I made this cheerful quilt block quickly and easily. The seams came out smooth, the curves behaved, and I didn’t have to clip or notch a thing. Once I figured out the quirks — needle position, gentle stretch, accurate cutting — it all came together.
And just look what happens when you take that one little block and multiply it. Isn’t it beautiful? The curves ripple across the quilt in such a soft, rhythmic way — like petals and sunshine stitched into fabric.
This layout creates a wonderful sense of movement without feeling busy. The daisy fabric and golden yellow play so nicely together, forming full circles and halos as your eye moves across the quilt. It’s cheerful, bold, and still sweet — like a summer picnic in quilt form.
So yes, those curves are totally worth it. And the Curve Master foot makes building a quilt like this feel not only doable — but actually enjoyable.
✧✧✧ 🪡 ✧✧✧
FAQ
Can I sew zigzag stitches with this foot?
Use a straight stitch only with the Curve Master foot. The needle hole in this foot is very small, so a zigzag stitch can make the needle hit the plastic.
Before you sew your curve, choose a straight stitch and lower the needle slowly by hand. Make sure it goes through the hole without any contact with the foot.
Which fabric piece goes on top when I sew curves?
Place the concave curve on the bottom and the convex curve on top. The concave piece has the inward curve, like a little fabric smile. The convex piece has the outward curve, like the rounded edge of a hill.
Keep the right sides together. Align the top edges first, then guide the raw edges along the ¼” guide as you sew. You do not need to match the whole curve at once. Work with a small section at a time.
Do I still need to clip or notch curved seams?
For this type of curved piecing, you usually do not need to clip or notch before sewing. The Curve Master foot helps guide the concave and convex edges together as the fabric moves under the needle.
After the seam is sewn, press the block and check how the seam allowance behaves. For quilt blocks with a ¼” seam allowance, clipping is often not needed. For projects with bulkier fabric, test on scraps first.
Why do my curved pieces fail to match at the end?
This can happen for a few reasons. The pieces may not have been cut with enough accuracy. One layer may stretch more than the other. The top fabric may also drift away from the ¼” guide as you sew.
Try to align only about ½” of the curve at a time. Sew a little, pause, and adjust the next small section. If the top piece ends a tiny bit short or long, add only the gentlest amount of ease as you sew.
What stitch length works best with the Curve Master foot?
A straight stitch around 2 mm to 2.5 mm works well for most curved piecing. A shorter stitch gives you more control on curved seams, especially when the curve is tight or the fabric has a bit of stretch.
Test on scraps from the same project before you sew the real block. If the stitches look too crowded, make them slightly longer. If the curve feels loose or unstable, shorten the stitch a little.
Can I use this foot for garment curves?
You can use it for some garment details, but it works best for curved piecing with a ¼” seam allowance. Think decorative curved panels, patch pockets, appliqué-style pieces, or small design accents.
For most garment seams, the seam allowance may be wider than ¼”. Many garment patterns use ⅝” seam allowances, so the Curve Master foot may not be the right choice for those seams. Use it where the seam allowance matches the foot and where the curved edges are meant to fit together like quilt pieces.
✧✧✧ 🪡 ✧✧✧
So… did this Curve Master foot guide smooth out those curvy sewing fears? If it did, save this pin to your sewing board before it disappears into the internet void (because we all know “I’ll find it again later” is a myth). And while you’re at it, follow me on Pinterest for more sewing lessons, clever tools, and honest takes on what actually works in the sewing room.
latest posts
- Dresden Plate Quilt Block: 4th of July Fireworks
- How To Sew Curves the Easy Way Using a Curve Master Presser Foot
- 30 Sewing Hacks That Turn Ordinary Items into Useful Sewing Tools
- Seam Allowances in Sewing Patterns: What They Are and How to Use Them
- What Do You Call a Person Who Sews? I Asked My Readers and Got 1,408 Opinions
- DIY Round Purse: PDF Sewing Pattern and Detailed Instructions
- Mini Wonder Clips By Clover: Useful Sewing Tool Or Just Another Notion?
- Non-Slip Grips For Quilting Rulers: A Small Notion With A Useful Job
- Fabric Eraser for Sewing: What It Removes and When to Use It