
Sewing Skills Challenged: 5 Common Mistakes and How to Overcome Them
Oh, the joys of sewing! It’s a skill that’s part precision, part creativity, and occasionally, part comedy of errors. One minute you’re feeling like a fabric wizard, and the next, you’re wondering if your sewing skills have gone on strike, demanding better working conditions and more chocolate breaks. Whether you’re a seasoned stitcher or just starting to thread your first needle, there’s one thing we all have in common: we make mistakes.
But here’s the thing about sewing mishaps – they’re not just frustrating moments or wasted fabric. They’re learning opportunities in disguise, right? We’re about to dive into five blunders that seem to be part of every sewist’s journey.
But don’t worry, we’re not here to point fingers or induce guilt over past project disasters. Instead, we’re going to laugh a little, learn a lot, and maybe even find out that these so-called “mistakes” are actually stepping stones to sewing success.
So, let’s explore the stitchy situations that unite us all in our love for sewing.
#1. Selecting Incompatible Fabric for a Project
One of the most common mistakes that can hinder the development of your sewing skills is selecting an inappropriate fabric for a project.
Patterns are typically designed with specific fabric types in mind. These recommendations are based on factors such as the garment’s intended drape, structure, and overall design. When sewists deviate from these suggestions without proper consideration, problems often arise.
Mismatching Fabric Weight
Using a fabric that’s too light or too heavy for the pattern can lead to issues with structure and overall fit. For example, you are using a pattern designed for medium-weight fabric. If you choose a lightweight fabric instead, you may have several issues:
- The garment may not hold its shape as intended, which can result in a limp or shapeless appearance.
- Lighter fabrics might be more see-through than desired, especially in fitted areas.
- The way the fabric falls and moves will be different, potentially changing the entire silhouette of the garment.
- Lighter fabrics may not provide enough support in important areas, where you might see sagging or stretching over time.
- Techniques specified in the pattern, such as certain types of interfacing or edge finishes, may not work well with lighter fabrics.
Conversely, using a heavier fabric than recommended can lead to its own set of problems:
- The garment may appear and feel overly bulky, especially in areas with multiple layers or gathers.
- The fabric might not flow or move as intended, particularly in designs meant to have some fluidity.
- Your machine might struggle with multiple layers of heavy fabric, particularly at seam intersections.
Of course, there’s nothing wrong with experimenting with different fabrics. But we need to understand the potential consequences and be prepared to make necessary adjustments to the pattern or construction methods.
To avoid this mistake, always consider the fabric recommendations provided with the pattern. If you do choose to deviate, take time to think about how the change might affect the final garment and be prepared to make modifications as needed.
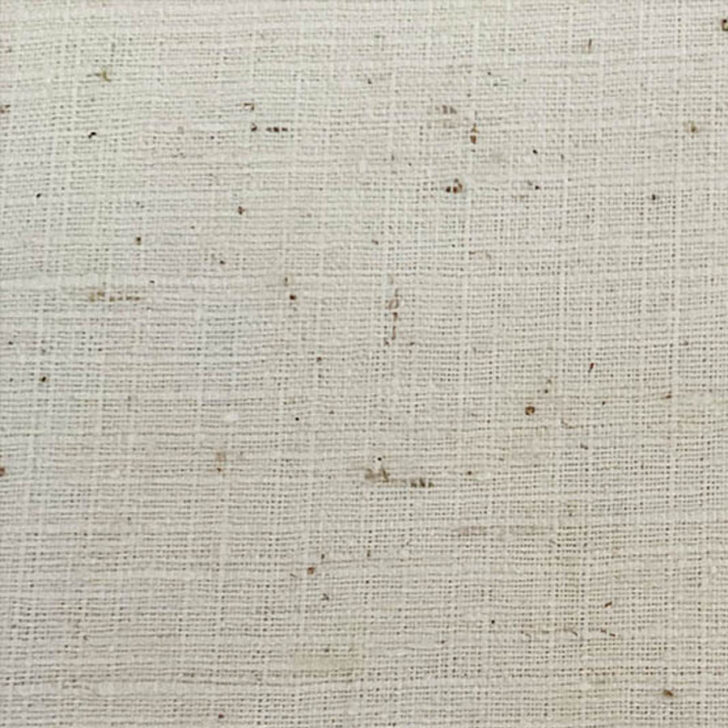
Overlooking Fabric Nap
Fabric nap refers to the raised or fuzzy surface on certain types of fabric, created by fibers that stand up from the base of the material. Common fabrics with nap include velvet, corduroy, velour, suede, and faux fur.
When working with napped fabrics, the direction of the nap affects several aspects. Napped fabrics often appear lighter or darker depending on which way the fibers are brushed. This effect is particularly noticeable in velvet and can create an unintended two-tone look if pattern pieces are cut in different directions.
For example, this image shows the same velvet fabric with its nap running in different directions.
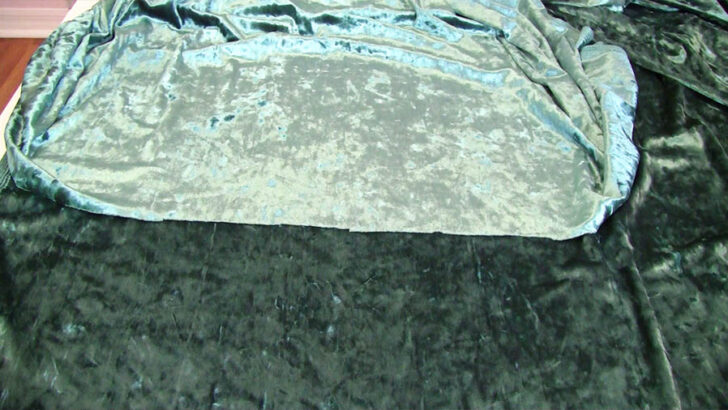
Velvet has a distinct pile that can reflect light differently depending on how the nap is oriented. In this photo, the top section appears lighter and shinier because the nap is facing one direction, catching and reflecting more light. The bottom section looks darker because the nap is facing the opposite way, absorbing more light.
Some napped fabrics, like satin-backed crepe, have a sheen that changes with the nap direction.
To properly account for nap:
- Identify the nap direction by brushing your hand along the fabric. The smoother direction is usually considered the nap direction.
- Ensure all pattern pieces are laid out in the same direction relative to the nap.
- Be prepared to use more fabric, as napped layouts often require all pieces to be cut in the same direction, which can be less efficient in terms of fabric usage.
- Pay attention to pattern instructions, which often include a “with nap” layout for applicable fabrics.
Disregarding Fabric Design
We also need to consider the design of a fabric, whether it’s a bold print, subtle pattern, or directional print. Overlooking these design elements can lead to disappointing or even unwearable results.
#1. Large-scale prints can be problematic when used with patterns that have many small pieces. The print may become distorted or lose its impact when cut into smaller sections. For example, a large floral print might end up looking unrecognizable when used for a complex bodice with multiple panels.
#2. Certain prints, especially those with distinct motifs, require careful consideration of placement. Failing to account for this can result in unfortunate positioning of design elements. For instance, a circular pattern might unintentionally align with bust points, creating an unflattering effect.
#3. Fabrics with a clear up and down direction, such as landscapes or animal prints, need to be cut consistently. Disregarding this can lead to upside-down elements in parts of the garment.
That’s exactly what happened with my pajama set. If you look closely, you will notice flamingos on the top are oriented upside down.
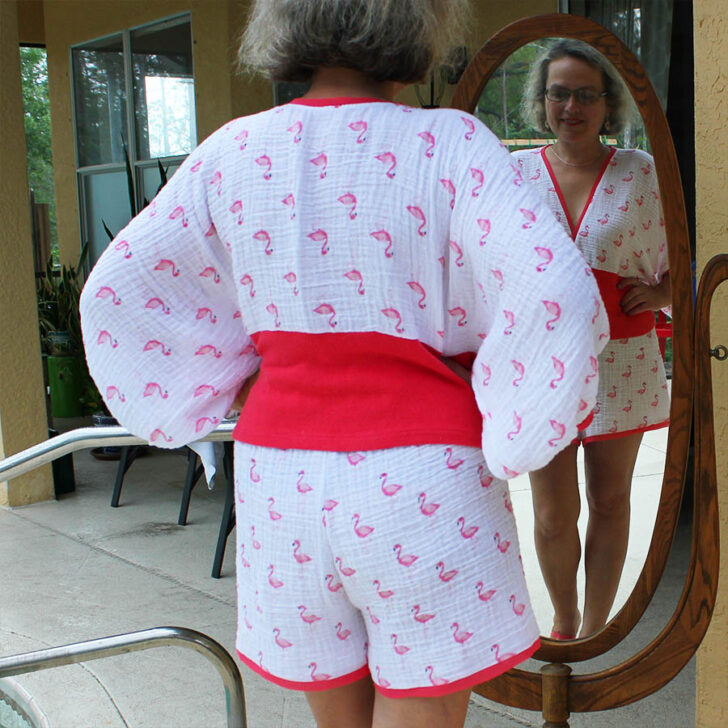
By the way I have a detailed sewing tutorial on how to make these pajama shorts – High Waisted Shorts DIY: How to Make an Easy Pattern. This tutorial walks you through the entire process, from creating a simple pattern with your own measurements to sewing the final product.
#4. Stripes and Plaids require extra attention to detail. Matching stripes or plaids at seams is crucial for a polished look. Some garment patterns may not be designed with this in mind. In this case, the matching process will be challenging or even impossible without modifications.
#5. Understanding the repeat of a pattern is very important for consistent design placement.
I discovered this the hard way when I was making curtains for my living room. I had found this gorgeous fabric with a beautiful floral pattern, and I was so excited to get started that I didn’t pay enough attention to the pattern repeat.
As I began sewing, I realized my mistake. The flowers weren’t lining up properly between panels, and the overall effect was jarring. Some sections had full blooms, while others were cut off awkwardly.
I remember standing back and looking at my handiwork, feeling a mix of disappointment and frustration. The curtains I had envisioned in my mind were a far cry from what I saw hanging before me. The inconsistent pattern placement made the curtains look amateur, despite all the care I’d taken with my stitching. So I had to buy more fabric and remake it.
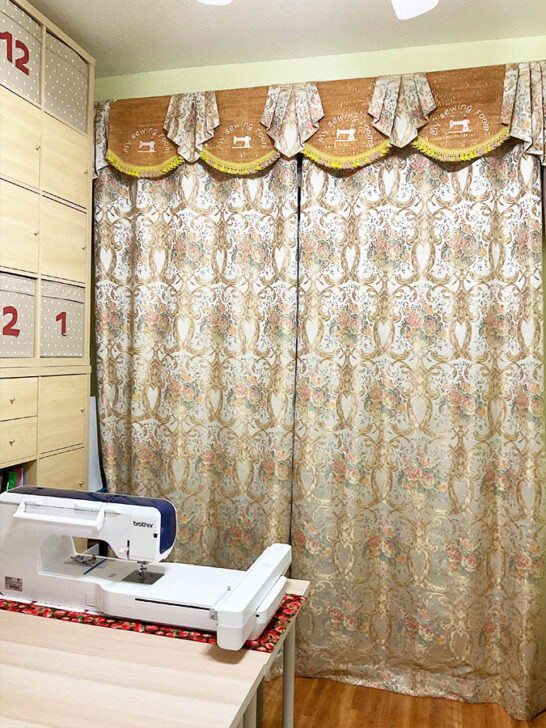
This experience taught me a valuable lesson about the importance of understanding and working with pattern repeats. Now, before I start any project with patterned fabric, especially something large like curtains, I take the time to study the repeat and plan my cuts accordingly.
#6. Border Prints have a distinct design along one edge. Using border prints effectively requires careful pattern layout and potentially altering the original garment design to showcase the border.
#7. Ombre or Gradient Fabrics transition from one color to another. Cutting pattern pieces without considering the color progression can lead to a disjointed or unbalanced final look.
To address these issues:
- Consider the scale of prints in relation to the garment pieces. Smaller, busier prints often work better for patterns with many small sections.
- Plan print placement before cutting, especially for prominent areas like the center front of a garment.
- Use a “with nap” layout for directional prints to ensure consistency.
- For stripes and plaids, choose patterns designed for pattern matching or be prepared to make adjustments.
- Calculate additional fabric needs for pattern matching and proper print placement.
- Consider making a mock-up using a similar print on inexpensive fabric to test the effect before cutting into your final fabric.
Confusing Knit and Woven Fabrics
One of the most fundamental mistakes I’ve seen sewists make, and I’ve been guilty of this myself, is confusing knit and woven fabrics or using them interchangeably without considering their unique properties.
Knit and woven fabrics are constructed and behave differently.
✅ Related tutorial: How To Sew Knit Fabric | 23 Expert Tips For Beginners
The consequences of mixing up these fabric types can be significant:
- Fit Issues: A pattern designed for wovens won’t account for the stretch in knits, potentially resulting in an oversized garment. Conversely, using a woven for a knit pattern can lead to a too-tight fit.
- Construction Problems: Techniques like darts and pleats, common in woven patterns, don’t typically work well with knits. On the flip side, techniques for knits like using a ballpoint needle or stretch stitches aren’t necessary for wovens.
- Durability Concerns: Knits sewn with techniques meant for wovens might have popped seams due to insufficient stretch in the stitching.
- Aesthetic Differences: The drape and overall look of the garment can be completely different from what the pattern intended.
To avoid this mistake:
- Always check the pattern’s fabric recommendations.
- Learn to identify knits and wovens by sight and touch.
- Understand the basic properties of each fabric type and how they affect garment construction.
- Use the appropriate tools and techniques for each fabric type (like ballpoint needles for knits).
#2. Neglecting Proper Fabric Preparation
One of the most common mistakes I see sewists make, especially beginners, is rushing into cutting and sewing without properly preparing their fabric. This oversight can lead to significant issues down the line, potentially ruining an otherwise well-executed project.
Pre-washing: A Critical First Step
Pre-washing fabric is often necessary (not 100% though) for several reasons:
- Shrinkage Control: Many fabrics, especially natural fibers like cotton, silk and linen, can shrink considerably when washed. By pre-washing, you ensure that any shrinkage happens before you cut your pattern pieces, not after you’ve sewn your garment.
- Removal of Excess Dyes: Some fabrics, particularly dark colors, may have excess dye that can bleed in the first wash. Pre-washing removes this excess, preventing color transfer to other parts of your garment or other clothes.
- Elimination of Sizing: Manufacturers often add chemicals to fabric to give it a crisp feel. These can interfere with how the fabric takes dye or how it responds to ironing.
I once skipped pre-washing for a cotton dress I was making. After the first wash, the dress shrunk noticeably and became a tunic.

✅ Related tutorial: Prewashing Fabric: Is It A Good Idea?
Ironing
After pre-washing, ironing is the next crucial step. It removes wrinkles that can distort the fabric, leading to inaccurate cutting. Pressing the fabric can reveal any flaws or damage that might have been hidden in the folds.
I’ve found that taking the time to properly iron my fabric not only makes cutting more accurate but also makes the sewing process smoother and more enjoyable.
✅ Related tutorial: Sundu Pro Steam Station with Ceramic Soleplate Review: Iron-y Good?
#3. Selecting and Using Incorrect Sewing Machine Needles
One of the most overlooked aspects of sewing is the humble needle. Many sewists, myself included, have made the mistake of using the wrong needle type or size, or simply forgetting to change needles regularly. This oversight can lead to a host of issues, from skipped stitches to damaged fabric.
The Importance of Changing Needles
Sewing machine needles wear out faster than you might think. As a general rule, I change my needle after every project or about 8 hours of sewing time. Here’s why:
- Dull needles can damage fabric by pulling or snagging threads.
- Bent needles, even slightly, can cause skipped stitches or uneven seams.
- Old needles may develop burrs that can snag delicate fabrics.
I once tried using an old needle on a silk project. The result was a series of small, but very visible pulls in the fabric that could ruin the garment’s appearance.
Choosing the Correct Needle Type
Different fabrics require different needle types:
- Universal Needles: Good for most woven fabrics, but not ideal for knits or speciality fabrics.
- Ballpoint/Jersey Needles: Designed for knit fabrics, these needles slide between the loops of the knit rather than piercing them.
- Stretch Needles: Similar to ballpoint but with a special eye and scarf, ideal for very stretchy fabrics like spandex.
- Denim/Jeans Needles: These have a sharp point and strong shaft for heavy fabrics.
- Leather Needles: Feature a wedge-shaped point to pierce leather without tearing.
- Microtex Needles: Very sharp and slim, perfect for silk, microfiber, and other delicate fabrics.
Using the wrong needle type can lead to skipped stitches, fabric damage, or even needle breakage.
So, these images below tell the whole story.
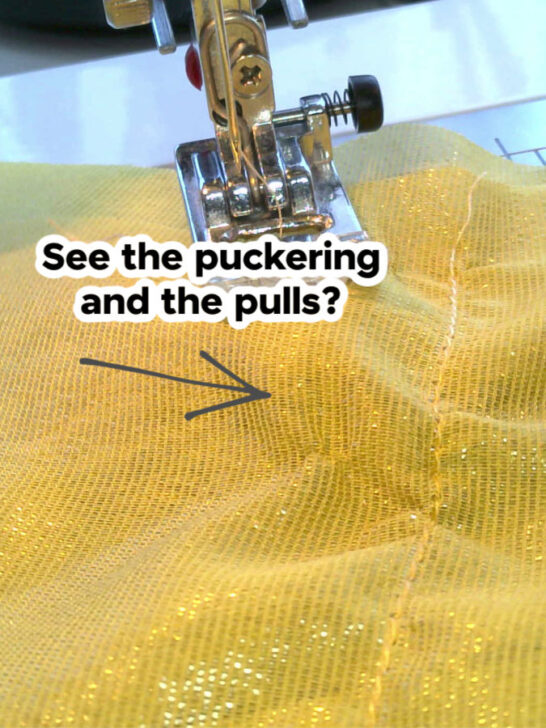
In this photo, I was testing stitches on a silk chiffon fabric with beautiful golden threads. I didn’t think to check the needle before starting and used the one already in the machine – a big mistake! The result was a disaster. The stitches caused puckering, and the fabric was visibly damaged with pulled threads.
That’s when I decided to investigate and discovered my mistake. It was a denim needle in the machine! Realizing this, I replaced it with a universal needle in size 70/10. The difference was immediate and amazing. In the second image, you can see the results after switching the needle. The stitches are smooth, there’s no puckering, and the fabric stays intact.

So, here is the lesson: always choose the right needle for the fabric.
For a more comprehensive look at sewing machine needles, including detailed information on many different types and their specific uses, check out my guide: 19 Types of Sewing Machine Needles and What They’re Used For. This resource will help you make informed decisions about needle selection for any sewing project you undertake.
Selecting the Right Needle Size
Needle size is just as important as type. The general rule is: lighter fabrics need finer needles, heavier fabrics need larger needles. Here’s a quick guide:
- 60/8 – 70/10: Fine fabrics like chiffon, georgettes, cotton voile
- 80/12: Medium-weight cotton, quilting cotton
- 90/14: Denim, canvas
- 100/16 – 110/18: Heavy upholstery fabrics
Using a needle that’s too large can leave visible holes in your fabric, while a needle that’s too small may bend or break under the strain of heavy fabric.
To further demystify the world of sewing machine needles, I’ve created a detailed tutorial that breaks down needle sizes and their applications: Sewing Machine Needle Sizes Explained. This resource will help you understand the numbering system used for needle sizes and how to choose the right size for your specific project.
Lessons Learned
- Keep a variety of needle types and sizes on hand.
- Always match your needle to your fabric type and weight.
- Change needles regularly, especially when starting a new project.
- If you encounter unexpected issues like skipped stitches or fabric damage, try changing the needle before assuming it’s a machine problem.
- When in doubt, consult your sewing machine manual or a needle guide.
#4. Bypassing the Test Swatch or Muslin Stage
One of the most tempting mistakes for sewers, especially when excited about a new project, is skipping the important step of making a test swatch or muslin. I’ve been guilty of this myself, and it’s a mistake that can lead to significant frustration and wasted resources.
The Importance of Test Swatches
A test swatch is a small sample of fabric that you use to test various aspects of your project:
- Stitch Settings: It allows you to adjust tension and stitch length for optimal results.
- Seam Finishes: You can experiment with different seam finishes to see what works best.
- Interfacing: Test how different interfacings affect the fabric’s drape and structure.
- Needle Compatibility: Ensure you’re using the right needle type and size.
I once skipped making a test swatch for a delicate silk blouse. The result was puckered seams and small holes along the stitching line (the thread I used was too thick, even though it matched the color very well) – issues I could have easily identified and resolved with a simple test swatch.
The Value of Muslins
A muslin, also known as a toile, is a test garment made from inexpensive fabric. Creating a muslin offers several benefits:
- Fit Adjustments: It allows you to check and refine the fit before cutting into your good fabric.
- Pattern Modifications: You can test any pattern alterations you’ve made.
- Construction Practice: It’s a chance to practice tricky techniques or unfamiliar construction methods.
- Design Decisions: You can evaluate design elements and make changes if needed.
I remember a particularly ambitious evening gown project where I decided to skip the muslin (because I used the pattern before, about 10 years ago, ha-ha) . The finished dress had major fit issues that could have been easily addressed in a muslin stage. It was a costly and time-consuming lesson.
When to Consider a Test Piece
- Working with expensive or difficult fabrics
- Trying a new pattern or silhouette
- Making significant pattern alterations
- Using unfamiliar techniques or design elements
Lessons Learned
- Always make a test swatch when working with a new fabric or technique.
- For garments, consider the complexity and cost of the project when deciding whether to make a full muslin.
- Use a fabric for your muslin that has similar properties to your final fabric.
- Don’t rush through the muslin process – it’s an opportunity to refine your project.
- Keep detailed notes during the muslin stage to refer back to when working on the final garment.
By taking the time to create test swatches and muslins, you can save yourself from costly mistakes and frustrations. It might feel like an extra step, but it’s an investment that pays off in better-fitting, more professional-looking finished projects.
Even experienced sewists use test pieces. It’s not a sign of lack of sewing skill, but rather a mark of a thoughtful and methodical approach to sewing.
#5. Using Incorrect or Subpar Sewing Tools and Notions
One of the most common mistakes I’ve observed, and admittedly made myself, is using the wrong tools or low-quality notions for sewing projects.
Cutting tools
While many sewists know not to cut paper with fabric shears, there are other less obvious mistakes related to scissors and cutting tools that can impact your projects.
Using dull scissors can be more damaging than you might think. They don’t just make cutting difficult; they can actually harm your fabric. Dull blades tend to chew and fray fabric edges rather than cutting cleanly. This fraying can extend beyond your seam allowance, potentially weakening seams or causing visible damage in your finished project. Regularly sharpening your scissors or investing in high-quality, self-sharpening shears can make a world of difference.
✅ Related tutorial: Cutting Tools For Sewing: The Ultimate Guide
Many sewists overlook the importance of small scissors or thread snips. Using large shears to cut threads can lead to accidental nicks in your fabric, especially in tight spaces. Investing in a good pair of thread snips or embroidery scissors can give you more control and precision when trimming threads close to your fabric.
While rotary cutters are excellent for straight cuts, using one with a dull blade can be problematic and dangerous. A dull rotary blade can skip and jump, leading to uneven cuts and potentially snagging or damaging your fabric. More critically, a dull blade requires more pressure to cut, increasing the risk of the cutter slipping. This can result in serious injury to your fingers. Always use sharp blades and replace them regularly. I you have to apply significant pressure, it’s time for a new blade.
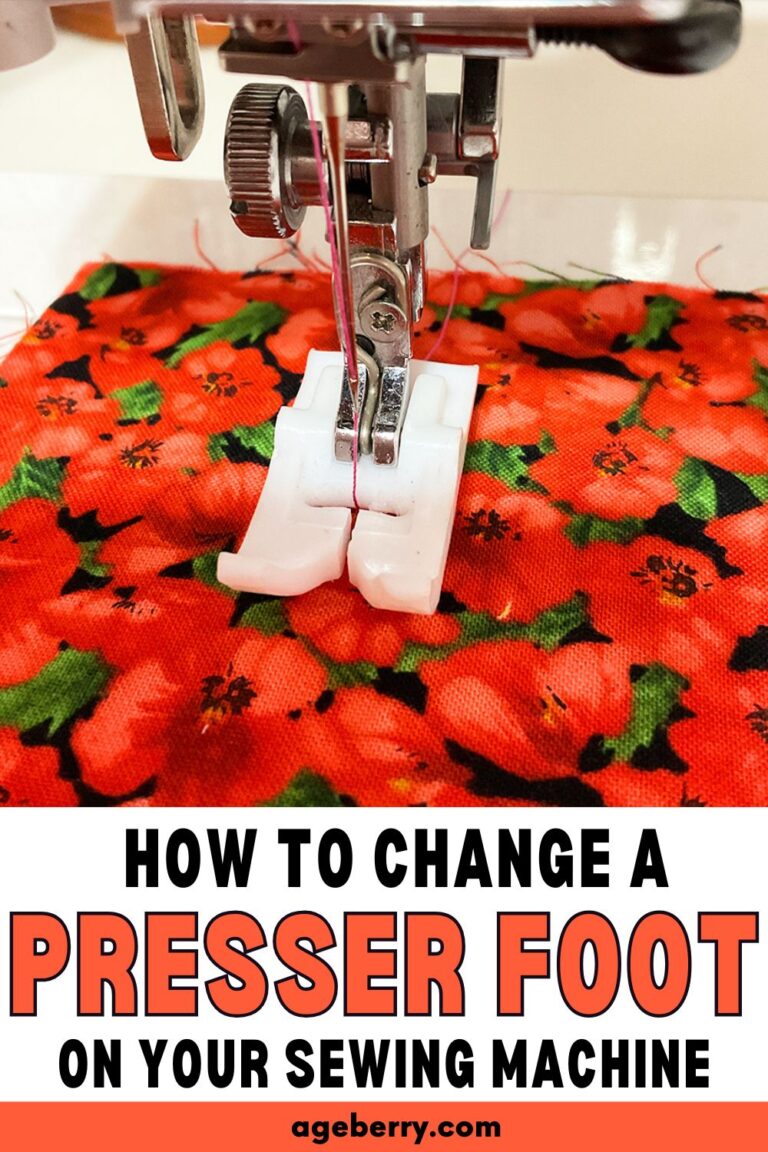
Presser Feet
When it comes to improving your sewing skills, one of the most overlooked details is using the correct presser foot for your project. Ignoring their roles can lead to uneven stitches, fabric puckering, or even damage to your project.
Many sewists stick to the standard presser foot that comes with their machine. While it works for general stitching, it isn’t ideal for every task. For example, using a regular presser foot for zippers can cause crooked stitches or broken needles because it can’t get close enough to the zipper teeth.
Without a walking foot or Teflon foot, materials like silk or vinyl can shift or stick, making the stitching uneven.
Similarly, trying to achieve perfect topstitching with a universal foot can be an exercise in frustration. While it’s possible, a topstitching foot or an edge-joining foot can make a significant difference in the ease and accuracy of your stitching. These specialized feet have guides that help you maintain a consistent distance from the edge of your fabric, resulting in beautifully straight topstitching.
To boost your sewing skills and achieve professional results, familiarize yourself with the variety of presser feet available. Here’s my detailed guide to some common options and their uses – Sewing Machine Presser Foot Guide: Types to Elevate Your Projects
Thread Quality
The importance of thread quality cannot be overstated. Low-quality threads can break frequently, leave lint in your machine, and result in weak seams. They may also cause tension issues, leading to uneven stitches. Invest in good quality thread that matches your fabric type. Be aware that old thread can become weak and brittle over time, even if it’s high quality. If you’re unsure about the age of your thread, it’s better to start with a fresh spool for important projects.
Other Notions and Tools
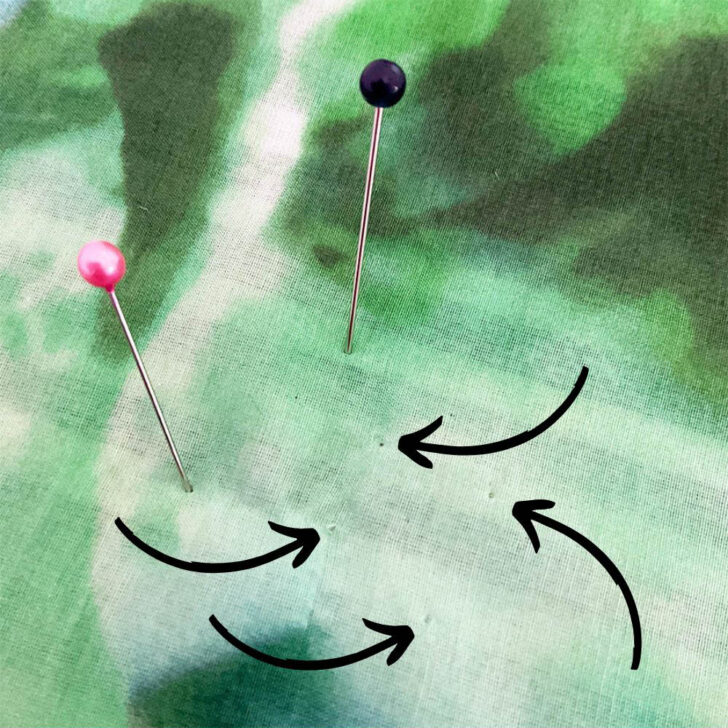
Pins: Dull or rusty pins can leave marks or snag delicate fabrics.
Marking Tools: Using the wrong type can lead to permanent marks on your fabric.
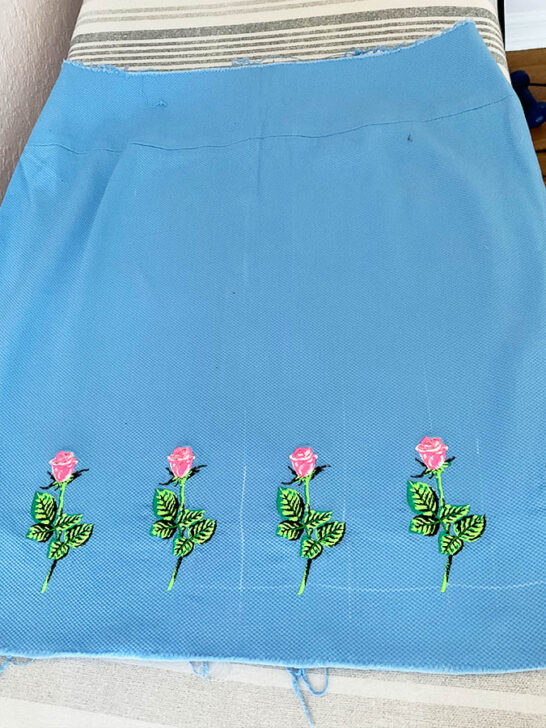
I had just bought my embroidery machine and was so excited to try it out. I carefully embroidered these beautiful roses and was quite proud of my progress. But before that, I used a violet marker to plan out the placement. It seemed like a good idea at the time, but it turned into a nightmare.
When I finished the embroidery, I noticed faint violet lines were still visible. “No problem,” I thought, “A quick wash will take care of it.” But after laundering the fabric, the marks didn’t disappear. Worse, they turned white, making them even more obvious against the blue background. I couldn’t believe it – my hard work was overshadowed by a marking mishap.
This experience taught me an important lesson: always test marking tools on a scrap of the same fabric before using them on your project. Not all markers behave the same way, and some can leave permanent marks, even if they claim to be washable.
✅ Related tutorial: Your Guide For Choosing The Best Quilt Marking Pens For Every Project
Measuring Tools: Inaccurate or warped rulers can affect your entire project’s fit.
Lessons Learned
- Invest in quality tools – they’re worth the extra cost in the long run.
- Use tools for their intended purpose to maintain their quality.
- Regularly check and replace worn or damaged tools.
- Don’t be afraid to expand your toolset for specific tasks.
- Store tools properly to maintain their condition and prolong their life.
If you found this guide helpful, don’t forget to save the pin provided below to your sewing board on Pinterest. This way, you can easily return to this article when you need this information on sewing mistakes. Following me on Pinterest will keep you updated with more useful tips, tutorials, and inspiration for all your projects. It’s a great way to stay connected and inspired throughout your sewing journey.

latest posts
- What Do You Call a Person Who Sews? I Asked My Readers and Got 1,408 Opinions
- DIY Round Purse: PDF Sewing Pattern and Detailed Instructions
- Mini Wonder Clips By Clover: Useful Sewing Tool Or Just Another Notion?
- Non-Slip Grips For Quilting Rulers: A Small Notion With A Useful Job
- Fabric Eraser for Sewing: What It Removes and When to Use It
- What Is The Best Thread For Sewing Machine Projects? Let’s Find Out!
- Butterfly Quilt Block Tutorial – Foundation Paper Piecing
- How To Sew Quilt Squares So The Corners Match
- Sewing With Fork Pins: How They Help With Pattern Matching, Slippery Fabric, And Seams

Olga,
Thanks so much for this amazing post about avoiding sewing problems we have all faced. Your information is spot on and so very helpful!
The problem is that I sometimes forget that I already made THAT mistake!
Dear Olga
Just wanted to let you know that I recommended your site to “Sewing Enthusiasts of Gab” a blog that I am a member of. I love your in-depth knowledge and wanted to share your expertise with like minded sewers. Thanks!
Thank you!