
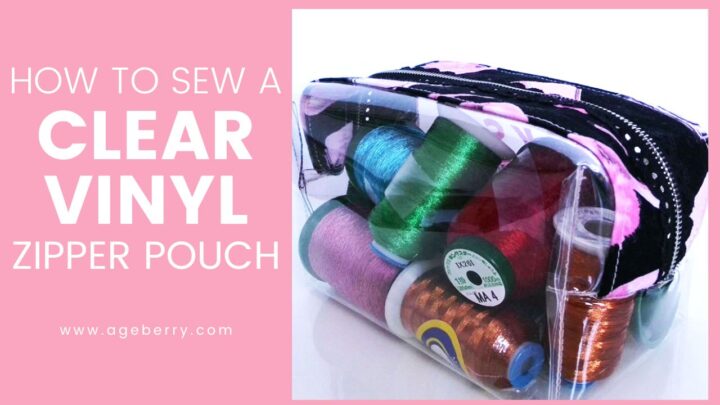
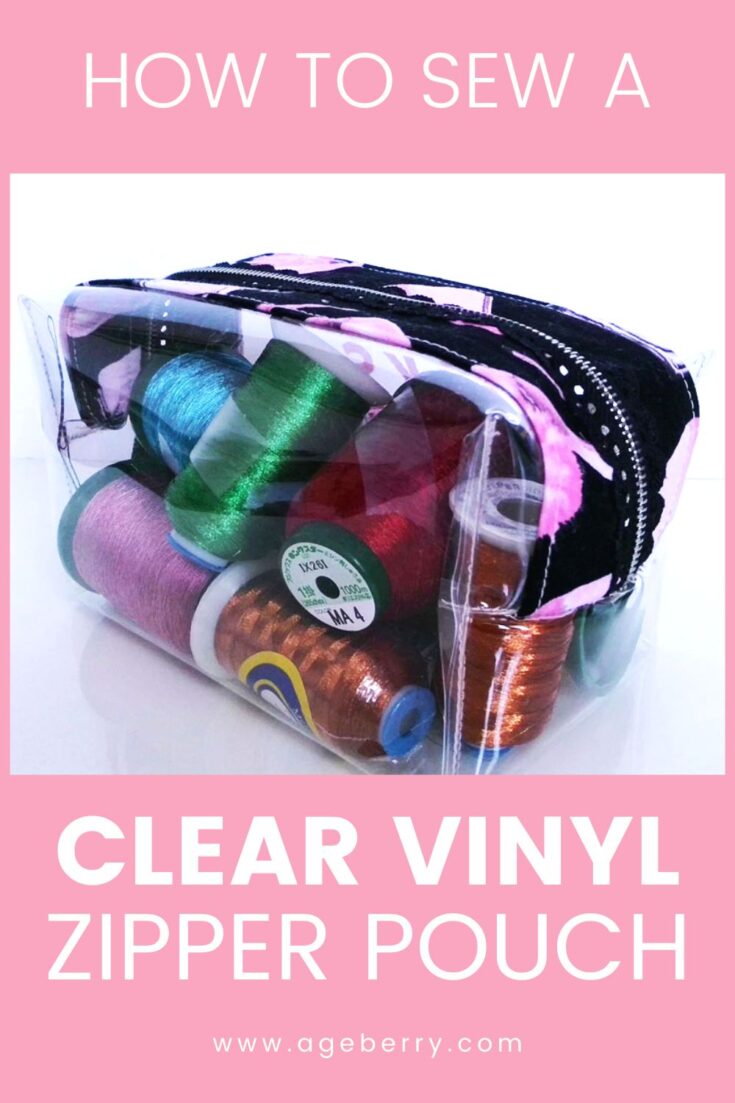
Video sewing tutorial on how to sew clear vinyl zipper pouches
In this video sewing tutorial, I will show you how to easily make a zipper pouch from clear vinyl. The pouch has a zipper closure and I also could practice my Cricut skills placing words on the vinyl.
I am going to use this pouch for used washable face masks – so I can find them easily in my bag and don’t mix them with other stuff. Of course, first I put used masks in a plastic bag (that I throw away each time), and only after that do I put them in the pouch.
Recently I noticed curious things happen: transparent clear vinyl bags, once used for shopping at grocery stores and as covers for dry cleaning items, are now considered chic. Yes, not only chic but also very stylish.
From the catwalk to street style images, transparency is gaining popularity in the fashion industry. Nowadays boots, hats, raincoats, and, of course, handbags are created from transparent vinyl. Designers took the “transparency” trend to a new level, turning recycled plastic into a trendy thing.
Karl Lagerfeld set the trend for transparent vinyl in the Chanel spring-summer 2018 collection: many details of the show were made from recycled plastic – from transparent bags, hats, gloves, raincoats, and boots to the scenery at the show. Balenciaga followed the suit by releasing short-sleeved oversize shirts and transparent vinyl over-the-knee boots. Meanwhile, at Burberry, we saw caps decorated with plastic visors and cases for bags in tone.
So, I think my pouch from clear vinyl promises to be quite a trendy accessory.
And you can even make several pouches of different sizes and designs. I think making a pouch with your choice of style and materials can be a very exciting sewing experience and in just a few hours you can get a nice, and most importantly – exclusive accessory.
These little pouches from clear vinyl are easy to sew and you can use them to store and organize many different items.
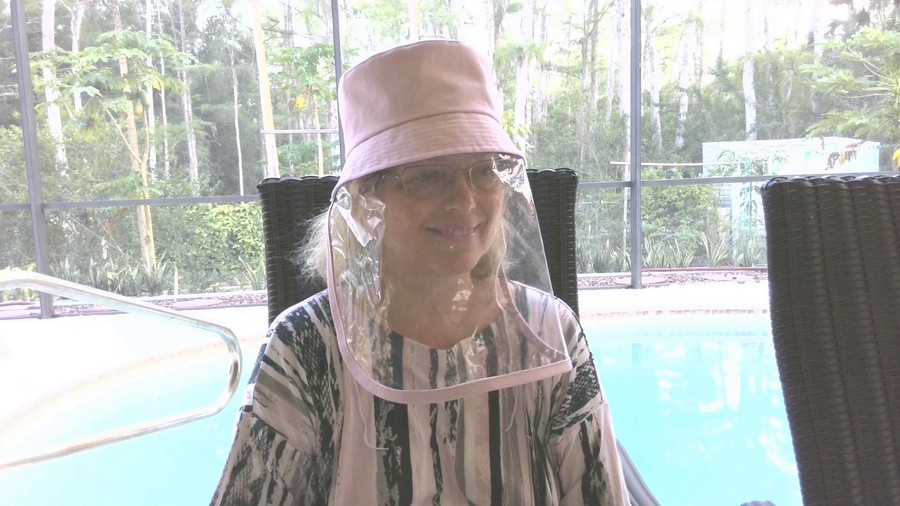
I also used clear vinyl to make something useful in our current situation – a bucket hat DIY with a face shield.
Note: Some of the links on this page are affiliate links. This means I will receive a commission if you order a product through one of my links. I only recommend products I believe in and use myself.
What you’ll need
Clear vinyl (mine was quite thick, 20 gauge, but you can use from 8 to 16 gauge)
Teflon presser foot or walking foot
Separating zipper 20 inches or bigger
Regular sewing notions
You can also buy already made clear vinyl zipper pouches on Etsy if you are in a hurry and don’t want to make your own.


Step 1
Cut all necessary pieces for the pouch.
From clear vinyl
A rectangle 12 x 15 inches (if you need to convert inches to centimeters check out my post)
From quilting cotton (or other fabric of your choice) Don’t forget to prewash your fabric before cutting!
2 rectangles 12 x 3 inches
1 rectangle 6 x 2 inches
From fusible interfacing
2 rectangles 12 x 3 inches
You can cut using fabric shears but also you can cut vinyl with a rotary cutter and a cutting mat as I did. Cutting vinyl with a rotary cutter is easy and the cut is very straight.
You won’t need much fabric and you might even have already some scrap pieces in your collection; but in case you are like me and looking at fabric is an entertainment, below are some very nice selections from Amazon.


Step 2
Attach fusible interfacing to the fabric pieces.
Prepare fabric pieces for stitching: fold them in half and turn in ⅜ inch seam allowances on each side of the fabric piece.
I am usually doing it using my iron.
First I press in ⅜ inch on one side.
Then I fold it in the middle and press.
And after that, I fold the seam allowances on the other side as you see in the image below.
I am doing this also for sleeve cuffs and waistbands. This way I am always sure that the stitching will not go out of the piece.
Step 3
This part is optional – embellish the vinyl however you want. I decided to use my new Cricut maker and cut letters from heat transfer vinyl.
I attached iron-on vinyl to my clear vinyl piece without any problem – and it was fun!
Step 4
Attach the fabric pieces to the vinyl.
I am using craft glue The Ultimate to hold the vinyl ⅜ inch inside. After the glue dries out I make a stitch by sewing machine. Set the stitch length at 3 mm and use a Universal needle size 90/14.
You can use invisible thread to sew clear vinyl. But I used light pink thread – the thread should be very strong.
You are not going to have vinyl under the presser foot – under the presser foot you will have fabric, so you can use a regular presser foot for now. But you may have problems with the vinyl part not moving over the metal throat plate. You can put a piece of tissue paper or a piece of tear-away embroidery stabilizer under the vinyl.
Step 5
Now we need to sew a zipper.
I decided to use a novelty zipper that has nice lacy ribbons around the metal teeth and can be seen on the right side of the item. It’s a separating zipper which is a big plus.
Place the zipper in such a way so that you don’t cut the upper part of it and cut only the bottom part.
Baste both sides of the zipper, separate the zipper and sew each side of the zipper to the fabric.
Use a Teflon presser foot or walking foot. I use my built-in Janome walking foot, it’s called the AcuFeed system. I like it very much.
Place tissue paper or a strip of tear-away embroidery stabilizer under the vinyl part of the pouch so it can move smoothly over the metal throat plate.
Sew slowly. I don’t think it’s a big deal to sew a few seams slowly, right?
Step 6
Make small loops from the rectangle of fabric 6 x 2 inches: make a stitch, turn it to the right side, press and cut in half.
Step 7
Fold the vinyl piece right sides together like in the image below so that the zipper teeth are aligned with the center fold line of the vinyl piece.
Keep the zipper half-open (or even more than half). It’s very important to remember to open the zipper, otherwise, you will not be able to turn the pouch on the right side.
Place fabric loops under the zipper teeth. I made a mistake and forgot to put the loops, so I had to rip this seam and correct the mistake.
Sew the sides of the pouch, keeping ⅜ inch seam allowances.
You will need a Teflon presser foot or a walking foot to sew over vinyl. I used my AcuFeed system (kind of walking foot for Janome machines) and I didn’t have any problems.
Sew slowly and place tissue paper under the vinyl. Tissue paper can be taken out easily.
Don’t sew over metal teeth! Stop before and secure stitches.
Cut seam allowances and protect fabric edges with Fray check – a seam sealant that prevents the fabric from fraying and secures thread ends. You will have to cut zipper teeth – do it with regular scissors, not with a rotary cutter.
Step 8
In order to give a shape to our pouch, we need to sew up the corners.
You have to make sure that all corners are the same.
For this mark the fold line with a marker (suitable for vinyl) and align stitches with the drawn line.
Measure 1.5 or 2 inches from the corner point and draw a perpendicular line – this is our stitching line for the corner. I did 2 inches.
Make a stitch and cut seam allowances. I used my rotary cutter and the cutting mat. No need to use Fray Check – vinyl never frays.
But you need to secure the thread ends.
Step 9
Sew all 4 corners and turn the pouch to the right side. It’s ready to be used.
I made a video tutorial for you if you are the watching type. Check this out if you like to watch the process of sewing a pouch from clear vinyl ( instead of reading).

Did you find this tutorial helpful? If so, save this pin (see below) on your sewing board so you can come to this tutorial later when you are ready to sew your own zipper pouch from clear vinyl and follow me on Pinterest for more tips, tutorials, and inspiration!
latest posts
- What Do You Call a Person Who Sews? I Asked My Readers and Got 1,408 Opinions
- DIY Round Purse: PDF Sewing Pattern and Detailed Instructions
- Mini Wonder Clips By Clover: Useful Sewing Tool Or Just Another Notion?
- Non-Slip Grips For Quilting Rulers: A Small Notion With A Useful Job
- Fabric Eraser for Sewing: What It Removes and When to Use It
- What Is The Best Thread For Sewing Machine Projects? Let’s Find Out!
- Butterfly Quilt Block Tutorial – Foundation Paper Piecing
- How To Sew Quilt Squares So The Corners Match
- Sewing With Fork Pins: How They Help With Pattern Matching, Slippery Fabric, And Seams


Thank you for this tutorial! I’ve been pinning a lot of your tutorials. You make it look easy to sew on vinyl. 🙂
I want to try to salvage a vinyl shower curtain that is just too cute to let go. The holes in the vinyl for the curtain rings have torn. I put grommets in them, but now they’re tearing around the grommets. I was thinking of cutting off the top where the holes are and replacing it with a strip of fabric and putting grommets in the fabric. I’ve been worrying about sewing on the vinyl and ultimately the curtain tearing at the stitch line, like a perforated tearaway. Should I worry about that? Do you have any advice for this type of project?
I thought about this because it is not in my nature to say “don’t do it”!. But I don’t think you can successfully salvage the shower curtain. That vinyl is probably not the best quality and in time will crack no matter what you do, so probably you will work a lot but the result will at best be useful for a short time only. But if you want to try, vinyl can definitely be used in a sewing machine, this article is talking about it. If you do it correctly, the seam WILL hold if the vinyl is still good.
@Olga Balasa, thank you so much for your advice! I may give it a try–all I’ll lose is my time. 😉