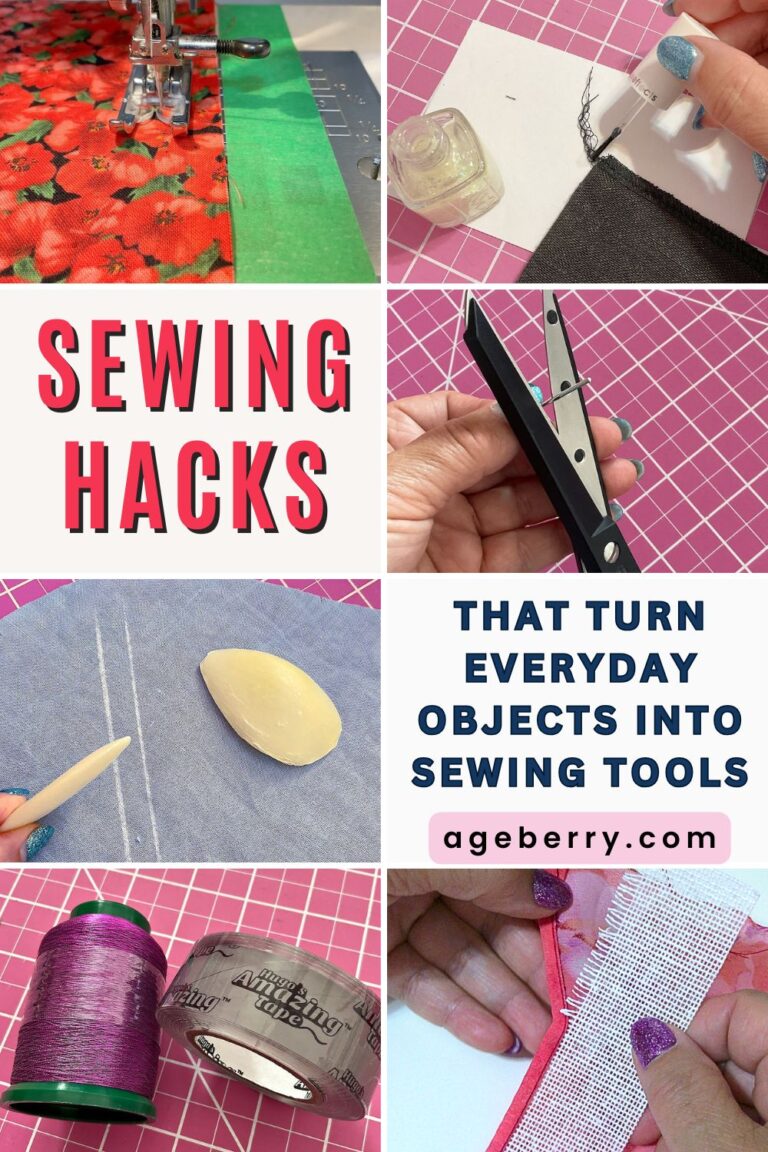
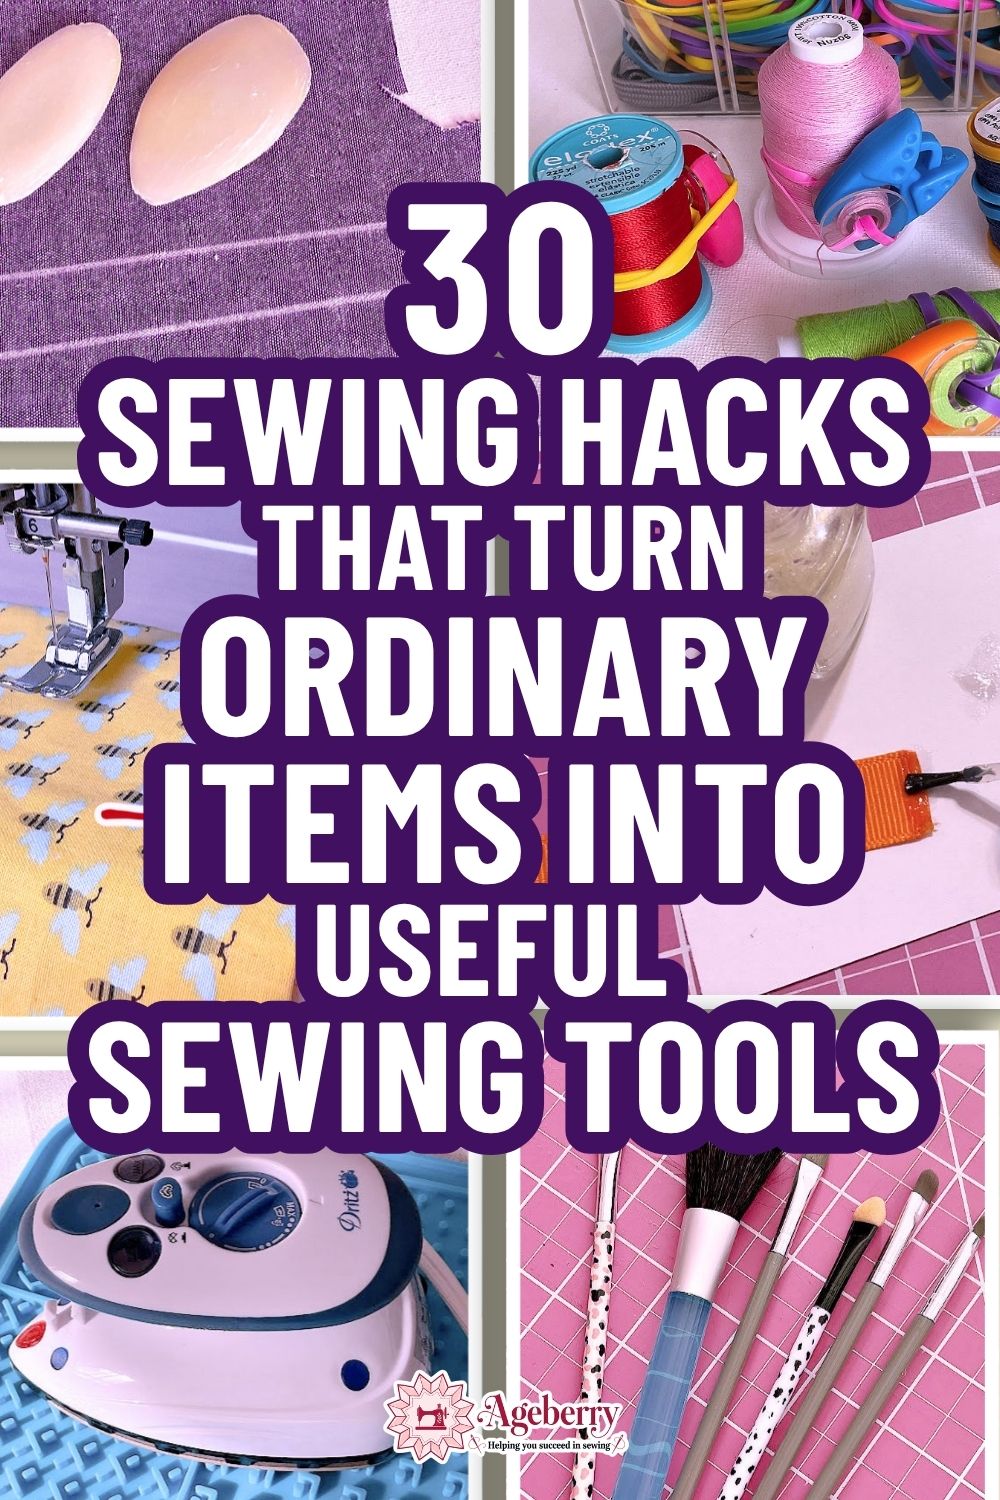
30 Sewing Hacks That Turn Ordinary Items into Useful Sewing Tools
These sewing hacks offer smart fixes for the everyday challenges that come up during a project. They use simple items you probably have at home and can make your sewing more efficient, accurate, and tidy. They’re more than just handy ideas—they truly make a difference. With a little creativity and a new way of looking at familiar tools, you can make your sewing routine smoother and less frustrating.
And most of these items weren’t even meant for sewing. That’s what makes them so practical.
If you want to download a printable version of this article, one is available in PDF format for a small fee in my shop: 30 Sewing Hacks That Turn Ordinary Items into Useful Sewing Tools. If you purchase the PDF you can copy it to your own devices and read it at leisure, without any ads.
1. Mark Fabric with Leftover Soap Slivers
Don’t toss those tiny pieces of bar soap—use them in your sewing room instead. Thin soap slivers work well for marking fabric and leave a clean, fine line. They’re great for drawing cutting guides or stitching lines, and the marks wash out easily. It’s a zero-cost, eco-friendly alternative to tailor’s chalk, and worth keeping a few on hand in your drawer.
Sadly, liquid soap is more common now and has taken over in most homes. But it’s no good for marking!
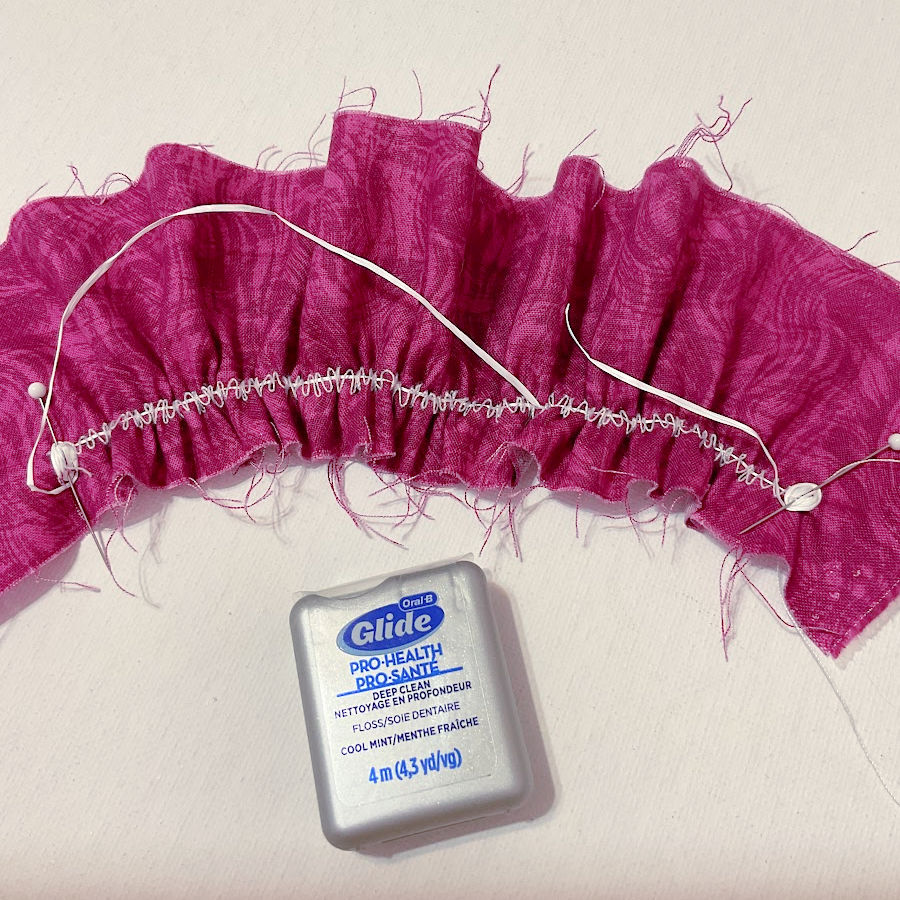
2. Use Dental Floss for Gathering
Dental floss is surprisingly useful when you need strong, reliable gathers. It’s much tougher than regular thread and won’t snap under tension.
To use it, lay a piece of unwaxed dental floss along your seam line and sew a wide zigzag stitch over it—just be careful not to stitch through the floss. Once that’s done, pull the floss to gather the fabric. This trick is especially helpful with heavier materials where regular gathering threads might not hold up.
3. Organize and Sew with Rubber Bands
Rubber bands are one of those simple tools that come in handy more often than you’d expect.
One clever use is keeping bobbins and their matching spools together. Just wrap a rubber band around the spool and tuck the bobbin inside. It keeps the thread neatly paired and helps prevent tangles in your storage drawer.
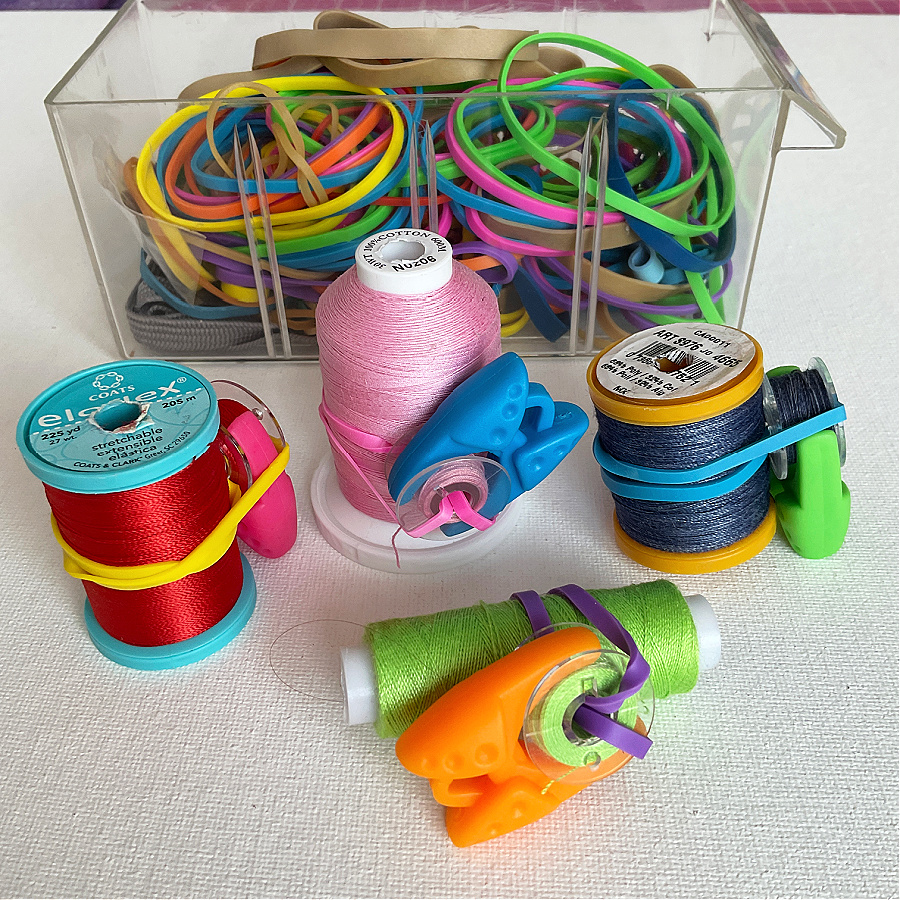
You can also wrap a thick rubber band around the free arm of your sewing machine, lining it up with your desired seam allowance. It acts as a quick visual guide, especially useful when sewing long, straight seams where accuracy matters.

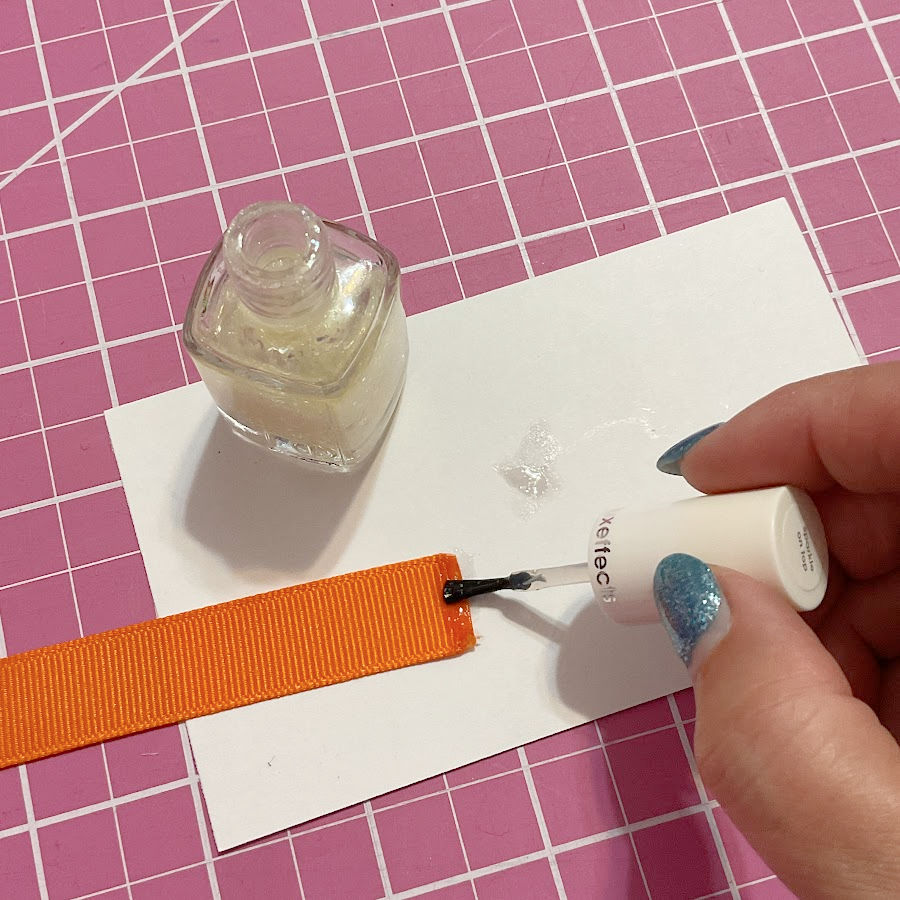
4. Use Clear Nail Polish for Quick Fixes
Clear nail polish is more useful in the sewing room than you might think.
After sewing on a button, add a tiny drop between the holes. This helps keep the thread secure and prevents it from loosening over time.
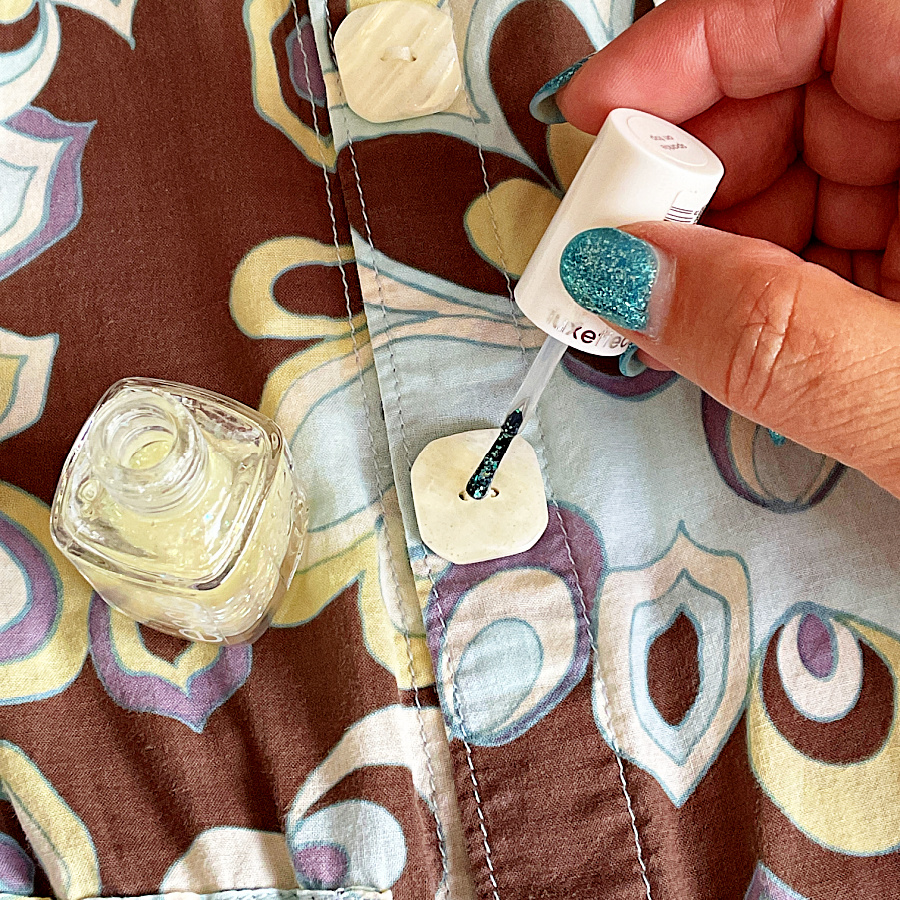
You can also use it to seal thread tails on serged seams. Just apply a small amount at the ends to stop fraying. Be careful not to use it where the seam touches skin. Dried polish can feel rough and uncomfortable.

It also works well on the cut edges of synthetic ribbon or elastic. A quick swipe can stop fraying if you’re not hemming the edge.
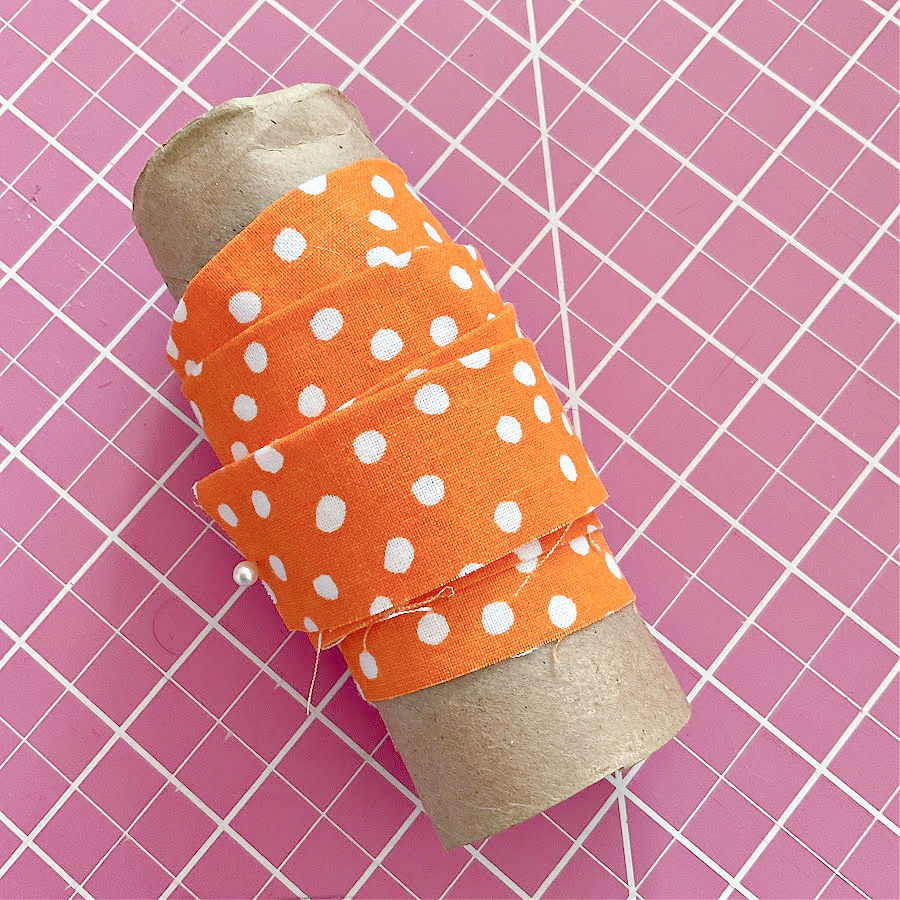
5. Use a Toilet Paper Tube to Organize Bias Tape or Ribbon
Bias tape and ribbon can easily get tangled or wrinkled when tossed in a drawer. A simple fix? Use an empty toilet paper tube. Wrap the tape or ribbon neatly around the tube and secure the end with a pin or clip. It keeps everything tidy, easy to find, and ready to use.
In this image, you can see the bias tape I made for a previous project—I had quite a bit left over, so I stored it for later. Wrapping it this way keeps it from tangling and makes it easy to use again. You can also tuck the tube into a plastic bag to keep it clean.
If you’re curious about making your own bias tape, check out my full tutorial: Bias Tape Tutorial: How to Use a Bias Tape Maker.
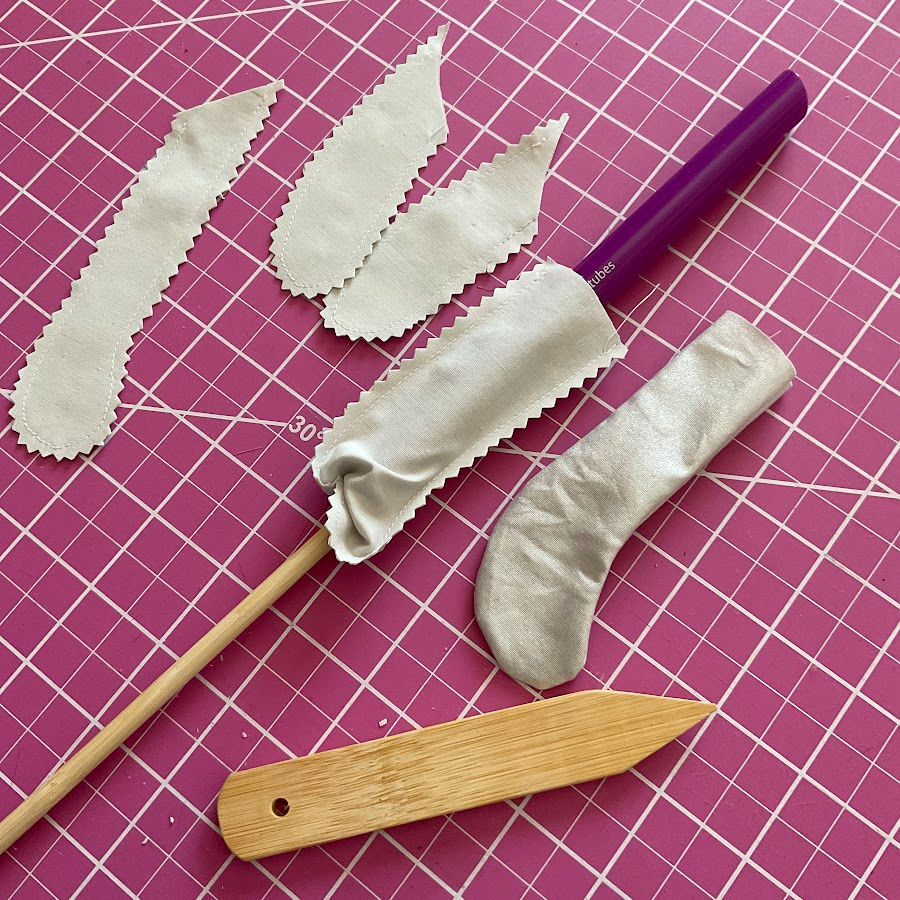
6. Turn Narrow Tubes Easily with a Straw and Chopstick
Turning tiny fabric tubes right side out doesn’t have to be a struggle. Just grab a straw and a chopstick. Slide the straw inside the fabric tube, then gently push the fabric through using the chopstick.
It’s a simple trick that works great for narrow pieces like spaghetti straps, belt loops, or button loops. It’s quicker than using a safety pin and much gentler on the fabric.
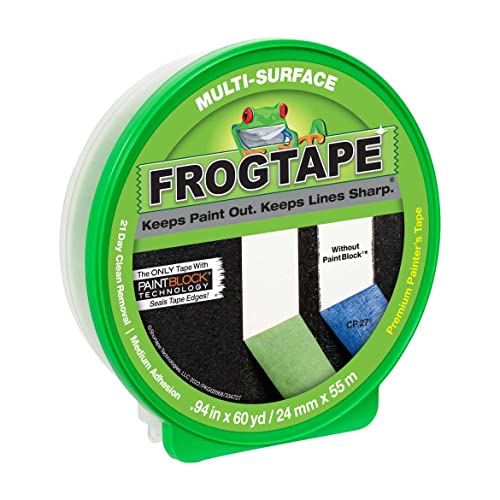
7. Use Painter’s Tape to Mark, Hold, and Guide Fabric
Painter’s tape isn’t just for walls – it comes in handy at the sewing table too.
It’s a great way to keep track of fabric sides, especially when you’re cutting out mirrored pieces like sleeves or pant legs. If your fabric looks the same on both sides, it’s easy to mix them up. Stick a small piece of tape on the wrong side as you go. It’s a quick, simple way to avoid sewing two of the same piece by accident.
You can also stick painter’s tape directly onto your sewing machine bed to use as a seam guide. It’s especially helpful if you’re just starting out or if the built-in seam lines on your machine are hard to spot.

Another handy use for painter’s tape is securing lightweight or slippery fabrics like chiffon while you trace your pattern. It helps keep everything flat and still, without marking or damaging the fabric.
I show exactly how this works in my tutorial: How to Cut Chiffon Without Problems.
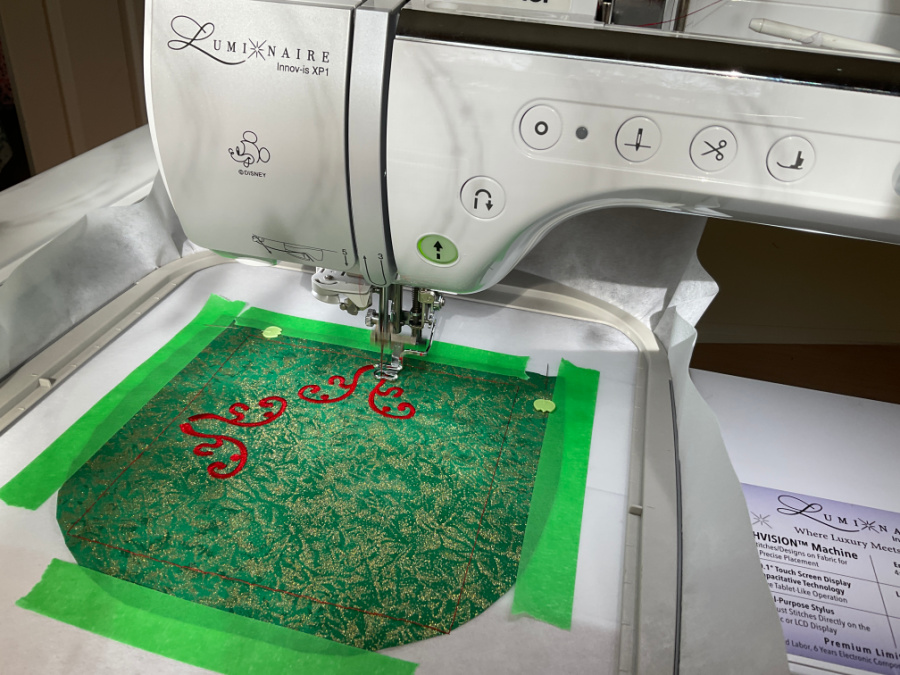
Painter’s tape is also a great helper when using an embroidery machine. If you’re working with fabric that’s tricky to hoop—like delicate material, small scraps, or spots close to seams—you can hoop just the stabilizer. Then place the fabric over it and hold it in place with painter’s tape. It keeps the fabric steady while stitching and removes cleanly once your design is done.
Note: Some of the links on this page are affiliate links. This means I will receive a commission if you order a product through one of my links. I only recommend products I believe in and use myself.

There are also masking tape and washi tape, and they can look similar at first glance. But they don’t behave the same way.
Masking tape is stronger and stickier than painter’s tape. It can work for quick sewing-room jobs, but it may leave residue if it stays on fabric or your machine for too long. I don’t like that kind of surprise near fabric. Sticky marks have no business joining a sewing project.
Washi tape is prettier, of course. It comes in colors and patterns that can make your sewing machine look ready for a party. It also removes easily, but it is usually thinner and less sturdy than painter’s tape. It may lift or curl while you sew, especially if your hands or fabric keep brushing against it.
That’s why I use painter’s tape most often. It has enough grip to hold fabric or mark a guide, but it usually peels away without fuss.
If you use painter’s tape on delicate fabrics like silk, chiffon, or rayon, test it on a scrap first. Adhesives vary by brand, and even low-tack tapes can behave differently on very lightweight fabrics.
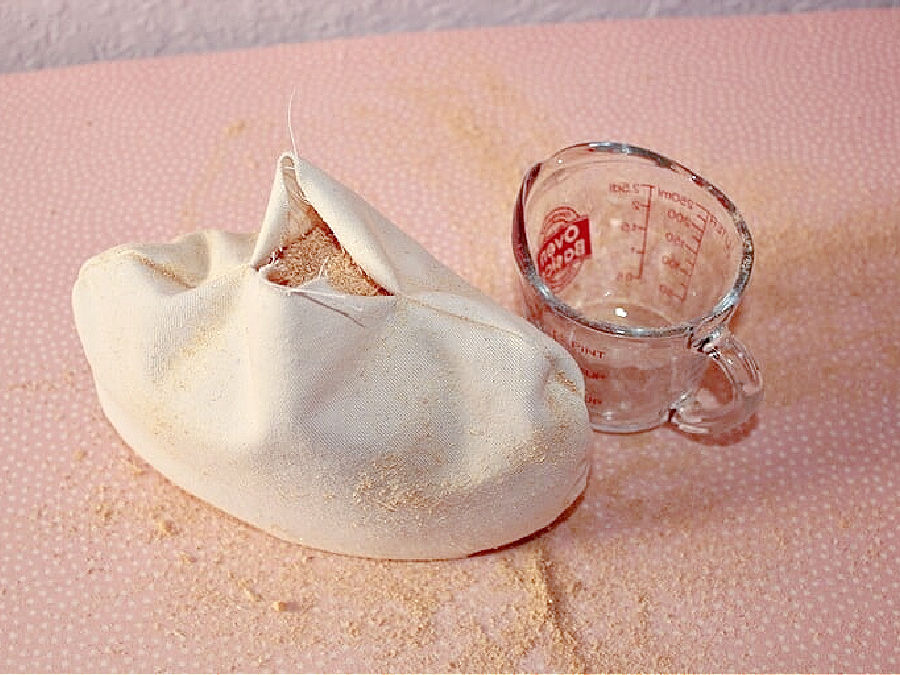
8. Stuff Pressing Tools with Sawdust
If you’re making your own tailor’s ham, seam roll, or sleeve board, try using sawdust instead of poly stuffing. Sawdust is dense and holds its shape well, so it’s better for pressing curves and seams. It also retains heat and moisture, so you get crisp, long-lasting results when using steam.
You can usually find fine sawdust at woodworking shops or pet stores, where it’s sold as animal bedding. Just make sure it’s clean and completely dry before using it to fill sewing tools. I had to sift through mine to remove larger wood bits and splinters, but once that’s done, it works beautifully.
For step-by-step instructions, see my tutorial: How to Make a Tailor’s Ham.
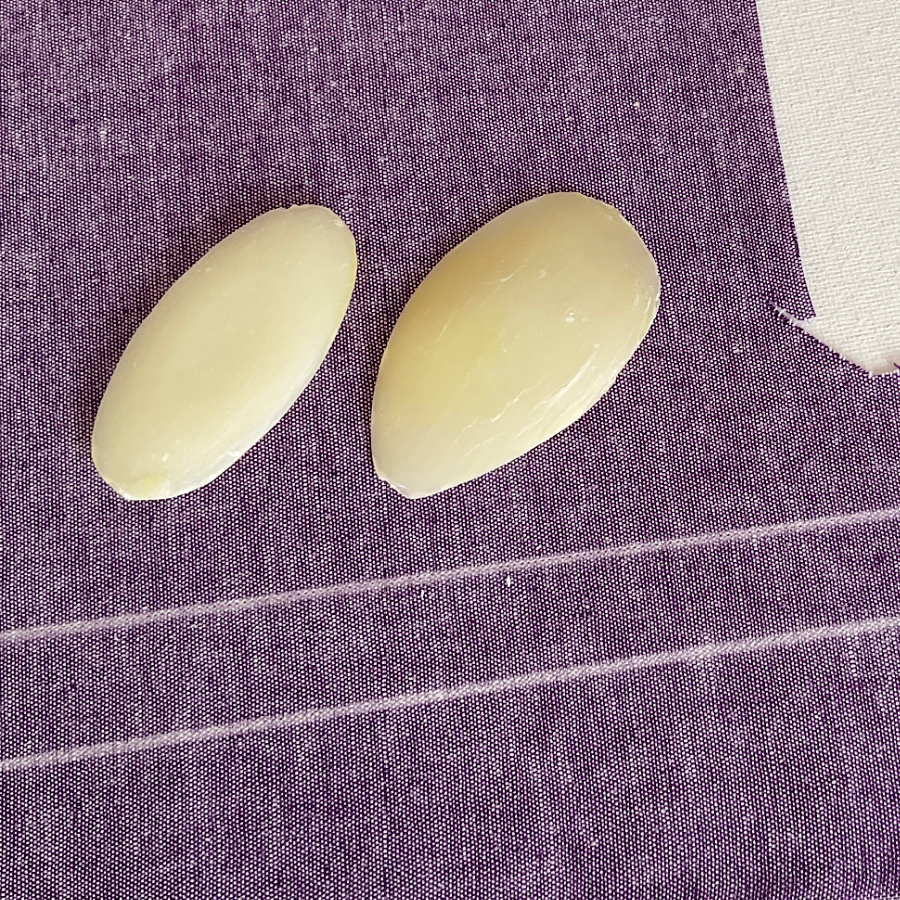
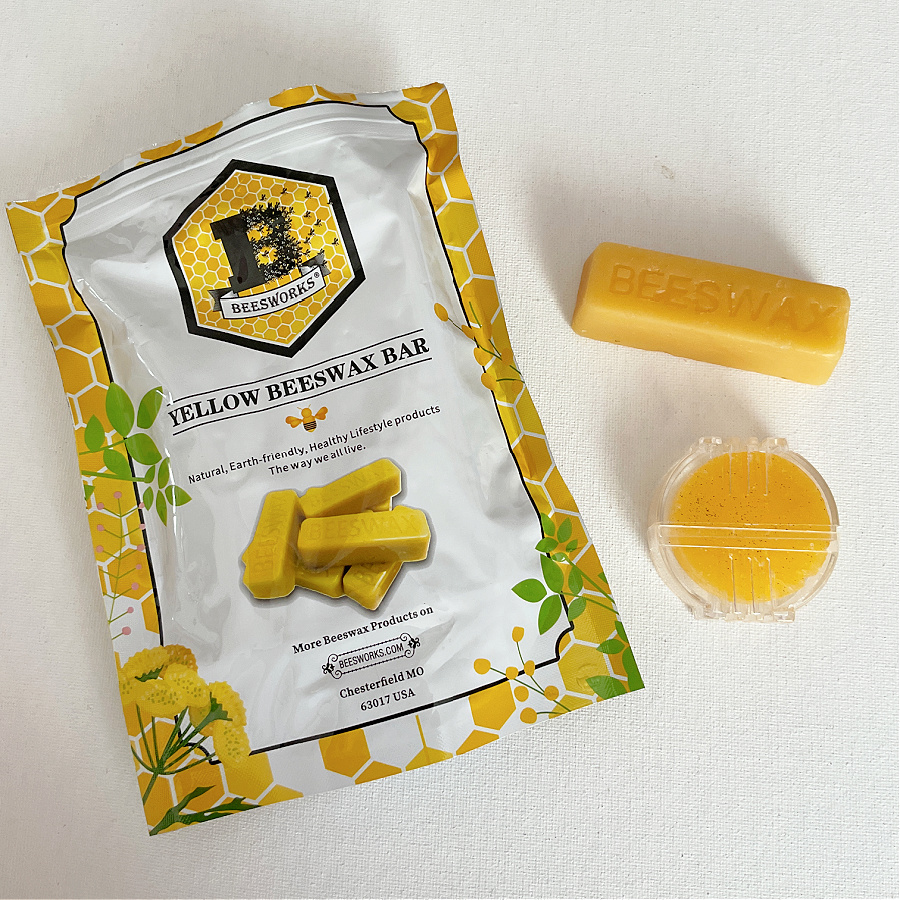
9. Use Beeswax for Your Thread
Thread has a way of tangling or snapping during hand sewing, especially when it’s cut long. A quick pass through a block of beeswax helps fix that. It adds a light coating that strengthens the thread and helps it move smoothly through fabric. This simple trick reduces knots and works especially well for embroidery, beadwork, or sewing with delicate materials.
You can use regular beeswax for this, but there’s also a version made specifically for sewing—usually shaped into small disks with a groove that makes waxing your thread easier.
10. Smooth Frayed Thread with Lip Balm
A natural beeswax-based lip balm, like the kind from Burt’s Bees, can help smooth frayed thread ends before threading a needle. Lightly swipe the thread across the top of the balm. It helps control loose fibers, firms up the tip, and makes it easier to pass through the needle eye. This is especially helpful when using embroidery floss or older thread that has started to fuzz.
Please note, this serves a different purpose than waxing the full length of the thread. This tip is only for the end, to make threading the needle easier.


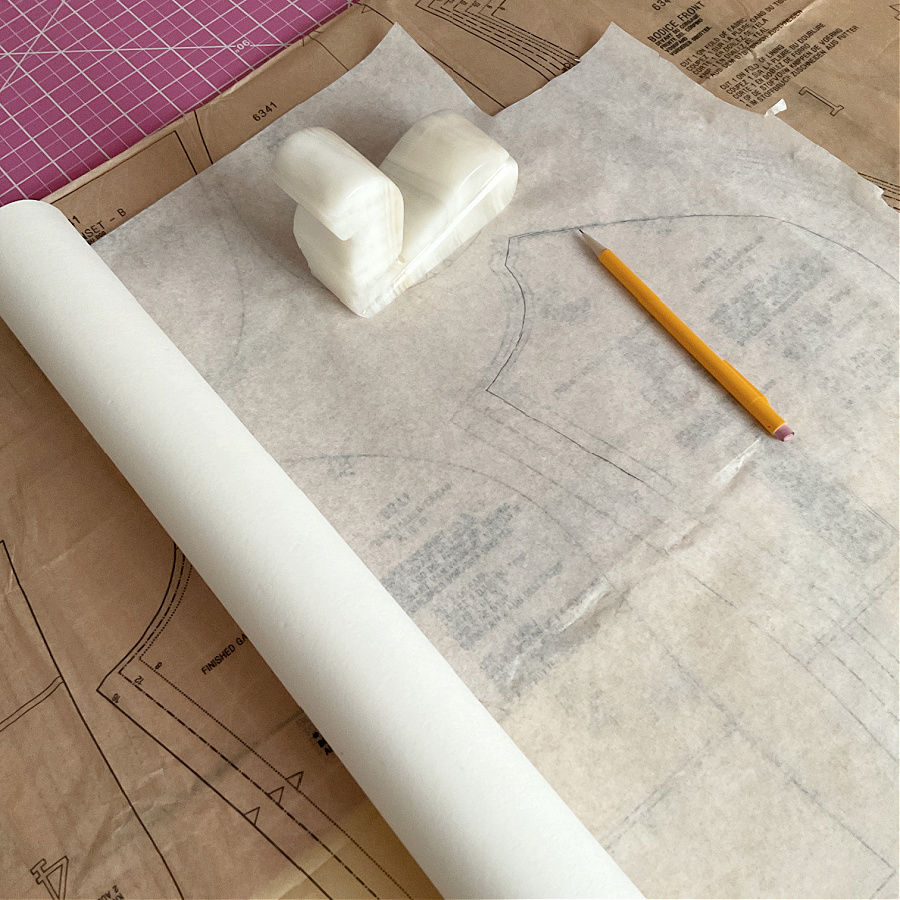
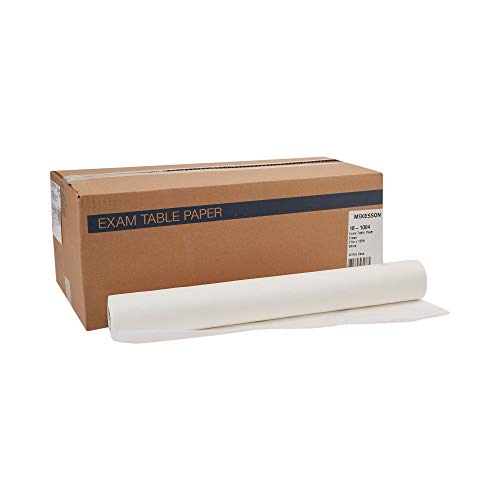
11. Trace Patterns with Medical Exam Paper
It turns out that the paper your doctor uses on the exam table is also a sewist’s best friend. Medical exam paper is thin, slightly see-through, and comes in long rolls. This make it perfect for tracing sewing patterns. You can see your original lines clearly, mark grainlines and notches with ease, and fold it neatly for storage.
It’s especially helpful when you’re adjusting commercial patterns or working on custom fit. And bonus – it’s usually much cheaper than specialty tracing paper.
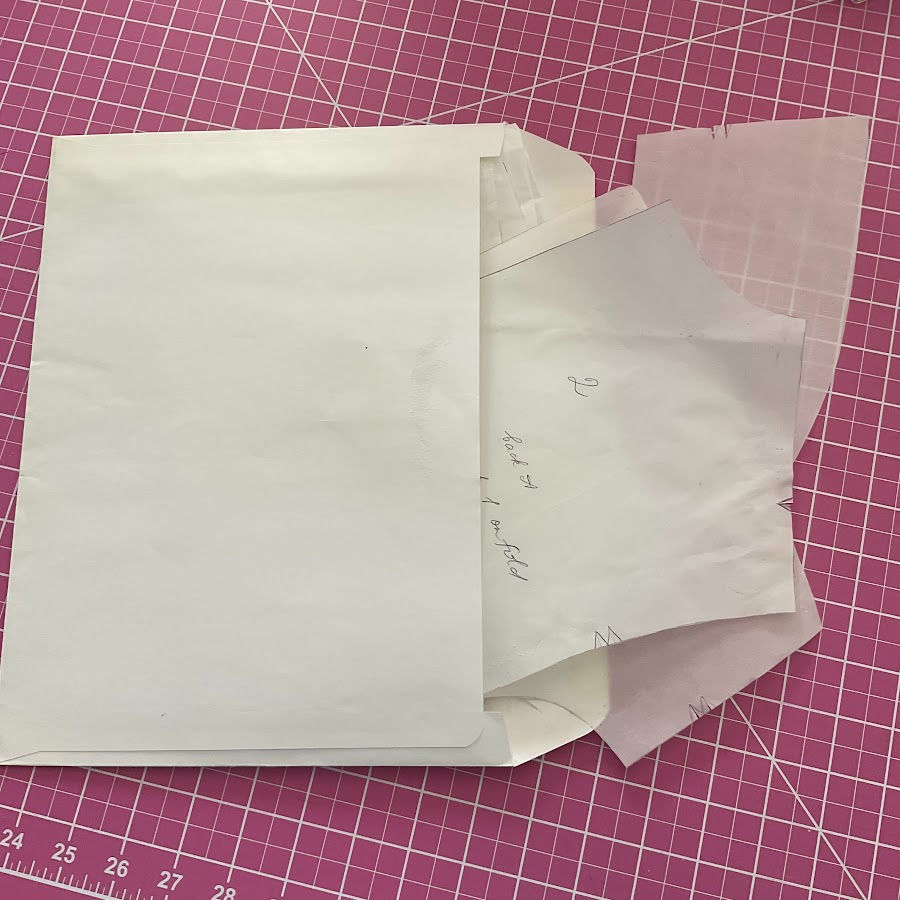
12. Keep Patterns Organized with File Envelopes
PDF patterns can quickly turn into a crumpled mess if you don’t have a good way to store them. Large file envelopes are a simple solution. They keep your pattern pieces flat, organized, and easy to label.
You can write down the pattern name, size, fit notes, or fabric ideas right on the front. No more digging through a pile of folded papers or wondering which piece goes with which project. The envelope keeps everything together and protects it from getting bent or torn.
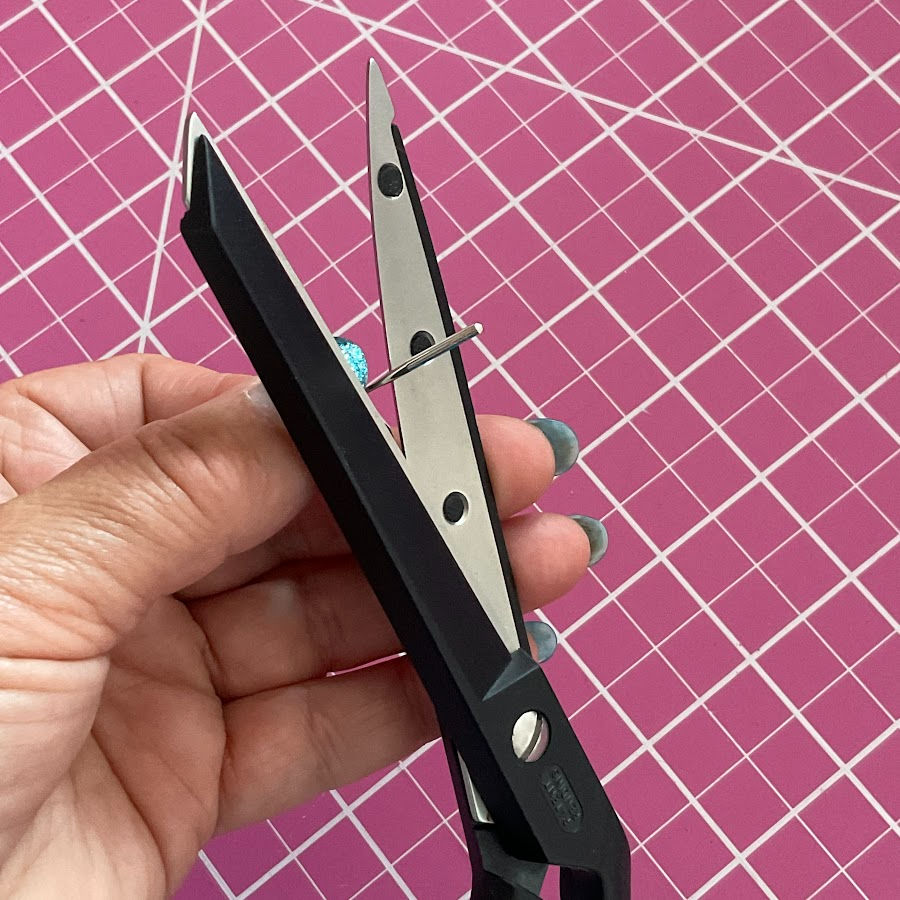
13. Refresh Dull Scissors with a Used Needle
When your fabric scissors start to feel a bit sluggish, a used sewing machine needle can help sharpen them. Just hold the needle steady and make a few slow cuts along its shaft, from the base to the tip of the blade. This gentle friction can help smooth out tiny burrs and improve the cutting edge. It’s not a full sharpening, but it’s a handy way to stretch the time between professional tune-ups.

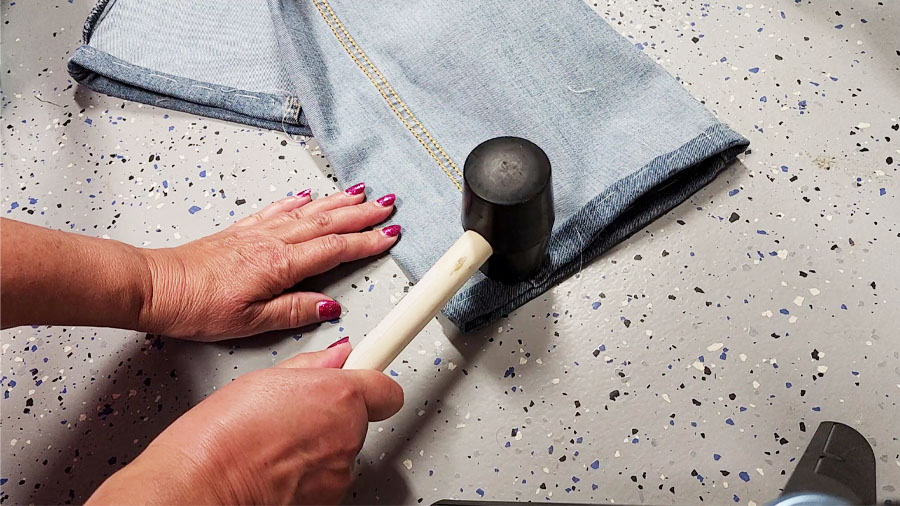
14. Flatten Thick Seams with a Mallet
Bulky seams can give your machine a hard time. If you’re hemming jeans or sewing through heavy layers, try using a rubber or wooden mallet to gently flatten the seam first. This helps compress the fabric, so your needle moves through more smoothly. It can also prevent skipped stitches and keep your presser foot from tipping. Just be sure to place the fabric on a firm surface and skip the metal hammer – it’s too harsh on the fabric.
I use this trick every time I hem jeans. You can see how it works in my step-by-step guide: How to Easily Hem Jeans at Home: A Beginner-Friendly Step-by-Step Tutorial.
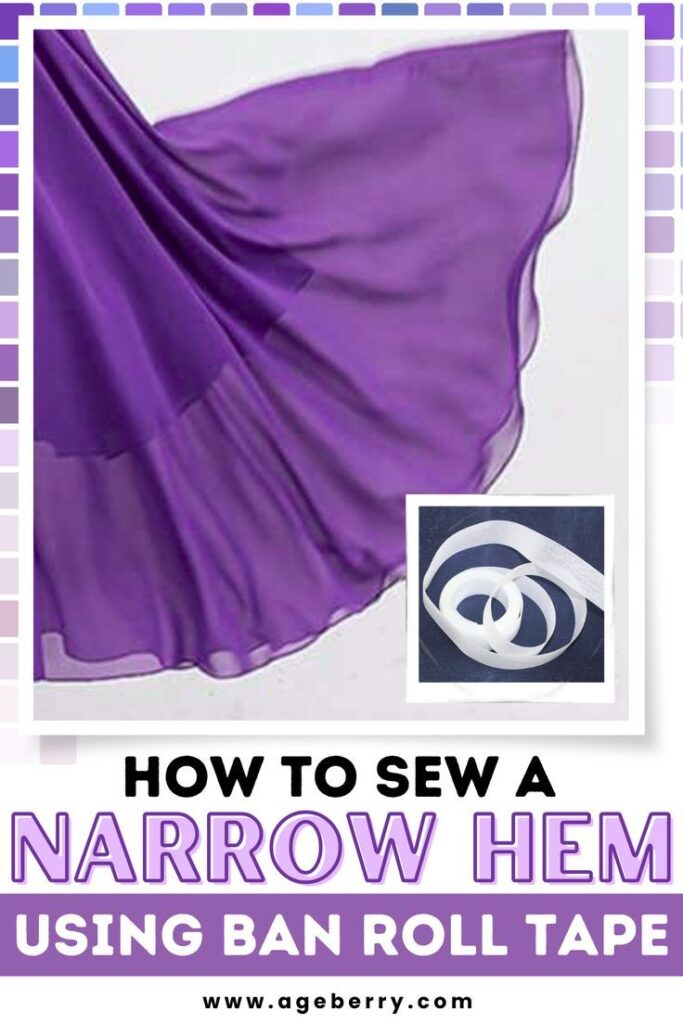
15. Sew Delicate Hems with Ban-Roll Tape
Ban-Roll is usually used to stiffen waistbands, but it has a second life as a secret weapon for hemming tricky fabrics. If you’re working with chiffon, silk, or anything slippery, Ban-Roll makes it easier to sew a narrow hem without stretching or warping the fabric. You can remove a few vertical threads to create small horizontal gaps. These gaps help you fold and stitch a perfectly even hem right along the edge. Once you’re done, the tape slides right out, leaving a clean, professional-looking finish.
Want to try it? Here’s the full step-by-step tutorial: How to Sew a Narrow Hem with Ban-Roll.
16. Make Narrow Hems Easier with Buckram Fabric
Buckram is traditionally used to stiffen hats, bags, or waistbands—but it also works surprisingly well for hemming delicate materials like chiffon.
It acts similarly to Ban-Roll tape by providing a stable edge that helps guide the fabric as you fold and stitch. This support makes it easier to sew a narrow, even hem without stretching or puckering the fabric.
Once the hem is complete, you can remove the buckram cleanly and have a smooth and professional finish.
You can find the full step-by-step guide in my tutorial From Frustration to Finesse: A Foolproof Method for Hemming Chiffon and Sheer Fabrics.


17. Use Frixion Pens for Temporary Marking
Frixion pens weren’t made for sewing, but they’re a handy tool at the cutting table. These pens create crisp, clear lines that disappear with heat. You can use them to mark darts, buttonholes, pleats, or stitch lines. Once you’re finished, just press the area with a hot iron and the marks vanish like magic.
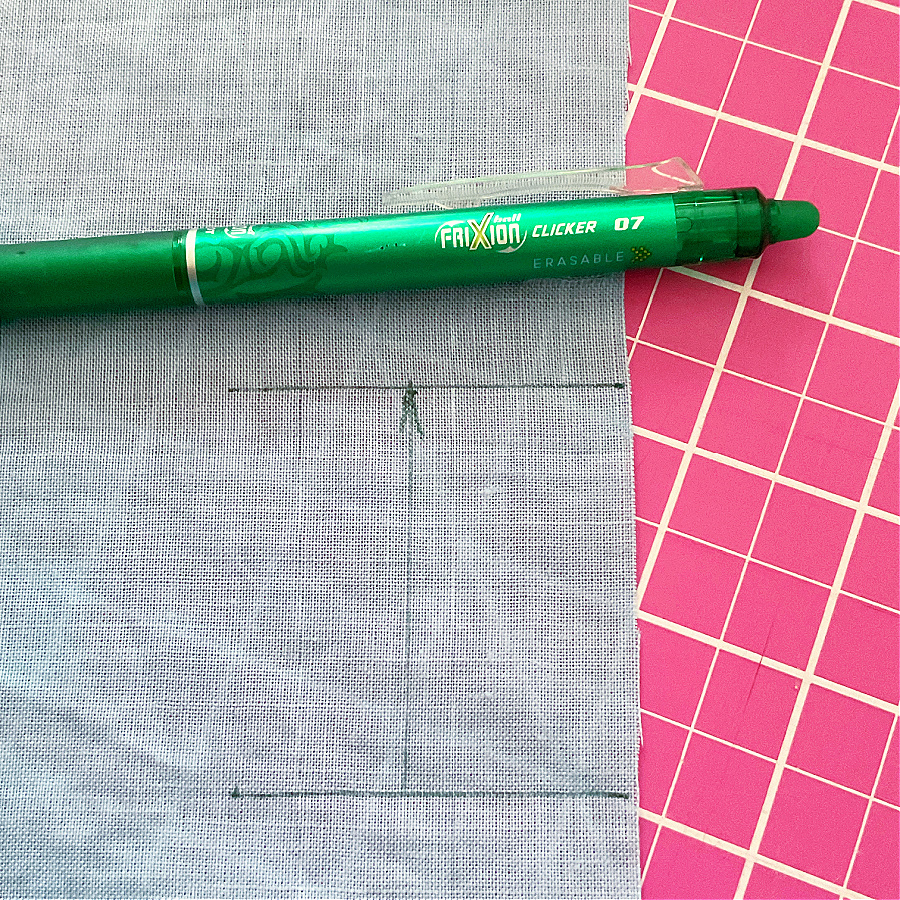

That said, they can sometimes reappear in cold weather. So it’s best to use them only in places that won’t show on the finished garment.
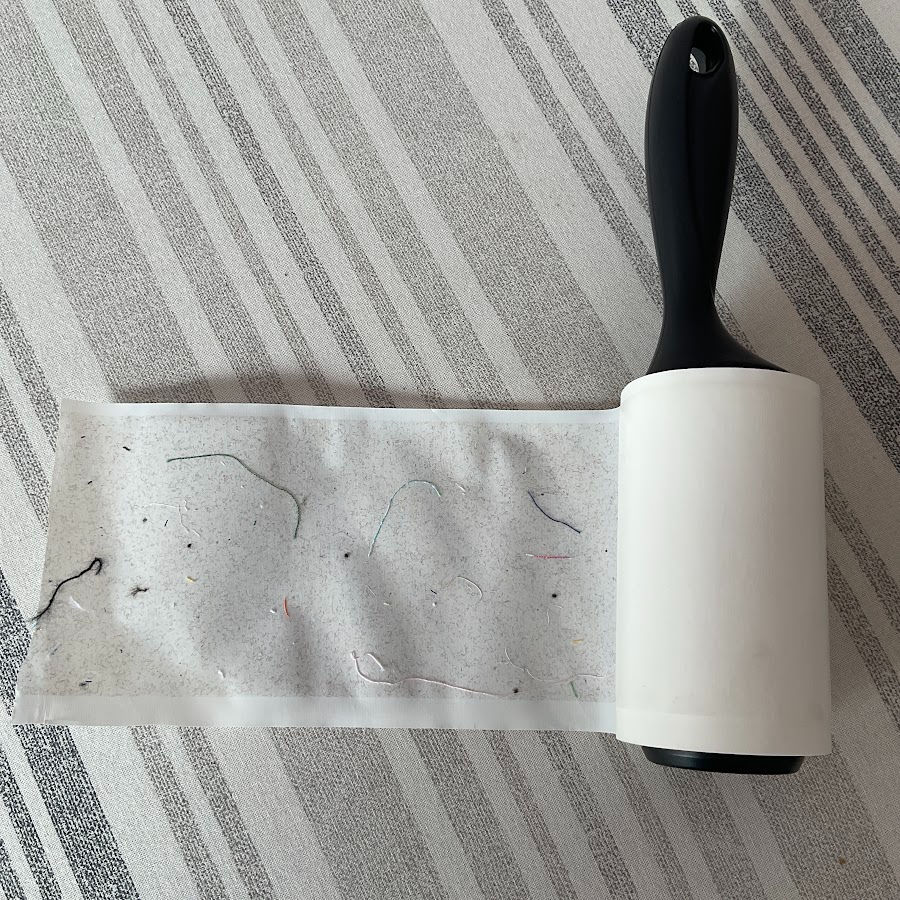
18. Clean Up Threads with a Lint Roller
Snipped threads and fuzz have a way of showing up everywhere – especially after seam ripping. A lint roller is a quick fix. Just roll it over your fabric, cutting mat, ironing board, or even your clothes to pick up the mess. It’s faster than pulling out a vacuum and way more satisfying than brushing by hand. Keep one near your machine and you’ll always be ready for a quick cleanup.
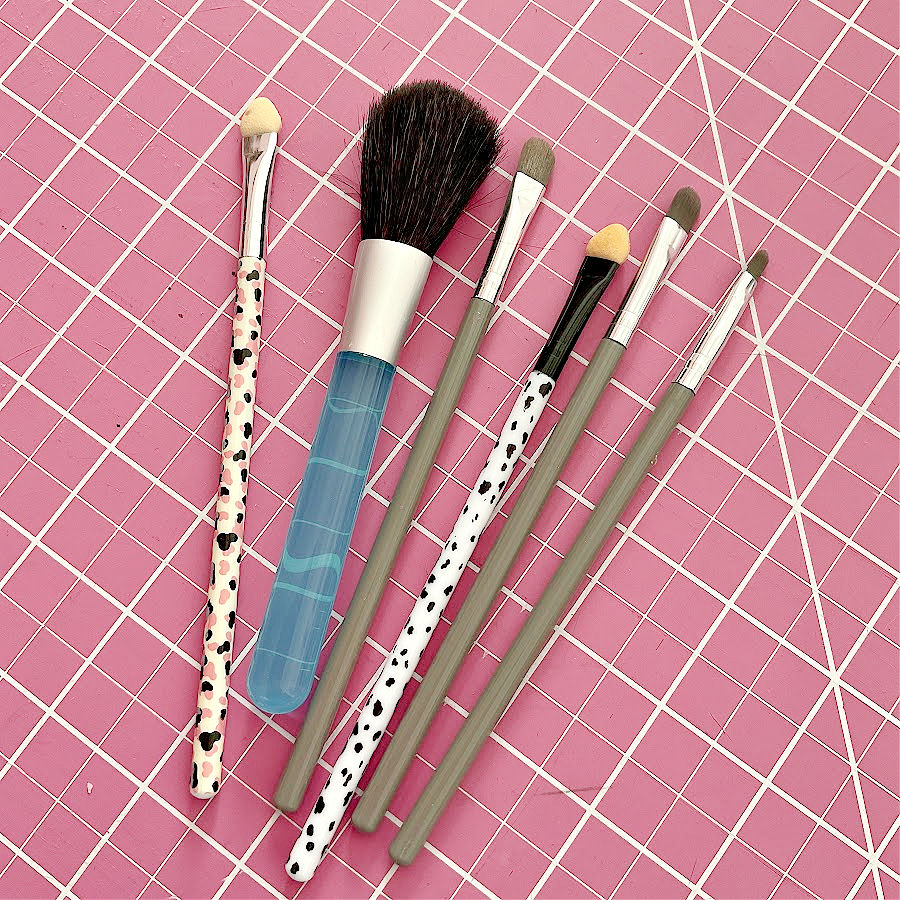
19. Makeup Brushes for Sewing Machine Care
A little lint can cause a lot of trouble. To keep your sewing machine running smoothly, try using a clean makeup brush to sweep away dust and thread bits. Soft bristles – like those on an eyeshadow or blush brush – can reach into small areas like the bobbin case or feed dogs without scratching anything. It’s a gentle way to keep your machine tidy between deeper cleanings.
20. Thread Needles with Floss Threaders
Floss threaders might live in the dental aisle, but they’re handy for sewing too. These flexible loops have a firm tip that slips through needle eyes with ease. Just loop your thread through, and pull it through the eye without the usual squinting and frustration.
They’re especially helpful for threading fine or metallic threads, or reaching awkward spots on your serger. They’re inexpensive, reusable, and fit right into your notions box without taking up space.


21. Press Small Areas with a Hair Straightener
A hair straightener can double as a compact pressing tool for tight spots and small projects. It works well along narrow seams, between buttons, or on tiny items like doll clothes. Look for one with adjustable heat settings so you can use it on delicate fabrics without worry. It heats up fast and fits easily into small sewing spaces.
I don’t keep a hair straightener at home, but whenever I visit my daughter, I borrow hers for sewing touch-ups. The one below, available on Amazon, is a newer version of the model she uses – and it works beautifully for pressing small areas.

22. Draw Perfect Circles Using Household Items
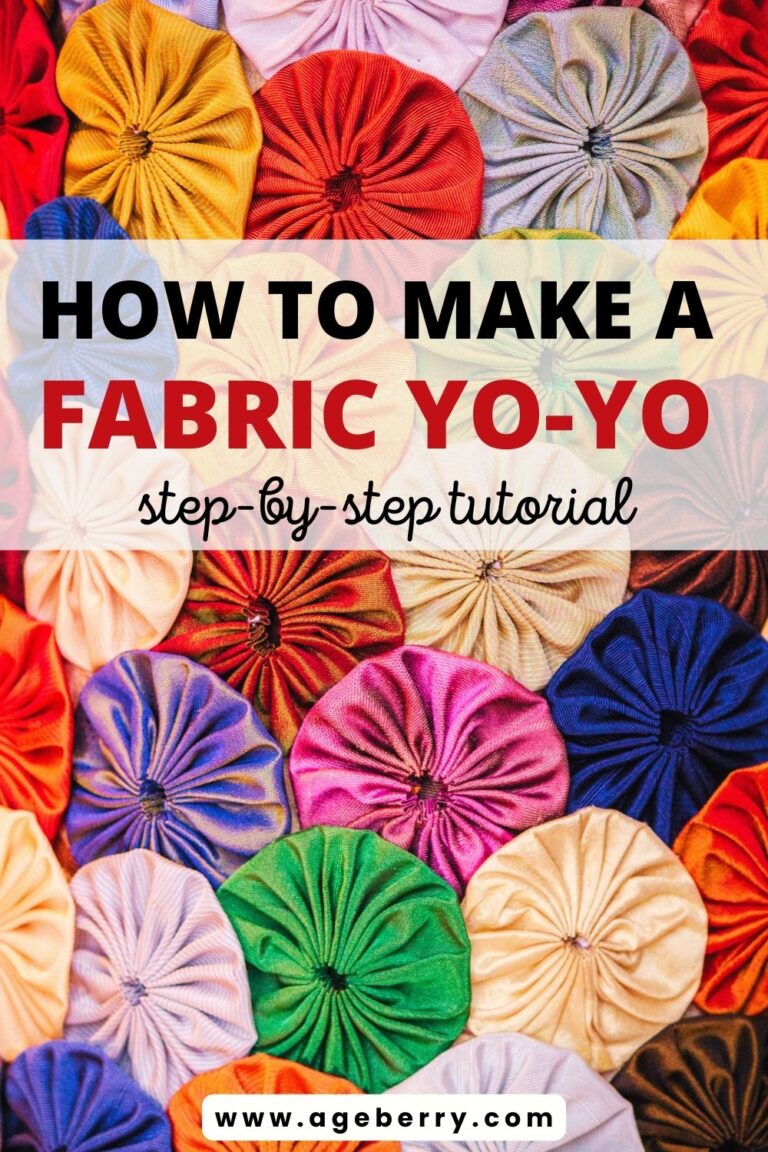
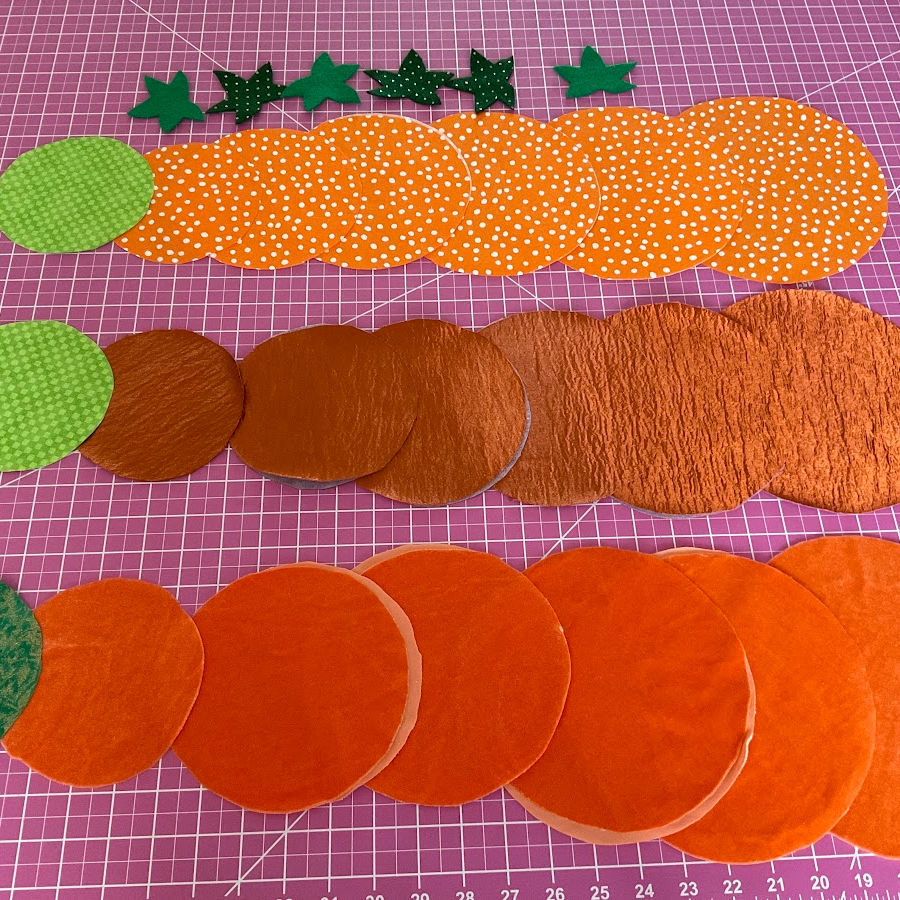
You don’t need special templates to draw neat circles for sewing projects. A mug, bowl, lid, or plate from your kitchen can do the job just as well. These everyday items come in all sizes and have smooth edges that make tracing easy. Keep a few on hand in your sewing space so you always have a quick way to draw curved corners, bag bottoms, or appliqué shapes. It’s simple, accurate, and saves time.
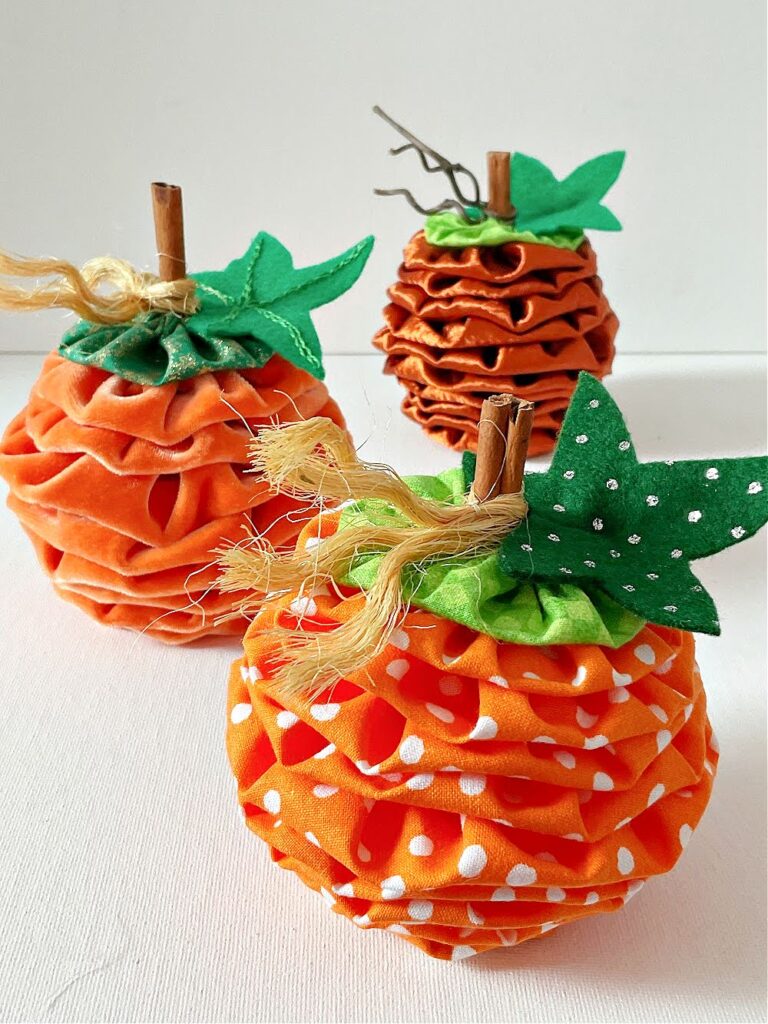
This method is especially helpful when you need to trace a lot of circles at once. If you’re sewing fabric yo-yos, for example—as I did recently to make some decorative pumpkins—you might need dozens of circles in different sizes. I used my Cricut machine to cut them, but plates and mugs would have done the trick just as easily.
You can see the full process in my tutorial: DIY Fabric Yoyo Pumpkins: Step-by-step Sewing Tutorial.
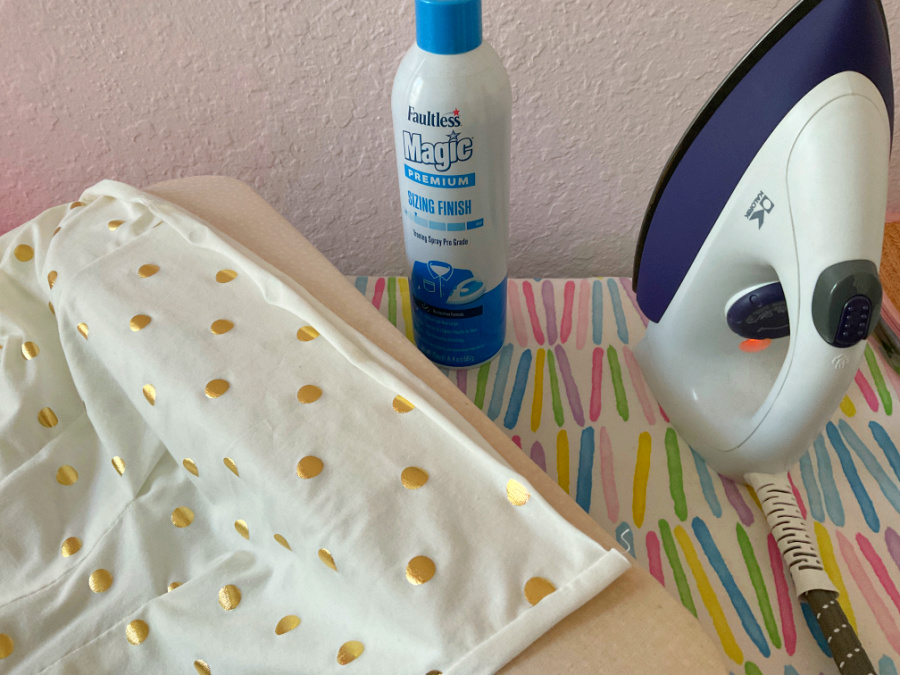
23. Stop Knit Edges from Curling with Ironing Spray
Knits that curl at the edges are tricky to work with. A quick mist of ironing spray along the edge helps relax the fabric and flatten it out. Once pressed, the edge stays smoother, so it’s much easier to cut, pin, and sew. This is especially useful for narrow hems or when adding binding to stretchy fabrics.
You can read more about this technique in my tutorial: How To Cut Knit Fabric: Ultimate Guide.


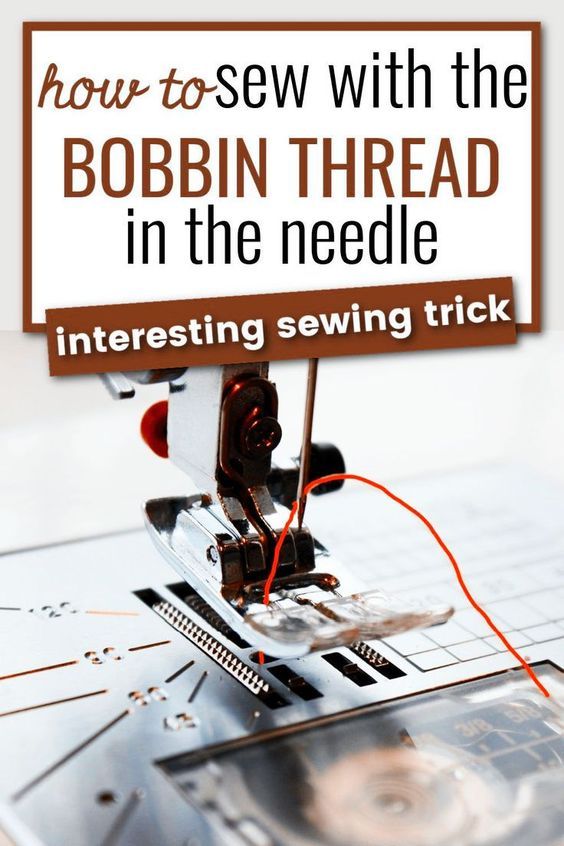
24. Use the Bobbin Thread Alone for Sheer and Delicate Fabrics
When working with sheer or delicate fabrics, visible thread tails can be a problem—especially at the start of seams. One solution is to sew using only the bobbin thread. Instead of threading the machine as usual, pull the thread directly from the bobbin and bring it up through the needle. The machine will still sew a straight stitch, but without leaving a top thread tail. This little trick gives you a clean, neat start on lightweight fabrics.
Want to see it in action? Take a look at my full tutorial: How to Sew Sheer Fabric Using Only the Bobbin Thread for Stitching.
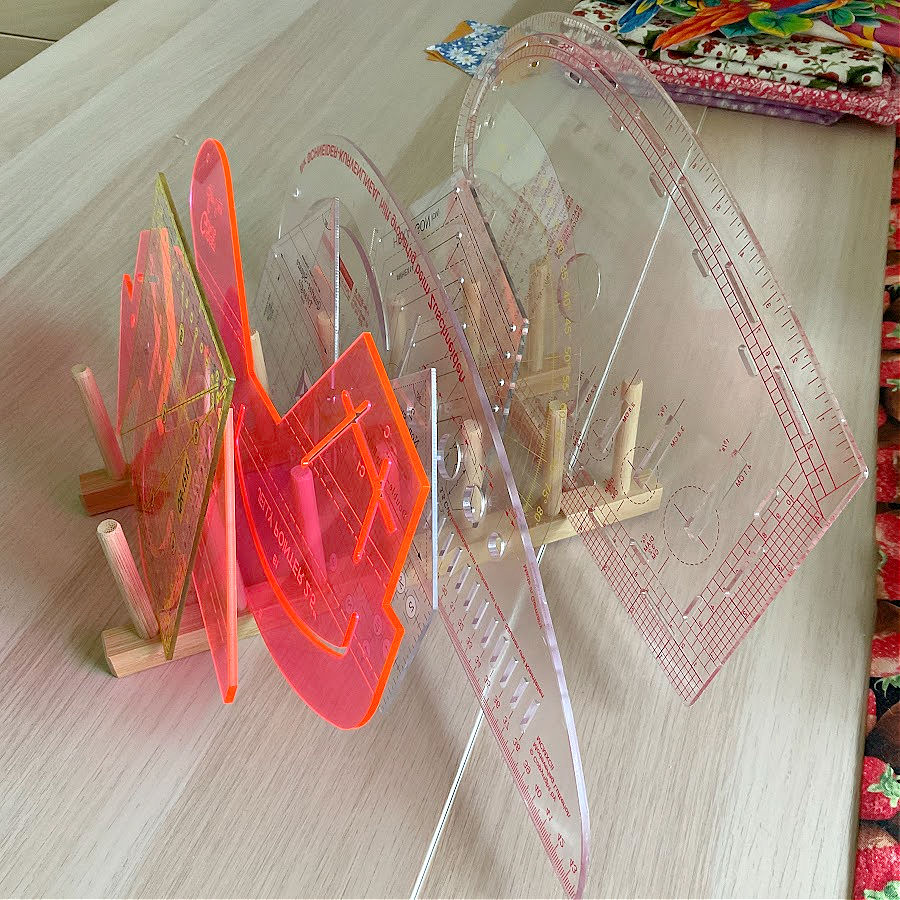
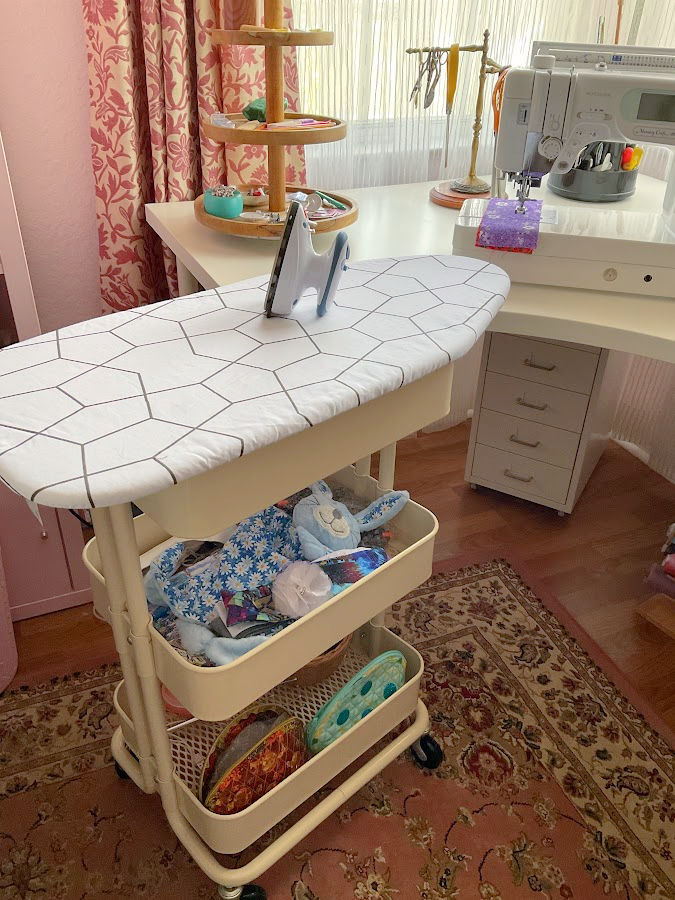
25. Turn IKEA Items into Sewing Room Helpers
Many IKEA finds can be cleverly reused to improve your sewing space.
For example, a pot lid holder works perfectly as a vertical stand for quilting rulers. It keeps them upright, visible, and easy to reach.
A three-tier rolling cart is easy to turn into a portable ironing setup. Just add a small pressing mat on top, and you’ve got a handy surface right next to your machine. It keeps everything within reach and works well in tight sewing spaces.
A pegboard with the right accessories is a smart way to organize your sewing tools. You can hang scissors, thread spools, rotary cutters, and rulers so they’re easy to see and easy to grab—without cluttering up your workspace.
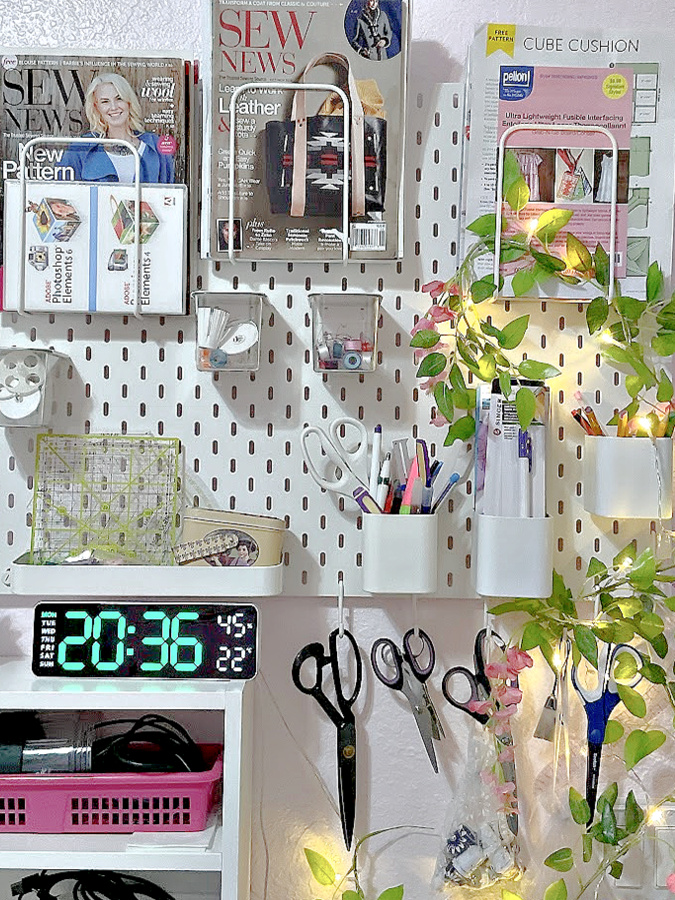
✅ Related tutorial: IKEA Sewing Room Ideas for small spaces
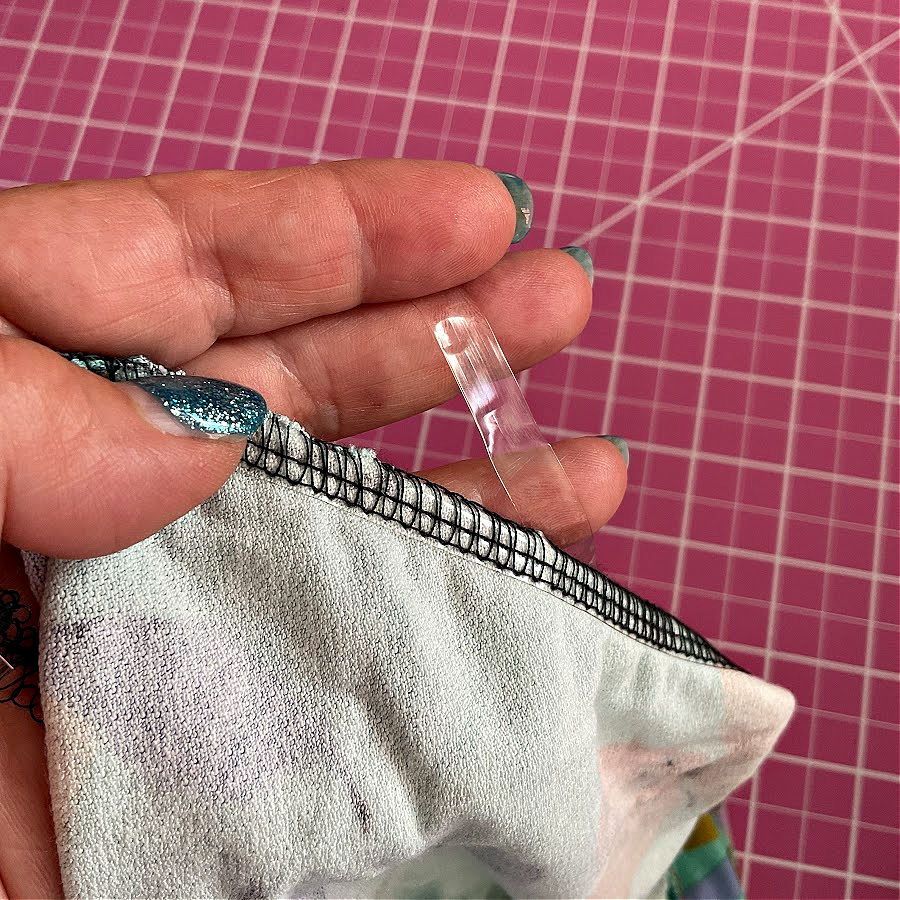
26. Reinforce Shoulder Seams with Clear Elastic
Clear elastic, commonly used in swimwear and activewear, works well for reinforcing shoulder seams in knit garments. Since knits can stretch out with wear, the shoulders are often the first place to sag. Sewing a narrow strip of clear elastic into the seam helps prevent that. It adds support without adding bulk, so your garment keeps its shape and fits better over time. Just stitch the elastic in as you sew the seam—it’s quick and makes a noticeable difference.

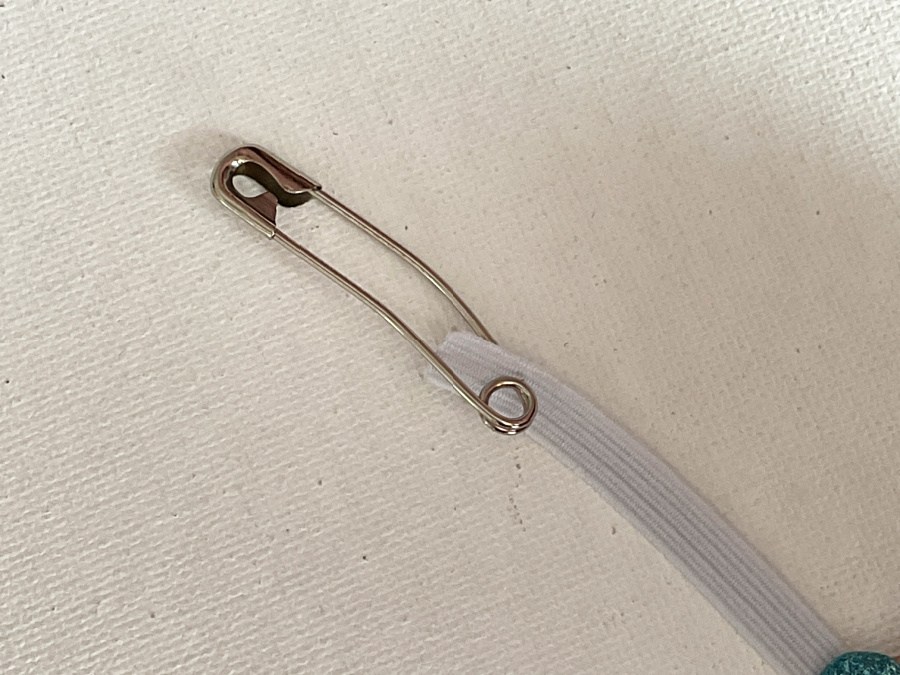
27. Pull Elastic Through Casings with a Safety Pin
Getting elastic through a waistband or casing is much easier with a safety pin. Just attach the pin to one end of the elastic, close it tightly, and guide it through the fabric tunnel. The pin gives you something sturdy to hold onto and makes it easier to push the elastic along. It’s a classic trick that saves time and frustration.
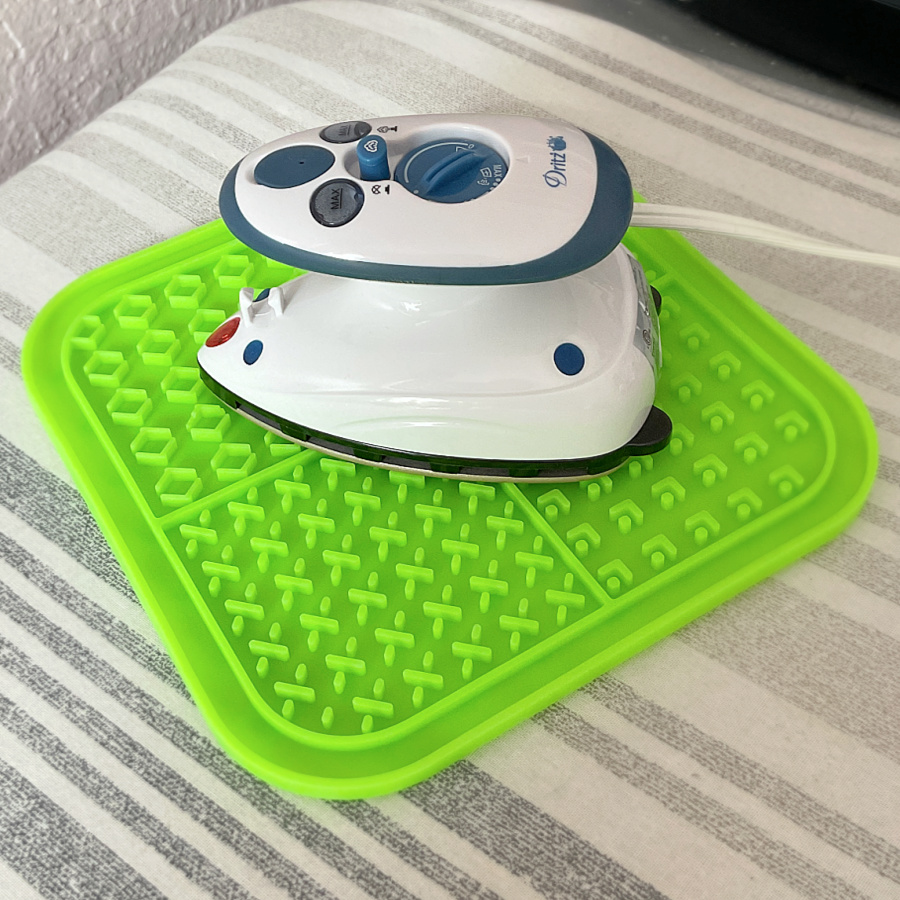
28. Use a Silicone Trivet as a Heat-Safe Iron Rest
A silicone trivet, usually found in the kitchen, makes a great resting spot for a hot iron. When you’re sewing small pieces like quilt blocks, appliqué, or narrow seams, place the trivet next to your machine and rest your mini iron on it between presses. This keeps the iron close at hand and saves trips back and forth to your ironing board. Silicone trivets are heat-resistant, non-slip, and easy to clean—ideal for keeping your workspace efficient and safe.
If you’re curious about mini irons, I go over several options in this article: Mini Irons for Sewing and Quilting.
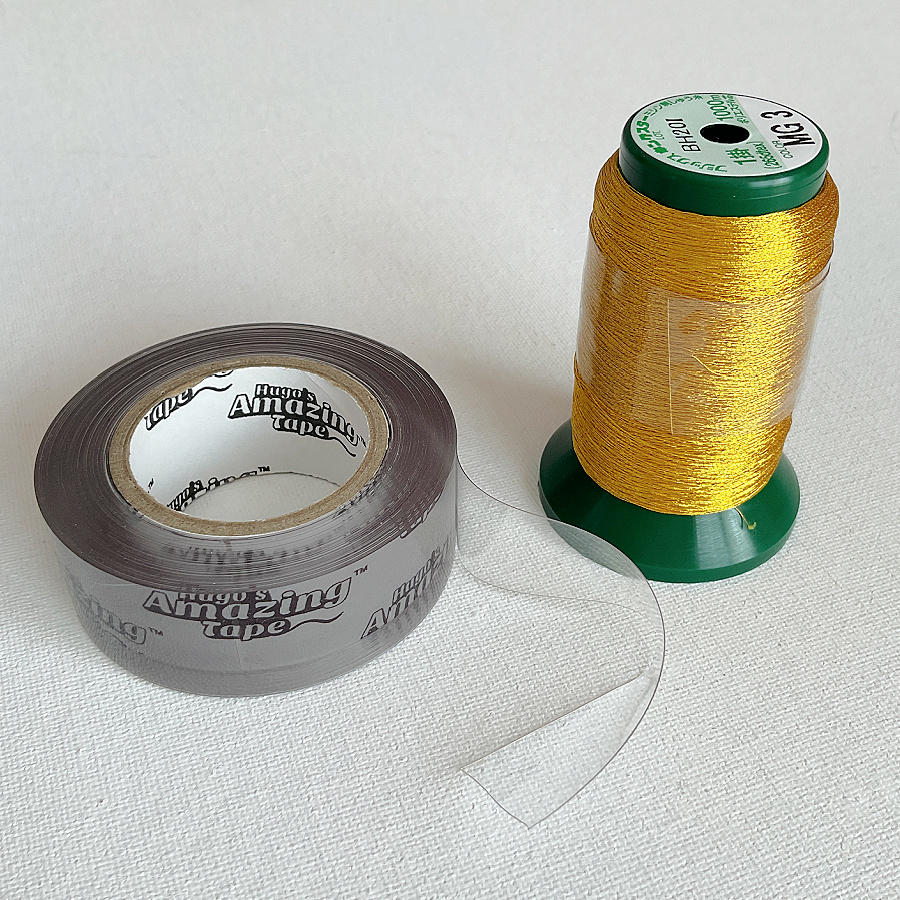
29. Wrap Spools with Hugo’s Amazing Tape
Hugo’s Amazing Tape is a clear, self-clinging tape that grips without glue. It’s perfect for keeping thread ends neat—just wrap it around the spool to stop unraveling.
Since it sticks to itself and not your materials, it won’t leave any residue or damage behind. It’s a great alternative to rubber bands, which can snap or dry out over time. You can also use it to bundle ribbon, cord, or trim that tends to come loose in storage.


30. Use a Magnetic Parts Tray to Keep Small Metal Tools Contained
This is one of those tools borrowed from the automotive world that works well in a sewing room.
A magnetic parts tray keeps screwdrivers, pins, needles, and small metal sewing machine parts in one place. If you accidentally knock it over, the contents usually stay put instead of scattering across the floor. It’s especially useful when cleaning a sewing machine, changing needles, or working with lots of pins during quilting.
I keep one on my table because tiny metal items have a talent for disappearing at exactly the wrong moment. A magnetic tray gives them a designated parking spot.

You can find these trays in automotive departments for just a few dollars, and they often hold more than sewing-specific magnetic pin dishes.
I hope you found these sewing hacks helpful. Save the pin below to your sewing board so you can easily find this tutorial again when you need it. You can also follow me on Pinterest for more sewing tips, tutorials, and creative ideas.
latest posts
- 30 Sewing Hacks That Turn Ordinary Items into Useful Sewing Tools
- Seam Allowances in Sewing Patterns: What They Are and How to Use Them
- What Do You Call a Person Who Sews? I Asked My Readers and Got 1,408 Opinions
- DIY Round Purse: PDF Sewing Pattern and Detailed Instructions
- Mini Wonder Clips By Clover: Useful Sewing Tool Or Just Another Notion?
- Non-Slip Grips For Quilting Rulers: A Small Notion With A Useful Job
- Fabric Eraser for Sewing: What It Removes and When to Use It
- What Is The Best Thread For Sewing Machine Projects? Let’s Find Out!
- Butterfly Quilt Block Tutorial – Foundation Paper Piecing