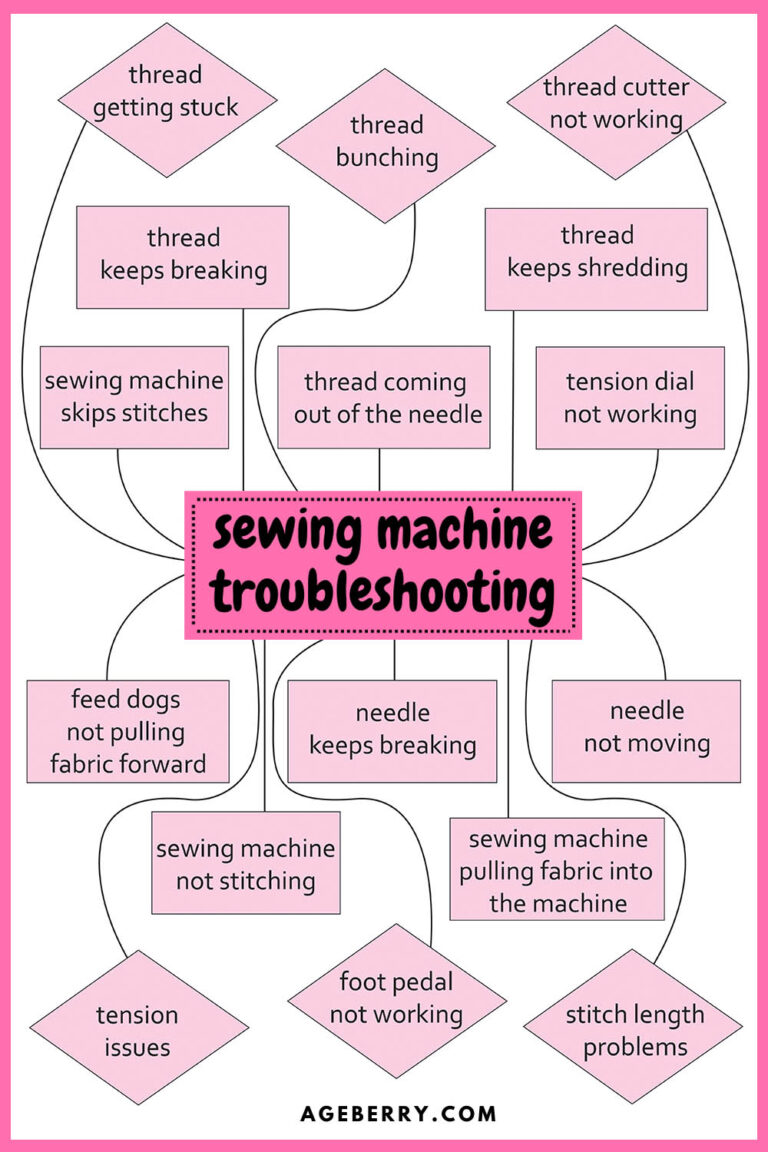
Basic Sewing Secrets Every Sewist Should Know (But Often Forgets)
There’s something comforting about the basics. They’re the quiet little tips we pick up, use a few times, and—more often than we’d like to admit—completely forget. Especially when we’re focused on fabric choices, new patterns, or the excitement of finishing a project, it’s easy to overlook the small things that actually make a difference.
This isn’t a list of advanced techniques or flashy shortcuts. These are the simple, practical sewing tips that often get skipped, ignored, or learned too late. Many of them don’t show up in sewing patterns or books. You usually pick them up by accident—by asking a friend, watching closely in a class, or making a mess and wondering what went wrong.
So I’ve gathered them here in one place. These “secrets” aren’t complicated. They’re just thoughtful habits that are easy to skip, but too useful to ignore.
If you’ve ever wondered why things sometimes go wrong—even when you follow the instructions—these might be the answers.
Note: Some of the links on this page are affiliate links. This means I will receive a commission if you order a product through one of my links. I only recommend products I believe in and use myself.
1. Use Guides to Sew Straight, Even Stitches
There’s nothing fancy about sewing a straight line, but it’s one of those things that feels harder than it looks. And if the stitching isn’t straight, you’ll notice. Especially after pressing.
What helps most is having something to follow.
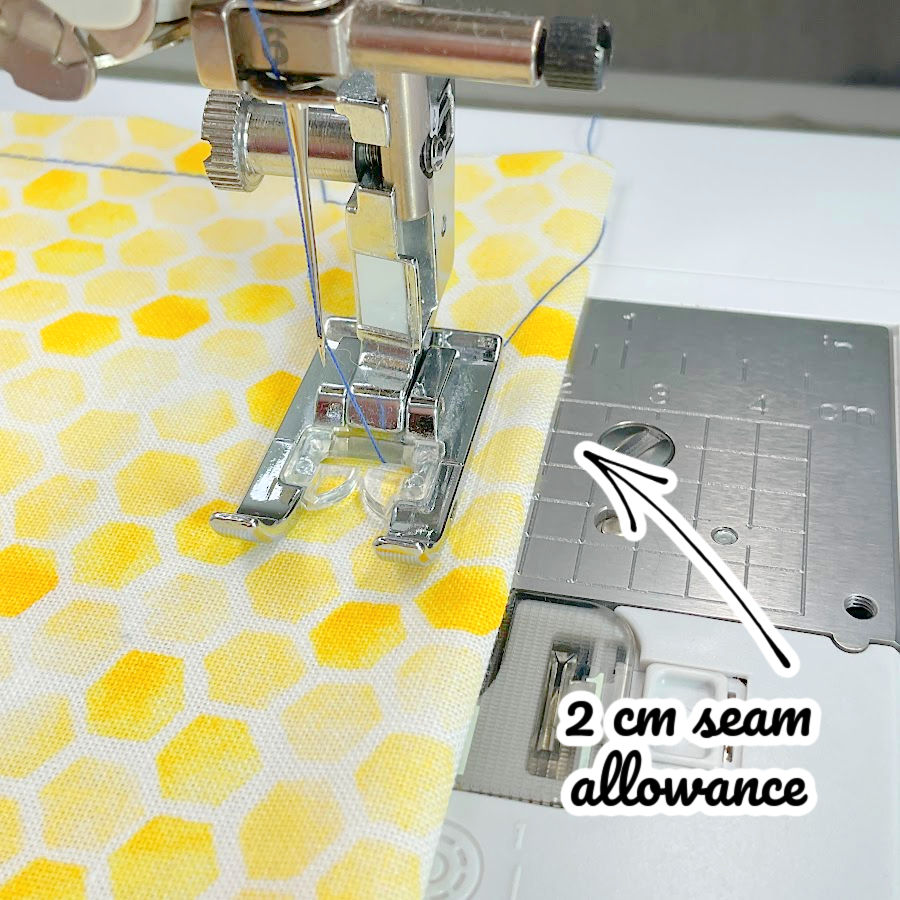
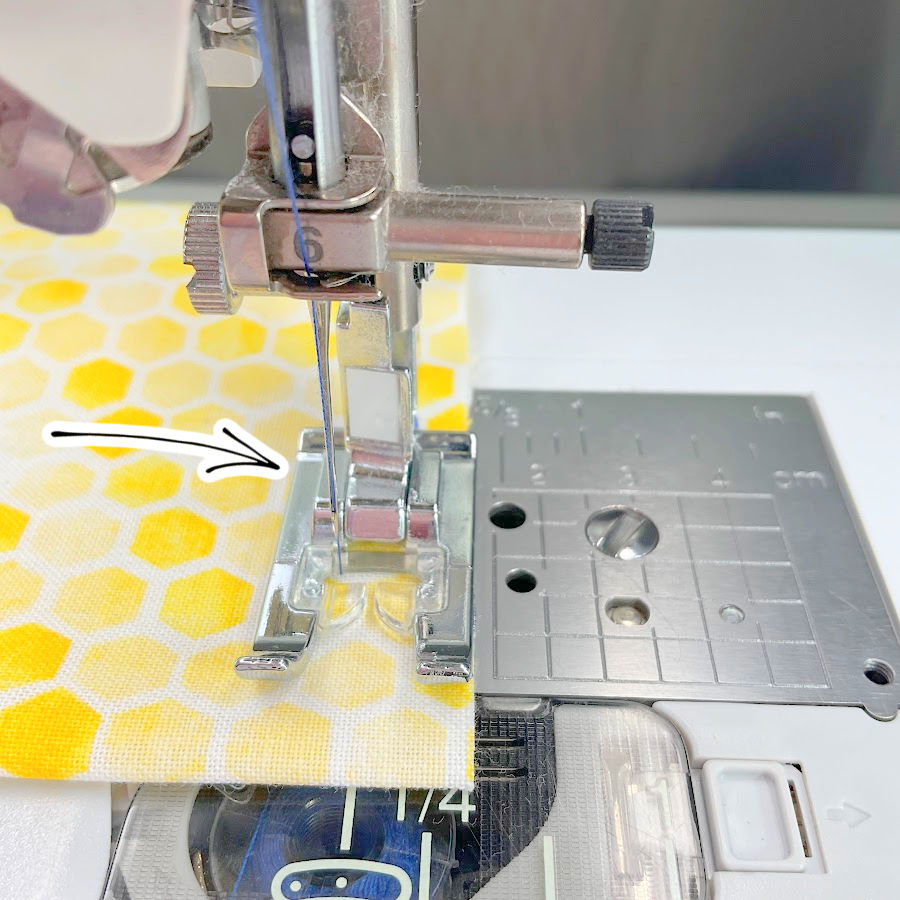
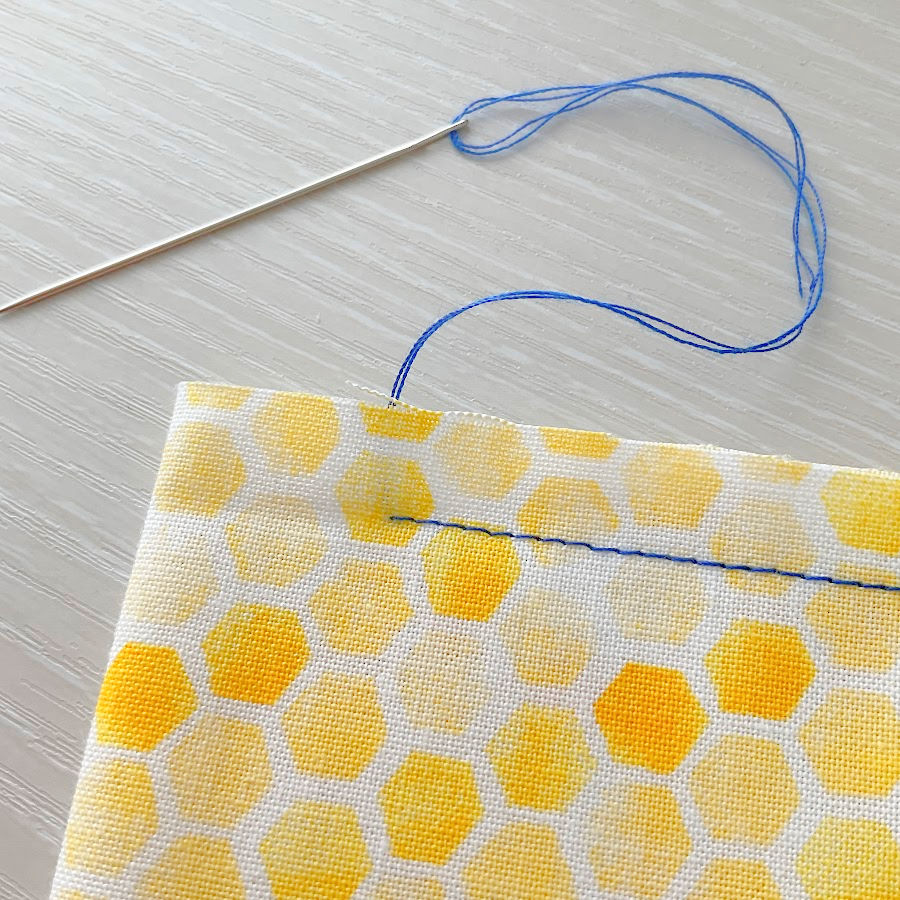
Most sewing machines have a metal plate under the needle – it’s called the throat plate, though you might also hear it called the needle plate or stitch plate. That’s where you’ll find a set of engraved lines just to the right of the needle.
Those lines aren’t just decoration. They’re measurement guides. Most show standard seam allowances – 10 mm, 15 mm, ¼ inch, ⅝ inch, and so on. Some machines have both millimeters and inches marked, which can be helpful if you work from patterns that use different systems.
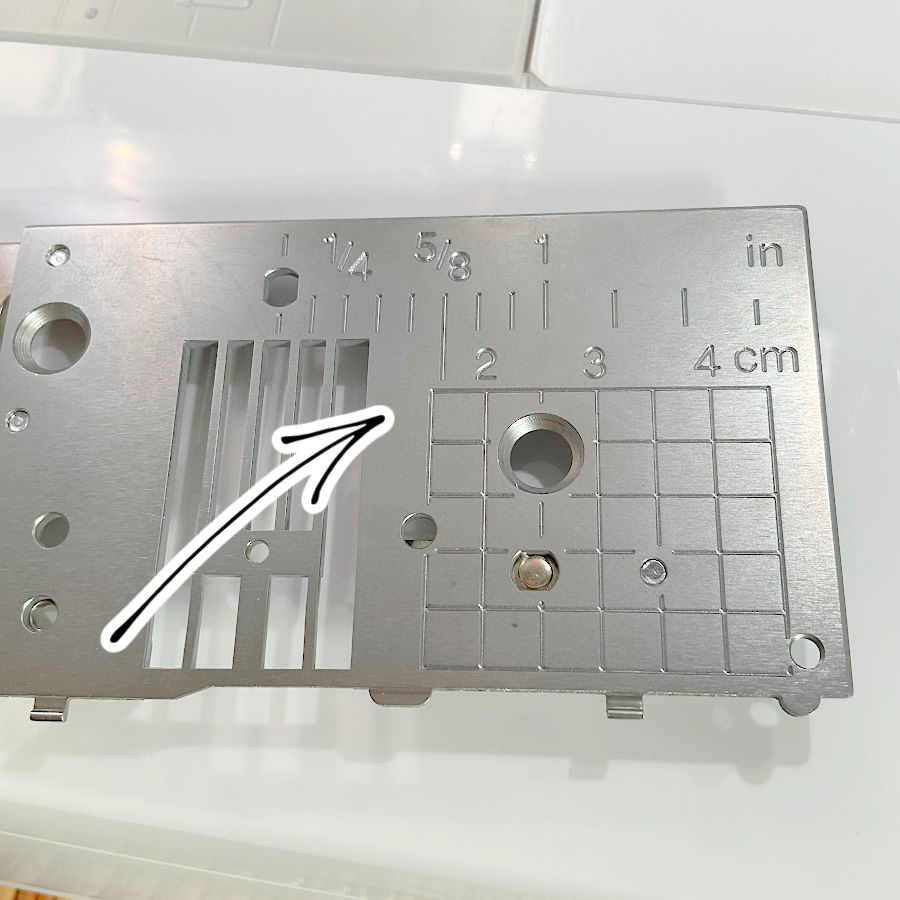
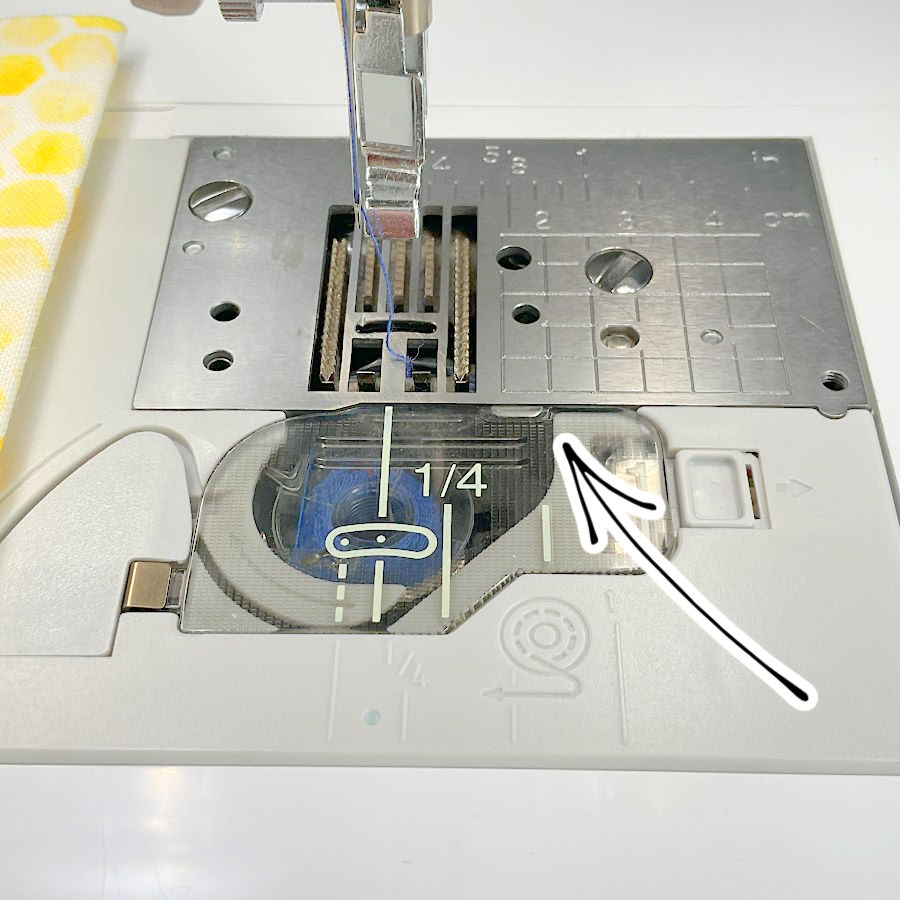
These marks are meant to help you sew straight, but only if you actually use them. The key is to line up the edge of your fabric with one of those engraved lines and keep it there as you sew. That becomes your guide – not the needle, not the presser foot, just the fabric against that line.
It’s something I check almost without thinking now. I glance at where the fabric touches the plate line before I lower the needle, and I keep my eye there as I sew.
You’ll get straighter results this way, and your seam allowance will stay consistent from start to finish.
Some machines even have grooves that extend out toward the front of the machine, which helps when you’re sewing longer seams. If your machine doesn’t, you can always place a strip of masking tape or washi tape on the machine bed to extend the line. It’s not fancy, but it works.
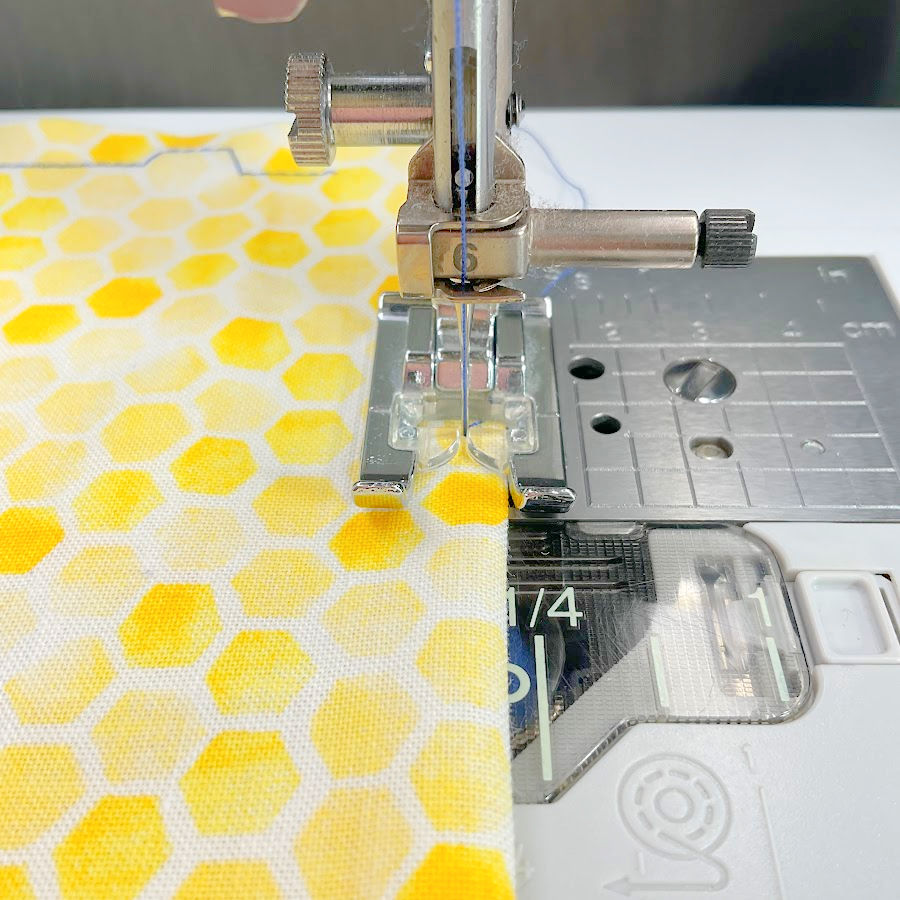
Sometimes I use a different method – I line up the edge of the fabric with the edge of the presser foot. That becomes my guide. I don’t watch the needle. I just keep my eye on that edge and sew at a steady pace. When the needle is centered and you use a zigzag presser foot, this gives a 1 cm seam allowance on most machines.
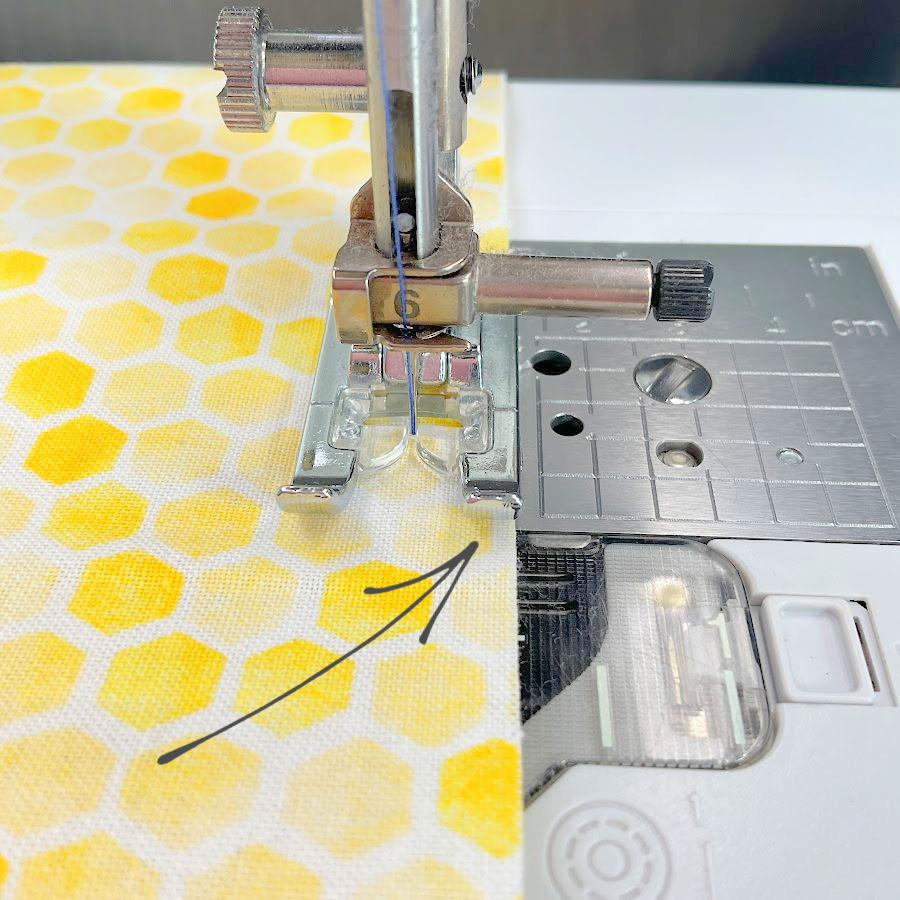
If I need a narrower seam, I move the needle slightly to the right from the central position.
For a wider seam, I move it left. It’s a small adjustment, but it gives more control without changing how I hold the fabric.
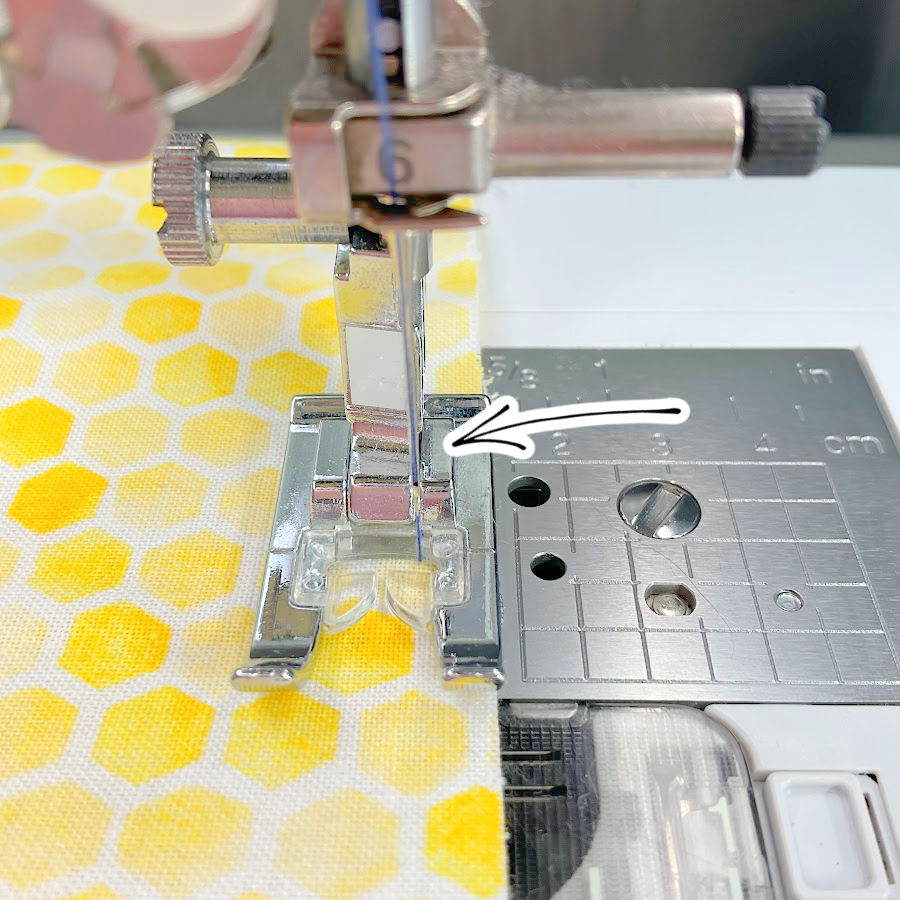
Sometimes I use the inner part of the foot instead of the full edge—there’s usually a small notch or line there that works just as well.
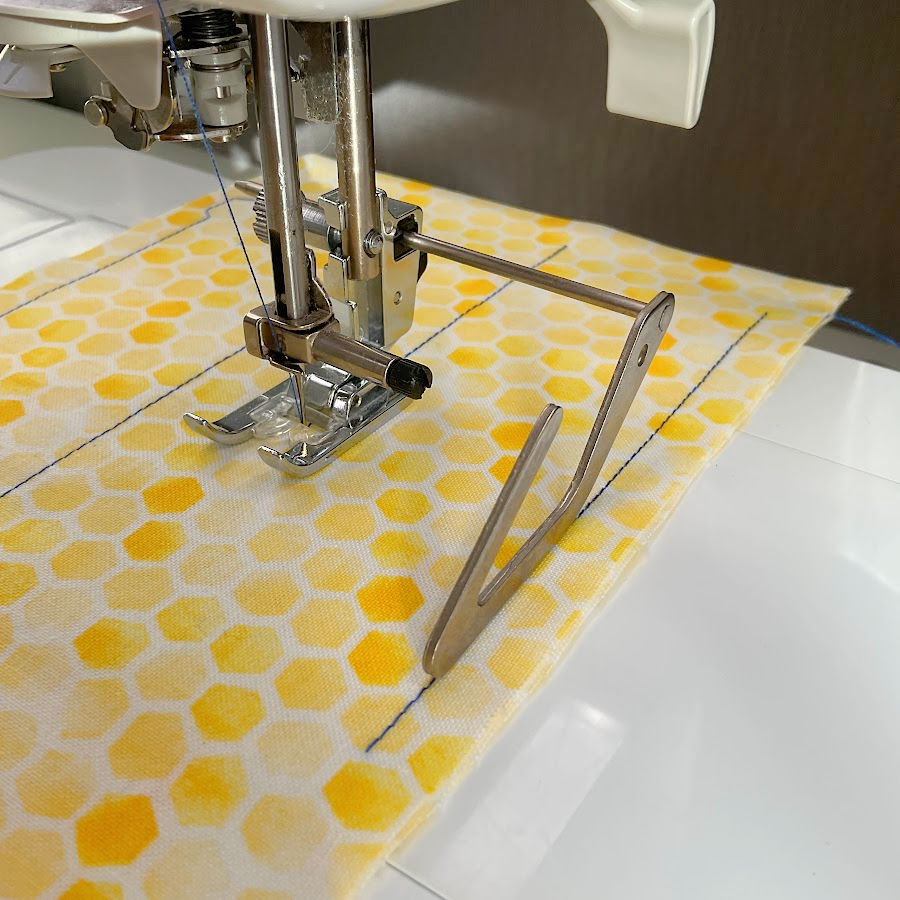
When I’m stitching somewhere in the middle of the fabric, without an edge to guide me, I like to use a quilting bar. It’s a simple little tool that attaches behind the presser foot and follows a previous seam or drawn line. It doesn’t look like much, but it keeps your rows straight and evenly spaced. I use it all the time for quilting and sewing hems.
And when the stitching really matters—like topstitching along a pocket or hem—I don’t rely on just my eyes. That’s where special presser feet and seam guides make a difference.
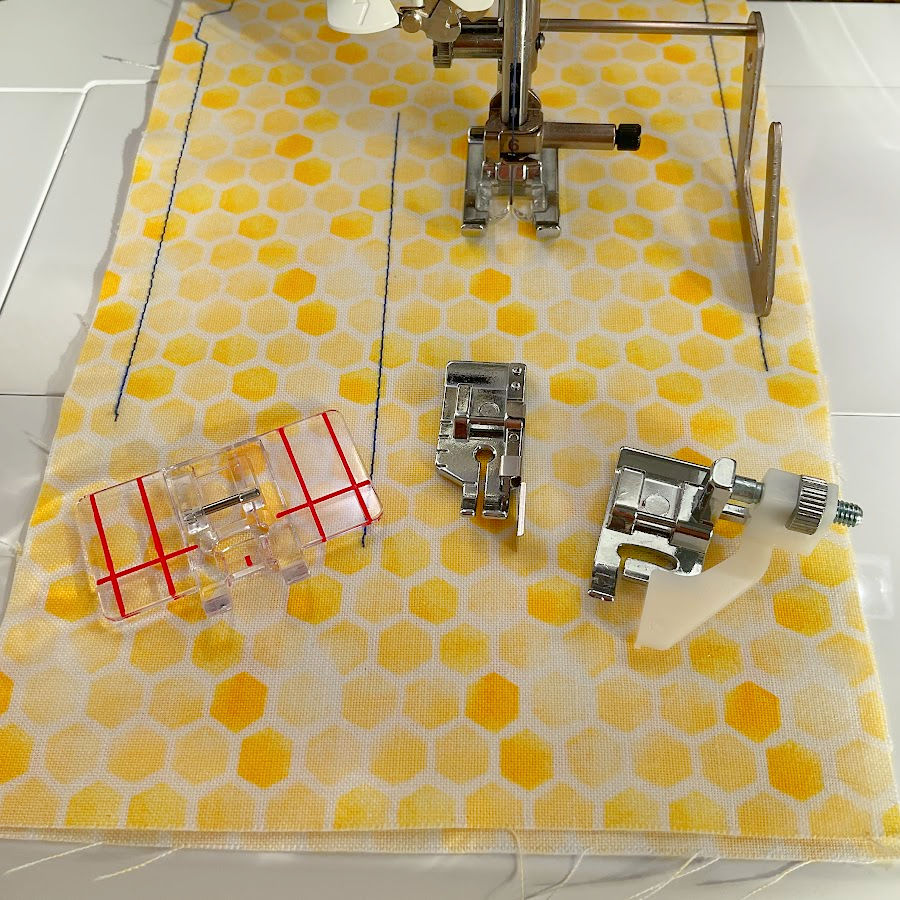
They give a cleaner result, especially when the seam will be seen.
I’ve written more about those in my articles
Seam Guide Tutorial: how to sew a straight line and keep seam allowances equal if you want to look into them.
Sewing straight doesn’t mean sewing slowly or holding your breath. It just means setting yourself up with a good reference and well… trusting your hands to follow it.


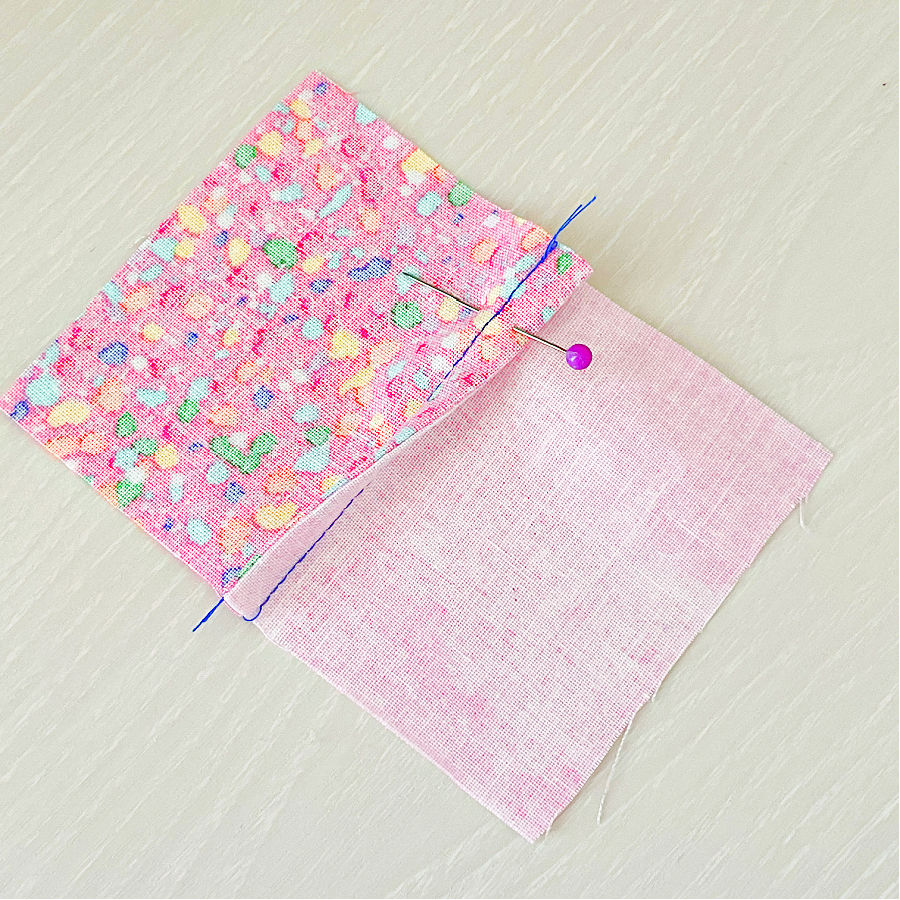
2. Use Sewing Pins Correctly
When I first learned to sew, I was taught to sew right over pins. And I did it for a while. But not anymore.
After breaking more needles than I care to count – and once having a pin jam so deep inside the machine it had to be pulled out with tweezers – I stopped. Sewing over pins can seem like a time-saver, but the risk isn’t worth it. Especially when you’re near a thick seam or going over uneven layers. That’s when things can shift, and the presser foot might tilt or slide just enough to throw everything off.
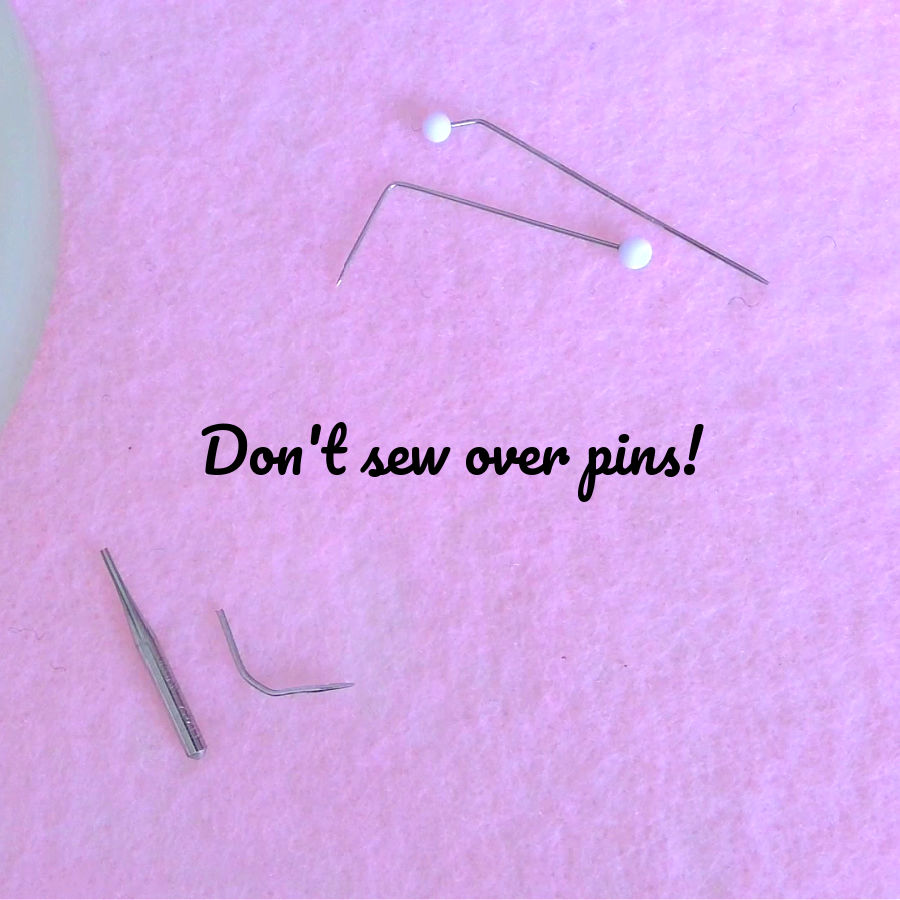
So now I always take pins out just before the needle reaches them. It keeps the seam smooth, the machine safe, and the needle intact.
And here’s something I wish I understood earlier. Back when I was learning to sew and pinning pattern pieces together, I could never figure out why one side of the seam always ended up longer than the other. It drove me crazy. I thought I was cutting wrong or tracing poorly.
But fabric isn’t paper. It stretches. It shifts. Especially if you’re working with lighter weaves or anything cut on the bias.
That’s why I now pin with intention. If I’m pinning two pieces – say, the front and back of a bodice – I always start with a pin at the beginning of the seam.
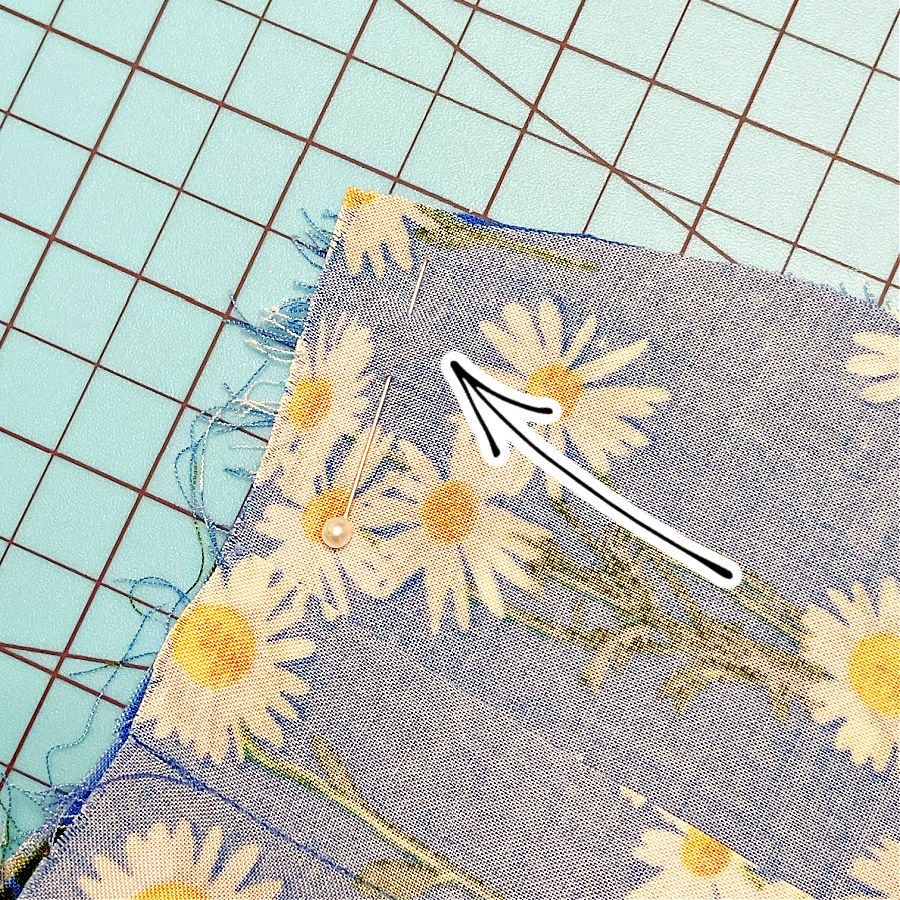
Then I place another pin at the end, making sure the raw edges match exactly.
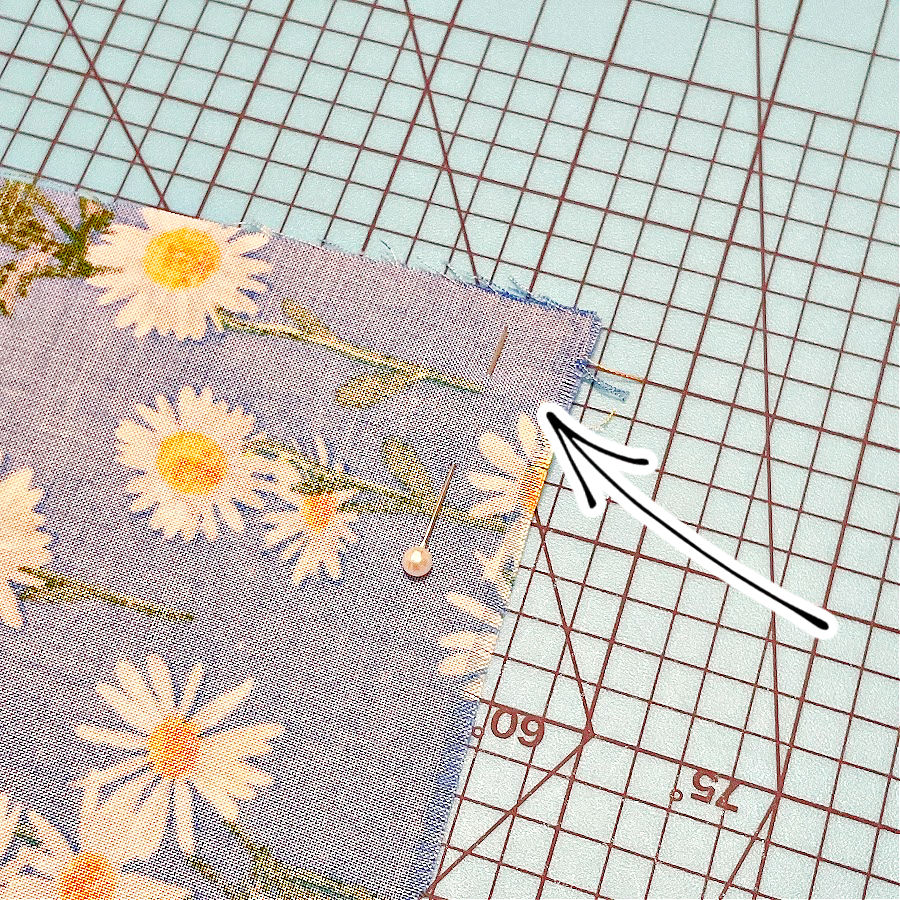
Only after that do I pin the middle. Then I fill in the rest, spacing pins evenly in between. This keeps the fabric from creeping or easing in without me noticing.
So, pinning if done well saves a lot of time and unpicking later.
You can read more about choosing and using pins in my tutorial Types of sewing pins and their uses: all you need to know about straight pins for sewing.


3. Learn Machine Basting
I almost always start by basting with pins or sewing clips. It’s quick, it holds well enough, and for most projects, it’s more than enough. The only exception is patchwork—sometimes those little fabric pieces behave better when you don’t pin them too much. But even then, not always.
When things get tricky—curves, corners, seams that just don’t want to stay in place—I baste with thread. I do it either by hand or on the machine, depending on the area. If it’s something especially fussy, I’ll baste by hand. But more often, I use the machine.
For machine basting, I set the stitch length to 5 mm and turn the tension almost to zero. That way the basting thread just sits lightly on the fabric, and I can pull it out easily when I’m done.
If possible, I try to place the basting stitch just a little—about 1 mm—to the left or right of the actual seam line. That makes it easier to remove later without disturbing the final seam. But it doesn’t always work out that cleanly. I usually baste in areas where the fabric isn’t behaving, so the stitch might wander a bit. That’s fine. Just take your time when removing the basting and be careful not to tug at the main seam underneath.
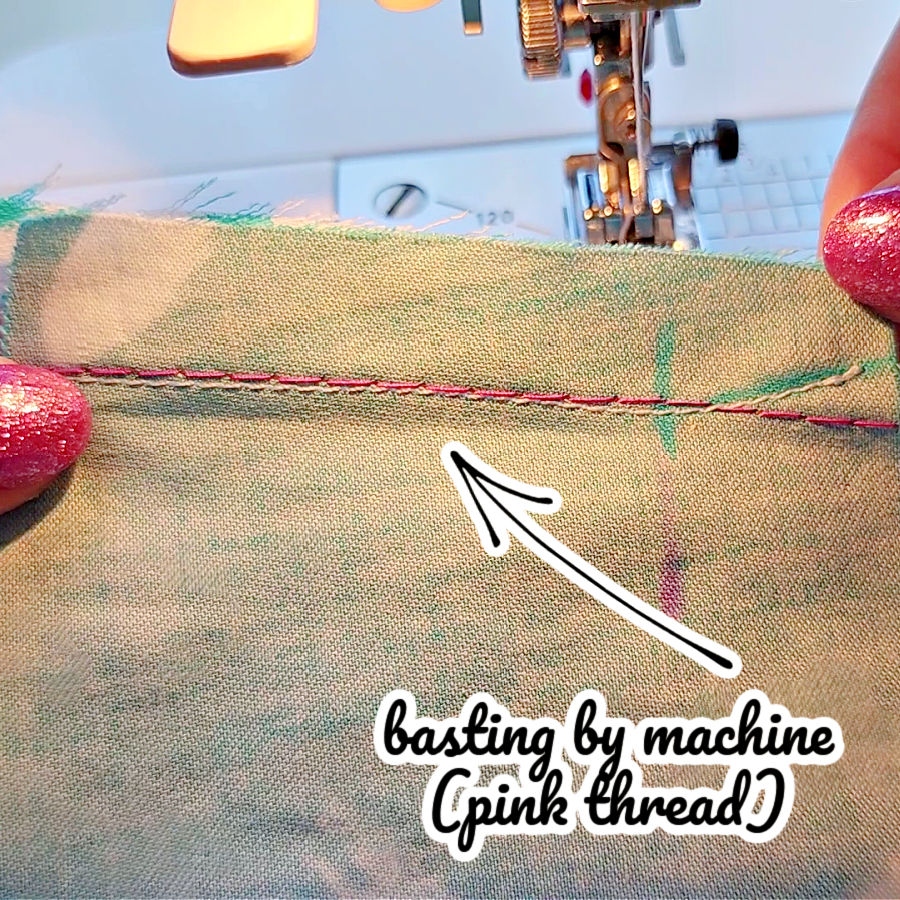
I also use pins before I baste with thread. Without that extra help, the lower layer can shift as you sew, especially on long seams or soft fabrics. Then you get to the end and realize the edges don’t match up. A few well-placed pins prevent that, and everything stays where it should.
Basting might seem like an extra step, but it gives you more control—and fewer surprises.
4. When to Use the Thread Cutter Button (and When Not To)
My machine has one of those little scissor buttons that cuts both the top and bobbin threads. I love it. It’s fast, it’s neat, and it saves so much time. I use it constantly.
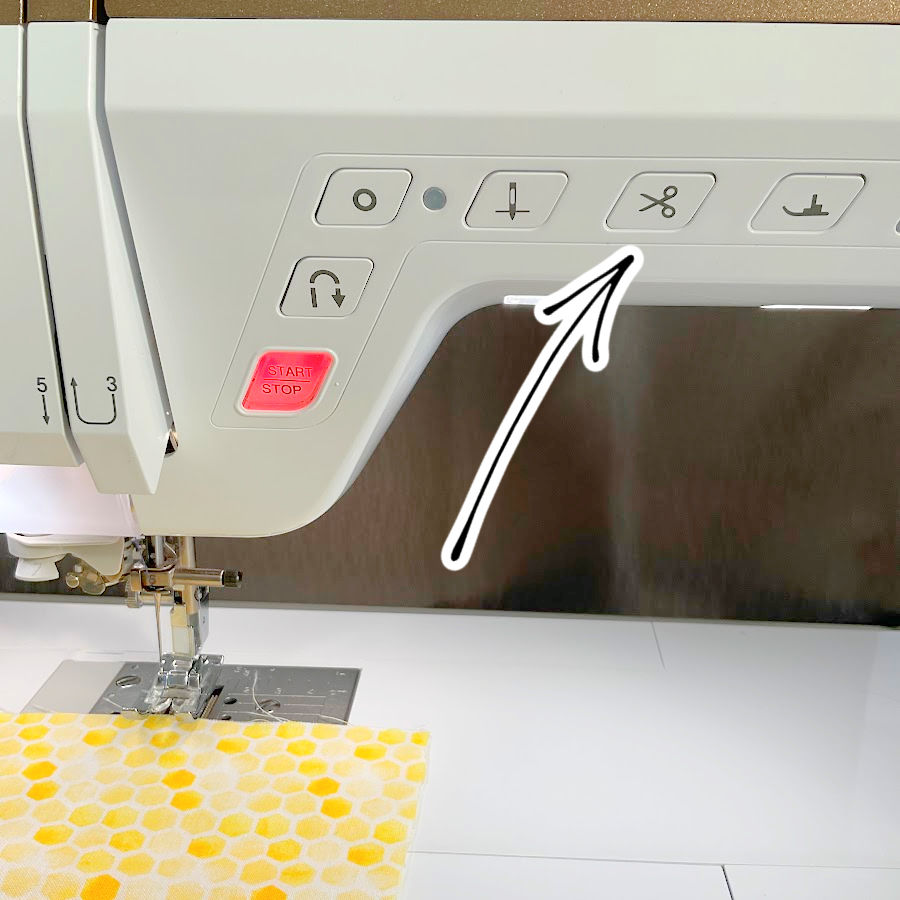
But there’s one thing I don’t like.
Almost every time I use the automatic thread cutter, and then start sewing again, I get a little thread nest on the underside of the fabric. Not always huge, but enough to cause problems—especially if that part of the seam is going to be visible.
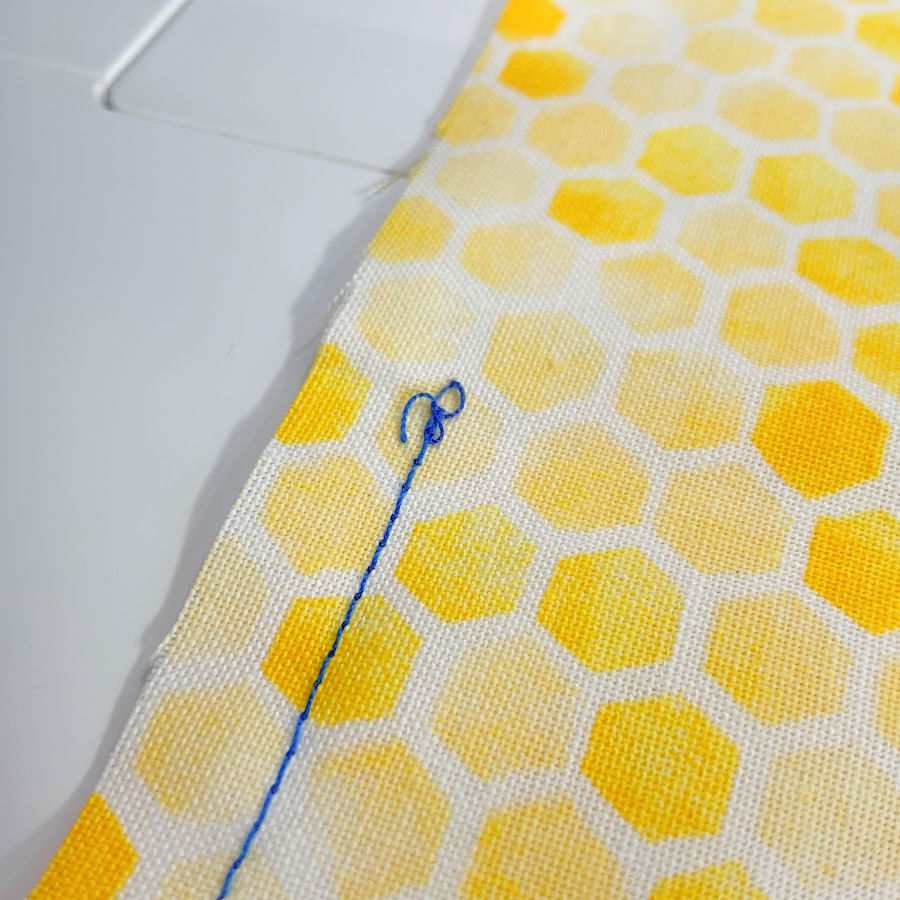
If that area will be hidden later—under a lining, inside a seam—I just keep going. It’s not worth fussing over. But if it’s a visible seam, like topstitching on a bag, or along the hem of a garment, then I take a few extra seconds to do it differently.
Here’s what helps:
- After cutting your last seam, don’t use the thread cutter button.
- Instead, leave a tail of thread and bring the bobbin thread to the top before you start sewing again.
- Hold the upper thread gently with one hand.
- Lower the needle, then raise it again.
- Lightly pull the top thread until the bobbin thread comes up through the fabric.
- Pull both threads toward the back of the machine.
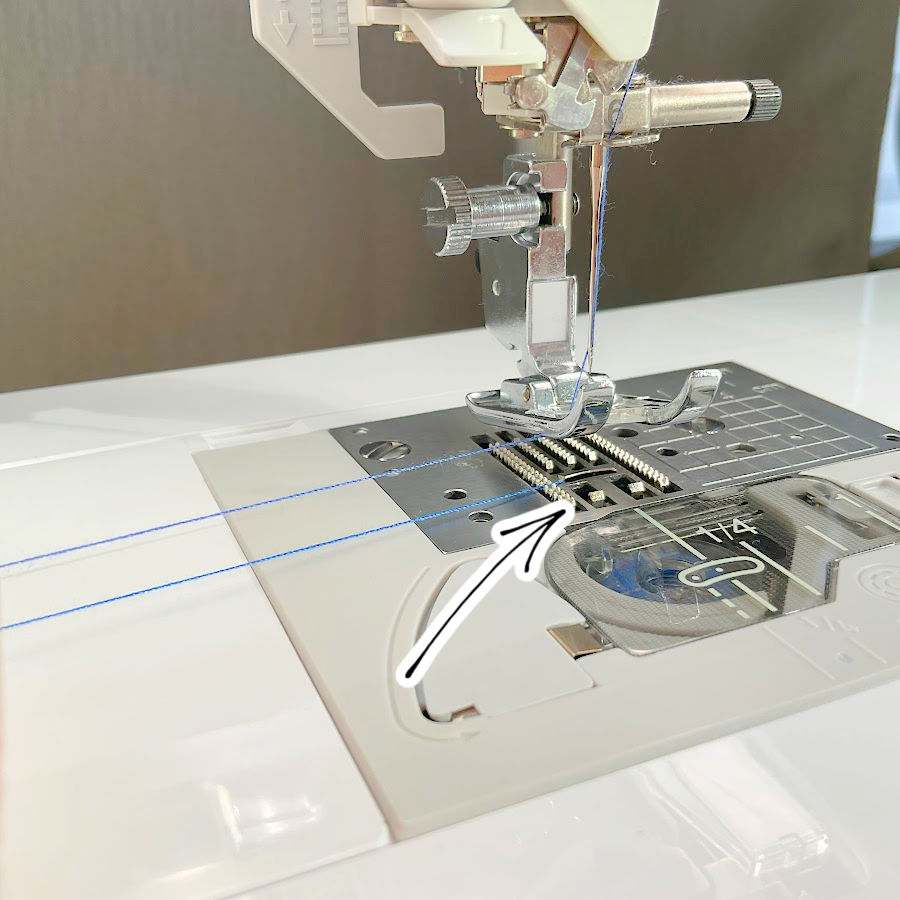
Once the threads are out of the way, start sewing as usual. You’ll get clean, smooth stitches with no tangles on the underside.
5. To Backstitch or Not?
At the beginning and end of a seam, most of us are taught to backstitch —two or three stitches forward, then the same in reverse.
But over time, I learned that backstitching isn’t always needed. And in some cases, it can actually cause more harm than good.
You don’t need to backstitch if another seam is going to cross over the one you just sewed. That perpendicular seam will hold everything together. A backstitch doesn’t add anything there. It just adds extra thread where it’s not needed.
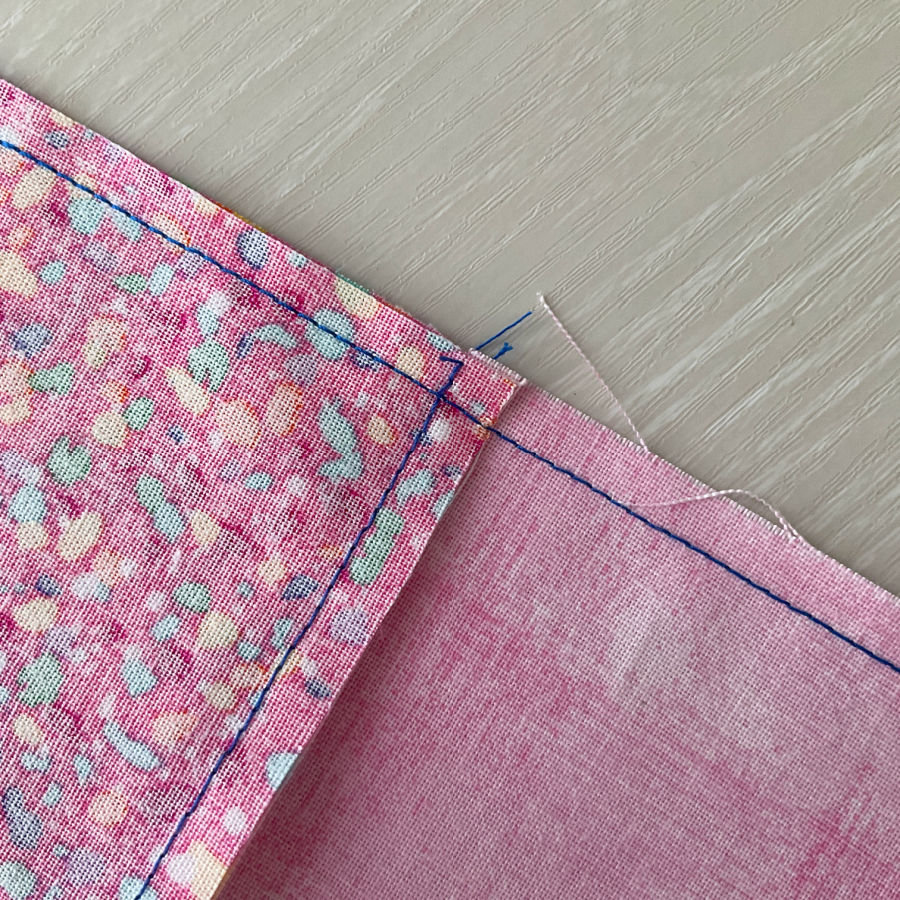
With sewing garments or bags, backstitching can sometimes create a thick bump at the beginning of the seam. Going back and forth like a jackhammer can bulk up seams and even distort delicate fabrics.
I’ll do this instead: I begin sewing about half an inch from the edge. I take two or three stitches backward to the start, then continue sewing forward. This gives the same result as a regular backstitch, but it avoids the lump that can happen right at the edge.
And if you’re sewing quilt blocks—especially ones that have seams that nest together—it’s best to skip the backstitch altogether. It adds bulk, and it stops the seam allowances from spreading or turning neatly in opposite directions. Nesting seams depend on those allowances moving easily, and a backstitch gets in the way.
So while backstitching is still useful, it’s not something I do by default anymore. It depends on what I’m sewing, and where that seam is going.
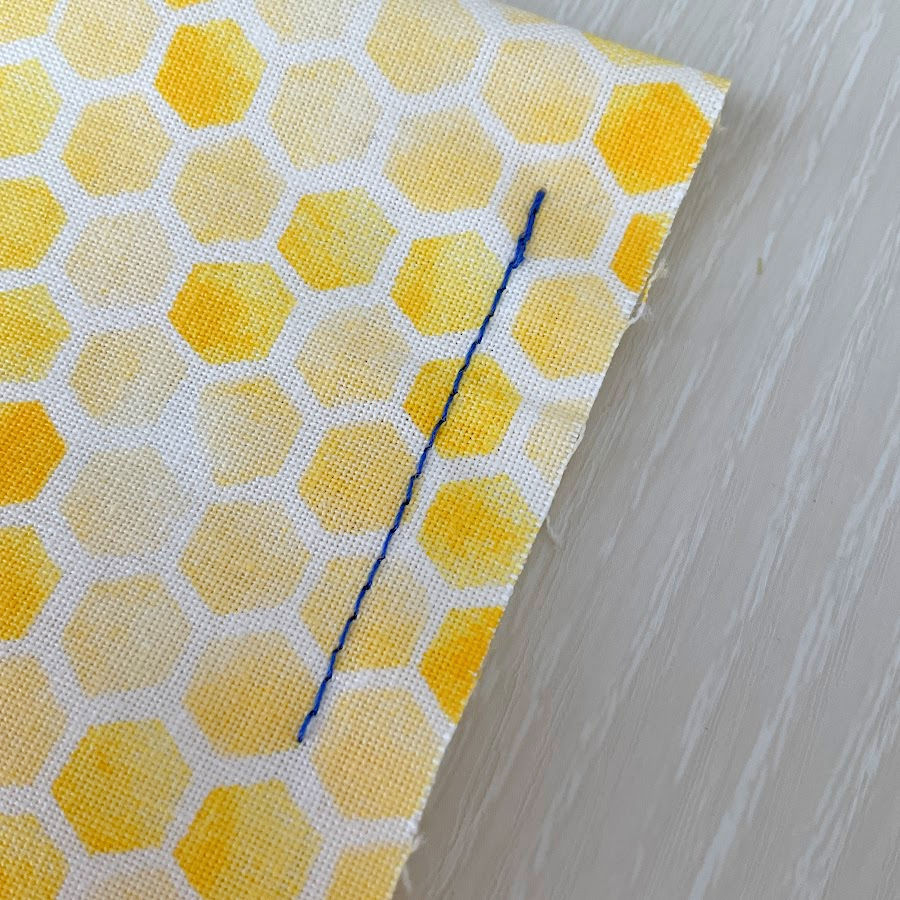
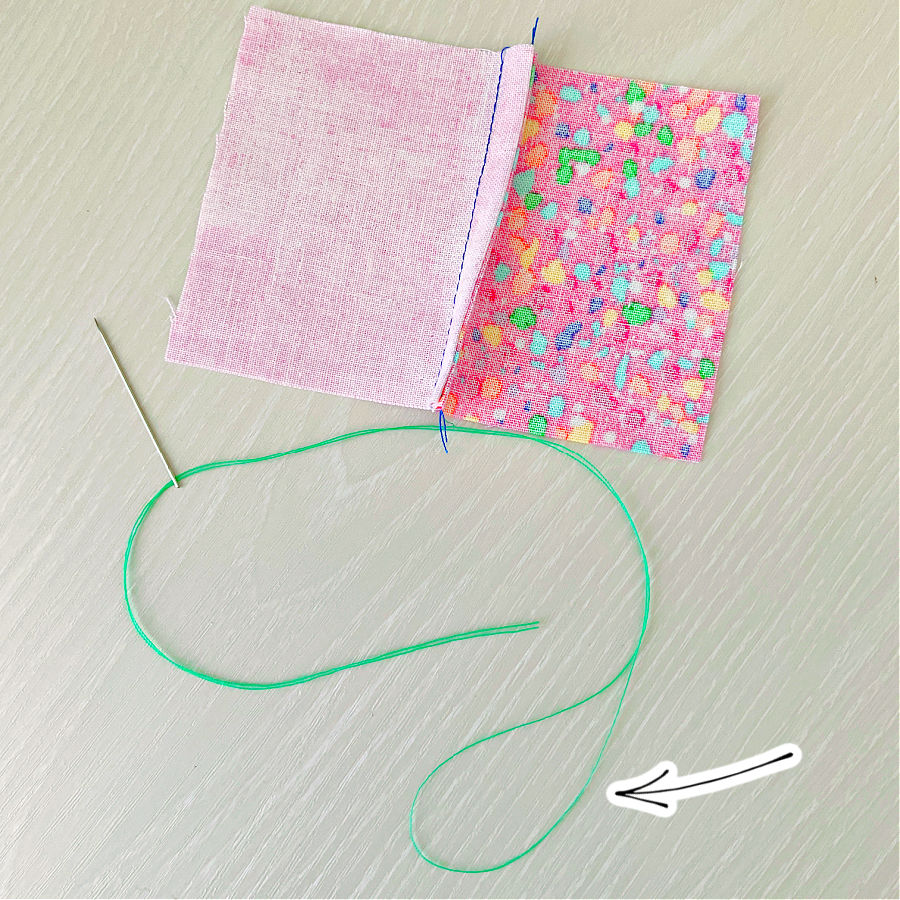
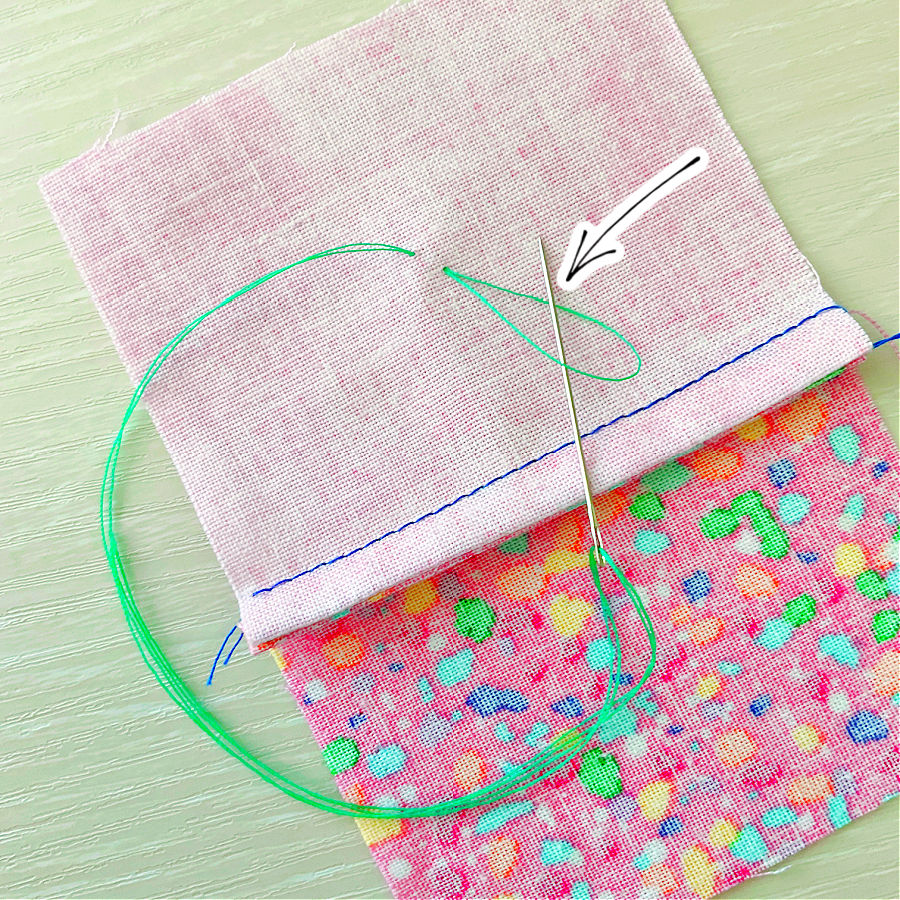
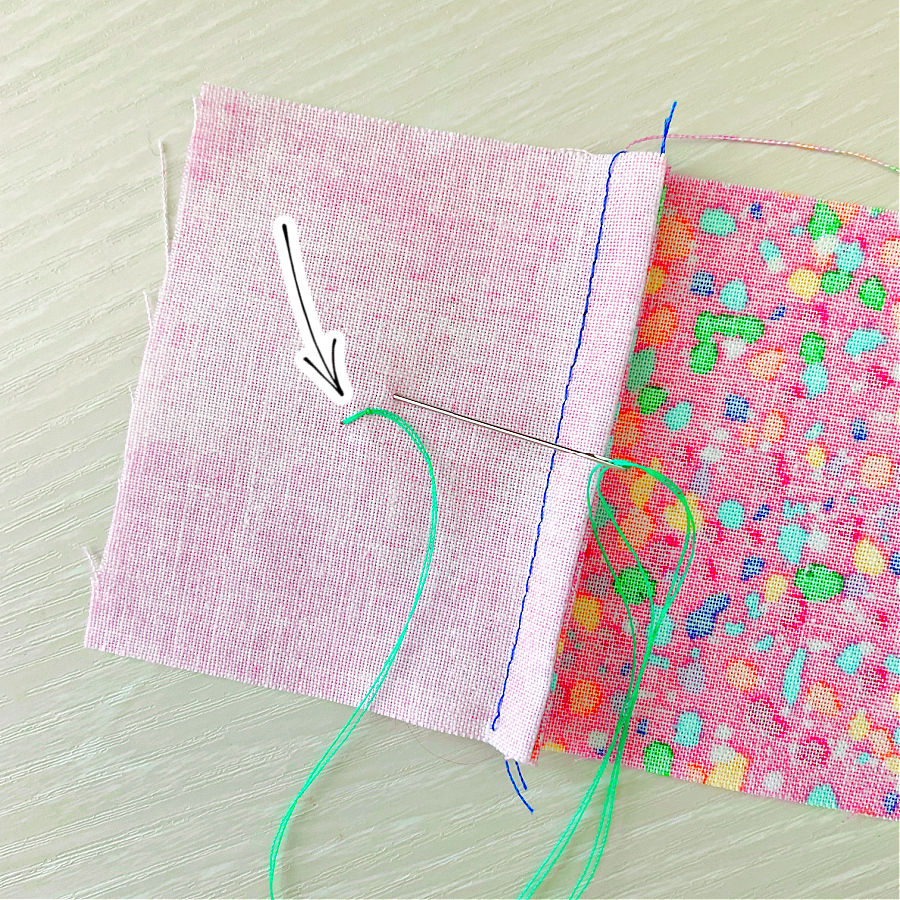
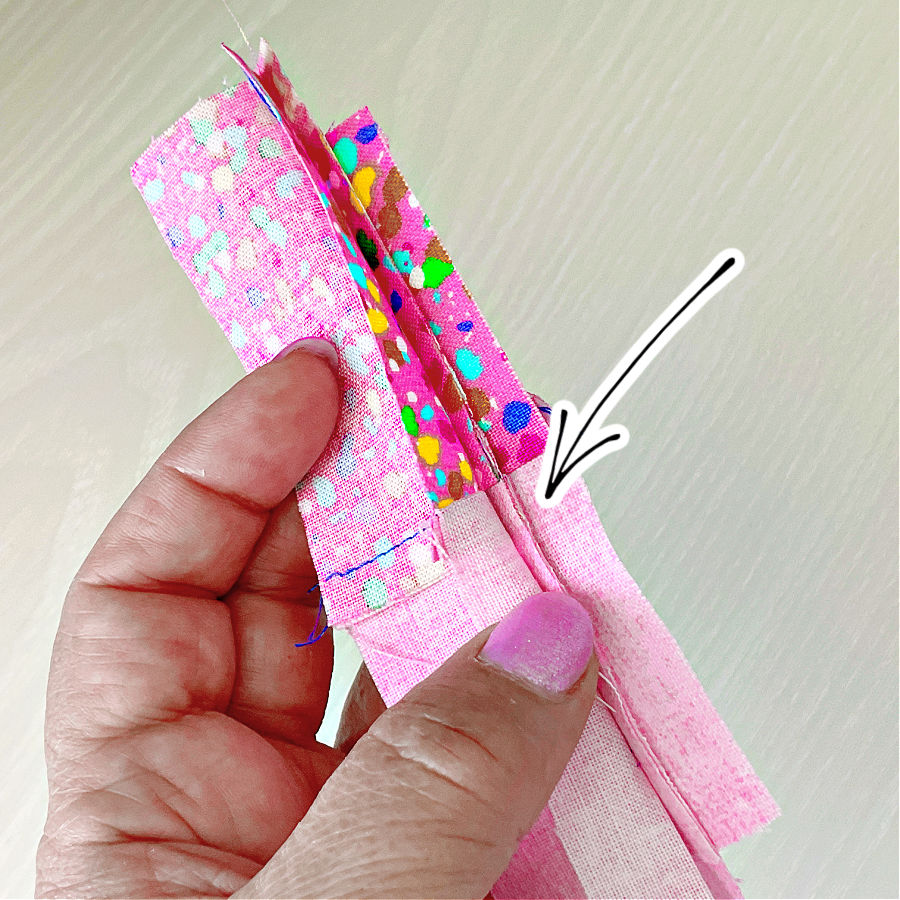
6. Hide Thread Tails
There are times when a backstitch just isn’t an option. Maybe the seam ends in a spot that’s going to be right in view—like the edge of visible topstitching. That extra bulk from reversing a few stitches would stand out more than you want it to.
In those cases, I secure the thread tails by hand.
Here’s how I do it.
First, I bring the upper thread to the wrong side of the fabric. I hold the bobbin thread and give it a gentle pull.
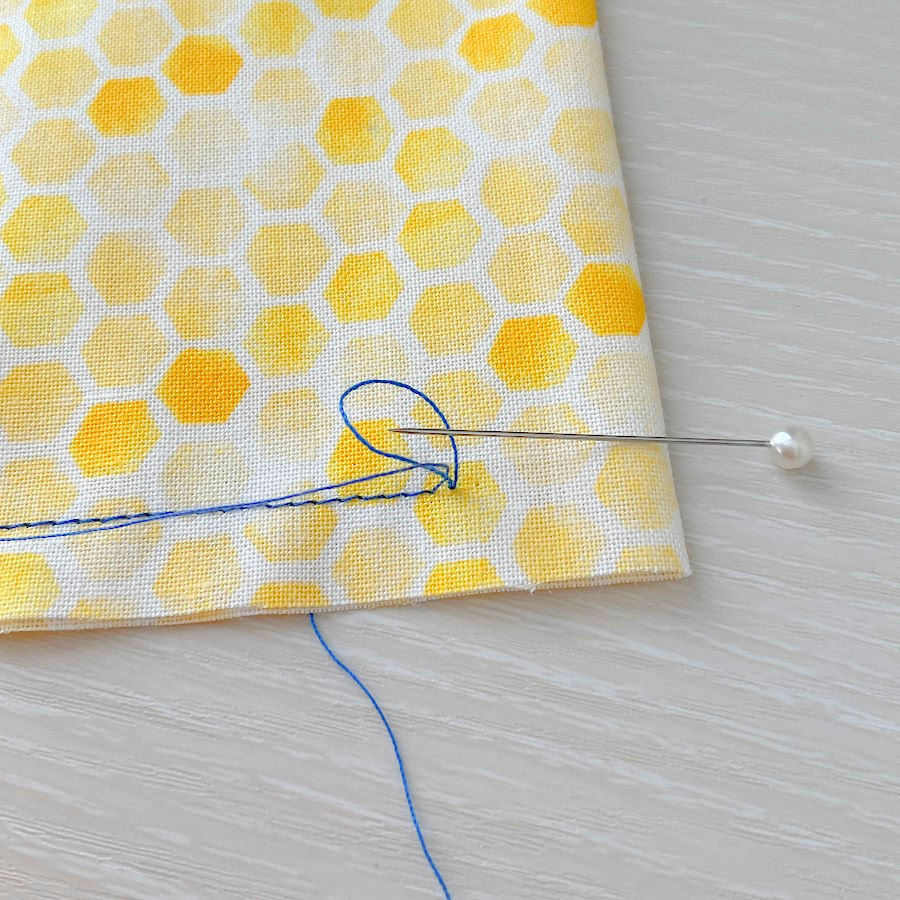
That brings the top thread down with it, so both threads are now underneath.
Then I tie a tight double knot with the two thread ends.
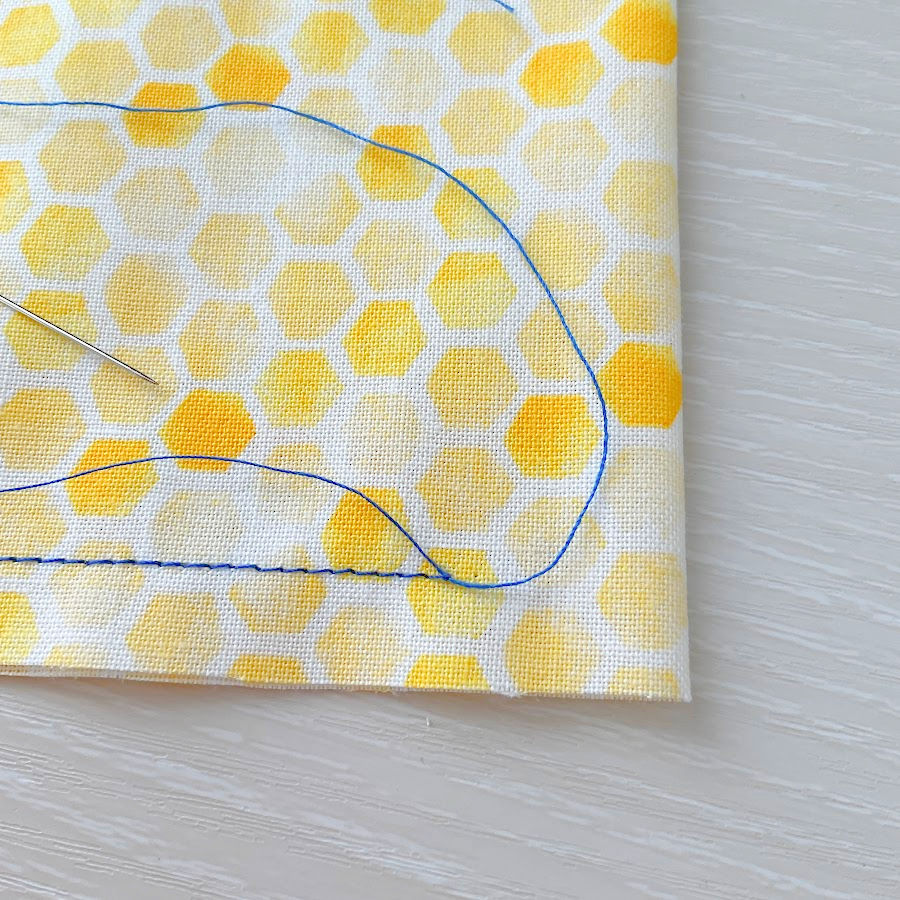
Next, I thread those tails onto a hand needle. If they’re too short to thread easily, I’ll insert the needle first, and then push the tails through the eye while it’s in place.
I insert the needle right at the point where the stitching ends and bring it out a little distance away, between the fabric layers. I’m careful not to poke through to the front or back—just through the middle.
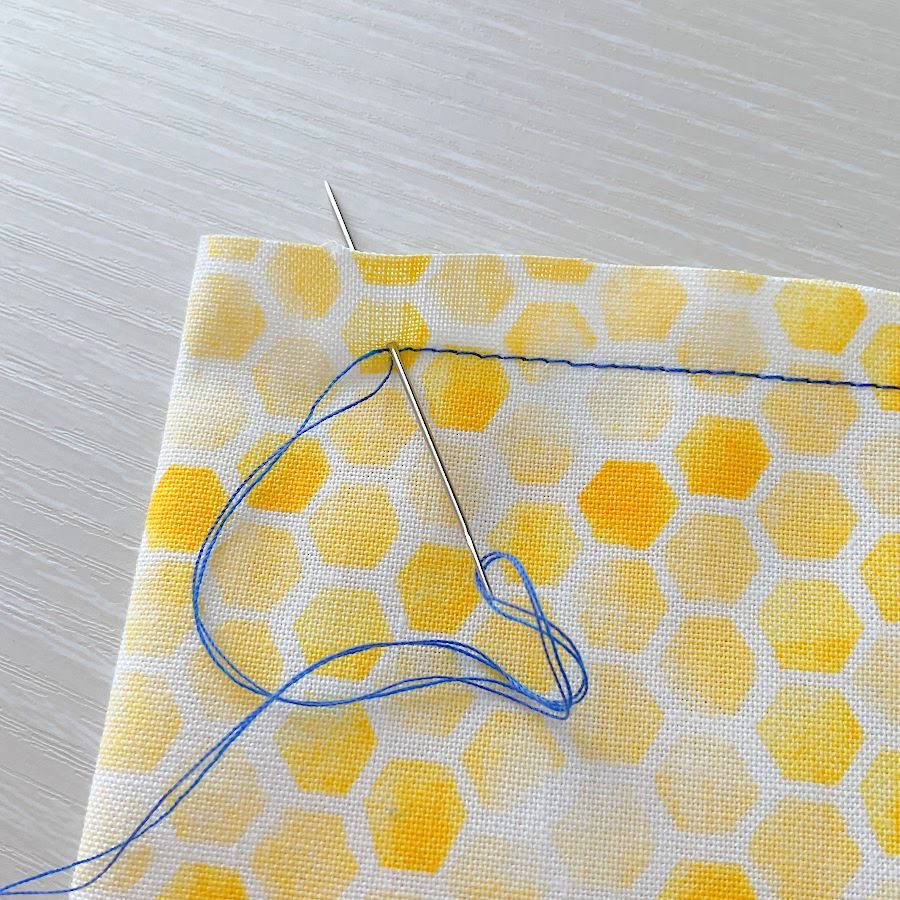
Once the thread is inside, I give it a small tug so the knot sinks into the layers and disappears. Then I trim off the tails (the image below is before the tails are trimmed of course).
No bumps. No knots showing. And nothing to unravel.
I also have a trick for when the thread tails are too short to tie off easily (it happens!). You’ll find it in my tutorial – Knot a Problem: Easy Ways to Secure Short Thread Ends
7. If the Machine Can’t Reach
There are places the sewing machine just can’t go. Tight corners, small openings, deep seams inside bags—no matter how much turning or shifting you try, the machine resists. And that’s fine.
When I run into one of those spots, I don’t try to force it. I just switch to hand stitching.
There’s no rule that says everything has to be done by machine. Sometimes a few quiet stitches by hand do the job better—cleaner, calmer, and without all the wrestling.
In these cases, I use a hand sewing stitch called backstitch. It’s a very simple stitch, but it’s strong. It creates a solid, continuous line of stitching, almost like what you’d get from a machine.
Here’s how it works:
- Bring the needle up through the fabric at your starting point.
- Take one stitch backward, then bring the needle up a short distance ahead.
- On the next stitch, go back again to the end of the previous one.
- Repeat. Each new stitch starts ahead but ends behind, overlapping the last.
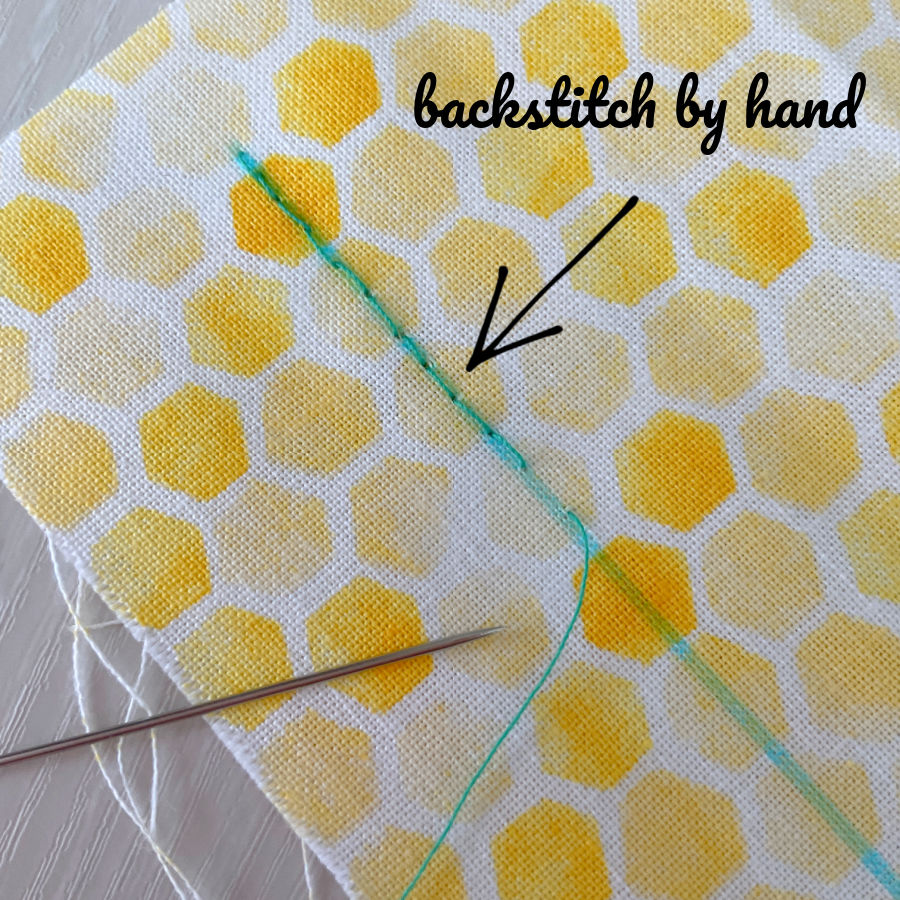
It’s much stronger than a simple running stitch and blends in well after pressing.
Also, I always mark the seam line before I begin. Even if it’s just a short one, it helps keep the stitches straight and in the right place. And I keep my thread length manageable—nothing too long that will twist or knot.
If the fabric layers are bulky, I use a thimble to press against the needle as I work.
There’s no need to force a machine to do something it wasn’t built for. A few quiet hand stitches can get you through the tight spots, and they often finish the job better than anything else.
8. To Overcast or Not?
This is one of those questions where the answer really depends on what you’re making—and what the inside of it will look like.
If the seam allowances are hidden under a lining, I usually don’t finish them at all. I don’t even use zigzag. There’s just no need. The only time I make an exception is when the fabric frays badly and the seam allowance is narrow. Then I’ll take a few minutes to secure it, just so it doesn’t unravel while I’m working.
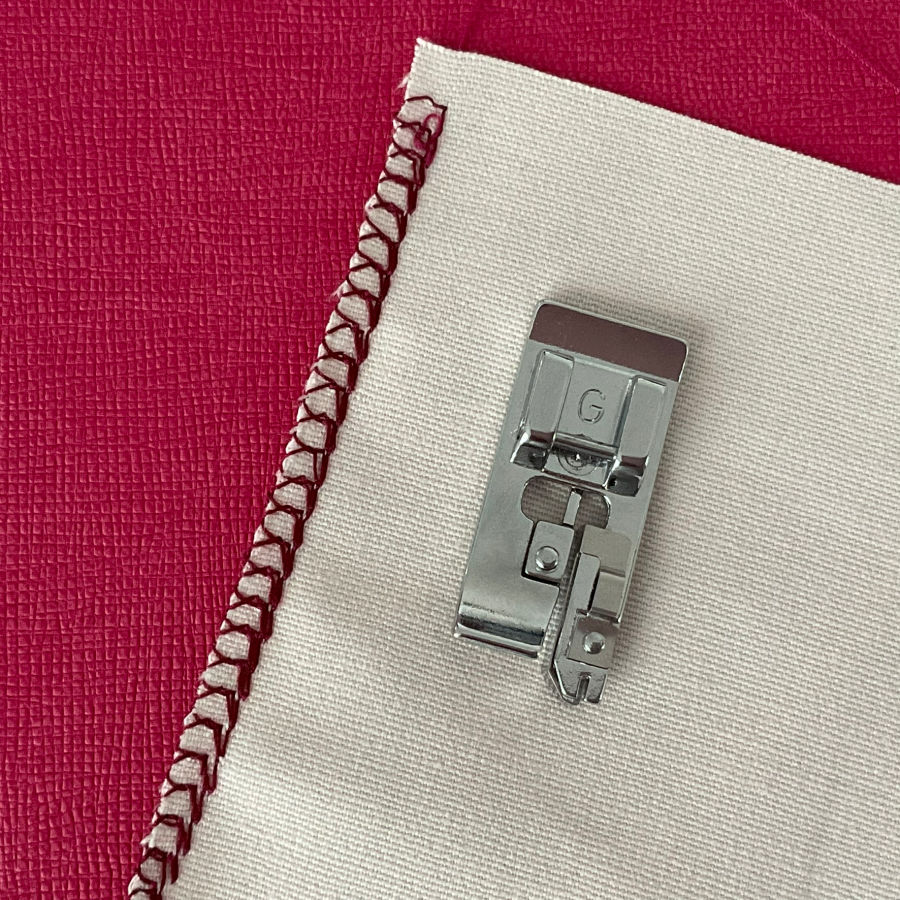
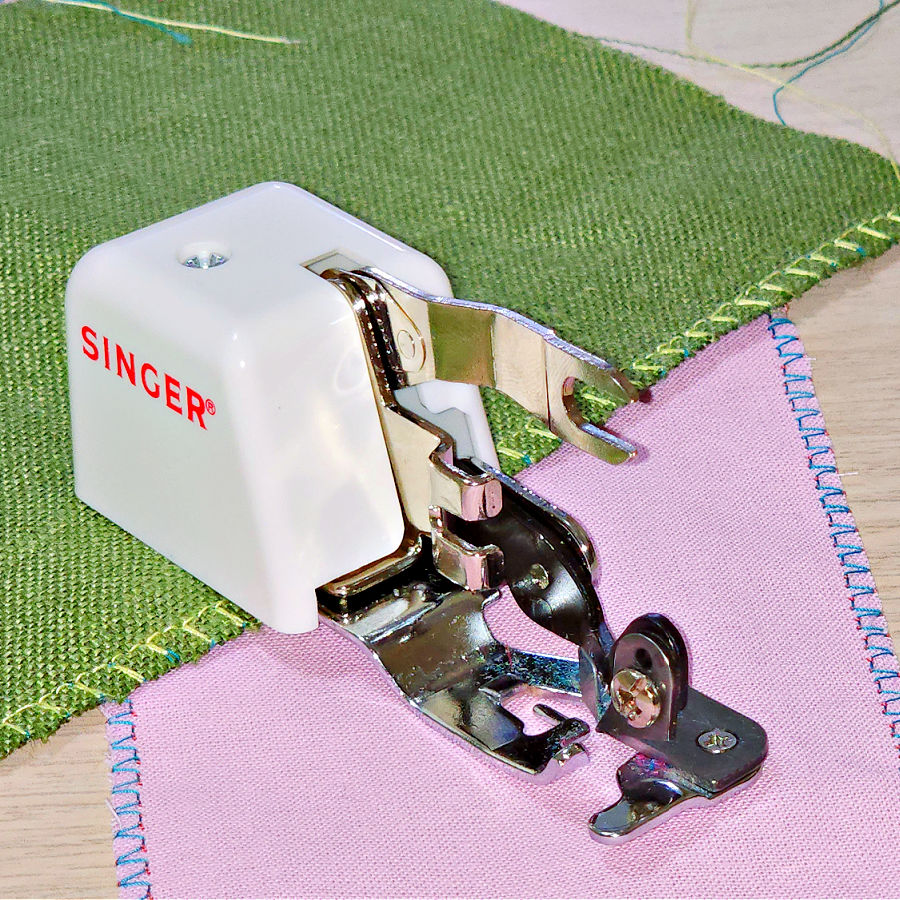
But if the seam allowances will be visible or left open, then I definitely finish them. I usually use my serger. It’s fast, clean, and holds up well through washing.
✅ Related tutorial: Serger vs. sewing machine
If I’m not using the serger, I’ll use one of the overcasting stitches on my sewing machine. Many modern machines have them built in, and they work surprisingly well—especially when paired with a special overcasting foot. It helps guide the fabric and gives a result that’s neater than just a zigzag.
There are also times when I prefer to keep things more polished. In those cases, I use an enclosed seam. A French seam is my go-to. It hides the raw edges completely and gives a tidy finish inside and out.
It takes a little more time, but it’s one of those small things that makes a project feel finished—even on the inside.
To read more about these options, take a look at my tutorials:
Mastering the Side Cutter Presser Foot / What It Is / How To Use
How to use overcast presser feet for sewing overcasting stitches

9. No Knots
I don’t do hand embroidery. I have my embroidery machine, and I use it for almost everything.
But… sometimes I need to embroider something small by hand. Or sew on a button. And that’s when I start thinking about knots.
Knots are often visible. They leave little bumps on the back, and on lightweight fabrics, you can even see them from the front. When I’m sewing buttons, I want the stitches to be neat and secure—but without a lump of thread hiding underneath.
So, here’s the thing—you don’t need knots at all.
This method is well known among hand embroiderers. But it’s only good for double thread.
- Fold the thread in half and thread the both cut ends through the needle. This leaves a loop at the other end.
- Make your first stitch, just like normal.
- Before pulling the thread all the way through, pass the needle through the loop.
- Then pull it tight. That’s it—no knot needed. It holds securely and disappears into the fabric.
It’s neat. It’s clean. And best of all, there’s nothing visible on the front or back. Once you get used to it—especially for sewing buttons—you won’t want to go back to knots again.
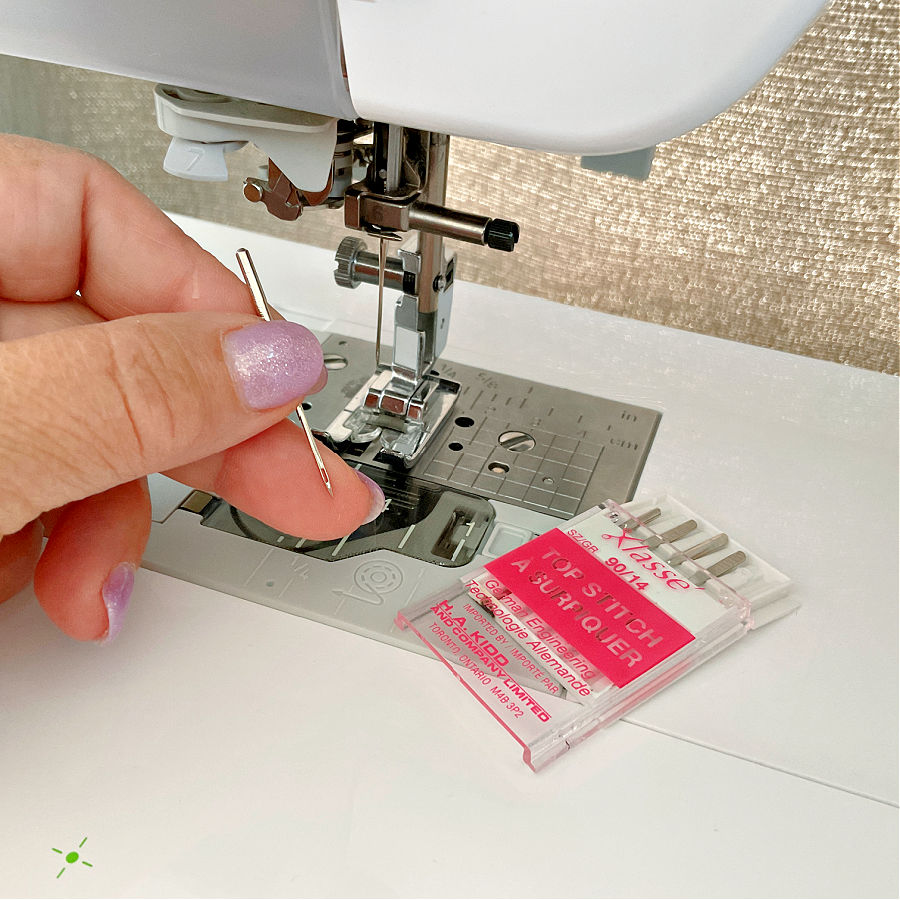
10. Change Your Needle (More Often Than You Think)
This is one of those little habits that often gets overlooked.
A dull needle won’t always break or bend. Sometimes it just quietly stops doing its job well. The stitches get uneven. The fabric starts to pucker. You might notice skipped stitches or hear a faint clicking sound as it struggles to pierce the fabric. And sometimes, the needle snags a fine fabric before you even realize something’s wrong.
If your stitching starts to look strange—and you’ve already re-threaded, checked the bobbin, and adjusted tension—it’s probably time to change the needle.
I remember once, my daughter-in-law said, “My machine doesn’t sew well anymore.” I asked her, “When did you last change the needle?” She looked at me for a second and said, “Hmm… I’ve never changed it. Not since I got the machine.”
It made me smile, because I’ve been there too. Many of us don’t think of the needle as something that wears out (it still works well on finger!) until we see what a difference a fresh one makes.
Stretchy knits, dense cottons, and delicate silks all wear down the tip differently.
It’s such a small thing. But a fresh needle often fixes problems before they start.
You can read more about this in my tutorial How To Choose The Right Sewing Machine Needle For Your Project


11. Use the Right Needle for the Right Fabric
It might say “universal” on the package, but the truth is—universal needles aren’t truly universal.
They’re fine for general use, but if you’re working with specialty fabrics, switching to the right needle can make all the difference.
For example, for knits or stretch fabrics, I always use a stretch needle. It slips between the threads instead of piercing them, which helps prevent skipped stitches and avoids damaging the fabric.
For heavier materials—denim, canvas, thick twills—I switch to a jeans needle. It’s sturdy and designed to handle the density without bending or snapping.
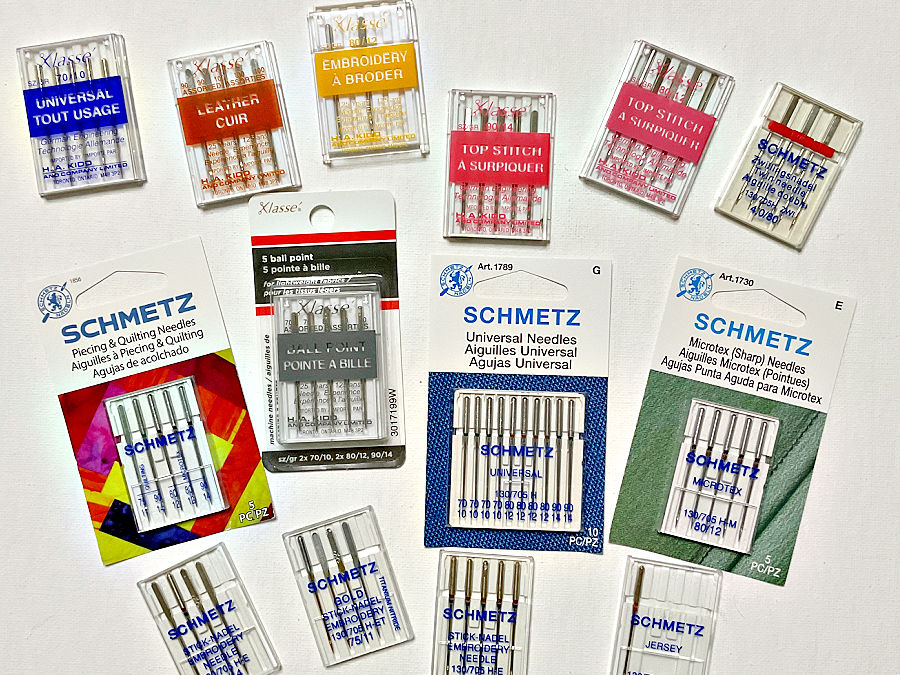
These little adjustments don’t take much effort, but they make sewing easier and improve the way your stitches look and feel.
I talk more about this in my article 19 Types of Sewing Machine Needles and What They’re Used For
12. Clean Out the Bobbin Case Regularly
Dust, lint, and little bits of thread build up faster than you’d think—especially if you’re sewing with cottons, batting, or anything fuzzy. Sometimes all it takes is a tiny tangle down there to cause skipped stitches, strange tension, or that clicking noise that tells you something isn’t quite right.
Just brushing out the bobbin case every now and then can fix some problems. I usually use the small brush that came with my machine or a soft makeup brush.
And if you sew a lot—especially at higher speeds or with layered fabrics—you might want to try Magic Bobbin Genies (also called bobbin washers). These are small, thin disks that sit in the bottom of your bobbin case, underneath the bobbin. They’re slick, and they reduce the friction between the bobbin and the case.
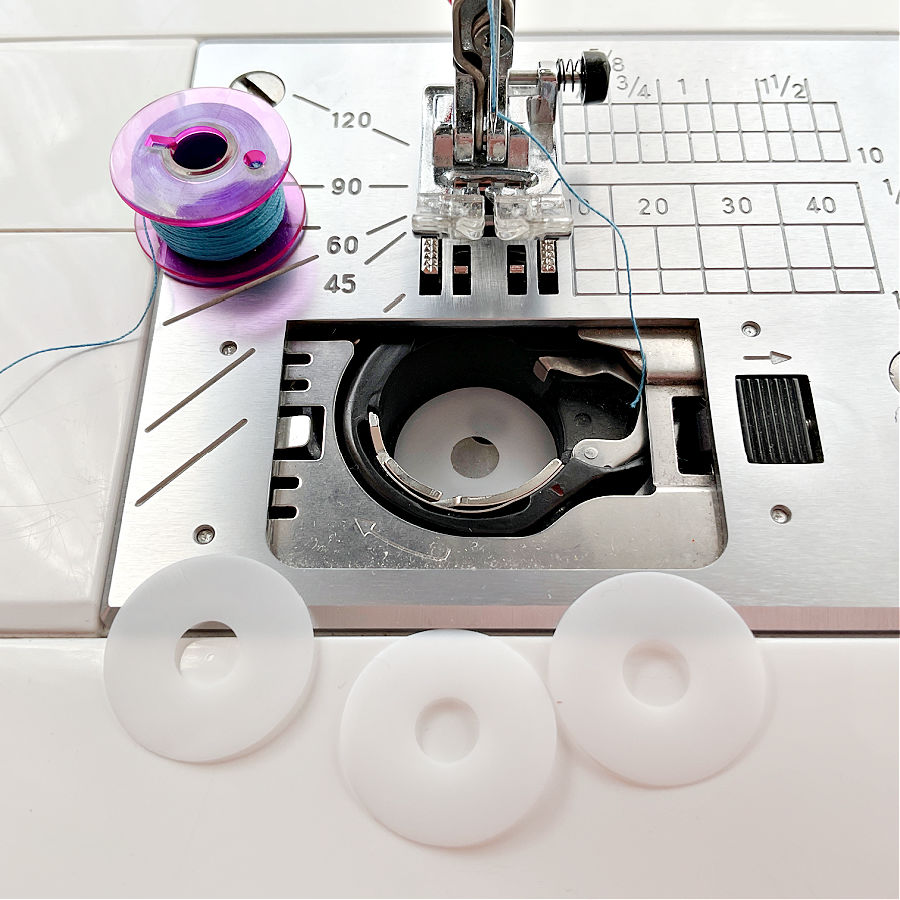
I’ve found they help the thread unwind more smoothly. They also help cut down on those messy little “bird’s nests” that tend to show up underneath the fabric when the bobbin thread isn’t feeding evenly.

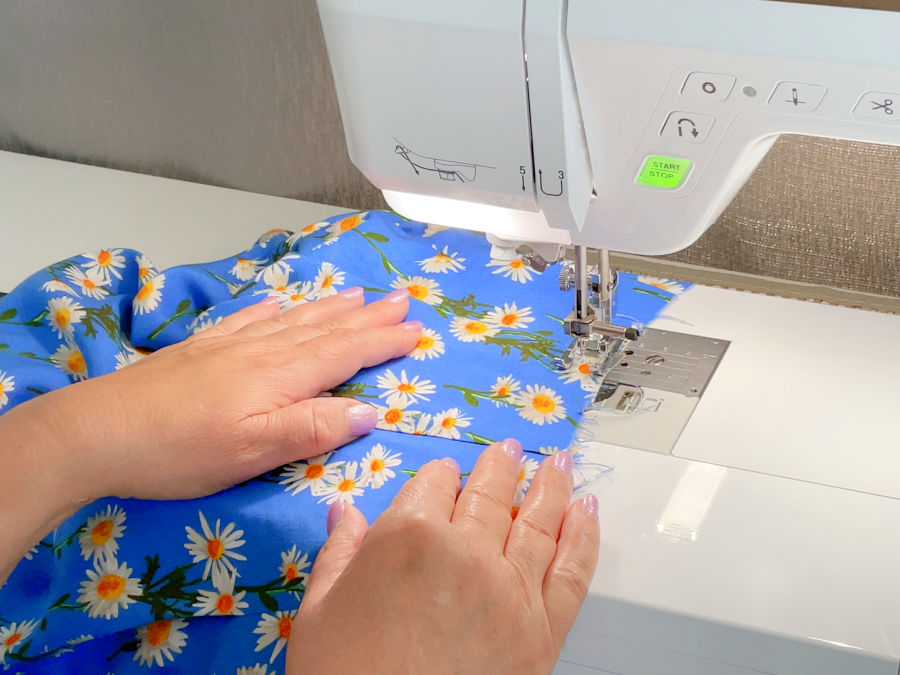
13. Don’t Pull the Fabric – Let the Feed Dogs Work
It’s tempting, especially when the fabric doesn’t seem to be moving fast enough, or when you want to “help” it along.
Your machine’s feed dogs—those little teeth under the presser foot—are designed to pull the fabric through at a consistent rate. When you pull from behind, a few things can happen:
- The stitches stretch out or bunch up.
- The fabric warps slightly, especially on the bias.
- Your stitch length changes without you realizing it.
Instead of tugging, I guide the fabric gently with my hands. I keep it straight, help it stay aligned, and let the machine do the job. It leads to smoother seams and far fewer problems later on.
If the fabric really isn’t moving the way it should, it’s usually a sign that something else needs adjusting—maybe the presser foot pressure, stitch length, or even the needle type.
But pulling? That never solves it.
14. Press Every Seam – Don’t Skip It
Pressing sets the stitches, helps seams lie flat, and makes the next steps easier and more accurate. It’s one of those habits that quietly improves your results without calling attention to itself.
You can really see the difference that pressing makes.

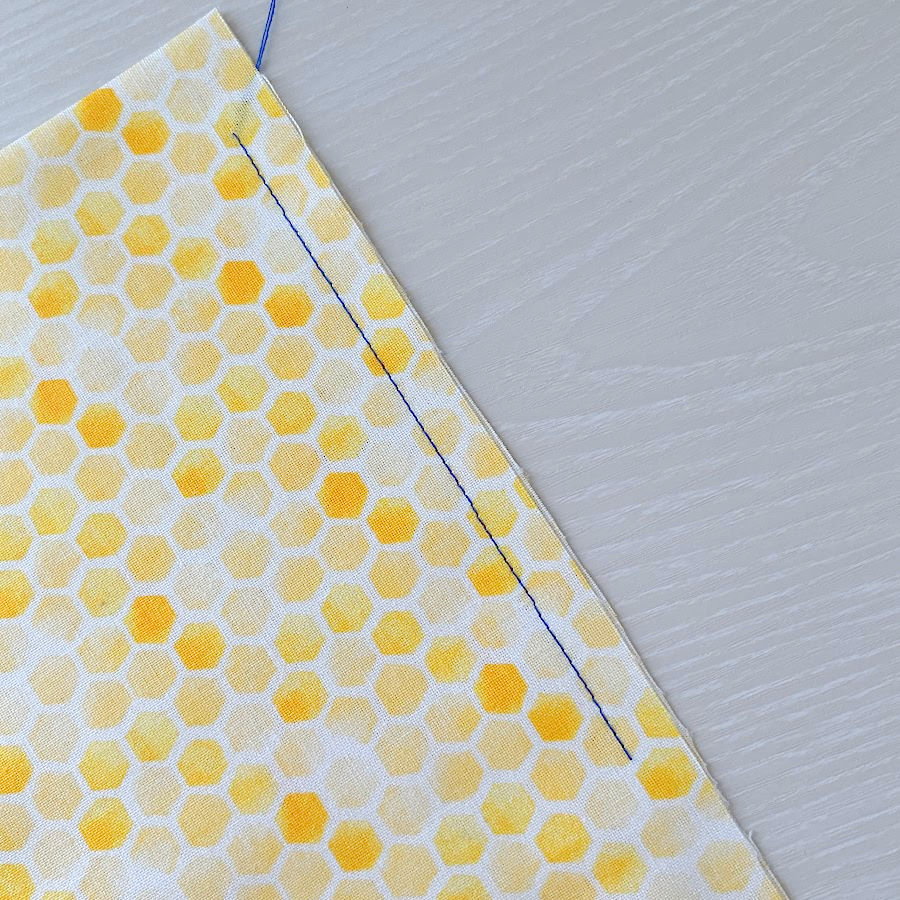
In the first image, the seam has not been pressed yet. The fabric looks a little puckered along the stitching line. The seam doesn’t sit flat against the surface, and the fabric around it looks slightly wrinkled and uneven.
In the second image, after pressing, the seam is smooth and crisp. The stitches settle neatly into the fabric. The fabric lies flat without pulling or rippling, and you can already tell that the finished project will look sharper.
I press after every seam – press the seam flat first, then open or to one side depending on the project. Pressed seams are easier to match. They behave better under the presser foot. And it only takes a few seconds after sewing.
15. Finger-Press Before Pressing with the Iron
Before I reach for the iron, I often finger-press first.
I simply run my finger-presser tool along the seam to open it or fold it to one side. It’s especially helpful when working with cotton fabrics, small patchwork pieces, or curved seams that need to be shaped carefully before heat gets involved.
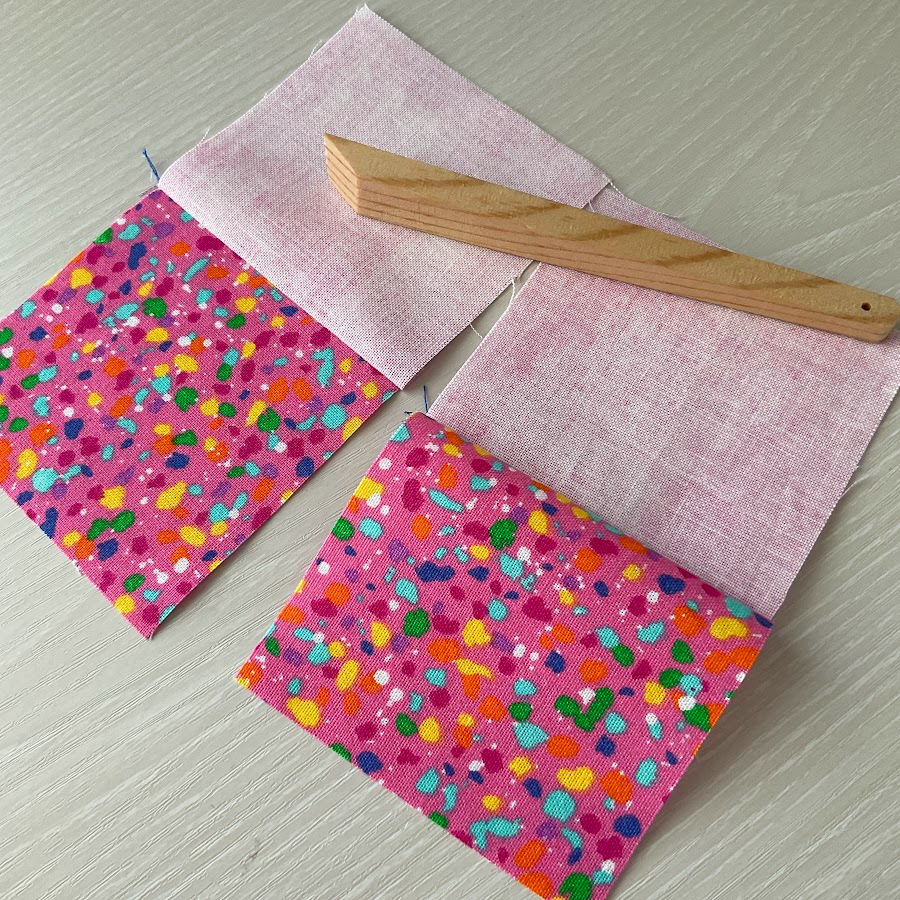
When I first heard about a finger presser tool, I didn’t think much of it. It’s small, inexpensive, and looks too simple to matter. But once I started using it, I couldn’t believe how often I reached for it.
It flattens folds, creases, and seams just by pressing firmly along the fabric. No heat needed.
It helps the fabric settle into position so the iron isn’t doing all the shaping at once. It gives the seam a head start, and your results come out crisper and more even.

In quilting, I use this step constantly—especially when working on blocks where accuracy matters. And on anything curved, it gives me more control and keeps the fabric from shifting under the iron.
16. Clip Curves and Corners Before Turning
Anytime you sew a curve—or stitch around a corner—you need to clip or trim before turning the piece right side out. It’s one of those steps that feels easy to skip, but you’ll see the difference immediately when you don’t.
For curves, I clip little notches into the seam allowance. This gives the fabric room to spread and settle without pulling against itself. If I’m working quickly or want to do it in one step, I use my pinking shears. They do the job perfectly—removing bulk and clipping the curve at the same time.
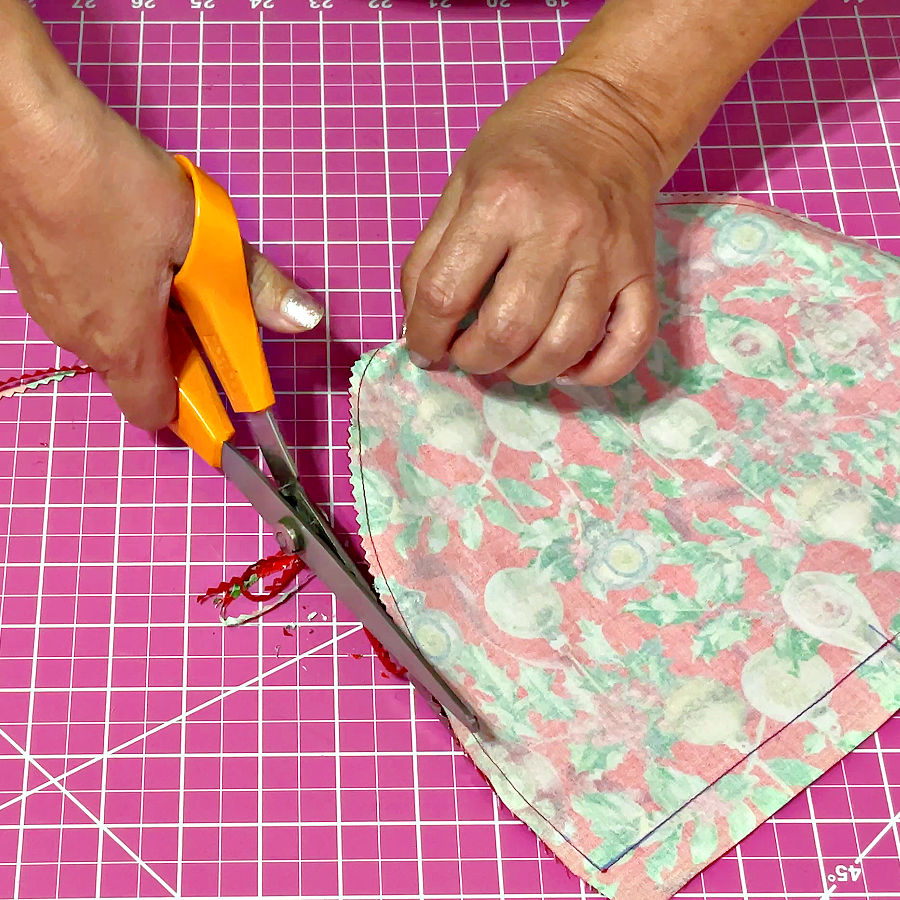


For corners, I trim the seam allowance diagonally across the tip. This takes away extra thickness so the point can turn out clean and sharp, instead of staying rounded or bunchy. Careful not to touch the seams!
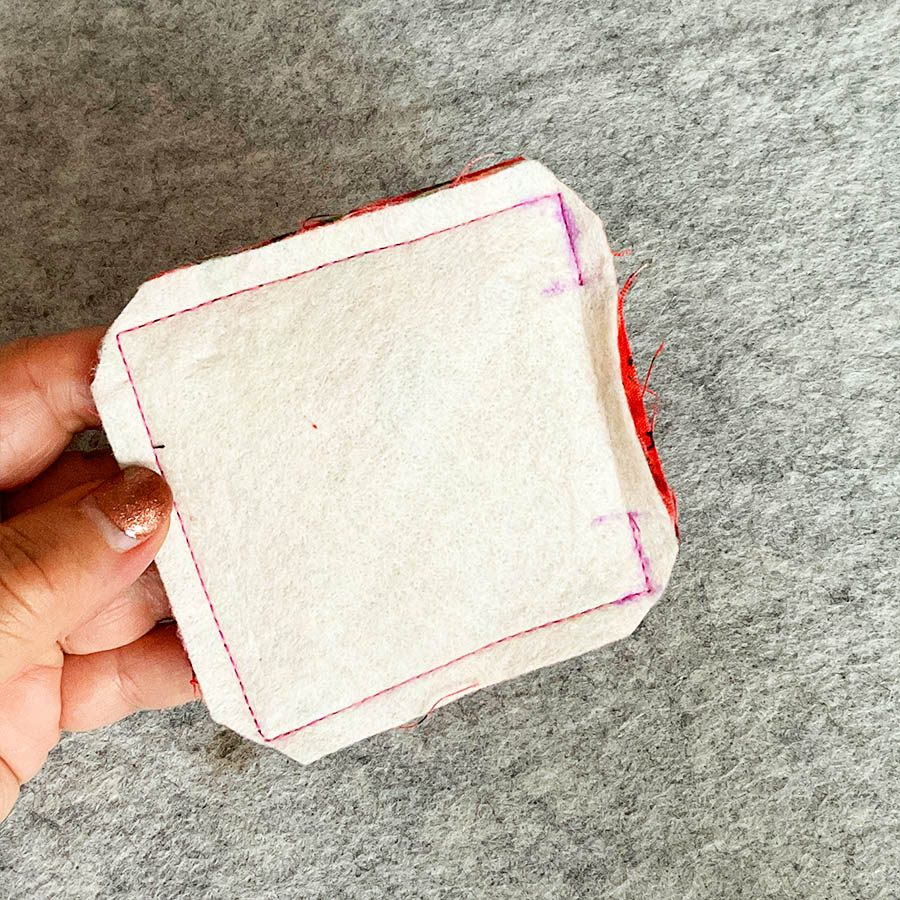
You can see more about how I do this in my tutorial – Basic sewing techniques: How to sew corners and curved seams
17. Trim Bulk at Intersections
When multiple seam allowances meet, like at the corners of patchwork blocks or where side seams join a waistband, the layers stack up quickly. You can end up with four—or even more—layers of fabric all trying to fold into the same tiny space.

That’s when I trim the bulk.
I look at how the seams come together and carefully trim back the layers that don’t need to be full width. Sometimes I’ll taper the seam allowances, or even angle the ends slightly to keep everything from piling up in one spot.
The goal isn’t to weaken the seam. It’s just to give the fabric a little more room to settle and press flat.
When you reduce the thickness at intersections, the fabric feeds through the machine more smoothly. Your stitches stay even. And when you press the seam afterward, it actually listens.

18. Shorten Your Stitch for Curves
Curves ask for a little extra care. Whether it’s a neckline, armhole, or any other tight bend, the stitching needs to follow the shape without pulling or forming little points.
One thing that helps a lot is to shorten the stitch length slightly. Not dramatically—just enough to give the curve a smoother flow. On my machine, I usually go from my usual 2.5 down to something like 2.0 or even 1.8 if the curve is very tight.
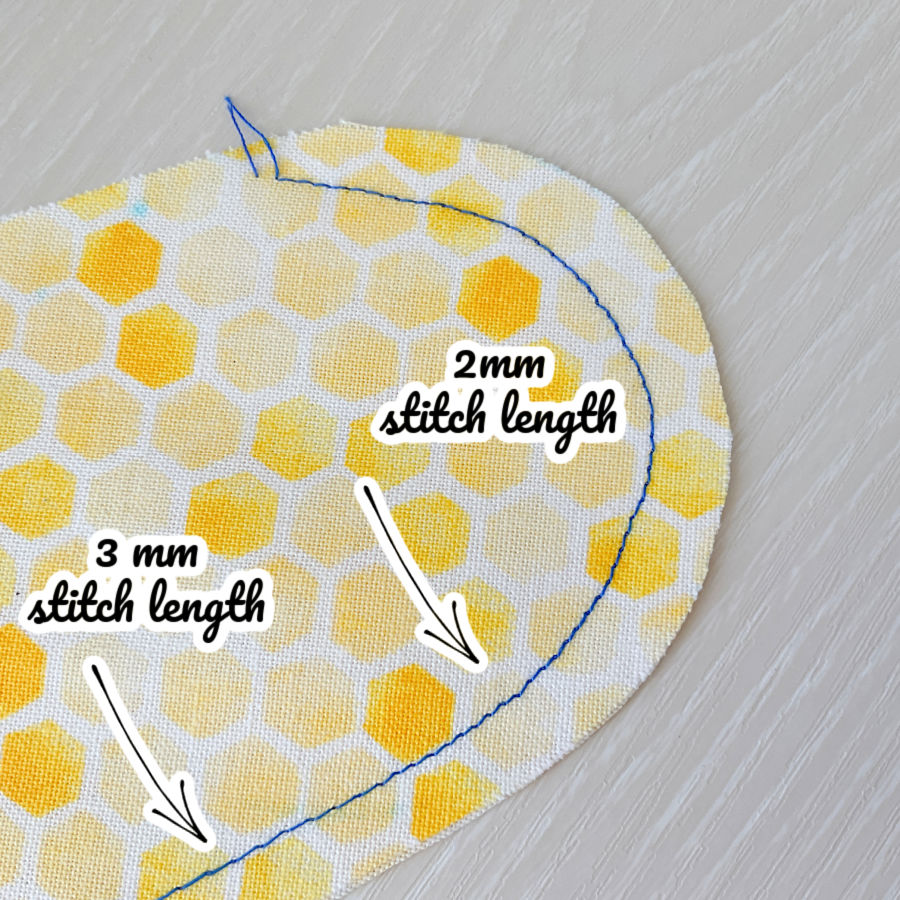
The shorter stitches allow the seam to gently round the shape instead of trying to force straight lines around a curve. It also gives me a bit more control as I guide the fabric through the machine.
This is especially helpful on lightweight or delicate fabrics where the grain might shift slightly along curves. Shorter stitches help the seam stay true to the shape, and pressing afterward is much easier too.
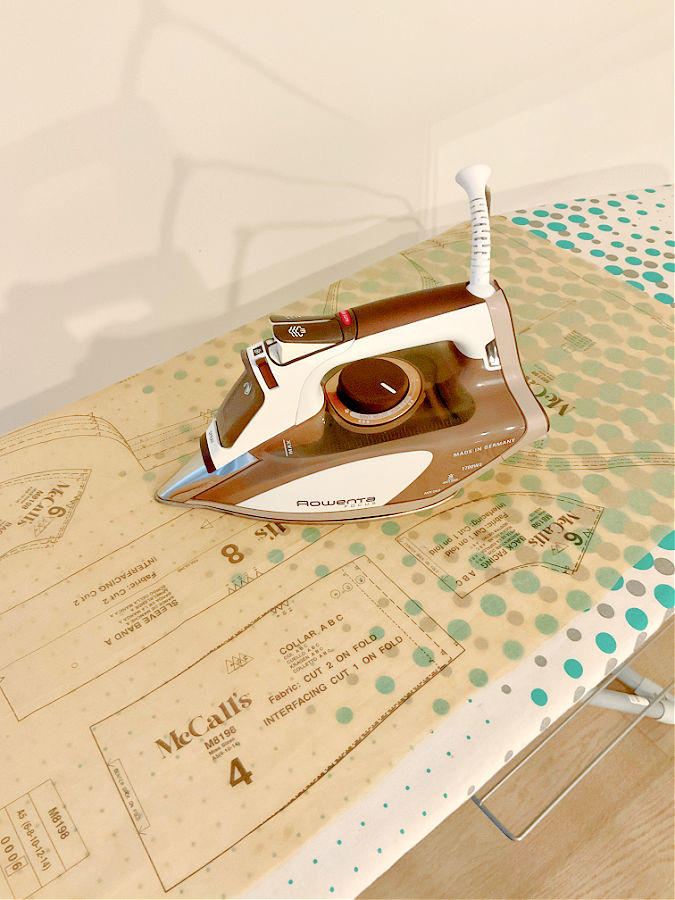
19. Press Your Paper Patterns Before Using Them
Commercial patterns are rarely ready to use straight out of the envelope. The tissue paper is thin and fragile, and it almost always comes with deep folds and sharp creases from being packed up tight. But the same goes for almost any paper pattern—even ones you’ve made yourself.
I often draft patterns on medical exam paper or lightweight tracing paper. It works well, but once I fold and store it, those creases settle in. And if you try to lay a wrinkled pattern over fabric, even a small ripple can shift the cutting line or distort a curve.
So before I cut anything, I press the paper pattern flat with a dry iron. No steam. Low heat. I usually do it on a pressing cloth or scrap fabric, just in case any ink smudges.
Don’t hold the iron in one spot too long – A quick, light press is enough to flatten out most folds.

I am sure everyone has his/her personal tips or findings that can help us all; if you do, please use the comments section to allow us all to learn.
Did you find this tutorial helpful? If so, save this pin (see below) on your sewing board so you can come to this tutorial later when you need this information, and follow me on Pinterest for more tips, tutorials, and inspiration!
latest posts
- What Do You Call a Person Who Sews? I Asked My Readers and Got 1,408 Opinions
- DIY Round Purse: PDF Sewing Pattern and Detailed Instructions
- Mini Wonder Clips By Clover: Useful Sewing Tool Or Just Another Notion?
- Non-Slip Grips For Quilting Rulers: A Small Notion With A Useful Job
- Fabric Eraser for Sewing: What It Removes and When to Use It
- What Is The Best Thread For Sewing Machine Projects? Let’s Find Out!
- Butterfly Quilt Block Tutorial – Foundation Paper Piecing
- How To Sew Quilt Squares So The Corners Match
- Sewing With Fork Pins: How They Help With Pattern Matching, Slippery Fabric, And Seams