
Toddler Quiet Book Ideas, Patterns and Templates: Sewing Tutorial
A quiet book is more than just fabric and thread — it’s a little world made by hand, page by page. Every button, flap, and zipper is a chance for a child to explore, focus, and learn through play.
I made this book for my granddaughter, who is now a year and a half old (she was a little younger when she got it). It quickly became her favorite thing to open, touch, and explore. Each page has its own small activity — from sliding beads and matching shapes to picking apples and finding hidden surprises. It’s calm, creative fun that keeps little hands busy and curious.
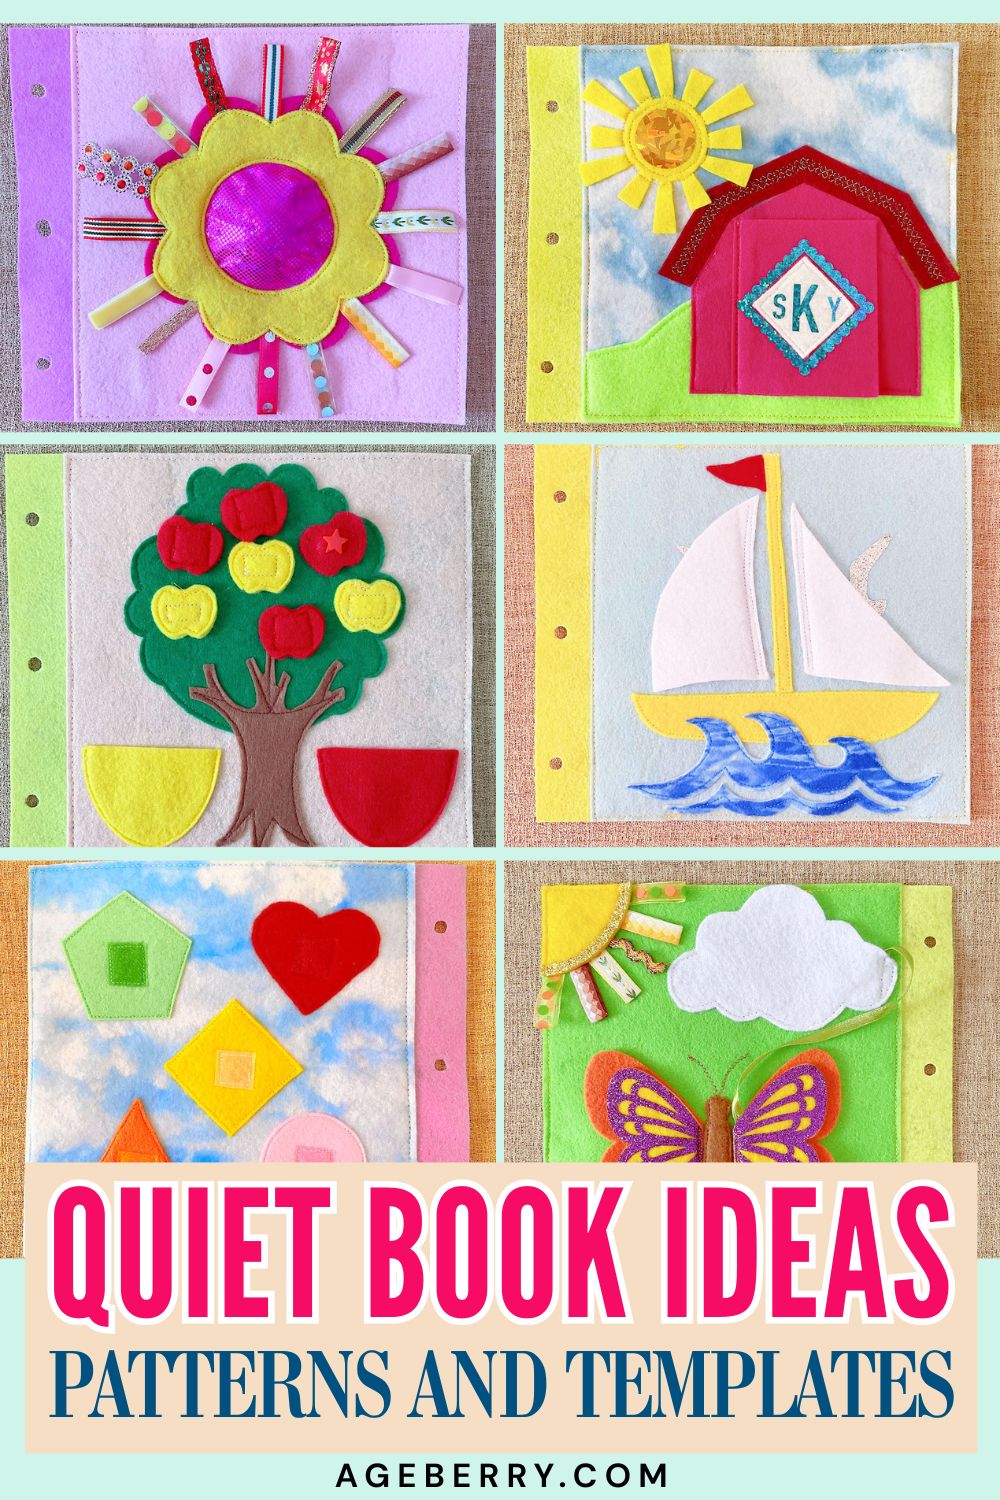
In this sewing tutorial, I’ll show you exactly how I made every page and the materials I used. I also offer a ready-to-print PDF patterns that includes all templates, SVG files for Cricut cutting, and detailed step-by-step instructions for each page.
You can follow my designs exactly or use these toddler quiet book ideas as inspiration for your own pages. And if you don’t have a toddler at home, quiet books like this are also wonderful handmade gifts — or even items to sell on Etsy.
Want to Make This Quiet Book Yourself?
I’ve prepared a complete printable pattern set that includes:
- A detailed PDF sewing guide with instructions for every page (100 pages with images)
- Printable PDF templates you can cut by hand
- SVG files for Cricut or other cutting machines
- All pages are sized for 8×8 inch felt squares.
You can find the full Toddler Quiet Book Set in my shop here:
What Is a Felt Quiet Book and Why Toddlers Love It
A quiet book (also known as a busy book) is a soft, tactile activity book made from materials like felt, fabric, zippers, buttons, and Velcro. It’s full of simple but engaging pages that toddlers can explore with their fingers and hands — sliding, zipping, matching, turning flaps, and discovering fun surprises.
My granddaughter is 1.5 years old now, and I made this quiet book especially for her. It’s ideal for the 1.5–2-year age range — at this stage, children enjoy exploring textures and simple activities that don’t overwhelm them. For a 3–4-year-old, this particular version might feel a bit too easy, but I plan to create another book for her when she’s older, with more complex challenges.
Note: Some of the links on this page are affiliate links. This means I will receive a commission if you order a product through one of my links. I only recommend products I believe in and use myself.
And even if you don’t currently have a child or grandchild in this age group, this project is still worth making. Many crafters create quiet books to sell on Etsy, where handmade educational toys and toddler learning materials are consistently popular. These books are often purchased as unique, personalized gifts, and the market includes not only parents but also grandparents, teachers, and friends looking for thoughtful, handmade presents.
So whether you’re making it for a little one in your life, as a gift for a new parent or simply want a creative project that could become a small income stream, a quiet book is both a heartwarming and rewarding make.
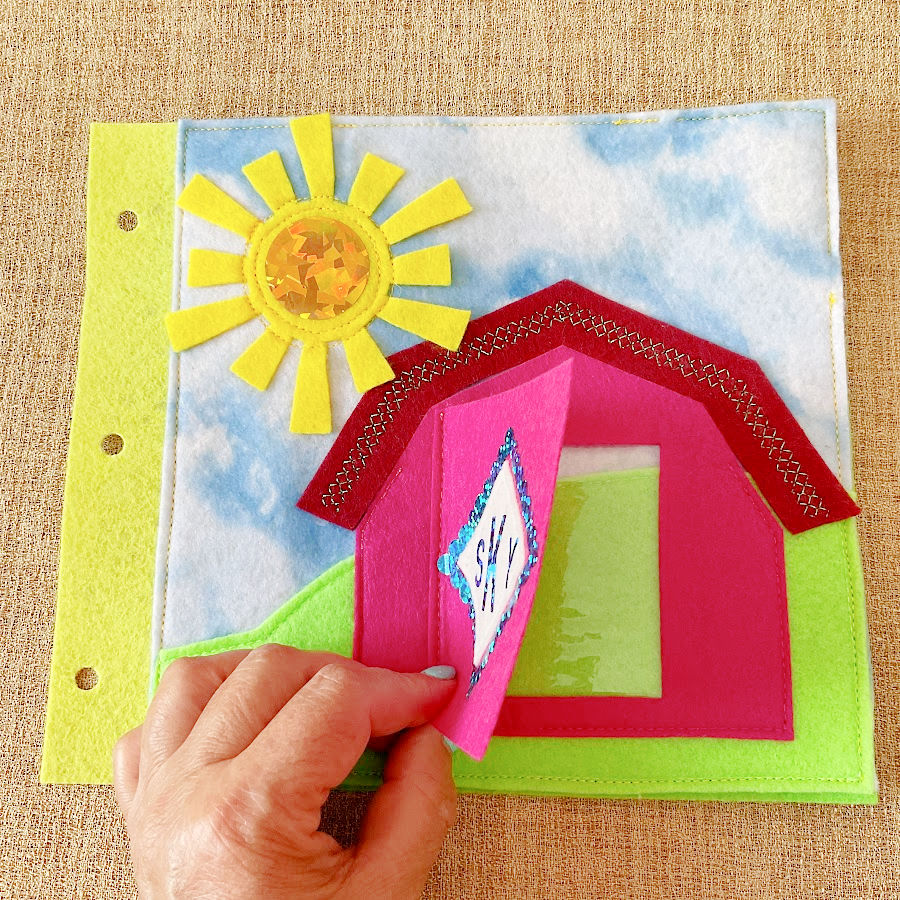
My Felt Quiet Book Cover
When I looked at other quiet book covers, I noticed that many say “My Quiet Book” or “My Busy Book.” While those titles sound nice to adults, I don’t think they’re much fun from a toddler’s point of view. Imagine being a little one and seeing the word “quiet” — it almost sounds like, “Oh, you want me to be quiet? Am I too noisy?” That’s not the feeling I want this book to give.
Instead, I wanted the cover to feel happy, welcoming, and truly personal. So I designed it around my granddaughter — it has her monogram right on the front, and when she opens the barn door, she sees her own picture inside. It’s bright, playful, and instantly hers.
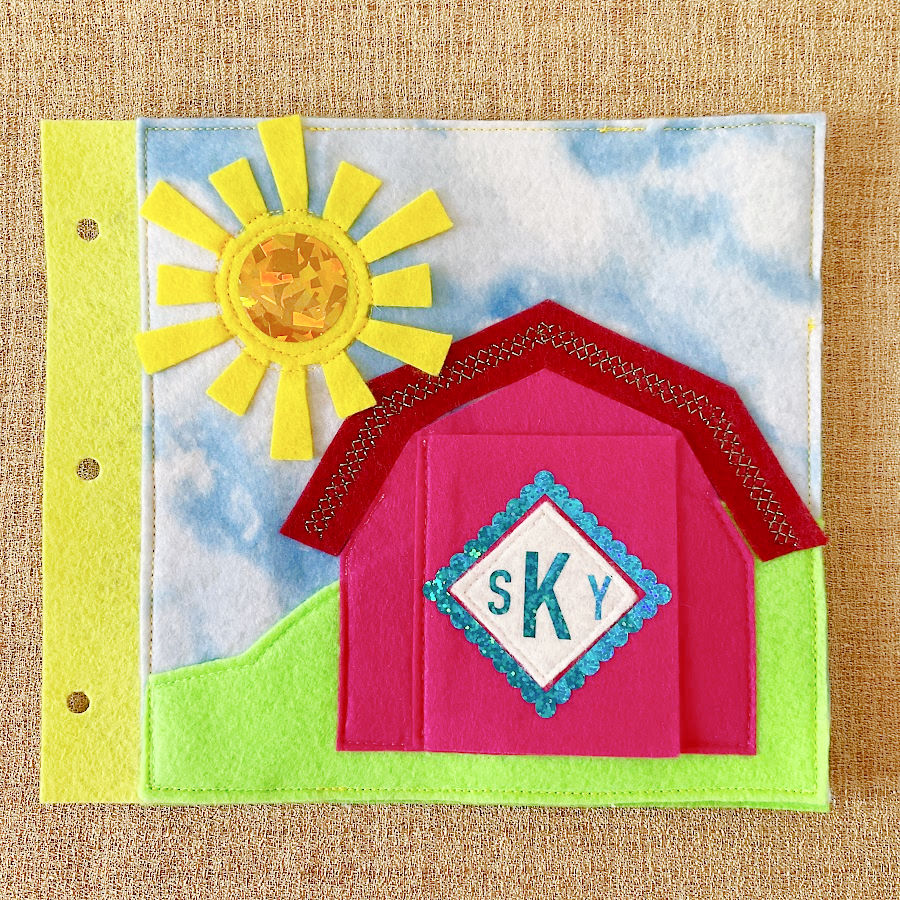
For toddlers around 1.5 to 2 years old, familiar faces and cheerful colors are what draw them in. Seeing themselves helps build recognition and belonging, while the simple barn door invites them to open, peek, and explore — a perfect introduction to the interactive pages that follow.
This cover doesn’t tell them to be quiet — it invites them to play, discover, and smile. It’s actually the start of the adventure giving the child a taste of what’s to come.
My Quiet Book Pages (Step-by-Step Overview)
Each page in this quiet book offers a different activity. Together they help little hands explore textures, practice coordination, and build curiosity through play.
Below you’ll find a short description of every page, what it teaches, and a few lessons I learned myself along the way.
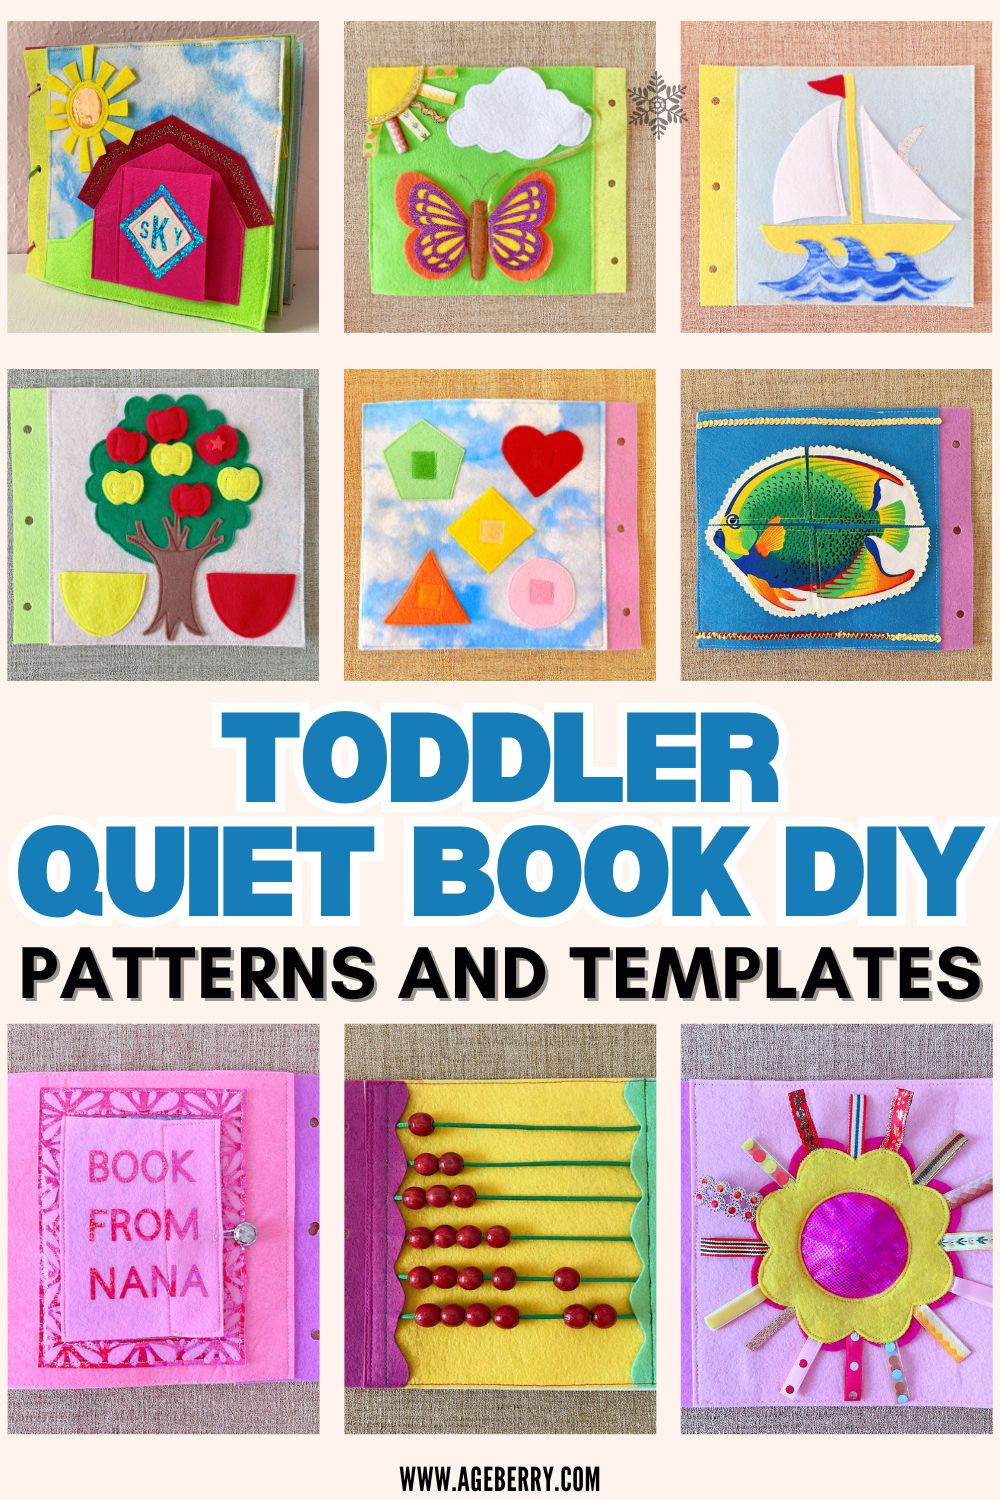
Page 1 – Welcome Home (Cover)
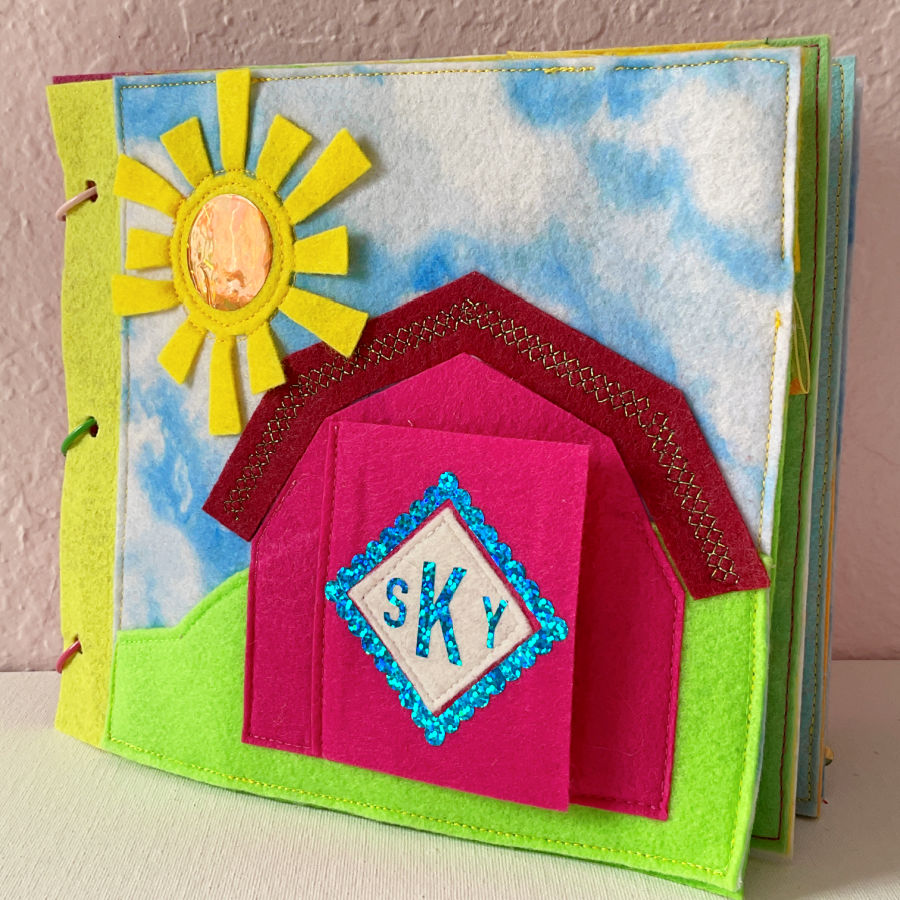
This first page makes the book truly personal. The clear vinyl window holds a photo of the child the book was made for. Seeing their own picture helps toddlers recognize that this special book is theirs — something made just for them. It adds pride, familiarity, and emotional warmth right from the first page.
Purpose: Helps a child connect with the book on a personal level and builds a sense of ownership.
Tip: When sewing clear vinyl, it can shift slightly under a regular presser foot. Use a roller or non-stick presser foot so it glides smoothly, and pin only along the edges that will later be covered by other pieces.


✅ Related tutorial: Must-Have Presser Foot for Sewing Challenging Fabrics: The Roller Foot
Want to Make This Quiet Book Yourself?
I’ve prepared a complete printable pattern set that includes:
- A detailed PDF sewing guide with instructions for every page (100 pages with images)
- Printable PDF templates you can cut by hand
- SVG files for Cricut or other cutting machines
- All pages are sized for 8×8 inch felt squares.
You can find the full Toddler Quiet Book Set in my shop here:
Page 2 – Butterfly and Cloud
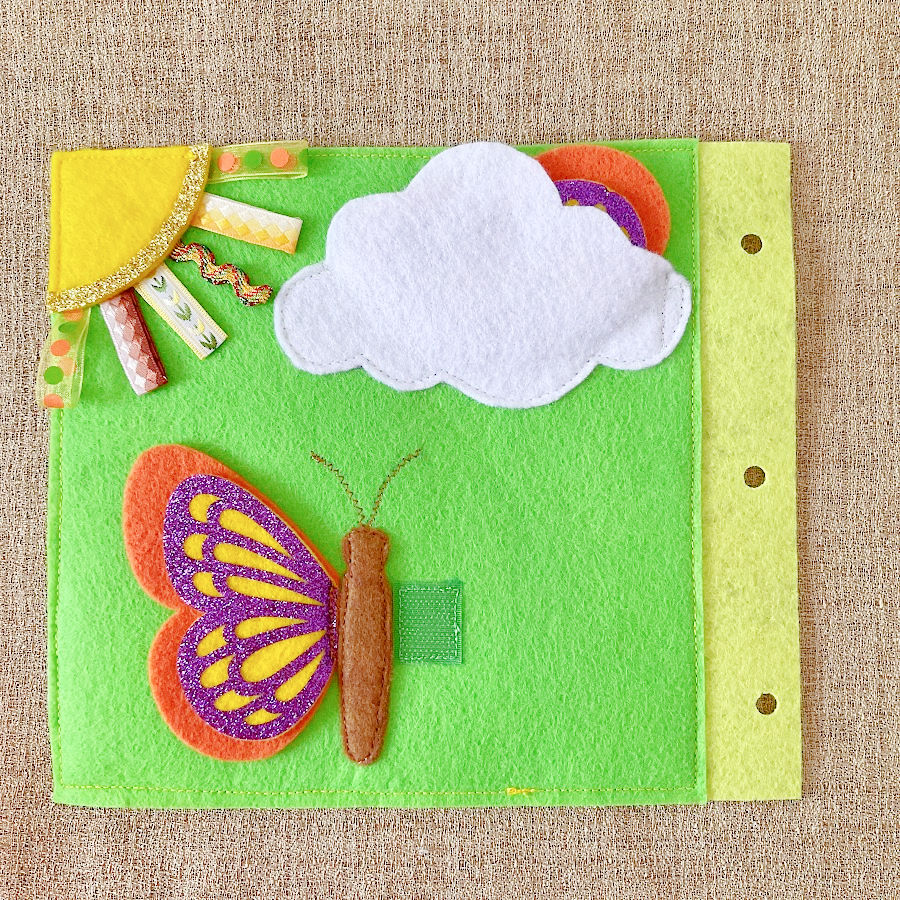
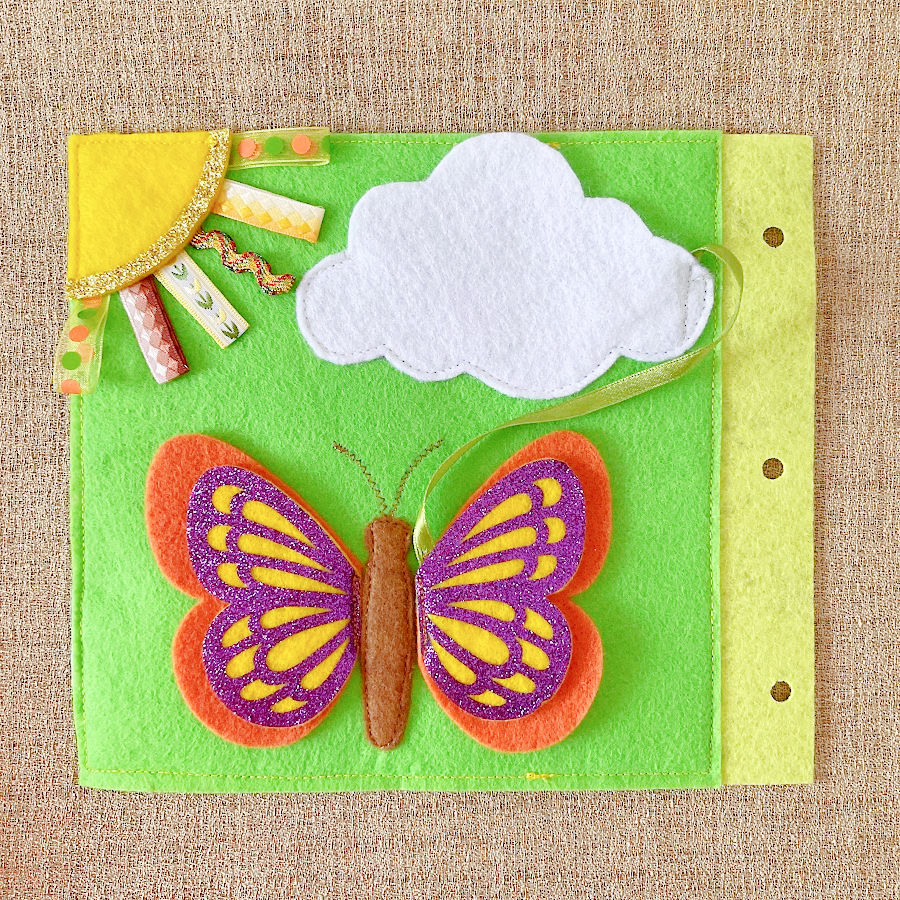
This page has a butterfly with one wing hiding inside a soft cloud pocket. The goal is to find and connect the two parts of the butterfly.
Purpose: Encourages problem-solving, discovery, and hand–eye coordination.
Tip: I made the butterfly wings from two layers of different sizes to show the motion of wings. You can decorate it or leave it plain.
Page 3 – Counting Beads on Cord
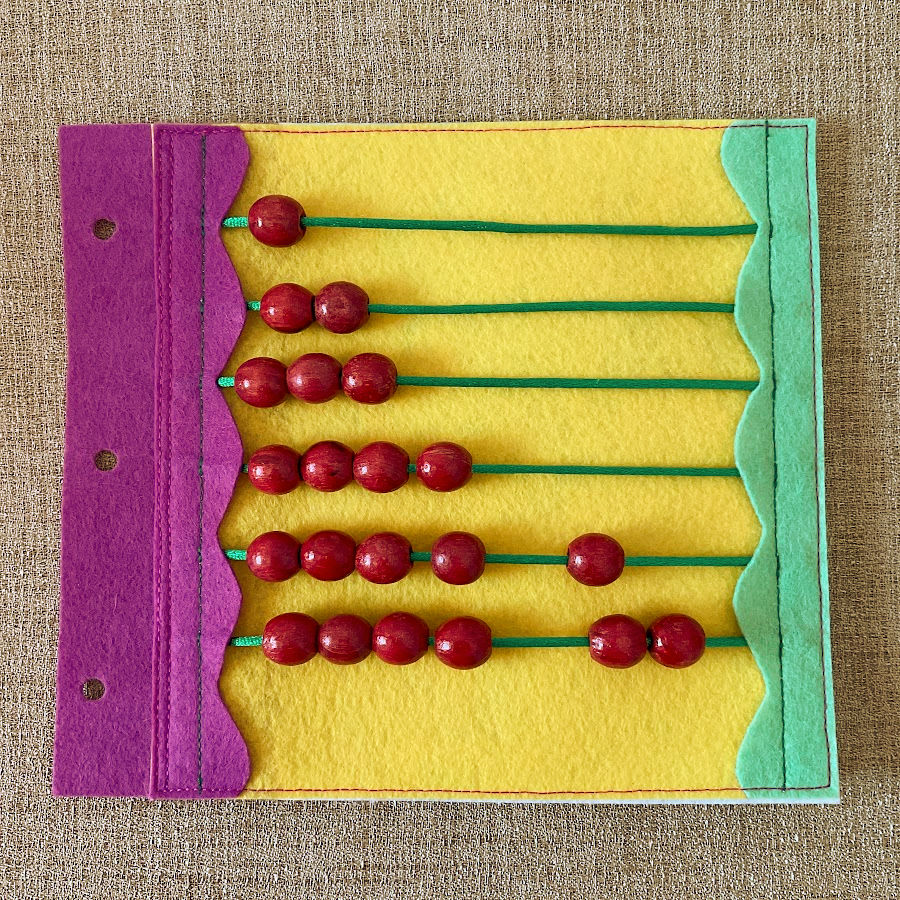
Colorful beads slide back and forth on a strong cord that’s stitched securely between two sides of the page. The motion keeps little hands active and focused, while also introducing simple counting. As the child moves the beads, they can count aloud — one, two, three, and so on, up to six in this case.
As the child grows older, simple addition / subtraction can also be taught in a now familiar environment since this is in fact a simple/limited abacus.
Purpose: Develops fine-motor control, hand–eye coordination, color recognition, and early counting skills.
Tip: Use very strong cord and sturdy, non-breakable beads. Stitch over the cord several times to be sure it stays in place, even with repeated pulling. Because the child will pull.
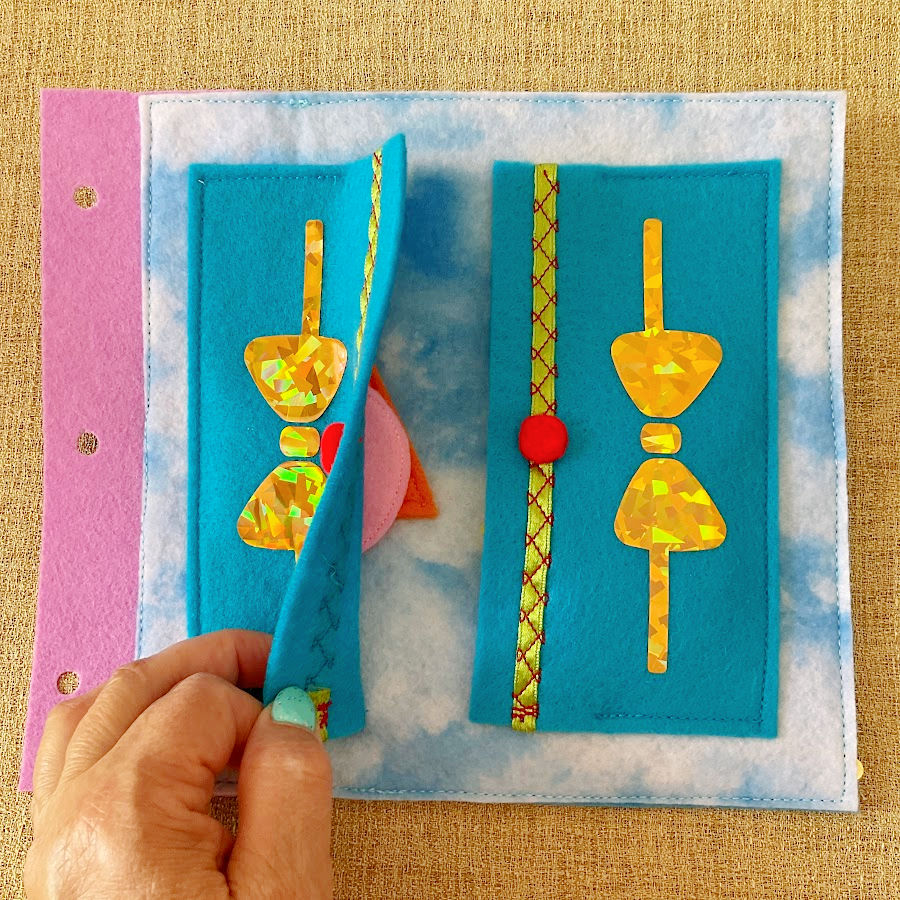
Page 4 – Flying Airplanes
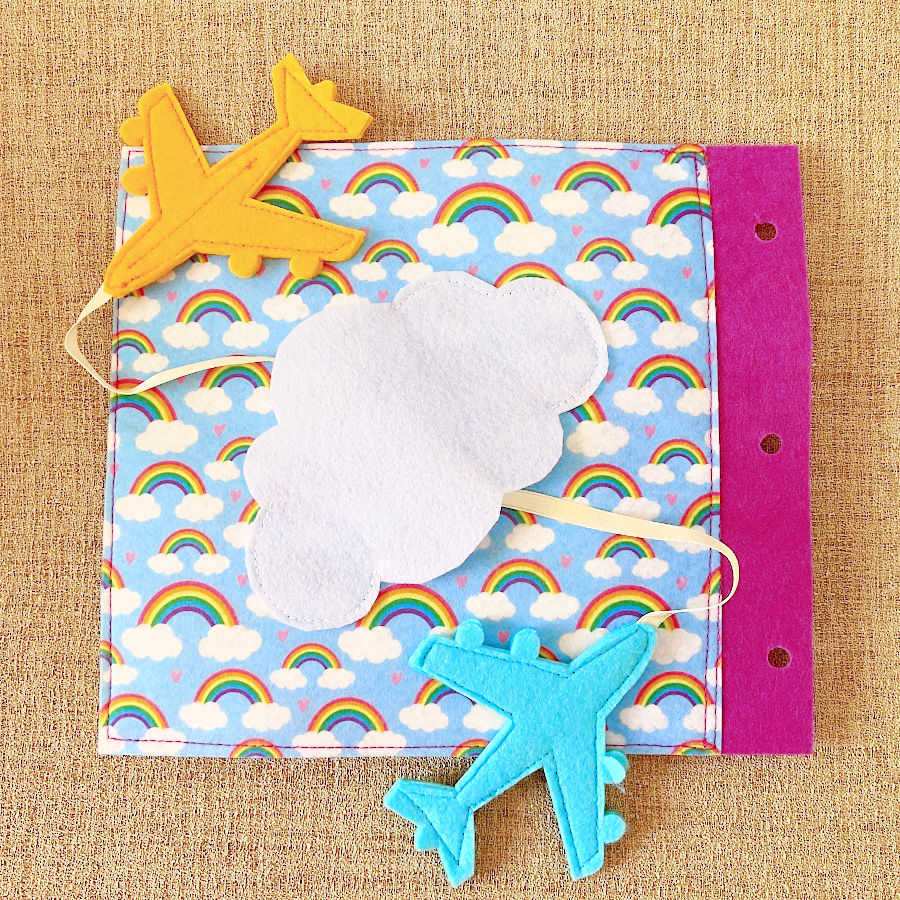
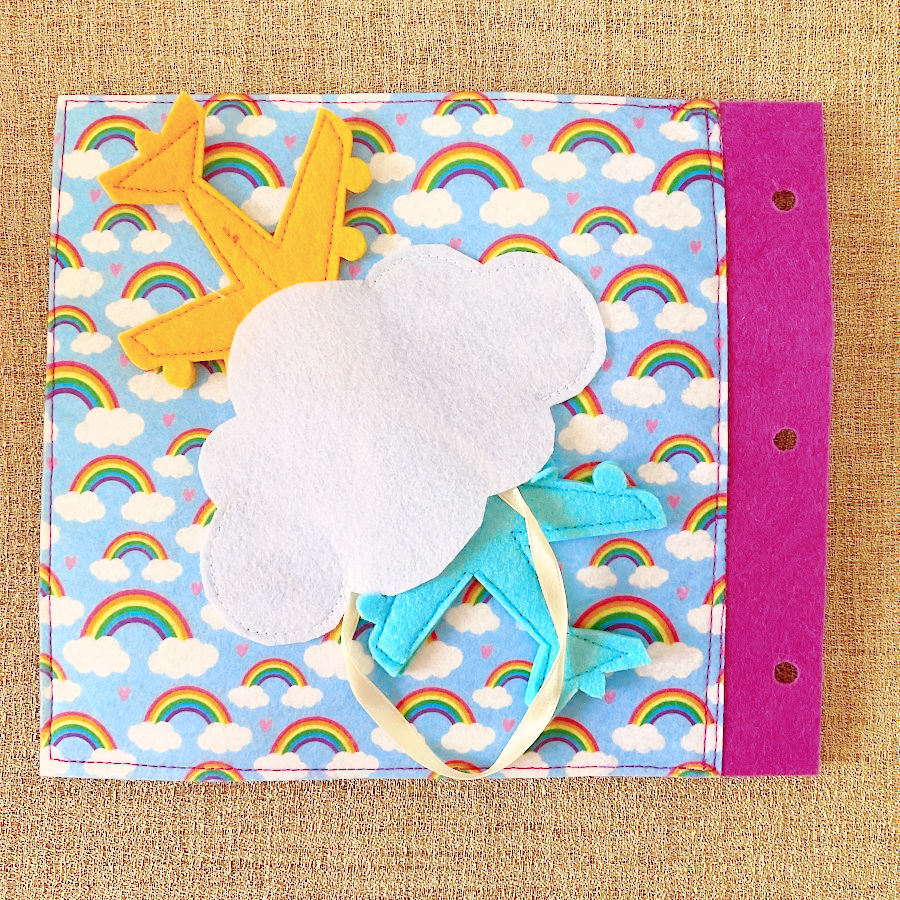
Two airplanes glide across the sky, each attached to the page with ribbon “tails” hidden neatly between two felt layers. The cloud is sewn directly onto the background, creating a simple sky scene that invites movement and play.
Purpose: Teaches motion, cause-and-effect, and coordination as the airplanes slide back and forth.
Tip: Secure the ribbon ends between the two felt layers of each airplane before stitching. This keeps the page tidy and prevents the ribbons from fraying or coming loose during play.
Page 5 – Boat and Birds

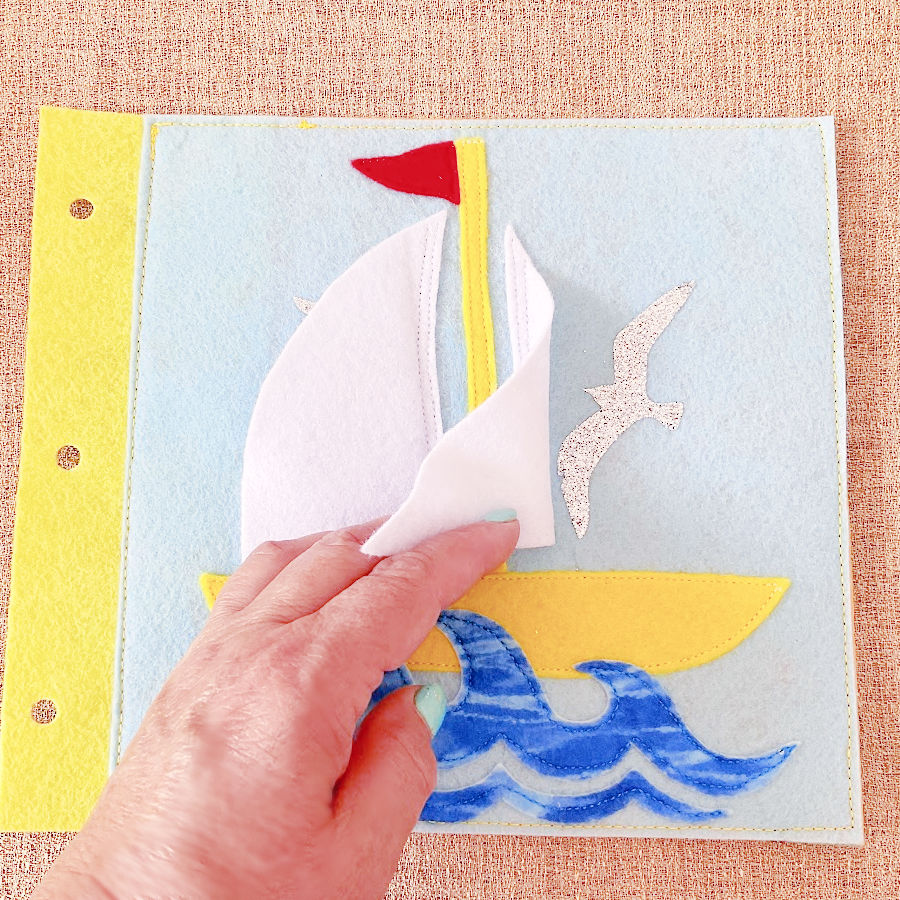
A small sailboat floats on the sea, its white sails lifting to reveal tiny silver birds underneath. The activity invites the child to peek under each sail and discover what’s hidden there.
Purpose: Builds curiosity and develops control of small hand movements while encouraging gentle exploration.
Tip: The silver birds reflect light beautifully and attract attention. Sew or glue them securely so they stay in place during repeated play.
Page 6 – Zipper Fun

This page features four colorful zippers sewn across the background. It’s a simple but engaging activity that gives children a chance to practice opening and closing zippers on their own — something they’ll use every day as they grow.
Purpose: Builds hand strength, coordination, and early self-care skills.
Tip: Sew each zipper securely only at the ends, not along the full length. This allows enough movement for little fingers to zip and unzip easily.
Page 7 – Under the Sea
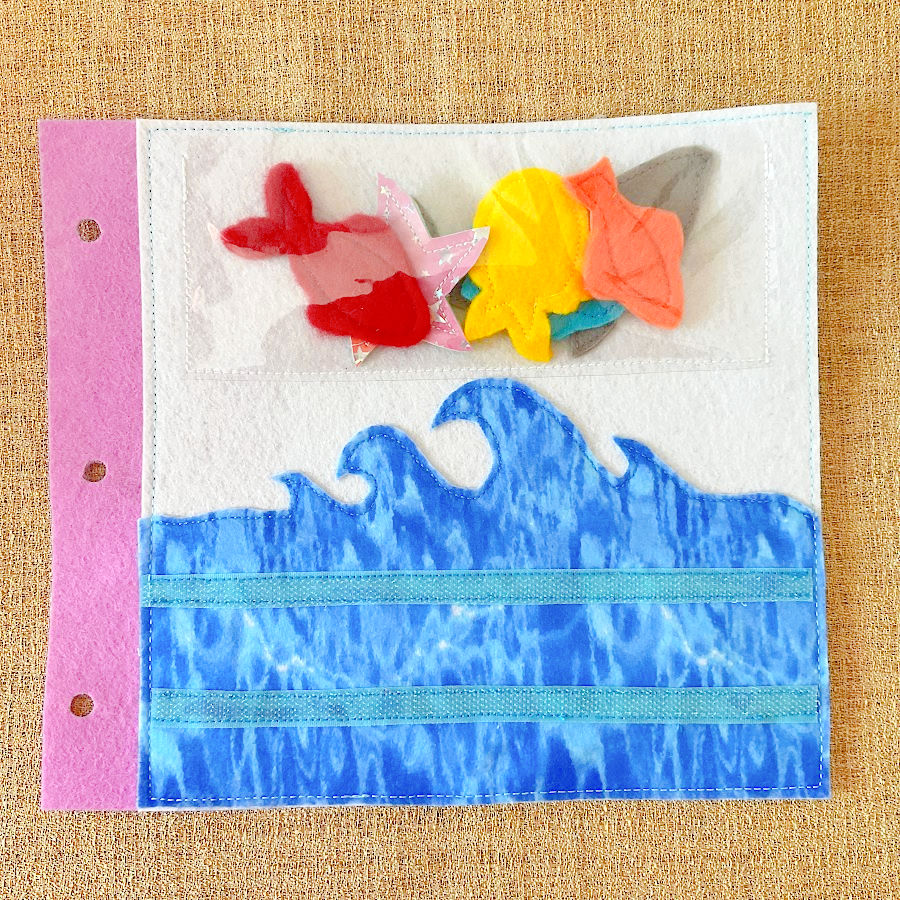
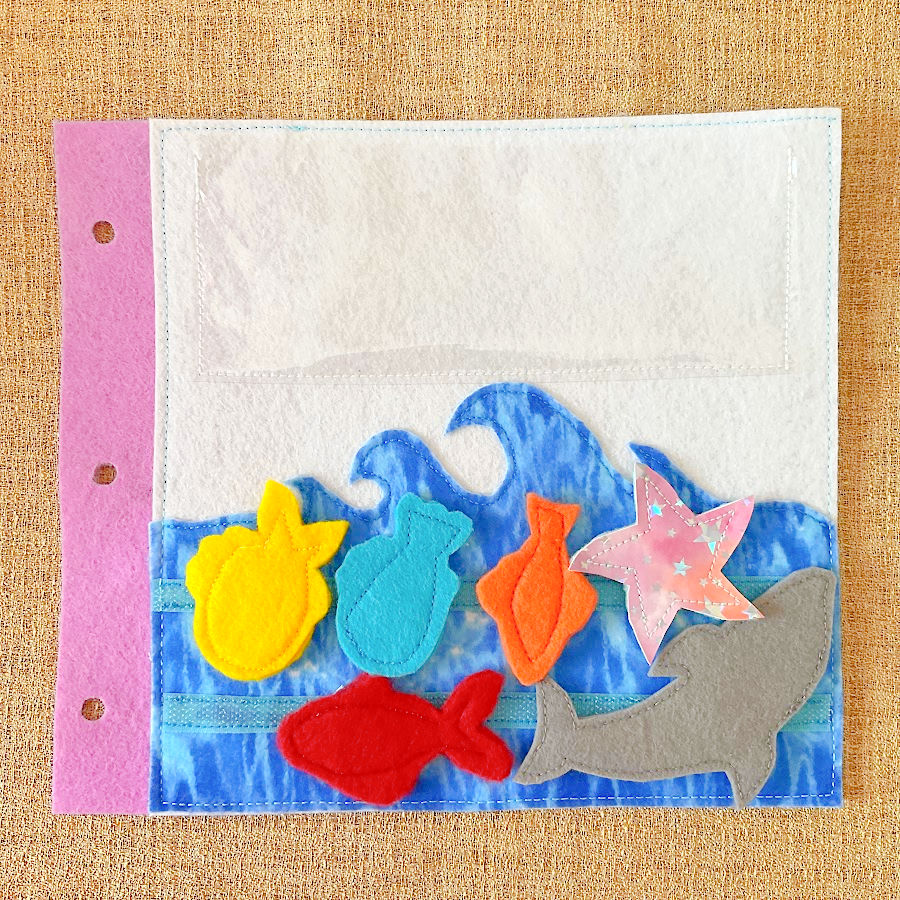
This page turned out to be my granddaughter’s favorite. It has a clear vinyl pocket filled with sea creatures — fish, a dolphin, and a starfish. Each attaches to the ocean background with Velcro.
Purpose: Builds imagination, sorting, and fine-motor skills.
Tip: To sew these shapes quickly, I stitched two felt pieces together first along the outline and then cut around the outline. Attach Velcro before sewing to keep stitches hidden.
Page 8 – Shapes Matching

Five basic shapes (square, circle, triangle, heart, and star) are sewn on the background, each in a different color. Matching loose shapes with Velcro backs can be attached in the right places.
Purpose: Teaches color and shape recognition.
Tip: Make the loose shapes double-layered for stiffness and durability. Two layers also prevent the Velcro stitches from showing.
Page 9 – Cabinet for Shapes
This page is a “cabinet” for storing the loose shapes from the previous page. Felt doors open a bit to reveal space for storage.
Purpose: Teaches organization, open-and-close motion, and tidiness.
Tip: Sew each door not only along one edge, but also half along the top and bottom. This keeps the shapes from falling out when the page is turned.
Page 10 – Fabric Picture Puzzle (Fish)
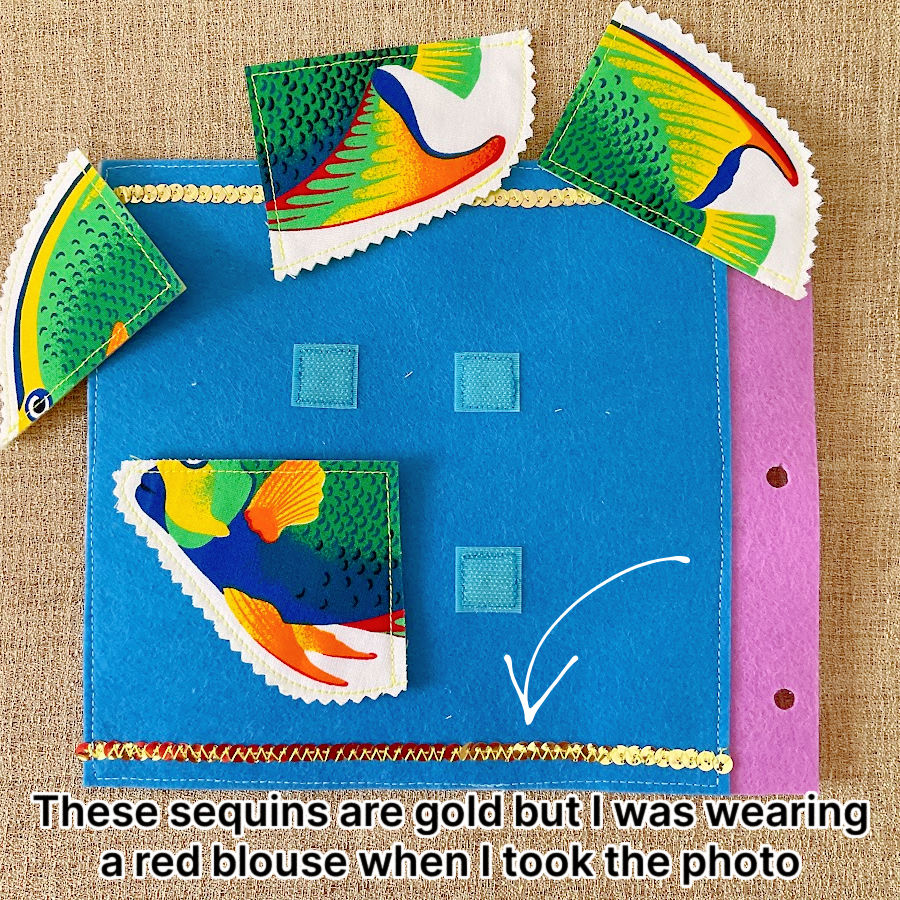
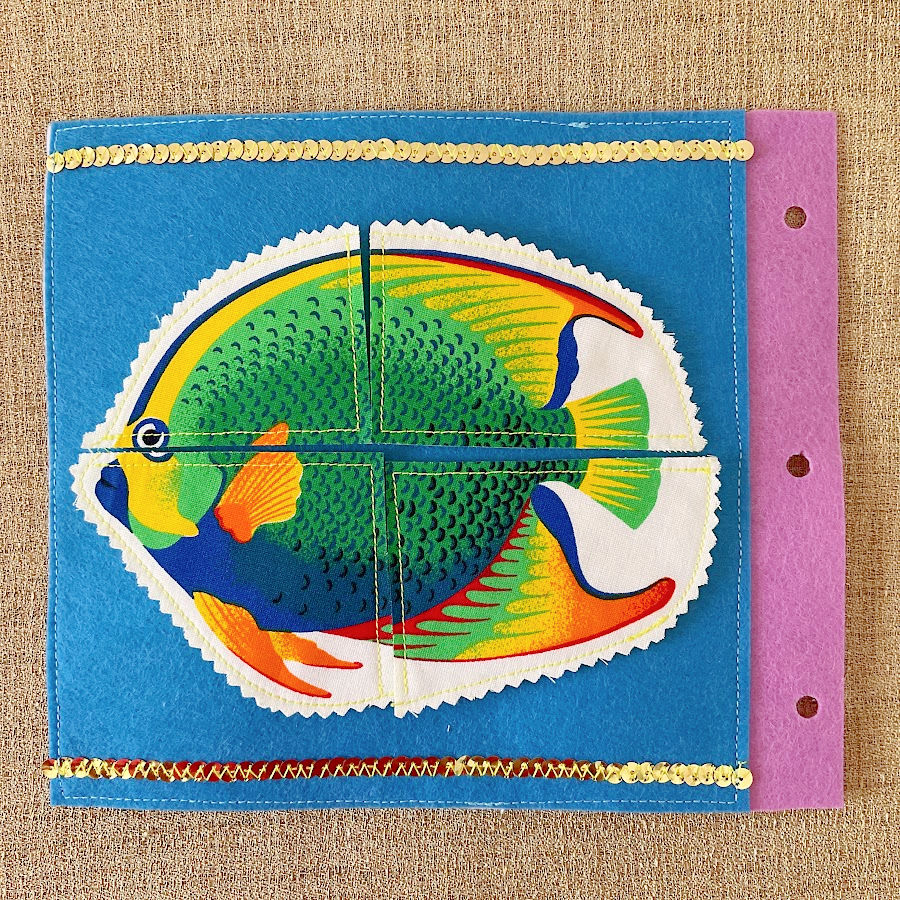
This page is a soft puzzle made from a printed fabric image. I used a fish print and cut the image into four pieces. Each attaches to the background with Velcro.
Purpose: Promotes matching, attention to detail, and spatial thinking.
Tip: Choose fabric with large, clear images and use soft felt backing for stability. Thin ribbons or trims make great decoration for the background.
Page 11 – Apple Tree
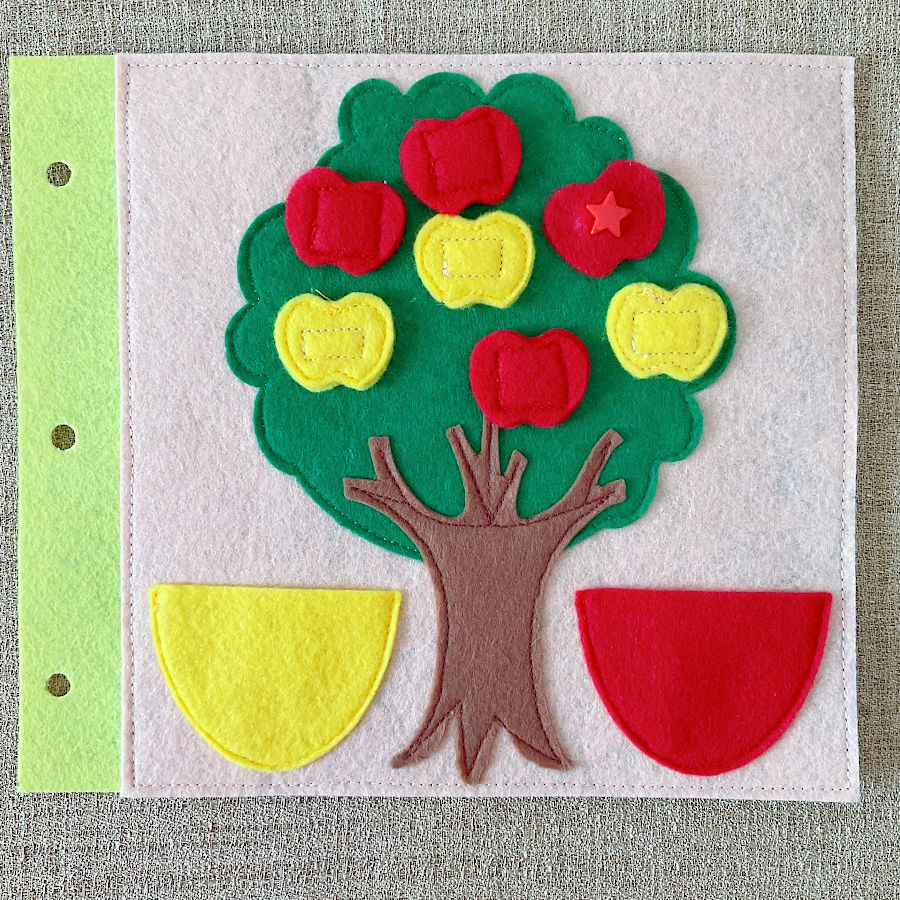
A felt tree holds red and yellow apples attached with Velcro. The apples can be “picked” and sorted into matching baskets.
Purpose: Teaches sorting, color recognition, and fine-motor control.
Tip: Attach the Velcro to one layer of each apple before sewing the two layers together. This hides the stitches and keeps the apples looking neat. I tested Kam snaps, but Velcro works much better — snaps stretched the felt.
Page 12 – Pick the Mushrooms
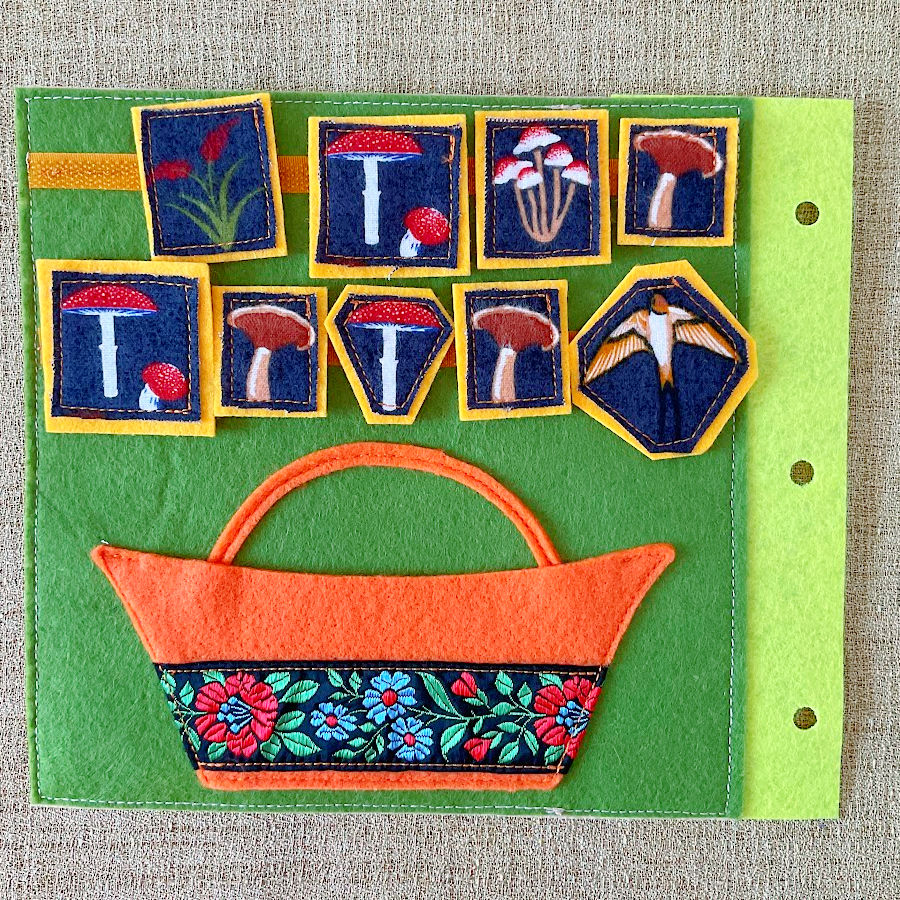
Small cutouts of mushrooms, flowers, and birds are sewn to felt bases. Only the mushrooms should go into the big felt basket in the middle.
Purpose: Encourages observation, sorting, and attention to detail.
Tip: Use fabric with small printed designs, about 1–1.5 inches in size. Sew the Velcro strips on the background before attaching the basket.
Page 13 – Flower with Sound
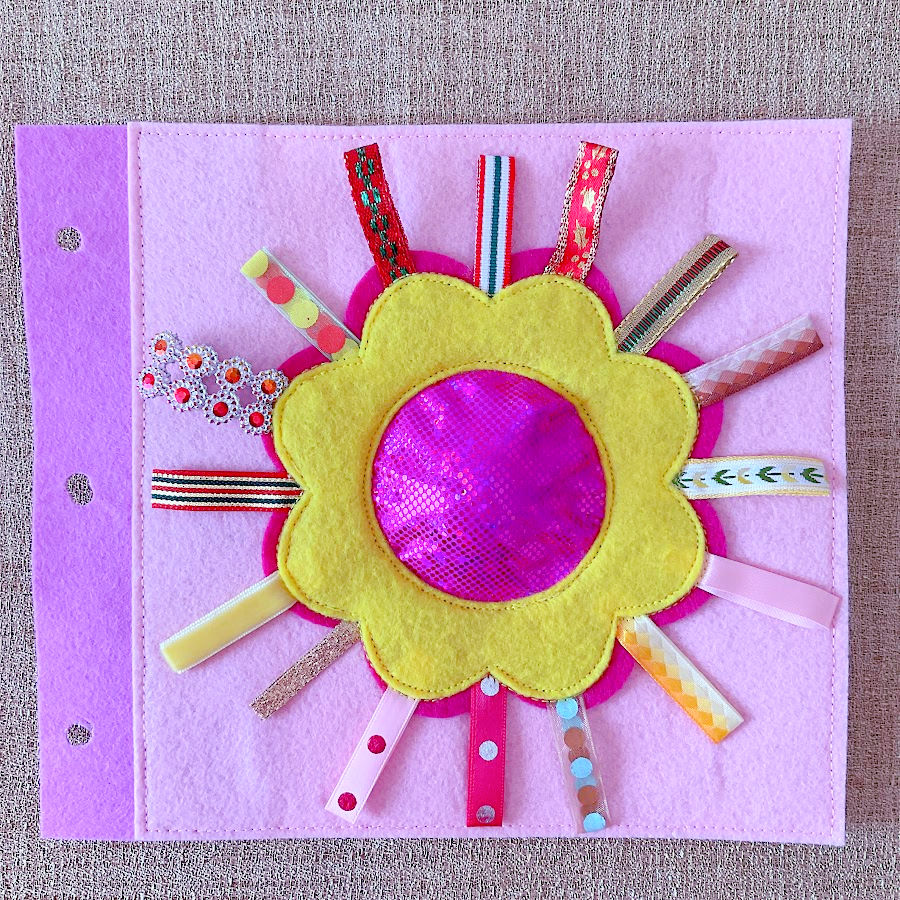
A bright red-and-yellow flower has ribbons for petals and a squeaky sound piece hidden beneath. The sound maker came from my dog’s old toy, held in place under stretch spandex fabric. The flower emits a squeak when pressed.
Purpose: Combines tactile play with sound for sensory development.
Tip: Stretchy spandex keeps the sound piece secure while allowing it to be pressed easily. Check that all ribbon ends are sewn firmly and sealed against fraying.
Page 14 – Photo Frame “Book from Nana”
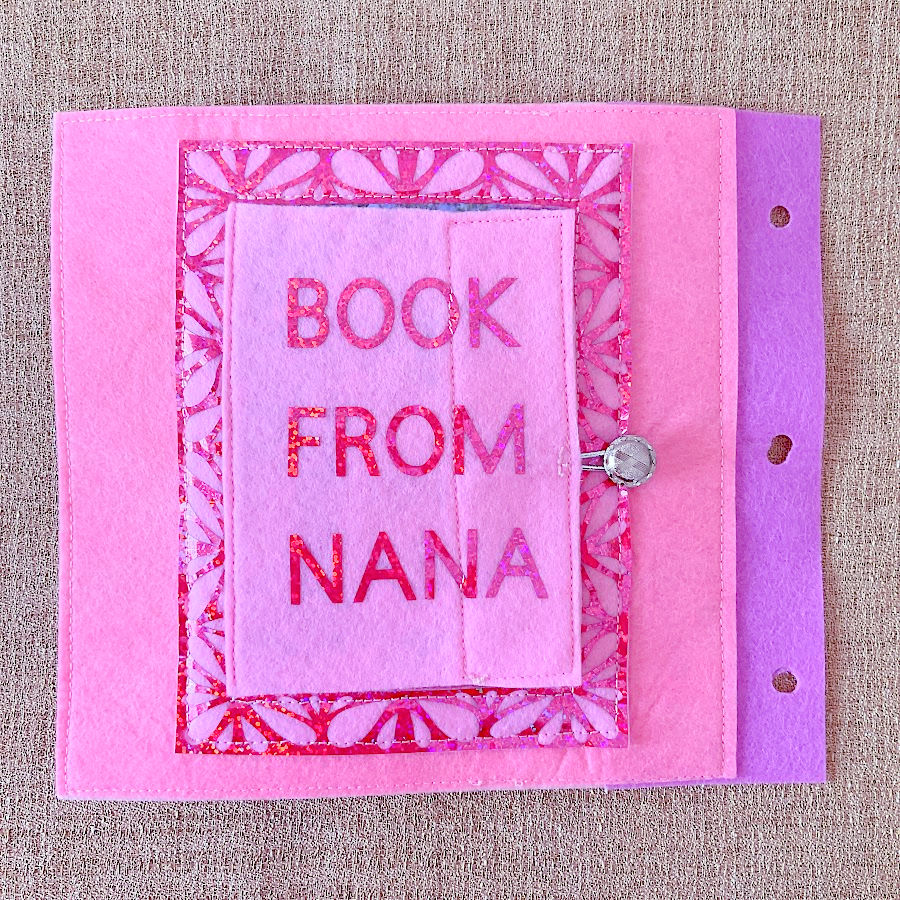
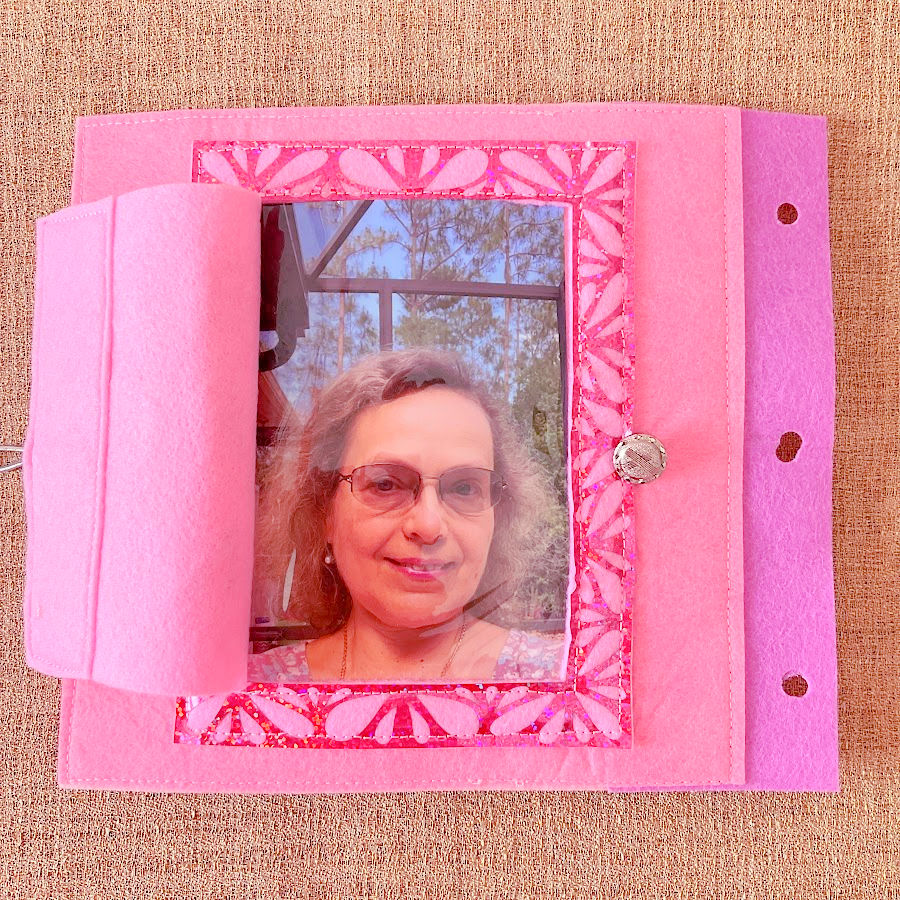
The final page has a decorative frame made on a Cricut, but any handmade frame works. A piece of clear vinyl holds a photo of me.
Purpose: Builds emotional connection by including a familiar face.
Tip: Sew the vinyl pocket on three sides only, leaving the top open to slide photos in and out. My flap says “Book from Nana,” which feels warm and personal.
How to Make a Quiet Book: Tips for Success
A quiet book takes time, but the process is just as enjoyable as the result. These tips will help your pages look neat, stay durable, and keep a child’s interest for years.
- Use two layers of felt for durability. Single-layer pieces can stretch or warp over time. Doubling the felt keeps pages sturdy and smooth.
- Mix textures and colors. Combine smooth, fuzzy, shiny, and soft materials. The more textures, the more sensory variety for little hands.
- Keep small parts secure — safety first. Stitch over cords, buttons, and ribbons several times to make sure nothing can be pulled off.
- Use a roller or non-stick presser foot when sewing vinyl. It prevents the vinyl from sticking and helps achieve cleaner seams.
- Mark placements before sewing. A disappearing fabric pen or tailor’s chalk helps position each piece precisely.
- Test each activity as you go. Open zippers, move beads, and lift flaps to be sure everything works as intended.
- You don’t need to finish it in one sitting. Quiet books are best made little by little. Working in short sessions helps you enjoy the process and keeps ideas fresh.
- Ask for help from older kids. They can cut felt shapes, glue pieces, or even do simple stitching. It becomes a shared project — and that makes the book even more special.
- Don’t worry about perfection. Small irregularities add charm. They remind you that this book was made by hand, with love.
- Label and save your page templates. They’ll make it easier to add new pages later.
- Keep your scraps. Small felt pieces are perfect for future projects or extra decorations.
- Add your own personality. Choose colors, stitches, and details that reflect you and the child the book is made for.
Personal Note
Making this quiet book was one of the most rewarding sewing projects I’ve ever done. I didn’t rush through it — I worked on it little by little, and each page felt like its own small story. Some parts were simple, others took patience, but seeing it all come together was pure joy.
My granddaughter is a year and a half old, and watching her explore the pages made every stitch worth it. She especially loves the ocean page with the fish and dolphin — that one quickly became her favorite.
If you decide to make a quiet book too, make it personal. Add your own colors, shapes, or family photos. Whether it’s for your child, grandchild, niece, or a little one you simply love, it becomes more than a toy — it’s a keepsake they’ll cherish.
Materials and Tools You’ll Need for a DIY Quiet Book
To make a quiet book, you don’t need fancy supplies — most materials are simple craft staples. Here’s what I used and a few notes about each:
Materials:
- Felt sheets (stiff and soft types)
- Velcro
- Zippers
- Ribbons
- Small pieces of clear vinyl (for some pages)
- Metallic binder rings
- Hole punch tool
- Optional: Cricut machine for cutting shapes
- Decorative trims and embellishments
- Fabric glue stick
Notes on Materials and Tools
Felt – Use stiff felt for the pages and soft felt for decorations. Mixing textures gives the book more character. Felt scraps from other projects work perfectly too and help reduce waste.
For the pages, I used mostly pre-cut stiff felt squares, 8 x 8 inches each. This size worked perfectly and saved a lot of time. Cutting large pieces of stiff felt evenly can be tricky without a special square ruler, so buying pre-cut sheets kept all my pages uniform and ready to sew right away. Besides, it’s easier!


If you’re new to working with felt, see my full guide: Felt Fabric 101: What Works, What Doesn’t, and Why It Matters — it explains which types of felt hold up best for sewing projects like this one.

Hook & Loop fasteners (or Velcro ) – Make sure to use the sew-on kind. Sticky type doesn’t adhere properly to felt and will eventually peel off. And you can’t sew through non sticky one without damaging your needle.
If you want to learn the best techniques for attaching it neatly and securely, see my full guide: How to Sew VELCRO® the Right Way: 23 Tips That Actually Work
Zippers – Any short zipper will work. You can reuse old ones or buy a mixed set in bulk. Using different colors makes the book more fun and visually engaging.
Ribbons – Keep various widths and textures on hand. Satin, grosgrain, or organza all work well. In this quiet book, I used ribbons as flower petals, sun rays and as tails for airplanes. You can also use them for small decorative details like basket trim or door accents. Mixing colors and textures adds movement and a playful look to the pages.
Clear vinyl – Use thin, flexible vinyl. The soft type is much easier to sew and won’t wrinkle or crack. It’s perfect for little windows or photo pockets.

Metallic binder rings – I tested 2″, 1 1/5″, and 1″ rings. The 1 1/5-inch rings fit best and hold the pages neatly. Larger ones make the book too floppy and smaller ones are not large enough to allow easy page turning. The size of the ring will also depend on the number of pages you have.

Hole punch tool – A simple hand punch or eyelet tool works well for making clean holes in the stiff felt spine pieces. Evenly spaced holes help the rings align perfectly. I am using (through my representative, my husband) a set of punches and he uses a piece of wood as backing, beware that the surface on which you work will be affected.
Cricut machine (optional) – All the shapes come as both PDF patterns (for printing and cutting by hand) and SVG files (for Cricut users). If you have a machine, it saves time and ensures every shape matches perfectly. If you want to buy one, I recommend the “Maker” version.

Decorative trims and embellishments – Lace, pom-poms, buttons, sequins can make the pages more playful. Use these details to add charm and texture.

Fabric glue stick – I used this frequently to baste small pieces in place before sewing. It’s non-toxic, dries clear, and keeps fabric from shifting without pins. It’s especially handy for small appliqués.
Want to Make This Quiet Book Yourself?
I’ve prepared a complete printable pattern set that includes:
- A detailed PDF sewing guide with instructions for every page (100 pages with images)
- Printable PDF templates you can cut by hand
- SVG files for Cricut or other cutting machines
- All pages are sized for 8×8 inch felt squares.
You can find the full Toddler Quiet Book Set in my shop here:
If this tutorial gave you some ideas for your next project, save the pin below to your sewing board. It’s an easy way to find it later when you’re ready to make your own quiet book. You can also follow me on Pinterest for more sewing tutorials, tips, and project inspiration.
latest posts
- What Do You Call a Person Who Sews? I Asked My Readers and Got 1,408 Opinions
- DIY Round Purse: PDF Sewing Pattern and Detailed Instructions
- Mini Wonder Clips By Clover: Useful Sewing Tool Or Just Another Notion?
- Non-Slip Grips For Quilting Rulers: A Small Notion With A Useful Job
- Fabric Eraser for Sewing: What It Removes and When to Use It
- What Is The Best Thread For Sewing Machine Projects? Let’s Find Out!
- Butterfly Quilt Block Tutorial – Foundation Paper Piecing
- How To Sew Quilt Squares So The Corners Match
- Sewing With Fork Pins: How They Help With Pattern Matching, Slippery Fabric, And Seams

Your ‘Toddler Quiet Book’ is BEAUTIFUL. I agree with your suggestion , to make it personal and I love your back page with your photo in it.
Such great ideas, thank you. I enjoy reading your articles and jokes.
Your granddaugter will cherish this book forever.
Jeanne Peters
Thank you! It was a lot of work, but I think it was worth it!