Quarter Inch Seams and Quilting Math: True, Scant, and Everything In Between
One of the first things quilters are told is to keep the seam allowance at exactly ¼ inch. It’s supposed to be the key to accurate blocks and correct quilting math. And for this, we have special quarter-inch presser feet.
But here’s where things get a little tricky.
Not all quarter-inch feet sew the same seam. Some give you a wider seam. Some run slightly narrower. A few include guides or markings that seem helpful — until you realize your finished blocks are coming out smaller than the pattern says they should.
In this tutorial, I’ll go over what quarter-inch presser feet really are, why they matter in quilting, and how to tell the difference between the types. I’ll also share what I noticed after testing several of them on my own machine — and how a tiny shift in seam width can quietly throw off your whole quilt.
Why the ¼″ Seam Allowance Is So Important in Quilting
Quilting depends on small pieces adding up neatly. Every block is designed with a ¼ inch seam allowance in mind. That measurement isn’t just a guideline. It’s built into the math.
When your seam allowance stays consistent across every block:
- Bocks finish at the right size
- Seams line up where they’re supposed to
- Points meet without drifting
- Rows join smoothly without needing to ease or stretch anything
That’s why quilters talk so much about the ¼″ seam. It’s not just a habit — it’s what keeps everything lining up the way the pattern intended.
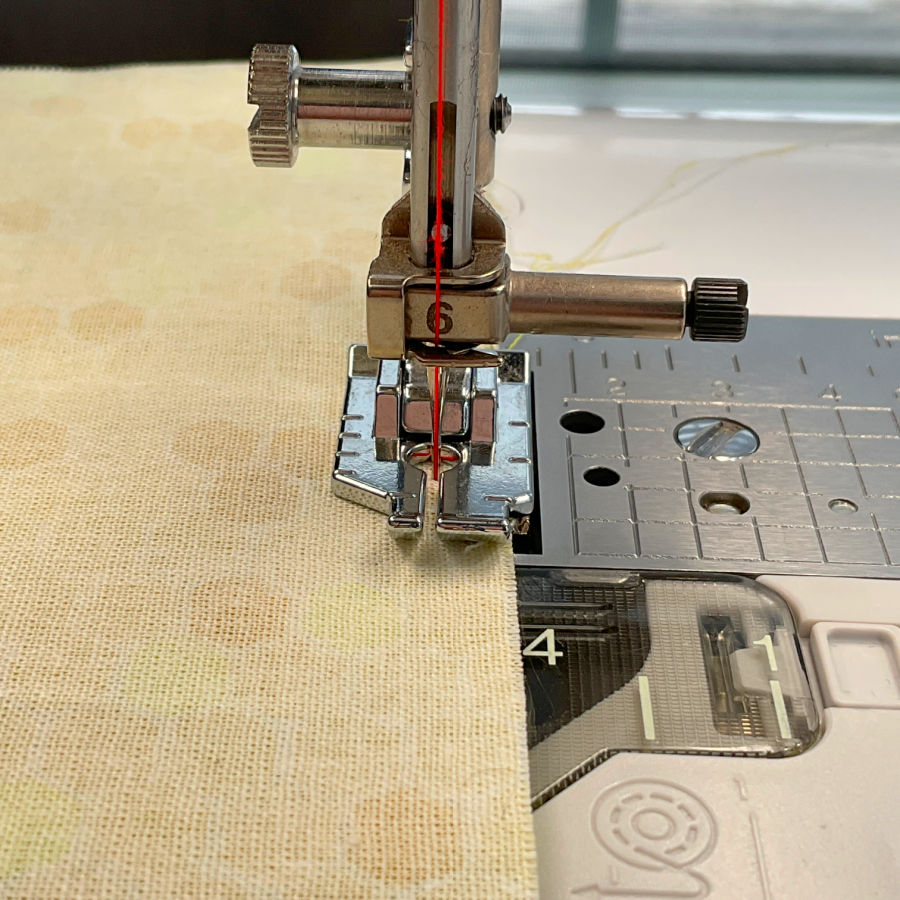
What “¼ Inch” Really Means at the Sewing Machine
At the machine, it means the distance from the needle to the edge of the fabric — before the seam is pressed. That’s the part many patterns assume, but don’t always explain.
This is why needle position matters. If your needle is slightly off-center or you move it left or right to adjust the seam width, you’re changing that measurement — even if the foot stays the same.
It’s also why measuring the seam after sewing can be misleading. Once the fabric is stitched and pressed, that line shifts. The fold takes up space. The thread fills in some of the gap. The finished result isn’t always the same as what the ruler says at the machine.
So when people say “use a ¼″ seam,” they’re really talking about the distance from the needle to the fabric edge as it feeds through the machine. And that’s the measurement we want to stay consistent.
True Quarter Inch vs Scant Quarter Inch
I am fairly new to quilting. When I made my first quilt, I did what many beginners do. I used the ¼-inch presser foot that came with my sewing machine.
Before sewing the quilt, I did a test seam on a fabric scrap. I measured carefully. The seam allowance was exactly ¼ inch. Everything looked right, so I moved on with confidence.
But when the quilt top was finished, something was not quite right. The quilt was smaller than the pattern said it should be.
Not by much. Just enough to notice.
That sent me down the rabbit hole of quarter-inch presser feet. This is where things got interesting — I discovered the idea of a scant quarter inch seam allowance.
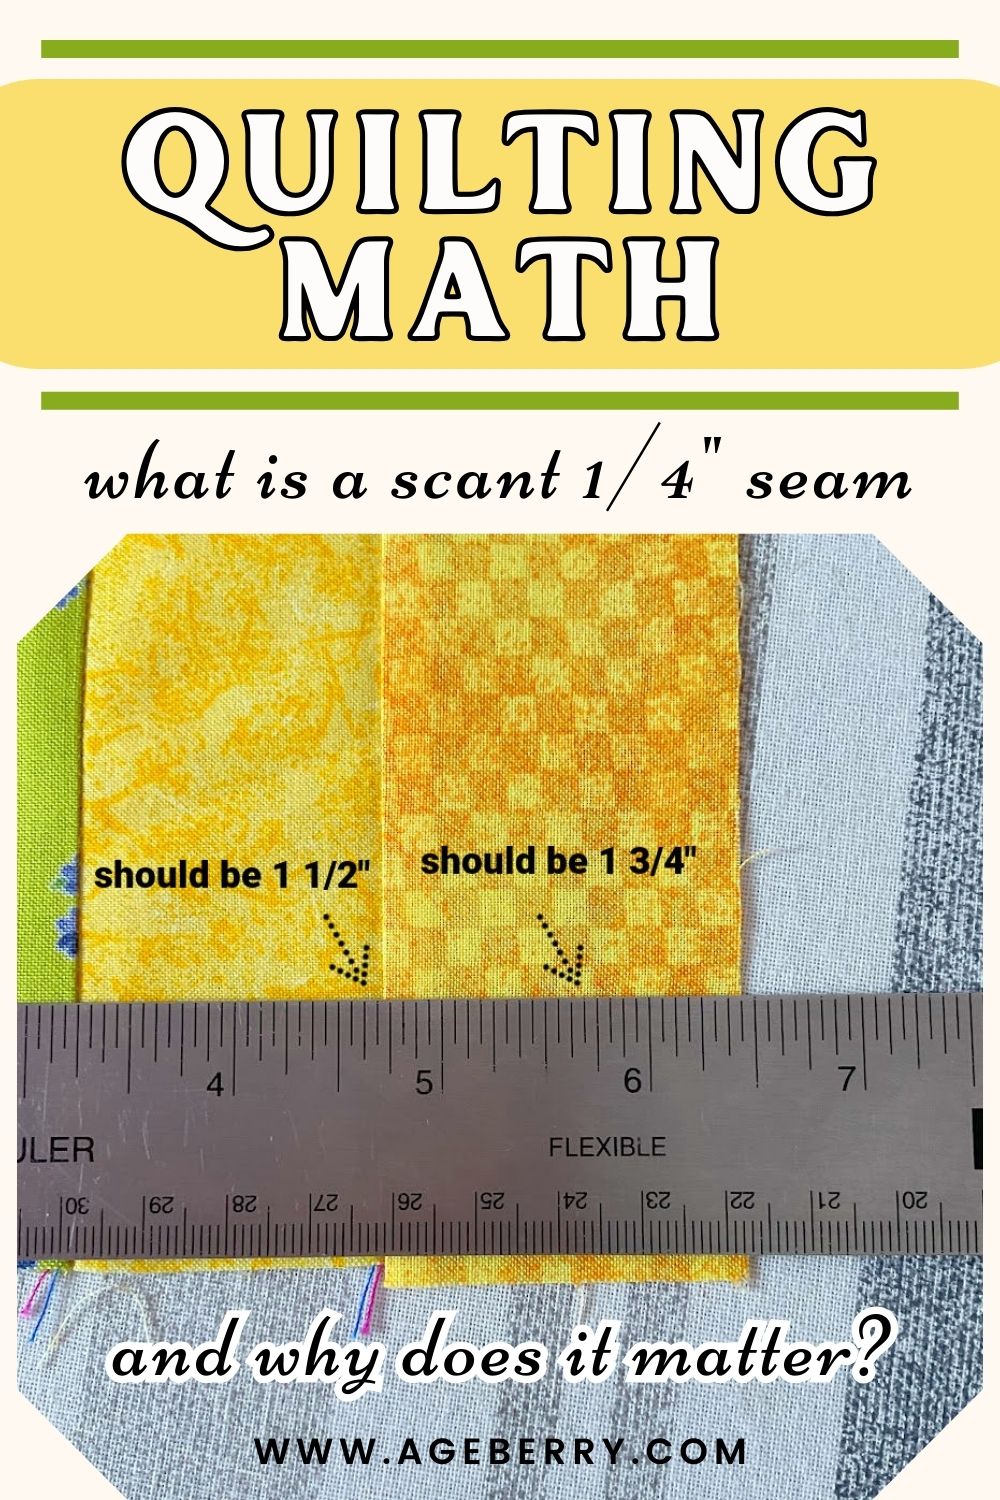
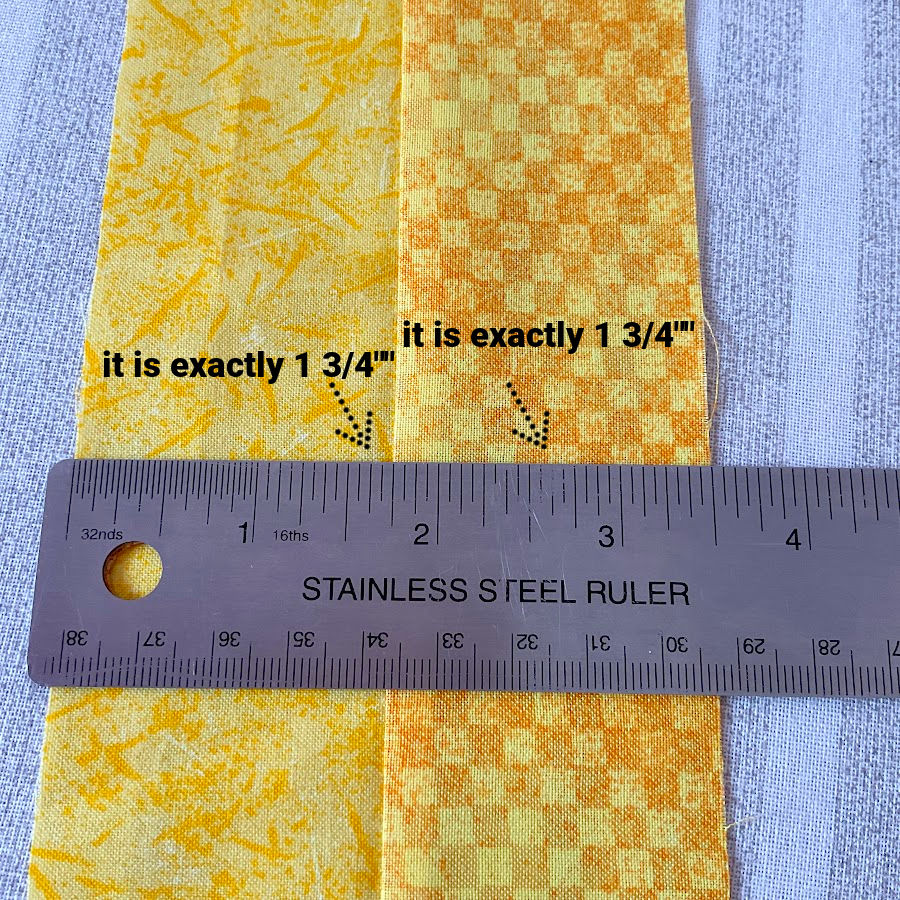
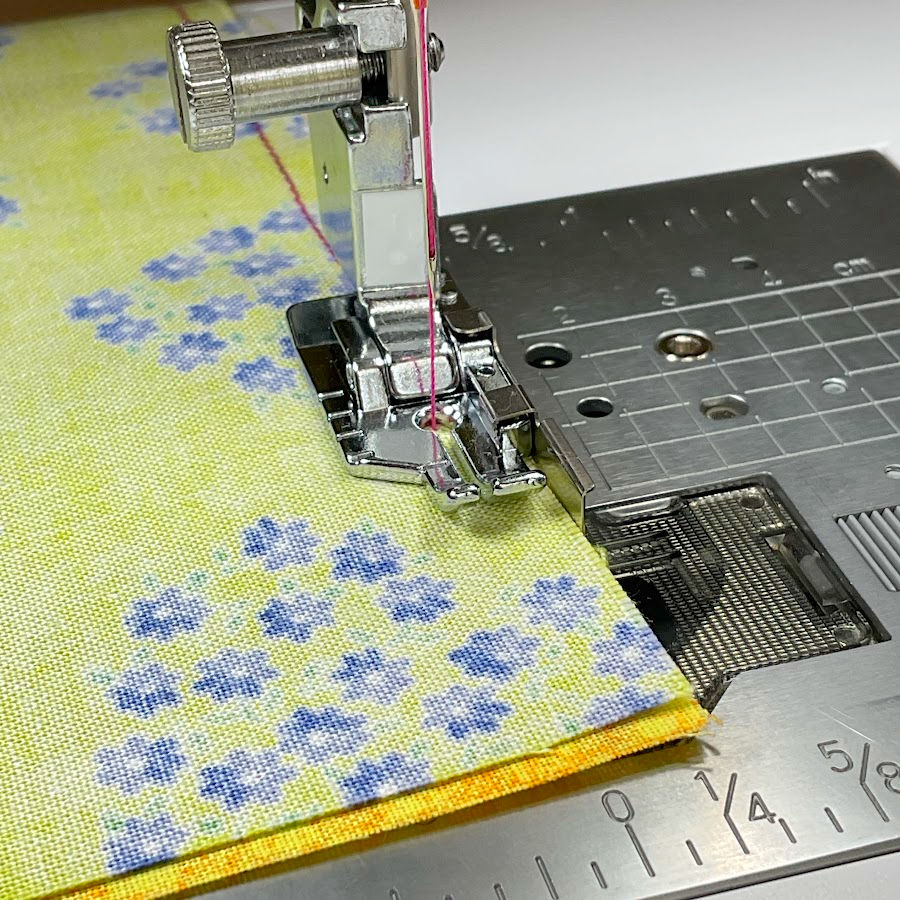
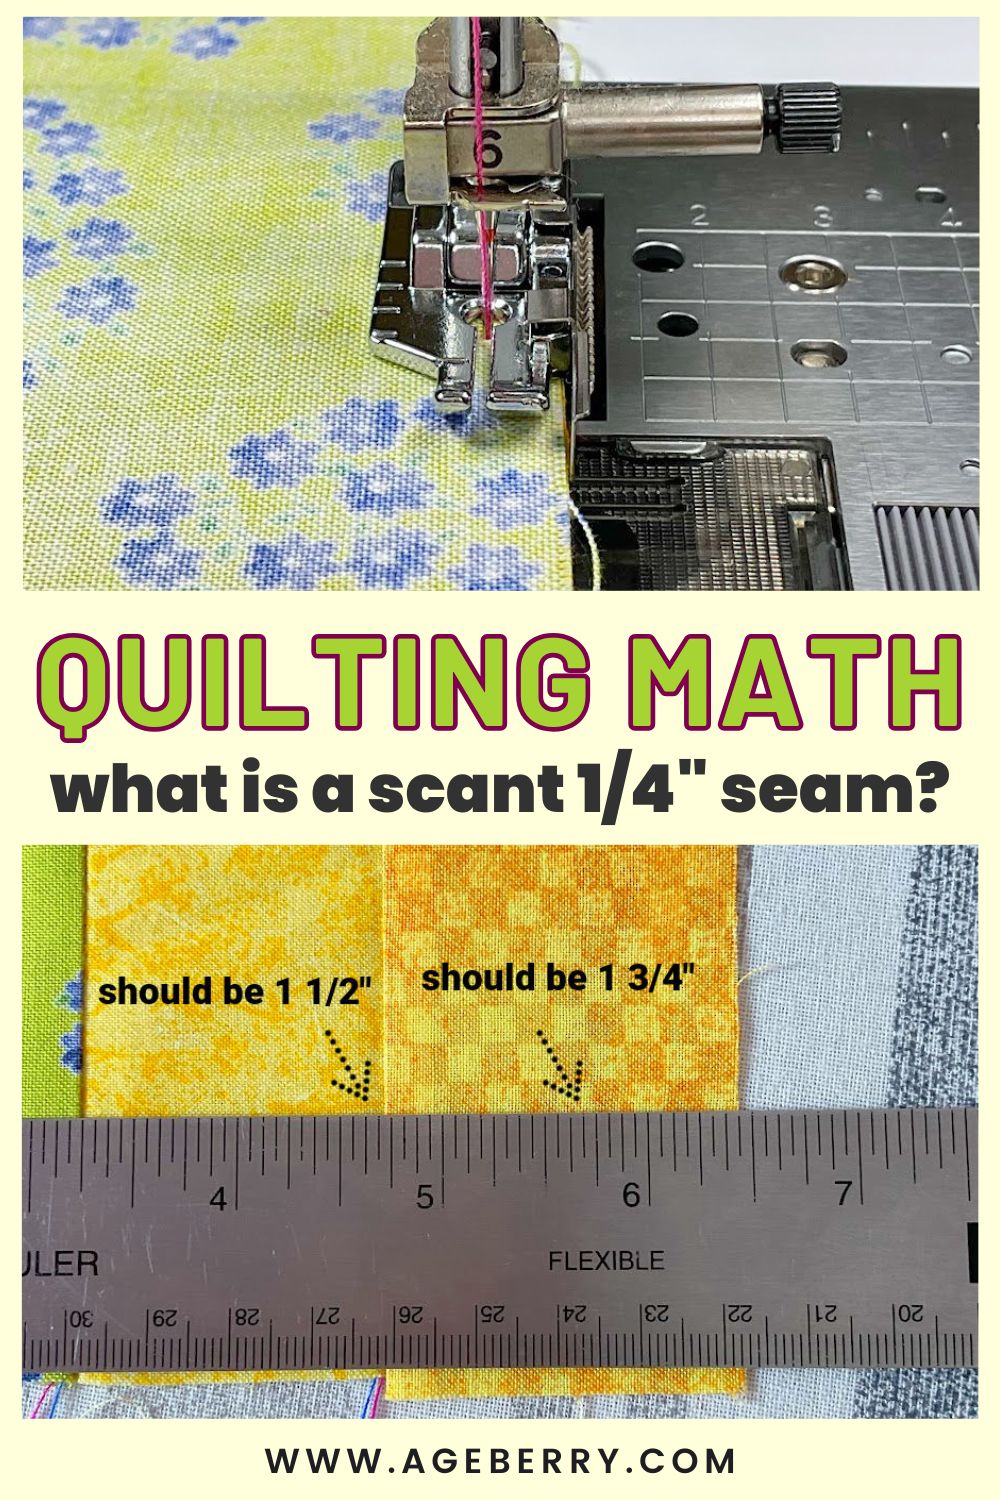
You see, a true ¼″ seam is exactly what it sounds like — the distance from the needle to the fabric edge is a full quarter inch.
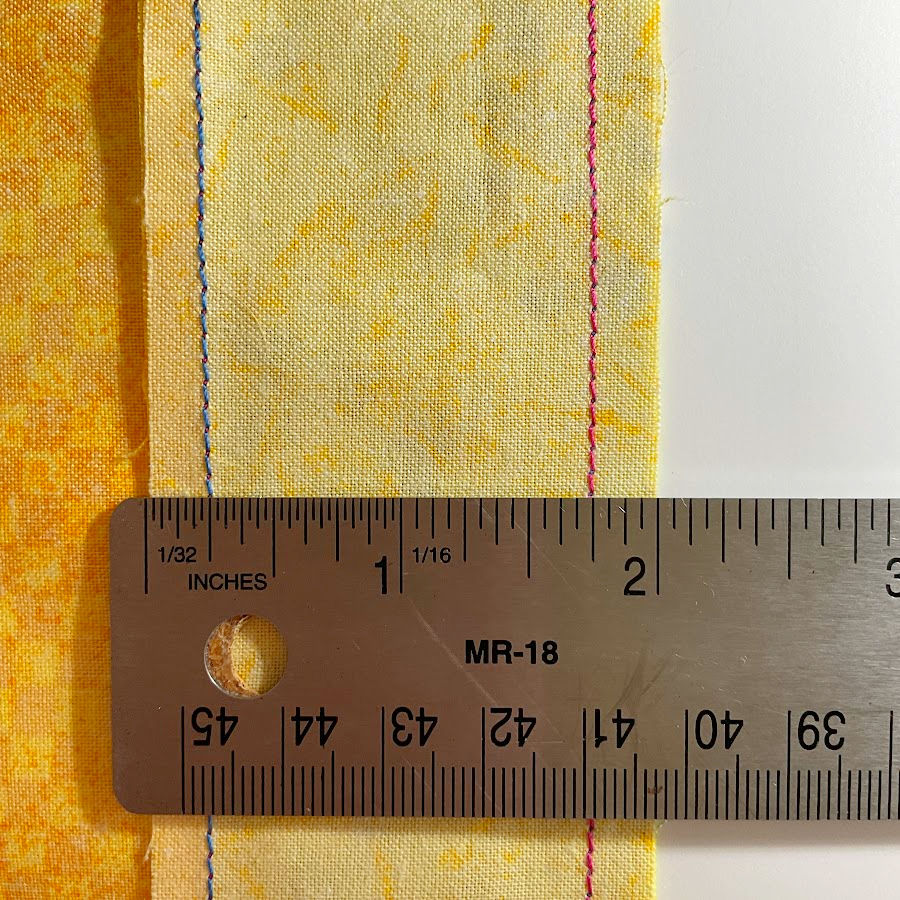
A scant ¼″ seam is just a bit smaller. Not much — usually just the width of a thread or two. In the image below, the measured distance is less than ¼″, short by slightly less than 1⁄32″. In millimeters about 0.5mm (¼″ is 6.35mm).
And this is why this is important mostly for quilting: this small difference won’t be so important for one or two seams only; it will probably not even be noticed. But when you build a quilting block from 3, 4 or even 6 parts and then you place 4, 6 or even more of this blocks side by side, this small amount adds up to a noticeable size.
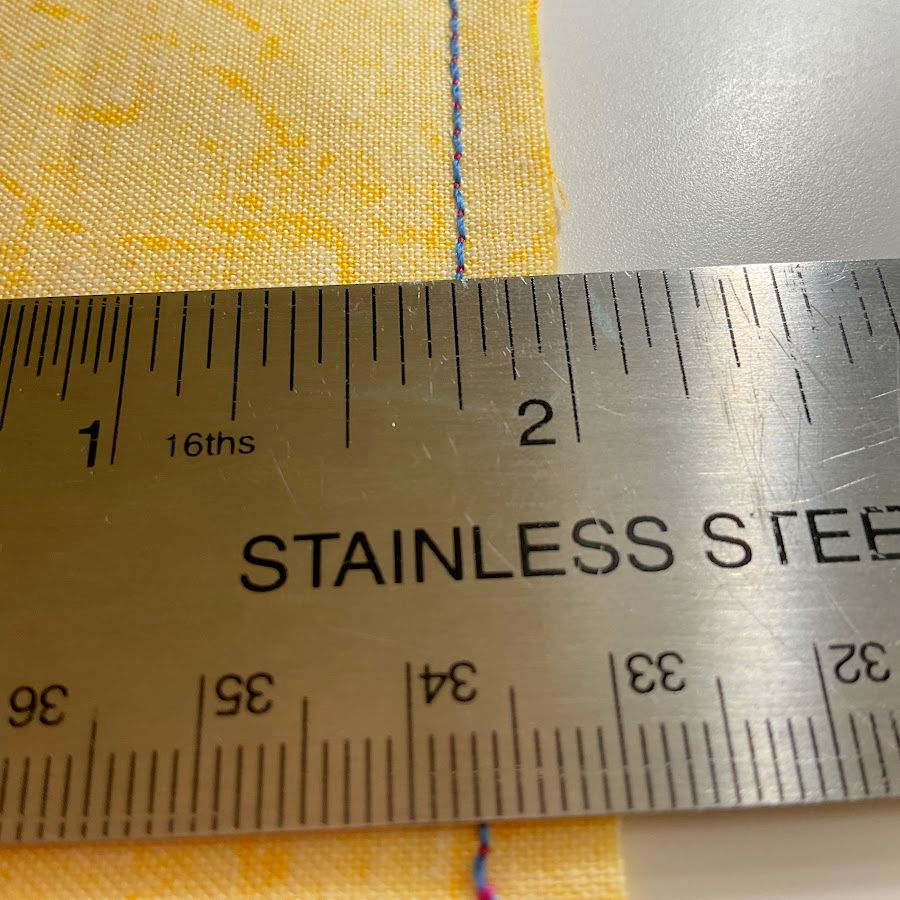
That tiny difference makes room for what happens after sewing. When you press a seam — whether open or to the side — the fabric and the thread take up space. That little bit of bulk can add up, and it can make your finished units come out smaller than expected.
A true ¼″ seam often ends up slightly too wide once everything is pressed. A scant ¼″ adjusts for that.
That’s why many quilt patterns expect it — even when they don’t say so directly. The instructions may say “sew with a ¼″ seam allowance,” but they’re often written with the scant version in mind.
✅ Related tutorial: Easy Quilting Techniques – Step-by-Step Patchwork Quilt Tutorial
Why Quilters Use a Scant Quarter Inch
A scant ¼″ seam isn’t about being extra careful or following tradition — it’s just a practical way to get blocks to finish at the right size.
Here’s why it matters:
- Fabric has thickness
- Thread takes up space
- Pressed seams don’t lie perfectly flat
All of that adds bulk. And once you press the seam — even if it was stitched at a true ¼″ — the finished unit can come out smaller than expected.
That’s where the scant seam comes in. By sewing just a thread or two shy of ¼″, you make room for the fabric and the fold. It helps the block measure what the pattern says it should, without having to stretch, trim, or fudge things later.
It’s not about being exact down to the millimeter. It’s about sewing in a way that works with how fabric behaves, not just how it measures.
Is a Scant Quarter Inch Required for a Good Quilt?
No, it’s not a rule — and it’s definitely not the only way to make a beautiful quilt.
You can absolutely piece a quilt using a true ¼″ seam throughout. If the seam allowance stays the same from start to finish, your blocks will still come together, your points can still match, and the finished quilt will still look great.
✅ Related tutorial: From Sewing Garments to Designing Quilt Blocks: My New Pattern Collection
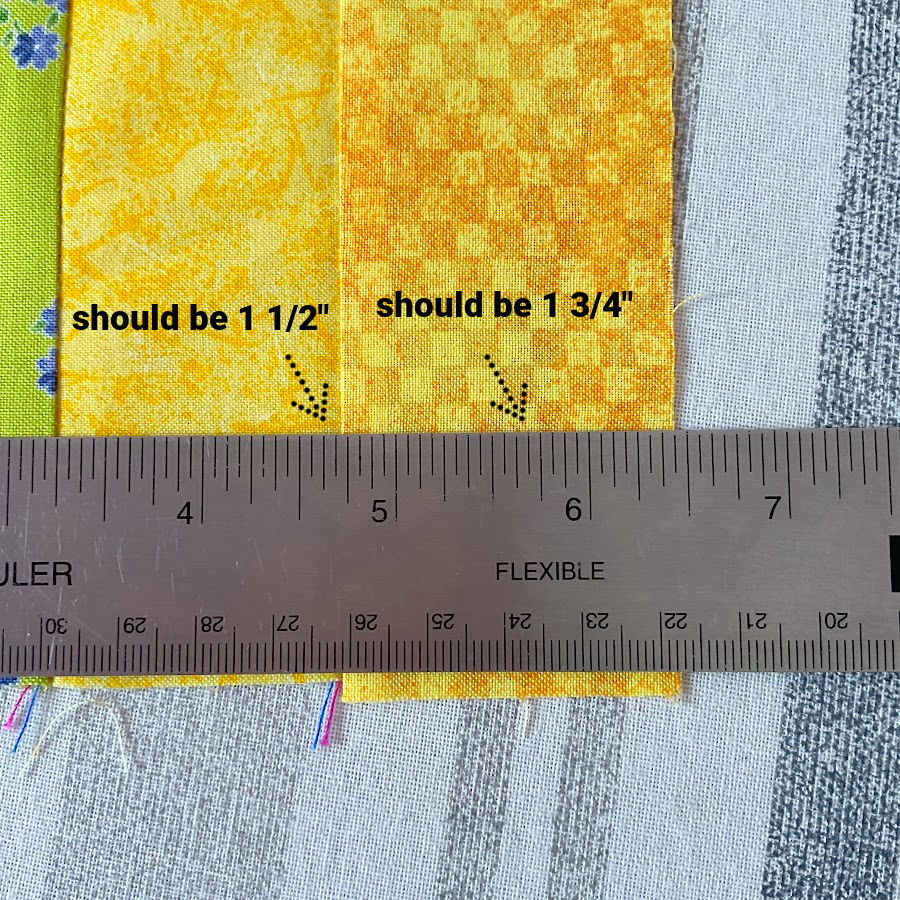
The problems start when the seam width changes in the middle of a project. Maybe one block was pieced with a scant seam, and another with a full quarter inch. That small shift can throw off the measurements, especially when blocks need to line up in rows or corners.
What matters more is that the seam allowance stays consistent across the whole quilt. Scant or true — just choose one, test it, and stick with it.
Why Different Quarter-Inch Feet Produce Different Results
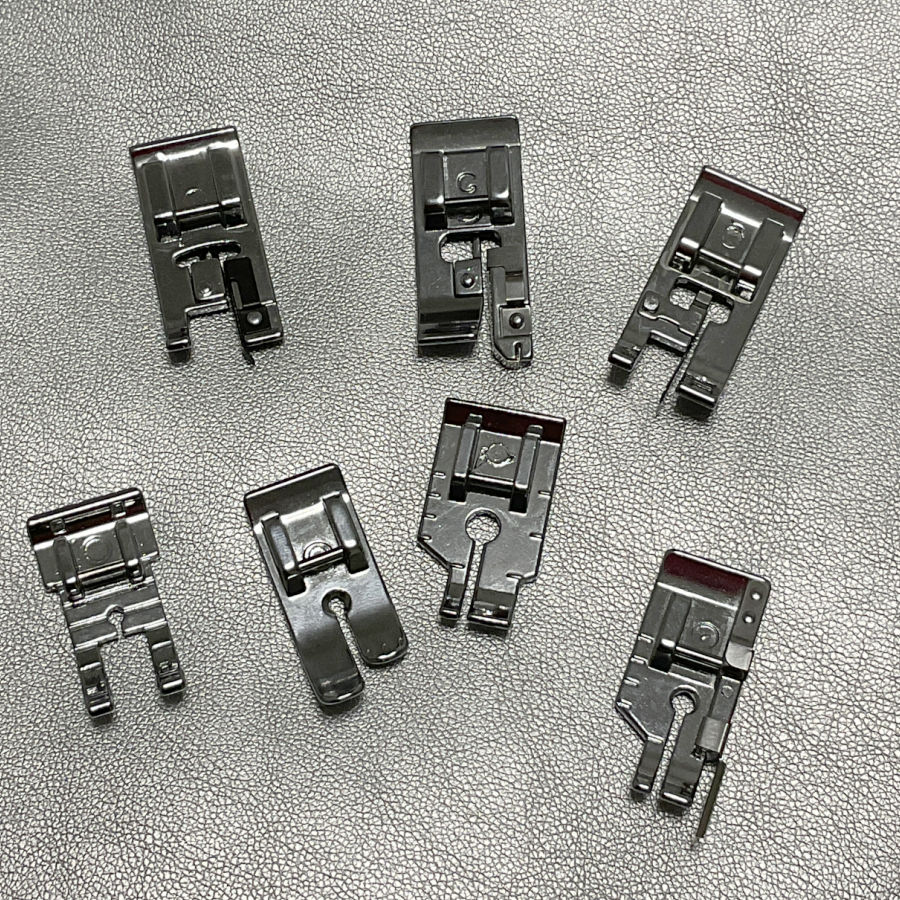
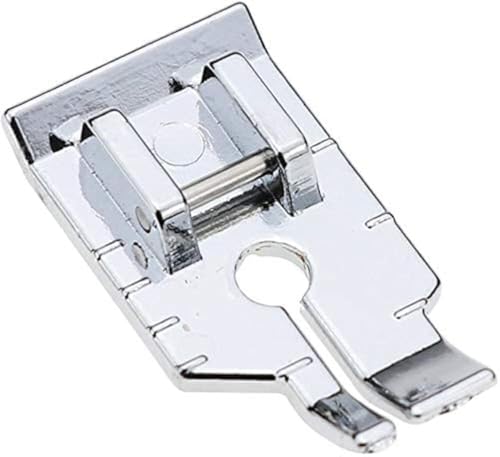
To help with sewing an accurate ¼″ seam, there are a lot of presser feet labeled as “¼ inch foot.” I have seven of them — and that’s just scratching the surface. There are many more out there, made by different brands, designed for different machines, and built with slightly different measurements in mind.
And none of them behave exactly the same.
Some are built for a true quarter-inch seam. Others sew a scant quarter inch, even if the packaging doesn’t say so. Some include a metal guide or markings to help position the fabric, but that doesn’t guarantee the seam will measure what you expect once it’s sewn and pressed.
Even fabric makes a difference. If you sew with standard quilting cotton, your seam might measure exactly ¼″. But switch to something thicker — like denim or canvas, especially for a quilted project — and the same foot, same needle, and same seam line can produce a very different result. The extra bulk changes how the fabric folds, which changes the finished size of your units.
So it’s not just about which foot you use. It’s about how that foot behaves with your fabric, on your machine, and how it handles real seam bulk.
✅ Related tutorial: 7 Easy Ways To Make Multiple Half Square Triangles
Types of Quarter-Inch Presser Feet
Up to this point, everything has been about seam allowances and why tiny differences matter. Now it’s time to look at the tools themselves. Below are several quarter-inch presser feet, starting with the most basic type. I’ll describe how each one is built and what that means at the sewing machine.
Note: Some of the links on this page are affiliate links. This means I will receive a commission if you order a product through one of my links. I only recommend products I believe in and use myself.
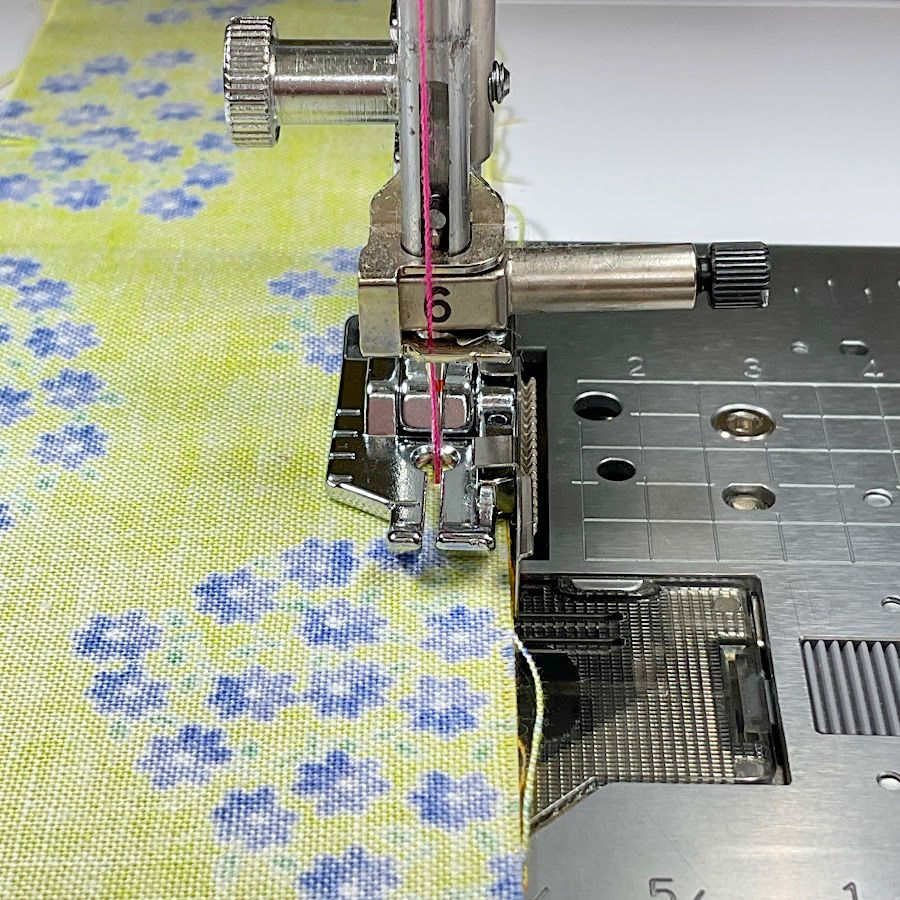
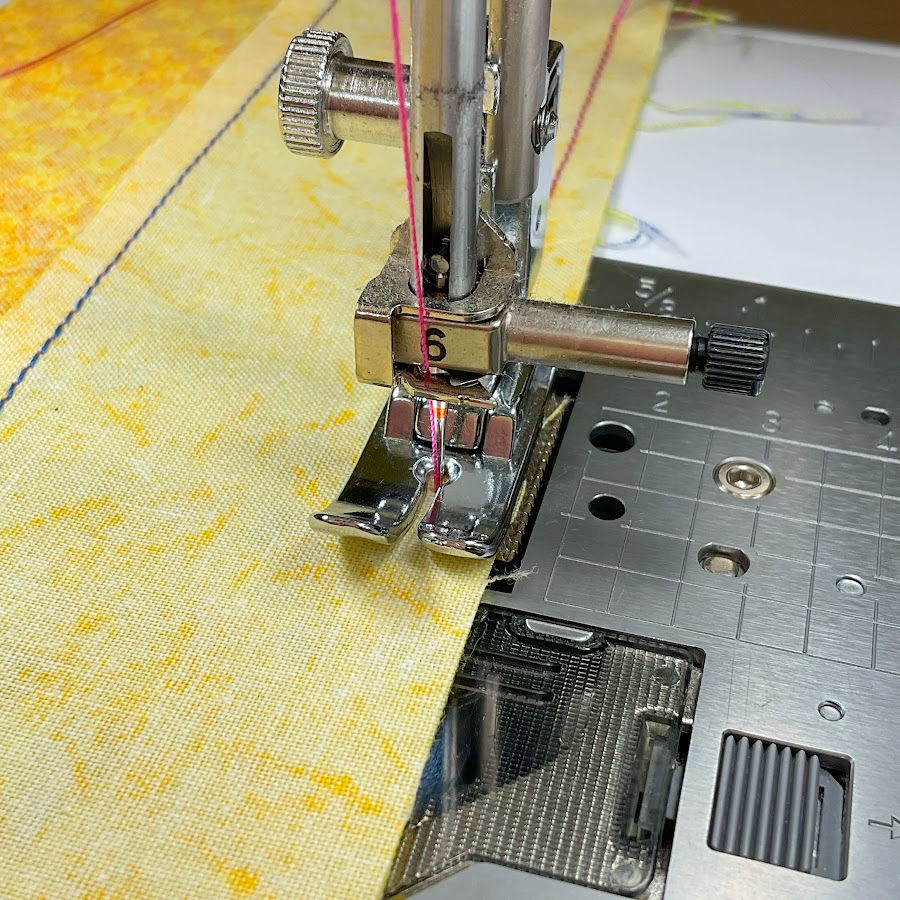
True ¼″ Straight Stitch Presser Foot (No Guide)

This is a basic straight-stitch quarter-inch presser foot. It has no guide, no flange, and no adjustable parts. The edge of the foot itself acts as the reference point for the seam allowance.
This type of foot is designed to sew a true quarter-inch seam. The distance from the center needle position to the edge of the foot measures exactly ¼″. If you keep the fabric edge aligned with the foot edge, the seam allowance will be a full quarter inch before pressing.
The needle hole on this foot is small. That extra support close to the needle helps prevent lightweight fabrics from dipping into the needle plate opening. It also reduces puckering and skipped stitches at the start of seams. Fabric feels more stable as it feeds under the foot.
This foot works well when:
- You want a true ¼″ seam
- You guide fabric visually rather than against a fence
- You sew straight seams without bulky intersections
Because there is no guide and no built-in adjustment, this foot does not compensate for fabric thickness or pressing bulk. In quilting, that means seams sewn with this foot often measure exactly right at the machine, but can finish slightly large once pressed.
✅ Related tutorial: Presser Feet 101: What They’re For, When to Use Them, and Why They Matter
True ¼″ Singer Presser Foot Without Side Guide

This is a true ¼″ presser foot without a side guide. There is no metal flange or fence on either side of the foot. The edge of the foot itself is the only reference point for the seam allowance.
The seam width is determined by the distance from the center needle position to the right edge of the foot, which measures a full quarter inch. If you keep the fabric edge aligned with that edge, the seam allowance will be exactly ¼″ before pressing.
This foot has a compact, solid metal shape with a small needle opening. That helps support the fabric close to the needle and keeps the fabric stable as it feeds, especially at the start of seams. It behaves similarly to other plain quarter-inch feet, but the shape and proportions can still affect how it feels at the machine.
In use:
- There is no physical guide to prevent drifting
- Seam accuracy depends on steady fabric feeding
- The seam produced is a true quarter inch
This foot works well when:
- You want a true ¼″ seam
- You prefer visual alignment instead of a guide
- You don’t want anything catching on seam intersections
Like other true quarter-inch feet, this one does not account for fabric thickness or pressed seam bulk.
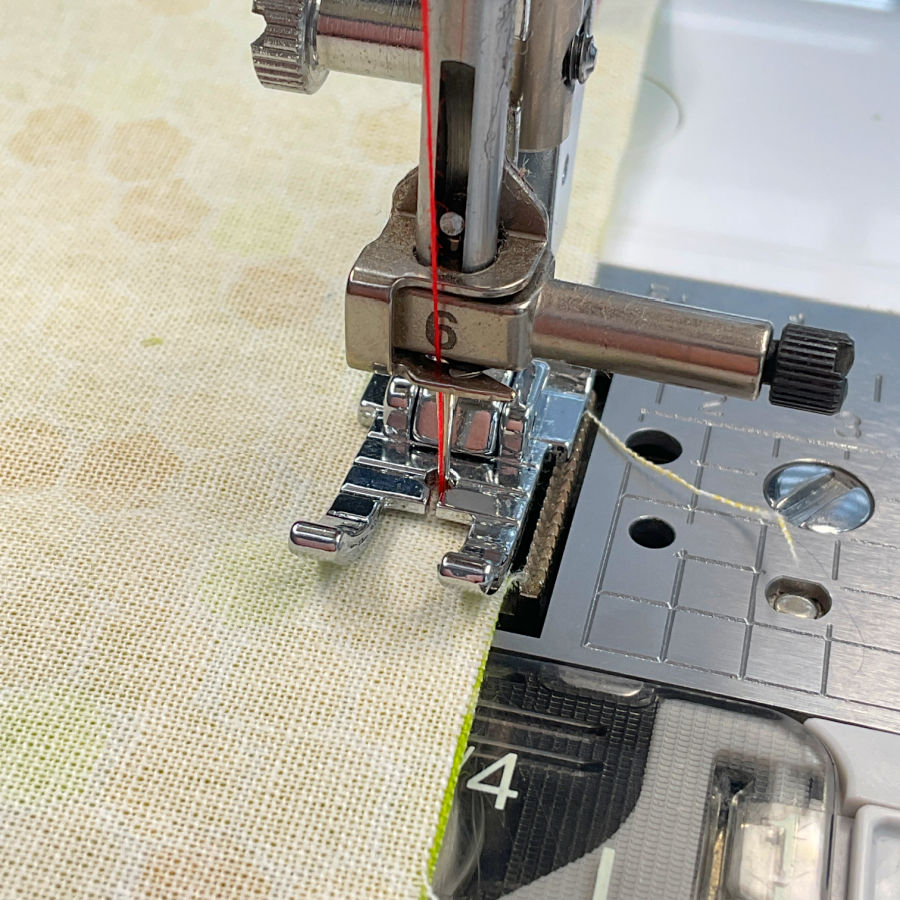
True ¼″ Quilting / Piecing Presser Foot (Straight Stitch, No Guide)
This is a true ¼″ straight-stitch presser foot without a side guide. The foot itself does not have a metal flange or fence. The edge of the foot is the only reference point.
The seam allowance comes from the distance between the center needle position and the right edge of the foot. That distance measures a full quarter inch. If you keep the fabric edge aligned with the foot edge, the seam allowance will be exactly ¼″ before pressing.
This foot has a narrow profile and a small needle opening, which helps support the fabric close to the needle. That extra support can reduce puckering and fabric dip, especially at the start of seams or when sewing lightweight quilting cottons.
In use, this foot behaves much like other plain quarter-inch feet:
- There is no physical guide to keep fabric from drifting
- Seam accuracy depends on steady fabric feeding
- The seam measures a true quarter inch at the machine
This foot works well when:
- You want a true ¼″ seam
- You prefer to guide fabric visually
- You don’t want a guide catching on seam intersections
Because there is no guide and no built-in adjustment, this foot does not compensate for fabric thickness or pressed seam bulk. In quilting, seams sewn with this foot often measure correctly while sewing but can finish slightly large once pressed — which makes it a good contrast to the scant quarter-inch feet that come later in the article.
True ¼″ Presser Foot With Fixed Metal Guide

This is a true ¼″ presser foot with a fixed metal guide along the right side. The guide is part of the foot itself and does not move or adjust.
The seam allowance is determined by the distance from the center needle position to the stitching line, which measures a full quarter inch. The metal guide does not change that measurement. It only provides a firm edge for the fabric to ride against while sewing.
In use, this foot feels more controlled than a plain quarter-inch foot. The guide helps keep the fabric feeding straight, especially over longer seams or when piecing strips. It reduces sideways drift, which can be helpful if your seams tend to wander slightly.
This foot works well when:
- You want a true ¼″ seam
- You like a physical guide rather than visual alignment
- You sew long, straight seams repeatedly
One thing to be aware of is seam bulk. The metal guide can bump into pressed seam intersections or thicker fabrics. When that happens, the fabric may hesitate or shift slightly. Slowing down as you approach intersections helps keep the seam consistent.
Like other true quarter-inch feet, this one measures accurately at the machine. It does not account for fabric thickness or seam folding during pressing. In quilting, seams sewn with this foot often look perfect while sewing but can finish slightly large once pressed — which is exactly why many quilters later move toward scant quarter-inch feet.
Scant ¼″ Presser Foot With Fixed Metal Guide

At first glance, this presser foot looks almost exactly the same as the previous true ¼″ foot with a metal guide. Same shape. Same guide position. Same general construction. If you put them side by side, it’s easy to think they are identical.
They are not.
This foot is designed to sew a scant quarter-inch seam. The difference is subtle, but intentional and probably invisible to the naked eye. The distance from the center needle position to the stitching line is just a bit smaller than a full ¼″ — usually by a thread or two.
That small change is the whole point.
Because the foot includes a fixed metal guide, the fabric still feeds straight and stays aligned. But the seam it produces is slightly narrower than a true quarter inch. That adjustment makes room for fabric thickness and seam folding when the seam is pressed.
In practice, this means:
- Blocks often finish closer to the pattern’s intended size
- Points line up more reliably
- Accumulated seam bulk causes fewer size issues
Just like the true ¼″ version, the metal guide can bump into bulky seam intersections. Slowing down near those spots helps keep the seam consistent.
The key takeaway here is that this foot looks like a true quarter-inch foot, but it behaves differently. That’s exactly why quarter-inch presser feet can be so confusing — and why testing matters more than appearance or naming.
Scant ¼″ Seam Presser Foot for Janome Machines

This is a scant ¼″ seam presser foot designed specifically for Janome machines with 7mm maximum zigzag width. Unlike the previous feet, this one is not a generic snap-on quarter-inch foot. It is shaped to work with Janome’s needle position and feed system.
What makes this foot different is that it is intentionally designed to sew a scant quarter-inch seam. The distance from the needle to the fabric edge is just slightly less than a true ¼″. That difference is small, but deliberate.
Because of that design:
- Seams finish slightly narrower than a true quarter inch
- Pressed units are more likely to measure what quilt patterns expect
- You don’t need to move the needle or “cheat” the seam
This foot is a good example of why quarter-inch feet can be confusing. It looks simple. It doesn’t advertise its difference visually. But the seam it produces is not the same as a true quarter-inch foot — and that small built-in adjustment can make a noticeable difference in finished quilt size.
If Most Feet Sew a True ¼″, Should You Move the Needle to Get a Scant Seam?
If you line up several quarter-inch presser feet, one thing becomes clear very quickly: most of them sew a true quarter inch. Feet designed to produce a built-in scant seam are much harder to find. They exist, but they are the exception, not the rule.
That leads to an obvious question.
If your foot sews a true ¼″ seam, do you move the needle to make it scant?
The short answer is: many quilters do.
Moving the needle slightly to the right is a common way to create a scant quarter inch when the foot itself does not provide it. The change is small — usually just one needle position click, sometimes two, depending on the machine.
How much you move the needle depends on several things:
- Your machine’s needle spacing
- The foot you’re using
- Fabric thickness
- Thread weight
There is no universal number. On one machine, a single click might be enough. On another, that same adjustment could be too much.
You have to be careful when moving the needle because almost all quarter inch feet have a narrow needle hole and moving the needle too much might actually make the needle hit the foot.
✅ Related tutorial: How To Prevent Needle Strikes And Burrs On Your Sewing Machine
That’s why measuring matters. The safest approach is to sew a test seam, press it the way you normally would, and then measure the finished unit — not the seam itself. If the unit finishes slightly large, the seam is too narrow. If it finishes small, the seam is too wide.
One important thing to keep in mind: once you move the needle, the foot is no longer doing the measuring — you are. That’s fine, as long as you stay consistent and don’t change settings halfway through a project.
Some quilters prefer moving the needle because:
- It works with feet they already own
- It allows fine control over seam width
- It avoids buying machine-specific feet
- They are used to doing it
Others prefer a built-in scant foot because it removes one variable from the process.
Neither approach is better. The goal is the same — a seam allowance that stays consistent and produces blocks that finish at the right size. How you get there depends on your machine, your feet, and what feels most reliable to you.
Did this tutorial give you any helpful information? Perhaps a new perspective on “all quarter inch feet are the same”? If so, save this pin (see below) on your sewing board, and follow me on Pinterest for more tips, tutorials, and inspiration!
latest posts
- Corset Pressing Board for Sewing: What It Does and How I Use It
- 7 Essential Tools and Settings for Sewing Denim on a Regular Sewing Machine
- That Purple Thang: 10 Smart Ways to Use This Weird Little Tool
- 20+ Reasons Your Sewing Machine Thread Keeps Breaking (+ Solutions)
- Dresden Plate Quilt Block: 4th of July Fireworks
- How To Sew Curves the Easy Way Using a Curve Master Presser Foot
- 30 Sewing Hacks That Turn Ordinary Items into Useful Sewing Tools
- Seam Allowances in Sewing Patterns: What They Are and How to Use Them
- What Do You Call a Person Who Sews? I Asked My Readers and Got 1,408 Opinions