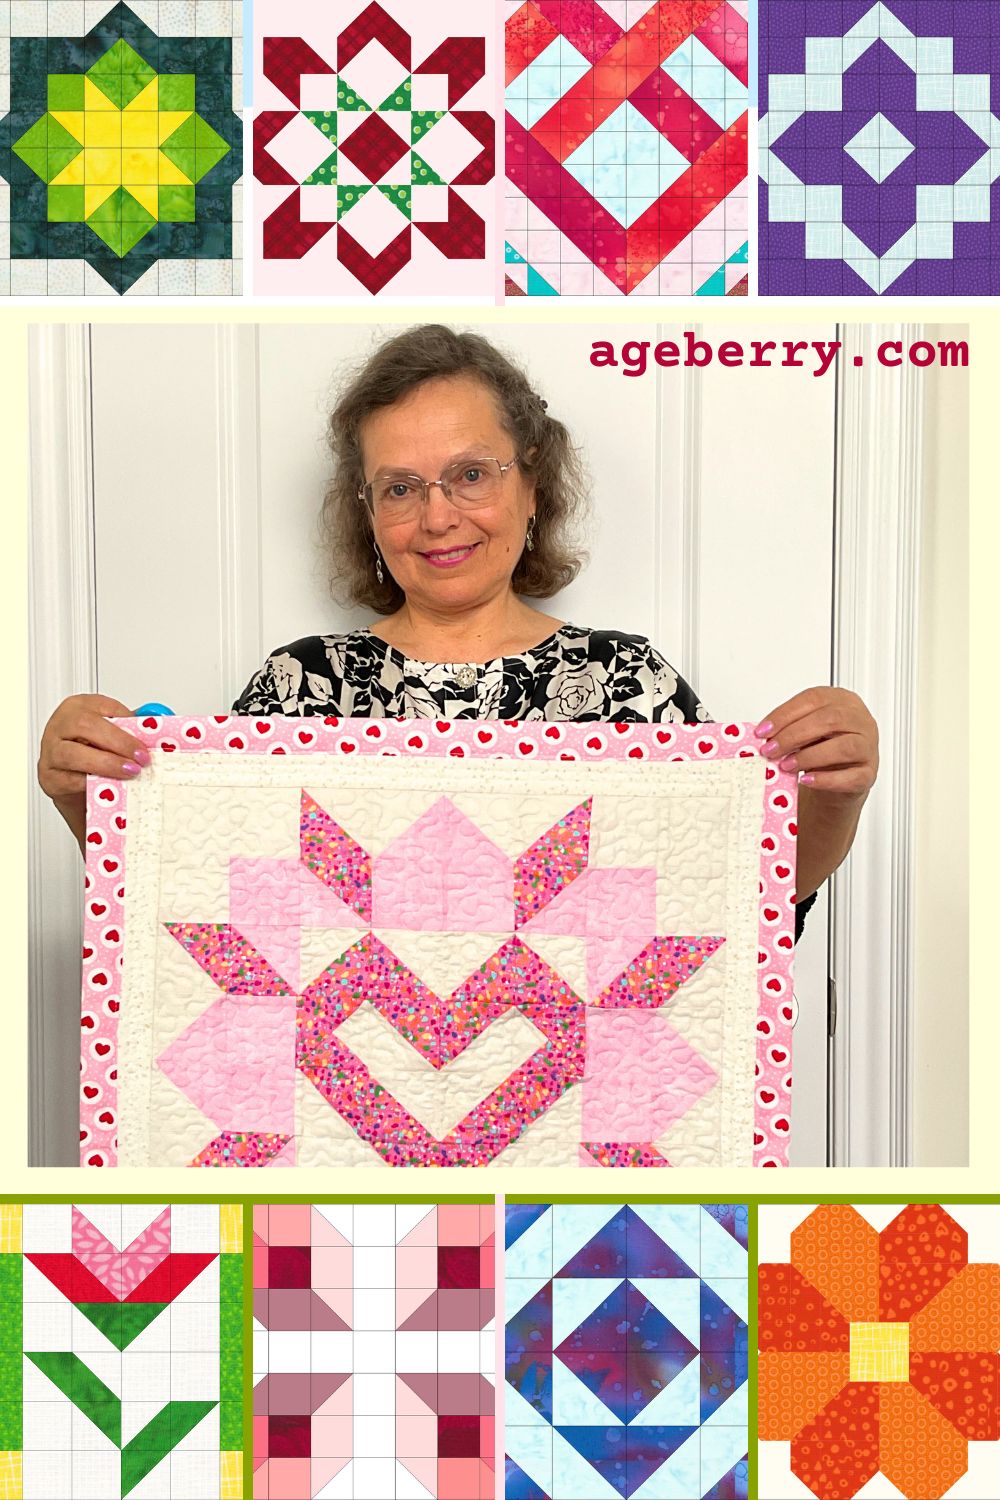
From Sewing Garments to Designing Quilt Blocks: My New Pattern Collection
I’ve spent most of my sewing life making clothes. I loved the process — picking fabric, adjusting fit, shaping seams. But at some point, I wanted a project that didn’t depend on body measurements or zippers. Something slower, neater, and more about color and shape than fit. That’s when I discovered quilting.
At first, I thought of it as a side project, something to try between garments. Then I bought the EQ8 software and started designing quilt blocks just for fun. It turned out to be a new kind of creative puzzle — one where every square has its own rhythm and logic.
Now, I’ve created a collection of more than 20 quilt block patterns, each with clean diagrams, accurate measurements, and several size options. In this article, I’ll show you what’s included in the patterns, how to read them, and why even garment sewists might find themselves unexpectedly drawn to quilting.
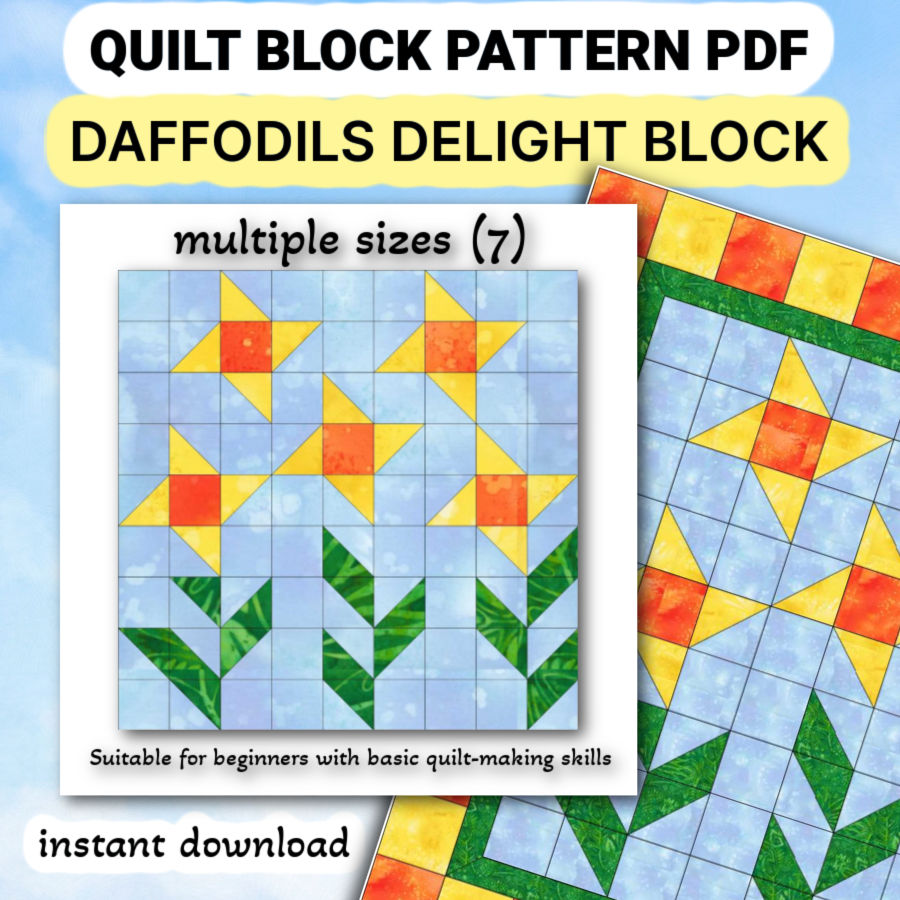
If you’d like a closer look, here’s one of the blocks from the collection — the Daffodils Delight Block.
Why Quilt Blocks Are Worth Making (Even for Garment Sewists)
If you mostly sew clothes, quilt blocks might not be on your radar. But I think they’re worth making — even if you have no plans to sew a full quilt.
Quilting trains your eye and hand in ways that garment sewing doesn’t always cover. You learn to cut with more precision. You start to notice how small shifts in color or angle can change the whole block. That kind of detail work sharpens your skills — and it shows up in other projects too.
Color pairing is another area where quilt blocks really shine. Garment sewing usually sticks to one or two fabrics. Quilting lets you experiment with four, five, sometimes more — all in a single square. It’s like a practical lesson in layout planning, without the pressure of fitting it to a body.
Quilt blocks are also a smart way to use up fabric scraps. The small pieces left behind after cutting out a sleeve or waistband? They’re exactly what you need for many quilt patches. If you’re looking for scrap-friendly ideas, I’ve shared a few other projects here and here:
✅ Related tutorials:
21 Scrap Fabric Projects to Transform Your Textile Trash into Treasure
Leftover Fabric Ideas: Fabric Crumbs Projects
And just because something starts as a quilt block doesn’t mean it has to end up in a full size quilt. You can turn a single block into a pillow. Or make a few and sew them into a tote bag. You can frame them, turn them into placemats, or use them as the front panel for a zip pouch. One square can go a long way.
✅ Related tutorial: How To Make A Quilted Christmas Table Runner
Quilt blocks are tidy little projects — fast to finish, easy to store, and full of learning. You don’t need to be a quilter to enjoy them. You just need a little fabric, a little time, and a curiosity for trying something different.

Here’s another design from the set — the Mystic Blooms block. It’s cheerful, symmetrical, and beginner-friendly, with printable templates and 7 block sizes to choose from.
Introducing My Quilt Block Collection
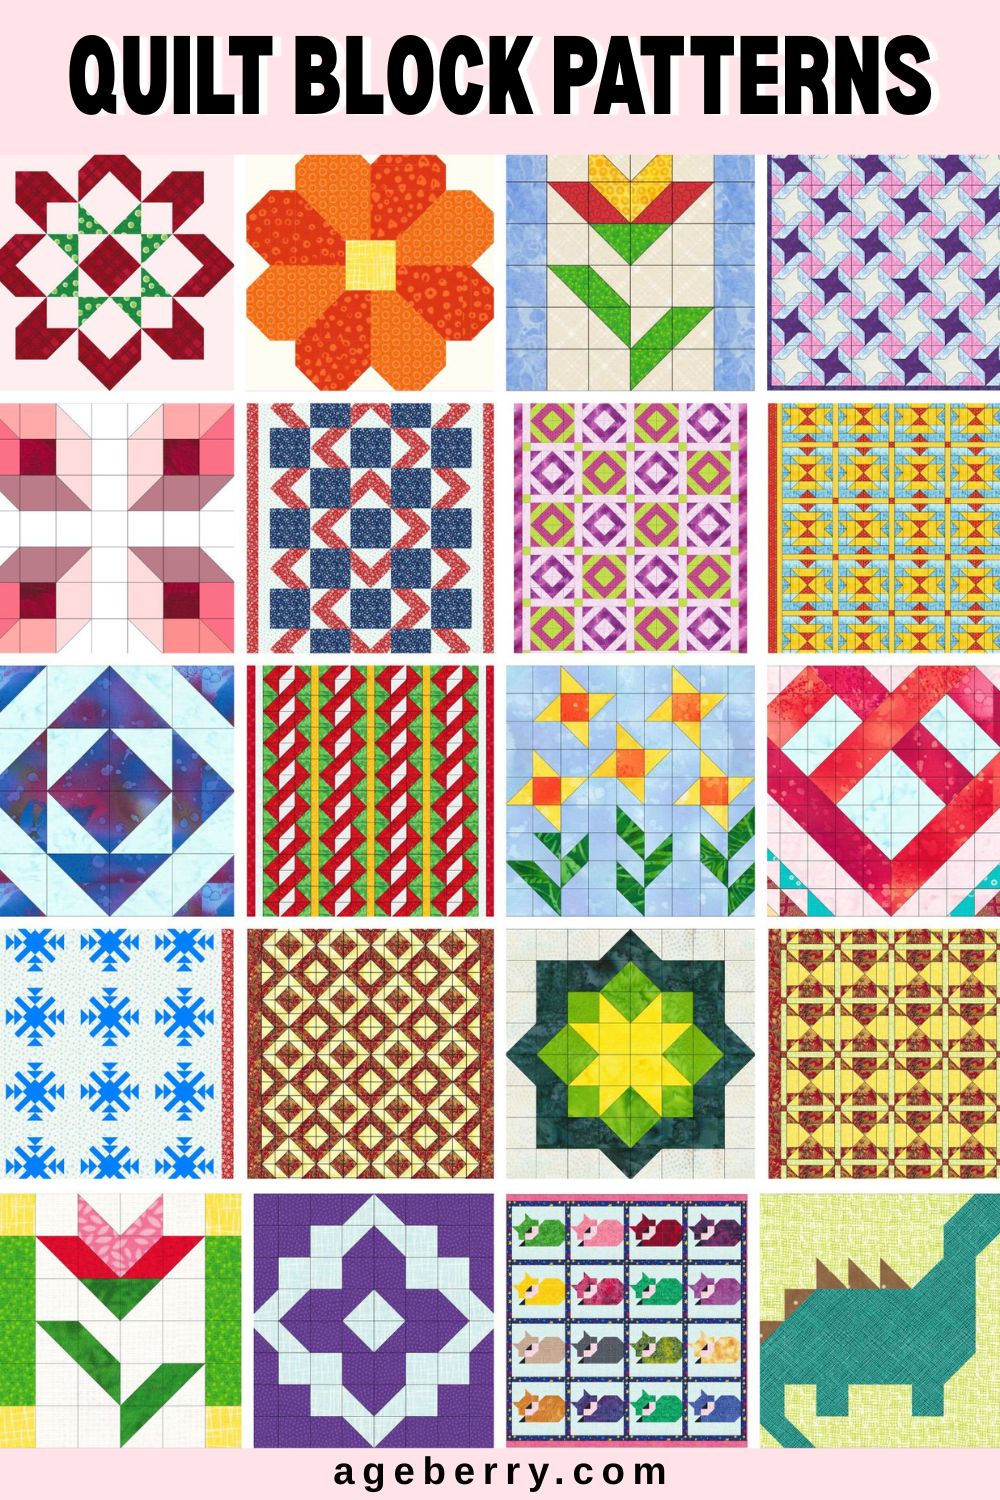
Here’s a look at the quilt blocks I designed — more than 20 in total. You’ll see a little bit of everything: bold geometric layouts, floral-inspired shapes, classic grids, and a few playful surprises (yes, that’s a dinosaur in the bottom corner).

Some blocks are traditional. Others are more modern. Most repeat beautifully across a quilt, while others work well on their own. I didn’t stick to one style — and that’s the point. I wanted variety, because sewing isn’t one-size-fits-all. Neither are quilt blocks.
If you’d like to see all the blocks I designed, you can find the complete Quilt Block Pattern Collection in my shop.
Each design comes with a rotary cutting chart and printable templates. You’ll also find a coloring sheet, in case you want to test out your fabric combinations before committing with the rotary cutter.
I’ve kept everything beginner-friendly. The shapes are clean, the diagrams are accurate, and the seam allowances are already included — just print, cut, and sew. There’s no guesswork about measurements or confusing shortcuts.
What I like most about these blocks is how they use symmetry and color. You can keep things simple with two fabrics, or go bold with six or more. You’ll start to see how placement can change the whole look — and once you finish one, you’ll probably want to try another.
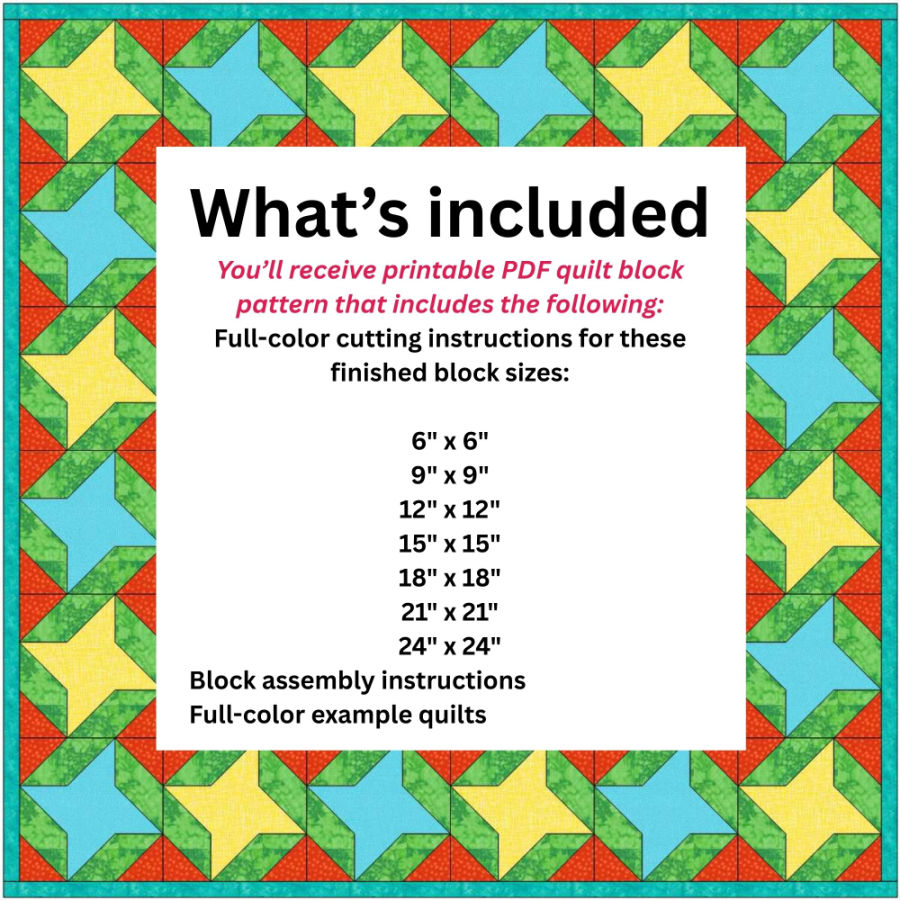
What’s Inside Each Pattern
Each quilt block pattern comes as a downloadable PDF that’s ready to use — no resizing, guessing, or redrawing needed. Here’s what’s included.
Rotary Cutting Chart
You’ll get a clear, organized chart with cutting instructions for each patch in the block. Measurements are written for rotary cutting, and seam allowances ¼” are already included. The charts are color-coded and grouped by shape and fabric to make prep easier.
Multiple Block Sizes
Each pattern includes cutting instructions for several finished sizes, depending on the design. That means you can use the same block for a mug rug or a bed quilt without doing any math. It’s one design, many possibilities. For example, the Starlight Mosaic block (which I am using as example in this article) includes 7 sizes.
Printable Templates
Even if you don’t plan to use templates for cutting, I always include them. They’re great for checking your rotary-cut shapes for accuracy — just lay your fabric on top of the template and see if the shape lines up. For blocks with odd angles or shapes that don’t fall nicely into squares or triangles, templates are especially helpful.
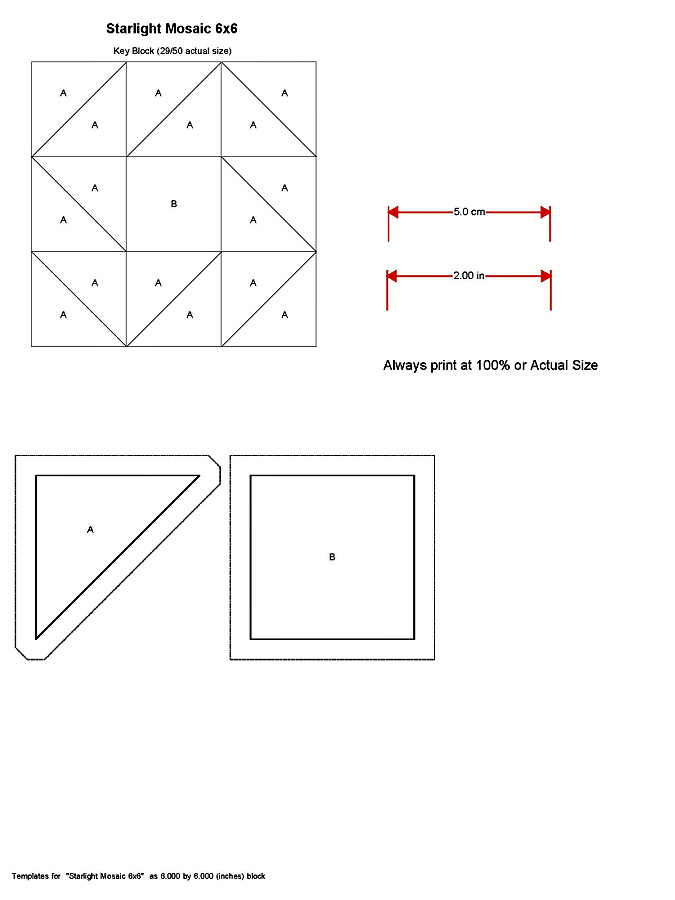
The printable templates are included for all shapes that can fit on a letter size (or A4) page. For larger shapes (very large size blocks) only the rotary cutting diagrams are included. For the example block (Starlight Mosaic) the block size 24 will not contain this template.
A test line or square is included in this template. If printed correctly, the size of the item should be as indicated (the test line should be 5 cm or 2 inches respectively).
Coloring Sheet
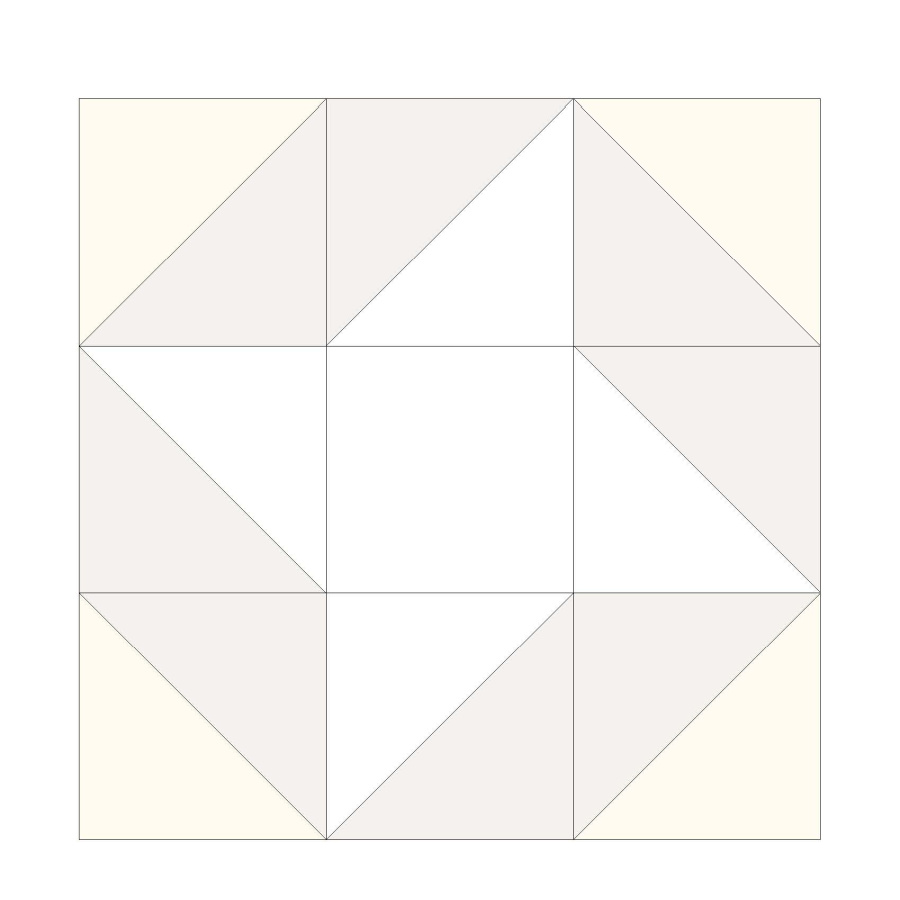
You’ll also get a plain line drawing of the block, which is great for planning your colors before you cut into fabric. If you’re mixing scraps or testing out new palettes, this makes it easier to visualize the finished block.
Half-Square Triangle Option
For blocks that use a lot of half-square triangles, I’ve added a shortcut method. Instead of cutting individual triangles, you’ll sew two squares together and cut along the diagonal. It saves time and helps keep points sharp. Instructions for this method are included right in the pattern.
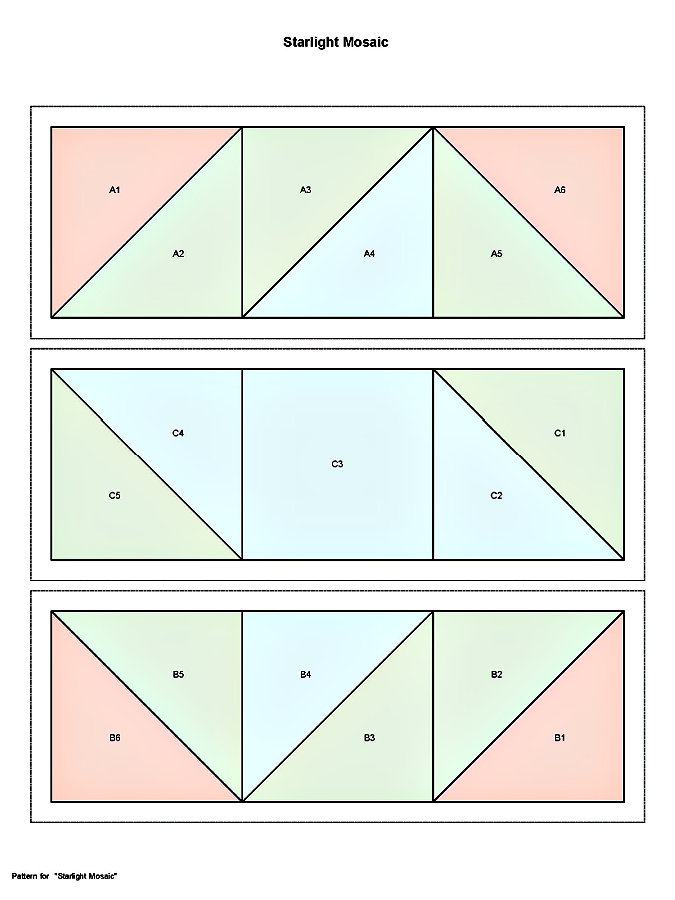
Row-by-Row Assembly Diagram
Each pattern includes a step-by-step layout showing how the block is built row by row. This makes it easier to piece everything in order — especially if you’re a visual learner or just like seeing how the whole thing fits together at a glance.
Everything is designed to be beginner-friendly, clearly labeled, and printer-ready. Just pick your size, print your pages, and start cutting.
Understanding My Quilt Block Patterns: A Step-by-Step Guide
I put together detailed instructions that walk you through how to use quilt block patterns, how to read the cutting chart, how to cut different shapes, and when to use HST method. These notes are part of every pattern, but I’m sharing them here in full so you can see exactly what to expect. If you’ve never used a quilt block pattern before, it might look a little technical at first — but once you understand how it works, it actually makes everything easier and faster.
If you’d like to see all the blocks I designed, you can find the complete Quilt Block Pattern Collection in my shop.
How to Read the Rotary Cutting Chart
Please keep in mind that these are cutting diagrams. No specialty quilting techniques are taken into consideration in these diagrams, such as squaring up later, for example.
✅ Related tutorial: Rotary cutter tips and tricks – what mistakes to avoid
Also this diagram shows the required number of patches for one block only.
If you will be using the Half Square Triangles technique (recommended for some blocks, this included) please read the instruction further in the document.
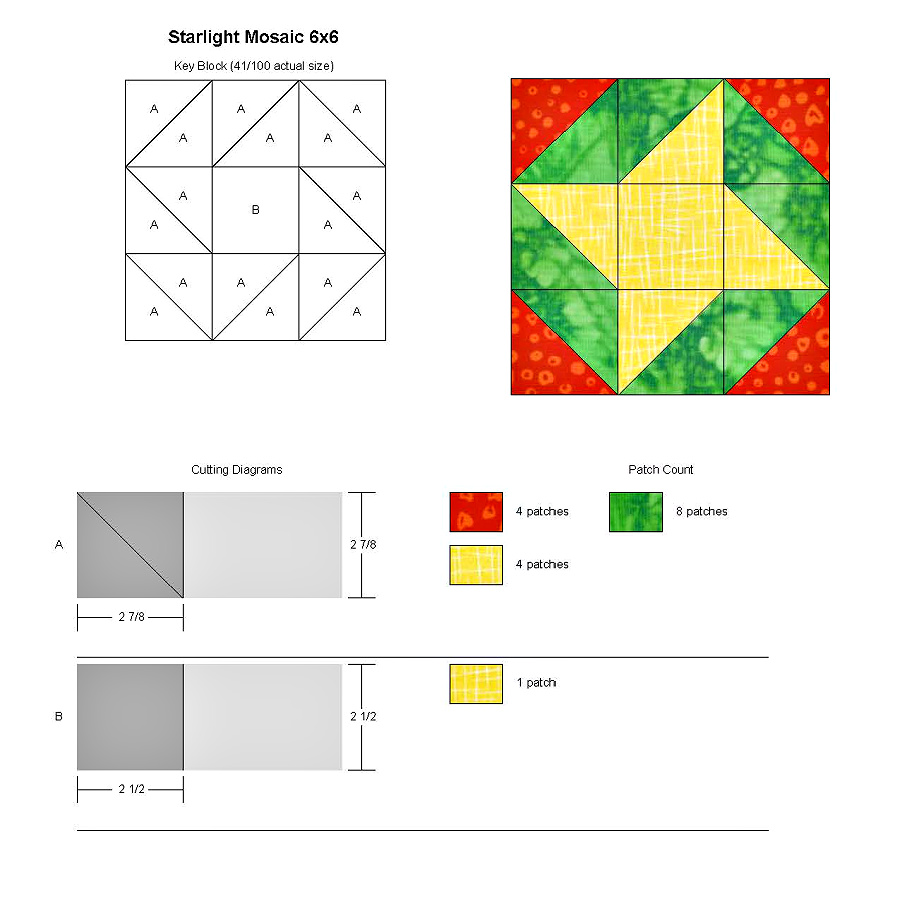
The image below shows the full cutting chart for the block. Here’s how to read the diagram below for each patch.
Patch A: Triangle resulting from a square cut in half
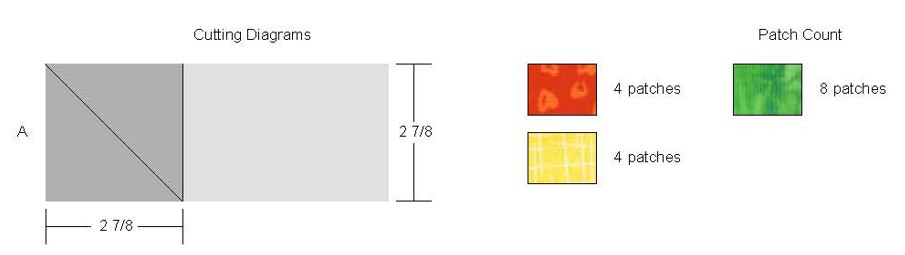
Cut a red strip 2 7/8″ wide. Cut 2 7/8″ squares from the strip. Then sub-cut the squares diagonally in one direction to make half-square triangles. You need 4 red triangles total (so you would cut 2 squares, and cut each in half diagonally to yield 4 triangles).
Beware that the 2 ⅞” size includes the seam allowances which is usually ¼”. The finished size of the triangle in the finished block will be smaller (in this case, 2” each right angle side).
Cut a yellow strip 2 7/8″ wide. Cut 2 7/8″ squares from the strip. Then sub-cut the squares diagonally in one direction to make half-square triangles. You need 4 red triangles total (so you would cut 2 squares, and cut each in half diagonally to yield 4 triangles).
Cut a green strip 2 7/8″ wide. Cut 2 7/8″ squares from the strip. You need 8 green triangles total (so you would cut 4 squares, and cut each in half diagonally to yield 8 triangles).
Patch B: Full square
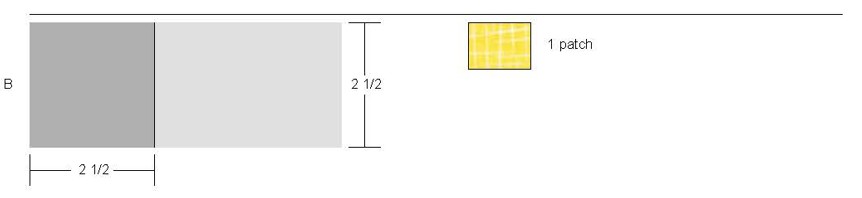
Cut a yellow strip 2 ½” wide. Cut one 2 ½” square from the strip

Depending on the quilt design, your cutting chart might include a few other patch types. Let’s take a look at some of them and how they work.
Patch C: Triangles resulting from a square cut in quarters (if present)
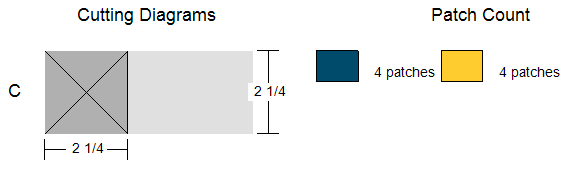
Cut a blue strip 2 1/4″ wide. Cut one 2 1/4″ square from the strip. Then sub-cut the square diagonally in both directions to yield 4 quarter-square triangles. You need 4 blue quarter-square triangles total (so you would cut 1 blue square and sub-cut the square diagonally in both directions to yield 4 quarter-square triangles).
Cut a yellow strip 2 1/4″ wide. Cut a 2 1/4″ square from the strip. Then sub-cut the square diagonally in both directions to yield 4 quarter-square triangles. You need 4 yellow quarter-square triangles total (so you would cut 1 yellow square and sub-cut the square diagonally in both directions to yield 4 quarter-square triangles).
Patch D: Irregular shapes (if present)
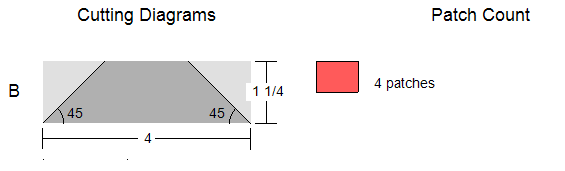
Cut a red strip 1 1/4″ wide. Cut four 4″ rectangles from the strip. Cut each end of the rectangles to 45°.
🧵 Rotary Cutting vs. Templates — What’s the Difference?
The rotary cutting chart gives you measurements for cutting with a ruler and rotary cutter — straight lines only. You’ll use those when your block is made up of standard, rotary-friendly shapes:
- Squares
- Rectangles
- Half-square triangles
- Quarter-square triangles
Those are easy to cut precisely with your ruler and don’t usually require any printed paper templates. You can, of course, use regular scissors instead of the rotary cutter.
However, even when your quilt is made entirely of rotary-friendly shapes (squares, rectangles, half-square triangles, etc.), the quilt pattern will still give you templates.
Print one sheet of templates just to keep as a reference — it’s a fast visual cue of how each patch should look and fit. You might even keep it pinned next to your cutting station for layout confirmation.
✅ How You Can Use Them for Accuracy Checking
You can treat these printed templates as a “control sample” to verify that your rotary-cut pieces are perfectly sized.
Here’s how to do that effectively:
- Print the templates at 100% scale.
Check the test square or line on the printout before trusting the size. The actual size of the test item should be as indicated. - Cut your pieces with your rotary cutter and ruler according to the rotary cutting chart.
- Lay your fabric pieces over the paper templates.
They should match exactly (including seam allowance if the template has one).- If the fabric piece is slightly larger — you’re fine.
- If it’s smaller or skewed — adjust your cutting or check your ruler alignment.
- Use them as a pattern-checking reference — it helps confirm that your measurements align.
If you’d like to see all the blocks I designed, you can find the complete Quilt Block Pattern Collection in my shop.
⚠️ A Few Caveats
- The rotary cutting chats and templates include ¼” seam allowance.
- Some printer settings (like “Fit to Page”) can shrink templates slightly — always verify that test item size.
- If you’re chain-piecing or cutting stacks, use the template check only once per shape type — no need to check every cut.
✂️ When and Why You Need Templates
Templates come into play when a patch cannot be cut accurately with a ruler. Use them for any shape that:
- Has curves
- Has odd angles (like 30°, 60°, or other non-90°/45° angles)
- Has irregular sides that don’t line up on a standard grid
- Needs to be traced around or used for appliqué
So if your block pattern includes a curve or non-rotary-friendly patch, the pattern provides a printable template that you can trace onto fabric, cut out with scissors, and sew along the marked seam lines.
📄 How to Read and Use Templates
When you print templates:
- Check the scale box – your PDF includes a test square or line; measure it before cutting anything to ensure printing is at 100%.
- Cut out the template pieces from the paper along the solid lines.
- Trace around the templates on the wrong side of the fabric (seam allowance are included).
- Cut the fabric pieces with scissors.
✂️ How to Use the Half-Square Triangle (HST) Technique for a Quilt
When you download a quilt pattern, you’ll see rotary-cutting instructions that give precise measurements for each patch. But in many quilts, the same units can also be built more efficiently using Half-Square Triangles (HSTs).
✅ Related tutorial: 7 Best Methods for Making Multiple Half-Square Triangles at Once
This guide explains how to adapt your printout for the HST method so you can sew faster and more accurately — especially for blocks with repeated diagonal seams.
🧵 Step 1. Identify the HST Units in Your Printout
Look through your pattern’s block diagrams or coloring sheets and find any shapes made of two right triangles joined along the diagonal — those are your HSTs.
You can spot them as patches divided diagonally corner-to-corner.
In the rotary cutting chart, these shapes are usually listed as triangles cut from squares (e.g., cut 2 ⅞″ squares, then cut diagonally once).
🔍 Step 2. Substitute HSTs for Rotary-Cut Triangles
Go back to your diagram and replace every pair of adjacent triangles with one HST unit. Keep the same color placement shown in your printout — the quilt layout is still your guide.
Example: If Block A shows two 2 ⅞″ triangles forming one square, you can simply piece one HST instead.
The rotary-cutting chart already lists the cut size of each patch — that means the measurement includes the ¼″ seam allowances on all sides. You can use those numbers directly to create your HSTs.
Here’s how to read and adapt the chart:
- Find the triangle measurement in your rotary-cutting chart.
For example, in this Starlight Mosaic 6×6 block, patch A is shown as
Cut 2 ⅞″ squares, then cut once diagonally. That 2 ⅞″ is the cut size already including seam allowance.
- Instead of cutting individual triangles, cut squares using the same measurement.
- You’ll need two fabrics (the two colors that form each HST).
- Cut one 2 ⅞″ square from each color for every HST unit.
- You’ll need two fabrics (the two colors that form each HST).
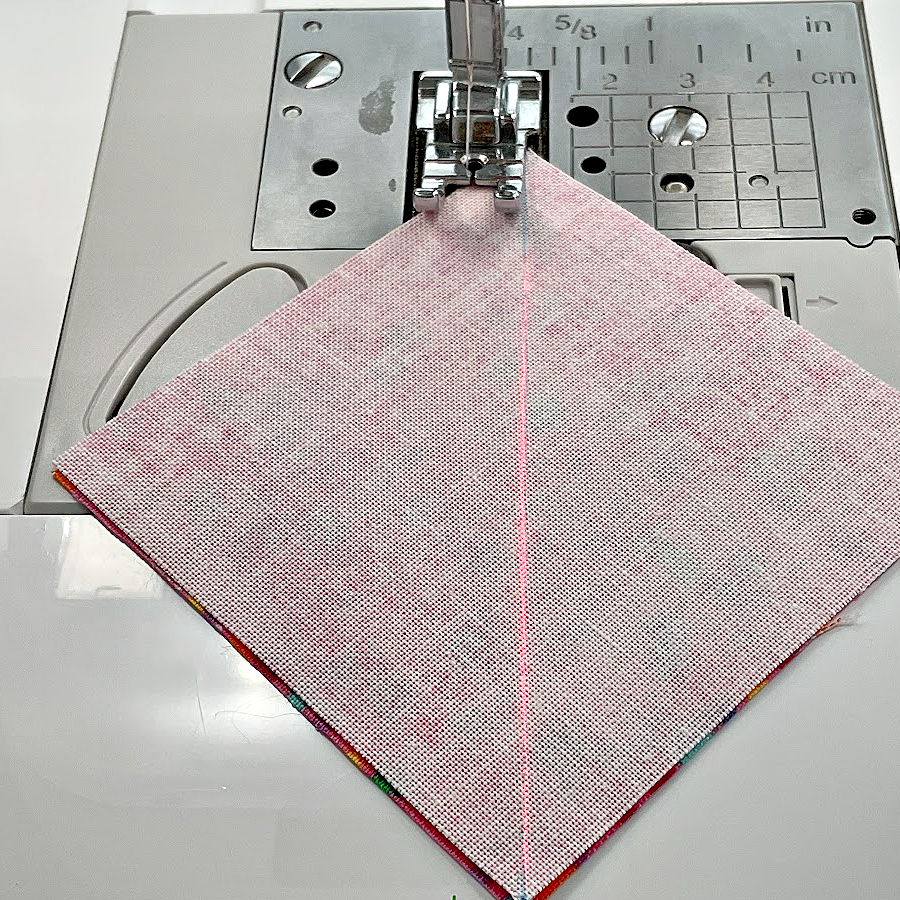
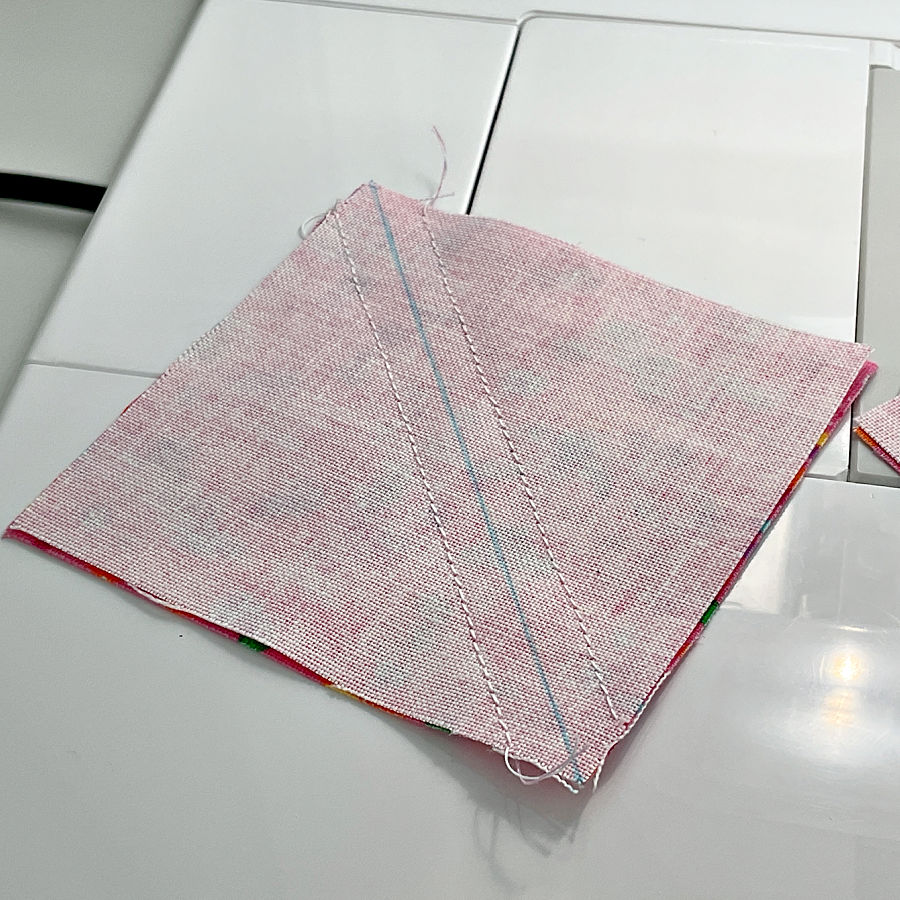
- Pair, mark, and sew the squares:
Place one light and one dark square right sides together.
- Draw a diagonal line corner to corner on the lighter square
- Stitch ¼″ away from both sides of the drawn line.
- Cut on the line to yield two HSTs
- Press seams toward the darker fabric (or open if preferred).
The result will match the triangle size the pattern specified in its rotary instructions.
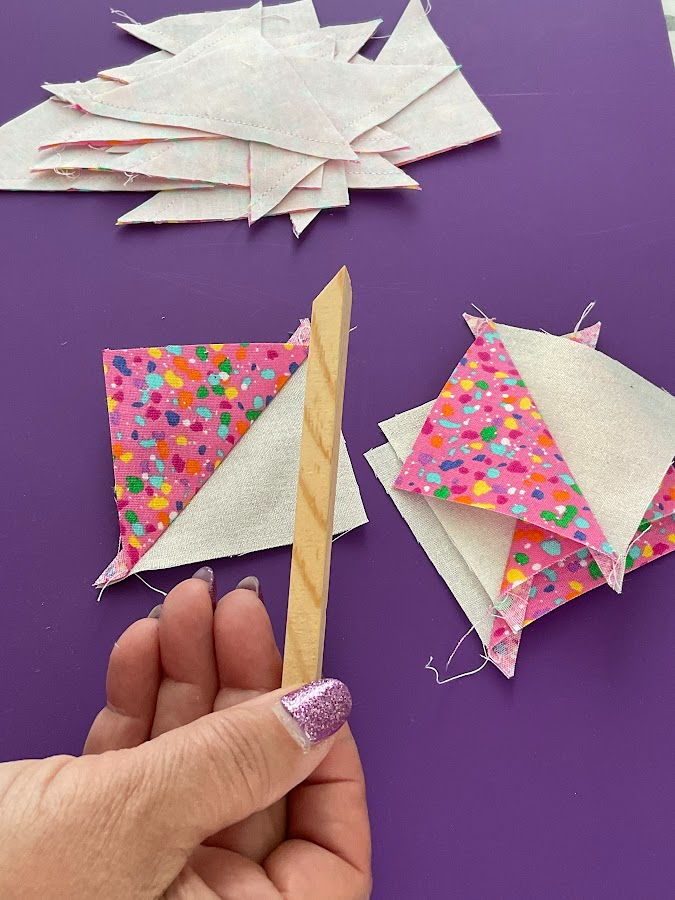
In the image above you see the stack of half square triangles after the cut (in the upper part) and how they look after opening, when you get to see the right sides of the fabric.
So this is the half square triangle: a square having its two halves made out of different fabrics. We have obtained this from two fabric squares and the process gives us two half square triangles, almost halving the amount of work that has to be done on the quilt. An added bonus is that we deal with bigger squares, as the individual triangles would be more difficult to maneuver and set up for sewing.
For a more in-depth description please see the article Easy Quilting Techniques– Step-by-Step Patchwork Quilt Tutorial
How to identify where Half Square Triangles (HST) can be used
Basically, every square on the block which is a combination of two triangles is a candidate for this.
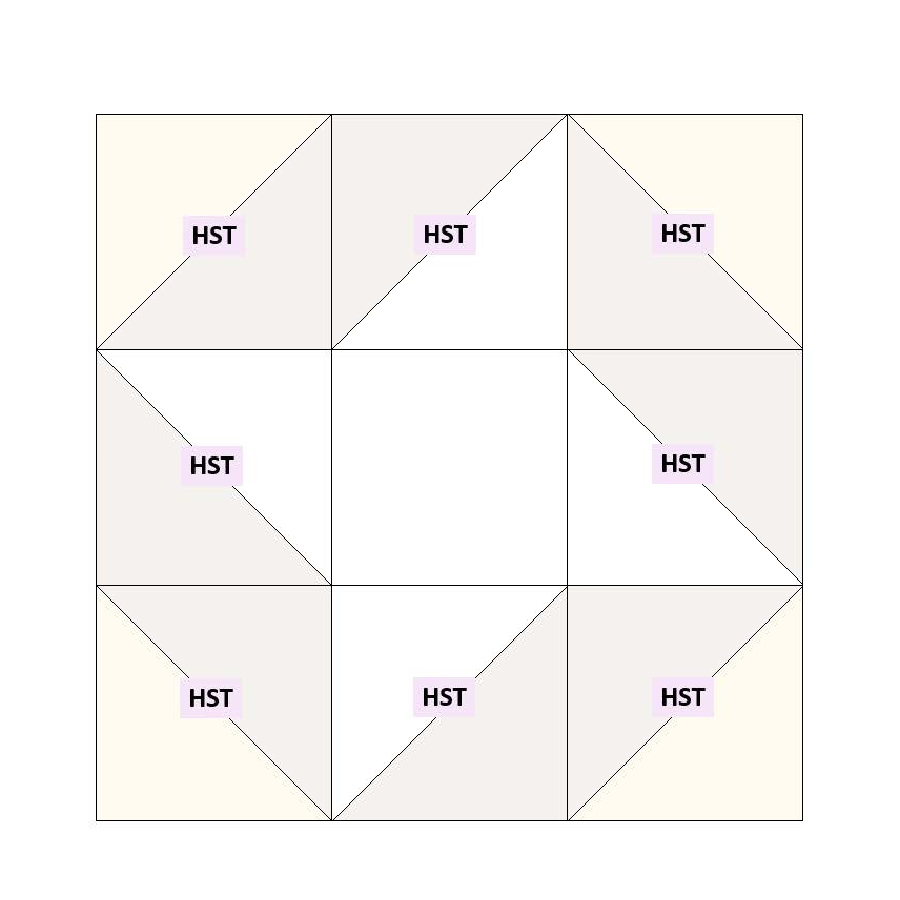
However for convenience I have generated a HST Arrangement page for all quilt block patterns which could in my opinion benefit from the technique. This diagram will indicate which block squares can be made using this:
🪡 Step 3. Assemble the Quilt Normally
Once all HSTs are made, continue following block assembly instructions. The construction sequence doesn’t change — you’ve only swapped out how the diagonal patches were created.
You can even mix methods: use rotary-cut rectangles and squares for straight pieces, and HSTs wherever the rotary cutting chat shows diagonals.
✅ Related tutorial: How To Make Quilt Binding From Start To Finish – Easy Binding Tips And Tricks
Why Use HSTs for Quilt Patterns?
- Faster production: Sew two triangles at once instead of cutting and piecing each individually.
- Better accuracy: Less bias stretching and cleaner corners.
- Scrap friendly: Easier to chain-piece and press efficiently.
- Flexible: Works for most star, mosaic, or geometric quilt patterns — like the Starlight Mosaic example above.
You don’t need a big plan or a full quilt in mind to start. Pick one block that speaks to you, print the pattern, and see where it takes you.
These designs are simple enough for a beginner and detailed enough to keep you interested. Each block teaches you something — about precision, color, or patience — without any pressure to finish a huge quilt.
You can find the full collection in my shop. Download the patterns instantly, print them at home, and start building your own quilt story, one block at a time.
If you found this article useful, save the image below to your sewing Pinterest board. It’s an easy way to keep this guide handy for later — and you can follow me on Pinterest for more sewing and quilting ideas.
latest posts
- What Do You Call a Person Who Sews? I Asked My Readers and Got 1,408 Opinions
- DIY Round Purse: PDF Sewing Pattern and Detailed Instructions
- Mini Wonder Clips By Clover: Useful Sewing Tool Or Just Another Notion?
- Non-Slip Grips For Quilting Rulers: A Small Notion With A Useful Job
- Fabric Eraser for Sewing: What It Removes and When to Use It
- What Is The Best Thread For Sewing Machine Projects? Let’s Find Out!
- Butterfly Quilt Block Tutorial – Foundation Paper Piecing
- How To Sew Quilt Squares So The Corners Match
- Sewing With Fork Pins: How They Help With Pattern Matching, Slippery Fabric, And Seams