
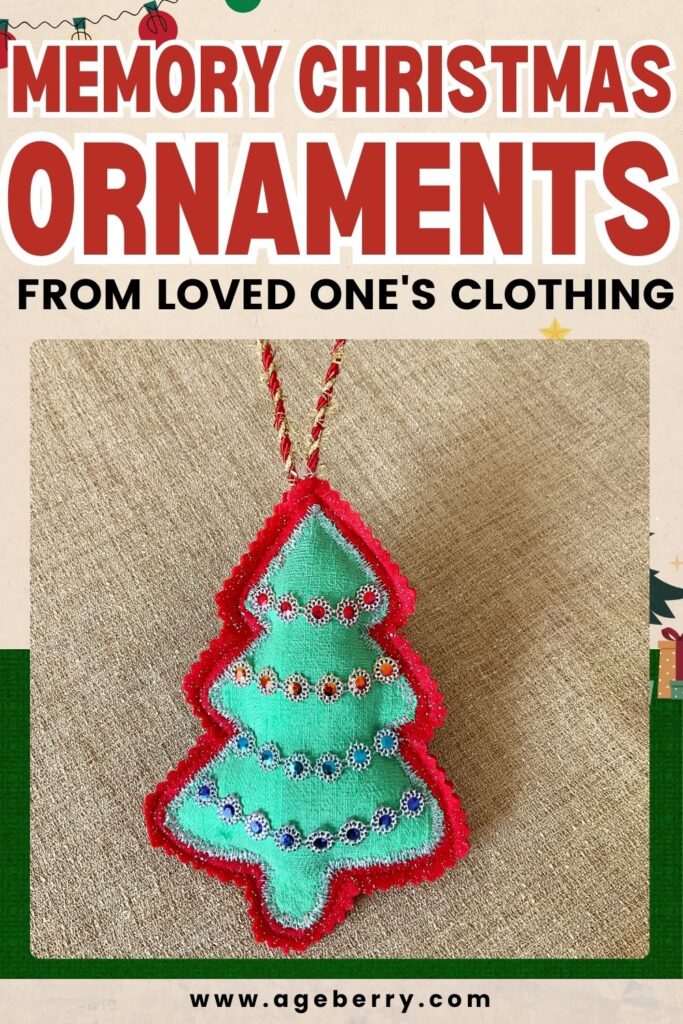
Creating Memory Christmas Ornaments from Loved One’s Clothing
Christmas is a time for remembering, and what better way to honor those we’ve lost than by making unique decorations that blend memories with current festivities? In this sewing tutorial, we’ll turn beloved clothing items into beautiful memory ornaments. It’s a chance to give new life to a piece of fabric, creating a decoration that carries deep meaning. This project is perfect for sewists of all levels, from beginners to experts. Together, we’ll craft ornaments that not only decorate your tree but also keep your loved ones present in your holiday celebrations. Let’s create something truly special that will be cherished for many Christmases to come.
Christmas ornaments made from a loved one’s clothes are a unique way to remember someone special during the holiday season. These handmade ornaments can help ease the pain of loss during what can be a tough time of year. They’re a reminder that even though someone is gone, their love and influence still remain.
Creating these ornaments can be a comforting activity. It gives you a chance to remember happy times while making something meaningful. Many people find it helps them process their grief in a positive way.
These special ornaments often become conversation starters, encouraging family and friends to share stories about the person who’s passed. It’s a lovely way to keep their memory alive and introduce them to new family members.
But you know what? You do not need to make them from the clothes of someone departed. You could, for example, make the ornaments from a piece of clothing worn at a special occasion by your child, this way that occasion will surely be remembered for as long as you have the ornament. Or, because they are indeed beautiful (and easy to make), you could simply make them just from regular fabric!
What You Will Need
Clothing item from loved one (silk pants used in this tutorial)
Ornament template (available in my shop)
Glittery felt for backing
Sewing machine
Metallic thread (silver used in this tutorial)
Regular thread matching felt color
Polyester fiberfill or cotton batting
Ribbon for hanging (sparkly red and gold used here)
Decorative ribbons for embellishment
Fabric scissors
Pinking shears
Pins
Fabric pen or chalk
Fabric glue
Seam ripper
Step 1: Select the Clothing Item
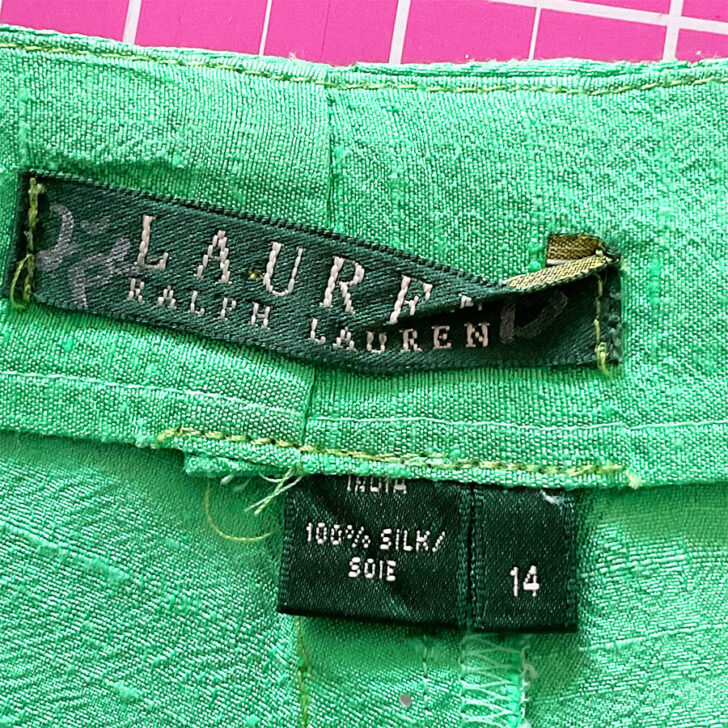
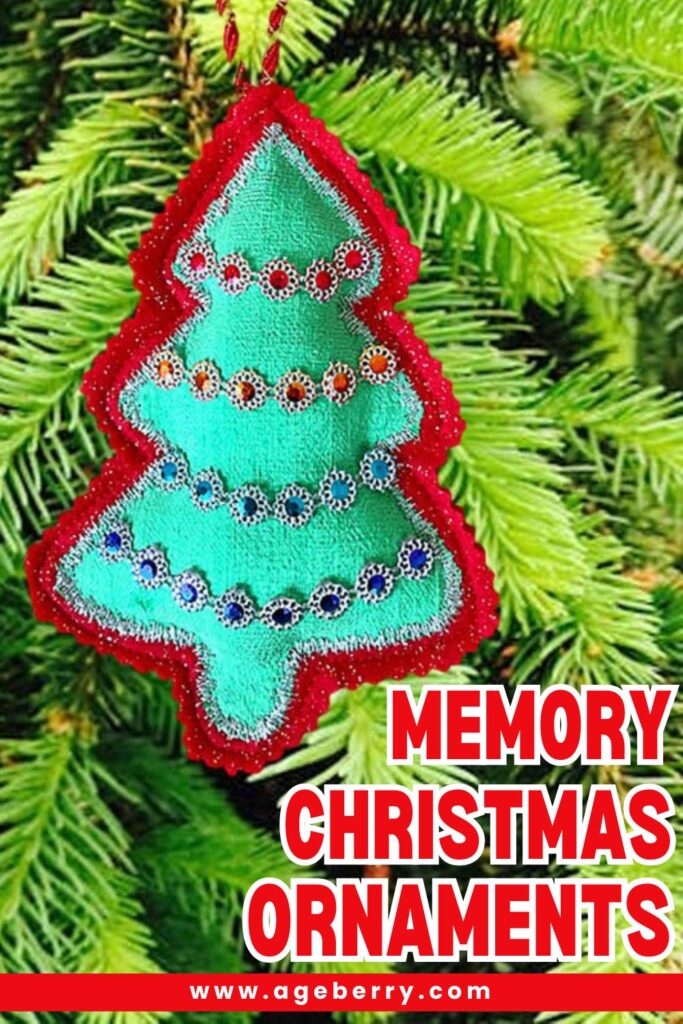
For this project, I’m using a pair of pants that belonged to my mother-in-law. They’re made from 100% silk dupioni in a beautiful shade of green. The fabric has a natural sheen that catches the light, giving it a subtle, elegant sparkle.
I’ve kept these pants since she passed away, always intending to upcycle them. As a seasoned sewer, I knew I could do the job myself, probably better than most tailors. But you know how it goes – other projects always seemed to take priority, and these beautiful silk pants remained untouched in my closet.
Now, using this fabric to create Christmas ornaments feels like the perfect way to honor her memory.
What’s great about this project is that it doesn’t matter what type of clothing you use. Whether it’s a dressy silk pants like these ones or a well-worn t-shirt, the fabric itself isn’t what’s important. It’s the memories attached to it that make it special.
Note: Some of the links on this page are affiliate links. This means I will receive a commission if you order a product through one of my links. I only recommend products I believe in and use myself.
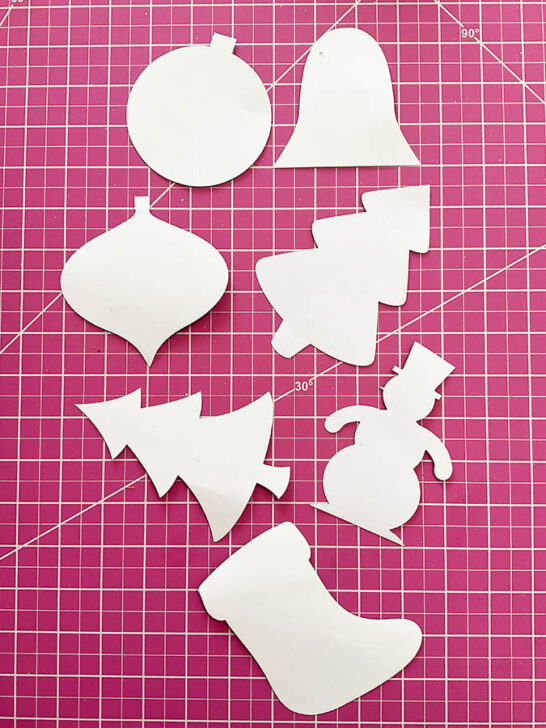
Step 2. Pick Your Ornament Design
For this project, we’re working with a Christmas tree shape. This beloved symbol of the holiday season pairs perfectly with the green silk fabric I’ve chosen, creating a elegant and festive ornament.
I’ve prepared templates for this tree design and several others, available in my shop. These are complimentary for my subscribers and come in two formats.
- PDF files to print. Ideal for those who prefer hands-on tracing and cutting.
- SVG files. Designed for use with Cricut or similar cutting machines. If you do not have a Cricut yet but want to get one, I recommend the Maker version. It is more expensive but it cuts larger shapes and is, in general, a more versatile tool. Check Amazon prices here.
The templates can be found here: Templates for Christmas Ornaments Made from Clothes.
If you do not have a printer in home, print shops will print the files for pennies; but I find that having a printer is useful for many purposes. I recommend a laser printer, they have come down in prices and unlike the (cheaper) inkjet printers, you don’t need to worry about ink drying and clogging the nozzles. Check current offers at Amazon.
While the Christmas tree is a classic choice, my template collection offers a variety of festive designs. The most important thing is selecting a shape that resonates with you and honors your loved one’s memory.
These templates are meant to be a starting point. Feel free to use them as-is or tweak them to create something uniquely yours.
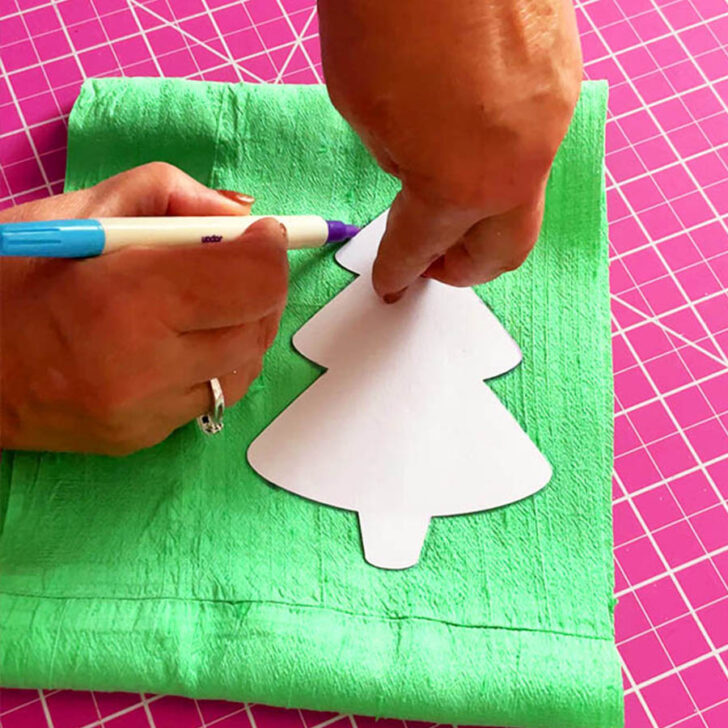
Step 3. Cut Out Your Tree Shape
Examine the fabric closely, looking for areas where the sheen and texture are most pronounced. For my tree ornament, I selected a spot where the silk fabric’s natural folds created an interesting effect.
Place your tree template on the chosen area and carefully trace around it with a fabric marker or tailor’s chalk. If you’re using a cutting machine, prepare your fabric as per the machine’s instructions.
Take care as you cut. Fabric can be quite delicate, so patience is crucial. If cutting by hand, follow your traced lines with precision. If using a machine, let it do the work while you supervise.
During this process, you may find yourself reminiscing about the original garment. This is the beauty of this project – each cut connects you more deeply to the memories you’re preserving. You’re not simply crafting a decoration; you’re creating a piece of your family’s history.
I am using these scissors, I find them excellent and they already lasted for a number of years. They are cheaper than other brand names but not of lower quality.
I am using an air and water erasable Dritz pen for marking, I find it better quality than other brands. There are cheaper alternatives and multi-packs available, however I find the multi packs less useful because by the time I get to use them, they are already dry. And other brands have a much lower user satisfaction rating.
Step 4. Add Structure with Felt
I like to reinforce an ornament with a felt backing. You can use glittery felt for extra holiday cheer or regular felt for a more subdued look. The choice is yours, but make sure the color harmonizes with your memory fabric.
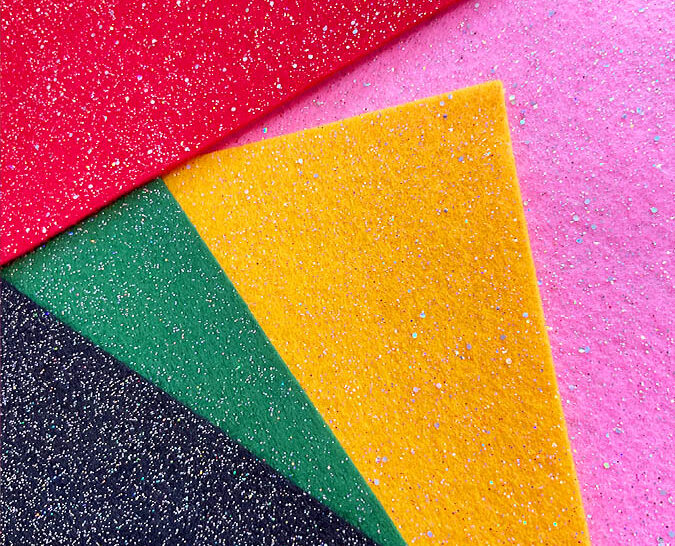
For my tree-shaped ornament made from green silk, I chose a deep red color to enhance the luxurious sheen of the original fabric. Cut your felt slightly larger than your fabric piece to ensure easy assembly and full coverage.
If opting for glittery felt, be aware it can be messy. Work carefully, preferably in a well-ventilated area, and wash your hands thoroughly after handling to avoid any potential irritation.
While the felt adds structure and finish to your ornament, the real star of the show is the memory fabric. The felt is there to support and showcase the piece of clothing that holds so many precious memories.
Some glitter fabrics promise low shedding (or no shedding) but this has to be taken with a grain of salt in my opinion. If you’re sensitive to glitter or prefer not to work with it, regular felt is absolutely fine. The most important part of this project is the memory fabric, not the backing material.


Step 5. Prepare Felt for Stuffing
Now, we’ll prepare the felt for stuffing.
- Place your cut felt piece on a flat surface.
- Find the center of your felt.
- With sharp scissors, carefully cut a small opening in the middle, about 1 inch (2.5cm) in length.
This opening won’t be visible in the final product, so don’t worry about its appearance. We’ll cover it with another felt piece later, creating a seamless finish on both sides of your ornament.
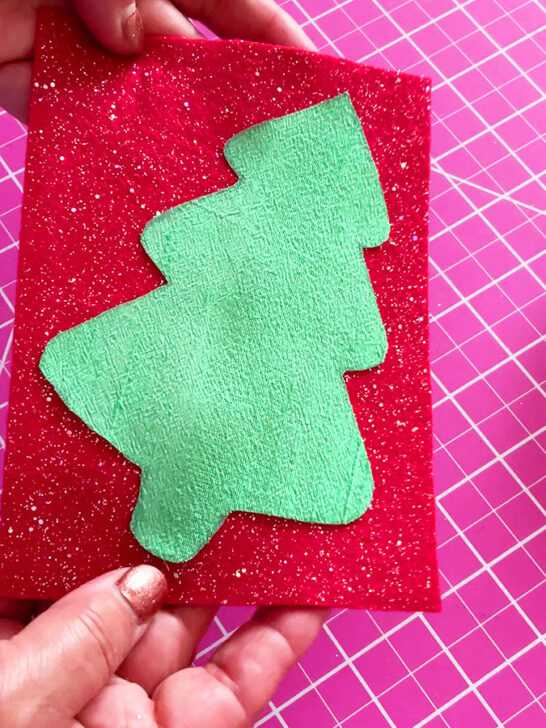
Step 6. Attach Fabric to Felt Backing
It’s time to combine your memory fabric with the felt backing. Begin by pinning your cut fabric shape carefully to the felt backing. These pins are essential for maintaining proper alignment throughout the sewing process.
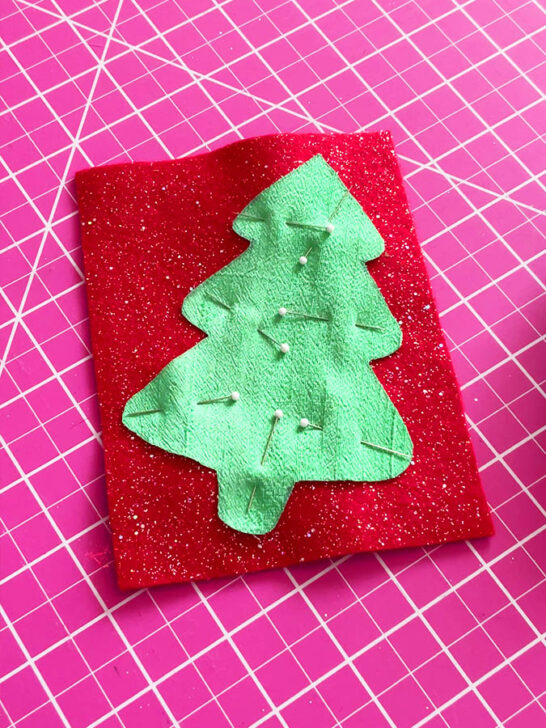
Choose a thread for your sewing machine that will work for both attaching and decorating. For my tree ornament, I selected a silver metallic thread. If you’re not sure how to sew with metallic thread, you might find my guide Mastering the Art of Sewing with Metallic Thread helpful.
Set your machine to a straight stitch and sew around the edge of the fabric shape, keeping a 1 mm (1/16″ or less) distance from the edge. This close stitching technique ensures your fabric is securely attached to the felt piece.
Proceed slowly, especially when navigating curves. You may need to pause periodically, leaving the needle down, to readjust the fabric and maintain that precise 1 mm (1/16″ or less) edge distance.
This stitching is just to join the fabric to the felt. We’ll add decorative stitches later, so don’t worry if this line isn’t perfect. What matters most is that your special fabric is firmly attached to the backing. This prepares your ornament for the next steps.
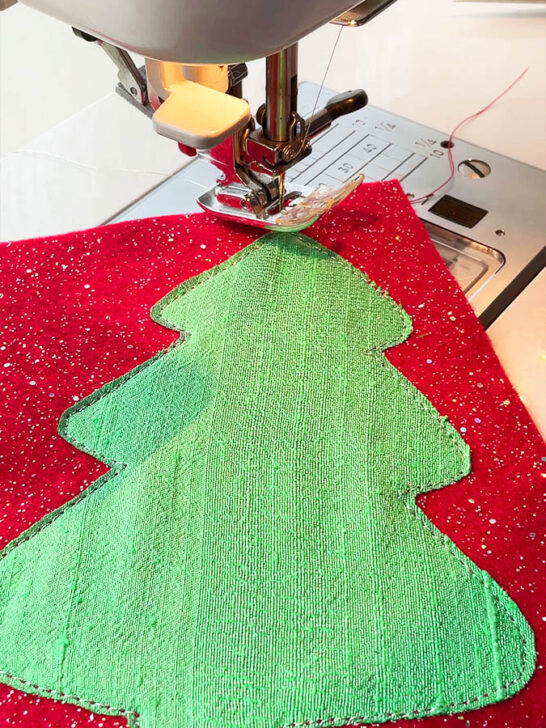
Step 7. Apply Decorative Stitching
Now, elevate your tree ornament with some decorative stitching. This step adds visual interest and provides extra reinforcement to the fabric-felt connection.
Explore the decorative stitch options on your sewing machine. Look for patterns that are dense and detailed. These will stand out more prominently against your fabric. Consider branch patterns, star shapes, or other holiday-themed designs that complement the tree shape.
I chose this decorative stitch for its unique qualities. It’s dense like a satin stitch, but with an irregular pattern where some threads are shorter and others longer. This variation creates a textured effect that reminds me of snow clinging to the edges of tree branches.
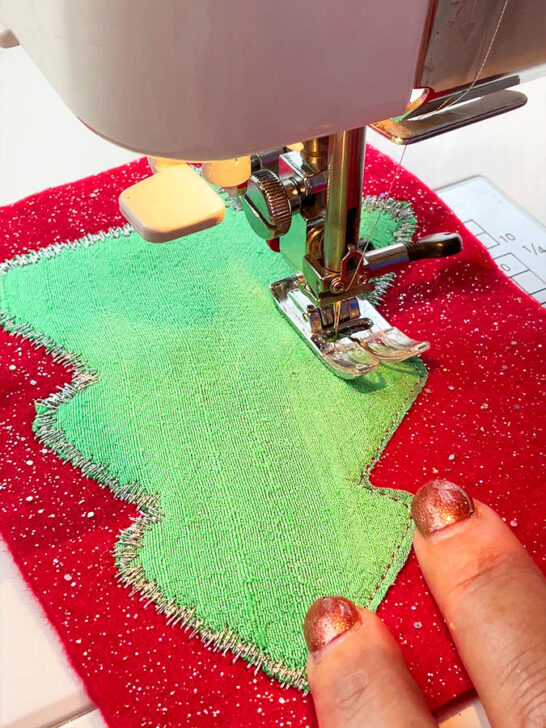
Keep using the metallic thread you’ve selected. The combination of lustrous thread and intricate stitches will create a dazzling effect, perfect for catching the twinkle of Christmas lights.
Sew around the contours of your tree ornament, keeping a consistent distance of 3-4 mm (1/8″) from the edge. You might need to stop and adjust your fabric occasionally to maintain even stitching.
I guess it’s okay to have minor imperfections in your stitching. These small details contribute to the unique, handmade quality of your ornament, making it truly one-of-a-kind.
✅ Related tutorial: Decorative Sewing Machine Stitches
Step 8. Filling Your Tree Ornament
Let’s add some depth to the ornament. Through the opening in the felt, begin inserting small amounts of polyester fiberfill. Guide the stuffing into the pointed top and any branch-like protrusions. Add filling bit by bit, maintaining the tree’s distinctive silhouette.
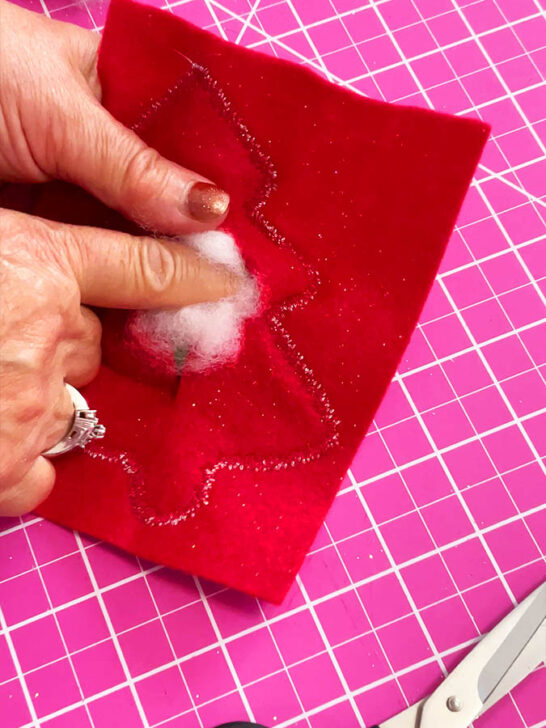
Aim for a soft, natural fullness that enhances the fabric’s texture without obscuring its pattern. Gently squeeze the ornament to distribute the filling evenly, paying extra attention to keeping the top pointed. This step brings a lifelike quality to your ornament, making it even more special.
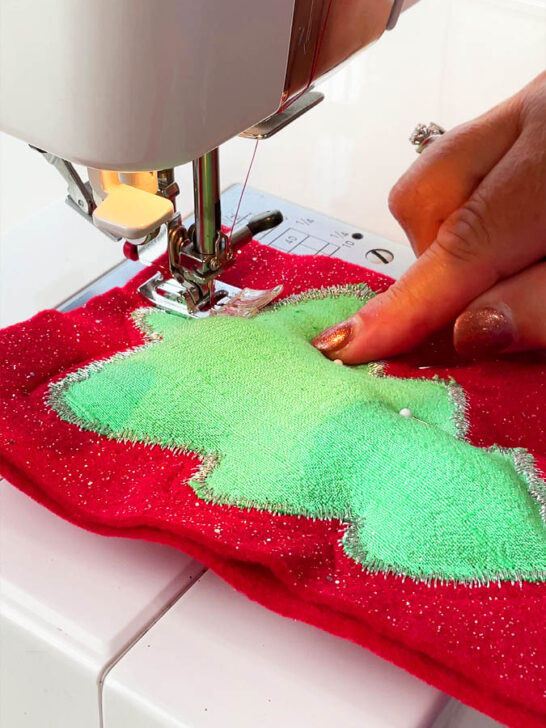
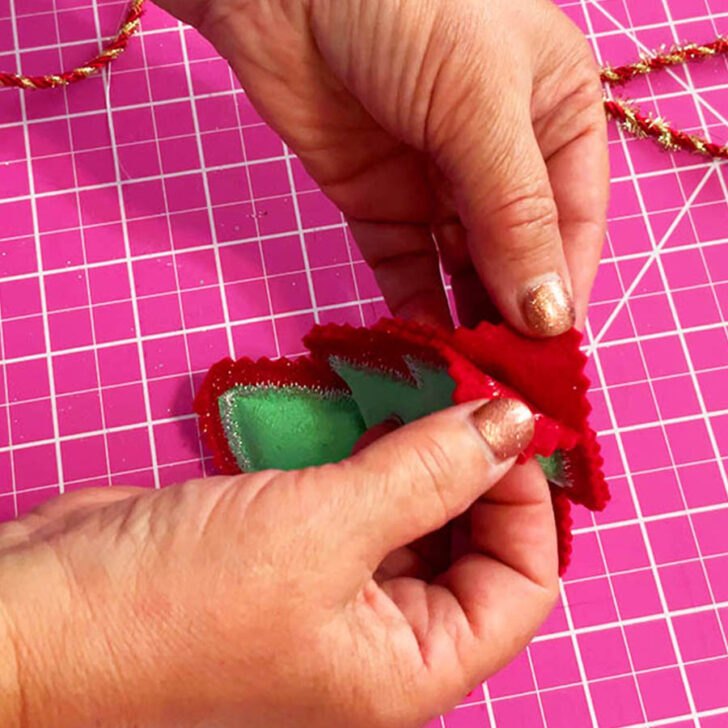
Step 9. Finish the Back of the Ornament
Prepare another felt piece. Place this new piece against the back of your ornament, with any decorative sides facing outward. Secure all layers with pins to prevent shifting while sewing.
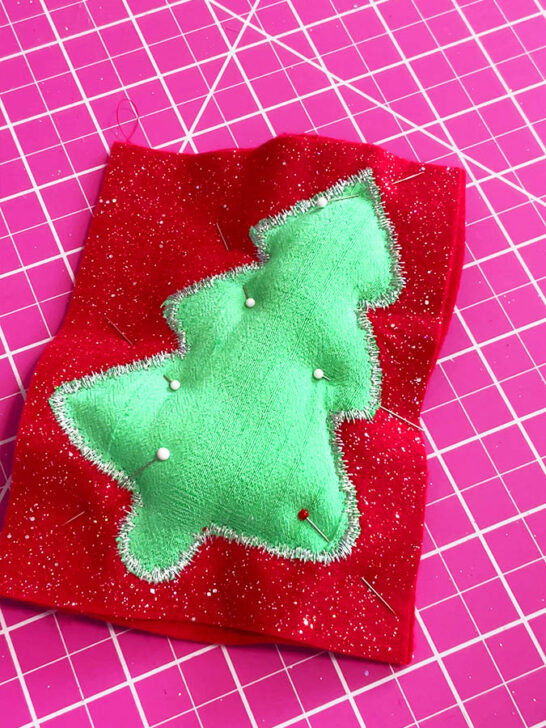
Select a thread that coordinates with your felt and stitch around the entire tree shape, maintaining a 3mm (1/8″) distance from the edge. This step encapsulates all layers and creates a clean finish. Be particularly careful when navigating the tree’s pointed top and any branch-like protrusions. Remember to remove pins as you go to ensure smooth sewing.
Step 10. Trim the Excess Felt
It’s time to define the edges of your tree ornament for that perfect finishing touch. Reach for your pinking shears – these specialized scissors will create a decorative zigzag edge. Carefully trim around your entire tree shape, maintaining a consistent 3-4mm (1/8″) margin outside your stitching line. The pinked edge adds a whimsical detail that complements the tree silhouette beautifully.
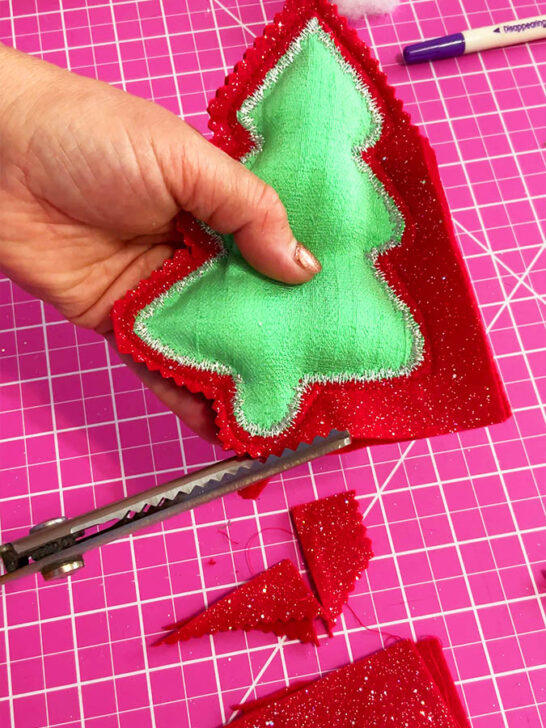
If you need a reliable pair of pinking shears, I’ve had great results with this set from Amazon for crafts like this.

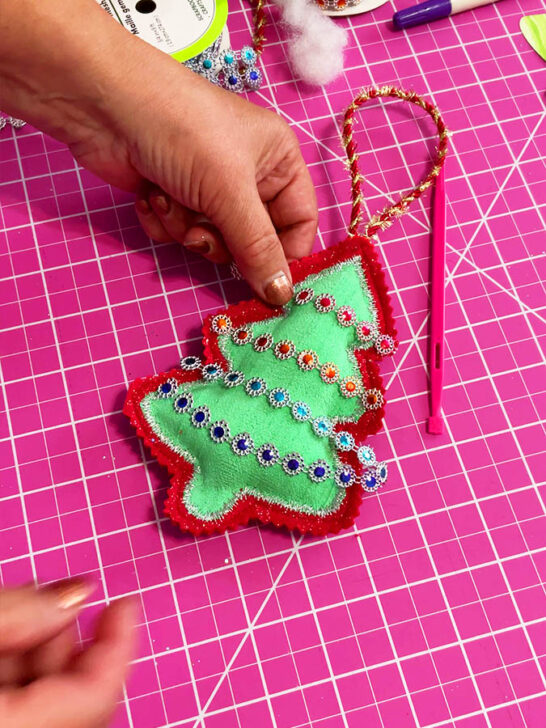
Step 11. Inserting the Hanging Loop

We have finished the ornament! But we need to hang it on the tree, and for this we will use also an ornamental cord (or ribbon). I used something I already had, but I found a very similar one on Amazon.
Let’s add a way to display the tree ornament. Find the top center point and carefully undo about 3/4 inch (2cm) of stitching using a seam ripper. Choose a festive ribbon (I picked a red one with golden threads) and thread both ends through this new opening. Push roughly 2 inches (5cm) of ribbon inside the ornament, making sure it’s straight and centered. Stitch the opening closed, securing the ribbon in place. Sew back and forth several times for strength.
While this technique might surprise you, it’s proven reliable in my experience. If you attach the loop during initial stitching it would expose it to potential damage when using pinking shears. This method of inserting the ribbon after trimming protects it from accidental cuts. By carefully opening a small section of stitching, you can position the loop exactly where you want it without affecting the decorative pinked edges.
This method allows you to add the ribbon after trimming, preventing any accidental cuts to your hanging loop. It might feel strange to undo some of your work, but the end result is a securely attached ribbon that looks great.
Step 12. Add Decorative Ribbons
Let’s add some sparkles to the ornament with festive ribbons. Pick ribbons that complement your fabric and cut them into various lengths. Use fabric glue to attach ribbon “garlands” across your tree, mimicking a decorated Christmas tree. Carefully place each ribbon, holding it in position. Step back and assess your design as you go – sometimes simplicity is key. Allow ample time for the glue to dry completely before handling your newly embellished memory ornament.
If you are looking for a decorative ribbon, here is a selection from Amazon.
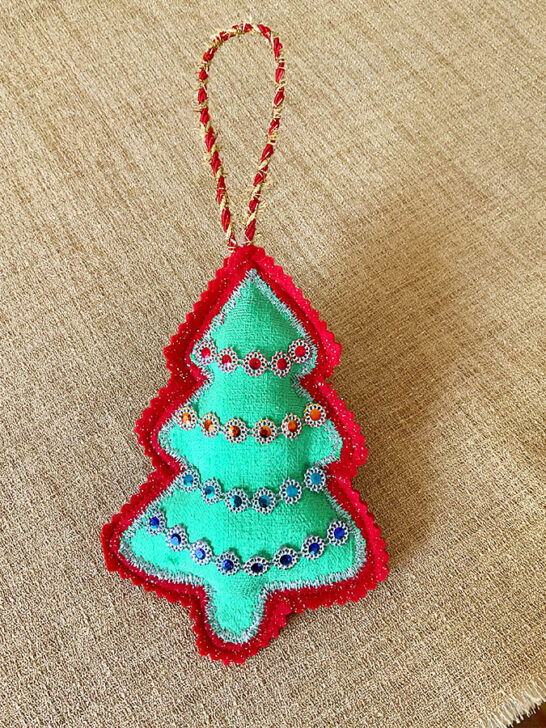
Take a look at this completed memory Christmas ornament, crafted from a loved one’s clothing. Why not try your hand at making one? The fabric, once worn by someone dear to you, is now shaped into an ornament. With its subtle sparkle and thoughtful design, it’s more than just a decoration – it’s a treasured reminder of someone no longer with us. When you hang it on your Christmas tree, you’ll be reminded of precious moments shared. This ornament adds a touching and meaningful element to your holiday celebrations, keeping your loved one’s memory alive during the festive season.
Liked this tutorial? Don’t forget to save this pin to your sewing Pinterest board for future reference. This way, you can easily return to this guide whenever you’re ready to sew memory Christmas ornaments. For more creative sewing tips, tutorials, and daily doses of inspiration, make sure to follow me on Pinterest.
latest posts
- What Do You Call a Person Who Sews? I Asked My Readers and Got 1,408 Opinions
- DIY Round Purse: PDF Sewing Pattern and Detailed Instructions
- Mini Wonder Clips By Clover: Useful Sewing Tool Or Just Another Notion?
- Non-Slip Grips For Quilting Rulers: A Small Notion With A Useful Job
- Fabric Eraser for Sewing: What It Removes and When to Use It
- What Is The Best Thread For Sewing Machine Projects? Let’s Find Out!
- Butterfly Quilt Block Tutorial – Foundation Paper Piecing
- How To Sew Quilt Squares So The Corners Match
- Sewing With Fork Pins: How They Help With Pattern Matching, Slippery Fabric, And Seams


This is beautiful, I will try this,I am a senior sewist the past few years , I have learned that I forgot .
Thank you, God Bless.
Thank you; but you know, we all forget. That’s life, and we have to accept that which we can’t change.