DIY Oven Mitts: Step-by-Step Sewing Tutorial
These DIY oven mitts aren’t just something you made — they’re something you can rely on in the kitchen.
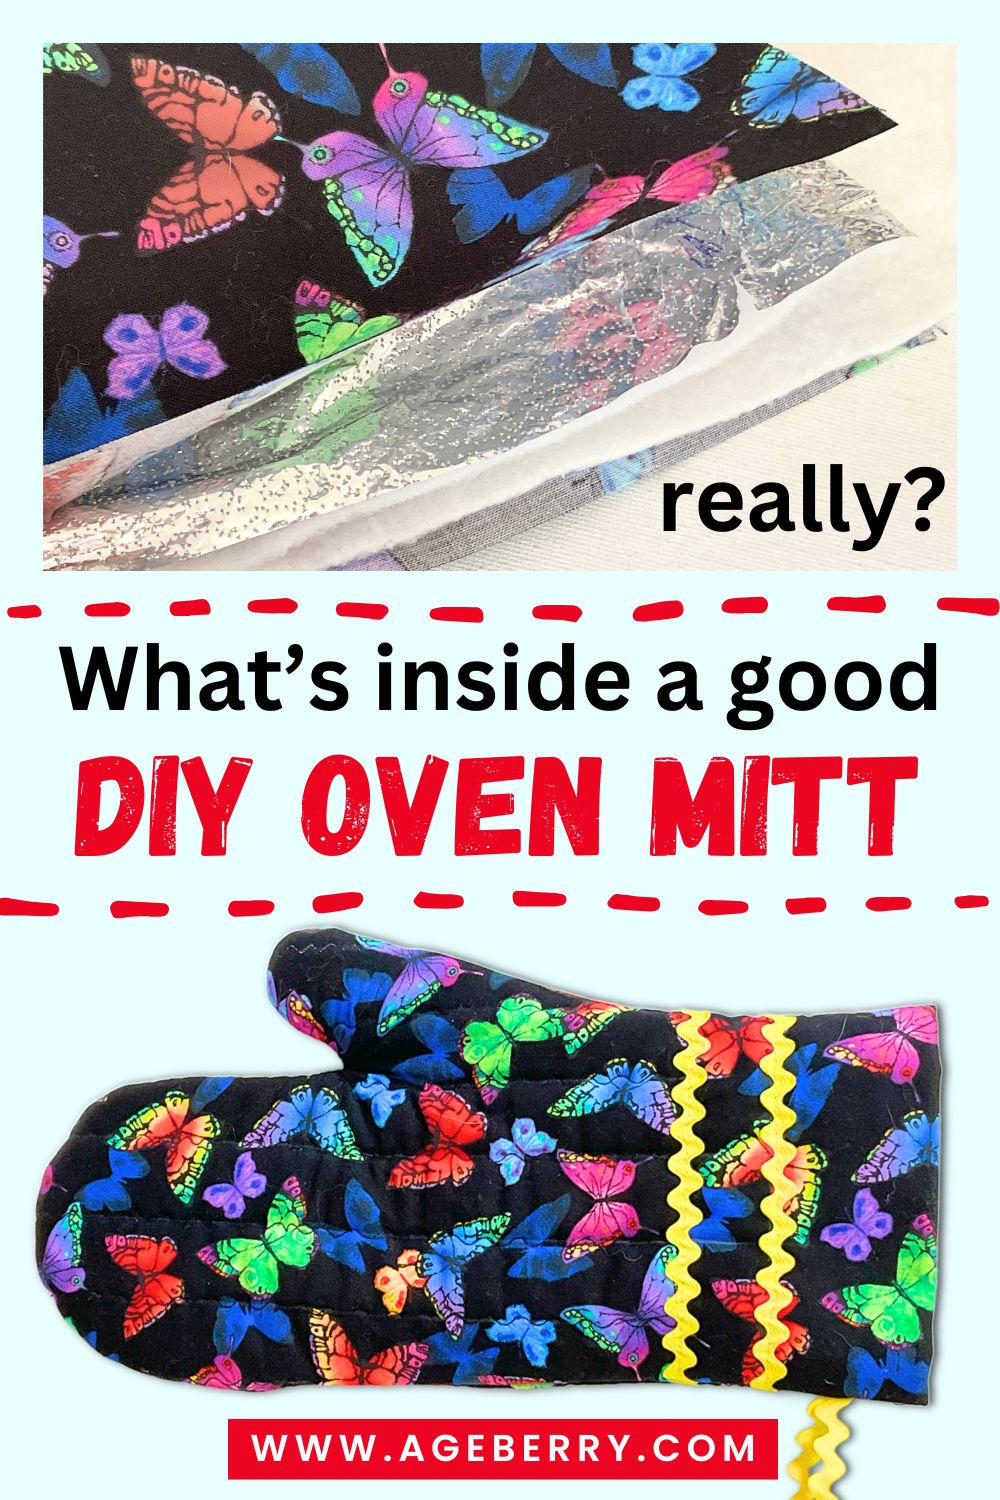
It has real structure. The layered batting (cotton + thermal) gives it thickness where it matters, so it doesn’t feel flimsy when you grab a hot pan. The quilting keeps everything in place, so it won’t shift or bunch up after a few washes.
The lining makes a big difference too. It feels smooth inside, slides on easily, and doesn’t catch on your hand like some store-bought ones do.
And of course, you get exactly the look you want. This butterfly fabric with the yellow trim doesn’t look like anything from a discount bin — it looks finished, intentional, and a little bit fun hanging in the kitchen.
That’s really the point of making it: not just to have an oven mitt, but to have one that fits well, feels right, and looks like something you chose — because you did.
And yes, the instructions may look long. Don’t let that scare you. It takes much longer to describe each step than to actually sew the mitt. Once the pieces are cut and layered, the process moves along pretty quickly.
Materials and tools
- 100% cotton fabric
- Thermal batting with a silver heat-reflective layer
- 100% cotton batting
- Transparent pattern paper or medical exam paper
- Printed oven mitt PDF pattern
- Printer for printing the PDF pattern
- Duckbill scissors for trimming batting (optional)
- Decorative trim ( I used cotton rickrack)
- Regular sewing tools
If you want a smoother sewing experience, I have the PDF (in US-letter and A4 sizes) in my shop for a small fee. You’ll get the pattern, more photos, clearer steps, and simple instructions for assembling the pattern pages. It’s best viewed on a phone or tablet since it includes many images — just print the 4 pattern pages. No ads — just a guide you can keep next to your machine.
Step 1. Prepare the Pattern Pieces
For this tutorial, I’m using my oven mitt sewing pattern, which is available in my shop for a small fee. You can draw your own oven mitt pattern if you prefer, but you will still need to make two extra pattern pieces before cutting the fabric.
The seam allowances are ½ inch. The dashed lines inside the pattern are stitching and quilting guides.
First, take a piece of transparent pattern paper. I use medical exam paper because it’s thin and easy to see through.
Trace two extra pieces from the main pattern:
- one full oven mitt shape with seam allowances
- one oven mitt shape without seam allowances, following the inner dashed line
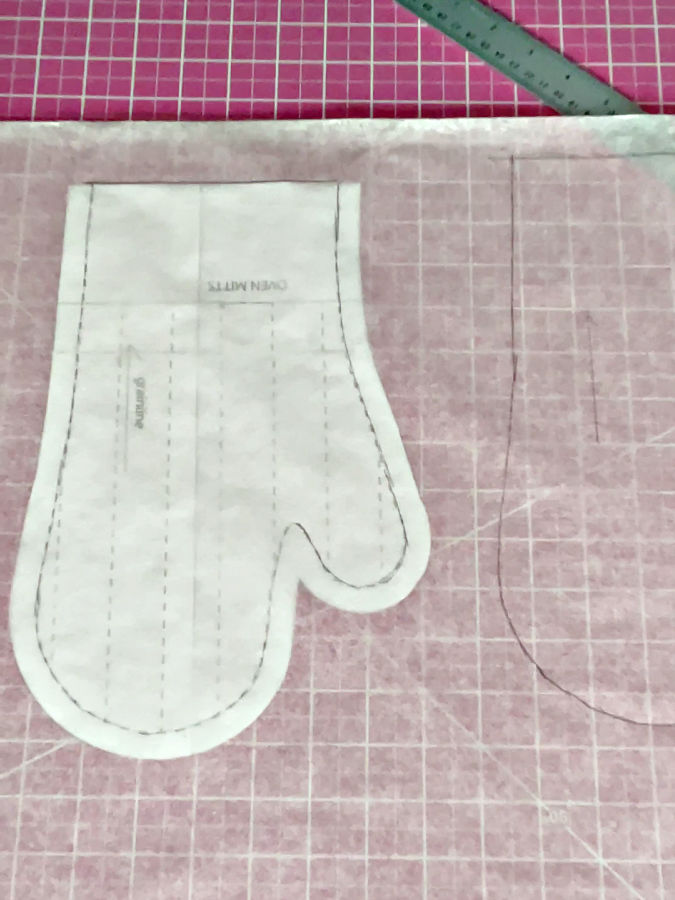
Cut out both pieces.
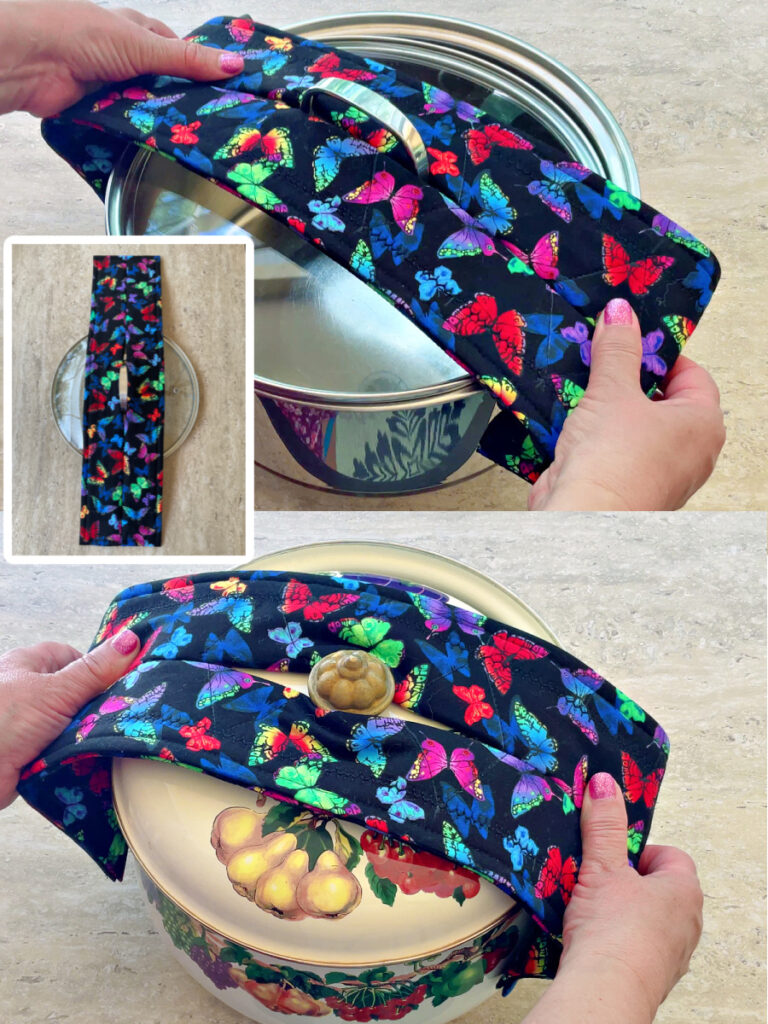
By the way, if you like quick, practical sewing projects, I recently made a potholder that works very differently from the usual ones. It wraps around the handle and stays in place, so you can lift pots or drain hot water safely. It’s quick to sew and makes a really nice handmade gift. I made a detailed PDF tutorial with all the steps – take a look here.
Step 2. Cut the Fabric Pieces
Do not cut the fabric using the mitt shape directly.
Lay your fabric flat. Now place both pattern pieces on the fabric side by side.
- The full oven mitt pattern (with seam allowances) is placed on one side
- The transparent pattern (also with seam allowances) is placed next to it, in a symmetrical (mirror-like) position
They are arranged like a left and right version of the mitt.
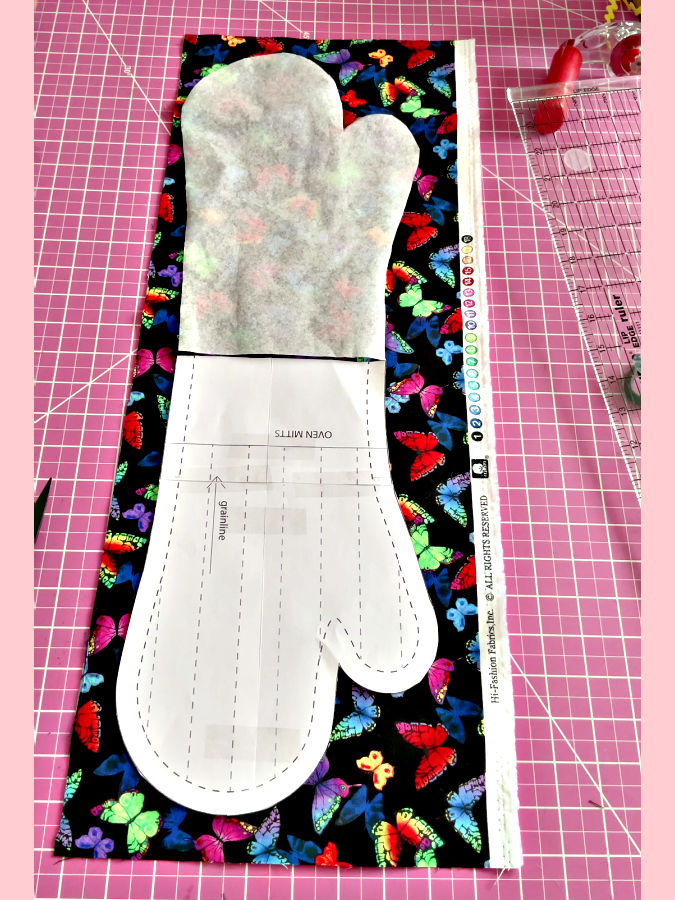
Using these as a guide, cut two rectangles of fabric large enough to fit the entire oven mitt shape with some extra space around it. The size of the rectangles is about 26×10 inches (66×25.5cm including the selvage in my case).
Note: Some of the links on this page are affiliate links. This means I will receive a commission if you order a product through one of my links. I only recommend products I believe in and use myself.

Step 3. Fold the Fabric
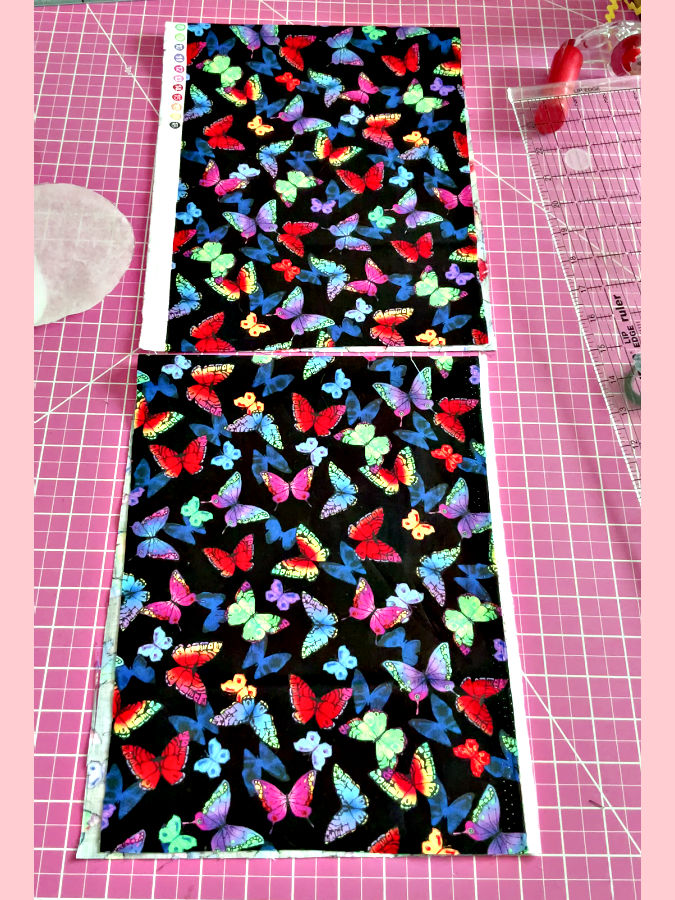
Take each rectangle and fold it in half, wrong sides together, as shown in the image.
Press the fold – make the crease.
Make sure the fold is straight — this will help keep both sides of the oven mitt even when you cut and sew later.
Step 4. Cut the thermal batting
Take the thermal batting (the one with the silver layer).
✅ Related tutorial: Heat Resistant Batting for Sewing: What It Is, How It Works, and What Makes a Difference
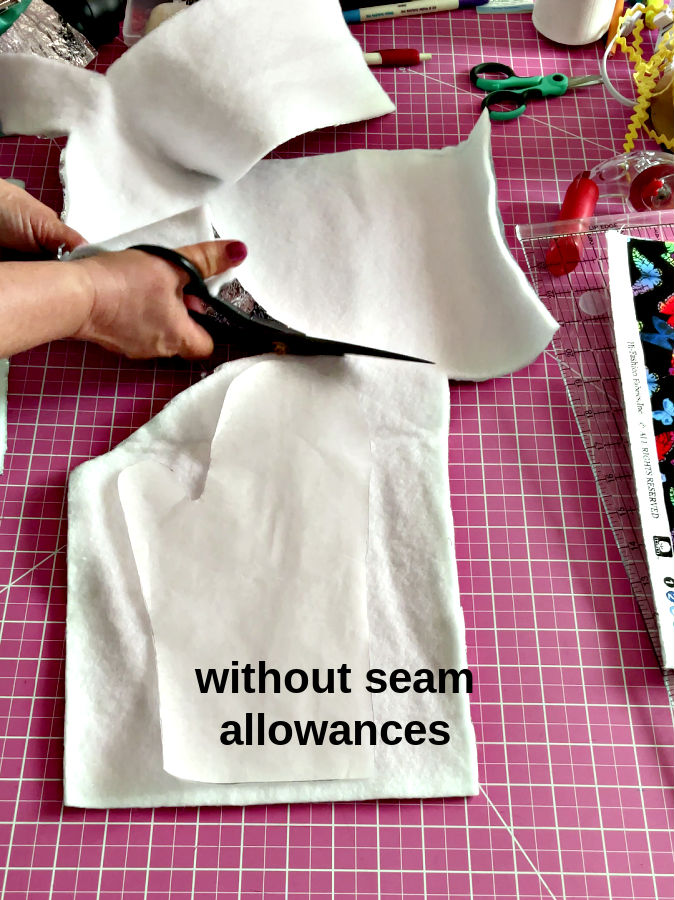
Place the pattern piece without seam allowances on top.
Cut around it, but don’t try to be exact. Just cut roughly following the shape, as shown in the image.


Step 5. Cut the cotton batting
Now take your 100% cotton batting.
✅ Related tutorial: Best quilt batting, types of batting and how to choose batting for a project
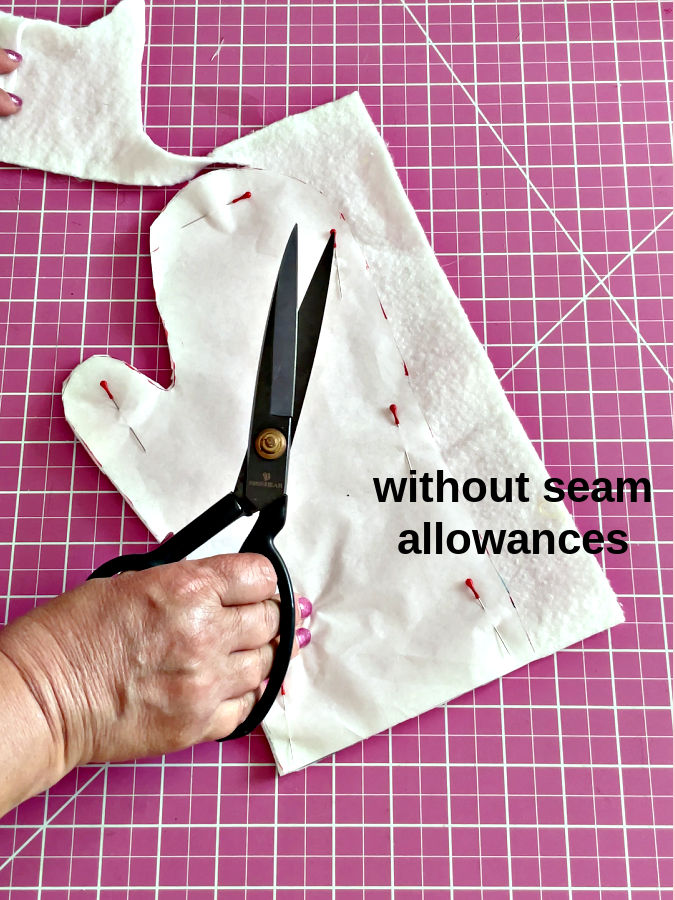
Place the same pattern piece without seam allowances on top again.This time, cut right along the pattern lines so the shape is accurate.
Step 6. Prepare the fabric
Take one of your folded fabric rectangles and unfold it.
You will see a crease line in the center — this is very important. It will guide the placement.
Take the cotton batting piece you just cut. On the straight top edge, trim off about 3/8 inch. This step reduces bulk.
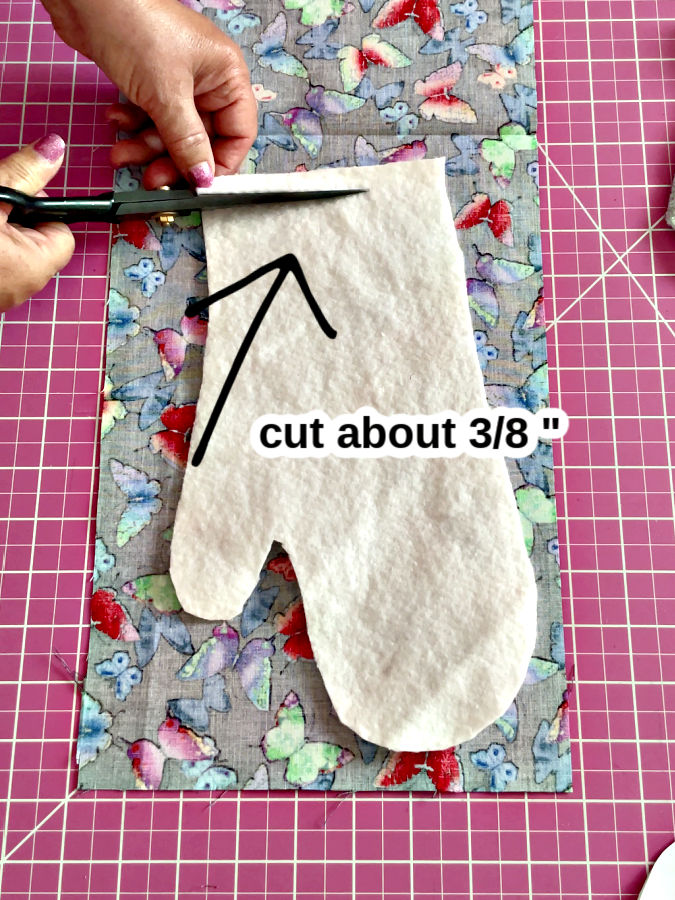
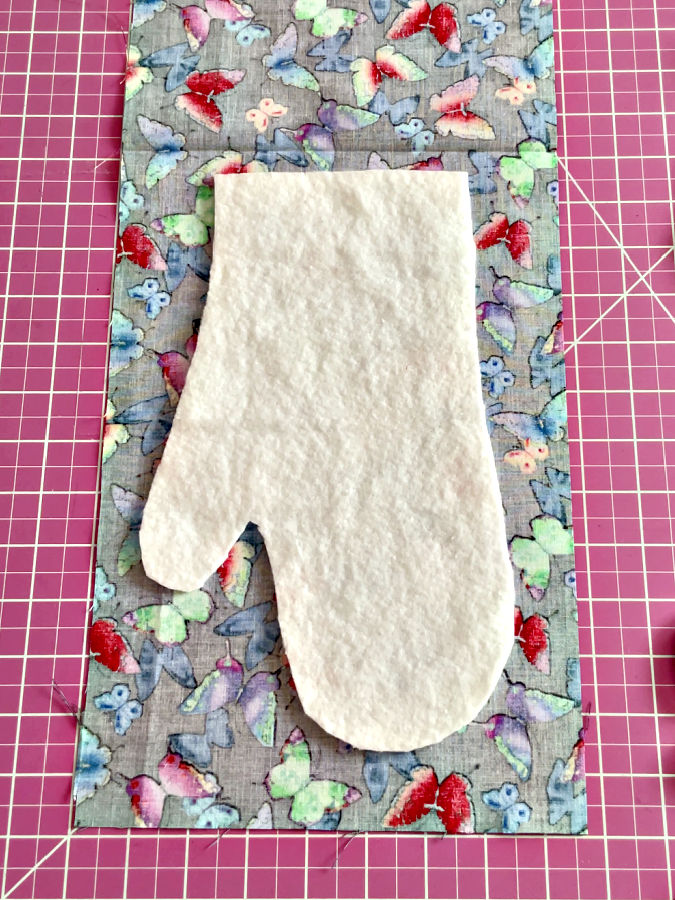
Place the cotton batting on the fabric so that:
- the trimmed straight edge is parallel to the crease, and positioned about ⅜″ away from it
- the piece is centered using that crease as a guide


Step 7. Add the thermal batting
Now place the thermal batting on top of the cotton batting (shiny side up).
Align it so that the batting layers sit correctly along the crease and cover the hand area.
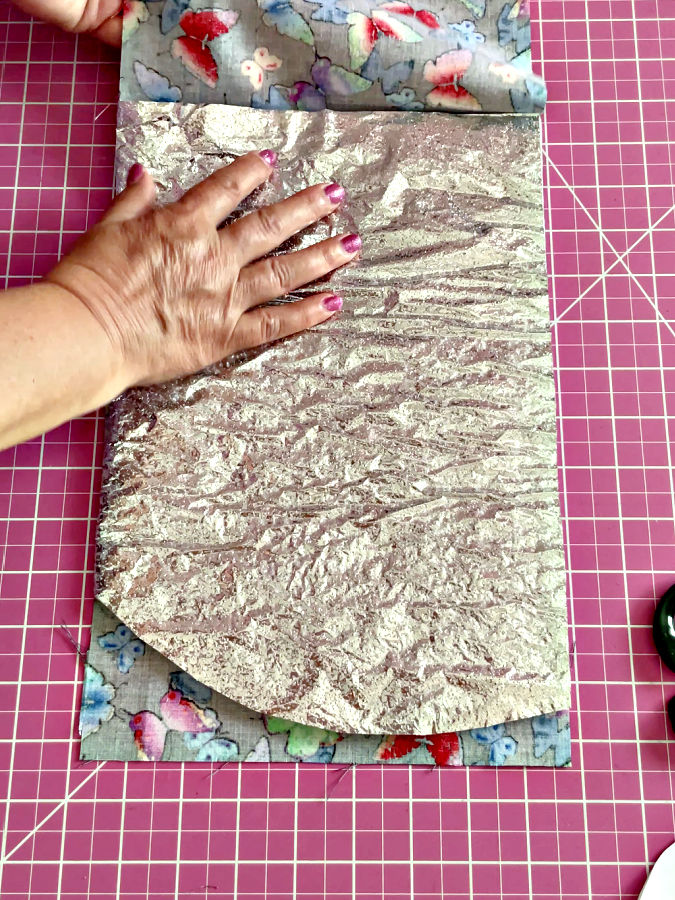
Step 8. Mark and Secure the Batting
Place the pattern piece without seam allowances on top of the thermal batting.
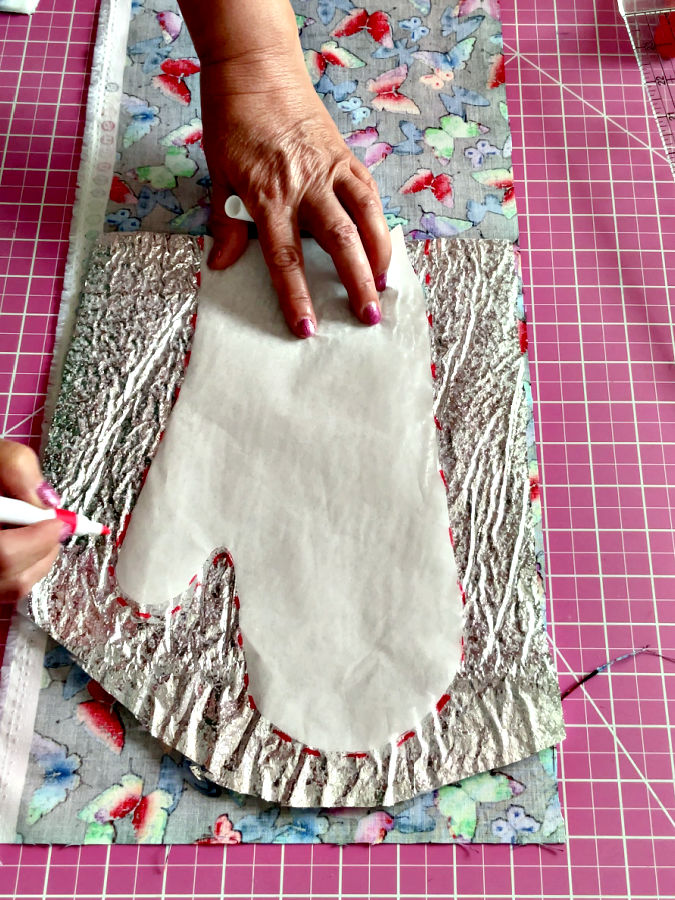
Trace around the pattern to mark the shape. You can use fabric markers, but I’ve used just a regular marker — the lines show up clearly in the images on the silver surface and don’t get lost.
Once the shape is marked, remove the paper pattern.
Now pin the batting layers to the fabric underneath. Use several pins to keep everything flat and in place — this will prevent shifting when you start sewing.
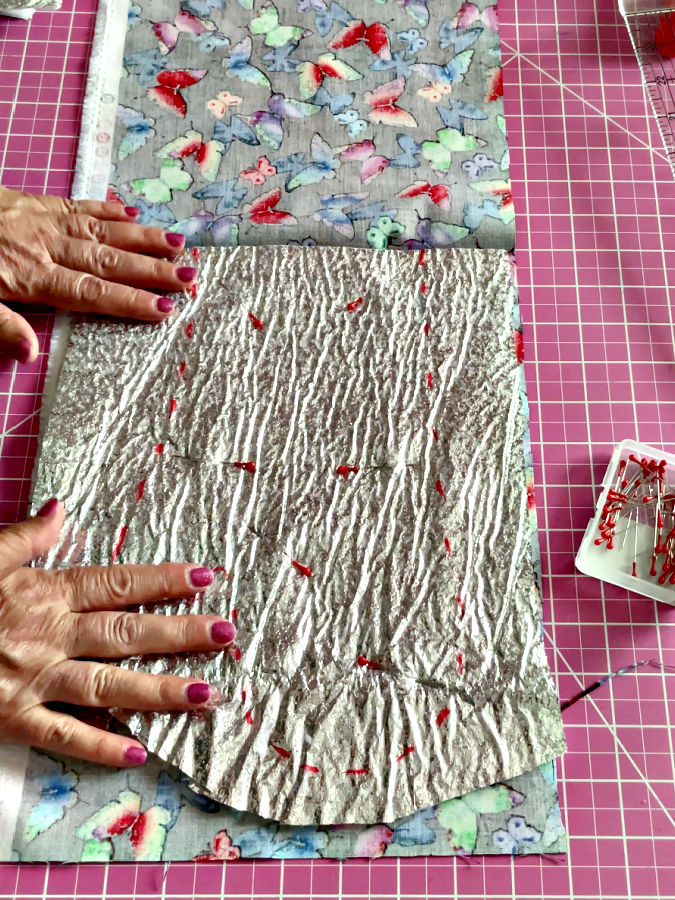
Step 9. Repeat for the Second Side
Cut another piece of thermal batting using the pattern without seam allowances. Cut it roughly around the shape, as before. For this cut the mirroring is not important, the batting is the same on both sides.
This is described in Step 4.
Now make the second side of the oven mitt the same way, but mirror the placement. However some steps will still be identical.
This is important because the oven mitt has two sides. One side must face one direction, and the second side must face the opposite direction so they fit together correctly.
Cut another piece of 100% cotton batting using the same pattern piece. Trim about ⅜″ from the straight top edge. This is identical with Step 5.Place the cotton batting on the second fabric rectangle in the mirrored position. The trimmed straight edge should be parallel to the fold crease and positioned about ⅜″ away from it. The image below shows the mirror position.
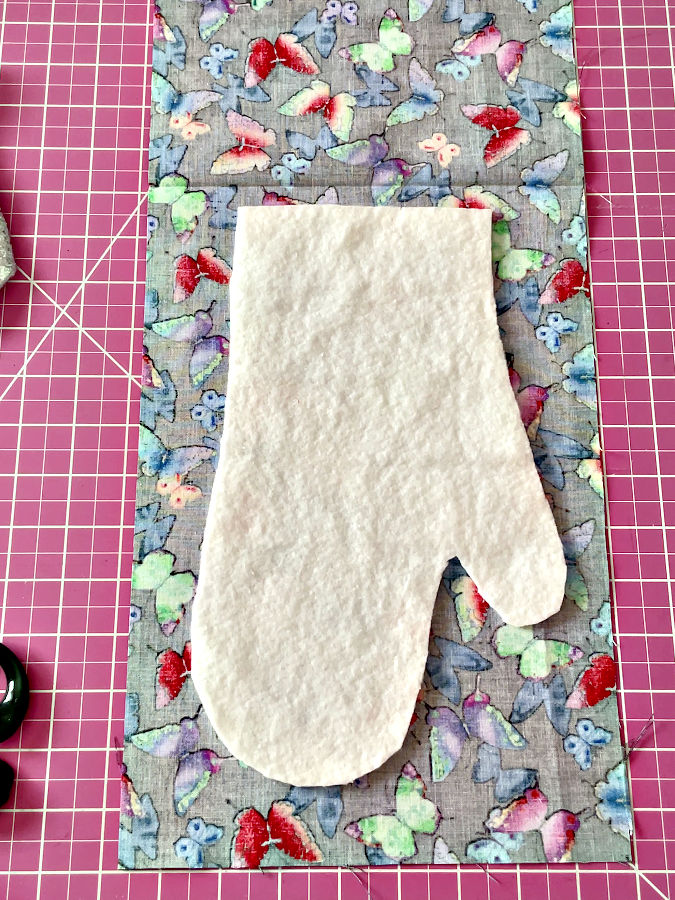
Place the thermal batting on top, with the silver side facing up. Line it up with the crease.
Then place the pattern piece without seam allowances on top of the thermal batting and trace around it.
Then remove the paper pattern and pin all layers together so nothing shifts.
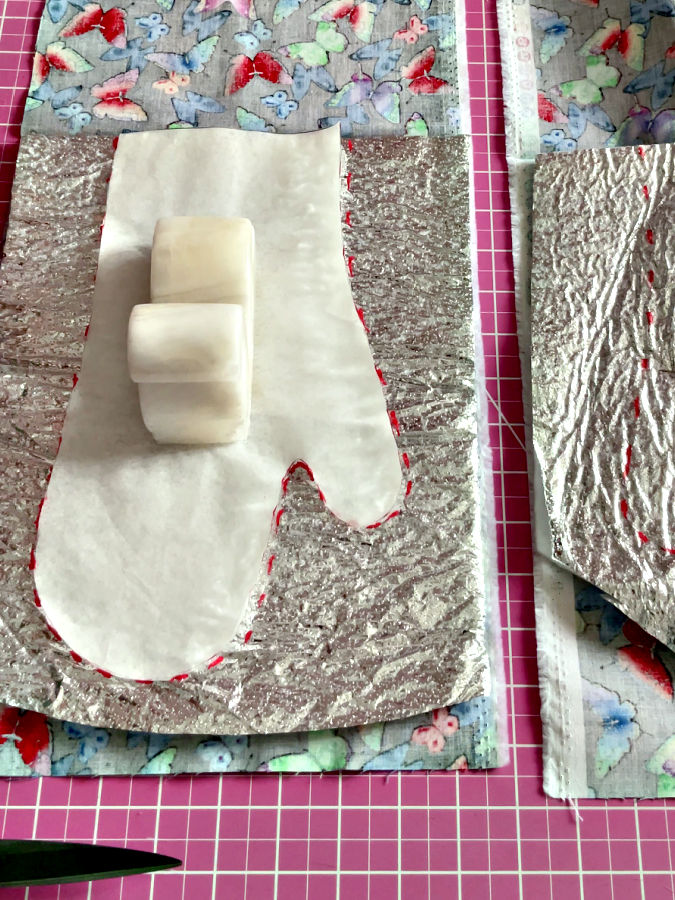
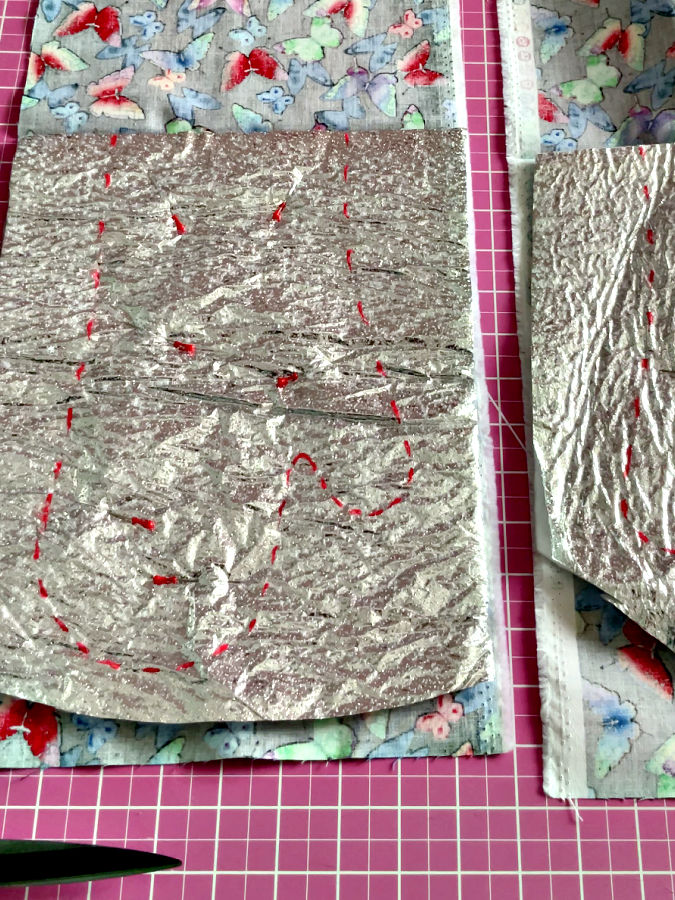
This setup may look unusual, but it’s intentional. Most oven mitts are made with batting only inside. This method creates a proper layered structure (fabric + cotton batting + thermal layer + lining), this gives better heat protection and a comfortable finish.
Step 10. Stitch and Mark the Quilting Lines
Take both prepared pieces to your sewing machine.
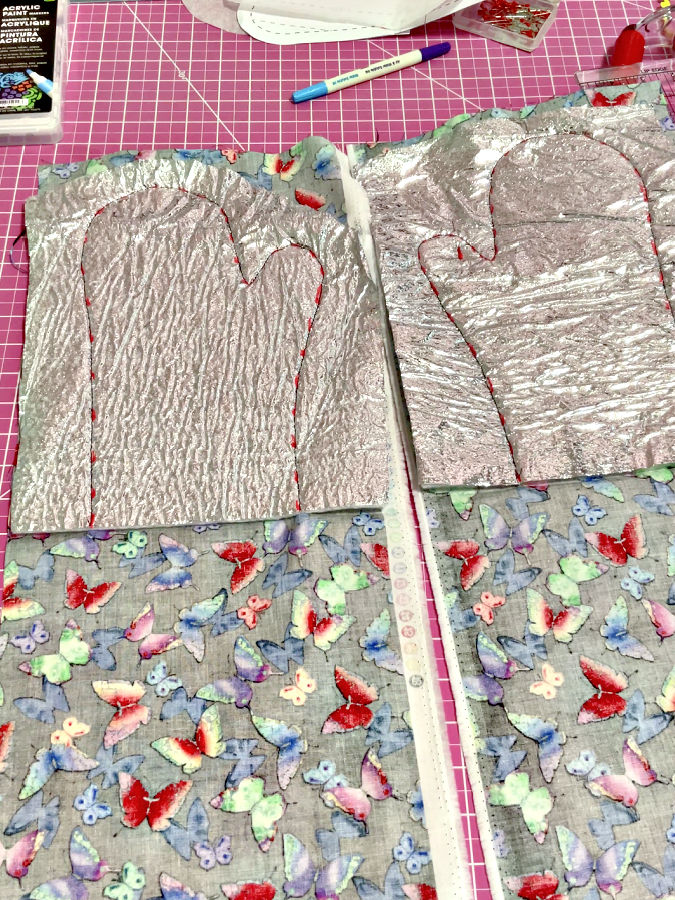
First, stitch directly over the marked oven mitt shape. This step attaches the thermal batting to the fabric and keeps all layers stable. Do this for both pieces.
Draw the Quilting Lines
Now turn the pieces to the fabric side.
Start by drawing the bottom horizontal line from the pattern. This line marks where the trim will be attached later, so don’t skip it.
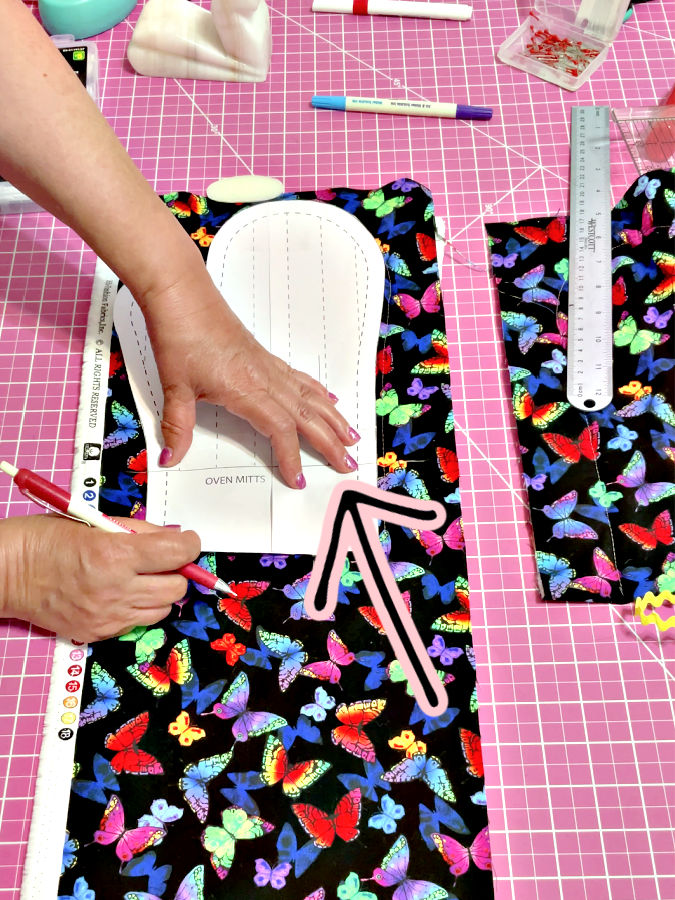
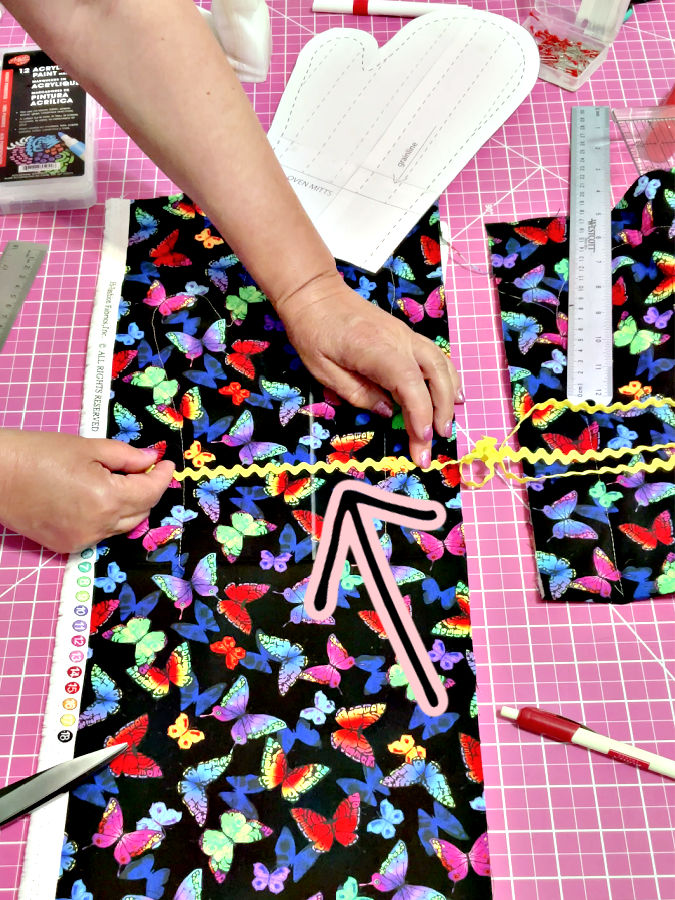
Next, draw the quilting lines:
- Use a ruler to draw straight lines 1 inch apart
- The lines should be perpendicular to the bottom edge (running vertically up the mitt)
- Draw them across the entire piece
Repeat the same process for the second piece.
These lines will guide your quilting and help keep the layers flat and evenly secured.
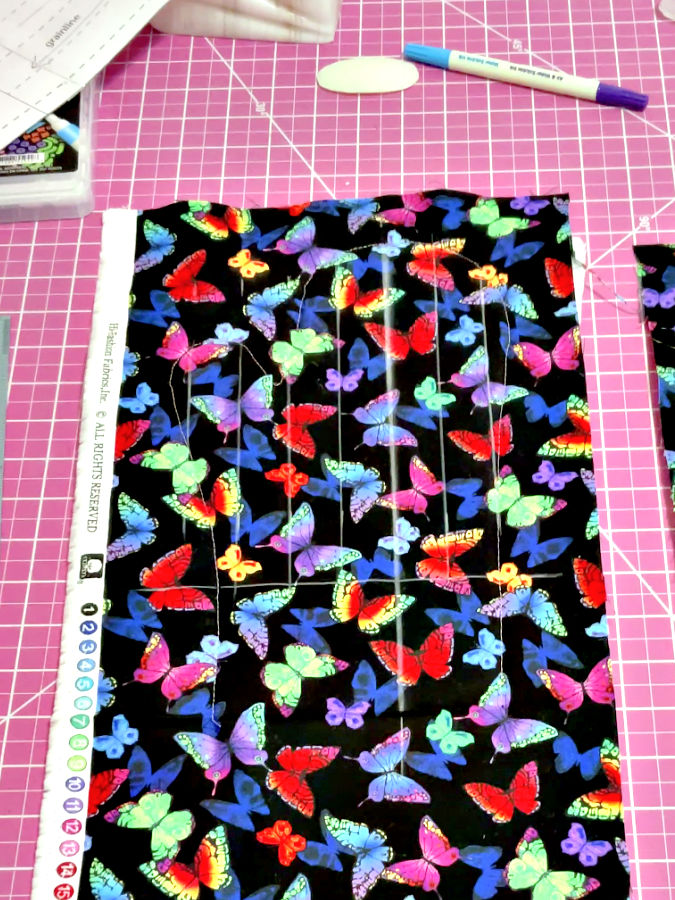
Step 11. Quilt the Layers
Now stitch along the lines you drew.
✅ Related tutorial: The Basics of Straight Line Quilting
I’m using a serpentine decorative stitch for quilting (visible in the below image). It holds the layers together well and adds a bit of texture.
If your machine doesn’t have this stitch, you can use:
- a straight stitch
- a zigzag stitch
- or any decorative stitch you like
The goal here is simple: secure all layers evenly.
Start and stop each line right at the stitched outline of the oven mitt shape. Do not sew over that outline. This keeps the edges clean and makes the next steps easier.

Repeat for both oven mitt pieces.
Step 12. Trim the Batting
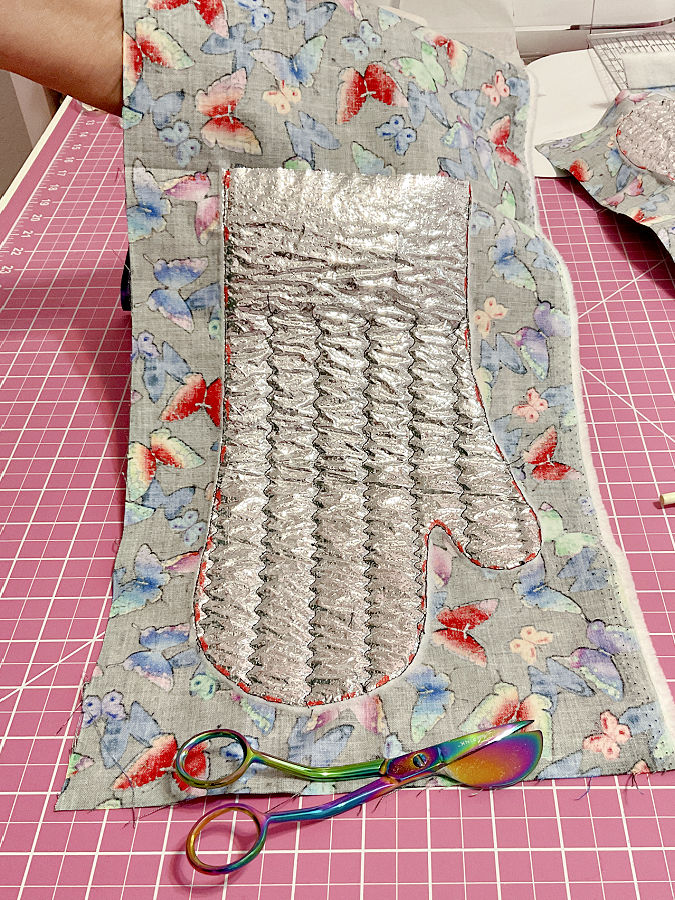
Now remove the extra batting around the mitt shape.
Use duckbill scissors for this step. These scissors have a flat, wide blade that slides under the batting and helps protect the fabric underneath.

Carefully trim the batting right up to the stitched outline of the oven mitt.
Take your time here:
- keep the flat blade against the fabric
- trim only the batting
- avoid cutting into the fabric layer
These scissors are designed for this exact job, so they make it much easier and safer. Repeat for both pieces.
✅ Related tutorial: Duckbill Scissors: What They Are And How To Use Them
Step 13. Add Seam Allowances
Place the full pattern (with seam allowances) made from transparent paper over the quilted mitt (the silver batting side). Align it carefully with the stitched shape and pin in place.
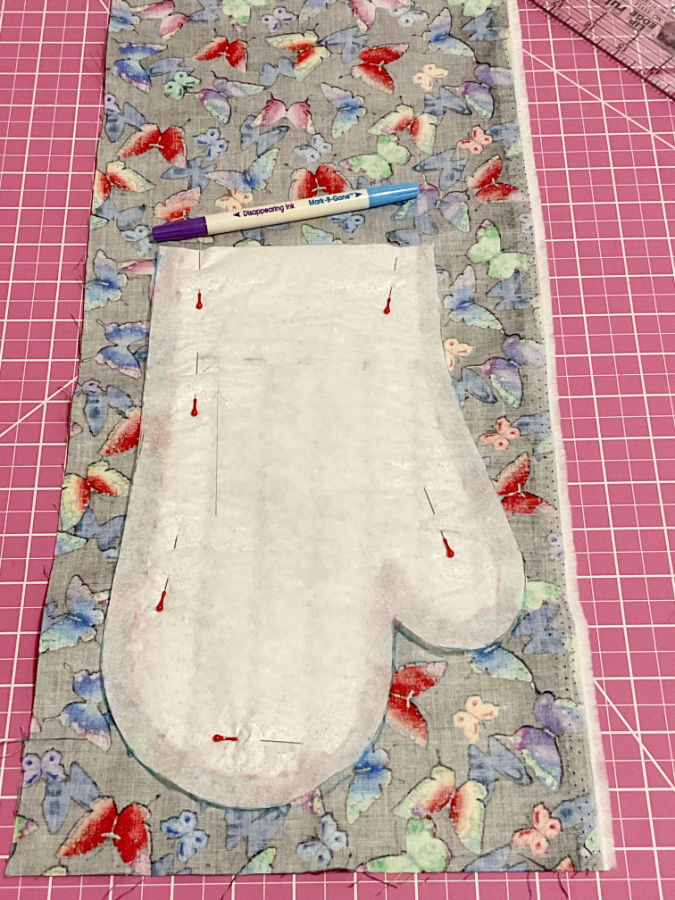
Trace around the pattern to add seam allowances.
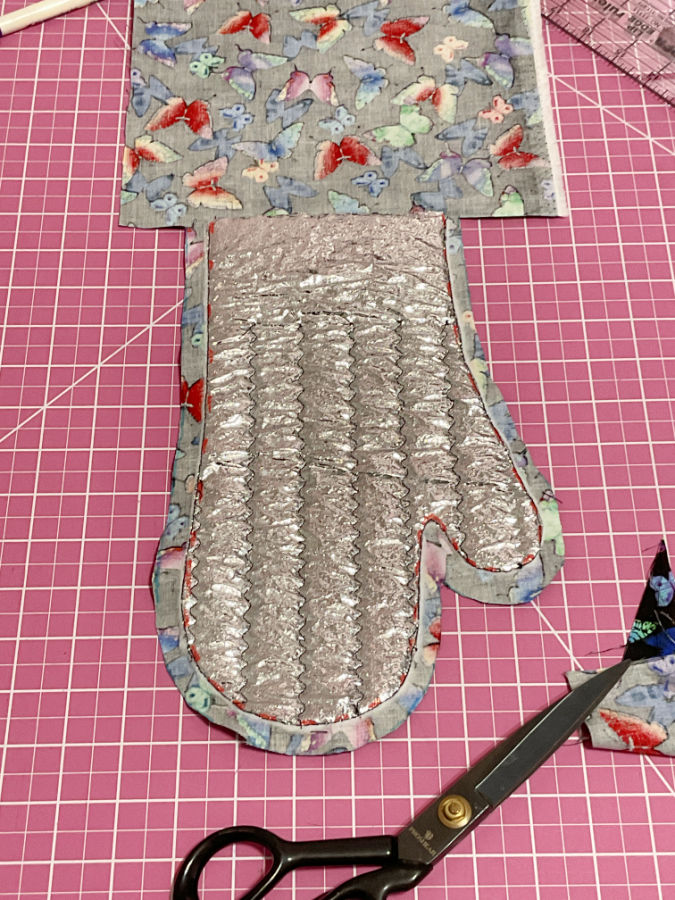
Now cut around the traced line but do not cut along the folded edge. Keep that fold intact—this is important for the final construction.
Step 14. Attach the trim
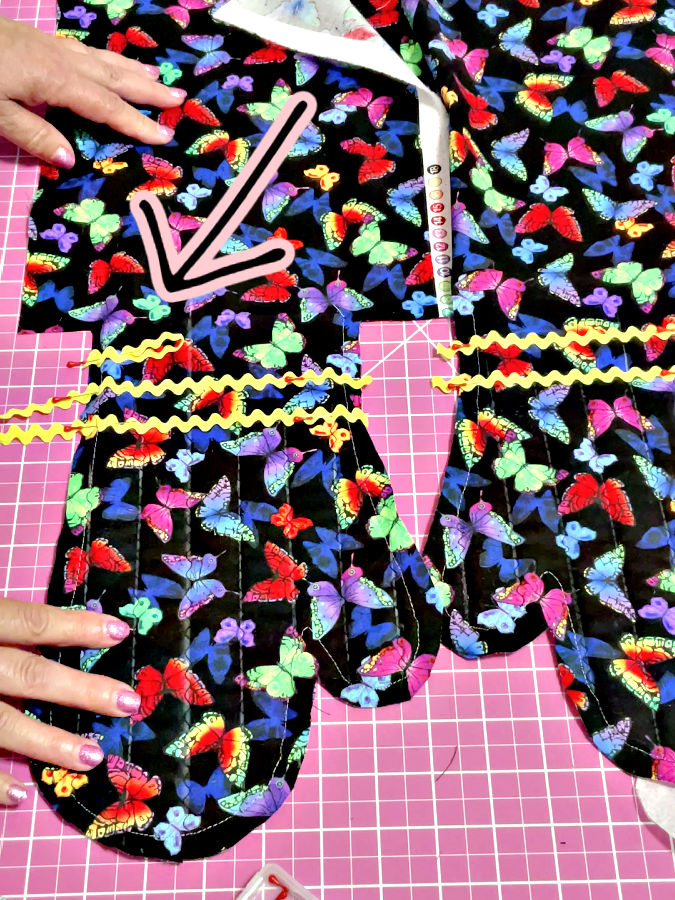
Sew the decorative trim (I used rickrack) across the bottom of the mitt:
- First row: stitch directly over the marked line (this is your placement line from the pattern)
- Second row: stitch another line about 3/4 inch from the first one
This creates a clean, decorative band.
I used rickrack trim for decoration because the one I had was labeled 100% cotton, which is important for a project like this.
If your trim doesn’t say what it’s made of, it’s better not to guess. Instead, you can easily make your own decorative strip from cotton fabric in a contrasting color. Just cut a narrow strip, press the edges under (or use a simple folded strip), and stitch it in place where the trim would go.
This way, you still get a nice decorative detail, and you know exactly what materials are going into your oven mitt.
Add a hanging loop
On one mitt piece, add a small fabric or ribbon loop:
- place it at the side edge, near the top of the trim
- secure it so it’s caught firmly in the seam
This loop lets you hang the mitt on a hook.
Step 15. Assemble the mitten and lining
Place the two prepared mitt pieces right sides together and pin.
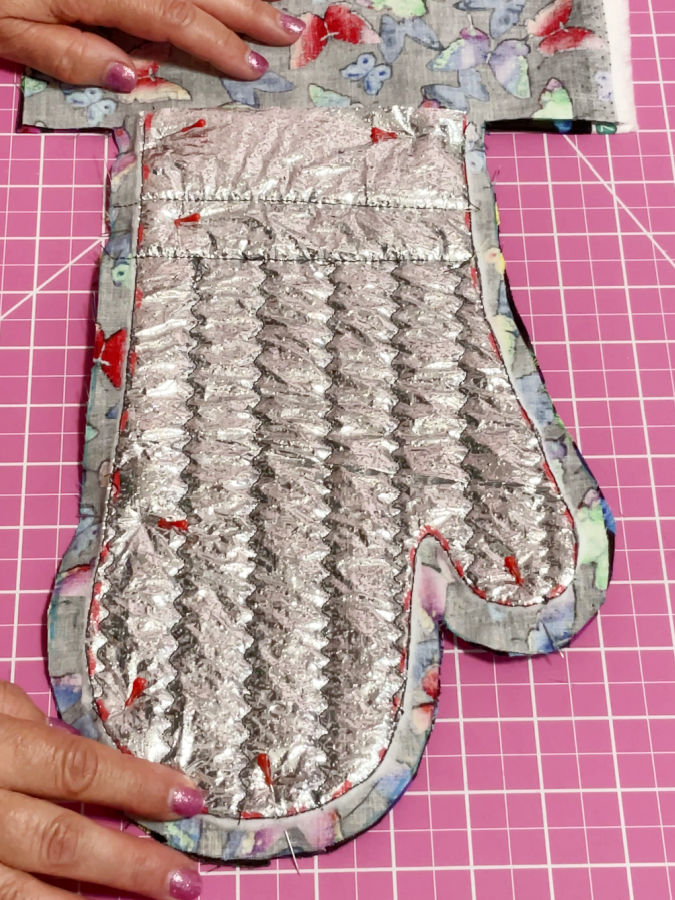
Stitch around the mitten shape, following the stitched line around the silver batting.
Do not stitch across the opening where your hand goes.
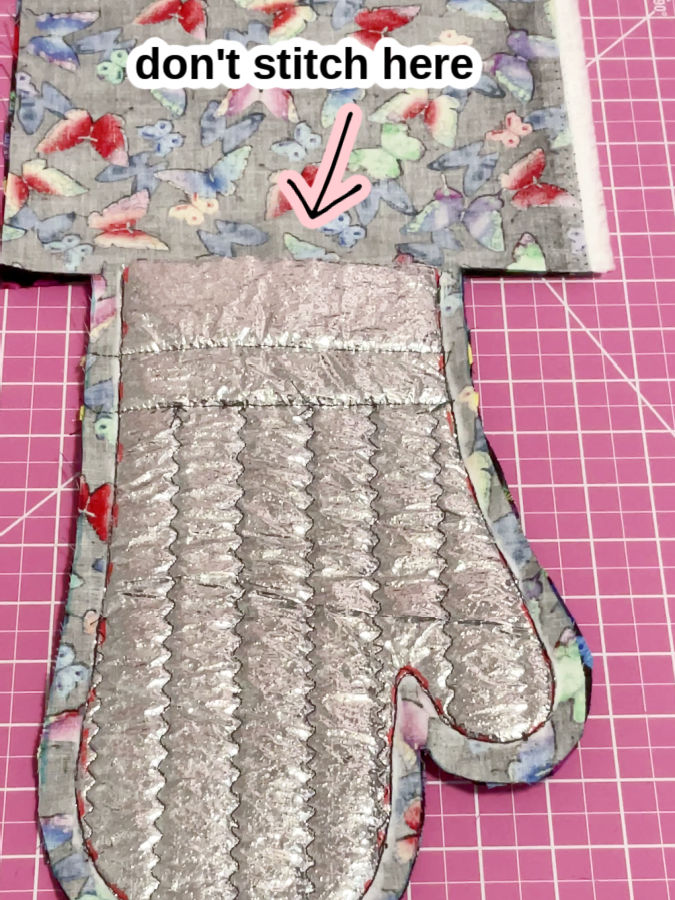
Now take the two rectangular lining pieces (the ones you kept attached to the pattern).
Place them on top of the mitten, covering it completely. Smooth them out so there are no folds. Then turn the whole piece over so you can work from the batting side again.
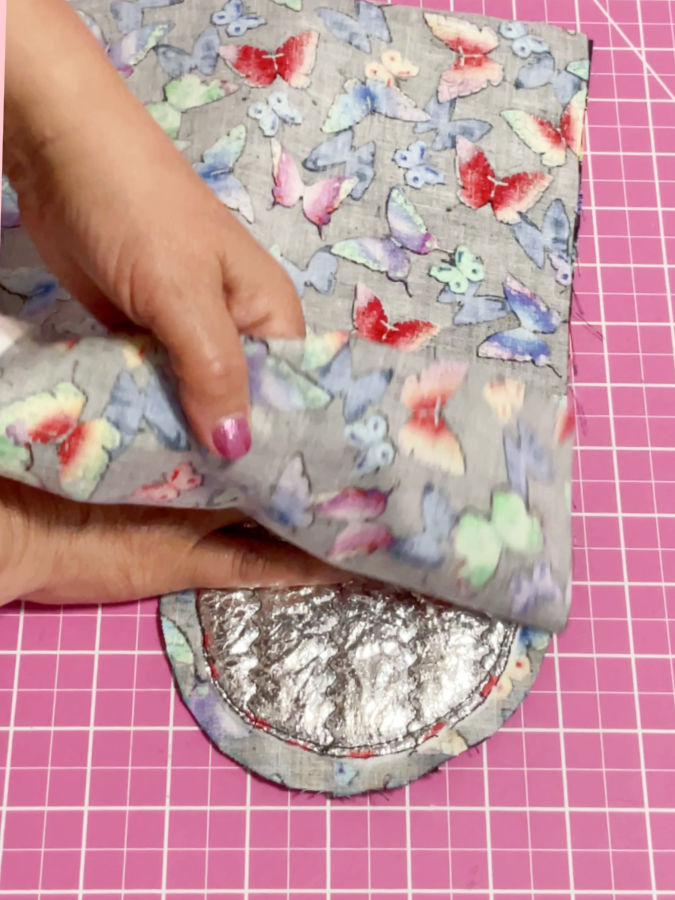
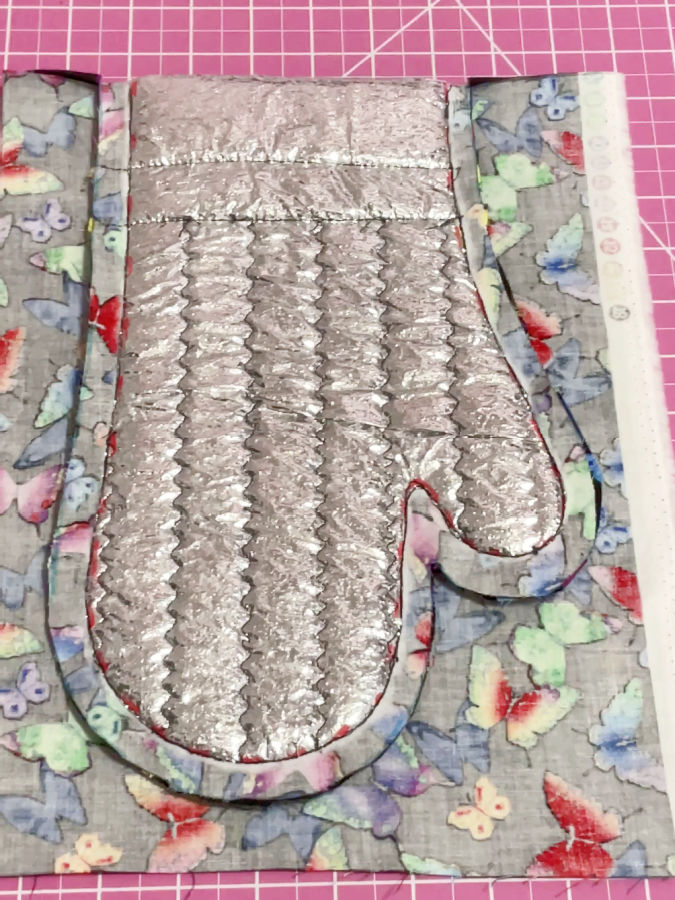
Pin the lining to the mitt all around.
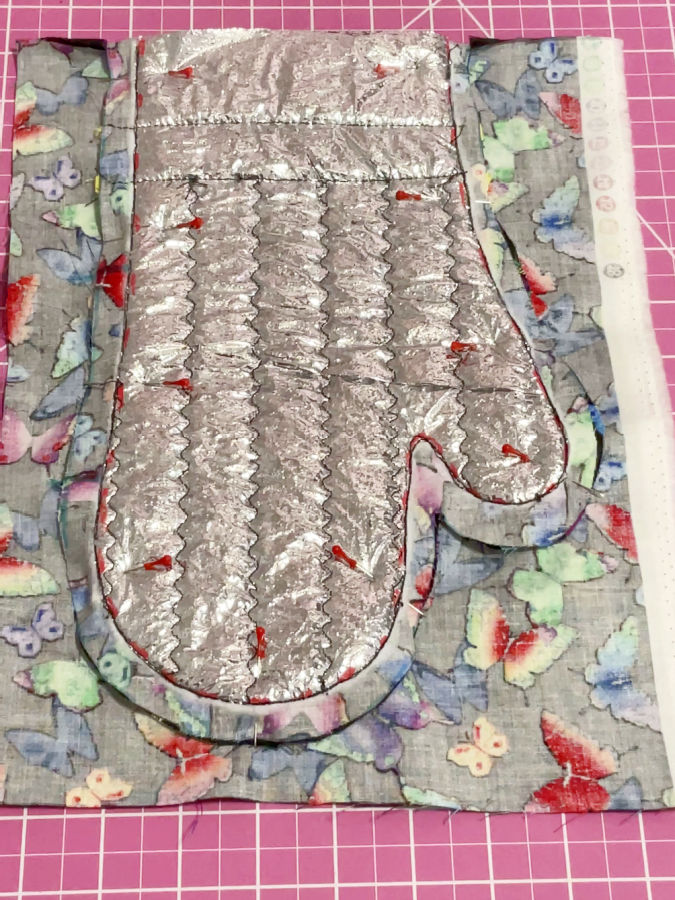
Sew around the same mitten shape again, following the same stitching line.
This time, leave an opening of about 4½ inches along one side. This opening is needed to turn the mitt right side out later.
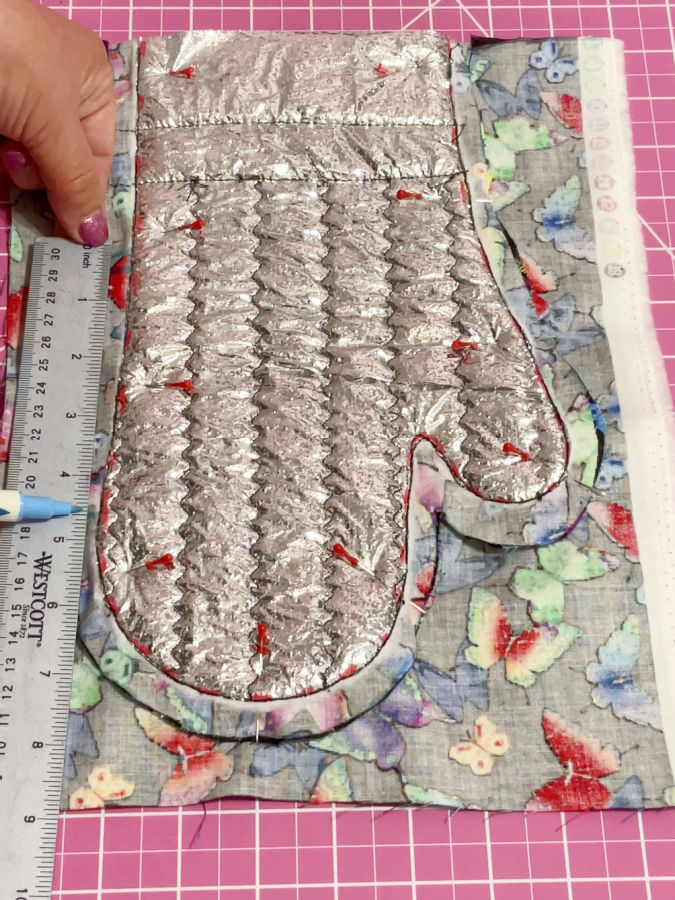
This is how the mitt looks from the fabric side after stitching. The mitten shape is clearly defined, and the stitching line follows the outline you traced earlier.
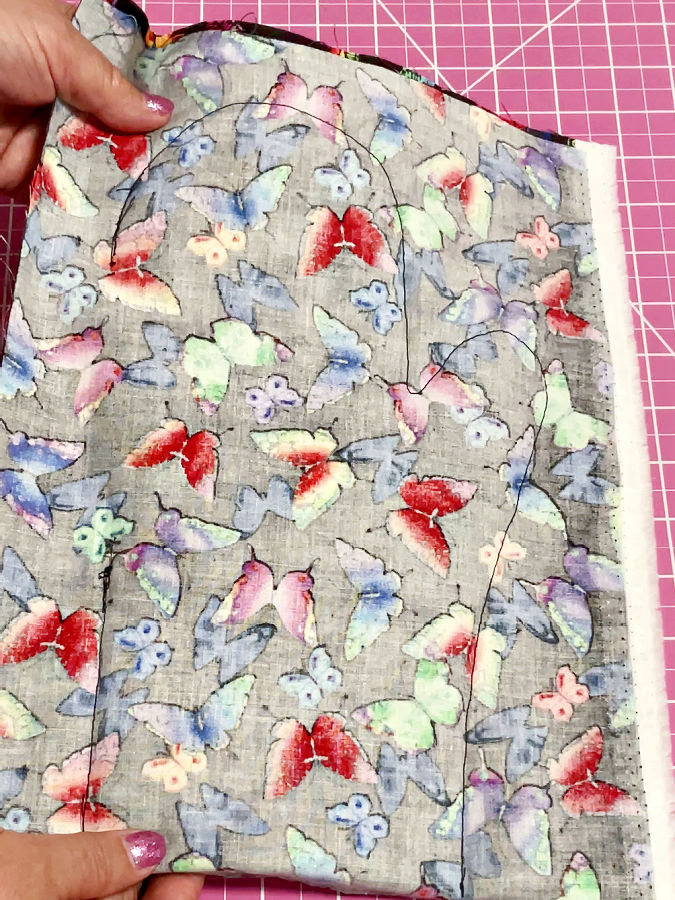
Here you can see the opening left in the seam on the left side. This gap is important—it’s where you will turn the mitt lining side out in the next step.
Cut the seam allowances all around the mitten shape. Then make small notches along the curved edges (especially around the thumb and rounded top). This helps the fabric spread and sit smoothly when you turn the mitt right side out.
✅ Related tutorial: Basic sewing techniques: How to sew corners and curved seams
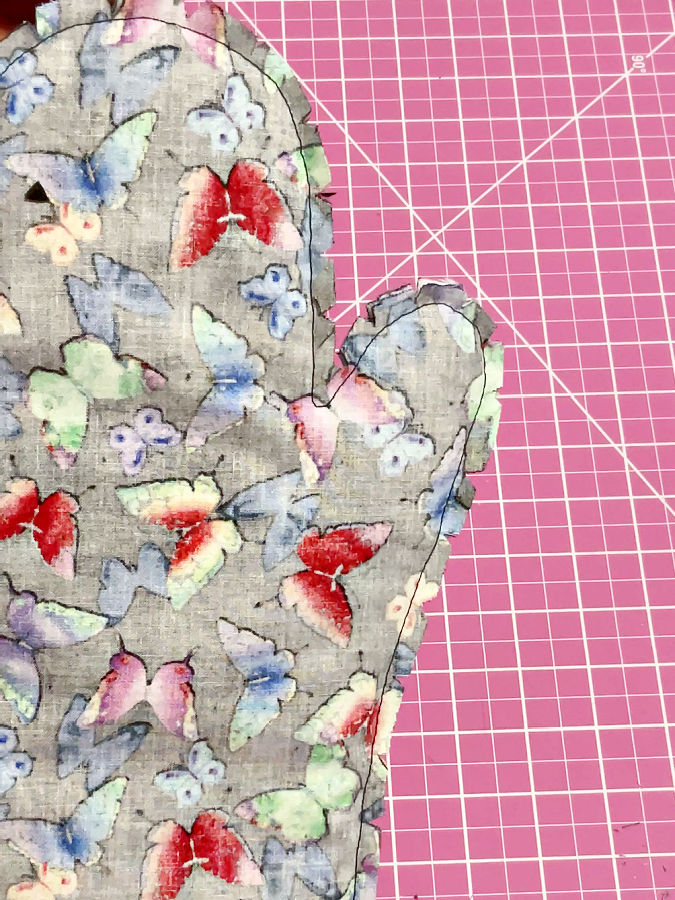
Step 16. Finish the oven mitt
Turn the mitt through the opening. When you pull it out, the lining side will come out first, and you’ll see the opening left for turning.
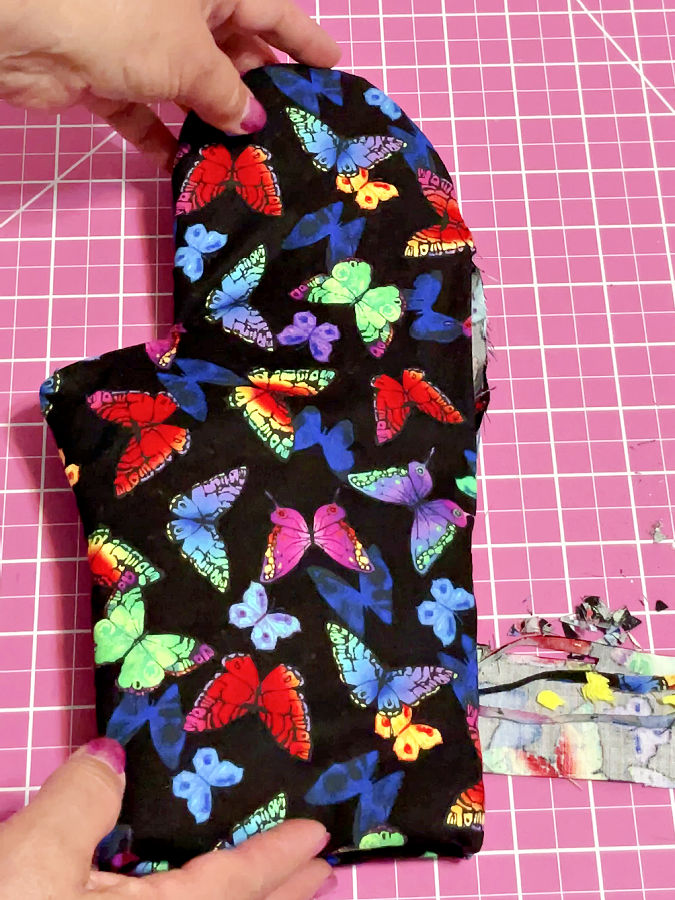
Close this opening by hand using a ladder stitch (about 4½ inches). Take your time here so the seam looks neat and almost invisible.
✅ Related tutorial: Invisible Stitch Tutorial: How To Fix A Tear (+ Sewing “Blind” Hems)
Once the opening is closed, push the lining back inside the mitt and turn everything right side out. Smooth the edges and shape the thumb and curves with your fingers.
That’s it — your oven mitt is finished and ready to use!
If you want a smoother sewing experience, I have the PDF (in US-letter and A4 sizes) in my shop for a small fee. You’ll get the pattern, more photos, clearer steps, and simple instructions for assembling the pattern pages. It’s best viewed on a phone or tablet since it includes many images — just print the 4 pattern pages. No ads — just a guide you can keep next to your machine.
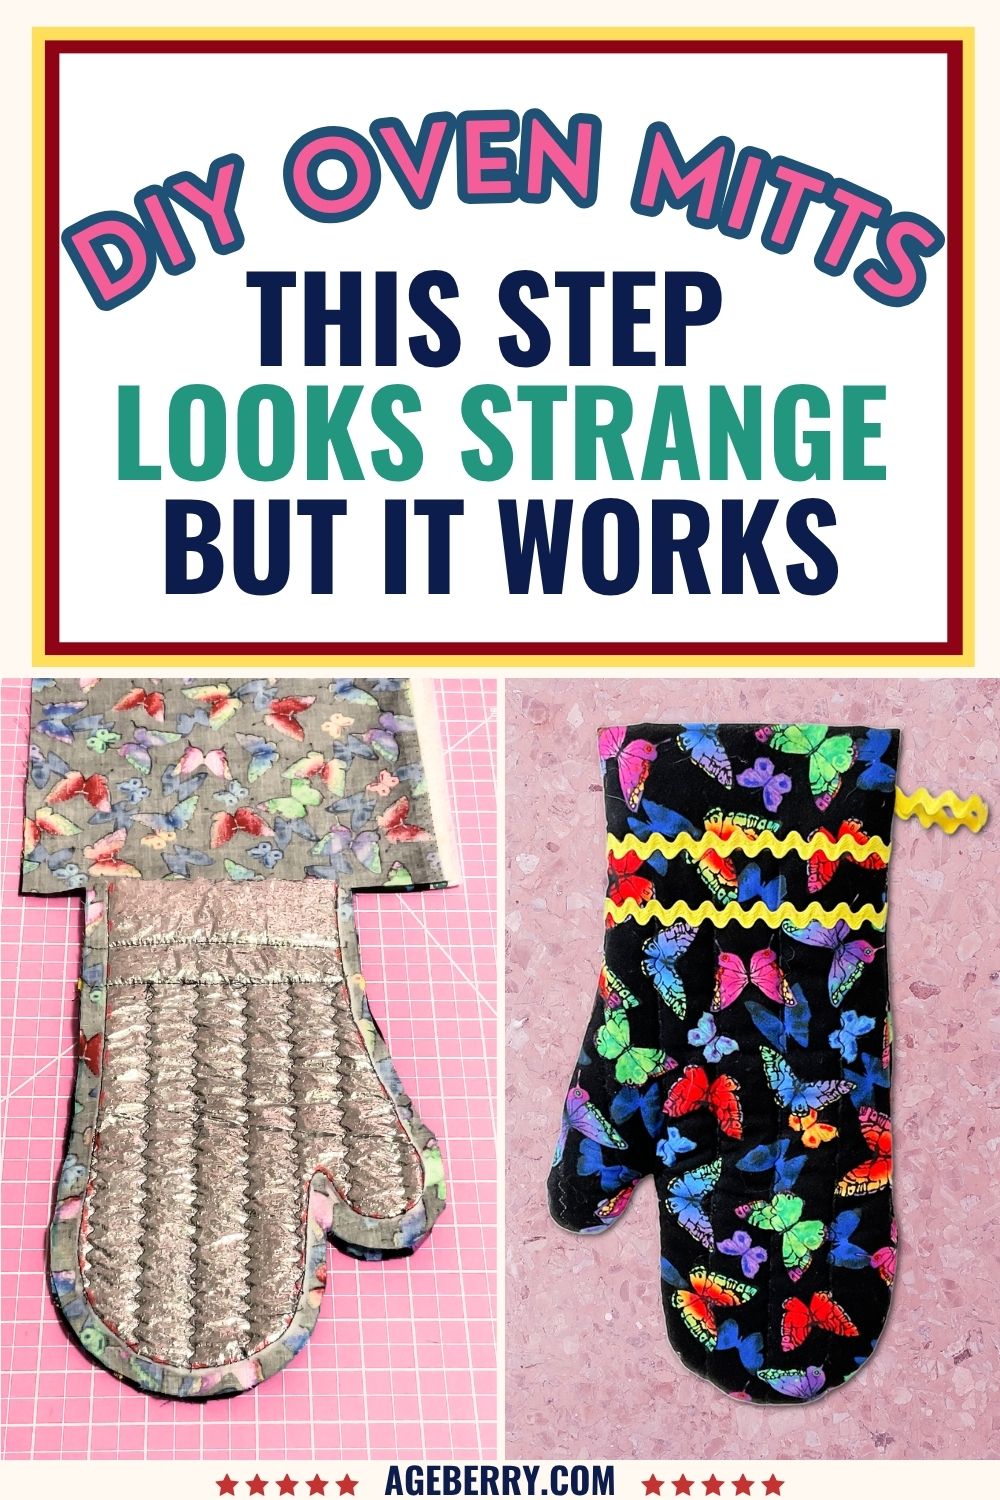
I know this tutorial has a lot of steps, but a good oven mitt needs more than two pieces of fabric and wishful thinking. If you found it helpful, save this pin to your sewing board so you can find the tutorial again when you’re ready to sew. Follow me on Pinterest for more practical sewing tips and tutorials.

latest posts
- Knit Presser Foot: How It Works, How to Use It, and My Sewing Tests
- How to Sew Neat Mitered Corners at Acute Angles
- Sewing Machine Needle Organization: A Clever System I Tried
- DIY Car Armrest Organizer: Sewing Tutorial
- Easy DIY Potholder Sewing Tutorial: Better Shape, Better Grip, Smart New Design
- How to Buy a Sewing Machine (Even If You Already Have 10)
- 23 Kitchen Items That Belong in Your Sewing Room
- What Is a Sewing Machine Piping Foot And How to Use It
- Fixing Sewing Mistakes: Repair an Accidental Cut in Fabric