15 Sewing Machine Parts You See All the Time — But Probably Ignore
A sewing machine is covered with tiny details that are easy to overlook — lines, grooves, holes, arrows, buttons, slots, guides, and little pieces of metal and plastic. We all know what the needle and presser foot are for, but some of the smallest features can make sewing faster, easier, or more accurate.
Not every machine has all of these parts, and the shape or location may be different on yours. But once you know what to look for, you may start noticing useful features you have been seeing for years without really using.
Prefer to read without ads?
I created a PDF version of this guide for anyone who likes to keep sewing guides saved, printed, or easy to read without ads. It includes the same helpful information in a simple format you can download and use whenever you need it.
The PDF is available in my shop for a small fee. It’s a nice option if you want to support my work and keep this tutorial close to your sewing machine.
1. The Seam Guide Lines on the Needle Plate
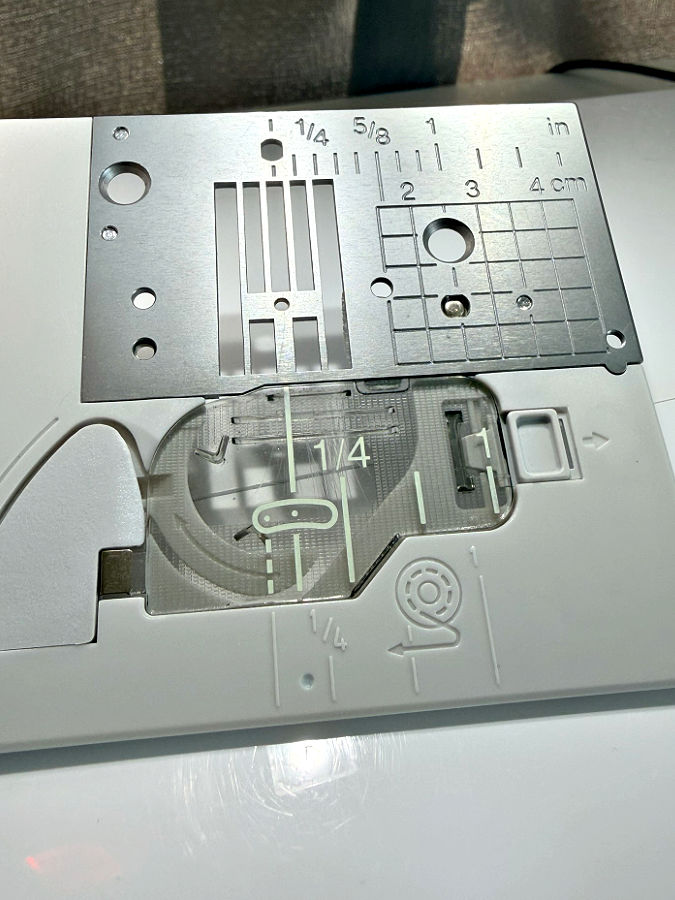
Those lines and numbers on the needle plate are not just there to make the machine look technical. They are seam guides, and they can save you from measuring and marking every seam allowance before you sew.
The lines usually show the distance between the needle and the edge of your fabric. Depending on the sewing machine, you may see measurements in inches, millimeters, or both. Common markings might include 1/4 inch, 3/8 inch, 1/2 inch, 5/8 inch, and larger distances.
To use them, place the raw edge of your fabric along the appropriate line and keep it there as you sew. For example, if you need a 5/8-inch seam allowance, line up the fabric edge with the 5/8-inch mark while the needle stitches along the seam line.
This is especially useful when sewing long straight seams because you don’t have to draw the seam allowance onto the fabric first.
But there is one detail that is easy to miss.
The measurements are often based on a particular needle position, usually the center needle position. If you move your needle to the left or right, the distance between the needle and the guide line changes.
So if you carefully line your fabric up with the 5/8-inch mark but have moved the needle several millimeters to the left, you may no longer be sewing a 5/8-inch seam.
The interesting part is: there may be more than one 5/8-inch reference on the same machine, because they are measured from different needle positions.
My Brother Luminaire is a good example. Its needle plate has one set of markings for stitches that use the left needle position and another set for stitches that use the center needle position. It also has 1/4-inch and 5/8-inch guides printed on the bobbin cover for the center needle position.
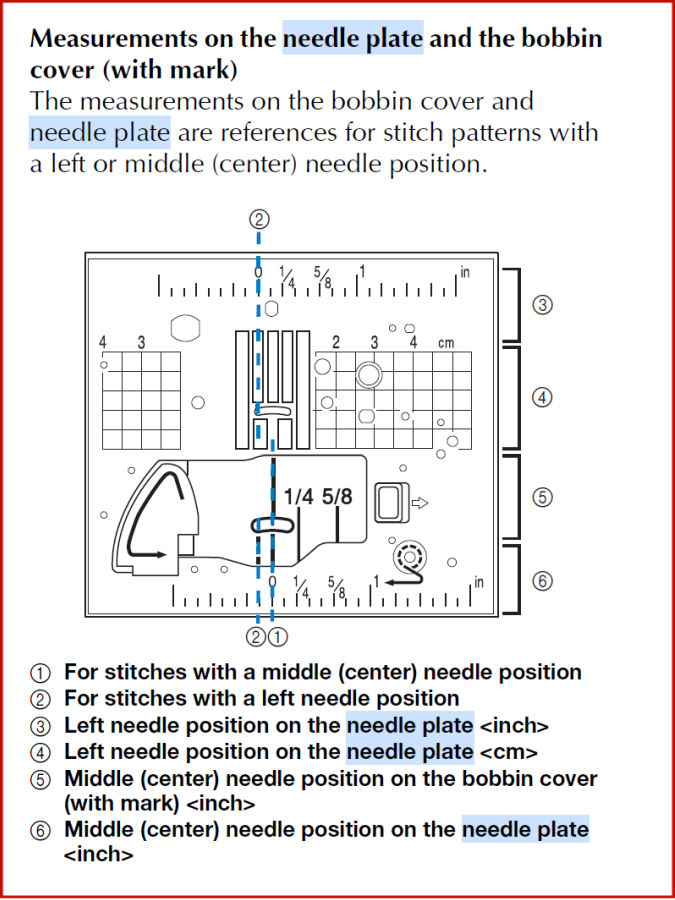
So before using a seam guide line, it is worth checking which needle position that particular marking is measured from.
Take a few minutes to really study the markings on your own needle plate. Most of us notice them, but I think many sewists use them far less than they could.
For ordinary seam allowances, those lines are often the fastest guide you have. Once you know which line matches your needle position, you can simply keep the fabric edge aligned with it as you sew. No extra attachment, no magnet, no ruler, no marking the fabric first.
And they can be very accurate for keeping the same seam allowance along a long seam.
Manufacturers put quite a lot of thought into those needle-plate markings. They are there to be used.
Note: Some of the links on this page are affiliate links. This means I will receive a commission if you order a product through one of my links. I only recommend products I believe in and use myself.
2. Those Little Empty Holes in the Needle Plate
Have you ever looked at the needle plate and wondered why there are several little empty holes in it?
I have.
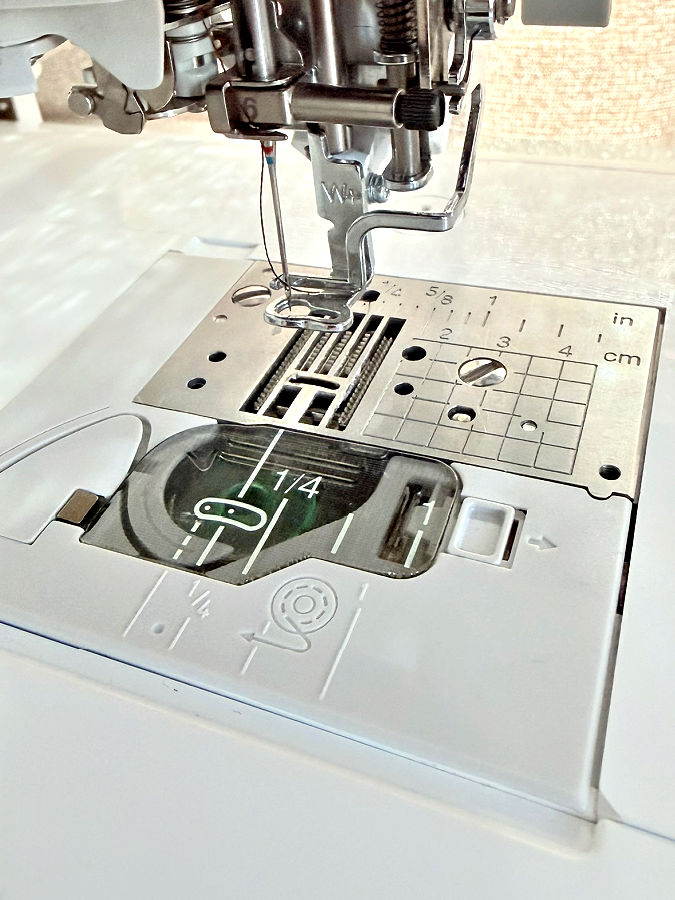
They can look as though a screw is missing. But on some sewing machines, those holes are there intentionally. They are mounting points for sewing-machine accessories.
For example, an adjustable seam guide can sometimes be screwed directly to the needle plate. Instead of trying to keep the fabric edge lined up with a printed mark, you have a small metal guide that gives the fabric a physical edge to follow.
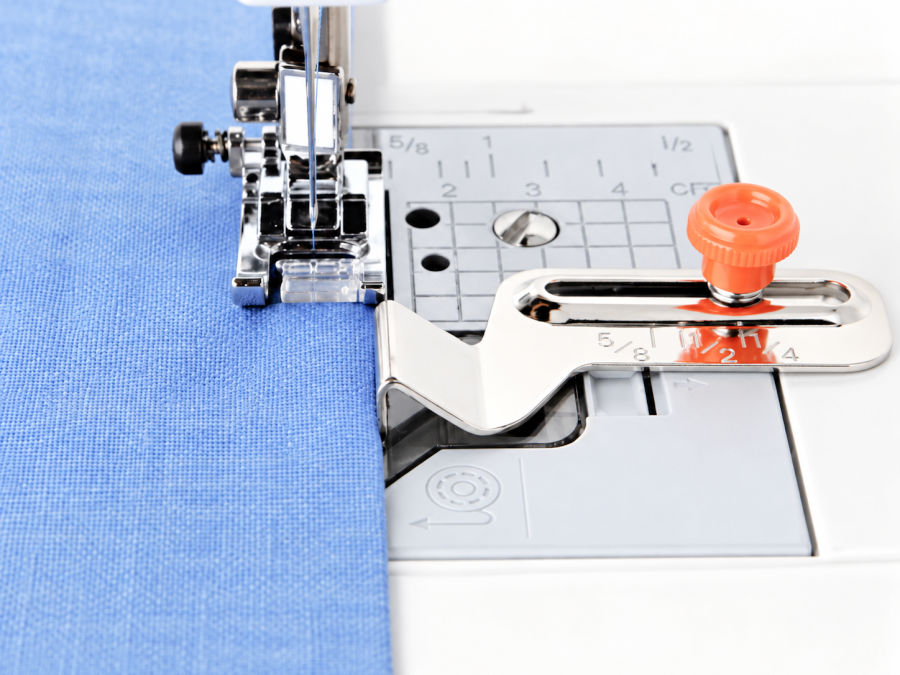
You can use this type of guide instead of the popular magnetic seam guides—no magnet is needed because the guide is secured directly to the machine. And before buying one, check the accessories that came with your sewing machine. You may already have a screw-on seam guide sitting in the accessory box and never realized what it was for.


Depending on the machine, similar mounting points may also be used for specialty accessories such as quilting guides, circular sewing attachments, or other manufacturer-specific attachments.
So those tiny holes aren’t necessarily evidence that something fell out of your sewing machine.
They may be waiting for something to go in.
There is an important caution here, though: don’t assume that every unexplained hole on every sewing machine is an accessory hole. Sewing-machine designs vary, and some holes have completely different purposes.
Before putting a screw into one, check the manual or the accessory information for your particular machine.
And don’t confuse these small mounting holes with the larger screws that actually secure the needle plate to the machine. Those are doing a very different job.
This is exactly the sort of feature I had seen many times without giving it much thought. Once you start looking closely at a sewing machine, you realize there are little provisions for accessories hiding everywhere.
✅ Related tutorial: Seam Guide Tutorial – all you need to know about how to sew a straight line and keep seam allowances equal
3. What Is That Tiny Hole in the Presser-Foot Holder?
Look closely at the presser-foot holder on some sewing machines and you may notice a small round hole near the back or side.
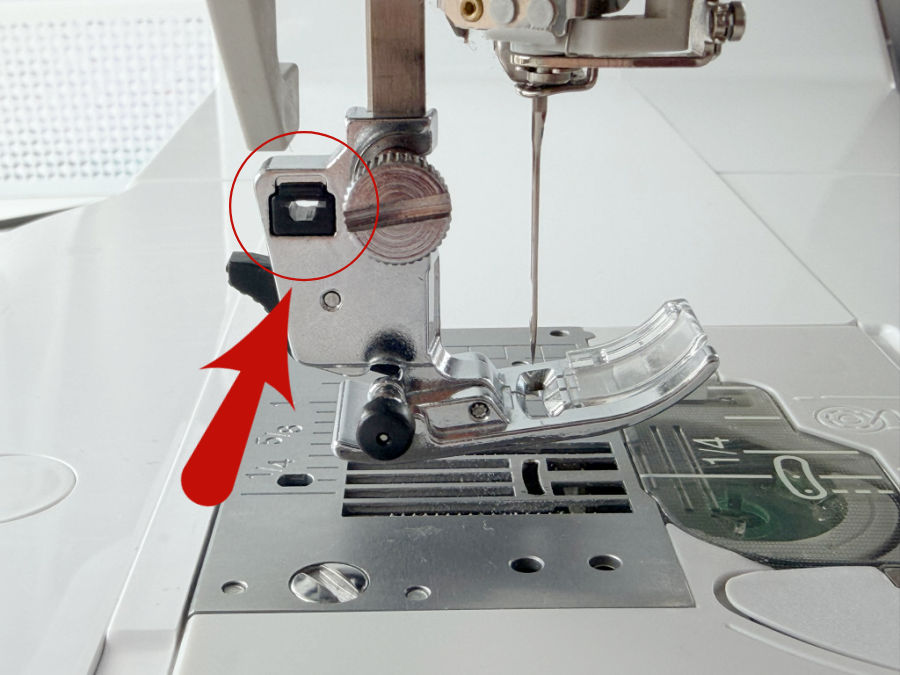
That hole is often there for a quilting guide bar, sometimes called a quilting bar or seam guide bar.
The long metal bar slides through the hole in the presser-foot holder. The bent end of the bar rests on the fabric beside the presser foot and acts as a visual guide while you sew.
The useful part is that you can slide the bar closer to or farther away from the needle to choose the spacing you want.
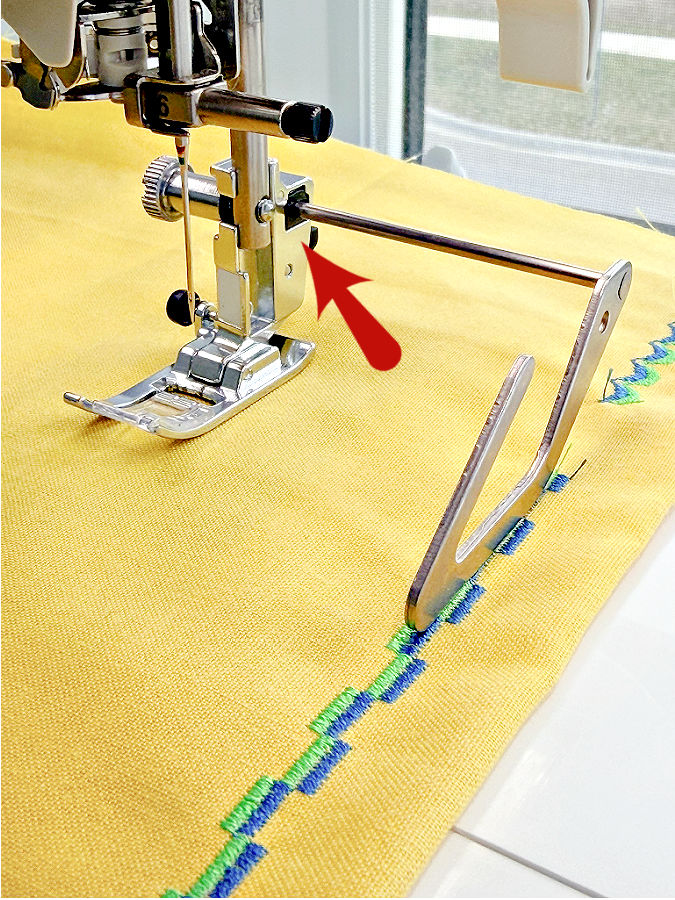
Then, instead of marking every new line on the fabric, you sew the first line and use the quilting bar to follow that previous line while you sew the next one.
It is especially useful for:
- evenly spaced quilting lines
- parallel rows of topstitching
- channel quilting
- decorative rows of stitching
- any project where you want several lines the same distance apart

For example, if I want rows of quilting one inch apart, I can adjust the bar so the guide sits one inch from the needle. After sewing the first row, I keep the guide running along that stitched line while I sew the next one.
Then I repeat.
It is a very simple way to keep parallel rows evenly spaced without drawing every single stitching line first.
And this is another accessory you may already own. Many sewing machines include a quilting guide bar in the accessory box, but if you don’t know what the small metal rod is for — or where it attaches — it can sit there unused for years.
The attachment method varies by machine. On some machines the bar slides into a hole in the presser-foot holder, while certain walking feet and quilting feet have their own place for a guide bar.
4. The Bobbin Winder With a Built-In Thread Cutter
This is a feature I especially like on newer sewing machines because it can look quite strange if you are used to an older bobbin winder.
Look closely at the bobbin-winding spindle. On some modern machines, the base around the spindle includes a small slot and built-in thread cutter.
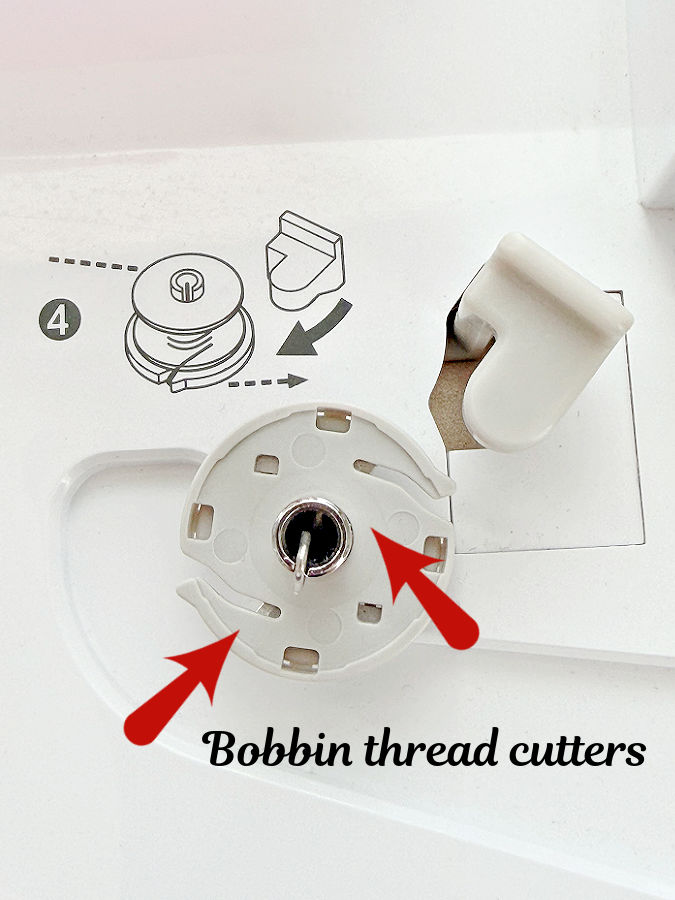
Instead of leaving a long thread tail hanging from the bobbin, you place the empty bobbin on the spindle, wrap the thread around the bobbin several times as directed by the machine, then pull the thread through the slot in the bobbin-winder base and across the cutter.
The excess thread is cut off right there.
Then you can start winding the bobbin.
This is different from older machines where you might hold the loose thread tail while the bobbin begins to wind and then stop to trim it with scissors.
The newer system makes the beginning of the bobbin neater and removes that loose tail before winding starts.
The feature can be easy to overlook because the cutter is tiny. In the photo above, for example, the little slot and metal cutting area are built right into the bobbin-winder assembly. If you didn’t know what you were looking at, you might never guess that part is meant to cut thread.
✅ Related tutorial: 5 Sewing Machine Bobbin Features You May Have Never Noticed
5. The Little Thread Guide Just Above the Needle
This is one of the smallest parts of the threading path, and it is also one of the easiest to miss.
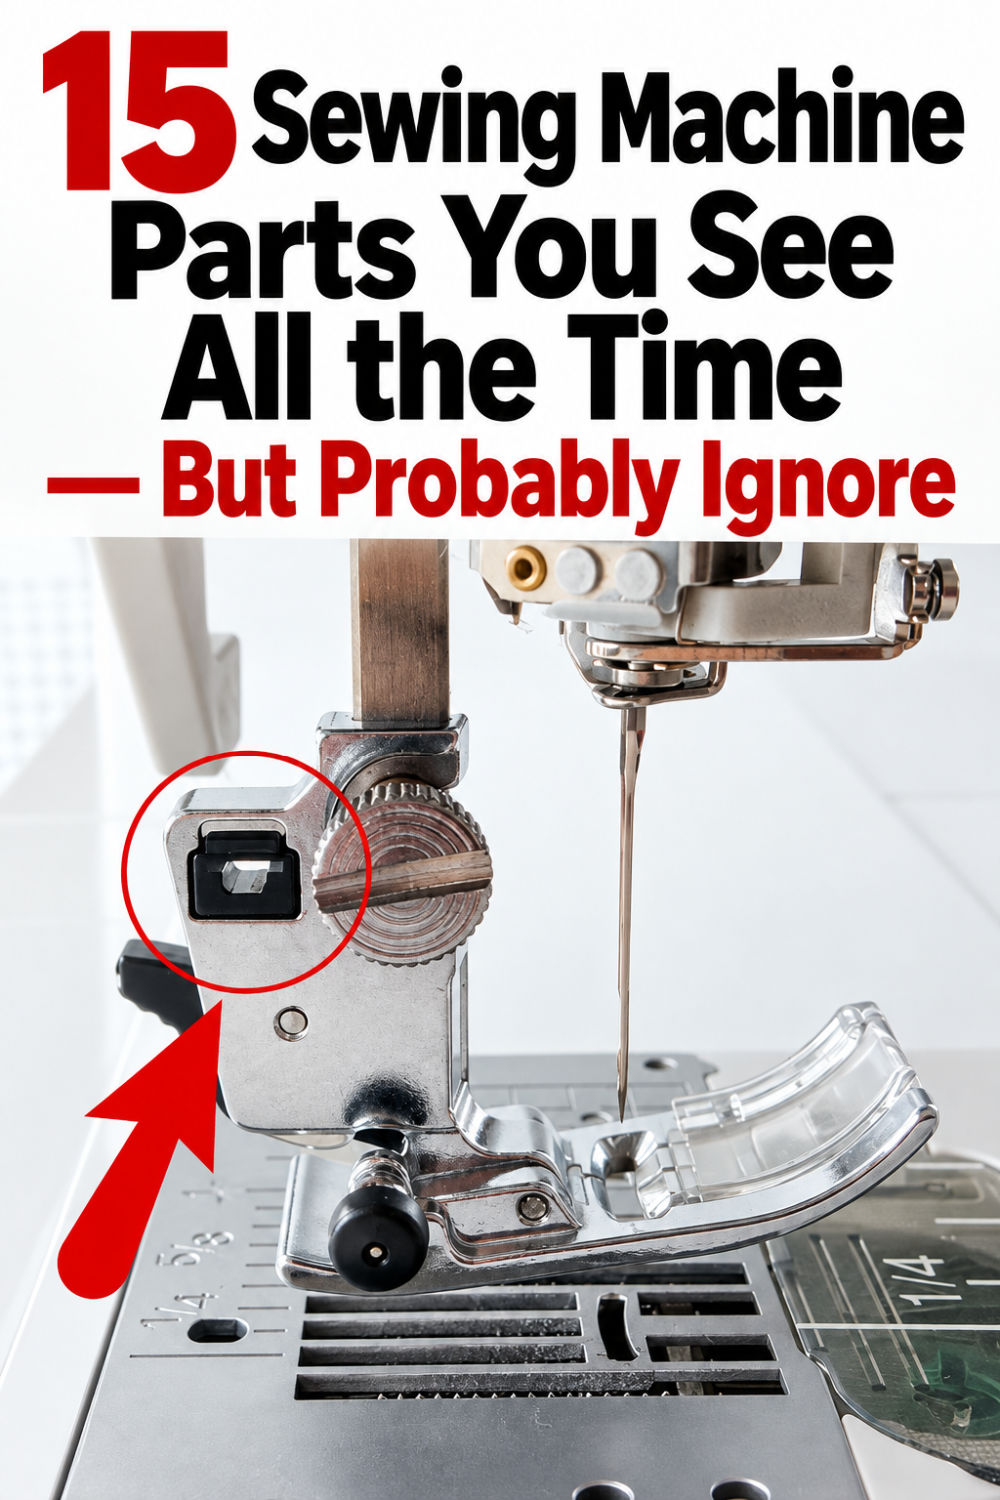
After the thread travels through the main guides and tension system, it usually passes through one final little guide near the needle bar before going through the eye of the needle.
On one of my machines, there is even a small number 6 printed right in this area. I used to wonder why there was a 6 on the needle holder. Then I realized it was simply showing me step 6 — the last step in the threading path before the needle.
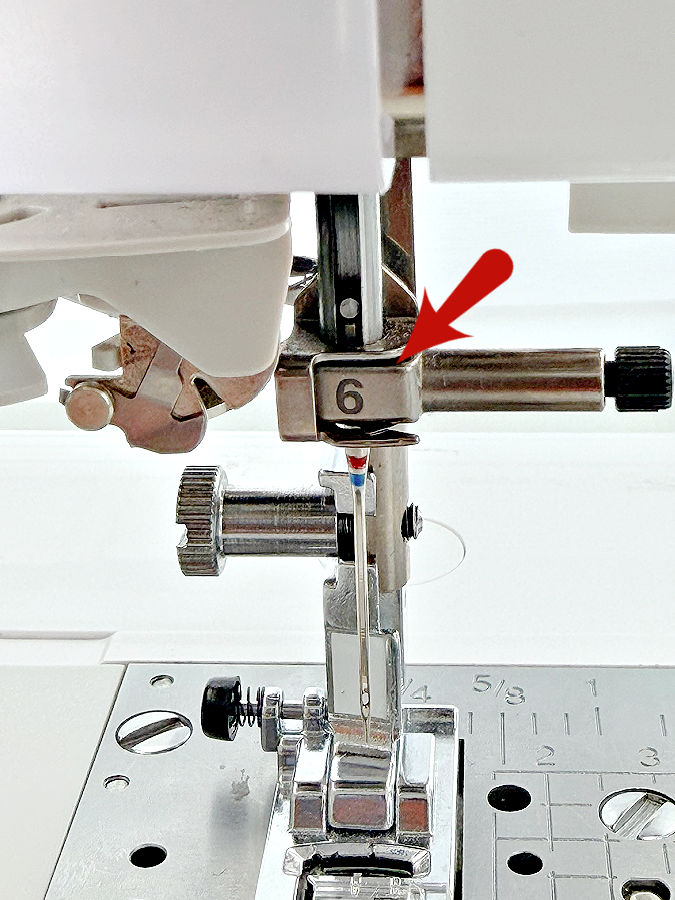
That little guide helps keep the thread properly positioned close to the needle while the needle bar moves up and down.
If you accidentally skip it, the machine may still sew, but the thread is no longer following the path the machine was designed for. That can contribute to inconsistent stitching, thread movement, or other annoying problems.
The exact guide can look very different from one machine to another. It may be a tiny hook, a slot, or a small metal loop, and some machines have more than one guide near the needle.
✅ Related tutorial: How to thread a needle on a sewing machine
6. The Felt Pad Under — or Behind — the Thread Spool
That little felt circle that came with your sewing machine may look like packing material, but it is there for a reason.
Some machines use a felt pad with a horizontal spool pin. In this setup, the spool usually stays still while the thread unwinds from the end. The felt sits behind the spool and helps support it, keep it properly positioned, and prevent the spool from rubbing directly against the machine.
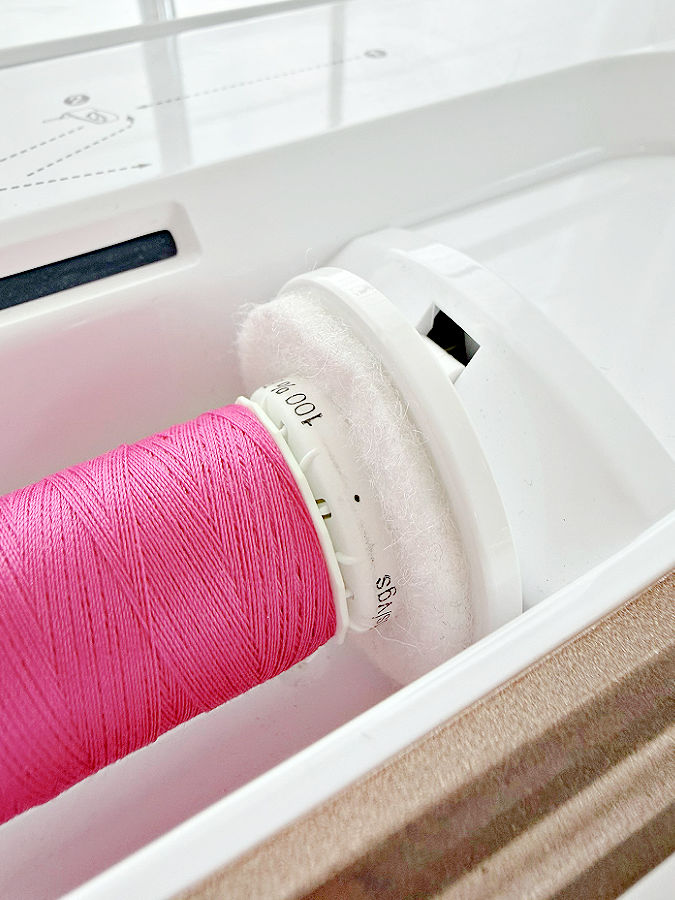
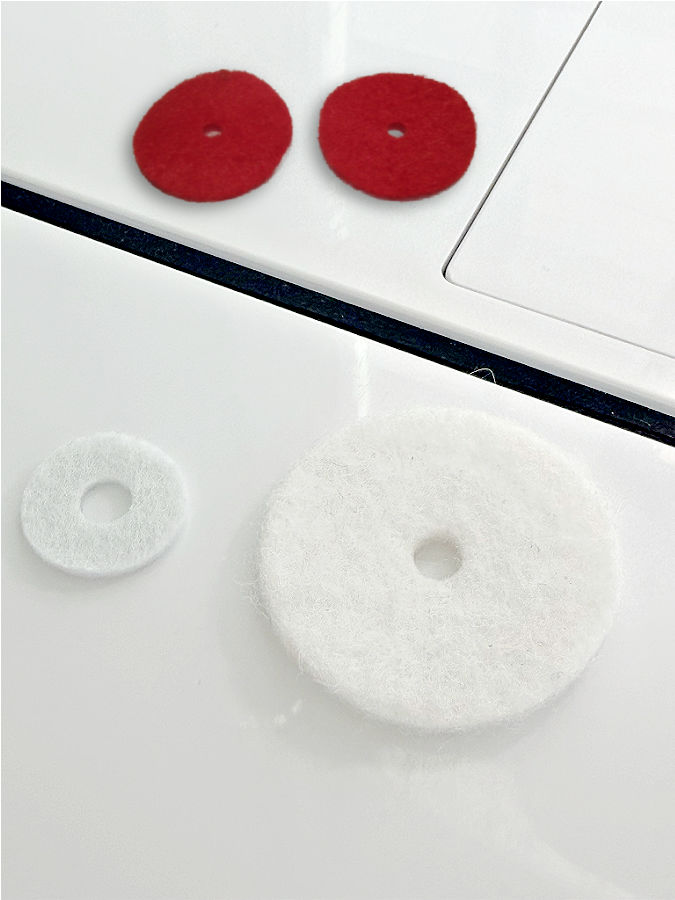
Other machines use a smaller felt pad with a vertical spool pin. In that setup, the felt provides a soft surface underneath the spool. It cushions the spool and keeps it from rubbing directly against the machine.
The size and placement of these felt pads vary from one machine to another, so it is worth checking your manual before deciding that the little felt circle is just an extra piece you can ignore.

7. The Different-Sized Spool Caps
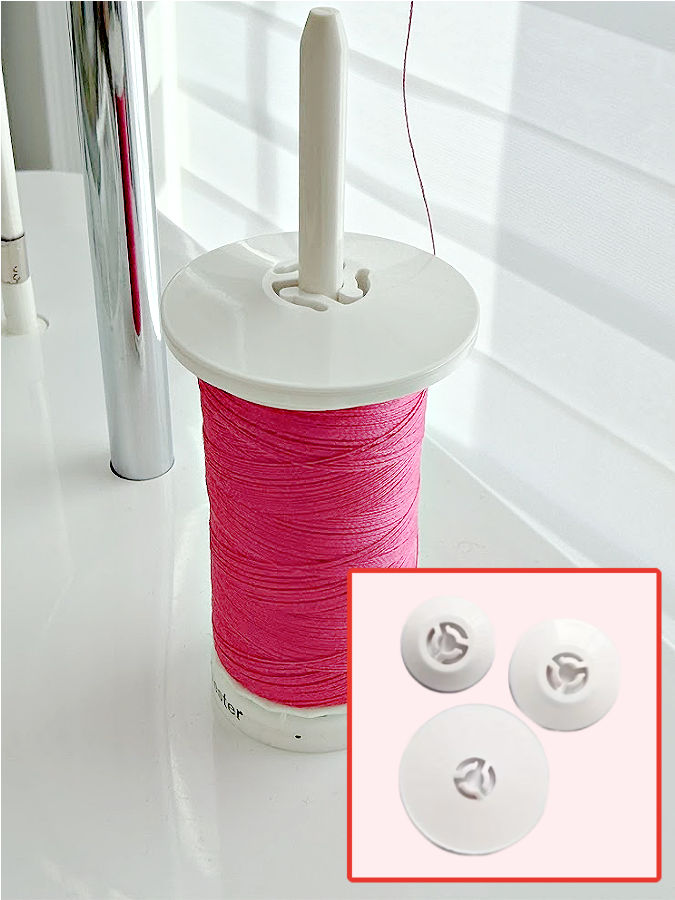
If your sewing machine came with several spool caps, there is a reason they are different sizes.
The spool cap helps keep the thread spool in the correct position while the thread unwinds. It also helps prevent the spool from sliding too far along the pin.
Many machines come with several sizes — usually small, medium, and large — because thread spools come in very different shapes and diameters.
You want a spool cap that suits the spool you are using. If the cap is much too large or used incorrectly, it can interfere with the way the thread comes off the spool. If it is too small for a particular spool, it may not hold the spool as intended.
✅ Related tutorial: 20+ Reasons Your Sewing Machine Thread Keeps Breaking (+ Solutions)
8. The Extra Spool Pin — Or the Hole Where It Goes
Some sewing machines have additional spool pins that are easy to miss because they aren’t always permanently attached to the machine.
It may fold up from the top, slide into position, or come as a separate little plastic or metal pin that you insert into a small hole when you need it.
The extra spool pin may give you a place for a second spool of thread, which is especially useful when sewing with a twin needle or double eye needle. Each needle/eye needs its own upper thread, so you need somewhere to put that second spool.
It can also be useful for certain decorative techniques that require two upper threads.
On some machines, the extra spool pin is especially useful because the bobbin winder can work independently while the machine is sewing or embroidering. Keep in mind that not all sewing machines have this feature.
I use this all the time when doing machine embroidery. While the machine is stitching an embroidery design, I can place a second spool of thread on the extra spool pin and wind another bobbin at the same time. I don’t have to stop the embroidery, remove the thread that is already in use, or wait until the design is finished.
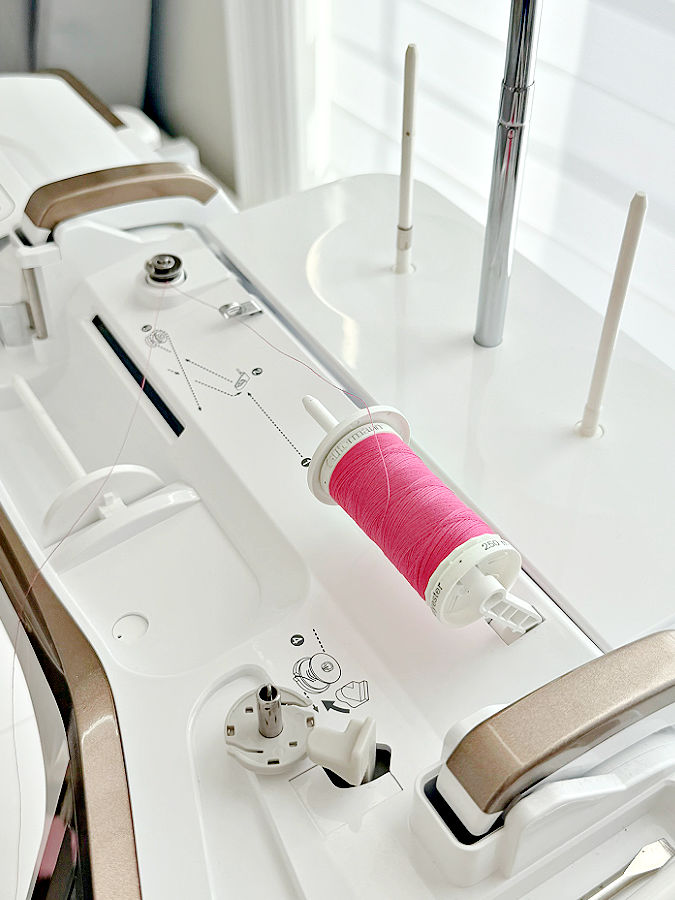
In the photo, the second spool pin is raised and holding a spool of thread, with the thread already routed toward the bobbin winder. The main fixed spool pin, normally used for sewing, is on the left and is empty.
This is very handy with embroidery because a large design can use several bobbins. I can have the next one ready before the current bobbin runs out.
Not every sewing machine can wind a bobbin while it is sewing, so this depends on the machine. But if yours has an independent bobbin winder and an extra spool pin, it is a feature worth using.
9. The Bobbin-Winding Thread Guide and Pretension Disc
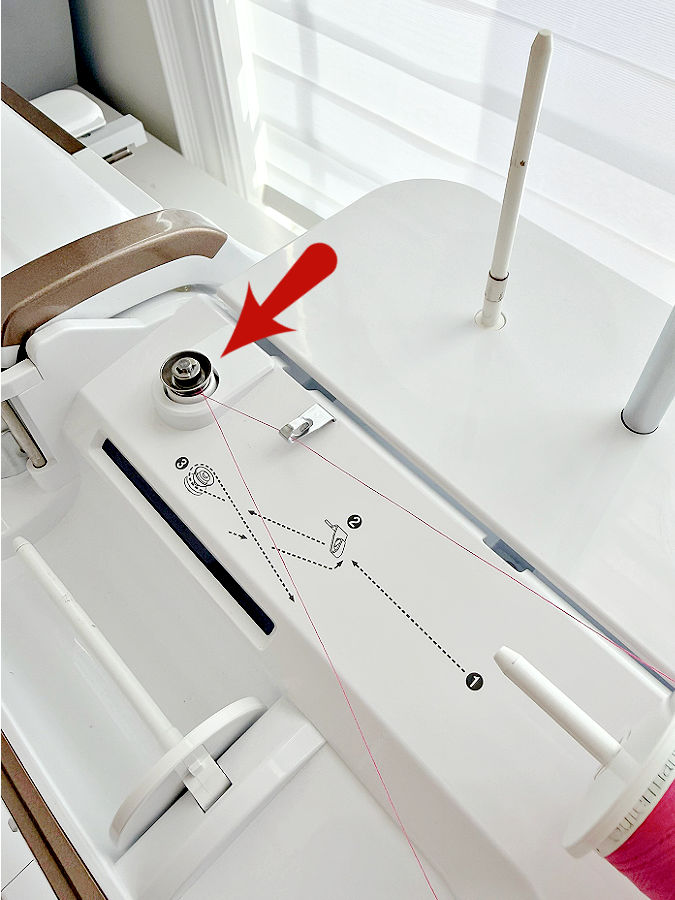
When you wind a bobbin, your machine usually tells you to pass the thread around a small guide or disc before taking it to the bobbin winder.
It is easy to think of this as just another place the manual tells you to put the thread.
But that little guide is an important part and you have to thread it correctly.
The bobbin-winding pretension disc puts controlled tension on the thread as it travels toward the bobbin. That helps the thread wind evenly and firmly instead of piling up loosely or winding unevenly from side to side.
If you skip this step, the bobbin may still wind, but it may not be wound properly.
And here is an important distinction: this is not the same tension system that controls your upper thread while you sew.
The bobbin-winding guide is used specifically when winding a bobbin.
On many machines, the threading path is printed right on the top of the machine with arrows showing exactly how the thread should pass around the guide.
10. The Bobbin Winder Stopper
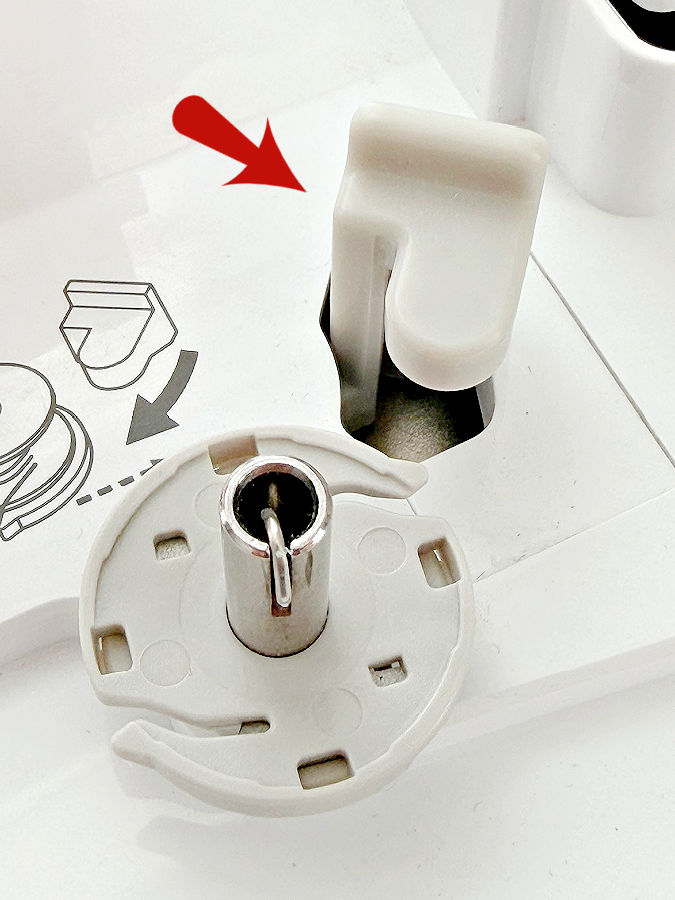
Beside the bobbin-winder spindle, there is usually a small stopper that determines when the bobbin is full.
As the bobbin fills with thread, it eventually reaches the stopper. Depending on the machine, the winding slows, stops automatically, or the winding mechanism disengages. This helps keep you from winding far too much thread onto the bobbin.
But there is another bobbin-winder detail worth knowing because it can make a perfectly good sewing machine seem completely dead.
Once, my Janome was turned on and had power, but it simply would not sew. I pressed the start button, checked everything I could think of, and nothing happened.
The problem was surprisingly simple: the bobbin winder was still engaged. Most machines will not sew with the bobbin winder engaged.
On many machines, you engage bobbin winding by pushing the bobbin-winder spindle to one side. While it is in that position, the machine will not sew normally. Some computerized machines display a message telling you that the bobbin winder is engaged, but many machines don’t give you such an obvious warning.
So if your machine suddenly has power but refuses to sew, take a quick look at the bobbin winder. Make sure the spindle has been moved back into its normal sewing position.
✅ Related tutorial: Troubleshooting Common Sewing Machine Problems (+ Solutions)
11. The Arrows, Grooves, and Tiny Cutter Around a Drop-In Bobbin
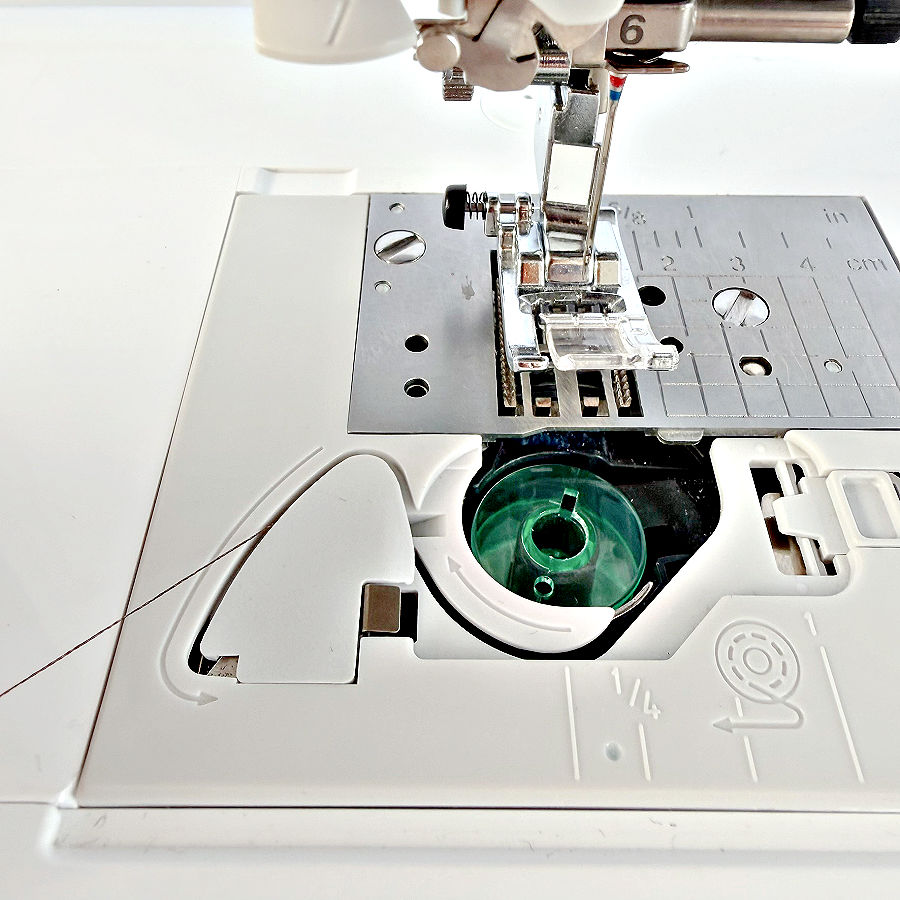
If your machine has a top-loading drop-in bobbin, look closely at the area around the bobbin case. You may see little arrows, grooves, numbered steps, and sometimes a tiny built-in thread cutter.
They are showing you exactly where the bobbin thread needs to go.
After you drop the bobbin into the bobbin case, the thread usually has to be pulled through a specific slot and along a narrow channel. That path brings the thread under the bobbin tension spring, which is what gives the bobbin thread the correct tension while you sew.
On some machines, the path continues to a small cutter. You pull the thread across it, the excess thread is trimmed, and the machine is ready to sew.
My Brother Luminaire has this type of setup. Following the marked path means I don’t have to pull the bobbin thread up through the needle plate before I start sewing.
✅ Related tutorial: I Went From a Basic Singer to a Brother Luminaire — The Shock Was Immediate
This is why it is important not to simply drop the bobbin in and pull the thread straight out wherever it seems convenient. If the thread doesn’t follow the correct groove, it may not be sitting properly under the bobbin tension spring.
So those tiny arrows around the bobbin aren’t just reminders of where the thread goes. They are showing you the path that positions the bobbin thread correctly for sewing.
Not every machine uses the same system, so follow the markings on your own bobbin area rather than assuming the path is the same as on another machine.
12. The Feed-Dog Drop Lever or Switch
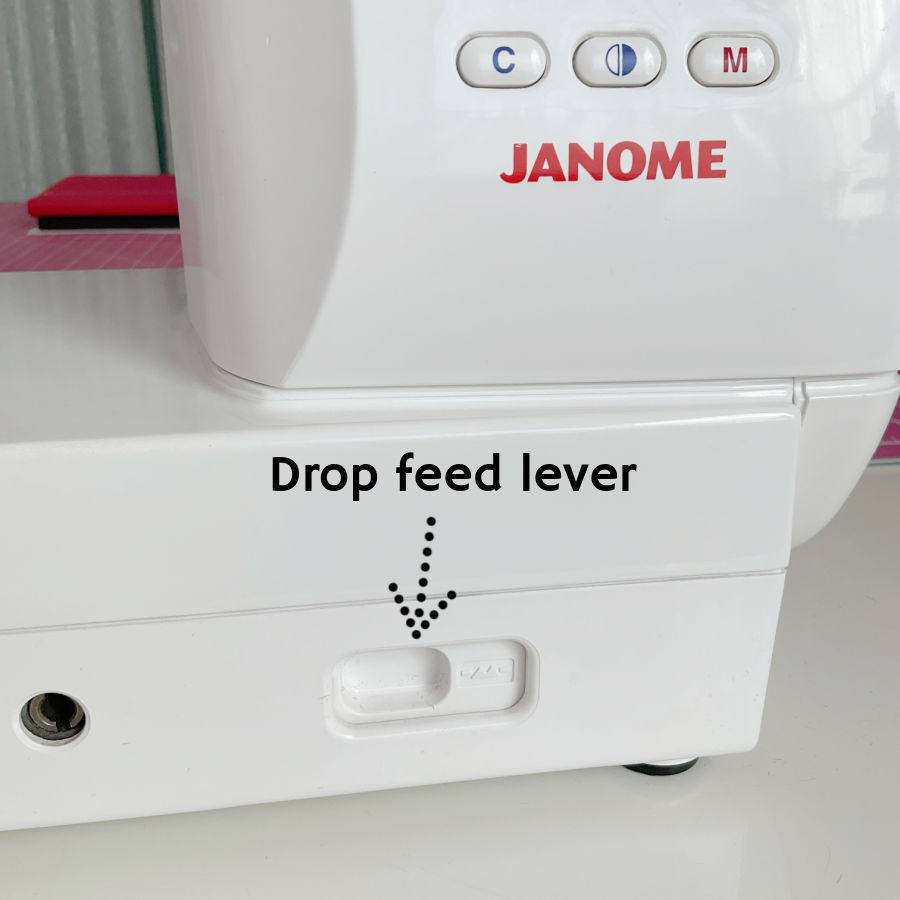
The feed dogs are the little metal teeth underneath the presser foot that rise through the needle plate and move the fabric forward as you sew.
But sometimes you don’t want the machine moving the fabric for you.
That is what the feed-dog drop lever or switch is for. When you move it to the lowered position, the feed dogs drop below the needle plate and no longer advance the fabric in the usual way.
This is useful for techniques such as free-motion quilting and darning, where you want to control the movement of the fabric yourself. Some machines also lower the feed dogs automatically for embroidery or certain specialty functions.
There is one detail that can be confusing the first time you use this feature.
After you move the lever back to the normal sewing position, the feed dogs may not pop up immediately.
You can look at the machine and think, Why are they still down? Did I break something?
On many machines, you need to turn the handwheel one full turn or start sewing before the feed dogs rise and engage again.
So if you raise the feed-dog lever and nothing seems to happen, don’t panic. Turn the handwheel toward you and check again.
As always, this varies by machine. Some models use a lever, some use a switch, and computerized machines may control the feed dogs through a setting on the screen.
13. The Free Arm
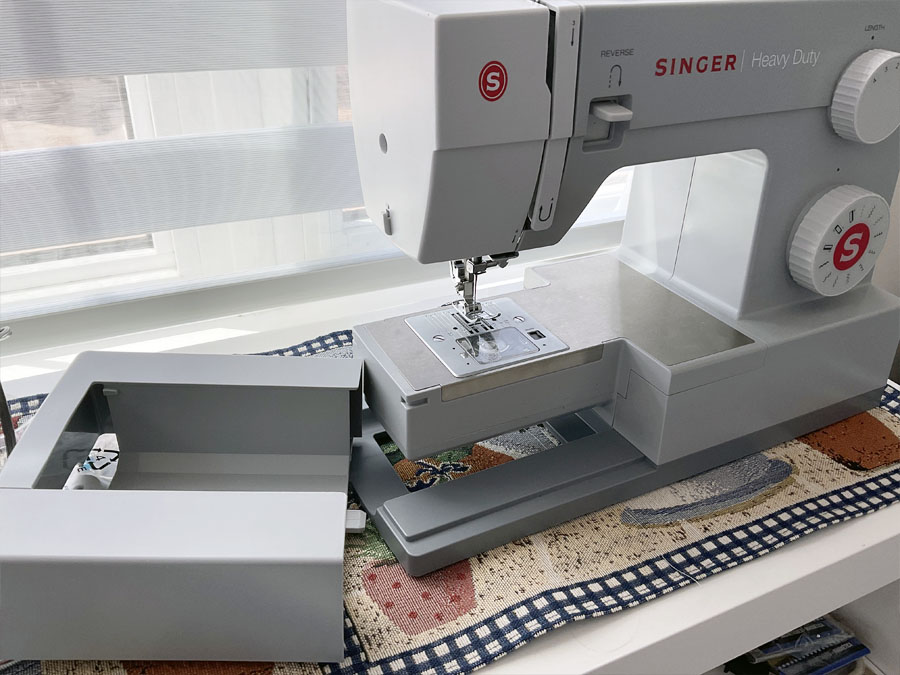
The free arm is one of those sewing-machine features that is easy to forget about because most of the time it is hidden.
On many machines, the flat sewing surface or accessory compartment around the needle area can be removed. Once you slide that section off, you are left with a much narrower part of the machine called the free arm.
✅ Related tutorial: Free Arm Sewing Machine: Do I Need One?
Why would you want a smaller sewing surface?
Because it lets you slide a tube of fabric around the machine instead of trying to sew it flat.
It is especially useful for:
- sleeve hems
- cuffs
- pant hems
- children’s clothing
- narrow tubular pieces
- repairs in places that are difficult to reach on a flat bed
For example, when hemming a sleeve, you can slide the sleeve around the free arm and rotate it as you sew. You are only sewing through the layer that is supposed to be under the needle instead of accidentally catching the other side of the sleeve.
The free arm is not necessarily very narrow on every machine, so very small cuffs may still be too tight to fit around it. But for many circular sewing tasks, removing that accessory compartment can make things much easier.
If you have always sewn with the extension piece attached, try sliding it off. You may discover a part of your machine that you rarely use.
14. The Built-In Side Thread Cutter
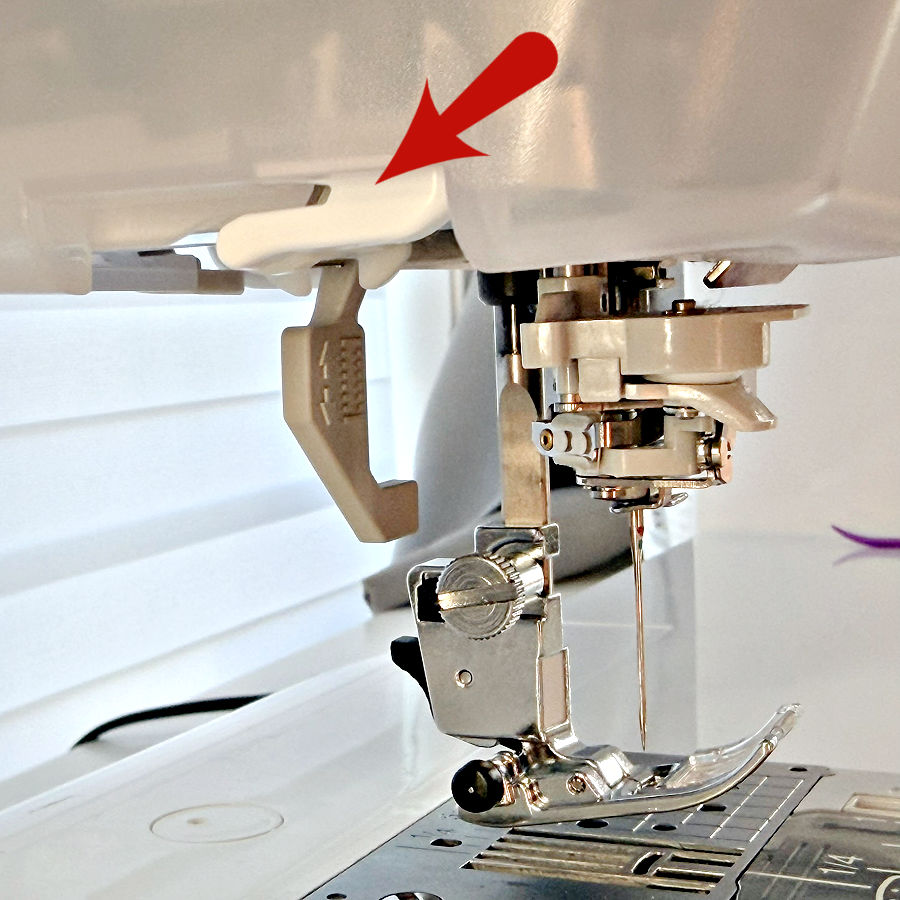
Many sewing machines have a small thread cutter built into the side of the machine.
It may look like nothing more than a tiny slot or notch, often near the left side of the needle area. Inside that notch is a small blade.
After you finish sewing, pull the threads into the slot and across the cutter. It trims the upper and bobbin threads without reaching for scissors.
This is especially convenient when you are doing repeated short seams because you can remove the fabric, cut the threads, and continue sewing without looking for snips every time.
It is also easy to confuse this with an automatic thread cutter.
They are not the same thing.
An automatic thread cutter is activated by a button or programmed setting and cuts the threads for you. The side cutter is completely manual — you pull the threads across the blade yourself.
Some sewists barely notice this cutter because it blends into the machine housing. Once you start using it, though, it can be very convenient for everyday sewing.
15. The Presser Foot Release Button or Lever
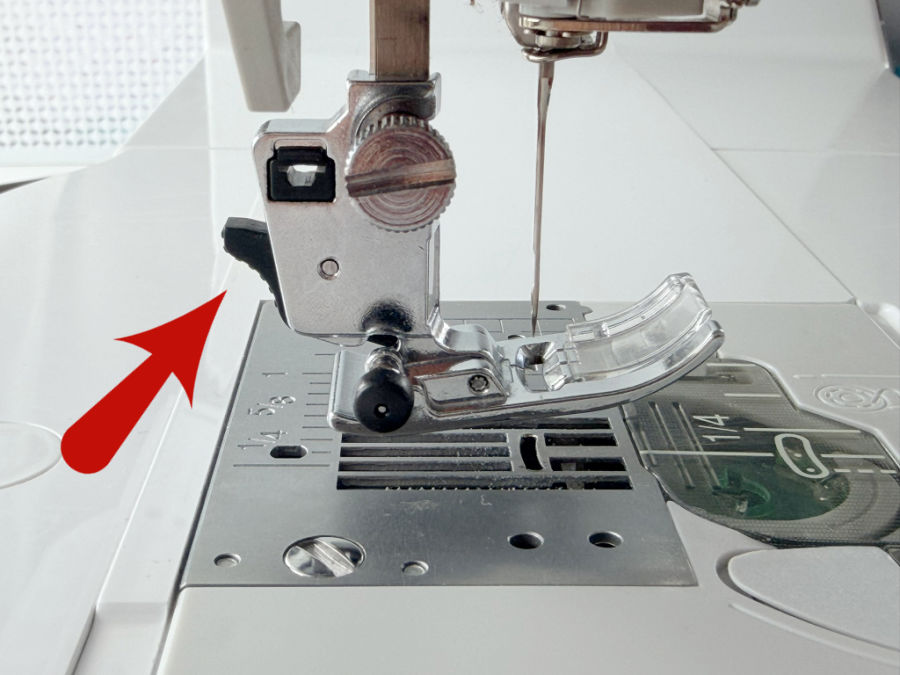
That little button or lever behind the presser foot lets you remove a snap-on presser foot without unscrewing anything.
When you press it, the foot drops away from the presser-foot holder — the metal part that stays attached to the machine.
These two parts are easy to confuse. The presser foot is the part that touches the fabric. The presser-foot holder, sometimes called the ankle or shank, is what the snap-on foot attaches to.
For most everyday feet, you leave the holder in place and simply snap one foot off and another one on.
But some specialty feet are different. A walking foot, certain quilting feet, embroidery feet, and other attachments may require you to remove the entire presser-foot holder first and attach the specialty foot directly to the presser bar.
So if a new foot seems impossible to snap on, check the instructions before forcing it. It may be designed to replace the holder instead of attaching to it.
This tiny release button makes changing ordinary presser feet very fast — once you know which part is supposed to come off.
Bonus: The Presser Foot Leveling Button
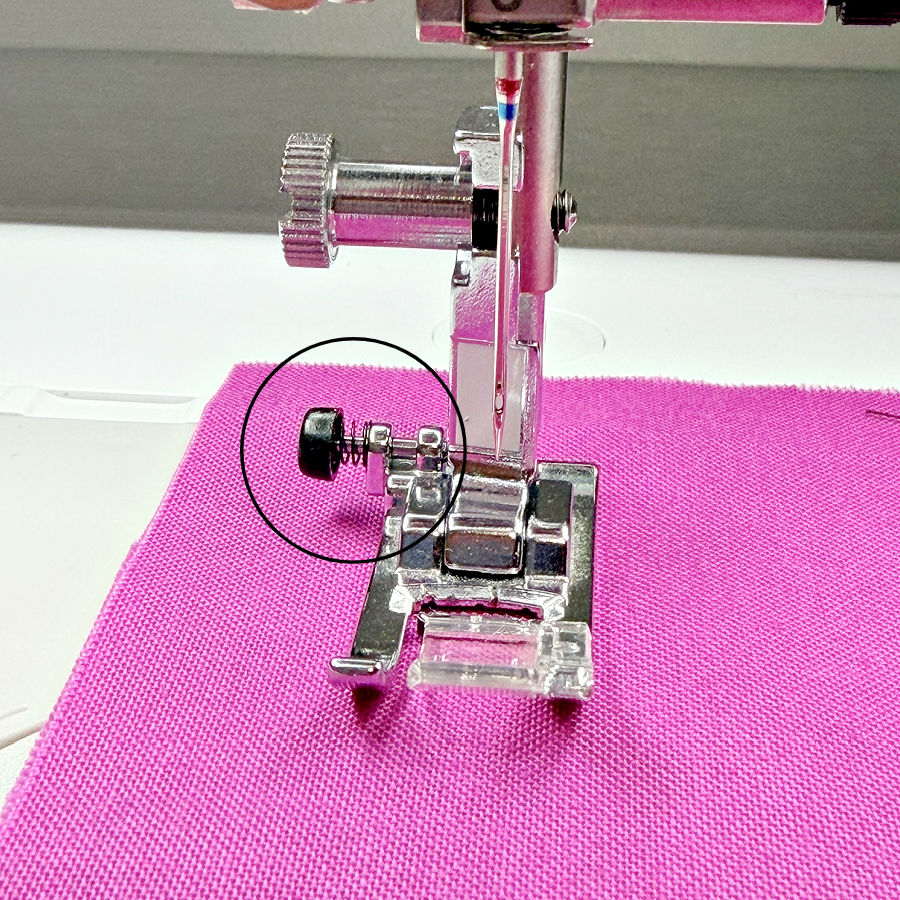
Have you noticed a little black button on the side of some all-purpose presser feet?
It is surprisingly useful.
This is usually called a presser foot leveling button, although manufacturers may use slightly different names for it.
Imagine that you are hemming jeans. The presser foot is sewing along normally, and then it reaches that big stack of fabric at a side seam.
Suddenly the front of the foot points upward while the back is still sitting on the thinner fabric.
Now the presser foot is tilted instead of sitting level.
That awkward angle can make it harder for the machine to feed the fabric smoothly over the thick area.
This is where that tiny button comes in.
When you reach the thick section, raise the presser foot. Press the leveling button and lower the foot again. The button temporarily holds the presser foot in a more level position instead of allowing it to tilt sharply backward.
Then start sewing slowly.
Once the presser foot moves past the bulky section and reaches fabric of a more even thickness, the button usually releases automatically.
You don’t have to stop later and push it back out.
It won’t make every giant lump of fabric sew smoothly — sometimes you may still need a hump jumper, folded fabric, or another leveling method — but for moderate changes in thickness, this tiny button can be very handy.
And it’s one of those sewing-machine features that is almost comically easy to ignore.
You can sew for years with that little black button sitting right in front of you and never once wonder why it’s there.
inspiration!
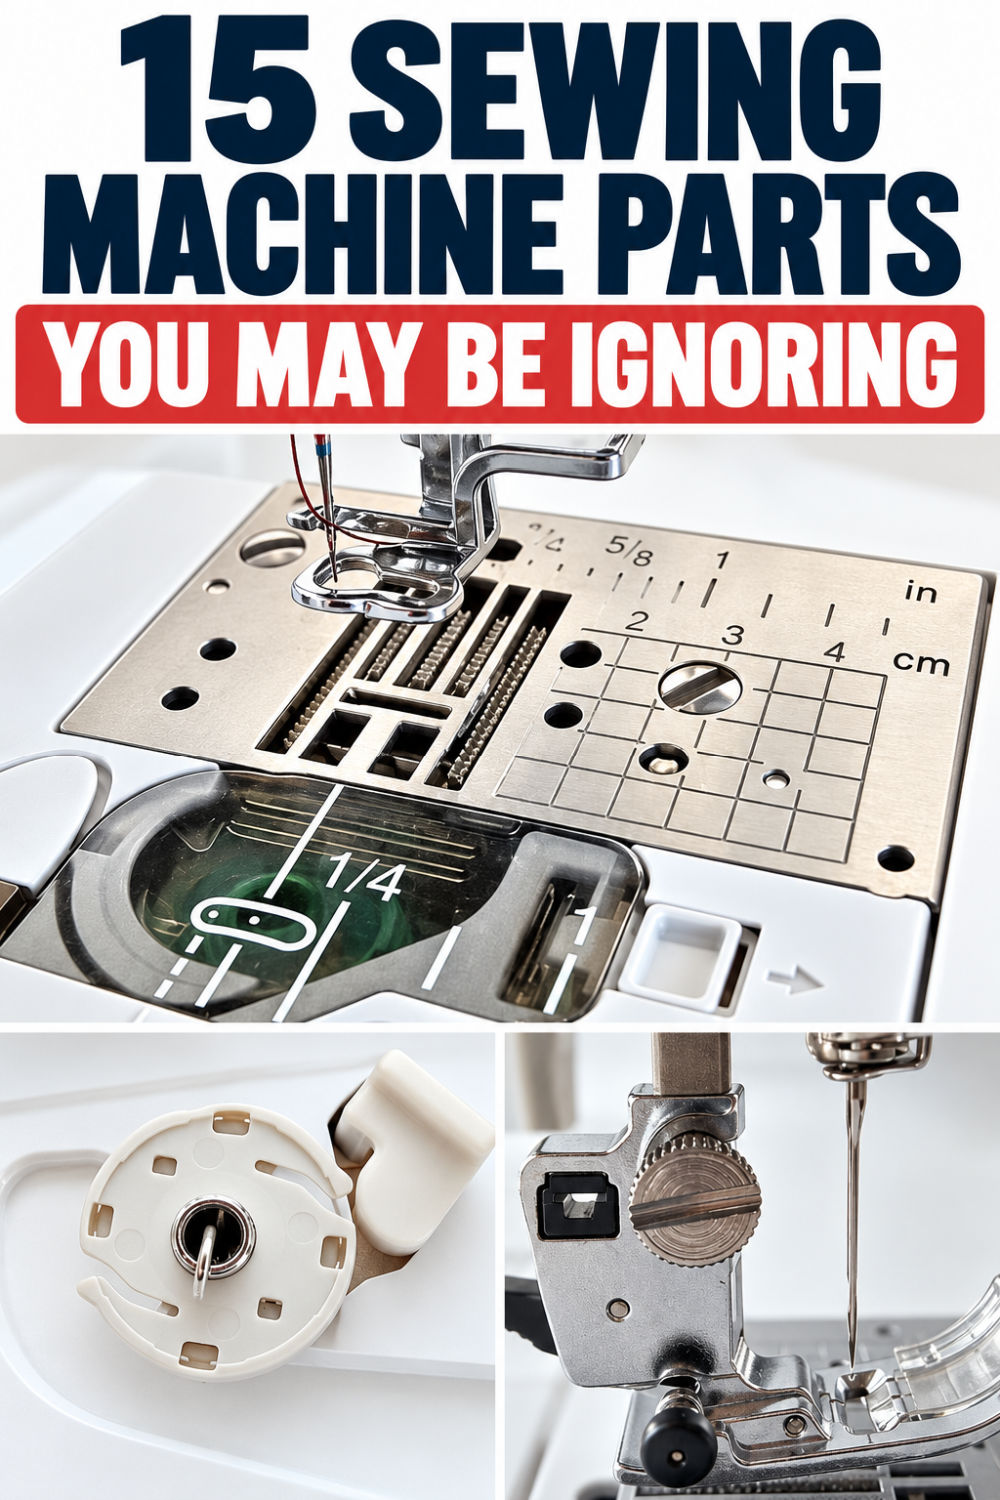
Did you discover a sewing machine feature you hadn’t noticed before? Save this pin to your sewing board so you can find the guide again when you want to check your own machine. And follow me on Pinterest for more sewing tips, tutorials, and ideas.

latest posts
- 15 Sewing Machine Parts You See All the Time — But Probably Ignore
- Adjustable No Buckle Elastic Belt DIY: Sewing Tutorial
- 23 Useful Things to Watch for on Amazon Prime Day
- Sewing Thread Secrets: 8 Tiny Details You Probably Never Noticed — But Should
- Bias Tape Tutorial: How to Make Bias Tape With a Bias Tape Maker
- 10 Easy-to-Miss Features on Sewing Supplies You Should Be Using
- Twin Needle Sewing: My First Try Was a Mess, But Here’s What Worked
- 10 Rules That Made Me a Better Sewist
- How to Make a Lightweight Summer Neck Scarf with a Lettuce Hem