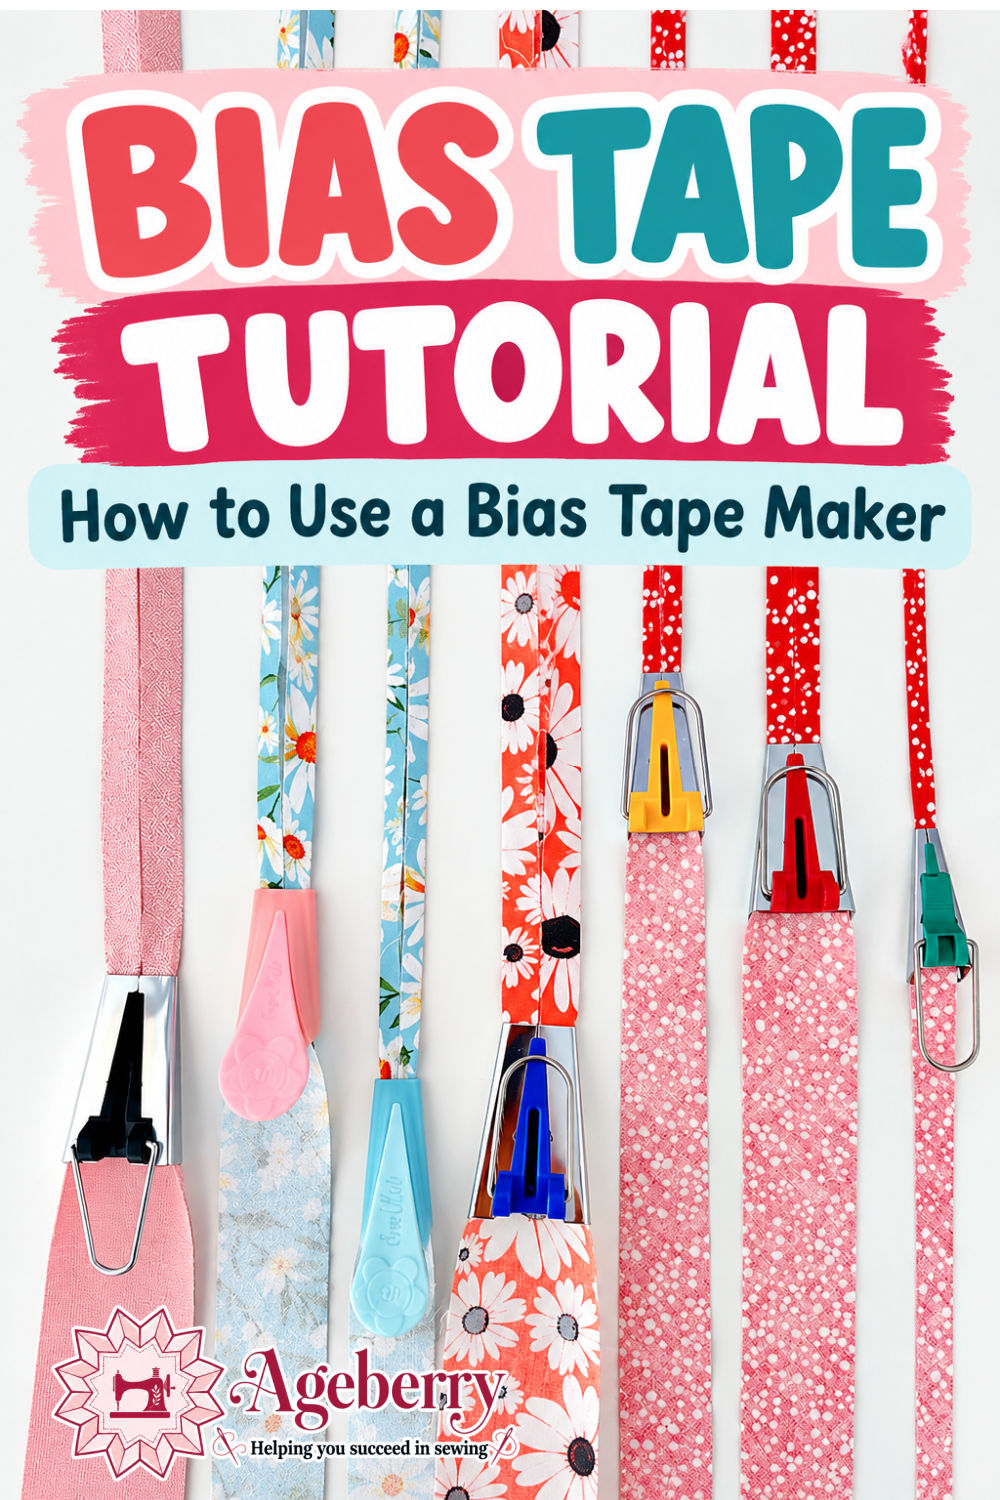
Bias Tape Tutorial: How to Make Bias Tape With a Bias Tape Maker
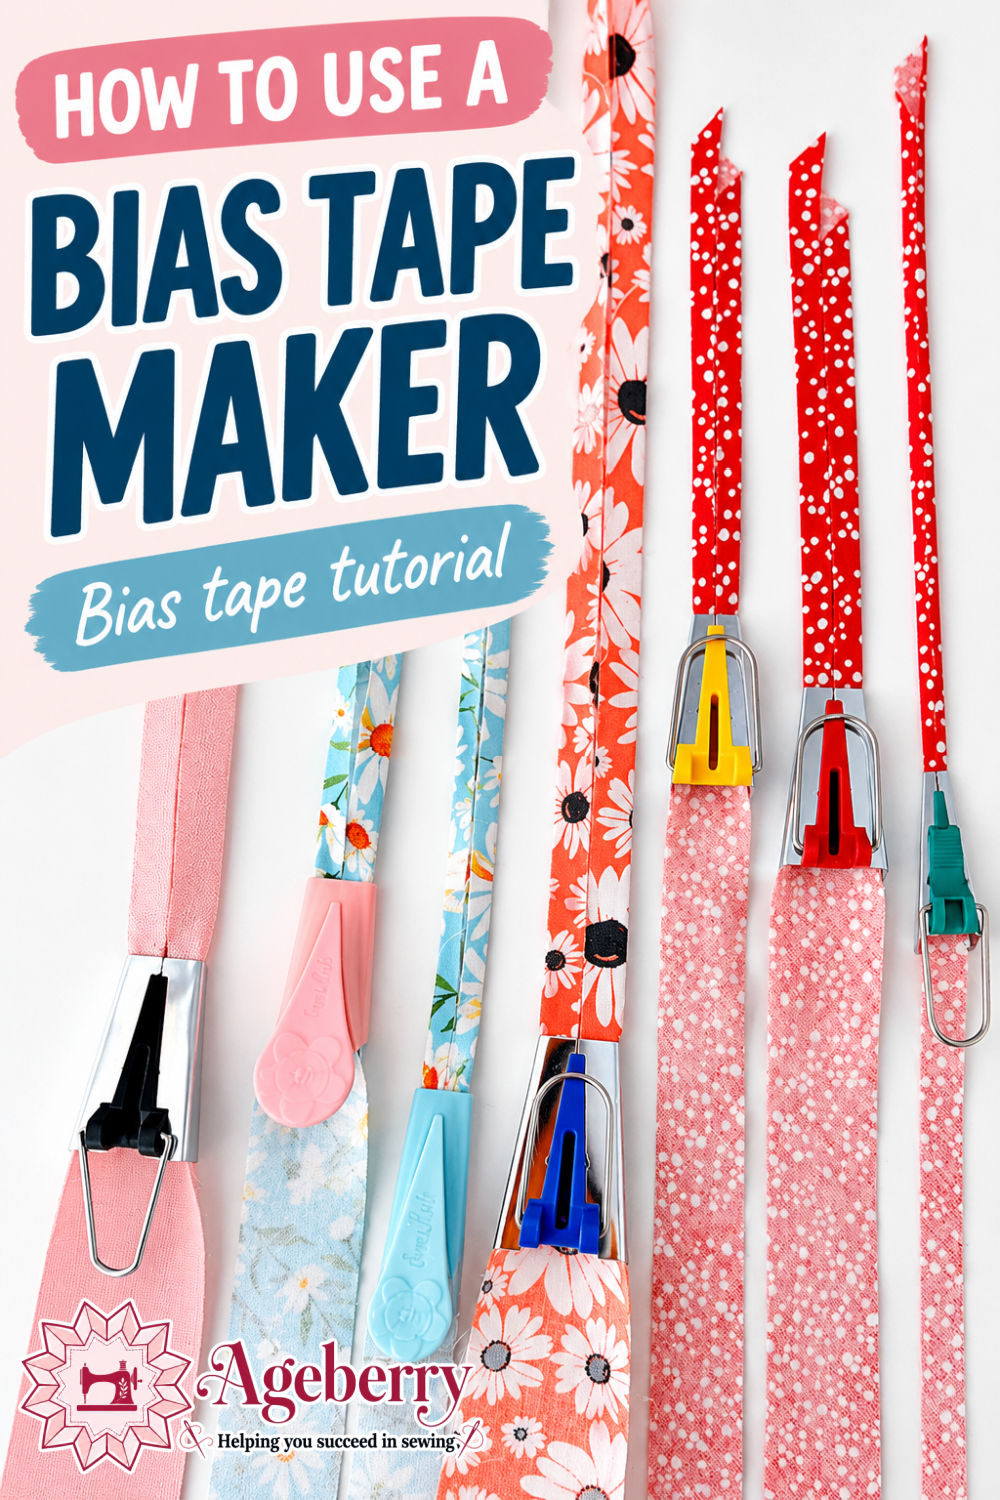
In this bias tape tutorial, I’ll show you how to use a bias tape maker step by step, including how wide to cut the fabric, which end goes where, and how to press the tape as it comes out.
But I also wanted to go farther than the basic instructions.
I wanted to see what happens when I change the grain direction, strip width, fabric, and size. Because the bias tape maker itself is simple. It’s everything around it that makes the difference.
Prefer to read without ads?
I created a PDF version of this guide for anyone who likes to keep sewing guides saved, printed, or easy to read without ads. It includes the same helpful information in a simple format you can download and use whenever you need it.
The PDF is available in my shop for a small fee. It’s a nice option if you want to support my work and keep this tutorial close to your sewing machine.
What Is a Bias Tape Maker?
A bias tape maker is a small sewing tool that folds both long raw edges of a fabric strip toward the center.
You feed a flat strip into the wide end of the tool. As the fabric comes out through the narrow end, the shape of the metal channel forces the edges inward.
Then you press those folds with an iron.
That’s all the tool does.
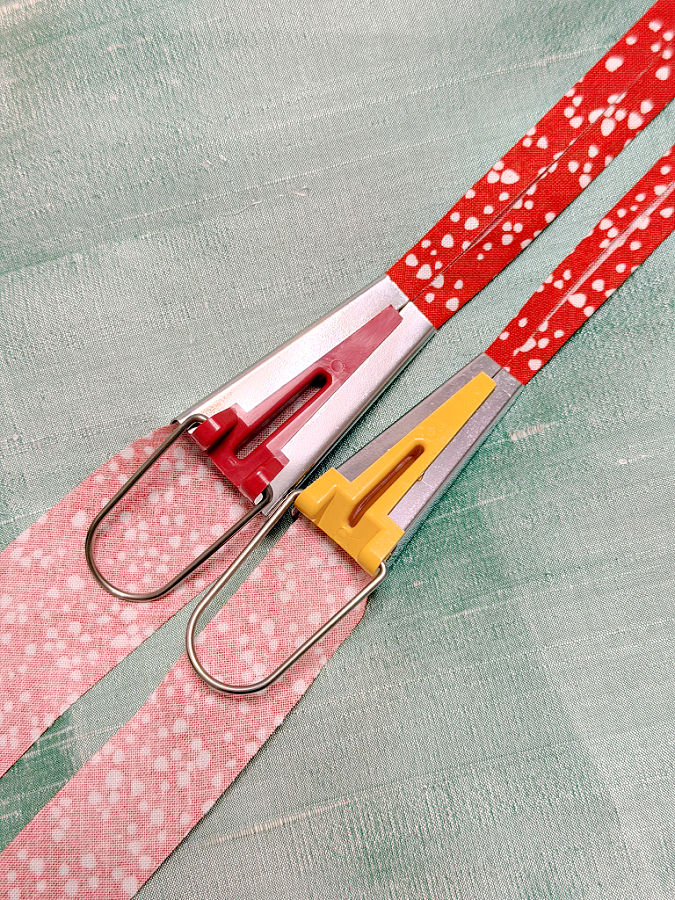
It doesn’t cut the fabric. It doesn’t sew the tape. And despite the name, it doesn’t require the fabric to be cut on the bias.
If you feed a straight-grain strip through it, it will fold that too.
So perhaps “fabric tape maker” would be a more accurate name. But I don’t think the sewing world is going to rename it for us anytime soon.
The grain direction becomes important because of what you plan to do with the finished tape. More about that farther down, because I did a comparison that makes the difference very easy to see.
What Do Bias Tape Maker Sizes Mean?
Bias tape makers come in several sizes, and the markings can be a little confusing because they are not always shown the same way.
Some of my bias tape makers have the size marked in millimeters, while others are marked in inches.
The metric sizes I have are:
- 6 mm — about 1/4 inch
- 12 mm — about 1/2 inch
- 18 mm — about 3/4 inch
- 25 mm — about 1 inch
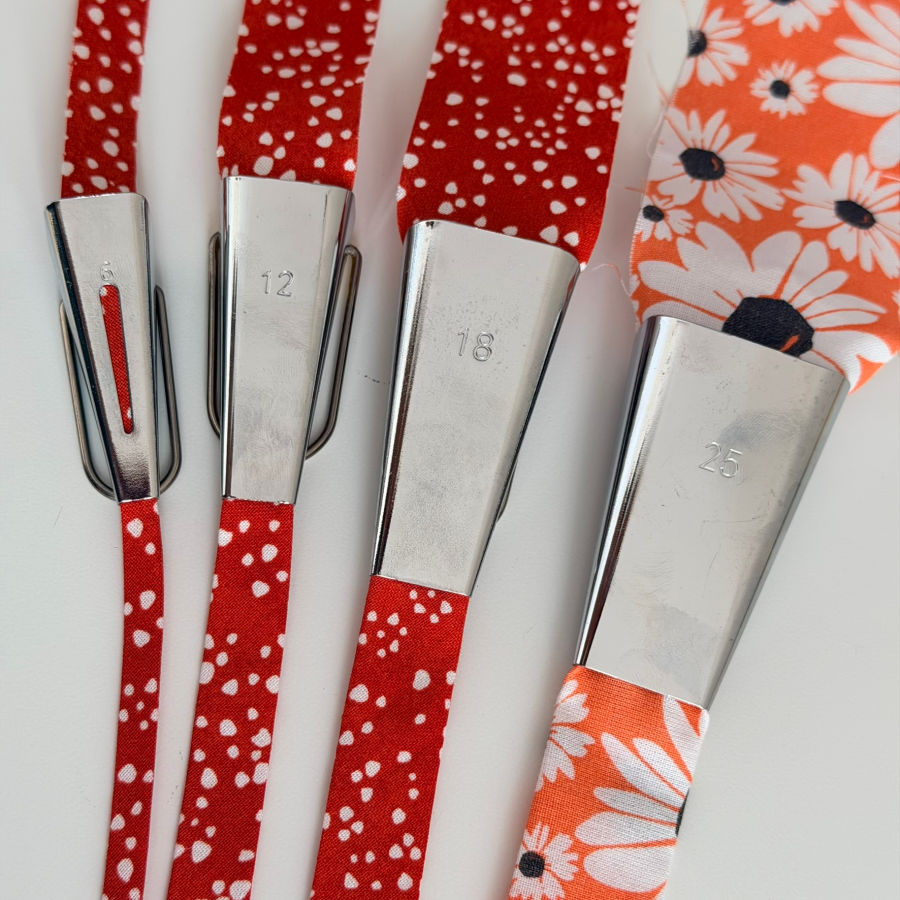
I also have bias tape makers that are labeled directly in inches – 1/2 inch and 3/4 inch.
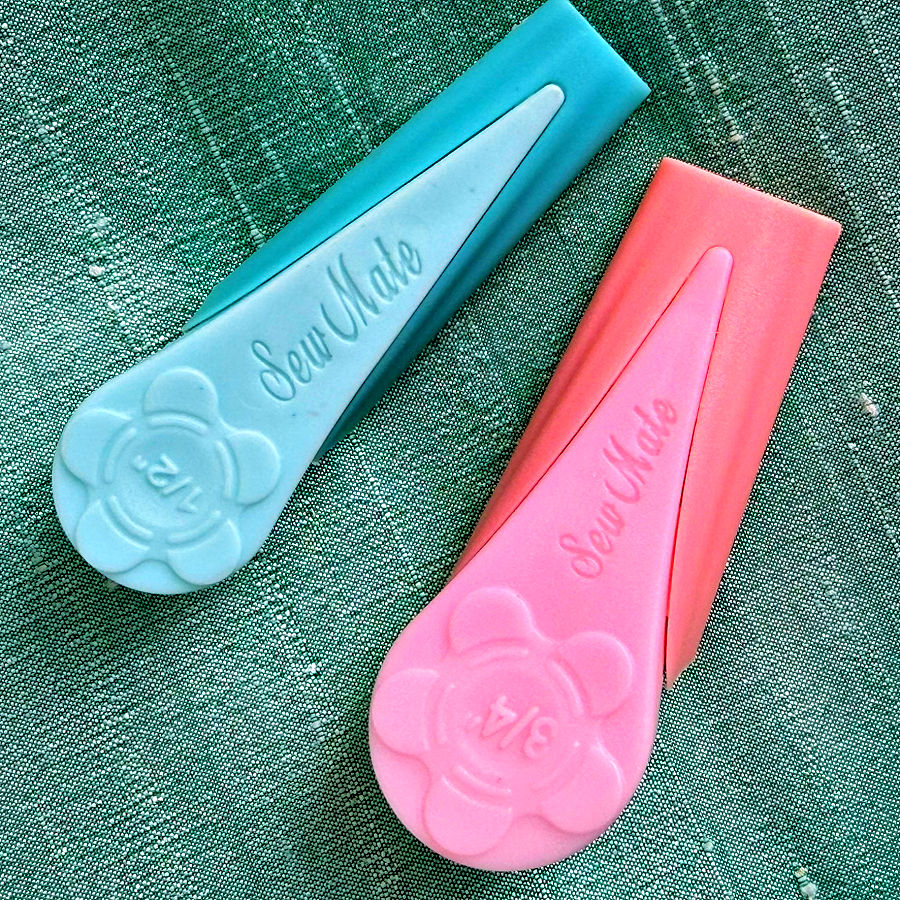
The metric and inch sizes are not always exact conversions. For example, 12 mm is about 0.47 inch, not exactly 1/2 inch, while 1/2 inch is 12.7 mm. An 18 mm maker is about 0.71 inch, while 3/4 inch is 19.05 mm. For sewing purposes, though, you will often see these treated as roughly corresponding sizes.
The number refers to the approximate width of the single-fold tape coming out of the bias tape maker.
So a 25 mm maker produces folded tape about 25 mm, or roughly 1 inch, wide. A 12 mm maker produces tape close to 1/2 inch wide.
This does not mean you should cut your original fabric strip 12 mm wide for a 12 mm maker. The strip has to be much wider because both long raw edges are folded toward the center.
That brings us to the next question: how wide should the fabric strip be before it goes into the tool?
How Wide Should You Cut Fabric for a Bias Tape Maker?
A useful starting point is to cut the fabric strip about twice the width of the bias tape maker.
For example, if your maker produces tape about 1 inch wide, a strip close to 2 inches wide is a reasonable place to start.
But I would not cut five yards of fabric strips based only on that formula.
Cut one short test strip first.
Fabric thickness makes a difference. A lightweight fabric may need a slightly different strip width than a medium-weight cotton. Some manufacturers even give different cutting widths for different fabric weights.
The tool also needs enough fabric to fold both edges inward without leaving a huge gap, but not so much that the fabric crowds inside the channel.
Later in this article I’ll show what happens when I run strips of different widths through the same bias tape maker.
For now, start at approximately twice the maker width and test before cutting the rest.
How to Use a Bias Tape Maker: Step-by-Step Tutorial
Now to the part most people want when they first buy one of these tools.
The process is simple once you know which end the fabric goes into and how to keep it moving smoothly.
Step 1: Cut the Fabric Strip
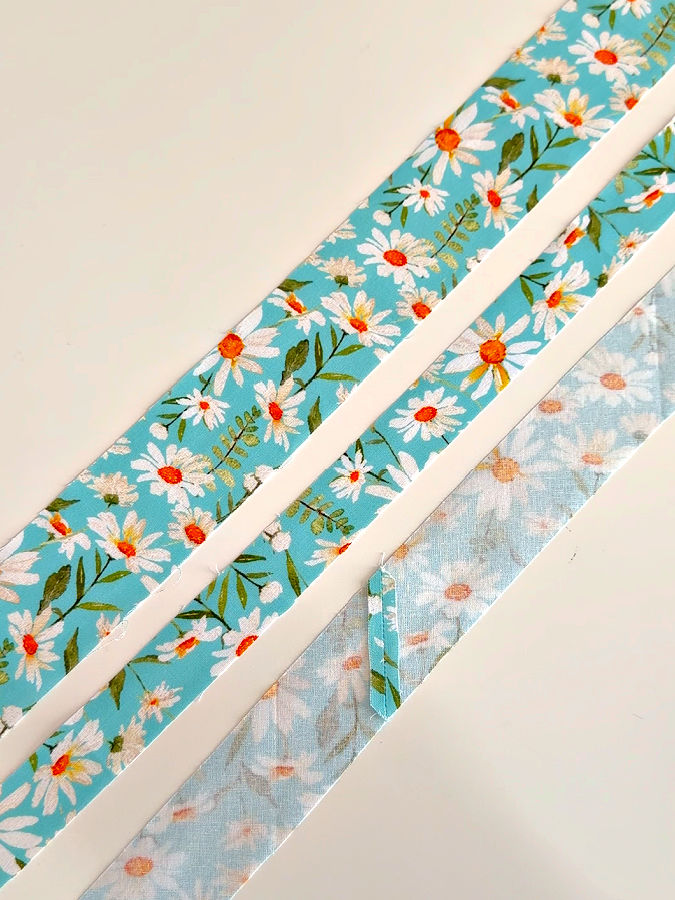
First, cut your fabric strip to the width needed for your bias tape maker.
If you are making true bias tape for a curved edge, cut the strip at about a 45-degree angle to the fabric grain.
Bias-cut fabric has more stretch and flexibility, which allows it to follow curves.
✅ Related tutorial: How to cut fabric on the bias
If you are making a straight decorative strip, fabric tie, belt loop, or another piece that doesn’t need to bend around a curve, the strip doesn’t always need to be cut on the bias.
I’ll show the difference between bias, crossgrain, and lengthwise-grain strips later.
For now, decide what you need the tape to do before choosing the grain direction.
Step 2: Prepare the Leading End
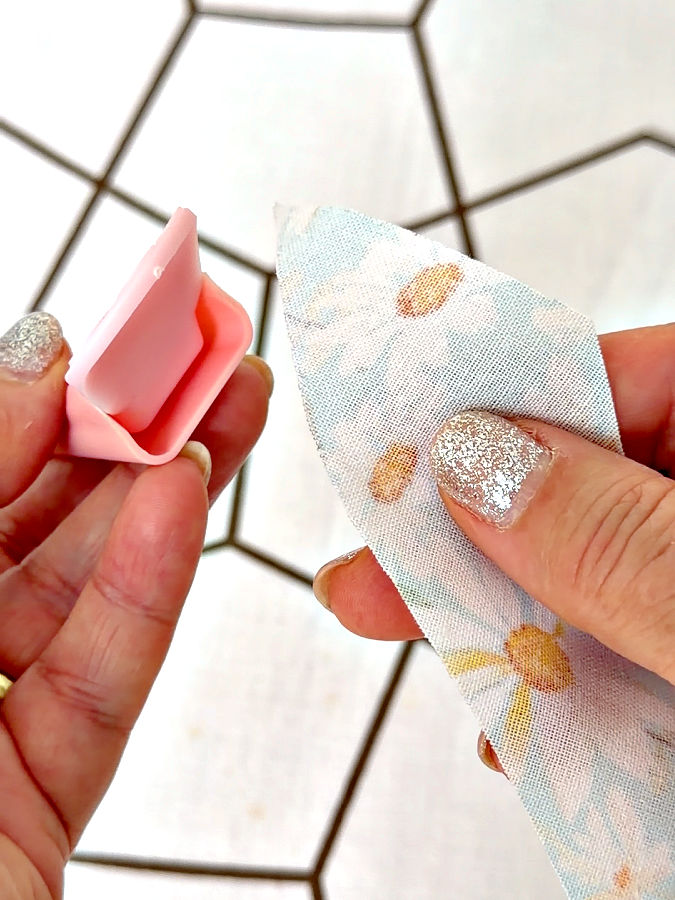
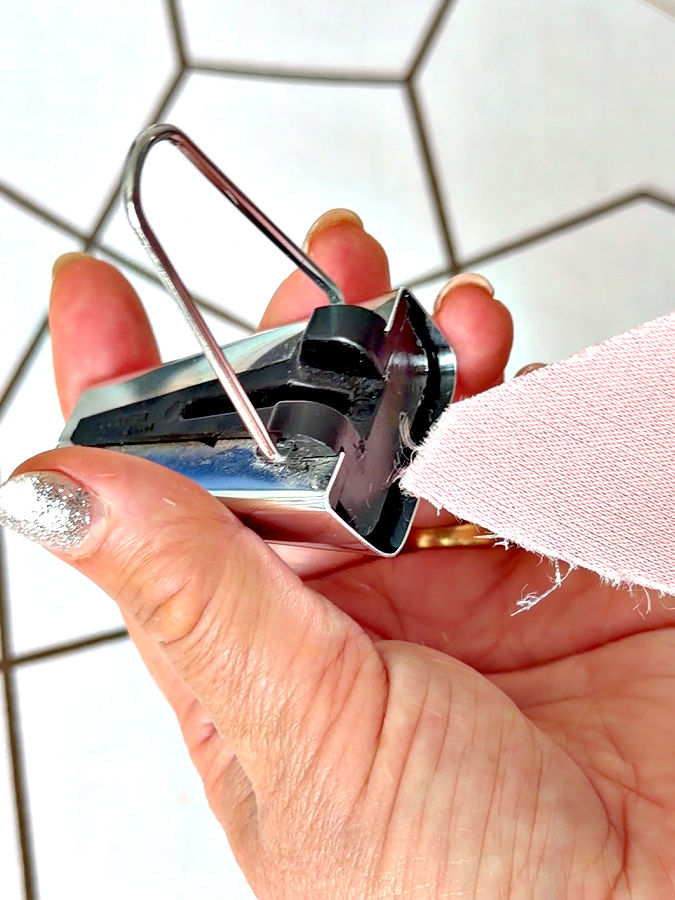
The fabric has to travel through a fairly narrow channel inside the maker.
A perfectly square end can sometimes bunch up instead of feeding through.
If that happens, trim the leading end into a slight point.
It doesn’t need to be a long sharp triangle. Just removing the corner can make the strip easier to start.
This tiny step can save quite a bit of poking at the tool.
Step 3: Insert the Fabric Into the Bias Tape Maker
Take the fabric strip and insert it into the wide end of the bias tape maker.
The wrong side of the fabric should face up.
Push the fabric into the opening as far as you can.
You may see it immediately beginning to move through the tool. Or it may stop somewhere inside.
That is normal.
There is usually a small opening or slot in the bias tape maker that lets you reach the fabric inside.
Step 4: Help the Fabric Through the Center Slot
If the fabric doesn’t come through on its own, use the center opening to help move it forward.
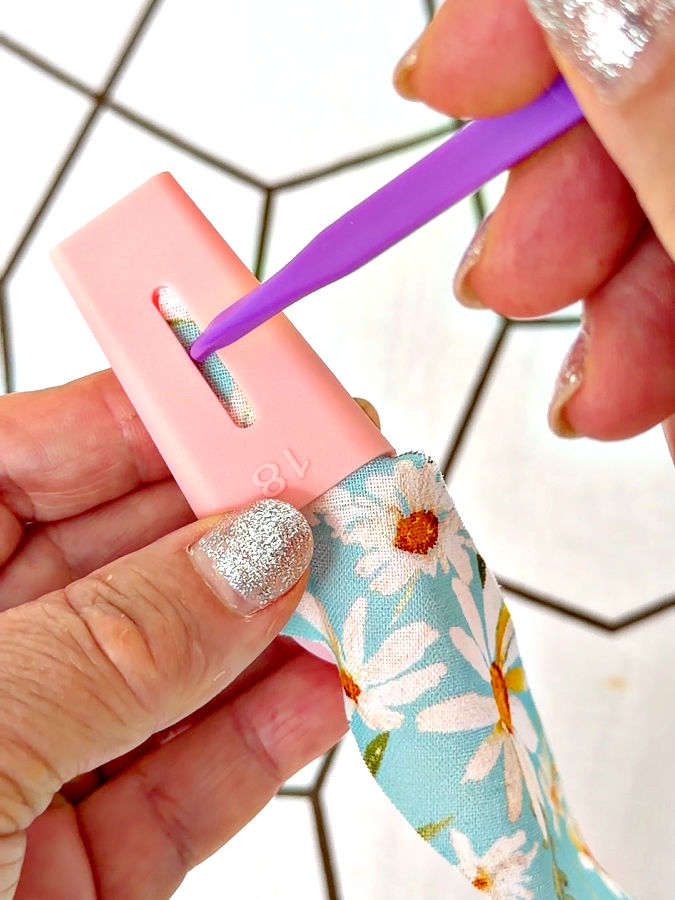
You can use an awl, a pin, or another slim tool that can gently push the fabric along without damaging it. I’m using a Purple Thang to help push the fabric through the bias tape maker.
✅ Related tutorial: You can use WHAT for sewing? A Thang?
Keep working the fabric forward until the end appears through the narrow opening.
Then pull out a few inches.
At this point you should see the two long edges beginning to fold toward the center.
Step 5: Check the Folds
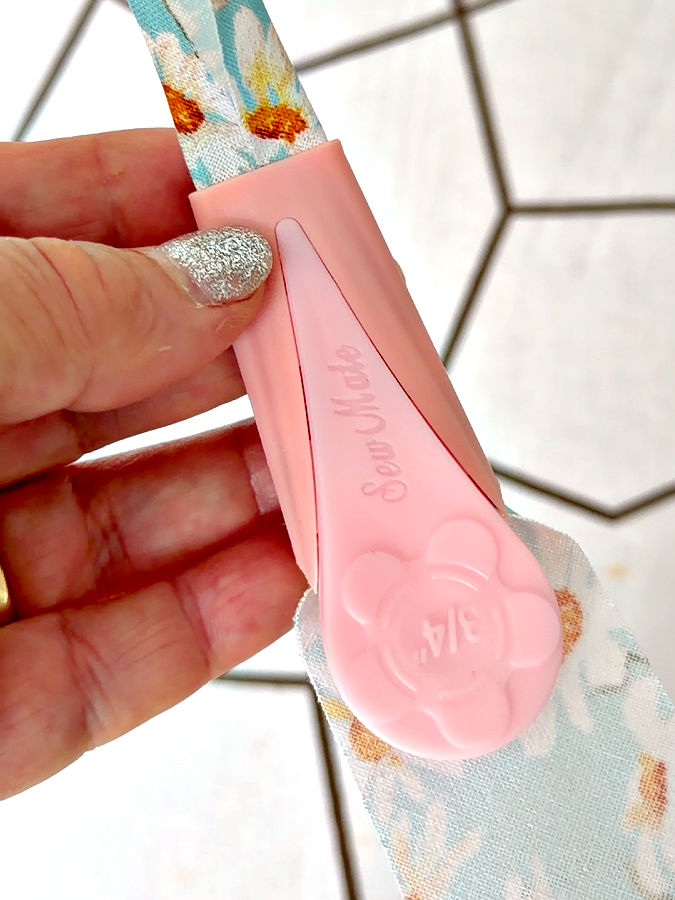
Before you reach for the iron, look closely at the fabric coming out.
Both sides should be folding inward.
Make sure:
- the strip is not twisted inside the tool
- one edge is not folded much farther than the other
- the fabric is moving through the maker straight
- the folded edges look reasonably even
If something looks wrong, fix it now.
Once you press an uneven fold into the fabric, you have created extra work for yourself.
If the strip is twisted, pull it back a little, straighten it, and feed it again.
Step 6: Press the Bias Tape as You Pull
✅ Related tutorial: Mini Irons For Sewing And Quilting
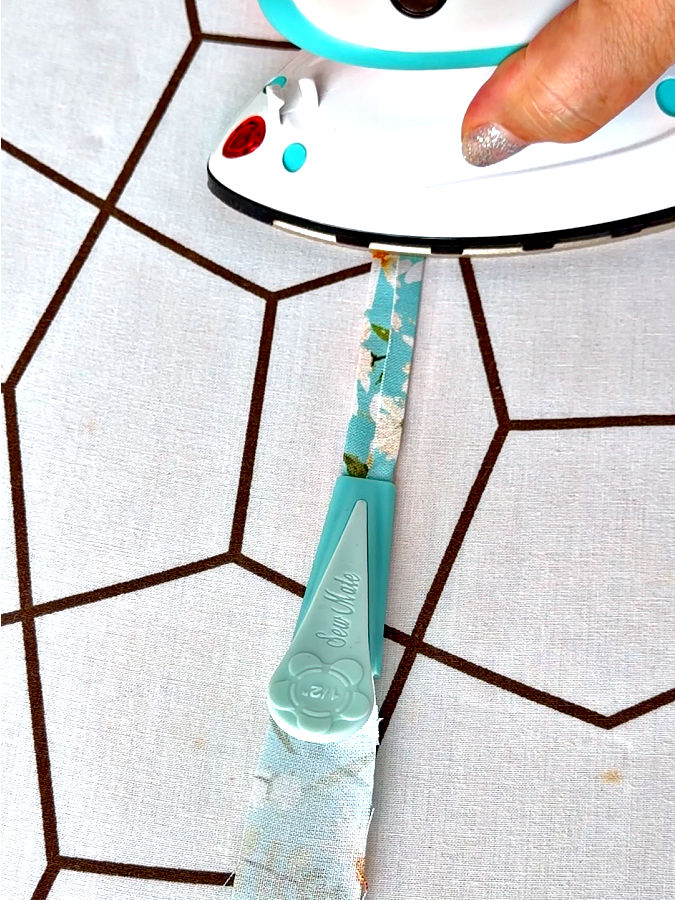
Now place the bias tape maker on your ironing surface and position your iron close behind the narrow end.
Slowly pull the maker away from the iron.
As the folded fabric comes out, press it immediately.
The idea is to press the folds before they have time to open again.
Move slowly.
There is no advantage to pulling the maker quickly, especially if the strip is cut on the bias. Bias-cut fabric stretches easily, and pulling hard can make the strip narrower as you work.
Guide the maker instead of tugging on the fabric.
I also try to keep the unpressed strip arranged loosely on the ironing surface so it isn’t hanging off the table or twisting around itself.
The smoother the fabric enters the tool, the smoother the job becomes.
✅ Related tutorial: Pressing Matters: 15 Common Ironing Mistakes to Avoid
Step 7: Let the Tape Cool
Once a section is pressed, leave it flat for a little while.
Hot fabric is easy to reshape.
If you immediately pick it up, stretch it, or roll it tightly, some of those freshly pressed folds may start opening again.
I prefer to let the tape cool before handling it much.
And now you have homemade single-fold bias tape.
How to Make Double-Fold Bias Tape
A standard bias tape maker normally gives you single-fold bias tape.
Both long raw edges are folded toward the center, but the whole strip is still lying flat.
To make double-fold bias tape, fold the single-fold tape in half lengthwise and press again.
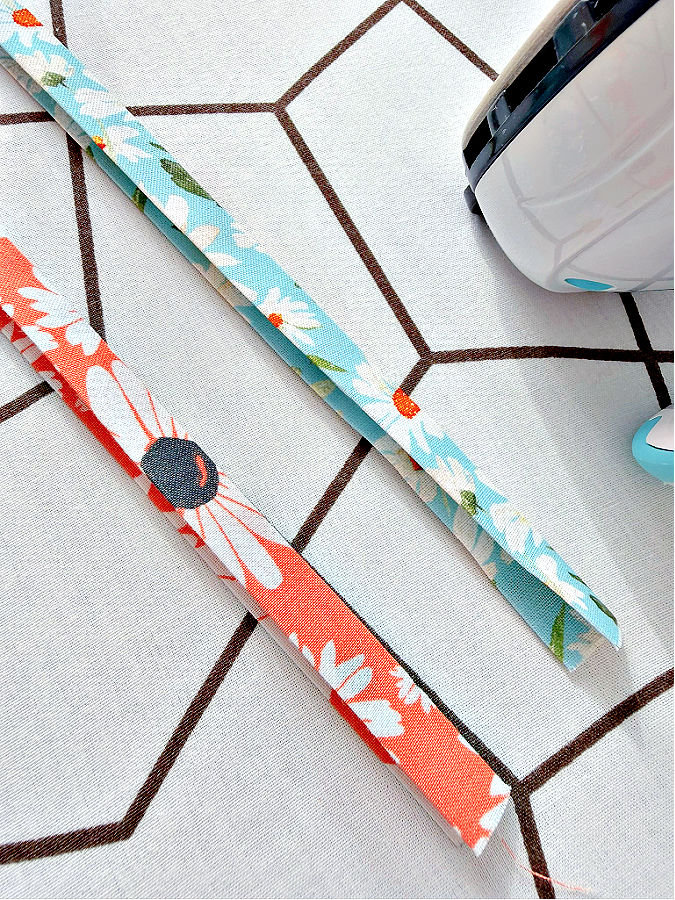
So the sequence is:
flat fabric strip → bias tape maker → single-fold tape → fold in half → double-fold tape
If your single-fold tape is approximately 1 inch wide, folding it in half gives you double-fold tape around 1/2 inch wide.
✅ Related tutorial: Binding in Sewing: What It Is, Why It Matters, and How to Use It
Does Bias Tape Really Have to Be Cut on the Bias?
This is where the name of the tool can be a little misleading.
No, the fabric does not have to be cut on the bias for the tool itself to work.
You can feed a strip cut on the:
- true bias
- crossgrain
- lengthwise grain
through the same bias tape maker.
The tool will still fold it.
The important question is what happens after the strip has been folded.
That depends very much on grain direction.
For this guide, I cut three strips:
- one on the true bias at about 45 degrees
- one across the grain
- one along the lengthwise grain
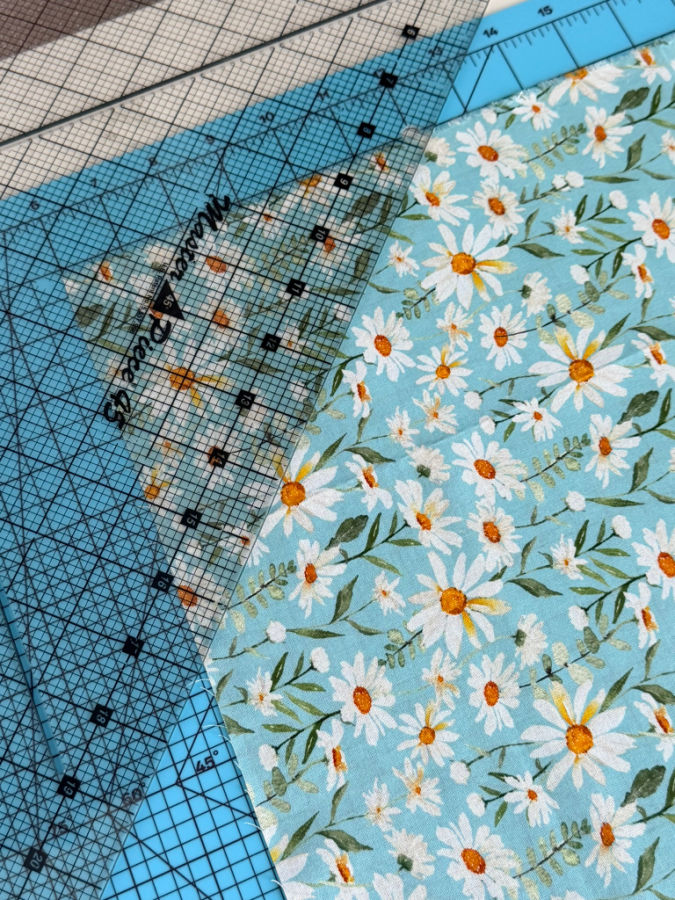
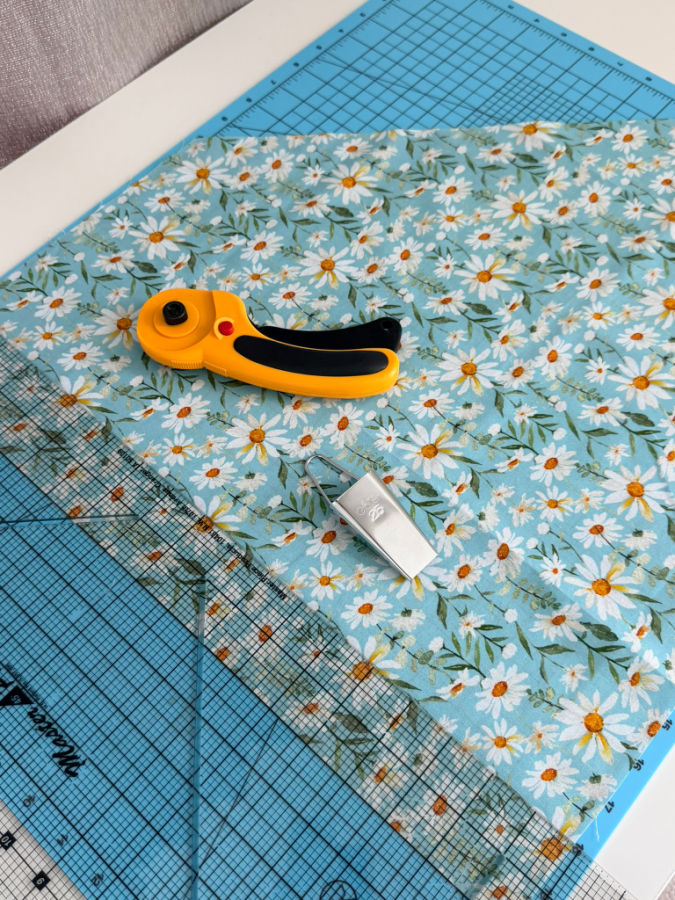
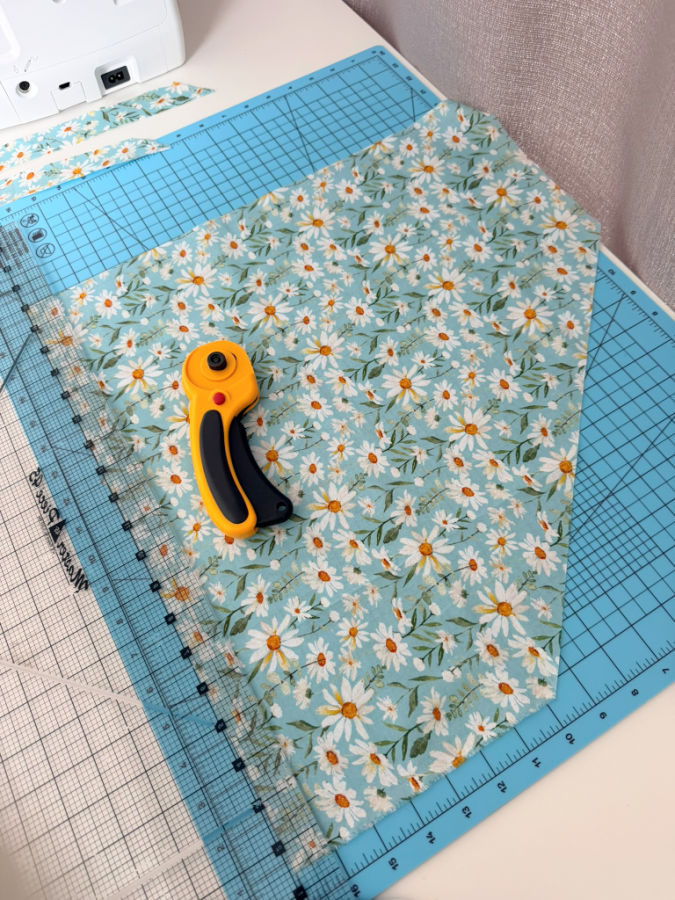
I ran all three through the tool.
When they were lying straight, all three looked like folded fabric tape.
The difference became much easier to see when I tried to bend them around the same curve.
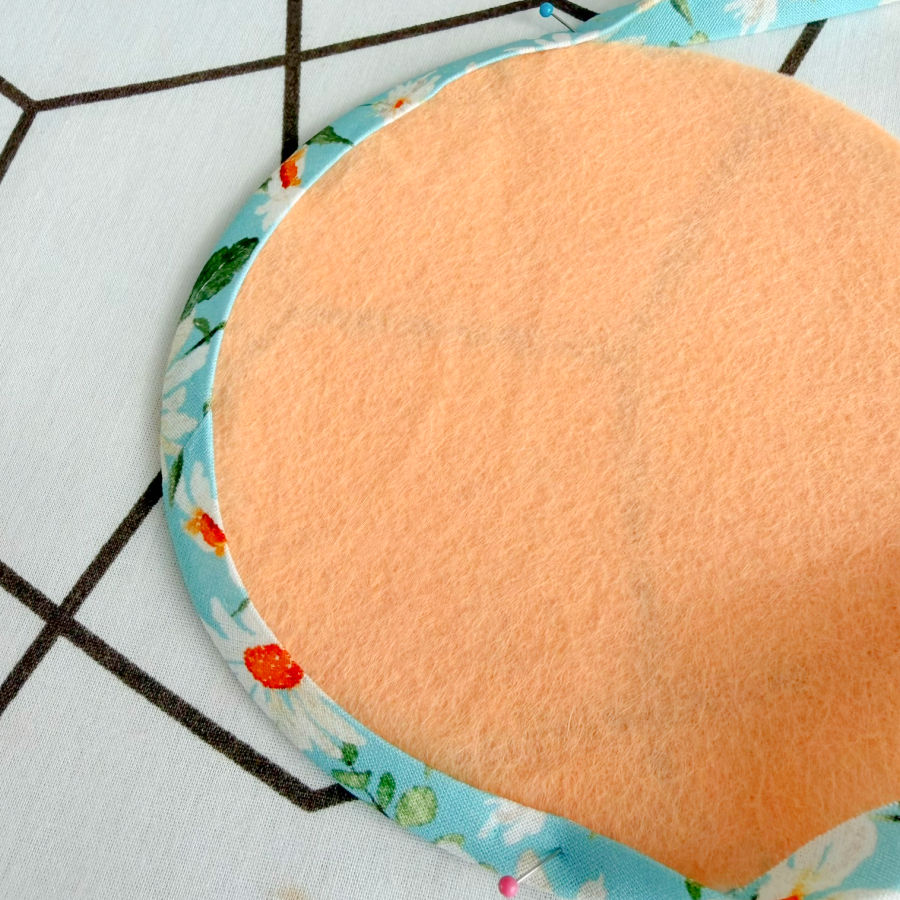
True bias strip
The true bias strip followed the curve easily, it stretched, and stayed flat.
Lengthwise-grain strip
The lengthwise-grain strip wasn’t flexible. When I tried to place it around the same round shape, it simply did not want to follow the curve.
Instead of lying flat, it formed frequent little folds and puckers along the inside edge. I could force it around the circle, but the result was not smooth.
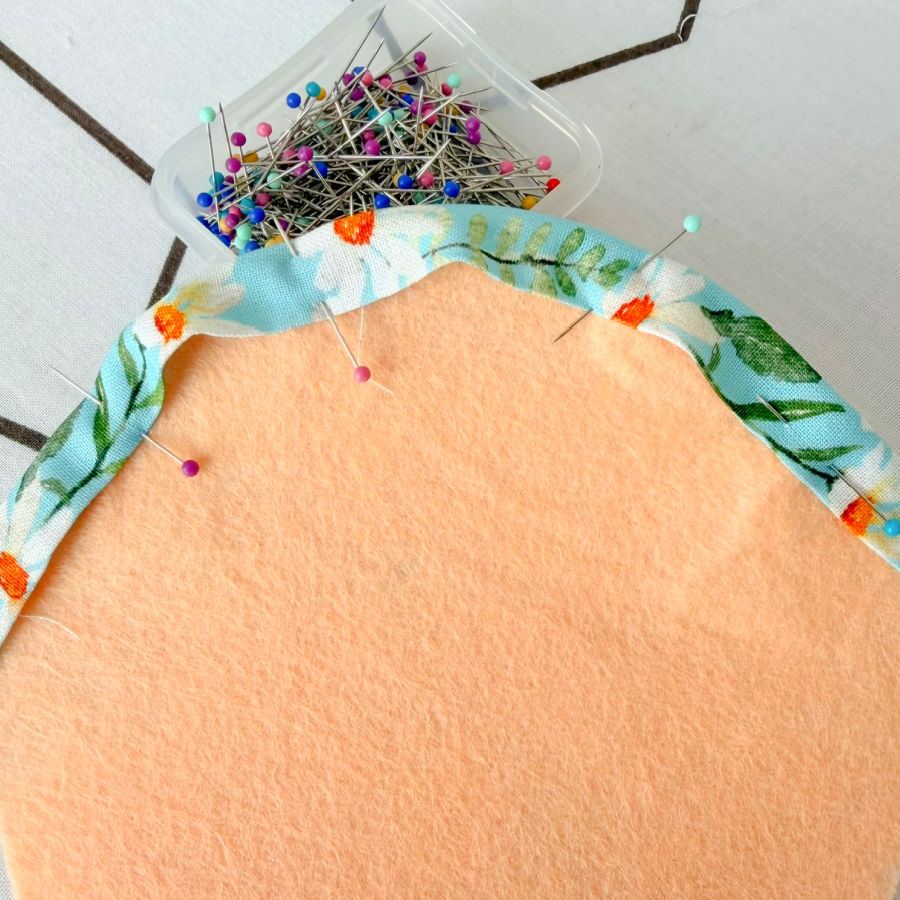
This is exactly why straight-grain strips are fine for straight applications but not a good choice when the tape needs to bend around a rounded edge.
This is the useful distinction:
The bias tape maker does not require bias. Curved edges often do.
For a neckline, armhole, curved hem, rounded appliqué, or another curved edge, the flexibility of true bias tape is extremely useful.
But if I need a straight fabric strip for something like a tie, belt loop, decorative band, or straight appliqué, cutting on the bias may not be necessary.
And cutting straight strips usually wastes less fabric.
Does Strip Width Matter?
The usual instruction is simple: cut the strip about twice the width of the bias tape maker.
It’s a good starting rule, but it isn’t an exact law.
Fabric has thickness.
A very thin fabric takes up less room as it folds. A thicker fabric takes up more.
This can affect how much fabric you need inside the maker for the folded edges to land where you want them.
Some manufacturers recommend slightly different strip widths depending on fabric weight, which is another reason I prefer testing one short strip first.
So I wanted to see how much difference a small change in strip width would make.
My Bias Tape Strip-Width Test
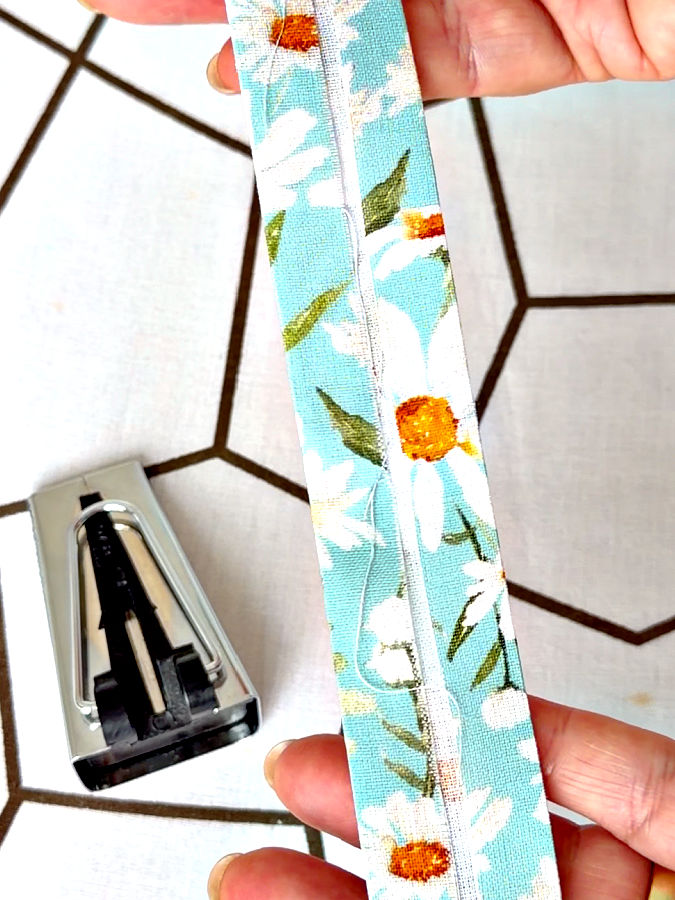
For this test, I cut two fabric strips exactly 2 inches wide and ran both through the same 25 mm (about 1 inch) bias tape maker.
The only thing I changed was the fabric.
One strip was lightweight cotton, and the other was a thicker home decor fabric.
The cotton went through the maker easily, but when it came out, there was a small gap between the two folded edges in the center.
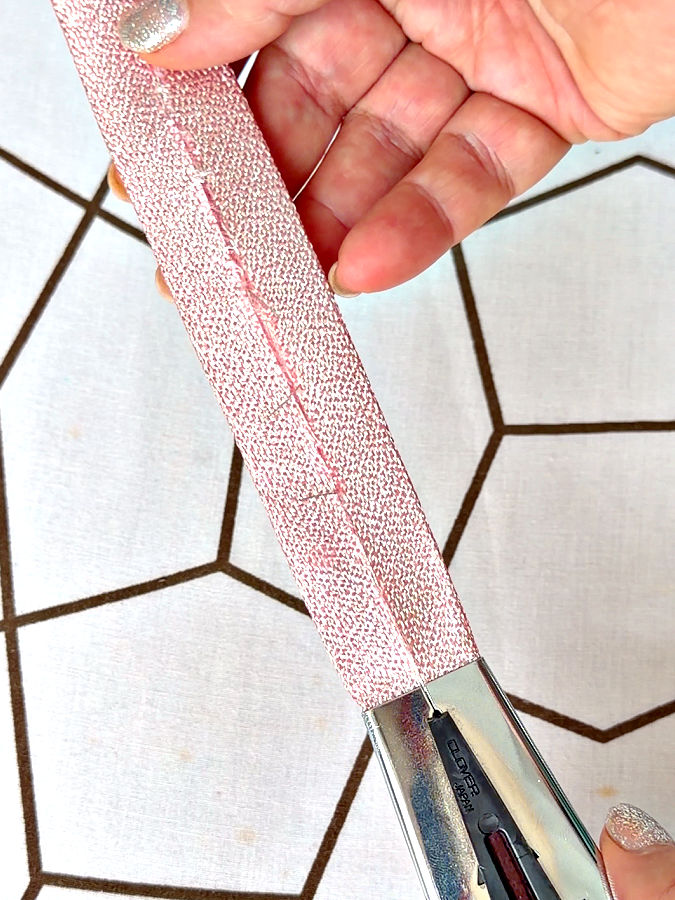
The thicker decor fabric behaved differently. With the same 2-inch strip and the same bias tape maker, the folded edges came together with practically no gap.
The reason is simple: thicker fabric takes up more space when it folds.
So the “cut your strip twice the width of the maker” rule is useful, but it isn’t exact for every fabric.
What to Do With Thin and Thick Fabrics
If you are using a thin or lightweight fabric and there is a larger gap between the folded edges than you want, try cutting the strip slightly wider.
You don’t need to add a lot. Start with a small increase, run a short sample through the maker, and see where the folded edges land.
With a thicker fabric, you may need less width. Because the folds themselves take up more room, a strip that leaves a gap in lightweight cotton may fill the same bias tape maker nicely when made from a heavier fabric.
This is why I recommend testing a short strip before cutting all the fabric for your project.
What Happens if the Fabric Strip Is Too Wide?
Wider is not always better.
If the strip is too wide for the bias tape maker, the folded edges may overlap in the center instead of meeting neatly.
And if there is too much fabric for the channel inside the tool, you may also notice that:
- the fabric is harder to pull through
- it bunches or wrinkles inside the maker
- the folds come out uneven
- one edge may fold over the other
- the tool may start catching or jamming
So if the tape is difficult to pull through or you see a lot of overlapping fabric in the center, try cutting a slightly narrower strip.
There isn’t one exact strip width that works with every fabric.
The bias tape maker size, fabric thickness, and strip width all work together. A quick test piece will tell you much more than a formula alone.
Does Starch Help When Making Bias Tape?
Starch can be very helpful when the fabric is too soft, slippery, or lightweight to move cleanly through the bias tape maker.
A little starch gives the fabric more body. That makes it easier to feed into the tool, helps the strip stay centered, and can make the folded edges hold their shape better as they come out.
I would consider using starch when:
- the fabric keeps collapsing inside the maker
- the strip twists or shifts easily
- the folds open again before you can press them
- the fabric is very lightweight
- the fabric is slippery and difficult to control
You usually don’t need starch for stable quilting cotton or another fabric that already has enough body to feed smoothly.
And I wouldn’t soak the strip until it becomes stiff. A light application is usually enough.
Let the fabric dry or press it as you normally would, then run it through the bias tape maker.
Starch doesn’t fix the wrong strip width or a fabric that is too bulky for the tool, but for soft, thin fabrics it can make the whole process much easier.
How to Join Fabric Strips for Bias Tape
If you need a long piece of bias tape, you will probably have to join several fabric strips together before feeding them through the bias tape maker.
I use two slightly different methods, depending on whether the ends of my strips are already cut at a 45-degree angle or are still straight.
In both cases, I prefer a diagonal seam instead of joining the strips with a straight seam across the width. The diagonal join spreads the seam allowance over a longer area, so there is less bulk when that seam eventually has to pass through the bias tape maker.
Method 1: Joining Strips With 45-Degree Ends
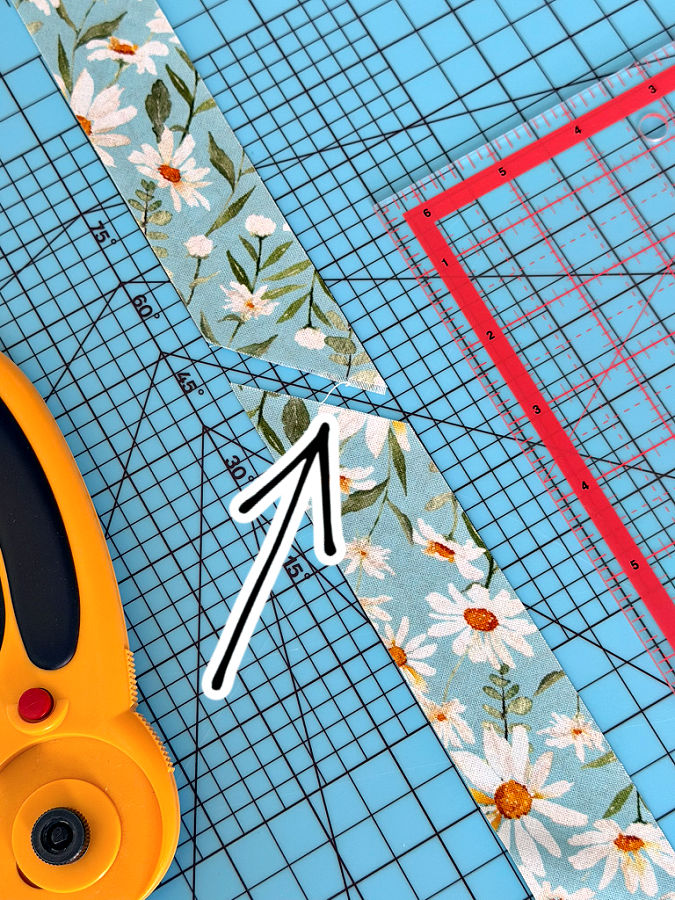
If the ends of my strips are already cut at a 45-degree angle, I place the two strips right sides together, matching the angled ends.
But don’t simply line up the very tips and sew them exactly as they are.
Position the strips so the angled edges overlap correctly and there is a small amount of fabric extending beyond the sides. This little offset is important because part of the fabric will disappear into the seam allowance when the strips are sewn and opened.
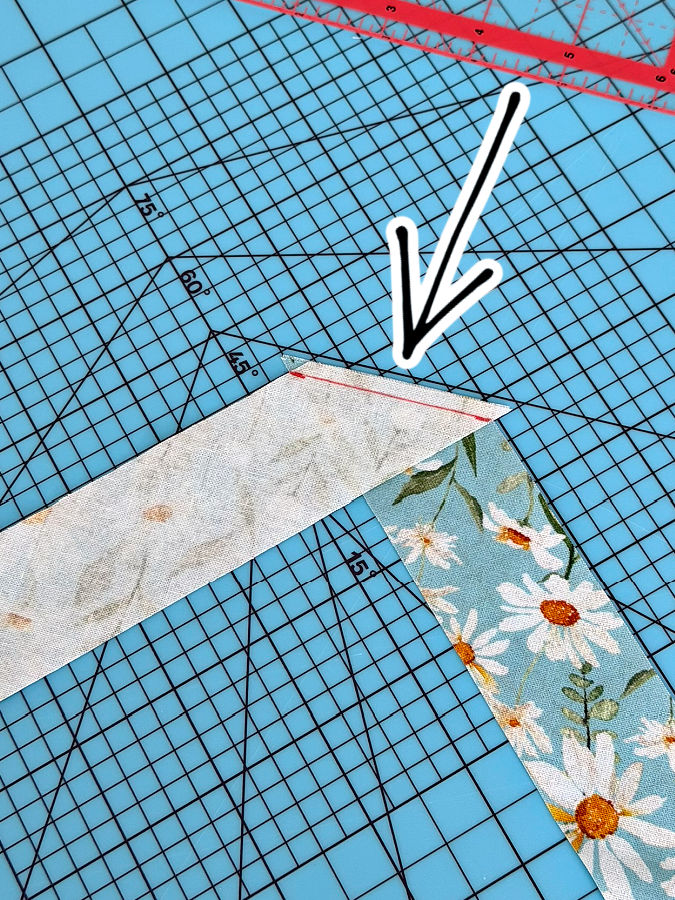
Sew along the angled edge with your normal seam allowance.
Before trimming anything, open the strips and check them. They should form one continuous strip, with the long edges lining up smoothly.
Then trim the seam allowance if necessary and press it open.
Pressing the seam open is especially important here. Later, this entire join has to travel through the narrow channel of the bias tape maker, and a seam with both allowances pressed to one side creates much more bulk.
Method 2: Joining Strips With Straight Ends
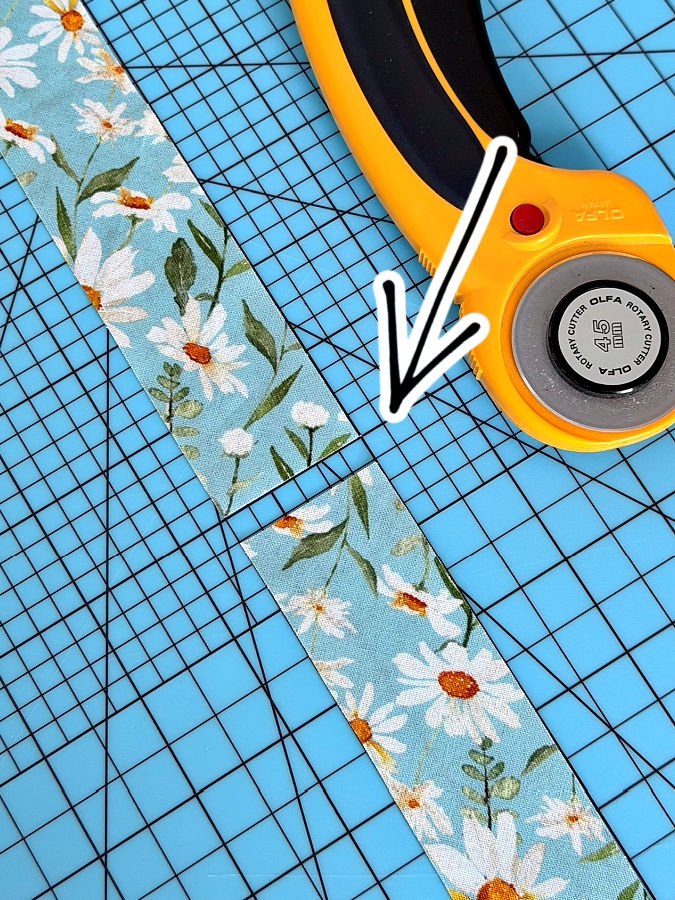
You can also join strips without cutting the ends to 45 degrees first.
This method is very convenient, but the way you position the strips before sewing matters.
Place the first strip right side up.
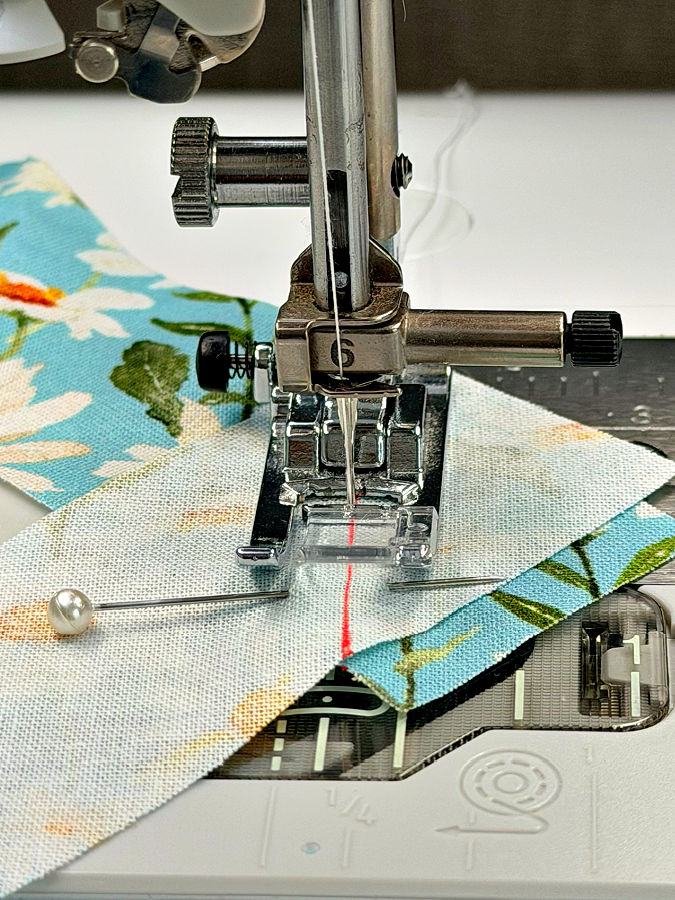
Place the second strip right side down across it at a 90-degree angle, so the right sides are together.
The two strips need to overlap, not simply touch at their ends.
This is the important part: let the end of each strip extend a little past the edge of the other strip, as you can see in my photo.
If you position the strips without those little extra ends and try to make everything end exactly at the intersection, the strips may not line up properly when you open the seam. The seam allowance takes up some of that fabric, and you can end up with an awkward step or an edge that doesn’t continue smoothly from one strip to the next.
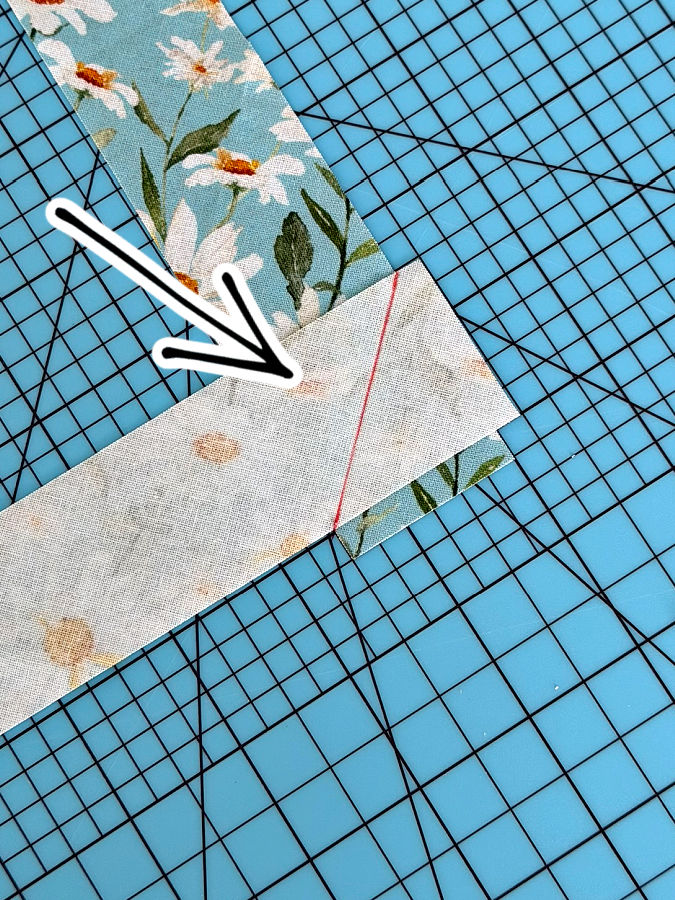
Once the strips are positioned correctly, draw a diagonal sewing line across the overlap, from one inside corner to the opposite corner.
I like to pin the strips before sewing because they can shift easily, and even a small shift changes where the edges meet after the seam is opened.
Sew along the marked diagonal line.
Before trimming, unfold the strips and check the join.
The two pieces should now form one long strip, and the long edges should continue smoothly across the seam.
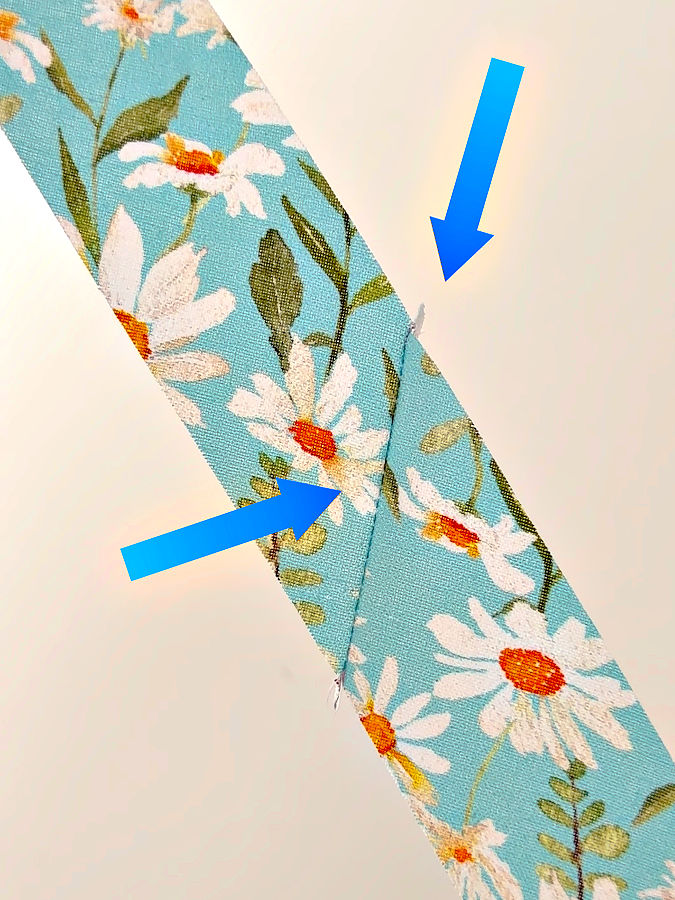
If everything lines up, trim away the excess fabric, leaving your normal seam allowance.
Then press the seam allowances open.
You will have two little points or “dog ears” sticking out at the edges after sewing. Trim those off too so the sides of the strip are straight.
Now the joined strip is ready to go through the bias tape maker.
And this is one of those places where I really recommend checking before trimming. If you accidentally sew the diagonal in the wrong direction—or position the strips incorrectly—you can simply remove the stitches and try again. Once the extra fabric is cut away, fixing it becomes much less convenient.
What Happens When a Joined Seam Goes Through a Bias Tape Maker?
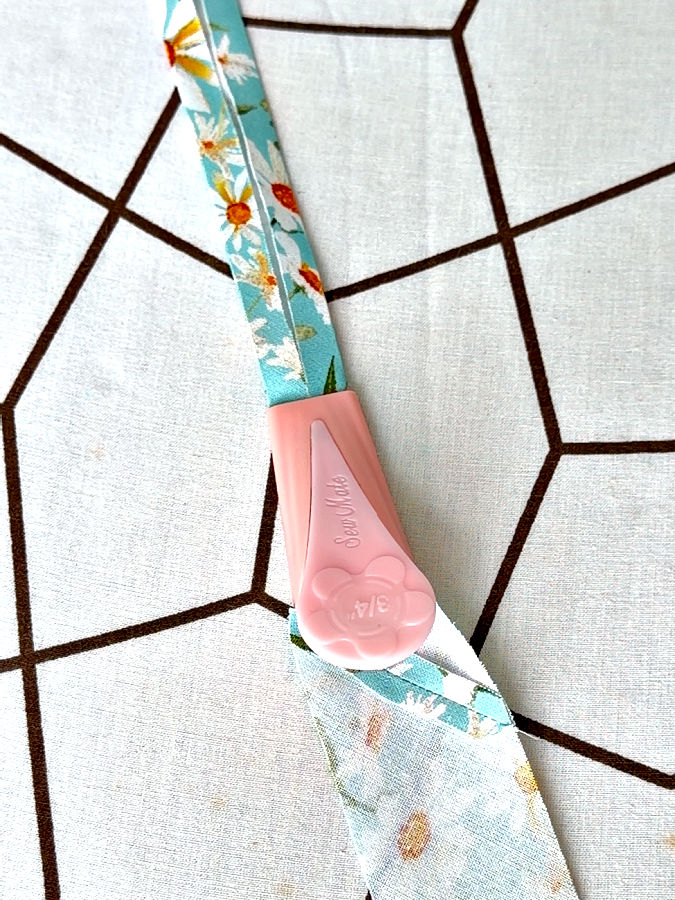
Once the joined seam is trimmed neatly and pressed open, it should pass through the bias tape maker without much trouble.
As the seam reaches the tool, the fabric becomes a little thicker in that spot, so I slow down and guide it through rather than pulling harder.
The seam may need a little extra help as it moves through the narrow channel, but if the seam allowances are pressed open and the little points are trimmed away, it usually goes through smoothly.
After it comes out, press that area the same way as the rest of the strip. The folds continue across the seam, and once everything is pressed, the join lies quite flat.
This is why I prefer to prepare the seam carefully before using the bias tape maker. A neat, flat join is much easier for the tool to handle than a bulky seam with the allowances stacked on top of each other.
Bias Tape Maker Troubleshooting
Once you understand how the fabric moves through the tool, most bias tape maker problems are not too mysterious.
Usually something is wrong with the strip width, fabric feeding, seam bulk, or tension from pulling.
Here are the problems I see most often.
Fabric Won’t Go Into the Bias Tape Maker
First, check the end of the fabric strip.
A square or floppy end can fold over instead of entering the channel.
Trim the end slightly narrower or into a point.
Then use the opening in the top of the bias tape maker to help guide the fabric forward.
If the fabric is extremely soft, a little starch may help give the end enough body to move through.
Also check that you are inserting the strip into the wide end of the tool.
Fabric Gets Stuck Inside the Bias Tape Maker
If the strip starts feeding and then stops, don’t pull harder immediately.
Check for:
- a strip that is too wide
- thick fabric
- a bulky joined seam
- fabric twisted inside the channel
- a raw edge folded over on itself
Pull the strip back slightly, straighten it, and try again.
If the same fabric repeatedly jams, test a slightly narrower strip.
The Folded Edges Don’t Meet in the Center
This can happen when the strip is too narrow for that fabric and maker combination.
It can also happen if the fabric has stretched while you were working.
A small gap in the center isn’t always a problem.
But if there is a very large gap, test a slightly wider strip.
The Folded Edges Overlap
This is the opposite problem.
The strip may be too wide, or the fabric may not be feeding evenly through the tool.
Try a slightly narrower strip and make sure the fabric enters straight.
One Side Is Wider Than the Other
Check the fabric before it enters the bias tape maker.
If the strip is pulling sideways, the folds can become uneven.
Sometimes simply rearranging the long strip behind the maker fixes the problem.
The Fabric Twists Inside the Bias Tape Maker
Stop. Don’t keep pulling and hope it will somehow correct itself.
Pull the fabric back a little, flatten it, and feed it again.
The longer you continue with a twist inside the tool, the more fabric you’ll have to re-press later.
The Bias Tape Gets Narrower as I Work
You may be stretching the fabric.
This is especially easy to do with true bias strips.
Don’t pull hard on the finished tape.
Move the maker slowly and let the iron set the folds behind it.
The tool should guide the fabric. It shouldn’t feel like a tug-of-war.
The Folds Keep Opening After Pressing
Try adjusting your pressing method.
Depending on the fabric, you may need:
- a little more heat
- steam
- starch
- slower pressing
- more time for the tape to cool before handling it
Also check that your iron is close enough to the bias tape maker.
If several inches of freshly folded fabric are allowed to open before you press them, you are making the job harder.
A Joined Seam Won’t Pass Through the Maker
Check the seam allowances.
If they are stacked on top of each other, the seam may simply be too bulky.
Trim the seam neatly and press the allowances open.
Then feed that area through slowly.
Bias Binding vs. Bias Tape: Are They the Same Thing?
You will often see the terms bias tape and bias binding used almost interchangeably.
They are closely related, but the words usually describe slightly different things.
Bias tape is the folded strip itself.
Bias binding often refers to bias tape being used to finish or bind a raw edge.
For example, you might make bias tape from your fabric and then use that tape as bias binding around a neckline.
The terminology isn’t completely consistent. Sewing books, patterns, manufacturers, and sewists sometimes use the words differently.
So I wouldn’t worry too much about the name.
What matters more is knowing:
- how wide the strip is
- whether it is single-fold or double-fold
- whether it is cut on the bias
- what you plan to do with it
Bias Tape Projects: What Else Can You Make With a Bias Tape Maker?
Once I stopped thinking of this tool only as a way to make binding, it became more useful.
Remember, the bias tape maker will fold straight-grain strips too.
That means you can use it for much more than finishing curved edges.
Here are some possibilities.
Fabric Ties
For ties that stay straight, you may not need to cut the fabric on the bias at all.
The tape maker gives you neatly folded edges without measuring and pressing each side separately.
Belt Loops
A narrow fabric strip with the raw edges folded inward can work well for belt loops, depending on the pattern and fabric.
Again, straight grain may make more sense than bias here because you generally don’t want belt loops stretching.
Decorative Trim
Make your own trim from the same fabric as the project or from a contrasting print.
This is especially useful when you can’t find ready-made trim in the color or print you want.
Appliqué Stems
Narrow folded strips can make beautiful stems and curved lines for appliqué.
For curves, bias-cut strips are helpful because they bend much more readily.
Celtic-Style Appliqué
Bias tape makers are often used for the narrow folded strips seen in Celtic-style appliqué.
The strips can curve and cross to create intricate-looking designs from surprisingly simple fabric tape.
Stained-Glass Quilt Effects
Narrow dark fabric strips can be used between colorful fabric sections to create a stained-glass look.
Fabric Lattice and Weaving
Straight folded strips can also be crossed or woven to create decorative fabric surfaces.
So yes, this little tool is called a bias tape maker.
But it doesn’t have to spend its entire life making bias binding.
If this bias tape tutorial was useful, save the pin below to your sewing board so you can find it again when you’re ready to make your own bias tape. And follow me on Pinterest for more sewing tips, tutorials, and useful tool ideas.