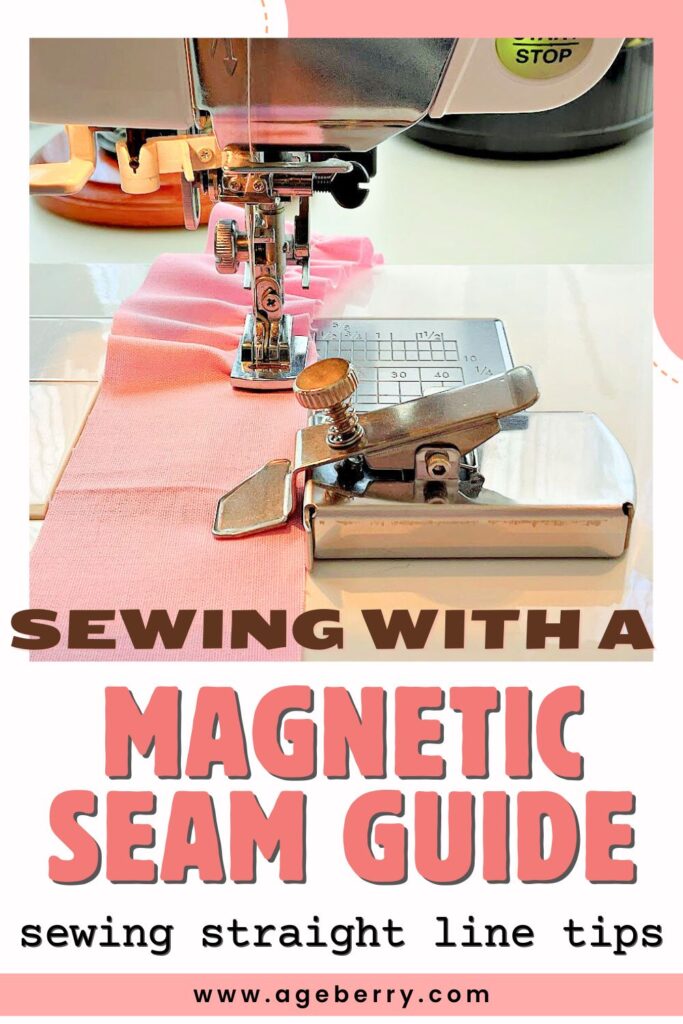
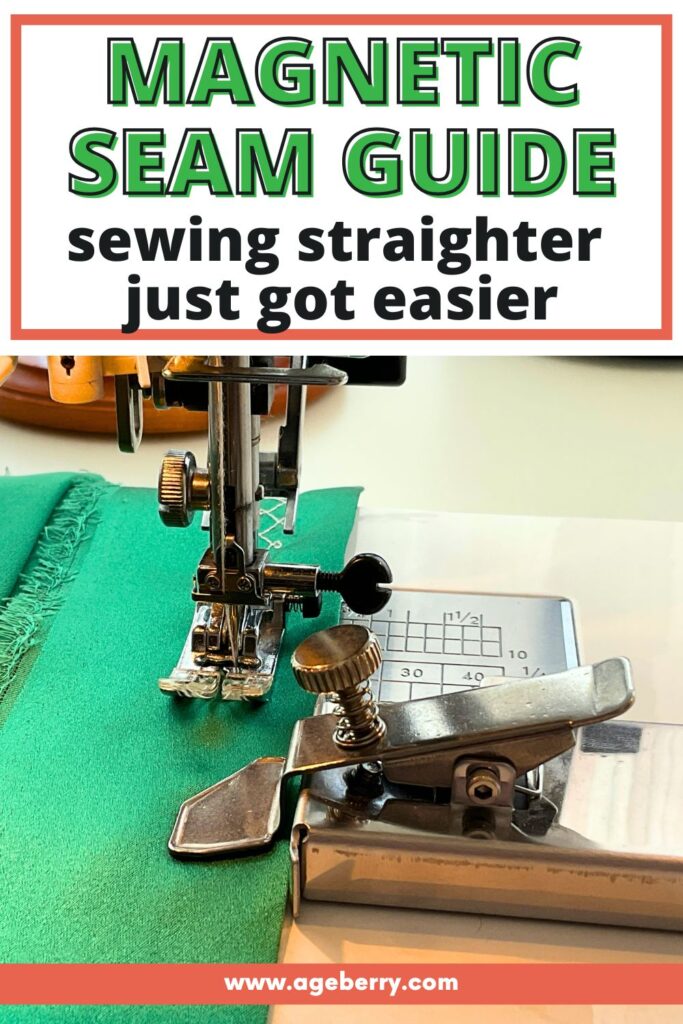
Magnetic Seam Guide Review – Sewing Straighter Just Got Easier
Let’s talk about sewing straight. Or more accurately, trying to sew straight while your fabric decides to go sightseeing across the needle plate. If you’ve ever eyeballed a half-inch seam and ended up with something closer to a generous three-eighths… or maybe a lazy five-eighths… then you know the pain. Precision? More like “close enough for homemade.”
Now, I’ve tried many seam guides. I’ve been sewing for years, and let me tell you—my love for seam guides runs deep. I collect them the way some people collect coffee mugs or cats.
Snap-on, slide-in, sticky, bendy—I’ve got a whole bunch of seam guides in my drawer. And yes, I actually use them. All of them.
Note: Some of the links on this page are affiliate links. This means I will receive a commission if you order a product through one of my links. I only recommend products I believe in and use myself.
So when Prime Day came around three days ago and this magnetic seam guide popped up with a 30% discount, it was basically destiny. It’s not an expensive tool to begin with, but hey—discounted sewing gadgets I don’t have? That’s my love language. Into the cart it went, and two days later it showed up at my door looking very confident about its new job.


Magnetic seam guides promise the same thing they all do: a consistent seam allowance without all the squinting and second-guessing. The difference is, this one sticks in place like it means it. Or at least, that’s what I set out to test.
And even if it’s not on sale anymore (Prime Day is over by now) I believe it’s worth considering.
✅Related tutorial: Seam Guide Tutorial: how to sew a straight line and keep seam allowances equal
First Impressions and Features
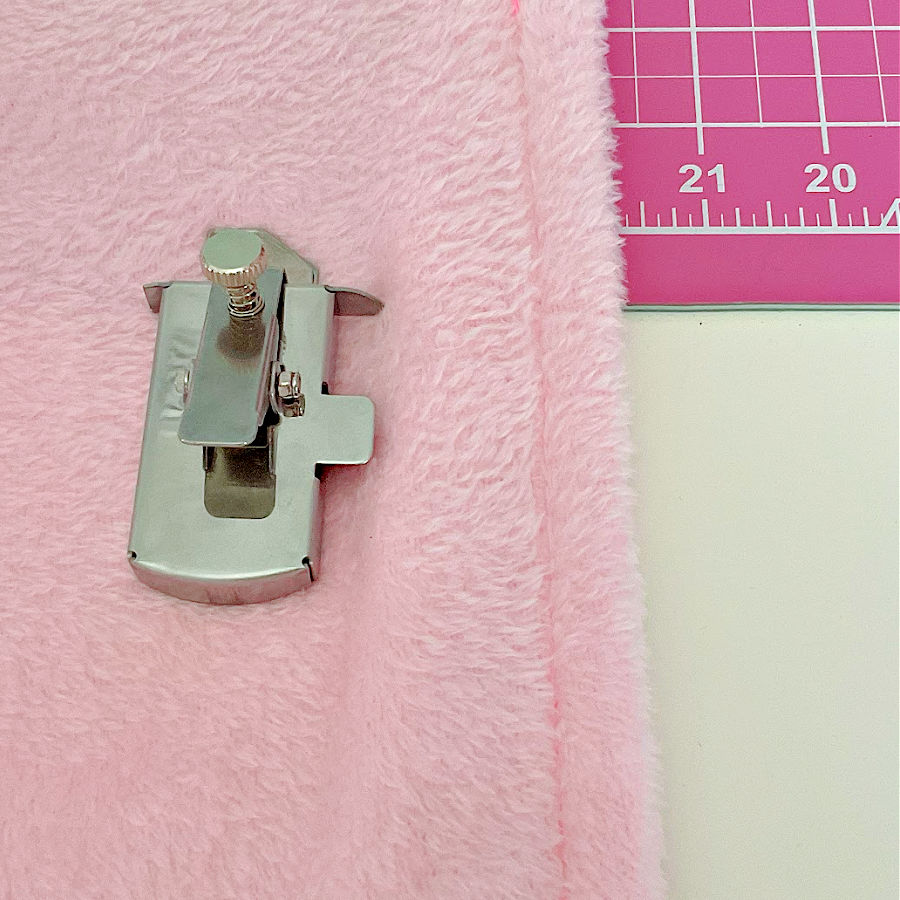
Out of the box, the magnetic seam guide is about the size of a … peanut butter candy. It’s solid, all metal, and has a nice bit of weight to it.
The magnet? Oh, it’s strong. You won’t knock this thing out of place unless you really try.
Now let’s talk about the parts that actually make this little gadget work its magic.
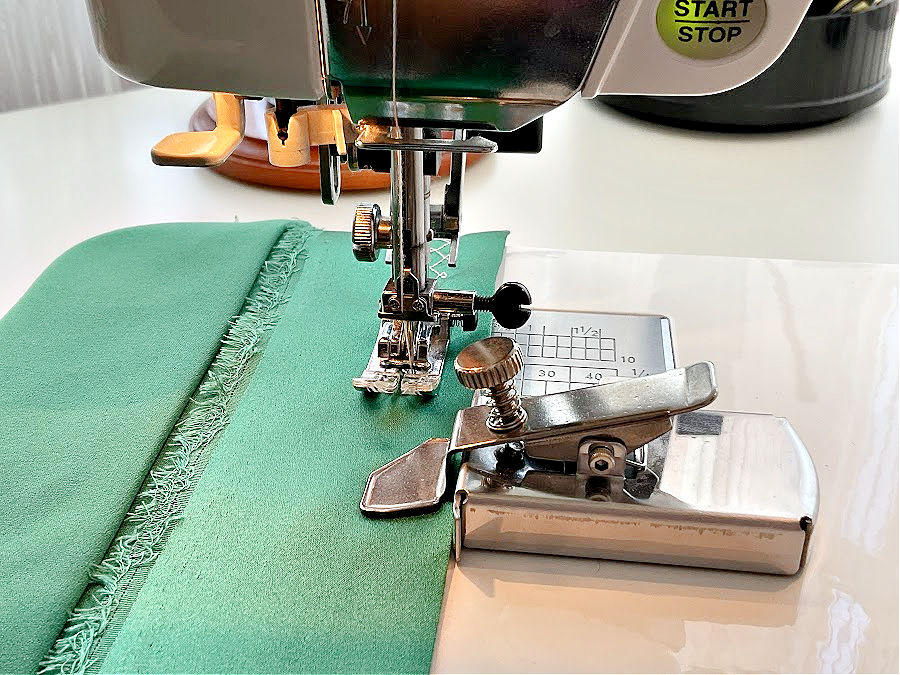
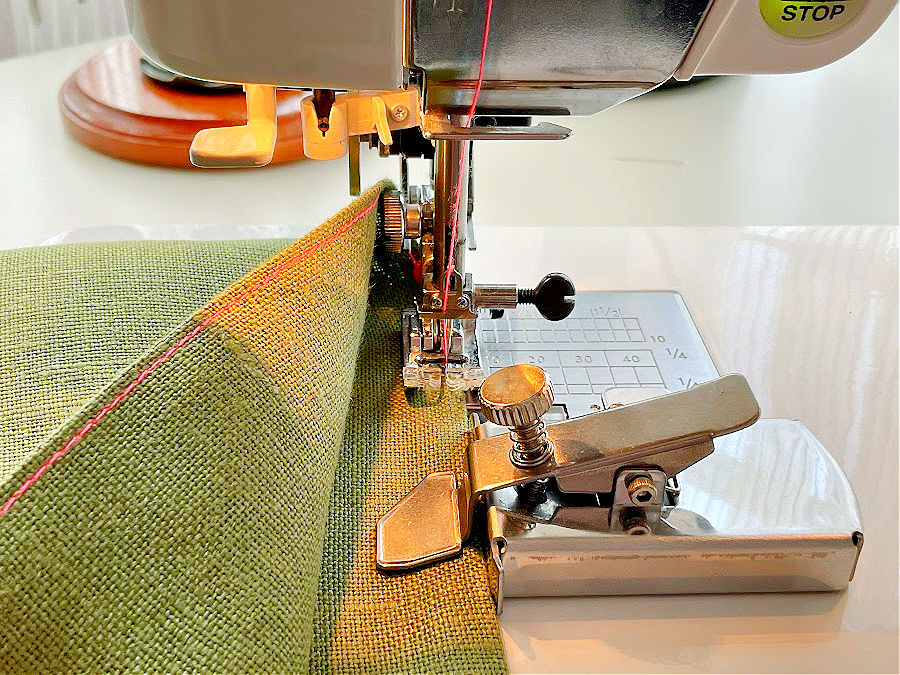
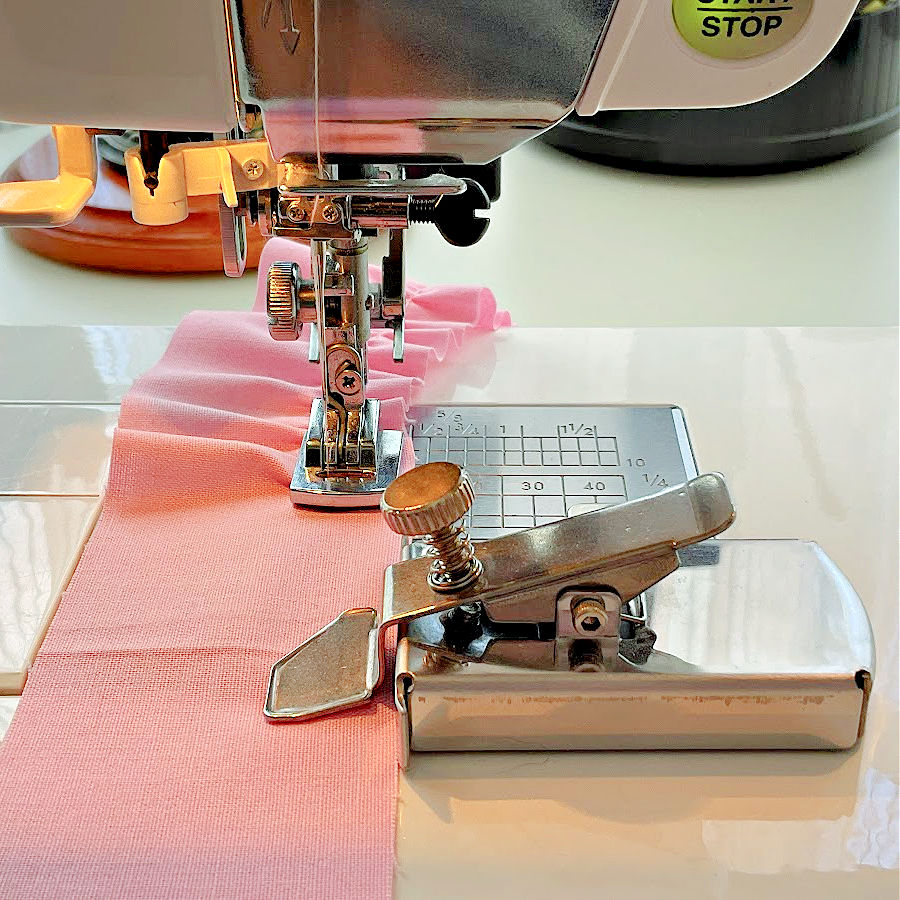
How does it work: the guide is mounted with the desired edge (it has two edges, flat and curved) at the desired distance from the needle. The flat piece of metal (the clip) presses on the fabric enough to keep it from puckering so if the fabric touches the edge the seam is always at a constant distance from the edge of the fabric.
The screw. It’s not just there for decoration. It holds the seam guide together and adds just enough height to give your fabric a reliable edge to ride against. When you tighten the screw, the clip presses down more firmly against your needle plate. This is great when you’re working with regular quilting cotton or any medium weight fabric.
But if you’re sewing something thicker—like fur, denim, or that fuzzy mystery fabric you bought because it was on sale—just loosen the screw a bit. That raises the clip slightly, giving thicker fabrics more room to glide underneath without getting squished or stuck.
Then there’s the clip-shaped edge on one side. This is the part that really earns its keep. That clip grabs onto your fabric edge just enough to guide it along without pulling or snagging. It’s not supposed to press hard on the fabric, just enough to keep it down. This is used only when sewing straight lines.
On the other side, there’s a rounded edge. This isn’t just a design flourish—it actually helps when you’re sewing curves. If you’ve ever tried guiding fabric around a neckline or armhole with a straight-edged seam guide, you know it can feel like trying to turn a shopping cart with a locked wheel.
But that rounded shape gives your fabric a smoother path to follow. It’s not a miracle worker—your hands still have to do a bit of guiding—but it makes curved seams feel a whole lot less rebellious.
There is a little bit of difference in mounting the guide for straight and curved seams. When sewing straight, the seam guide is installed a little in front of the presser foot. When sewing a curved seam, the center line of the guide is installed in line with the needle, as in the images below.
And best of all? This tool plays nice with almost every sewing machine out there. As long as your needle plate is flat and magnetic, the guide fits right in since it does not need any special attachment to the machine.
Quick note: this only works if your sewing machine’s needle plate is magnetic. Some fancier machines—especially computerized ones—have aluminum plates, which won’t hold a magnet no matter how much you wish they would. Mine? Nice flat metal plate, perfect match. But definitely give your machine a little magnet test before buying, unless you want a very stylish paperweight.
Overall, it feels well-made. No plastic parts pretending to be useful. Just one job—keeping your seams on track—and so far, it’s showing up to work.
How to Use the Magnetic Seam Guide
Using the magnetic seam guide is ridiculously simple. It doesn’t need screws, setup videos, or an engineering degree—just a flat metal needle plate and a little common sense (and maybe a few test stitches).
Here’s how to get started.
#1. Place the guide on your needle plate at the desired seam width
Want a skinny 1/8″ seam for delicate topstitching? Easy. Need a bold 2″ line of topstitching down the middle of your fabric? That works too. You’re not stuck with just the edge of your fabric. This guide is happy to hang out anywhere on the plate—center, side, or somewhere in between.
#2. Check your presser foot clearance
This is important. Before you start sewing, lower your presser foot and make sure it doesn’t touch the seam guide. Some presser feet, especially wider or specialty ones, can bump into it if the guide is too close. So reposition the guide slightly and try again.
This is true for both straight and curved seams.
#3. Line up your fabric and start sewing
Guide your fabric edge right up against the seam guide. No need to press or push. Just keep the fabric running smoothly along the edge, and your seam allowance will stay consistent without you having to hold your breath and squint.
Great for Decorative and Zigzag Stitches (Yes, They Need Even Seam Allowances Too)
In this example, I’m sewing on natural silk—yes, the slippery, shifty diva of the fabric world. And even with silk’s usual attitude, the magnetic seam guide did a great job helping me keep things neat and under control.

This is where this little gadget really impressed me: decorative stitches. Decorative stitching isn’t just about making something pretty—it also needs to be tidy and consistent, with even seam allowances—especially when you’re stitching near an edge or alongside a seam. Nothing ruins a row of delicate leaf or scallop stitches faster than drifting off track halfway through. And unlike straight stitches, it’s a lot harder to hide mistakes with a decorative one.
✅ Related tutorial: Sewing Tutorial: Embroider a Heart Using Decorative Sewing Machine Stitches
And this guide shines here. It gives your fabric a gentle fence to follow, whether you’re using a zigzag or one of those fancy “I-didn’t-even-know-my-machine-could-do-this” patterns.
If you’re new to decorative stitches or just want a refresher, I actually have a full guide with all the juicy details—what they are, how to use them, and how to keep them looking fabulous. You can find that here – Decorative Sewing Machine Stitches: Ideas, Projects and Inspiration.
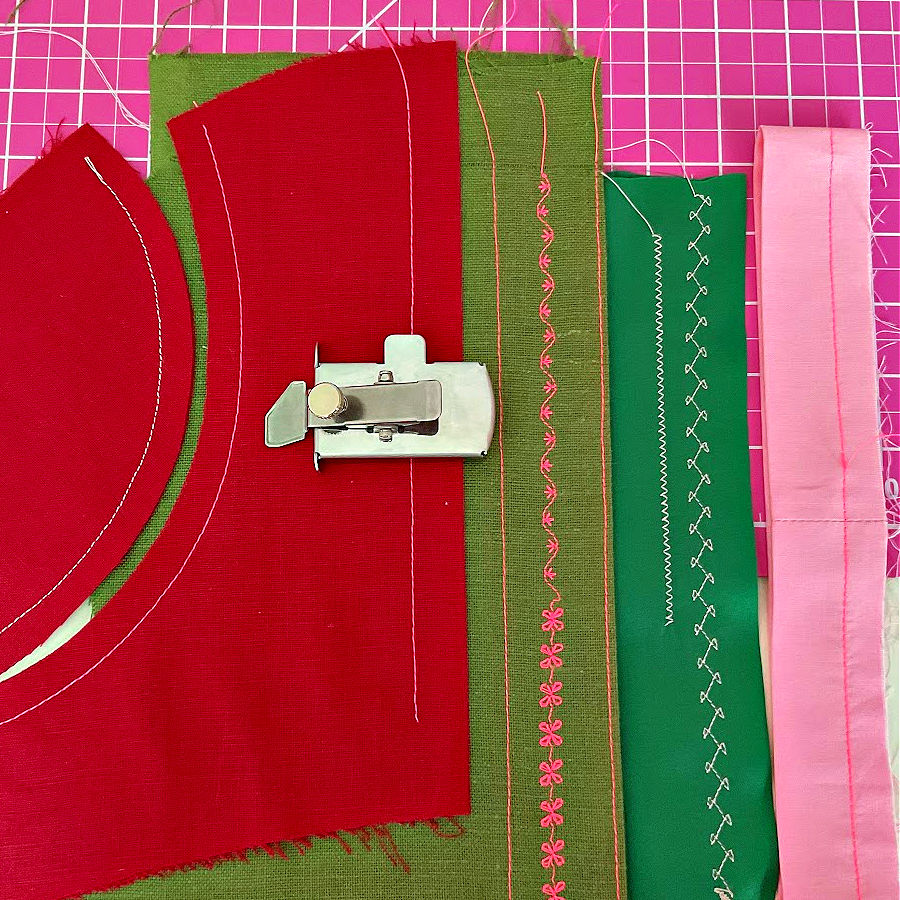
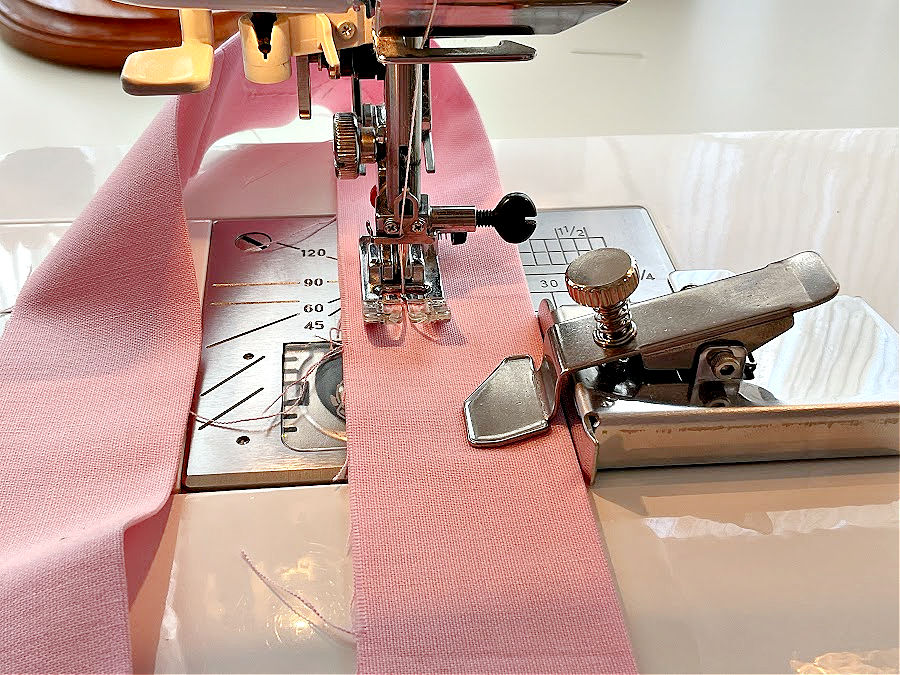
Testing on Linen: Straight Stitches and Decorative Precision
In this test, I used a medium-weight linen—not one of those thick upholstery beasts, but definitely heavier than your average quilting cotton. And wow, the seam guide didn’t flinch. I could sew right along the edge for topstitching, or swing it all the way out to stitch 1½ inches from the edge. That kind of flexibility is so satisfying—especially when your fabric actually listens and follows the line like it’s supposed to.
You can see in the photo how neat the seams turned out. I stitched two decorative patterns and two rows of straight stitches.
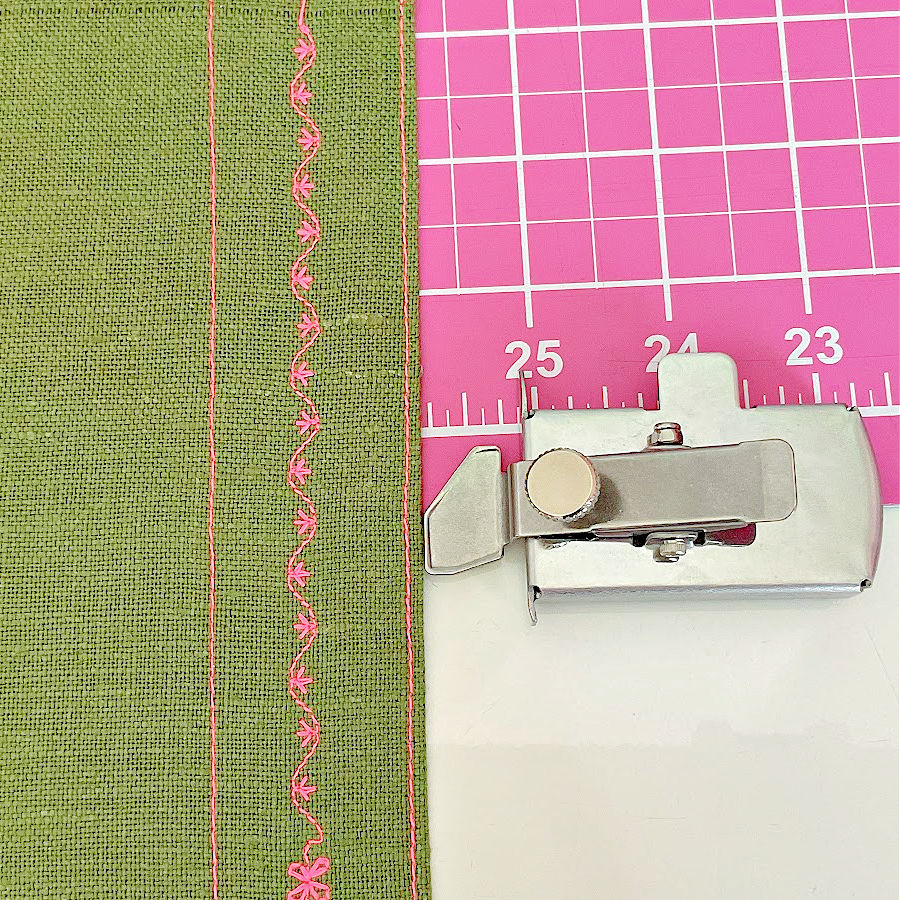
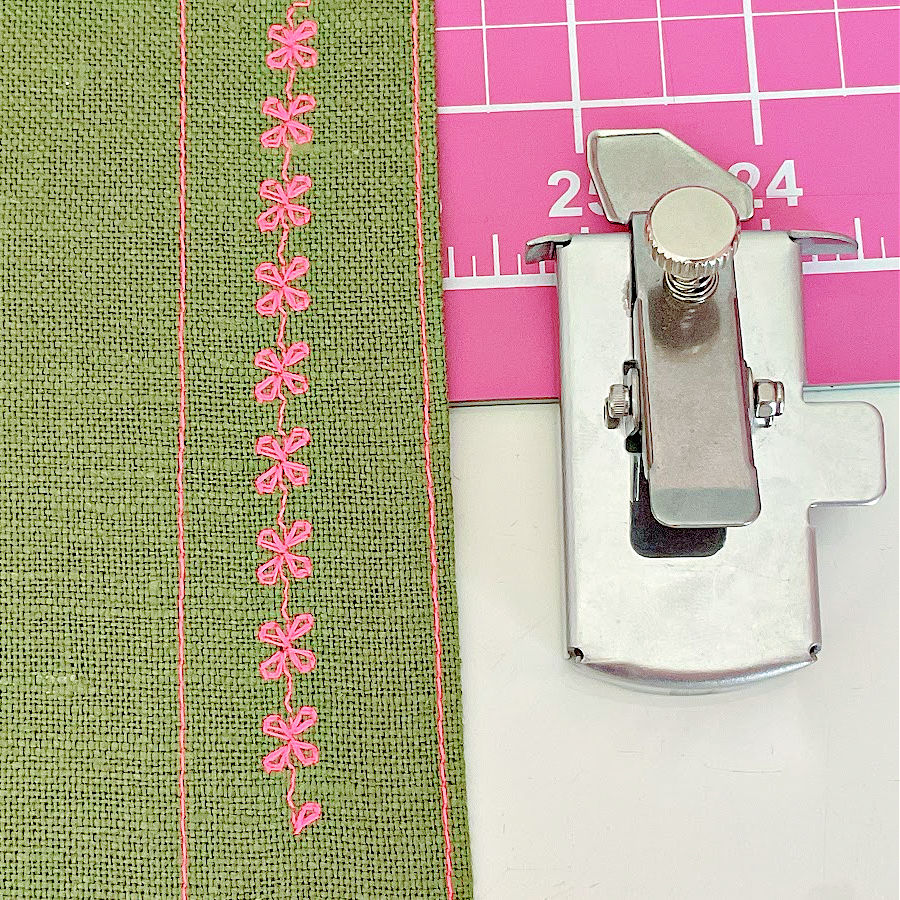
And look at those seam allowances. Every line is evenly spaced. There’s no drifting, no guessing, no oops-that-was-supposed-to-be-a-quarter-inch moments. Just clean, consistent rows. It was quick, too—no fussing, no marking lines, no double-checking every two inches.
The tool made it easy, and honestly, I liked it.
Great for Fur and Textured Fabrics
This seam guide works beautifully with textured and bulky fabrics, like faux fur. If you’ve ever tried to sew fluffy fabric before, you know it has a mind of its own. It slides, it shifts, and sometimes it even hides your seam line.
But this tool? It held its ground. That clip design really came through here. It gently presses the fabric from the side, giving you a reliable edge to follow—even when the fabric is lumpy or fluffy.
In the photo, you can see how I used it with faux fur.
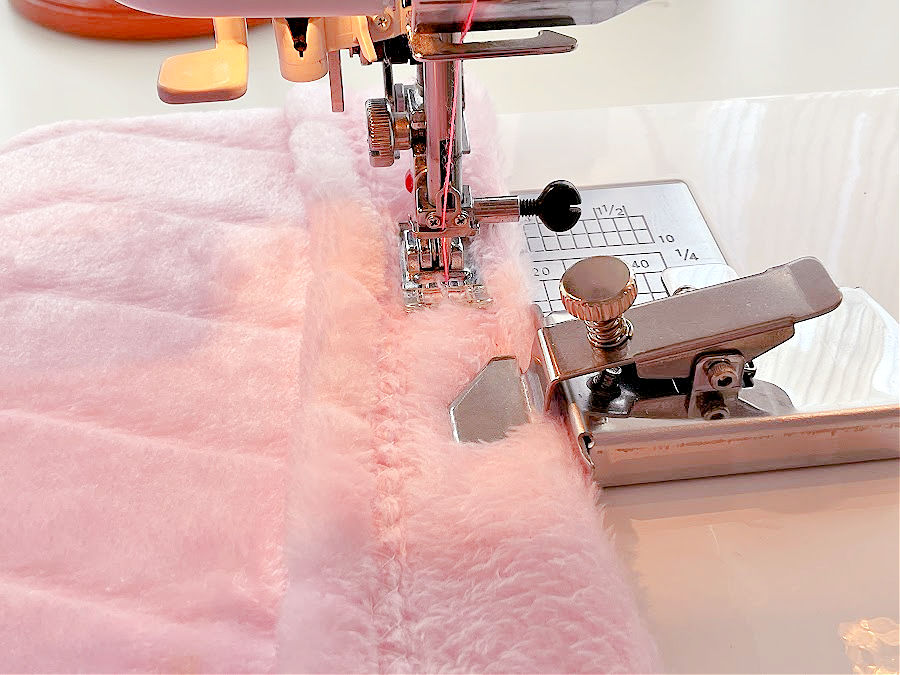
The seam line stayed consistent, the fabric didn’t wander off, and I didn’t have to wrestle with it the whole time. I also adjusted the screw to lift the clip slightly—this gave the fur a bit more breathing room under the guide.
So yes, this little gadget isn’t just for neat quilting cotton. It can absolutely handle the fluffier, fussier stuff too—and that’s when it really earns its spot in your sewing toolbox.
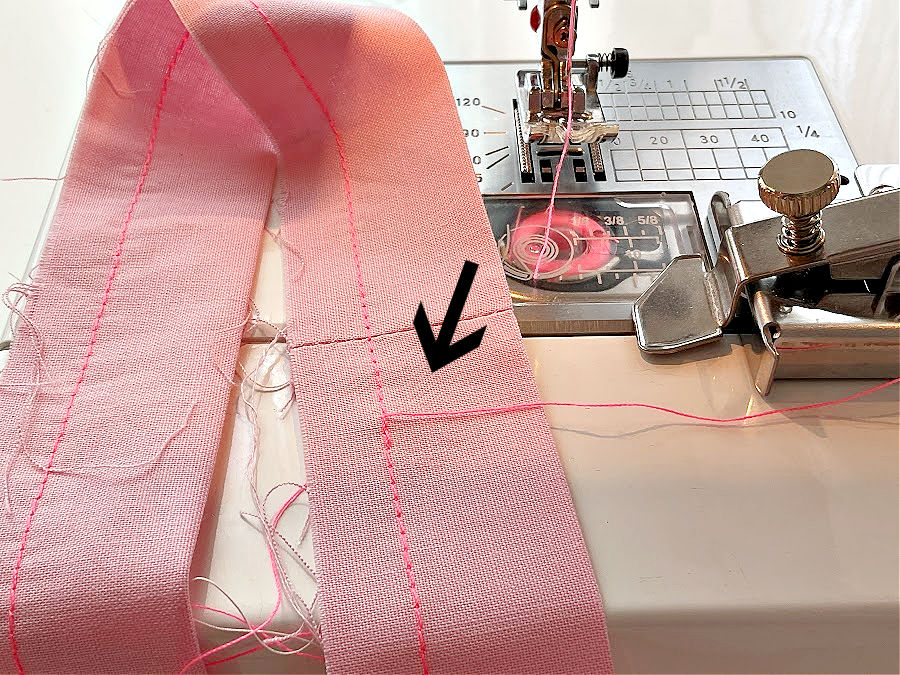
Perfect for Sewing in the Round
Here’s another test that sealed the deal for me: sewing in the round. You know those times when you need your starting and ending stitches to meet up exactly—no awkward gap, no “eh, close enough”? Yeah, that moment when perfection is not optional.
This seam guide absolutely came through.
I used it while stitching a loop. And look at that join in the photo—the stitches lined up properly.
It’s the consistency that makes it work. Once you’ve placed the guide, you’re locked into the same seam allowance from start to finish. That means when you come full circle (like hems, cuffs, headbands), your stitches actually match up.
Works with Different Presser Feet—Even the Tricky Ones
One of my favorite things about this seam guide? It doesn’t care what presser foot you’re using. Some tools get picky, but this one’s pretty easygoing.
I’ve used it with a walking foot. No slipping, no shifting—even when I was sewing through layers. And for this tutorial, I paired it with a gathering foot. Gathers can be unpredictable on a good day, but this guide kept my seam allowance from drifting all over the place. The gathers stayed neat, the seam was even, and it was fast, easy, and even satisfying to watch.
So yes—it works great with specialty feet. It fits right in with your setup, no matter what type of stitching you’re doing.
✅ Related tutorial: How to Use A Ruffler Presser Foot
That Curved Edge? It’s Actually Super Handy
So, I gave the curved edge of the seam guide a try—and I have to say, I liked it too.
I don’t usually expect much help when it comes to sewing curves. Most tools just look at the shape and say, “You’re on your own, friend.”
But the rounded edge on this guide actually made a difference.
I used it to sew a couple of curved seams, and it helped me keep a consistent seam allowance all the way around. And it works equally well on both inner and outer curve stitches, like in the image below.
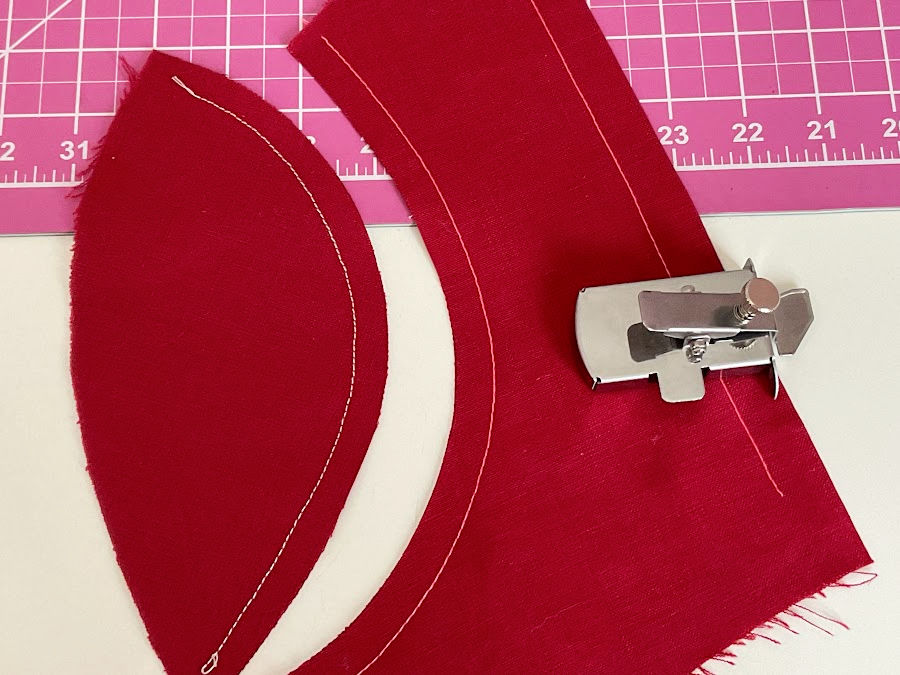
Was it perfect? No. You still need to guide the fabric gently, especially on tighter curves. But it was smoother, faster, and more accurate than trying to freehand it. And that’s a win in my book.
I don’t normally expect a magnetic seam guide to handle curves this well, but this one just…did.
✅ Related tutorial: How To Sew Curved Seams: 21 Helpful Ideas for Sewing Round Edges
Potential Drawbacks (Because No Tool Is Perfect)
As much as I like this seam guide, there are a few things you’ll want to keep in mind before you toss one in your cart.
First, this little helper is magnetic, and that means it’s not compatible with every sewing machine. Some machines—especially newer computerized ones—have aluminum or non-magnetic needle plates. And guess what magnets don’t stick to? Yep, aluminum. So before you get your hopes up, grab a fridge magnet and give your needle plate a quick test. If it doesn’t stick, this tool won’t either.
Second, even if your plate is magnetic, it needs to be flat. Machines with bumpy screw holes, weird cutouts, or raised measurement markings can cause the guide to sit unevenly or wobble.
Third, the magnet is very strong. Like, surprisingly strong. It’s great for keeping it in place while you sew, but when you want to move it? You’ll need to give it a proper pull—not a gentle nudge. I mean, it’s not going to require a crowbar, but don’t expect it to glide politely across your plate. It knows its place and it wants to stay there.
Now here’s the question I see all the time: “Can I use a magnetic seam guide on a computerized sewing machine?”
The answer? **Yes—**as long as your needle plate is magnetic. The guide sits on the metal plate, not near the computer parts. It doesn’t interfere with the electronics. You’re not placing it on the motherboard—you’re sticking it to a piece of steel. I’ve used it on my computerized machine without a single glitch.
Still, if you’re extra cautious, check your machine’s manual or ask your manufacturer. Some brands love to make things more complicated than they need to be.
What Do You Think?
Have you tried a magnetic seam guide before? Or maybe you’re just discovering how helpful one can be. I’d love to hear what you think—drop a comment below and tell me about your experience (or ask anything you’re wondering!).
If you want to try the exact one I used in this post, you can find it here:

And if you liked this tutorial, don’t miss the rest of my sewing tips, how-tos, and tool reviews. There’s a whole sewing room’s worth of ideas waiting for you on the site.
So… did this little seam guide just straighten out your sewing life a bit? If you’re thinking, “I should try that,” then trust me—save this pin to your sewing board now before it disappears into the Pinterest abyss. Because we both know that magical “remember later” moment never actually arrives. And while you’re pinning, why not follow me on Pinterest for more sewing tutorials, tool reviews, and clever tricks that make your stitches behave? Your fabric pile will thank you. Probably.
latest posts
- What Do You Call a Person Who Sews? I Asked My Readers and Got 1,408 Opinions
- DIY Round Purse: PDF Sewing Pattern and Detailed Instructions
- Mini Wonder Clips By Clover: Useful Sewing Tool Or Just Another Notion?
- Non-Slip Grips For Quilting Rulers: A Small Notion With A Useful Job
- Fabric Eraser for Sewing: What It Removes and When to Use It
- What Is The Best Thread For Sewing Machine Projects? Let’s Find Out!
- Butterfly Quilt Block Tutorial – Foundation Paper Piecing
- How To Sew Quilt Squares So The Corners Match
- Sewing With Fork Pins: How They Help With Pattern Matching, Slippery Fabric, And Seams