How to Use a Wing Needle for Hemstitching
I have recently discovered a weird needle in my collection. Well, I knew I had it, I just didn’t think about it until one day I found it and it occurred to me: this is an interesting piece of equipment which can really help us in some instances. You want a decorative stitch? The wing needle can do it. If you follow a number of simple rules. This article will try to explain what a wing needle is, how to use it and what are the (very simple) rules.
Of course it goes without saying, the first rule is keep your hands away from the needle when in action 🙂 Kind of a general rule, I would say.
Wing needles are typically associated with heirloom sewing (the kind your grandmother was doing). Perhaps because it leaves holes in the fabric, the way a manual sewing needle does. When sewing manually we tend to use thicker needles, especially as our eyesight goes South, and it is probably natural to do that. Of course, this is a personal assumption. But the reality is, the kind of stitch a wing needle does looks very much like an older decorative stitch.
In this article, I’ll show you how to use a wing needle to create an artistic hem stitch to add a touch of elegance to your sewing. I’ll cover the best fabric to use, the type of thread to choose, and the sewing machine settings that will work best with a wing needle. I had to learn myself the technique of using this needle, and in the beginning I was not very successful. But after getting some experience, the results were very nice.

What is a Wing Needle?
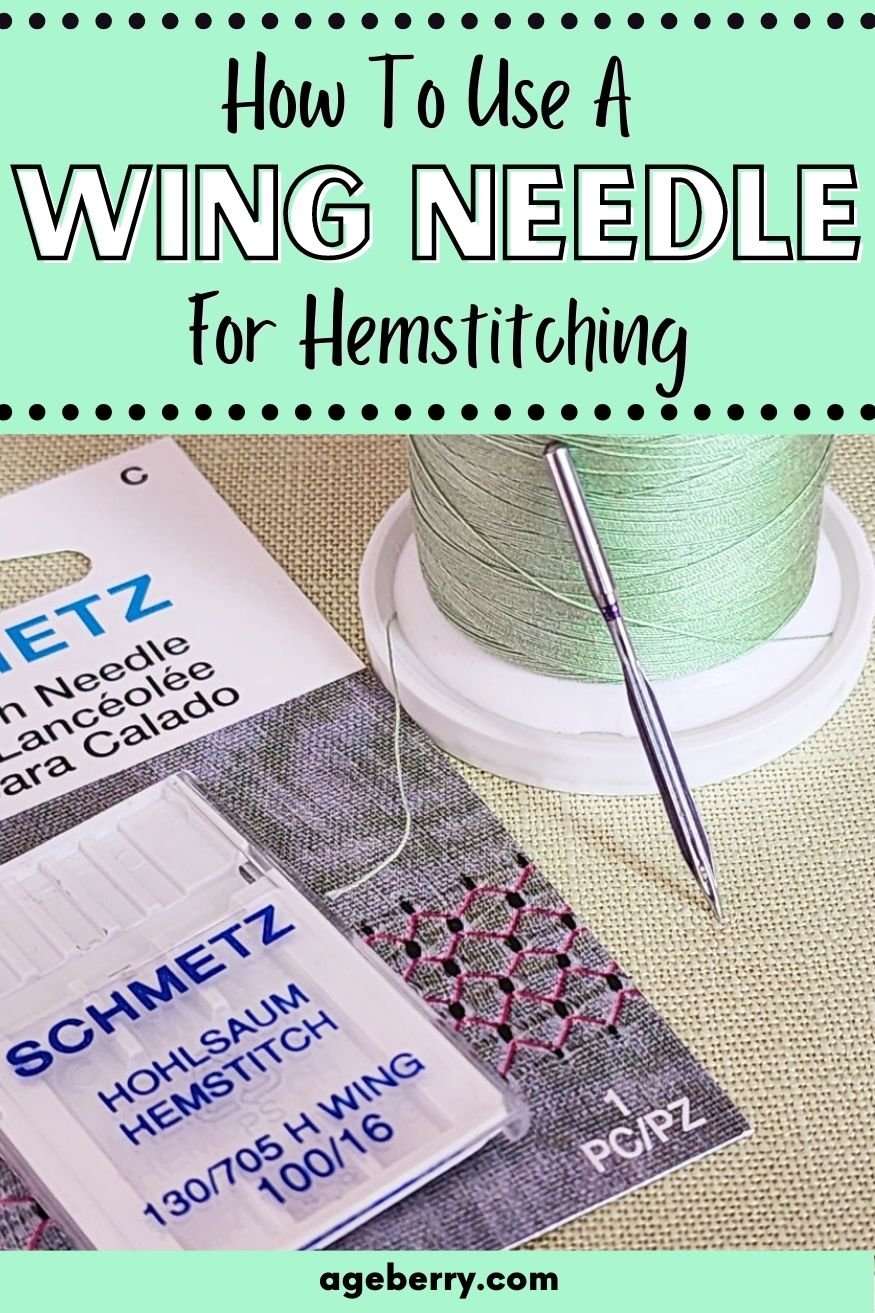
A wing needle, also known as a hemstitch needle, is a specialized sewing machine needle with a unique feature. It has wings or fins on each side of the shaft. No, it does not fly. Not even very low 🙂. These wings, combined with the fabric movement, create small holes in the fabric as the needle penetrates it. This is what gives the stitch the decorative effect, the holes look pretty much like an embroidery. The wings push the fabric threads aside, creating a lacy look that is perfect for hemstitching, fagoting, and heirloom sewing.
Note: “Fagoting” is a type of decorative stitch. Merriam-Webster dictionary describes it as “an embroidery produced by pulling out horizontal threads from a fabric and tying the remaining cross threads into groups of an hourglass shape” (Fagoting Definition & Meaning – Merriam-Webster).
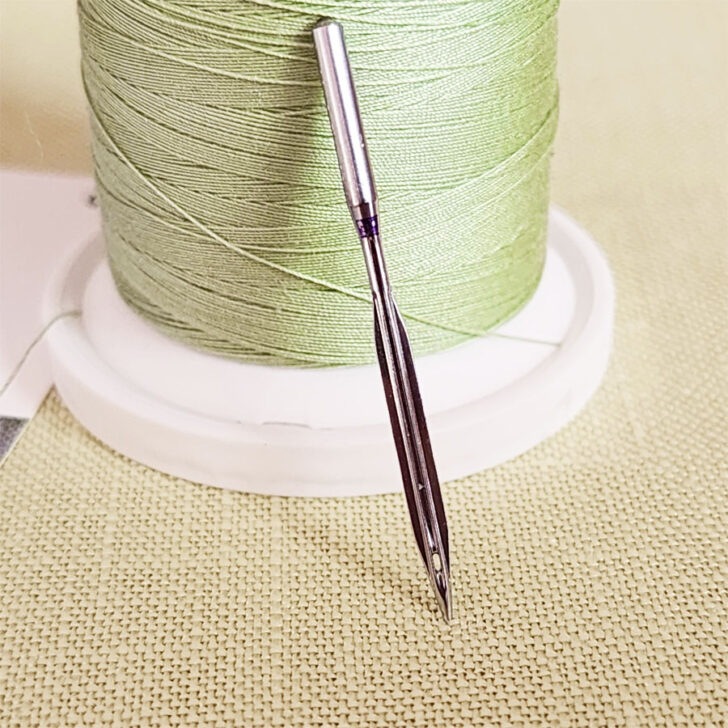
Wing needles come only in two different sizes, 100/16 and 120/19 which makes them larger than the standard sewing machine needles used for everyday sewing. I am using a Schmetz wing needle 100/16 in this tutorial. For thicker material you might need the bigger needle.
✅ Related tutorial: Everything You Ever Wanted to Know About Schmetz Needles
Note: Some of the links on this page are affiliate links. This means I will receive a commission if you order a product through one of my links. I only recommend products I believe in and use myself.
Why am I using the Schmetz needle? Because I like the brand, it usually has good quality needles. And besides it is the cheapest option on Amazon right now. You can easily find them at your nearby fabric store in the notions section alongside other sewing machine needles. Or you can buy them at Amazon which I prefer because for me the fabric stores are quite a distance away.
Note: did you know that they make twin needles, one of them with wings? I did not know either. I just bought one to try. Check this out: twin wing needle at Amazon.


In case you wonder if you need a special throat plate or presser foot for your sewing machine, the answer is probably no. But you will probably not use the wing needle with a straight stitch. The decorative effect is best created with a zigzag stitch. So you will need to use the throat plate and foot that accommodates the width of the zigzag width you selected.
As I said before, I had to learn to use the wing needle. But with some practice and patience I have achieved good results. I needed to adjust the stitch width and length to accommodate the needle’s size and until I obtained the desired decorative effect. Also, as a general rule, it is also essential to use the correct thread and stabilizer to prevent the fabric from puckering or stretching. Remember to test on scrap before working on the actual project.
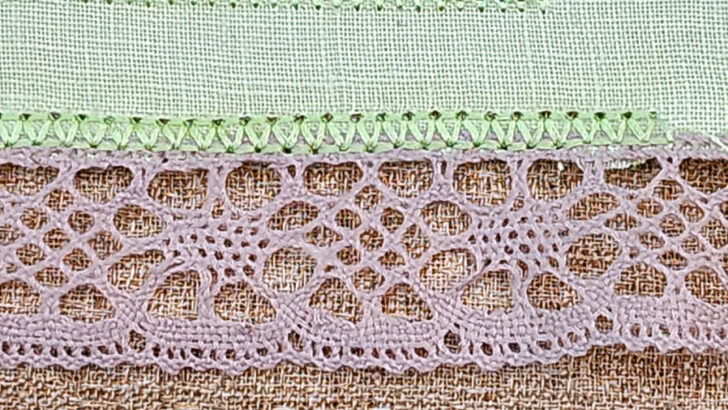
Where can you use the wing needle? In my opinion, pretty much everywhere you need a decorative stitch. Traditionally probably items like christening gowns and table linen are good examples. But you can also add unique accents to regular clothes and accessories. It can be an interesting way to secure a facing, or sew a hem, while also adding an elegant decorative touch. I also like to use a wing needle for attaching lace. Here is an example:
What Fabric to Use with a Wing/Hemstitch Needle
The best fabrics to use with a wing needle or hemstitch needle are medium to heavyweight natural fiber fabrics – linen, cotton, and 100% wool. These fabrics can withstand the pressure of the needle and the tension created by the hemstitching process. They also have enough weight to hold the stitch in place and create a crisp, defined hemstitch.
Remember that the decorative effect is created by the tiny holes in the material. Tiny alright, but still holes.
Lightweight fabrics such as silk, chiffon, and satin are not recommended for use with a wing needle. These fabrics are delicate and can easily be damaged by the needle, leaving behind unsightly holes or puckering. They also lack the weight and stability needed to hold the stitch in place, resulting in a messy or uneven hemstitch. The holes might be too large here.
Another reason sheer fabric is not suitable for use with a wing needle: the decorative effect is created by the color contrast between the material color and whatever is under the top layer. The normally hidden layer becomes visible through the small holes. Therefore sheer fabric is probably not suitable for a wing needle use since the contrast would not be easy to create.
Also, knits and other stretchy fabrics are not suitable for hemstitching with a wing needle. The fabric’s “stretchiness” will cause the hemstitching to stretch out of shape, and the needle may cause the fabric to pucker or warp. It is best to use a stretch or a ballpoint needle when sewing stretchy fabrics.
✅ Related tutorial: All About Modern Types Of Knit Fabric
What Thread to Use with a Wing/Hemstitch Needle
I never use cheap, low quality thread in my sewing machine. Never. In fact, in my article Sewing thread types and uses I am going a little further:
I feel that nobody is the holder of the absolute truth and what may be right for me, might be not-so-right for someone else, but I strongly feel that you should not do the following:
- Buy cheap no-name thread sold at dollar stores or other discount stores.
- Buy old threads of the type found in garage and estate sales without trying them individually, and even then, be cautious.
Always use a high-quality thread. Thread is not expensive; why create more problems for yourself by using low-quality threads that can break or fray? Low quality threads leave lint, and cleaning your sewing machine is not a cheap operation. I suggest opt for a thread that is strong, durable and has a smooth finish.
Very good threads to use with a wing needle are 40 weight embroidery threads, polyester or rayon. These threads are available in a wide range of colors so you’ll have plenty of options to choose from for your project. Embroidery threads have a smooth finish, which helps them glide through the fabric easily. And we are also making an ornamental stitch here, it makes sense to use a nice thread.
Sometimes I also use high-quality 100% cotton thread. This type of thread is strong enough to withstand the pressure of the needle and it produces a crisp, well-defined hemstitch. Cotton thread is also easy to work with and readily available in a variety of colors.
I like these threads – New Brothread Multi-Purpose 100% Mercerized Cotton Threads. They’re smooth and soft, but at the same time strong. Buying them in sets gives you a very attractive price. Thyu are available in many color combinations, it is very likely you will find a set suitable for your purposes. I have used them on an embroidery machine at high speed (higher than a regular sewing machine), they won’t break or fray.
Another good option is an all-purpose polyester thread, which is also quite strong and durable. But you can reward more about threads in the related article below.
✅ Related tutorial: Sewing thread types and uses
On the other hand, there are some threads that are not suitable for use with a wing needle. Avoid using serger threads, as they can break or fray during the stitching process. Serger threads are cheaper but not as strong as regular threads. Also, avoid using metallic threads or wooly nylon threads, as they are not suitable for the wing needle.
✅ Related tutorial: Wooly Nylon Thread | What It Is And How To Use
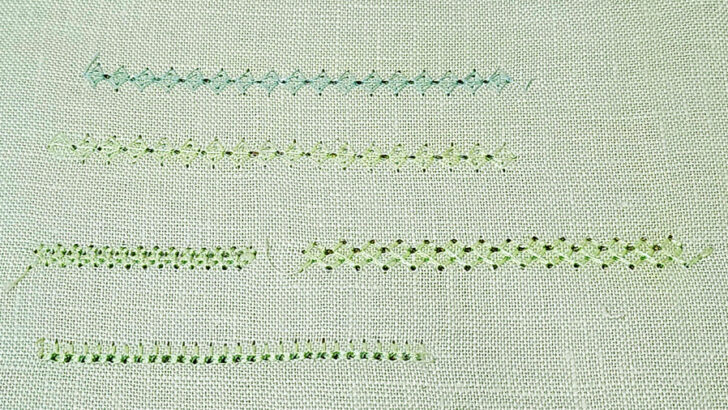
Because we have a decorative stitch, I encourage you to experiment with different thread colors to create unique designs. One option is to choose thread colors that match the fabric being used but ared not identical. For example, I’m using green fabric, and I use lighter green thread for the wing needle.
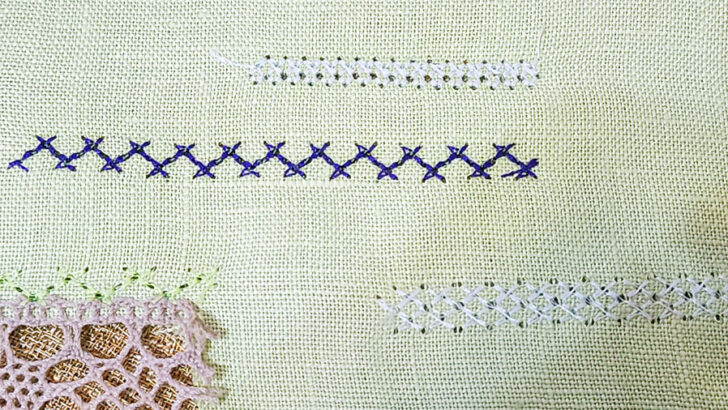
Or you can choose different thread colors to create a contrasting design that really pops. But try to choose lighter colors for light fabric as holes are not very visible with darker colors as you can see in this image.
Preparing Fabric for Sewing with a Wing Needle
Puckering is bad. If you don’t bel;ieve me, I have some examples in my article Seam puckering: what it is, how to avoid it, how to fix it. To reduce puckering, especially on thinner materials, you need to make sure that the fabric is stabilized and ready for the needle. There are several methods for preparing fabric for wing needle sewing, including the use of spray starch and stabilizers.
Spray starch is a popular option for preparing fabric for wing needle sewing. It is used to stiffen the fabric and make it more stable during stitching. To use spray starch, simply spray a light mist over the fabric, then iron it to evenly distribute the starch. This will create a crisp, stable surface that is ideal for wing needle stitching. However, it’s important to test it on a small area of the fabric first.
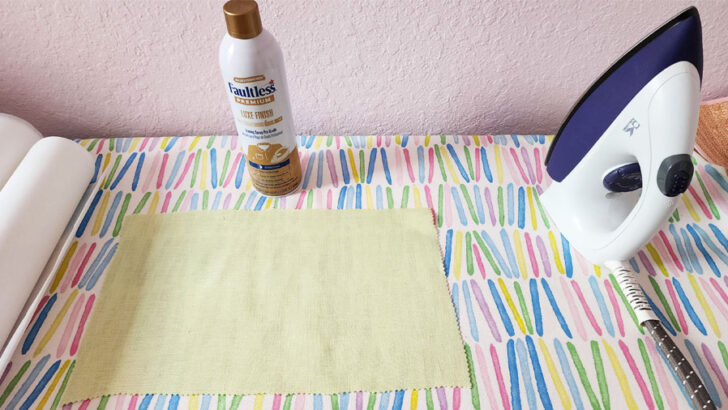
I starched my green fabric but it was not enough because the fabric is not heavyweight. So I had to add a stabilizer for extra stability during stitching.
✅ Related tutorial: The Essential Guide To Spray Starch: What It Is | How To Use It | Types
Stabilizers are another option for preparing fabric for wing needle sewing. I like to use either tear-away and wash-away varieties. They are readily available in any store. If you are like me, an online shopping person, you can find them at Amazon: tear away stabilizer offers, wash away stabilizer offers.
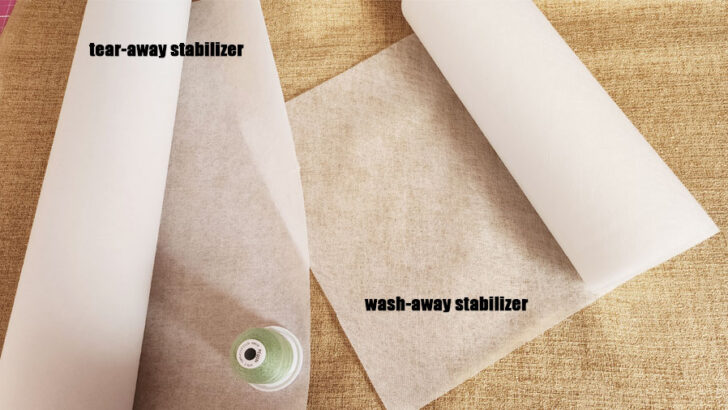
Tear-away stabilizers can be torn away after stitching and wash-away stabilizers dissolve when the fabric is washed. I prefer a wash-away stabilizer for this green fabric because I can be sure that all of the stabilizer will dissolve in the wash, leaving no residue behind. If I look at the wrong side of the fabric it becomes free of stabilizer after washing.
But if I use a tear-away stabilizer, small pieces of the stabilizer will become trapped in the stitches and can’t be completely removed. For this reason, whenever I can use wash away stabilizer, I use it. Of course if the item can not be washed, you have to use the tear away version.
Note: You can hemstitch on a single or double layer of fabric if you need to sew a single fold hem for example.
How to Use a Wing Needle: Step-by-Step Instructions
Before you start sewing with a wing needle, set up your sewing machine. Here are some steps to follow.
Step 1. Insert the wing needle into your sewing machine
- Turn off the machine: Always turn off the sewing machine before you insert a needle. This will prevent any accidents from occurring and ensure that the needle doesn’t accidentally move while you are inserting it.
- Remove the old needle: If there is an old needle already inserted into the machine, remove it by loosening the needle clamp screw or pushing the needle up and out of the clamp. Store it properly, or else you will find it with your foot later.
- Insert the new needle: Hold the new needle with the flat side facing the back of the machine. Push the needle up as far as it will go into the needle clamp, making sure it is inserted all the way to the top.
- Tighten the needle clamp screw to tighten the needle into place. Make sure the needle is straight and secure before tightening the screw.
- Check the needle position. Lower the presser foot and turn the handwheel towards you a few times to check that the needle is in the correct position. The needle should pass through the center of the presser foot and be able to move up and down freely.
- Verify that the needle is not going to strike the throat plate, either the sides or back/front. You may need to reduce the stitch width if it touches the sides, or you may need to change the throat plate. If the needle touches the front or back, either the needle is not inserted properly, or is already bent and therefore not good to use.
These needles are very thick and heavy and can damage your machine if they hit something.
Step 2: Choose a presser foot
Attach the appropriate presser foot for hemstitch sewing. Depending on the sewing machine manufacturer, this may be designated as an “N” foot or another specific letter. Refer to the sewing machine manual for specific instructions. If there are no specific instructions about hemstitching, use the foot recommended for zigzag.
Step 3: Thread the Machine
Always make sure your sewing machine is threaded correctly, and the wing needle is no exception.. Thread your machine as you would normally do.
If your machine has an auto threader, don’t use it. A wing needle needs to be threaded manually, manufacturers even indicate this in their sewing machine manuals (for example, this tip from Brother).
✅ Related tutorial: How to thread a needle on a sewing machine
Wind a bobbin, preferably with the same thread you will be using in the needle. But it’s not a must – for example, I used embroidery thread at the top and cotton thread in the bobbin. I started to use cotton thread in the needle too, following the principle tto use the same thread in both needle and bobbin. But the color didn’t match the fabric so I changed it to embroidery thread at the top because that is the visible thread. I could have changed the bobbin thread too, of course.
Step 4. Adjust the Tension
You will need to adjust the sewing machine tension to prevent the fabric from puckering or stretching. The tension depends on many factors but usually I sew with the normal tension (around 4).
Sometimes lower tension on your machine can work better with the wing needle. Test on scrap and you will find out.
✅ Related tutorial: Sewing Machine Tension Adjustment
Step 5. Select the Stitch
Not all stitches work well with a wing needle; for example, the straight stitch is not really good. Check your sewing machine manual for specific stitch options, you can test and swee which work well with a wing needle. The most common stitches to use with a wing needle are special hemstitches, which can make it easier to achieve the desired results.
Many modern sewing machines come with a variety of hemstitches and they are marked as such in the manual or the menu. If the manual doesn’t specify hemstitches, look for stitches that go into the same hole a few times.
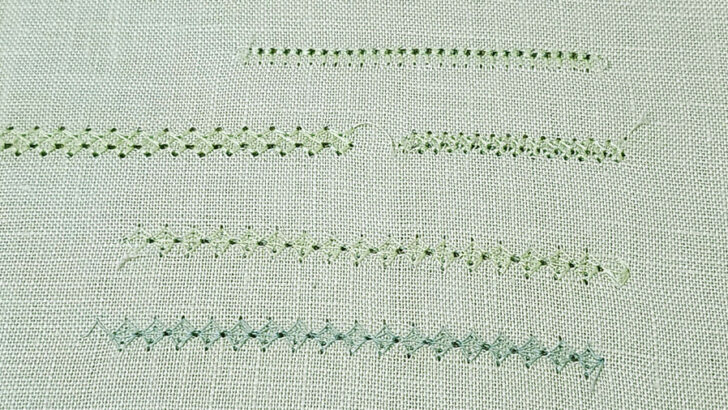
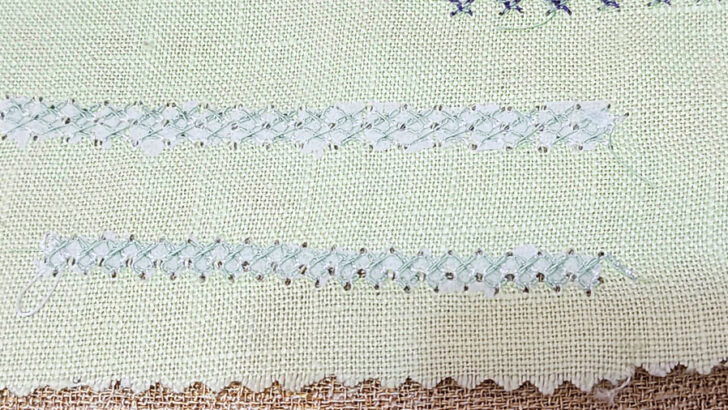
You can create many different designs with hemstitching. Here are examples of hemstitches from my Brother Luminaire machine.
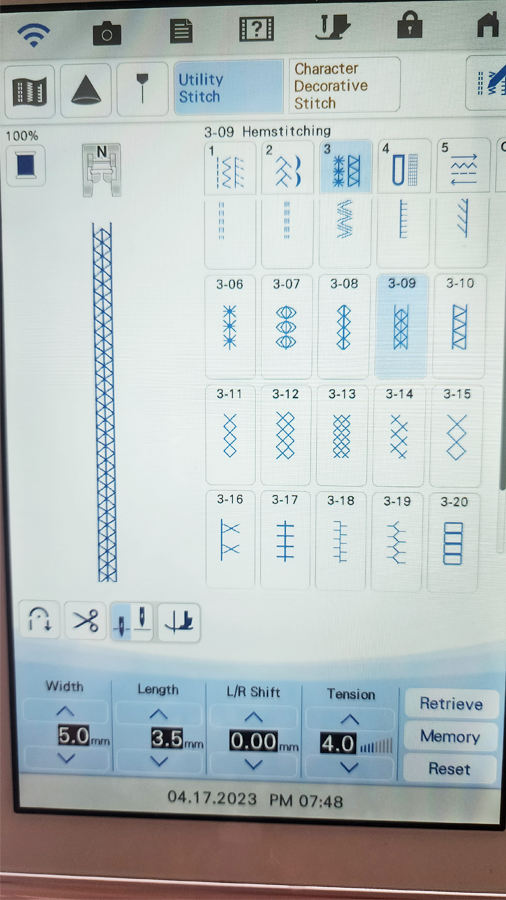
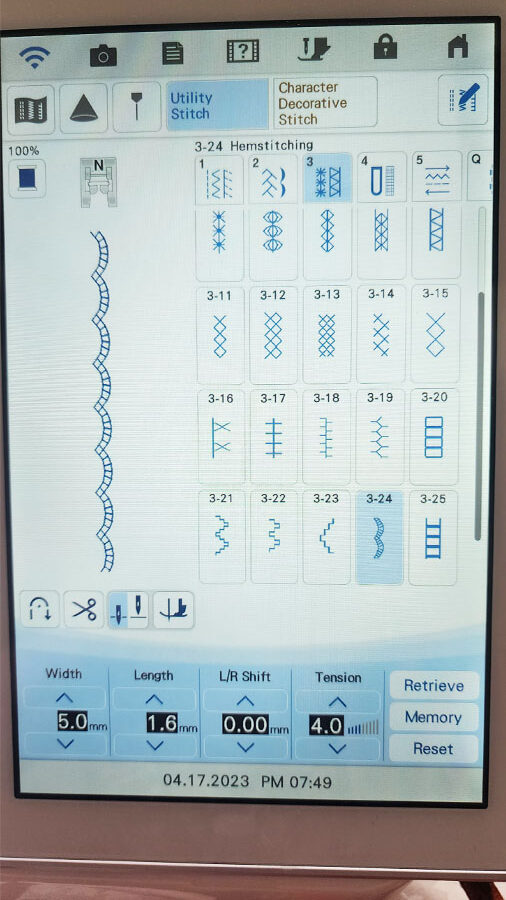
Step 6. Adjust the Stitch Length and the Stitch Width
The ideal stitch width and length vary from stitch to stitch and the final decorative effect depends heavily on both the stitch type and the stitch length.width. A longer stitch length will create a more prominent stitch. I like to make the stitch wider and longer most of the time. Again, test before.
Step 7. Test your machine
It is also important to test your machine before starting your project. In fact, I probably mentioned “test” at each step in this article. Here are some steps to follow:
- Choose a scrap piece of fabric that is similar to your project fabric.
- Sew a few test stitches to check that the needle creates the desired stitch.
- Check the tension and stitch length and width to ensure that they are correct for the fabric you are using and adjust if necessary
- Inspect the stitching on the fabric to ensure that it is neat and even.
Sewing Techniques
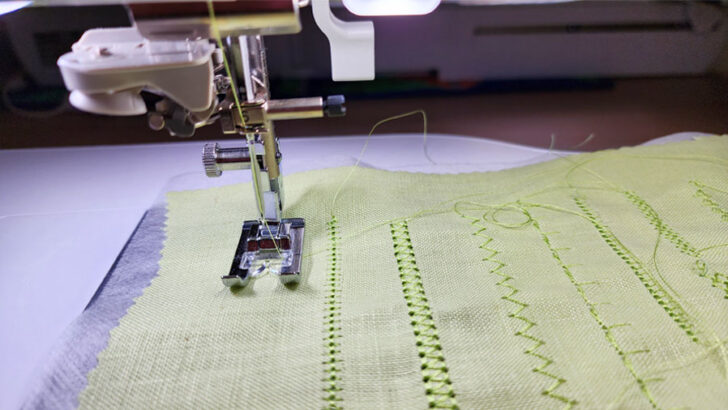
Place the fabric under the presser foot and begin sewing. Start slowly and use a steady pace to allow the wing needle to create small holes in the fabric. A steady pace is really essential here.
After completing the hemstitching, gently remove any stabilizing material. You may need to trim any excess stabilizer fabric close to the stitching – use duckbill scissors in this case.
Press the completed hemstitch to set the stitches and create a crisp, professional finish.
Did you find this tutorial helpful? If so, save this pin (see below) on your sewing board so you can come to the article later when you need this information on how to use a wing needle for hemstitching, and follow me on Pinterest for more tips, tutorials, and inspiration!
latest posts
- Types Of Sewing Machine Feet And Their Uses
- The Interfacing Cutting Guide: Methods, Folds, and Seam Lines
- Steam or Dry Heat for Fusible Interfacing: Which Actually Works
- Essential Sewing Tips: How to Apply Fusible Interfacing Correctly
- Types of Interfacing Explained: Woven, Non-Woven, Knit, Fusible, and Sew-In
- Fabric Eggs DIY: Quick Easter Craft Decorations From Scraps
- Stuffed Bunny Sewing Pattern And Tutorial (Free Download)
- Sewing Machine Basics: Simple Maintenance Tips Every Sewist Should Know
- Interfacing vs Stabilizer: Is There Really a Difference?