
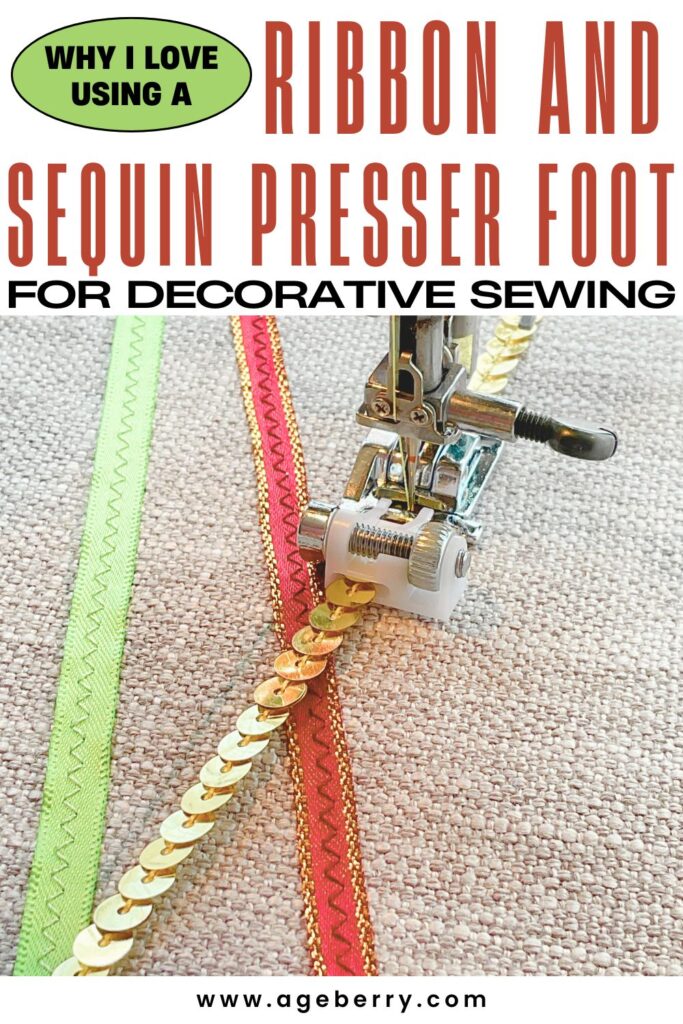
How to Sew Sequins and Ribbons onto Fabric Using a Special Sequin Presser Foot
I still remember the first time I tried to attach sequins for my daughter’s dance costume. I wanted to add a little sparkle to the hem of her dress. I didn’t have the Sequin Presser Foot, but I figured I could sew them on with my regular presser foot. The problem? The strand of sequins kept shifting as I sewed. I couldn’t baste them, and glue wasn’t an option. No matter how carefully I tried to guide them, they wobbled from side to side, and the stitching wasn’t as straight as I wanted.
That’s when I knew I needed a better solution and bought the Sequin Presser Foot. It makes decorative stitching so much easier.
I’ve used this foot for all kinds of projects, from simple ribbon embellishments to multi-layered decorative trims. In this sewing tutorial, I’ll show you how it works and share a few tips I’ve picked up along the way. If you’ve ever struggled with keeping trims straight while sewing, this sewing machine presser foot guide might be exactly what you need.
What is a Ribbon Sequin Presser Foot?
The Sequin Presser Foot is a snap-on foot designed to make sewing ribbons, trims, and strung sequins easier and more precise. It features built-in guides that hold the ribbon or sequin strand in place, allowing them to feed evenly as you sew.
By using this foot, you can easily attach decorative elements, keeping your hands free to guide the fabric while the foot ensures even stitching.
It comes in two sizes:
- 7mm for machines with a maximum stitch width of 7mm (this is the one I use).
- 9mm for machines with a maximum stitch width of 9mm.
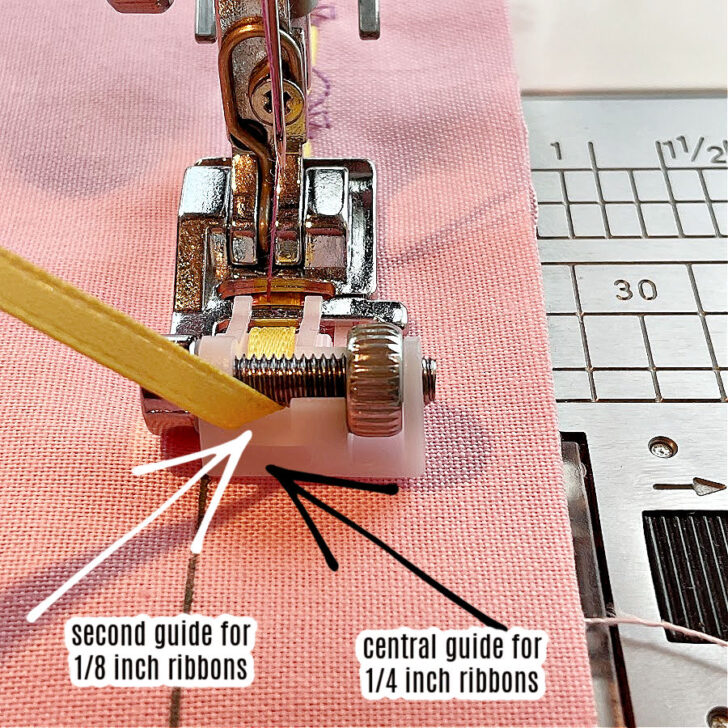
I use the 7mm version with my Janome machine, but this foot is also compatible with many Babylock, Elna, Pfaff, and Singer models that support snap-on presser feet.The main feature of this foot is its central guide, designed for standard ribbons and sequin strands that are ¼ inch wide (6.4 mm). This guide holds the trim securely in place as you sew, preventing shifting or twisting.
This foot works great for:
- Sewing a single ribbon or trim – the most common use.
- Attaching a strand of sequins – keeps them straight without basting.
- Using different stitches – straight, zigzag, or decorative stitches to secure trims in place.
Using the Ribbon Sequin Presser Foot with a Double Needle
It stands to reason: when using decorative stitches, you might as well consider using a twin needle, as one reader pointed out to me. So I decided to try this. The result? Please see below image:
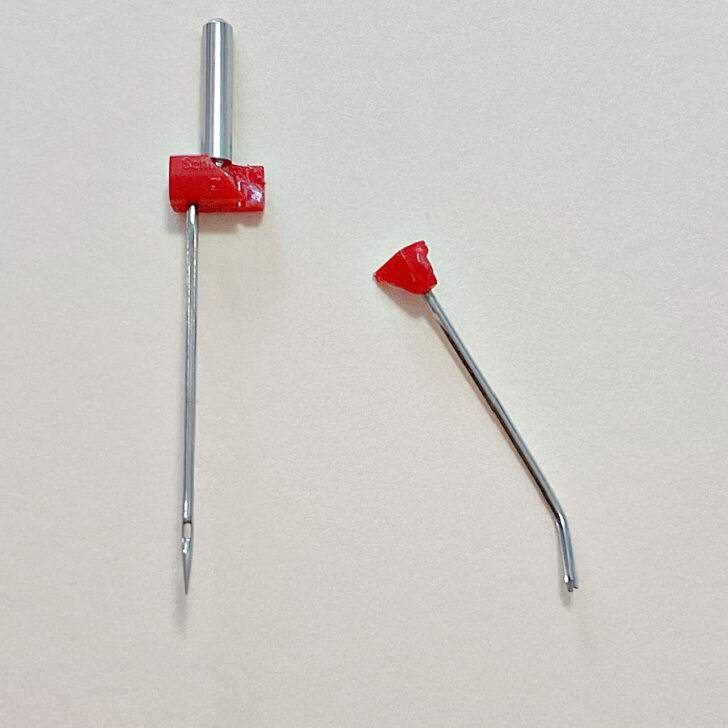
I asked then my husband to measure the size of the foot needle opening and for the zigzag stitch this is about 1/2mm larger than the one for the ribbon foot I have. Visually, it seemed the same size to me, but when I tried it on a piece of fabric …
Remember that not all feet are the same, perhaps other types have a larger opening. Perhaps the particular stitch I used was too wide. Perhaps I made a mistake and did not tighten the needle enough (I don’t think so, but it’s possible). Perhaps only the smallest twin needle can be used. No matter what, the result for me was not pleasant.
The conclusion is: if you want to use a double needle with this foot, select the stitch type you want to use then test for a couple of stitches by manually moving the machine needle. Make sure there is enough clearance for the needle on both sides. Make sure the needle does not come in contact with the foot at all during stitching. If the needle grazes the foot, it’s not ok – remember that at higher speed the needle may come even closer to the foot than at low speed.
I did not do that; I relied on my visual “inspection” and now I need to buy another double needle. Not counting that I needed to hunt for 20 minutes for the pieces of the needle on the floor (but I did find them all!). Now back to our subject.
For most projects, I use it to attach a single ribbon because standard decorative ribbons fit perfectly into the guide.
Note: Some of the links on this page are affiliate links. This means I will receive a commission if you order a product through one of my links. I only recommend products I believe in and use myself.


But the foot actually has two openings at the bottom, so you can insert even narrower ribbons and even stack two layers of ribbons for a decorative effect.
Sewing Ribbons with the Sequin Presser Foot
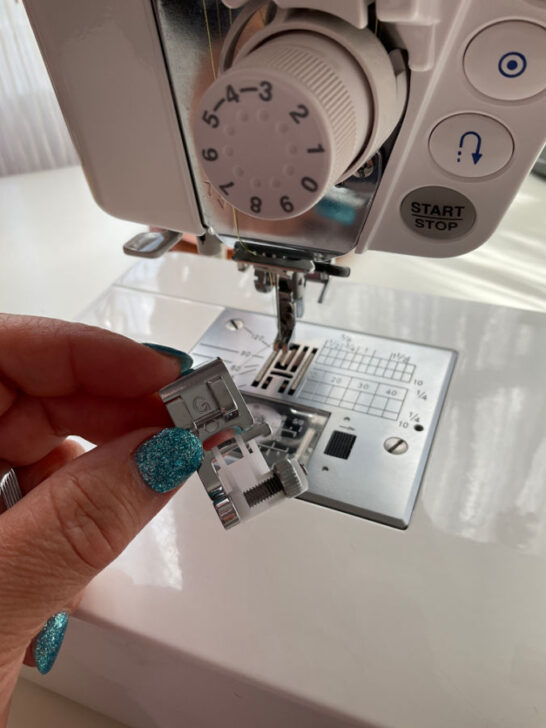
Installing the Foot
- Remove the regular presser foot from your machine.
- Attach the Sequin Presser Foot, making sure it clicks securely into place.
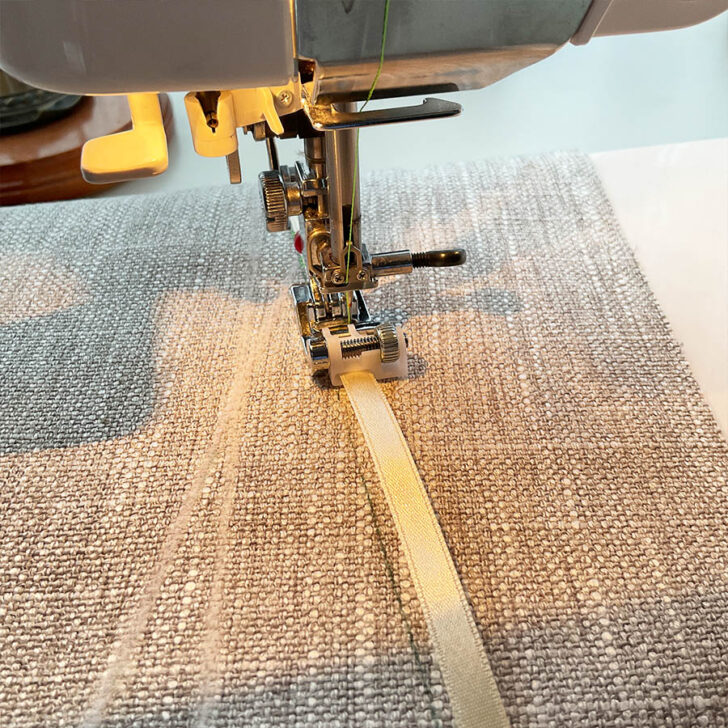
- Thread the ribbon or sequin strand through the guide of the foot. Ensure it feeds smoothly without twisting.
Adjust your sewing machine settings – choose a stitch type (straight stitch, zigzag stitch, or decorative stitch), stitch width, stitch length, etc. Adjust thread tension as needed. Choose the correct needle and thread.
✅ Related tutorial: How to Change a Presser Foot on Your Sewing Machine
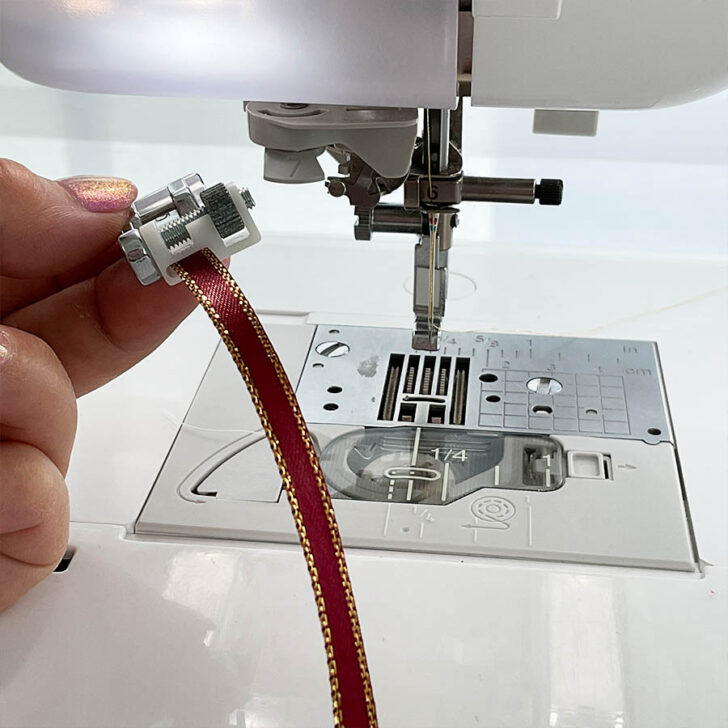
How to Sew Ribbons with the Sequin Presser Foot
- Insert the ribbon into the guide on the presser foot. Make sure it feeds smoothly.
- Mark a guideline on the fabric if you need to keep the ribbon perfectly straight.
- Start sewing slowly, letting the foot guide the ribbon while you focus on keeping the fabric steady.
I’ve found that drawing a guideline on the fabric before sewing makes a difference in keeping everything straight. But here’s the important part – this guideline isn’t where the ribbon will be sewn. Instead, it’s a placement guide for the presser foot itself.
Where to Position the Guideline
The plastic rectangle on the presser foot, which holds the ribbon in place, has a left edge. That left edge of the rectangle should align with the guideline as you sew. This way, the ribbon stays centered within the guide, and the stitching remains perfectly straight.
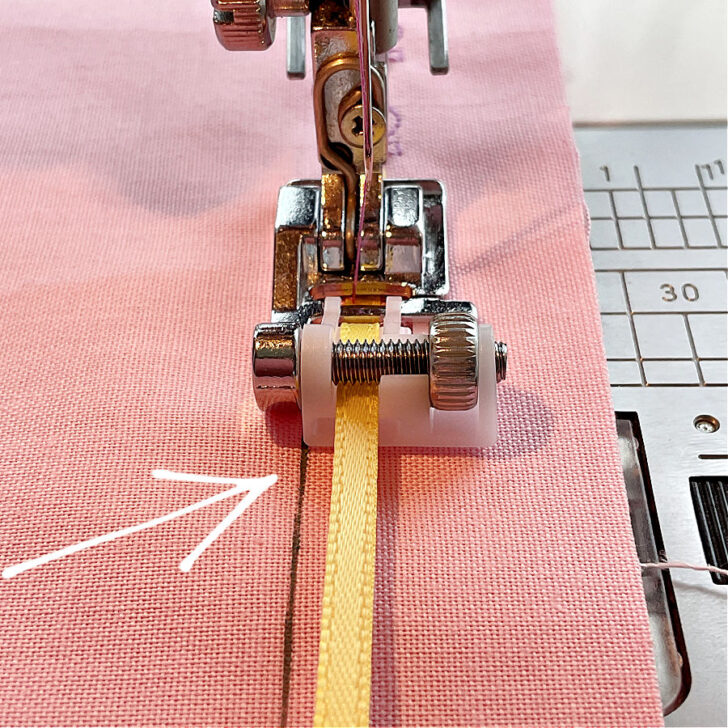
You can see this in the image – how the left side of the plastic guide follows the drawn line. By focusing on keeping the foot aligned with the guideline, rather than the ribbon itself, I get much better results.
Best Tools for Marking the Guideline
For marking the guideline, I like to use a heat-erasable pen. These pens create clear, visible lines and disappear with heat – so a quick press with an iron removes any marks after sewing.

Madam Sew Heat Erasable Fabric Marking Pens
But depending on the fabric, I sometimes use:
- Air-erasable markers – The ink fades on its own over time, which is great for projects I’ll sew right away.
- Water-soluble fabric markers – The lines disappear with water, making them a good option for fabrics that might be heat-sensitive.
- Tailor’s chalk – Ideal for dark fabrics, though it can rub off if handled too much.
- Hera marker – Creates a crease instead of a visible line, perfect for delicate fabrics where ink or chalk might leave residue.

![LEONIS Water Erasable Fabric Marking Pen Blue 5 Count Pack [ 78008 ]](https://m.media-amazon.com/images/I/41z8SEIoPNL._SL500_.jpg "LEONIS Water Erasable Fabric Marking Pen Blue 5 Count Pack [ 78008 ]")

")
✅ Related tutorial: Your Guide For Choosing The Best Quilt Marking Pens For Every Project
Stabilizing Thin Fabrics for Sewing Ribbon
Some fabrics are just too thin to support the Sequin Presser Foot properly. Since the foot has a plastic guide and a bit more weight than a standard presser foot, it can sometimes pull or drag delicate fabrics out of shape.
You may notice this when sewing lightweight cotton, silk, or thin synthetic fabrics – the fabric might not stay flat.
To fix this, I like to use fusible interfacing before sewing. Adding a layer of lightweight or medium-weight interfacing gives the fabric more stability, so it stays flat under the foot. This makes it much easier to sew ribbons without puckering or stretching the fabric.
✅ Related tutorial: How To Use Fusible Interfacing (Video + Tips And Tricks)


Types of Stitches to Use with the Sequin Presser Foot
One of my favorite things about using this presser foot is that I’m not limited to just a straight stitch. I love decorative stitches – they add even more interest to the ribbon and make the project unique. And since my sewing machine has so many beautiful built-in stitches, why not use them?
Decorative stitches do more than just hold the ribbon in place. They create texture and enhance the look of trims. I also like to play with different threads, combining colors and textures to make the stitches stand out even more.
✅ Related tutorial: Decorative Sewing Machine Stitches: Ideas, Projects and Inspiration
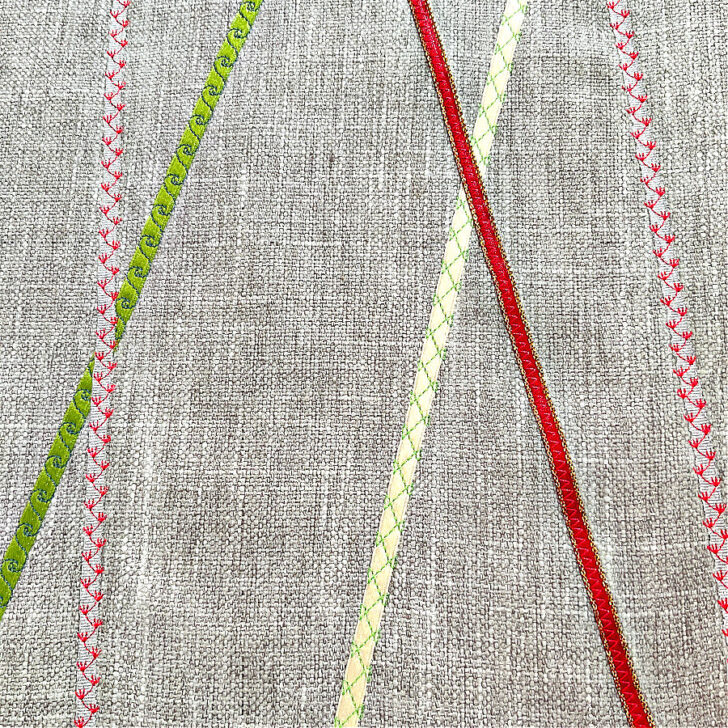
Let’s take a closer look at the stitches on the yellow, green, and silver ribbons.
The yellow ribbon has a delicate crisscross pattern stitched in bright green thread. The design creates a lattice effect, making the ribbon look almost quilted.
The green ribbon features a wave-like decorative stitch, done in blue thread.
The silver ribbon – the contrast between the bold red and the metallic silver makes it look even more intricate.
I love experimenting with different stitches and thread combinations – it’s a great way to turn a simple ribbon into a decorative feature. And with so many stitches on my sewing machine, there’s always something new to try.
But sometimes a simple zigzag stitch is the good choice. For the red ribbon with gold edges, I didn’t want to cover up the metallic trim with stitching. A zigzag stitch was the good solution – it secured the ribbon without hiding the decorative edges. I love that I can switch between decorative stitches for some ribbons and zigzag for others, depending on the look I want.
✅ Related tutorial: Mastering the Zigzag Stitch on a Sewing Machine
How to Sew Sequins with the Sequin Presser Foot
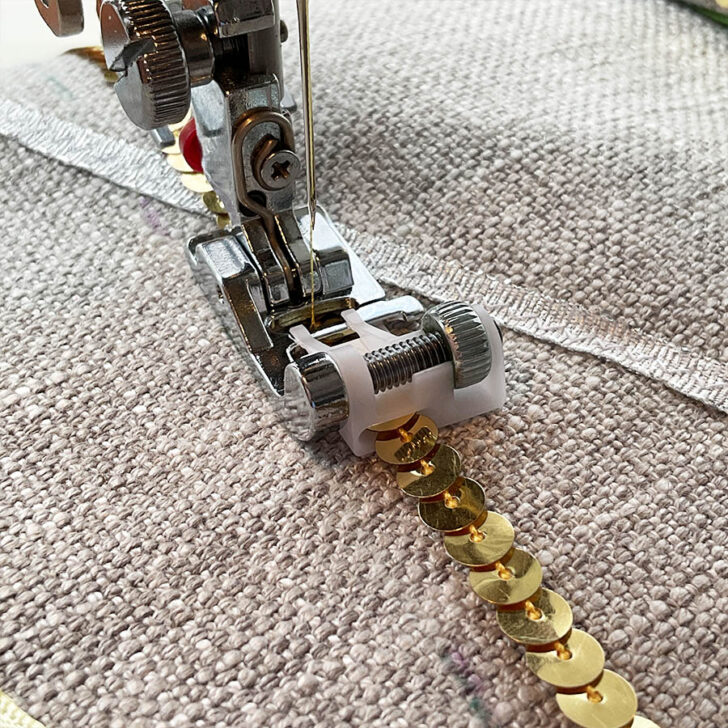
I use a straight stitch down the center of the sequin strand, which keeps everything secure while allowing the sequins to remain flexible and visible. But the key to getting this right is properly inserting the sequins into the foot. If they aren’t positioned correctly, the foot won’t glide smoothly, and the sequins may flip or shift as you sew.
Step 1. Preparing the Sequin Strand
- Make sure the sequins are strung in a continuous line (not individual loose sequins).
- Check that the sequins lay flat and are all facing the same direction.
- If the strand is twisted, gently adjust it before inserting it into the presser foot.
Step 2. Inserting the Sequins into the Foot
- Place the sequin strand into the central guide of the presser foot.
- Ensure the sequins are feeding smoothly from the spool or strand.
- Position them so they are lying flat and slightly tilted downward toward the fabric. This helps the foot glide over them instead of getting caught.

Step 3. Adjusting Machine Settings
- Stitch Type: Straight stitch (sewn directly down the center of the sequins).
- Stitch Length: Set to 4.0 so the needle doesn’t hit too many sequins.
- Thread Tension: Adjust as needed for your fabric and sequins.
- Needle Type: Use a sharp or universal needle, but be prepared to replace it if it dulls from hitting sequins.
Step 4. Sewing the Sequins
- Lower the presser foot carefully so the sequins remain in place.
- Begin sewing slowly, guiding the fabric and making sure the sequins continue feeding smoothly.
- If a sequin gets caught under the foot, pause, lift the foot slightly, and reposition the strand before continuing.
- Finish with a backstitch or lockstitch to secure the end of the sequin strand.
Troubleshooting Common Issues
- Sequins flipping up while sewing? Make sure they are inserted so they lay flat toward the fabric, not upward toward the foot.
- Foot not moving smoothly? Check that the sequin strand is feeding evenly and that none are getting stuck under the foot.
- Needle hitting sequins? Increase the stitch length slightly so the needle lands between the sequins, rather than on them.
When the sequins are inserted properly, the foot glides right over them, making it easy to sew a perfectly straight, secure row of sparkle.
Tips for Best Results with the Sequin Presser Foot
There are a few things I always keep in mind to get the best results.
1. Always Test on Scrap Fabric First
Before sewing on my actual project, I test on a scrap piece of the same fabric. This helps me check:
- If the trim is feeding smoothly.
- If the stitch type and width look good.
- If I need to adjust thread tension or stitch length.
2. Clean Your Machine After Sewing Sequins
Sequins can leave behind tiny plastic shavings that build up inside the machine. After sewing sequins, I brush away any small plastic bits and check the bobbin area for debris.
3. Press with a Pressing Cloth
Pressing the fabric after sewing trims makes the project look crisp. But I never press directly on sequins, ribbons, or decorative stitching – they can melt or flatten under heat. I use a pressing cloth to protect the trims and press from the back of the fabric when possible.
Project Ideas Using the Sequin Presser Foot
The Sequin Presser Foot is a great tool for adding decorative trims to all kinds of projects.
- Decorative trims for clothing – Use it to embellish collars, sleeves, and hems with ribbon or sequins. It’s great for adding detail to dresses, blouses, or children’s clothing.
- Evening wear and dance costumes – Sequins instantly make any outfit stand out.
- Accessories – Attach decorative trims to headbands, handbags, and belts. It’s an easy way to customize plain accessories and add a unique touch.
- Home décor – This foot works beautifully for enhancing pillows, curtains, table runners, and placemats.
My Easter Table Runner and Placemat
Recently, I used the Sequin Presser Foot to make a table runner and placemats for Easter.
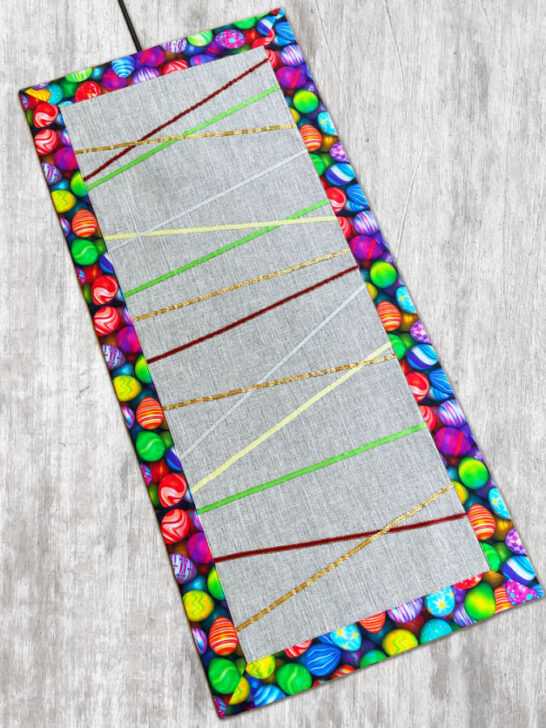
I chose a bright and cheerful Easter-themed fabric, covered in colorful eggs, as the backing. The main fabric is a neutral linen-like material, which made the decorative trims stand out beautifully.
For the table runner, I arranged different ribbons and trims in a crisscross pattern. For the placemats, I followed a similar idea but on a smaller scale.
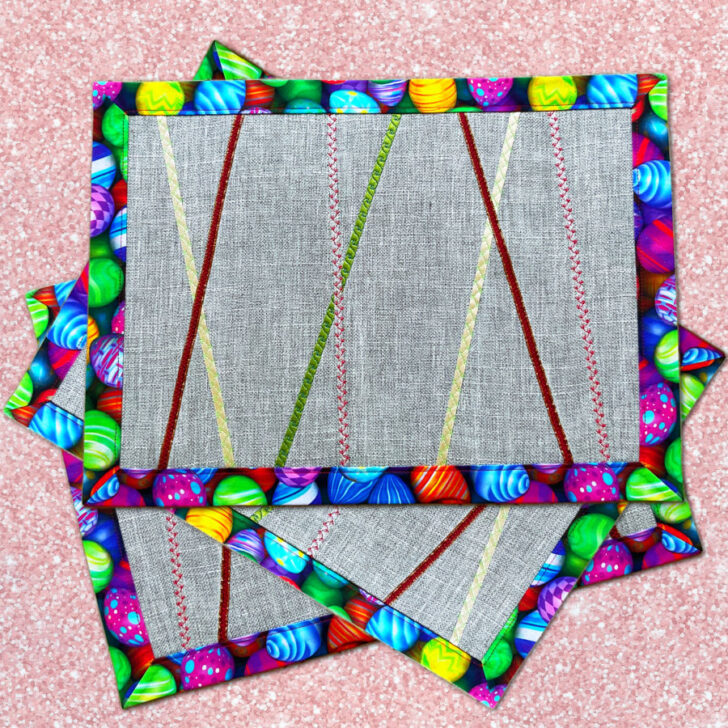
These projects were so fun to make! With all the different decorative stitches on my machine, I had endless ways to make each ribbon stand out.This foot is definitely a must-have for anyone who loves adding decorative details to fabric projects. I can already think of more ways to use it – maybe for Christmas décor next.
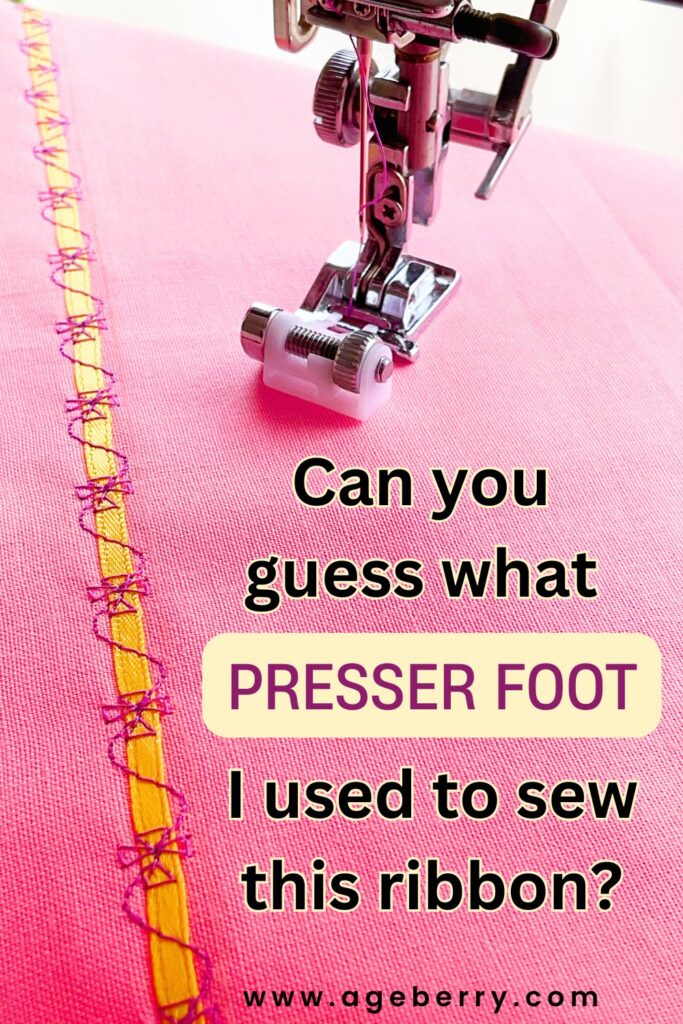
Did you find this tutorial helpful? If so, save this pin (see below) on your sewing board so you can come to this tutorial later when you are ready to sew sequins and ribbons, and follow me on Pinterest for more tips, tutorials, and inspiration!
latest posts
- What Do You Call a Person Who Sews? I Asked My Readers and Got 1,408 Opinions
- DIY Round Purse: PDF Sewing Pattern and Detailed Instructions
- Mini Wonder Clips By Clover: Useful Sewing Tool Or Just Another Notion?
- Non-Slip Grips For Quilting Rulers: A Small Notion With A Useful Job
- Fabric Eraser for Sewing: What It Removes and When to Use It
- What Is The Best Thread For Sewing Machine Projects? Let’s Find Out!
- Butterfly Quilt Block Tutorial – Foundation Paper Piecing
- How To Sew Quilt Squares So The Corners Match
- Sewing With Fork Pins: How They Help With Pattern Matching, Slippery Fabric, And Seams

I have so much fun with the ribbon/ sequins foot. Make it so easy.