How to Make a Pajama Shorts Pattern (XS–XXL) Using Your Own Measurements
Basic pajama shorts are one of those projects that never go out of style. They’re quick, comfortable, and useful—everything you could ask for in a sewing project. The best part? You don’t even need to hunt down a fancy PDF. You can draft your very own DIY pajama shorts pattern with just a few simple steps.

And yes, that’s right—it only takes about 30 minutes to draft this pattern. Once you’ve got it drawn out, you’ll have a foundation piece that works for every body type. Want to add pockets? Easy. Prefer a drawstring waist? No problem. Thinking about turning them into capris or full pajama pants? That’s just one tweak away.
Start with a test pair in cotton, and when you’re ready to treat yourself, cut into natural silk. Store-bought silk shorts can cost a small fortune, but when you make them yourself, you get all the luxury without the price tag—and they feel amazing to wear.

Many sewists will tell you the crotch area is the trickiest part of making shorts or pants. It’s where all the seams meet, and if the pattern isn’t right, you end up with puckers, folds, or that dreaded bunching effect. There are even entire classes dedicated to “mastering the crotch seam.”
But with this simple pattern, you don’t have to worry. The proportions built into the pattern give you a smooth, comfortable fit every time. I’ve sewn plenty of shorts from this pattern, and not once have I had issues with awkward folds at the crotch. It just works.
This method works for sizes XS through XXL because it’s based on your numbers, not some vague “standard size” chart.
So grab a pencil, some big paper, a ruler, and your sense of humor. We’re about to make the comfiest DIY pajama shorts you’ve ever owned.
Note: Some of the links on this page are affiliate links. This means I will receive a commission if you order a product through one of my links. I only recommend products I believe in and use myself.
What You’ll Need
- Large sheet of paper — pattern paper, medical exam paper (my favorite), gift wrap flipped to the blank side, or even taped-together printer sheets
- Long ruler or yardstick
- Pencil and eraser (you will erase, trust me)
- Measuring tape
- French curve or hip curve (helpful, but a dinner plate works in a pinch)
- Your own body measurements (we’ll get to those in a moment)
Why I recommend medical exam paper
Out of all the options, medical exam paper is the most practical. It comes in long rolls so you’re never short on space. It’s strong enough to withstand multiple tracings and foldings, yet light and easy to handle. The semi-transparency is the real game changer—you can line up grainlines or trace adjustments without struggling to see through layers. It’s inexpensive, convenient, and once you try it, you’ll probably stick with it for all your pattern drafting.


Step 1: Take Your Measurements
You’ll need just a few numbers:
- Hips – around the fullest part of your hips and bum.
- Side length – from your natural waist down to the horizontal surface when you sit down on that surface ( please see image below )
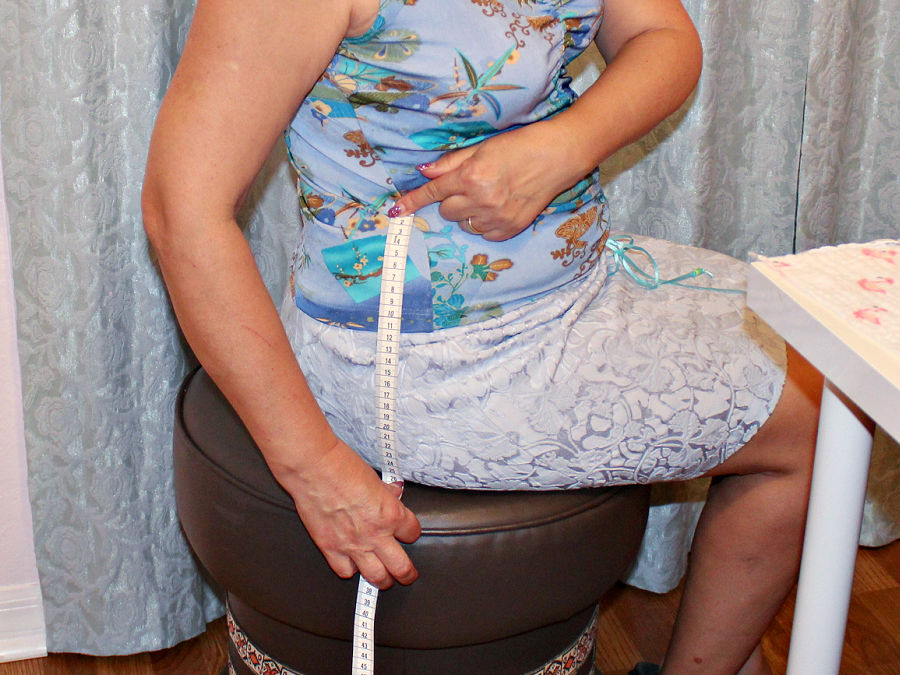
Now, a quick note about that “side length” measurement. Traditionally, sewing books will tell you to measure both the outside pant length (from waist to hem) and the inside pant length (from crotch to hem). Then, the side length is calculated as the difference between those two. I am more used to my way of taking the measurement but there is nothing wrong with the traditional method either. The important thing is the end result.
- Inner leg length – from the crotch down to your chosen hem.
Write these down. We’ll plug them into some easy little formulas in the next step.
I’ll be honest: I’m not a trained pattern maker, and I haven’t taken any formal courses in drafting. So yes, it might bend a few “official” rules of pattern making. What I do know is that it works. The fit is reliable, the method is simple, and it’s an easy pattern you can return to again and again.
Step 2: Start Your Pattern
Note: This pattern already has seam allowances built in — about ¼ inch all around.
Why ¼-Inch Seam Allowances?
If you’ve sewn from commercial patterns before, you’re probably used to seeing ⅜ inch or ⅝ inch seam allowances. My draft is a little different. I use ¼ inch seam allowances, and here’s why: I prefer sewing the seams on my serger with a 4-thread overlock stitch, and I set that stitch width at exactly ¼ inch. It keeps everything neat and tidy without extra trimming.
Of course, if you like a wider seam allowance, you can add it once your draft is finished. For example, if you want ½ inch seams, just extend the lines by an additional ¼ inch around all edges except the waist. That edge stays as it is.
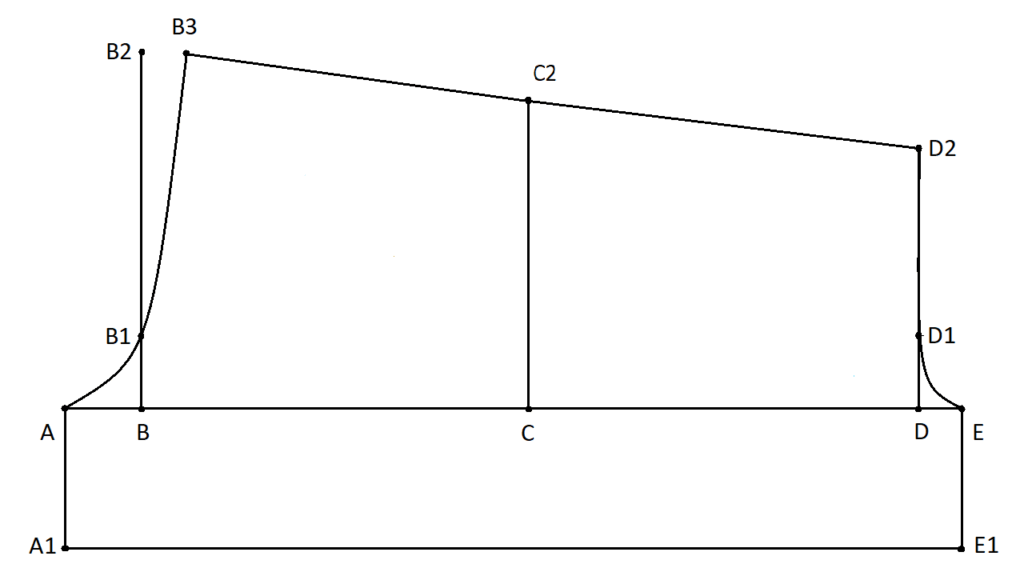
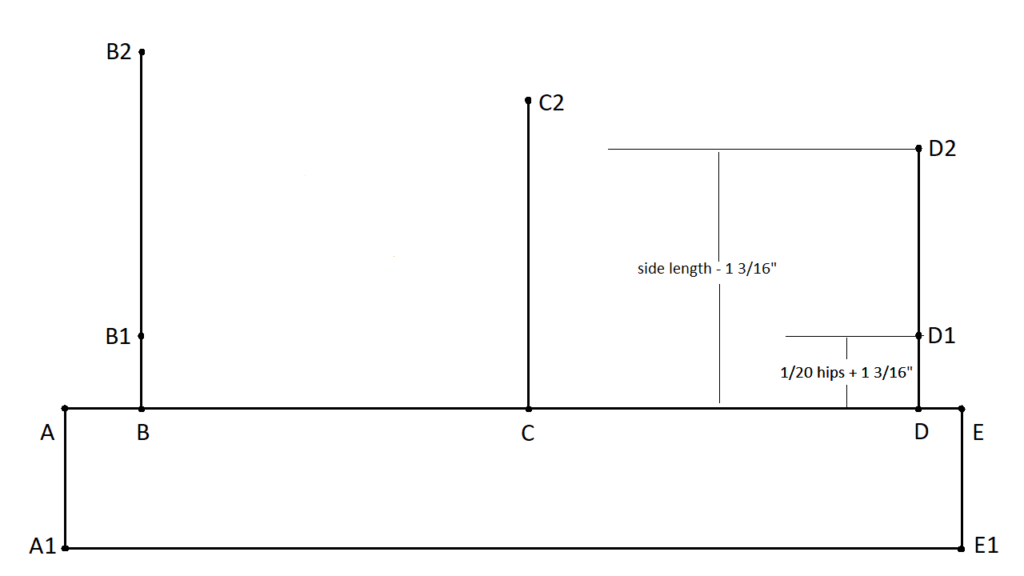
Start your drawing not in the middle of the paper but closer to one of the edges because later we will add elements above the line. Not right at the edge either because we will add elements below the line also. To give you an idea this is how the final pattern will look like.
💡 Want the complete guide in one place?
I know scrolling back and forth through a long tutorial can be a bit tricky while you’re working at your sewing table. That’s why I created a printable PDF version of this tutorial: How to Sew Pajama Shorts and Make an Easy DIY Pattern.
It includes everything step-by-step, with clear instructions and images, so you can keep it right next to your fabric while you cut and sew. No ads, no distractions—just the whole process in a neat package you can save or print.
You can grab your copy below and have the instructions handy anytime you feel like making a new pair of pajama shorts.
Let’s start!
On your paper, draw a straight horizontal line and mark on this line a number of points:
Start with Point A on the left.
Now we’ll split this line into key points:
- A → B = 1/10 hip + ⅜ inch
- B → C = ¼ hip + ⅜ inch
- C → D = ¼ hip + ⅜ inch
- D → E = 1/20 hip + ⅜ inch
As you may notice distances B-C and C-D are equal to each other and are equal to ¼ hips + 3/8in.
Note: 3/8 inch = 1 cm
These divisions give us a balanced, comfortable fit. Mark those letters clearly.
About Those Fractional Numbers
This pattern uses simple formulas based on your hip measurement, like ¼ hips, 1/10 hips, or 1/20 hips. The math is easy enough, but the results can look a little odd once you plug them into a calculator. For example, with my hip measurement of 41 inches:
- ¼ hips = 10.25 in
- 1/10 hips = 4.1 in
- 1/20 hips = 2.05 in
Now, rulers don’t speak “decimal.” There’s no mark for 4.1 inches or 2.05 inches. But don’t panic—you just need to convert those decimals into fractions you can actually see on your ruler.
For instance:
- 4.1 in becomes about 4 2/16 in, which is the same as 4 1/8 in.
- 2.05 in rounds to 2 1/16 in.
- 10.25 in becomes 10 ¼ in.
To make this easier, I’ve created a handy conversion calculator on my site. You can use it to quickly translate decimals into fractions: Fabric Conversion Calculator.
If you’re working in the metric system, the same tool will also give you the numbers in centimeters. No guessing, no stress—just the right numbers you can actually mark on your pattern paper.
Step 3: Draw the Hemline
At Point A, draw a line straight down (a perpendicular to line A–E). Measure from A down the distance of your inner leg length. Mark this new point as A1. (For my shorts, that measurement was 4 inches, about 10cm.)
Now repeat the same step at Point E: draw a vertical line downward (also a perpendicular to line A-E), making E–E1 equal in length to A–A1.Finally, connect A1 to E1 with a straight line. This line runs parallel to A–E and will serve as the hemline of your shorts.
Step 4: Draw the Vertical at Point B
From Point B, draw a line straight up at a right angle to the baseline A–E.
On this new vertical line, mark two points:
- B1: place it above B at a distance of 1/20 hip + 1 3/16 in.
- B2: place it above B at a distance equal to your measured side length + 1 3/16 in.
Note: 1 3/16 inch = 3 cm
Step 5: Add Point C2
At Point C, draw a line straight up, perpendicular to the baseline A–E.
On this vertical line, measure upward a distance equal to your side length and mark that spot as C2.
That’s all for this step—C2 will help shape the top edge of the shorts.
Step 6: Draw the Vertical at Point D
Repeat the same process you used at Point B, but this time start from Point D.
- From D, draw a line straight up, perpendicular to the baseline A–E.
- Mark D1 on this line at a distance of 1/20 hip + 1 3/16 in above D.
- Then mark D2 further up, at a distance from D equal to your measured side length minus 1 3/16 in.
This gives you the upper reference points on the right-hand side of the draft.
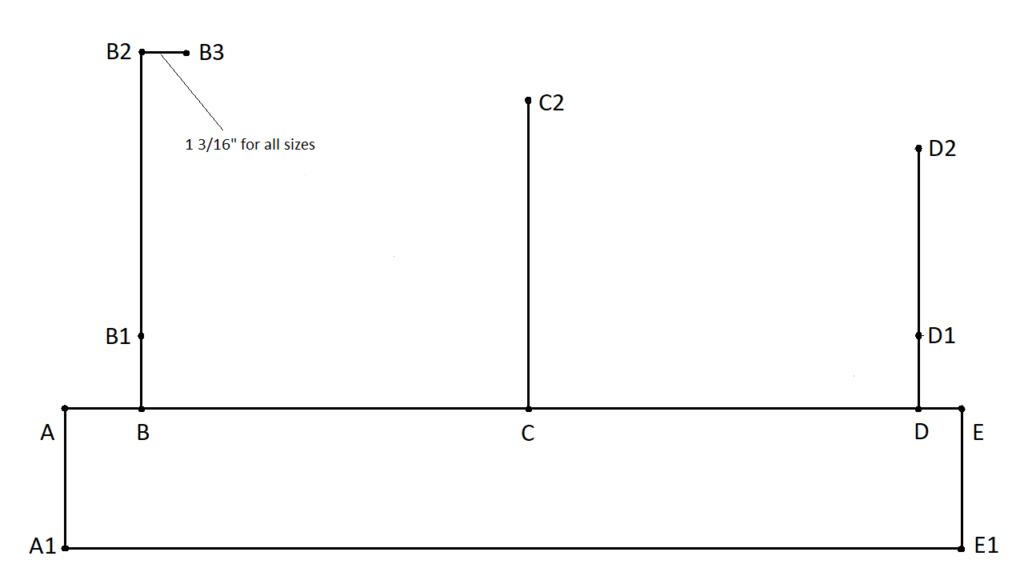
Step 7: Add Point B3
At Point B2, draw a short horizontal line to the right, keeping it square to the vertical B–B2.
- Mark B3 on this line at a distance of 1 3/16 in from B2. (This distance is the same for all sizes.)
- Line B2–B3 should be parallel to the baseline A–E.
For the grainline, keep in mind that it runs parallel to the verticals B–B2, C–C2, and D–D2.
Step 8: Connect the Upper Points and Shape the Curves
Now connect points B3, C2, and D2. Don’t worry if they don’t form a straight line—these three points are close, but not exactly co-linear. That’s expected.
Next, use your French curve ruler (or a curved object like a dinner plate, if needed) to smooth in the crotch areas:
- Draw a curve passing through B3, B1, and A. Here is where you will use the French curve ruler.
Do the same on the other side, curving from D1 down to E.
This step shapes the front and back crotch curves for a natural fit.
- The front is on the right-hand side, where points D2–E1 are.
- The back is on the left-hand side, and you’ll notice it’s cut higher for comfort and better fit.
Remember, your grainline runs parallel to the verticals B–B2, C–C2, and D–D2.
And a quick reminder: this draft gives you one pattern piece, but when cutting fabric, you’ll need two mirrored pieces to make your shorts.
Seam Allowances and Waistline
As I already mentioned before, this draft already has a ¼-inch seam allowance built in, so there’s no need to add more. If you prefer working with wider seams—say, ½ inch—you can simply extend the cutting line by an additional ¼ inch around all edges, but leave the waistline as it is.
For those who want to sew an elastic casing at the top, add an extra 1 to 1½ inches at the waist. This extra height will give you the room you need to fold and stitch the casing neatly.
Your Custom Pajama Shorts Pattern
You’ve now drafted your pajama shorts pattern! The best thing about this method is that it scales automatically with your own measurements. Whether your hips measure 34 inches or 50 inches, the math adjusts to fit you.
Instead of chasing after the “average body” that pattern companies love to imagine, you end up with a design that works for the one body that really matters: yours.
Tips for success
Double-check the math
Small numbers change the fit in a big way. Write each formula next to the line you’re measuring, then do the calculation twice.
Use a sharp pencil so markings stay precise. Erase cleanly if something looks off. Pencil + eraser beats guessing.
Use sturdy paper
Choose paper that survives tracing, folding, and storage. Medical exam paper on a roll works quite well. It is semi-transparent, so you can align grainlines without guesswork. It also handles tape and repeated edits without tearing. Label the piece with date and hip measurement.
Wrapping It Up
Once you have this base shorts pattern, you can play around. You can shorten the legs for playful bloomer shorts, or extend them into easy DIY pajama pants. Add lace at the hem for a softer, more feminine look, or keep things simple in breathable cotton for summer. Switch to flannel for cozy winter nights. You can even add pockets or a drawstring waist if you like extra function.
This isn’t a one-and-done project—it’s a foundation you can come back to again and again, shaping it into whatever style you need. It’s quick, adaptable, and completely free.
Now grab your scissors and fabric, because the next step is the most rewarding part: actually sewing your new pajama shorts. Here is my full step-by-step sewing guide that shows you how to sew, cut and hem shorts, and finish the waistband – How To Sew PJ Shorts (Elastic Waist) — A Step-by-Step Sewing Tutorial.
Here’s the link once more to my printable PDF ebook about pajama shorts. It’s the same tutorial in a clean, ad-free format that’s easy to keep by your side while you sew.
Loved this tutorial? Then don’t let it slip away! 📌 Save this pin to your sewing board so it’s right there when pajama-short inspiration strikes. And follow me on Pinterest for more fun, fuss-free tutorials, clever tips, and DIY goodness!

latest posts
- What Is The Best Thread For Sewing Machine Projects? Let’s Find Out!
- Butterfly Quilt Block Tutorial – Foundation Paper Piecing
- How To Sew Quilt Squares So The Corners Match
- Sewing With Fork Pins: How They Help With Pattern Matching, Slippery Fabric, And Seams
- How Much Fabric Do I Need? 21 Helpful Tips For Calculating Fabric Yardage
- Easy Simple Sewing Project: Fabric Jar Opener
- DIY Oven Mitts: Step-by-Step Sewing Tutorial
- Easy DIY Potholder: New Design
- Tailor’s Clapper: What It Does, Why It Works, And How To Use It Right