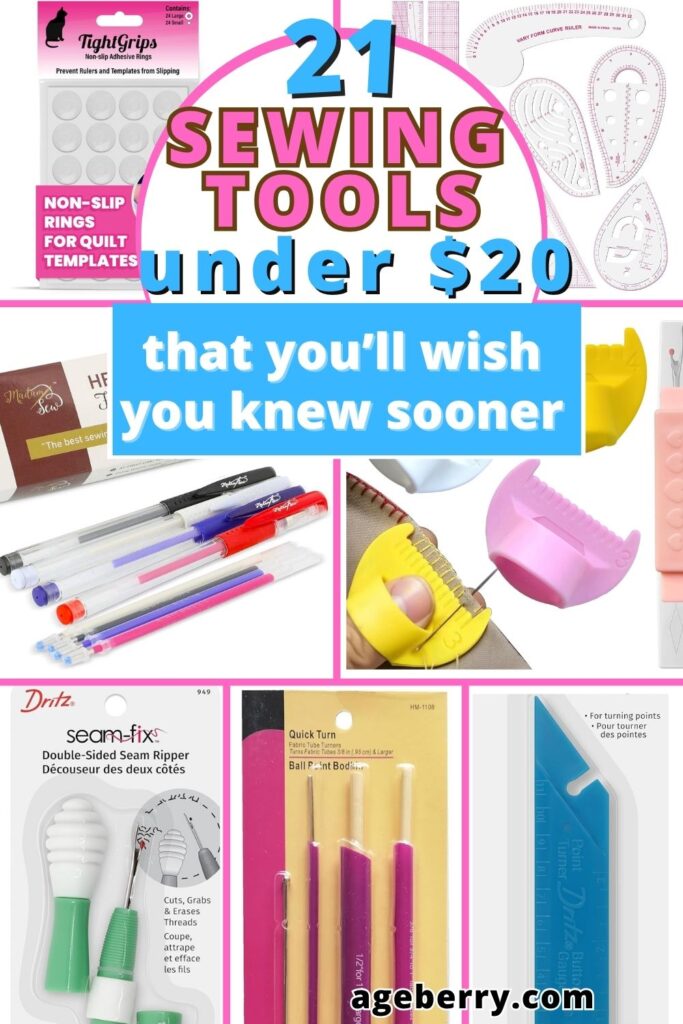
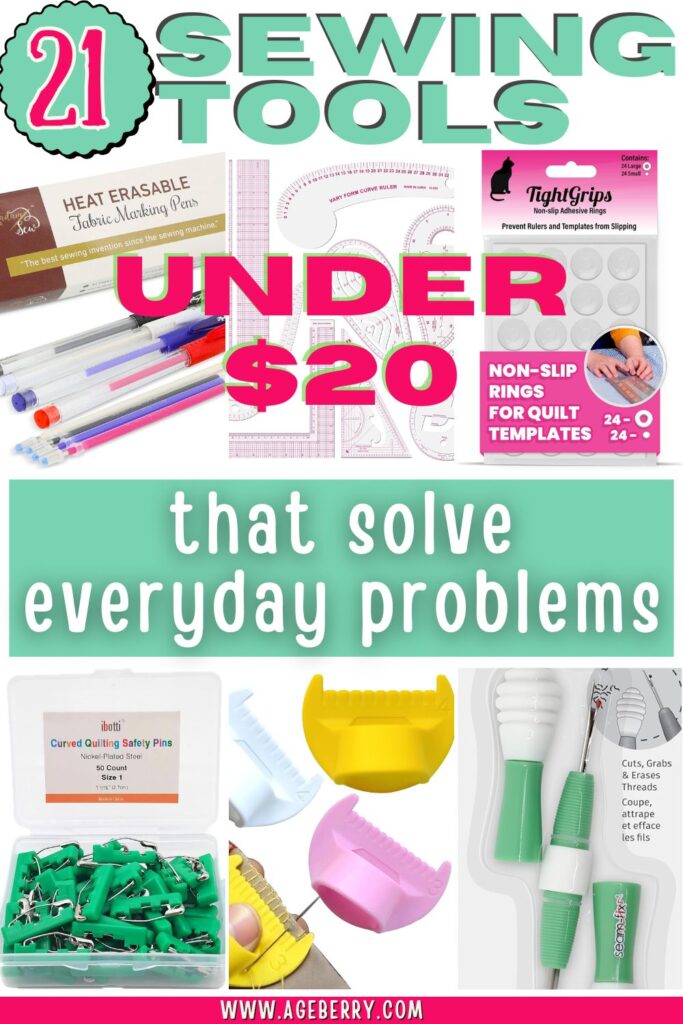
21 Sewing Tools Under $20 That Solve Everyday Sewing Problems Without Breaking the Bank
If you’ve been sewing for a while, you’ve probably noticed how quickly the costs add up. Sergers/overlock machines, embroidery machines, specialty presser feet — the list of “must-haves” grows fast.
But not everything that makes sewing easier has to cost a fortune. In fact, some of the most practical tools in my sewing room are under $20 — and quite a few are even under $10.
Note: Some of the links on this page are affiliate links. This means I will receive a commission if you order a product through one of my links. I only recommend products I believe in and use myself.
1. Quick‑Turn Tube Turner (aka “Tube Turner Tool”)
What it is & how it helps
Turning narrow fabric tubes (like straps, drawstring casings, or tie belts) used to feel like it’s a slow-motion wrestling match. A tube turner makes that flip happen in seconds. You choose the cylinder size that fits inside your sewn tube, push it through, and then pull the fabric through (the rod helps push it from the closed end) — suddenly your tube is right‑side out and neat.
- It saves time. No wrestling, no pins, no fuss.
- It gives clean, crisp edges inside the tube corners.
- For the price, it’s a solid upgrade over using chopsticks, safety pins, or “finger method.”

Quick helpful tips
- Always pick a cylinder size slightly smaller than your tube width so the fabric can slide freely without bunching.
- Insert the rod from the closed end so you push the seam through, not pull against it.
- After turning, leave the rod inside for a moment to help square up the tube before pulling it out.
2. Curved Safety Pins with Grip Covers
What they are & why they stand out
These aren’t just any safety pins. These curved quilting pins come with two features that sewists love: a gentle curve and a textured grip cover. That curve helps the pin glide through multiple quilt layers without distorting your fabric. The bright pink grips give your fingers something solid to hold, so your thumb isn’t slipping while trying to close a stubborn pin.
Quilters especially benefit from these during basting. You can pin a full quilt sandwich without wrestling or jabbing yourself every few inches. The smooth nickel-plated finish also means less drag when inserting or removing.
But they can be used for garment sewing as well: pin hems, pleats, and bias binding without shifting delicate fabrics.

How to use them
- Use the curve to your advantage: pin in a slightly arched motion from top layer to bottom. It holds better without shifting.
- The grips are a big deal if you have hand fatigue, arthritis, or just want a faster pin-and-go process.
- These are reusable and easy to store in the included box — so your pin tin stays neat and finger-friendly.
3. Wooden Pedal Adapter Holder
What it is & why it’s helpful
This is a wooden base crafted to hold your sewing machine’s foot pedal in place. If your pedal slides around or your floor is slippery, this adapter keeper gives it a stable home. It’s especially handy when your workspace is tight or when the pedal cord pulls. This adapter model is designed for pedals smaller than 6.2″ by 4.5″, so it works with many standard foot controls.
It features a non-slip surface (leather overlay and grip base) to resist slippage while you press. The wood is hand-polished and smooth, it has a natural look that fits well in a sewing room.

How to use & when it shines
- Slide your pedal into the slot so it sits snugly but without binding.
- Adjust the holder so your foot rests naturally without strain.
- Works especially well on smooth floors like hardwood, tile, or laminate where pedals usually slide away.
- If you sew on thick carpet, results may vary — some users still prefer a non-slip mat underneath.
Pros & things to watch out for
Pros
- Makes your pedal stable and secure
- Looks nicer than duct taping or anti-slip mats
- No tools required for setup — you just place the pedal onto it
- Works for a common range of pedal sizes (< 6.2″ × 4.5″)
Considerations
- If your foot pedal is larger than 6.2″ × 4.5″, it won’t fit.
- The wood and leather surfaces may need occasional cleaning — dust or grit can lessen grip over time.
- It adds extra “height” under the pedal; test to see if it changes your foot angle uncomfortably.
4. Wool Pressing Mat
What it is & why it’s helpful
This mat is made of 100% felted wool (usually New Zealand wool). Wool naturally retains heat and steam, so when you press on top, the heat also reflects upward, letting you press both sides of the fabric more effectively.
In effect, you don’t always need to flip your piece over — for many fabrics, pressing with a wool mat helps “complete” the back side as well. That saves time and wear on delicate seams. The mat’s dense fiber structure resists stretching and can even accept pins (hand-pinning into it) to help anchor small projects.

How to use it & tips to get the most out of it
- Place the wool mat on a heat-resistant surface or pressing board.
- Lay your fabric neatly on top and press as you normally would. Because the wool holds heat, you may find you don’t need as many passes with the iron.
- Avoid leaving the iron resting in one spot for too long (wool can scorch or flatten).
- If you steam a lot, let the mat dry fully (air out) between sessions — wool is porous and can retain moisture.
- Clean simply by rinsing with cool water (no machine washing).
5. Sewing Clips
What they are & why they stand out
These are small plastic “wonder-clip” style clips (100 pieces er box usually) that you can use instead of pins for holding fabric pieces together, especially layers, seams, bindings, or delicate fabrics. The clips are made of transparent AS plastic, come in assorted colors, and they open to about 0.9 cm wide. The box also includes three measurement lines on each clip so you can align edges evenly.
In case you wonder what AS plastic is (I did), it is a relatively hard, transparent and resistant plastic widely used.
They grip firmly (much more reliably than cheap binder clips or clothespins) and don’t leave holes. They’re especially beloved for quilting, bags, fleece, vinyl, or any material where pins would leave marks or be cumbersome.

Pros
- No pinholes or damage to delicate fabrics
- Safe for fingers (no sharp points)
- Fast clipping and unclipping
- Good visibility and color coding
- Come in a handy box for storage
✅ Related tutorial: Sewing Clips vs. Pins | Which To Choose?
6. Quilting Rulers
What it is
This set includes four square quilting rulers in the most useful sizes: 3.5″, 5″, 6.5″, and 10.5″. They are made from durable, transparent acrylic, so you can clearly see your fabric underneath while lining up the measurements. Each ruler has precise grid markings with 1/8-inch increments and diagonal 45° lines, which makes them helpful for cutting bias strips, triangles, and squared quilt blocks. The rulers are lightweight but sturdy enough for repeated rotary cutting, and the smooth edges help keep your blade sharp.

Tips for using
- Use the diagonal lines to center and trim half-square triangles or align bias cuts.
- The small rulers are perfect for trimming smaller quilt blocks or appliqué pieces, while the larger 10.5″ size is ideal for squaring up quilt blocks.
- Always cut on a self-healing cutting mat
7. Non-Slip Pads for Rulers
What it is
These are small, self-adhesive silicone pads or various sizes designed to stick on the underside of quilting rulers or templates. The pads are semi-transparent so they don’t block the view of your markings. Their tacky surface helps prevent rulers from sliding on fabric while you cut or trace.
They are usually round but there are also other shapes. Sometimes the rules set already comes with included non-slip pads since they are really useful in preventing the ruler from sliding once set.

Tips for using them
- Clean the underside of your ruler first (remove dust, lint, or oils) so the pads stick better.
- Place pads evenly spaced (for example, three across a 6×24 ruler) so the grip is balanced.
- If you reposition or remove them, warm gently with your fingers or a bit of heat to loosen the adhesive without damaging the ruler.
- The pads add just enough barrier to stop slipping but don’t lift the ruler too far from the fabric (they are thin by design).
- If your ruler has slots or windows, avoid placing pads in those zones to prevent interference with cutting.
8. Bamboo Point Turner & Presser
What it is
This is a handy tool made of bamboo, about ¾″ × 5″ in size, built for pushing out sharp points and shaping small areas in sewing projects. It has a fine pointed end to help nudge fabric in tight corners (like collars, lapels, or applique points) and a rounded edge that acts as a presser/crease maker. The tool also doubles as a guide when sewing, helping you control the fabric as you stitch.

Tips for using it
- After sewing a corner, slip the pointed end into the seam allowance and gently push the corner outward. Use moderate pressure so the seam doesn’t distort.
- Use the rounded edge to press seams open or make a crisp fold in places where an iron can’t reach (like small curves or flaps).
- When guiding fabric under the presser foot, rest the tool just ahead of your stitching path to stabilize and steer the fabric.
9. Clover Hera Marker
What it is
This is a classic dry “Hera marker,” made by Clover. It’s a plastic tool with a chisel-shaped edge used to press or score lines into fabric — without using ink. The marker doesn’t deposit a visible line; instead, it leaves a gentle crease or indentation. Quilters and garment makers use it to mark fold lines, darts, piping guides, etc. On light or solid fabrics, a faint crease can act as your sewing guide, especially when you don’t want ink.
The tool is sometimes called a “dry marker” because it works without chalk, pen, or other marking media.
You press it along a ruler or pattern, and the subtle crease it creates is enough for many sewing tasks. Because there’s no line to remove later, it’s quite neat for fine fabrics or projects where marking lines would show.

Tips for using it
- Use the chisel edge against a ruler or template to press in your fold or seam line.
- Go slowly and apply even pressure so the crease stays crisp without distorting fabric.
- Use it on both bias and straight grain fabrics — fold lines or dart legs are easier to follow this way.
- If the crease is too faint, go over it again from the opposite direction (gently) to deepen it.
- Always test on a scrap first to see how visible the crease is on your fabric.
10. Finger Presser
What it is
This little wooden tool is one I truly love and use every single day in my quilting tutorials. It replaces using your fingernail to press a seam flat after stitching.
When you’re piecing quilt blocks, you know how many times you need to quickly press a seam open or to the side before moving on to the next piece. Doing that with just your fingers gets tiring (and doesn’t give a crisp fold). With this finger presser, you simply run it along the seam and it lays flat, neat, and ready for the next step.
The wood is smooth, polished, and shaped to fit comfortably in your hand, so it glides over fabric without snagging. It’s sturdy enough to give a sharp crease, but gentle on the fabric fibers.


Tips for using it
- After stitching each seam, use the finger presser to flatten it right at your sewing machine. No need to jump back and forth to the iron after every piece.
- You can press seams to one side or open them — the tool handles both quickly.
- Once you finish piecing a group of units, take them all to the iron and give them a final press with heat. This way, you save time and get cleaner blocks.
- Hold the presser at a slight angle and apply even pressure — it takes very little effort for the seam to lay flat.
11. Button Gauge & Point Turner
What it is
This small but mighty tool has two jobs packed into one design. On one end, you get a smooth, tapered point turner. It slips neatly into corners of collars, pockets, cuffs, and flaps to push the seam outward without poking a hole in your fabric.
On the other end is the button gauge, which does more than one thing. You can use it while sewing a button to create the perfect thread shank — just slide it under the button before stitching. The built-in thickness keeps the button slightly raised so it doesn’t pull or strain the fabric.
The same gauge also works for measuring the distance between buttons. Instead of guessing or fiddling with a tape measure, you can step your way down a placket or front band with even spacing every time.

Tips for using it
- When turning points, insert the tapered end gently into the seam allowance and nudge the fabric outward — a slow push gives you the cleanest edge.
- When sewing buttons, place the gauge under the button, sew through your fabric as usual, then remove the gauge and wrap the extra thread underneath to form a secure shank.
- For button spacing, line up the gauge along your placket or cuff edge, mark your placement with chalk or pencil, then move the gauge down for the next mark. It’s faster and more consistent than using a ruler every time.
12. Tracing Wheel
What it is
This is a tracing wheel — a handheld tool with a spiked or serrated wheel mounted on a handle. As you roll it over a pattern placed on fabric (with tracing paper or carbon underneath), the wheel marks or perforates the fabric with the design, seam lines, darts, notches, or placement lines.
This set comes with two different tracing wheels, each designed for a slightly different job.
- The serrated wheel (with the wooden handle) has short, close teeth that leave a dotted line. It’s ideal for everyday sewing tasks like marking darts, pleats, or seam lines on woven fabrics.
- The needle-point wheel (with the black handle) has longer, sharper spikes that make deeper perforations. This one is especially useful for leatherwork or heavy fabrics, where you want marks to show clearly or to create evenly spaced holes for stitching.


Tips for using them
- Always place dressmaker’s carbon or tracing paper between your pattern and fabric before rolling the wheel.
- Use the serrated wheel for light to medium fabrics where a gentle mark is enough.
- Switch to the spiked wheel when working with thick layers, canvas, or leather for stronger, longer-lasting marks.
- Apply steady pressure as you roll. Too much force can distort delicate fabrics, while too light a touch may leave faint lines.
- Test on a scrap of your fabric first to see how visible the marks will be.
If you’d like a step-by-step walk-through, I have a full tutorial on this tool — Tracing Wheel in Sewing – What It Is and How to Use It — where I show different types of wheels, how to choose one, and how to get the cleanest marks. It’s a great resource if you want to see the wheel in action.
13. Thread Wax with Case
What it is
This is thread wax designed especially for sewing, packaged inside a clear plastic case with built-in grooves. You pull your thread through the slots, and the wax coats the fibers evenly without making a mess. It helps reduce tangles, prevents knotting, and lets your needle glide through fabric more smoothly.
A raw beeswax block works too, but it can crumble, flake, or leave uneven coatings on your thread. This version stays clean and protected inside its case, so it doesn’t pick up dust or lint from your sewing basket.
The grooves guide your thread across the surface, giving it just the right amount of wax each time. And since the wax is contained, you won’t end up with sticky fingers or a block that softens in warm weather.
Tip: Always use pure beeswax, mixtures with artificial wax may stain your fabric

Tips for using it
- Pull your thread through the wax a few times before stitching. This helps the wax coat every strand.
- (Optional, but useful) Place the thread between clean pieces of papers or cloth and press with a warm iron. The heat helps melt the wax so it penetrates the fibers evenly. Or just run the thread through your fingers a few times. The warmth of your hands will help set the wax well enough for most projects.
- Use it before hand quilting or appliqué to prevent thread snagging through multiple layers.
- If your thread gets fuzzy or starts catching, re-wax it and trim any frayed ends before continuing.
- For stronger threads (like thick cotton or polyester), use just a light touch so you don’t overcoat and make the thread stiff.
- After heavy use, wipe the wax block with a dry cloth to remove lint buildup and keep it fresh.
14. Magnetic Multifunctional Seam Guide
What it is
This is a magnetic seam guide that attaches firmly to your sewing machine’s metal throat plate. It helps you keep perfectly even seam allowances by giving your fabric a steady edge to run against. This version also doubles as a hemmer with a built-in measuring scale, and it includes small seam rippers for quick fixes. It’s compact, simple to use, and easy to reposition when you switch to a different seam width.

Tips for using it
- Place the guide on your machine’s throat plate at the measurement you want, then keep the fabric edge pressed against the guide for a steady seam.
- If you need to change seam width, stop sewing, lift your presser foot, and slide the guide to the new position.
- The included seam rippers are handy for undoing stitches right at your machine without hunting for another tool.
15. Seam-Fix Seam Ripper
What it is
The Dritz Double-Sided Seam-Fix combines two seam rippers in one tool — a fine blade on one end for delicate stitches, and a larger blade on the other for long seams and heavy fabrics. But what sets it apart is the rubbery tips on both ends. These aren’t just decorative caps. They work like little thread erasers, grabbing and lifting the tiny bits of thread that are left behind after unpicking.
A single-side version of the tool exists too, with the same rubber end but with a seam ripper only at one end.


This is why it’s called Seam-Fix probably. It doesn’t just rip seams. It also helps you clean them up, leaving your fabric free of messy thread fuzz. Instead of picking at threads with your fingers or lint roller, you simply rub the tip gently across the fabric and the loose threads ball up for easy removal.
Tips for using it
- Use the smaller blade for short, delicate seams and the larger blade for stronger stitch lines.
- Once the seam is cut, flip the tool and roll the rubber tip across the fabric. The threads cling to it and lift away, so you start fresh with a clean seam line.
- The soft grips in the middle make it comfortable to hold, even when you’re working through a big unpicking job.
- Keep it by your machine or in your hand-sewing kit — it’s one of those tools you’ll end up using constantly.
If you want to see it in action, I use this exact tool in my tutorial: Master the Seam Ripper: Your Ultimate Guide to Precision Stitch Removal. In that guide, I show not just how to unpick stitches neatly, but also how to actually fix the seam area — which is where this tool shines.
16. Edge Stitch Lock & Sewing Gauge
What it is
This is a dual-purpose tool combining an edge stitch guide and a mini sewing gauge — specially designed for blanket stitches or overcasting.
The guide helps you maintain even distances from the fabric edge as you stitch. The gauge markings allow you to measure small seam widths or spacing (for things like decorative stitching or edge finishes) without reaching for a ruler.
In short: it keeps your stitches aligned and gives you a quick measurement reference when you need precision near edges.

Tips for using it
- Place the edge guide flush against your fabric’s raw edge; the stitching line then follows the guide for beautiful uniform edges.
- Use the gauge side to check your decorative stitch placement mid-seam, especially when doing blanket or overcast stitches.
- Adjust the position gently as you sew so your stitches stay consistent all the way across.
- If your fabric shifts slightly, pause and realign the tool before continuing to keep stitch spacing even.
17. Sewing Rulers + French Curve Set
What it is
This is a 9-piece clear metric sewing ruler set. It includes straight rulers, French curves, and curved templates that are especially helpful for pattern drafting and garment alterations. Each piece is made of clear plastic with red grid markings in metric measurements, so you can see your fabric or paper pattern underneath while lining things up.
The French curves are designed for reshaping armholes, necklines, hips, and waistlines. Smaller templates handle detailed areas like darts or pocket curves, while the longer rulers are good for truing up side seams or skirt hems. It’s a versatile kit for anyone who wants to customize or draft clothing patterns.

Tips for using it
- Use the long rulers to add or correct seam allowances when adjusting paper patterns.
- Reach for the French curve whenever you need a smooth, flowing line between measurement points, like armholes or neckline adjustments.
- For embroidery or cross stitch, the straight rulers help square grids and align designs.
- Store flat in a case or drawer to keep the clear plastic from warping or scratching.
How it differs from quilting rulers
Earlier in this roundup, we looked at quilting rulers (#6), which are designed with bold grid markings and thicker acrylic for rotary cutting fabric. This French curve set is thinner and lighter, with more curved templates, and it’s made for pattern drafting and garment sewing. If you quilt and sew clothing, you’ll likely find both sets useful — one for cutting fabric accurately, the other for shaping and adjusting patterns.
18. Memory Bear Template & Pattern Ruler Set
What it is
This is a 10-piece acrylic ruler and template set designed specifically for sewing memory bears. The pieces include all the bear parts you need — head, body, arms, legs, and ears — along with a few straight-edge rulers to help with alignment and cutting. Each template is made of clear acrylic with red printed grid lines, so you can see your fabric underneath while keeping your cuts precise.
It’s reusable, easy to wipe clean, and works with a wide range of fabrics, from cotton and denim to fleece. Because the templates are durable acrylic, you can use them without wearing them down.

Tips for using it
- Place the templates directly on your fabric and trace around them before cutting. The transparent acrylic lets you position pattern pieces carefully over design details (like stripes or logos) when using keepsake clothing.
- Use the rulers in the set to double-check seam allowances as you cut, so all your bear pieces match up neatly.
- Label your fabric pieces as you go — with so many small bear parts, it’s easy to mix them up.
- If using stretchy fabric (like knits), stabilize with lightweight interfacing before cutting to keep the bear’s shape consistent.
19. Duckbill Appliqué Scissors
What it is
These 4-inch duckbill appliqué scissors by Tula Pink Hardware are finished in a striking rainbow color. The duckbill blade — wide and flat like a duck’s beak — is what makes them special. It sits against your fabric while the narrow blade trims away excess. This design lets you cut extremely close to your stitching without risking cuts to the fabric underneath.
They’re especially useful for appliqué, embroidery, and in-the-hoop projects where precision trimming is key. The small size makes them easy to maneuver in tight spots or around curved edges, while the stainless steel blades stay sharp for fine, detailed work.
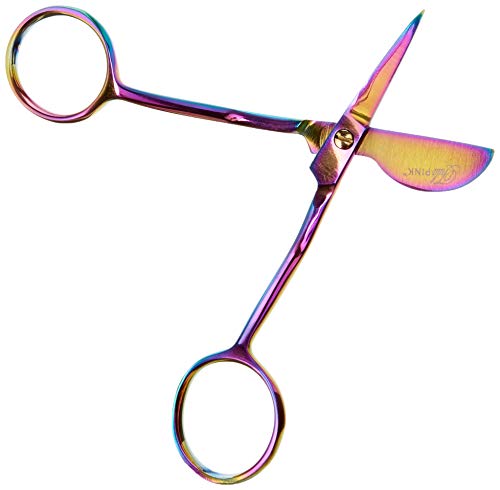
Tips for using them
- Trim appliqué fabric or stabilizer right up to the seam line — the duckbill edge shields your base fabric.
- For curved shapes, work slowly with small cuts and let the wide blade glide smoothly underneath.
- Keep them handy during embroidery projects — you’ll reach for them often to clean up edges inside the hoop.
- Wipe blades after use to keep the rainbow finish bright and free of lint buildup.
20. Stick-on Ruler Handle
What it is
This stick-on ruler handle with a strong adsorption grip is designed to attach to flat rulers and templates. The HONEYSEW version sticks securely, giving you a convenient “handle” for your rulers so you can move or grip them more comfortably while cutting or positioning them. The grip is strong, yet the listing promises it’s easy to remove without damaging the ruler.
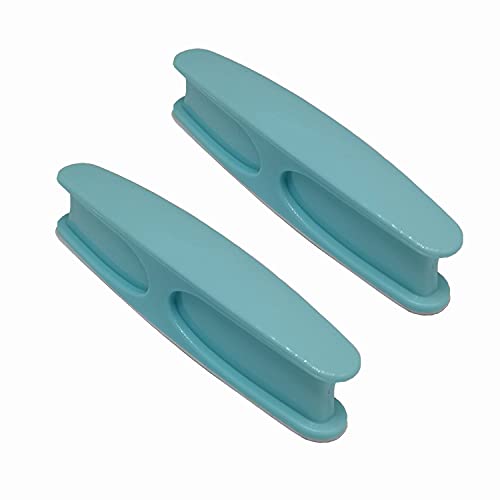
Tips for using it
- Stick the handle toward one edge of your ruler, so your hand clears the area you need to mark or cut.
- Press firmly to activate the adsorption when applying; that grip keeps the ruler from sliding as you draw or cut.
- When removing, peel slowly and gently upward — it’s designed not to damage the ruler’s surface.
- If the grip weakens (due to lint or dust), wash it gently — it recovers adhesion after cleaning.
- Use matching handles on the ruler set you use most, so you always have a grab point ready without searching for one.
21. Heat Erasable Fabric Marking Pens
What it is
I use marking tools constantly, and these pens are one of my favorites. The set comes with four fine-tip pens (0.7 mm) in different colors plus four extra refills. The lines go on smooth and precise, so they’re perfect for marking darts, pleats, quilting lines, or placement guides where chalk just feels too bulky.
The magic part is that the ink disappears with heat. Run a hot iron across the fabric and the lines are gone — no scrubbing, no water, no ghost marks. It makes sewing feel tidier, especially when working on lighter fabrics where chalk dust is obvious.

Tips for using them
- Always test on a scrap of your fabric first. Some fabrics hold the ink differently, and it’s good to see how cleanly it disappears.
- Use a light hand when marking. You don’t need to press hard to get a clear line.
- After sewing, erase your lines with a warm iron. For tricky areas (like curves or inside seams), a hair dryer also works.
- Store the pens capped and tip-down. That way, the ink stays fresh and doesn’t dry out.
- Keep the refills handy — you’ll be surprised how quickly you go through them once you start using these for every project.

Found a few new sewing gadgets here that deserve a spot next to your machine? Pin this post to your favorite Pinterest board so it’s waiting for you the next time you wonder, “what was that tool called again?” It’s the easiest way to keep this list handy for future projects. And if you enjoy discovering clever little notions and practical sewing tricks, follow me on Pinterest — I’m always sharing tutorials, ideas, and tools that make sewing more fun.
latest posts
- 30 Sewing Hacks That Turn Ordinary Items into Useful Sewing Tools
- Seam Allowances in Sewing Patterns: What They Are and How to Use Them
- What Do You Call a Person Who Sews? I Asked My Readers and Got 1,408 Opinions
- DIY Round Purse: PDF Sewing Pattern and Detailed Instructions
- Mini Wonder Clips By Clover: Useful Sewing Tool Or Just Another Notion?
- Non-Slip Grips For Quilting Rulers: A Small Notion With A Useful Job
- Fabric Eraser for Sewing: What It Removes and When to Use It
- What Is The Best Thread For Sewing Machine Projects? Let’s Find Out!
- Butterfly Quilt Block Tutorial – Foundation Paper Piecing