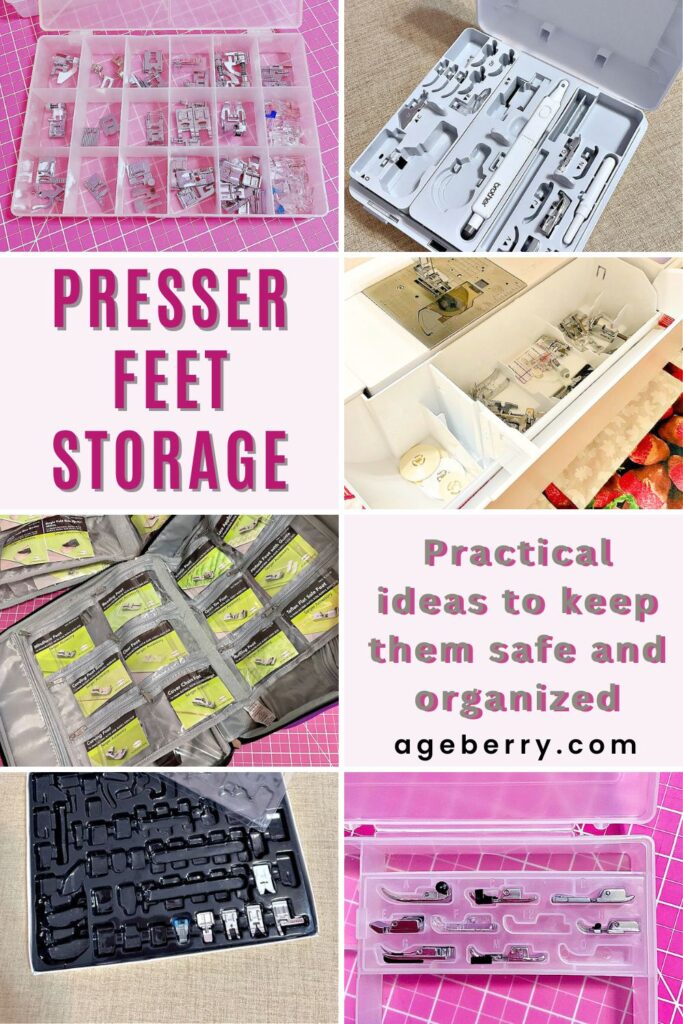
Presser Feet Storage: Practical Ideas to Keep Them Safe and Organized
Presser feet are essential sewing tools, but they’re often the most overlooked when it comes to organization. If you’ve been sewing for any length of time, you probably have more than a few. Some are tiny. Some are expensive. And some are absolutely crucial for certain techniques.
The trouble starts when you don’t have a proper place for them.
Here’s what I’ve learned – if you don’t store them properly, a few things can go wrong.
- They can break. Some specialty feet are more fragile than they look. I learned this the hard way when my Janome sequins and ribbon foot snapped during my trip. It wasn’t packed carefully, and that small mistake meant I had to replace it.
- They can get lost. These little pieces have a way of disappearing into drawers, baskets, and sewing boxes. If they aren’t easy to see, you may end up wasting time searching or buying duplicates.
Have You Ever Lost a Presser Foot? Maybe you set it aside “for safekeeping” – and the spot was so safe, even you couldn’t find it again? I’ve done that. More than once.
You check under the machine, in the drawer, behind the thread stand… nothing. Weeks later, you might find it hiding inside a stack of fat quarters or wedged between pages of your sewing notebook like a rogue bookmark. Or worse – right where it was supposed to be all along, just cleverly disguised among a dozen other look-alike feet.
That’s why having a reliable storage system isn’t just helpful – it’s essential. It saves time, prevents those mid-project scavenger hunts, and gives every foot a proper place to live.
- You might forget you even have them. It’s easy to fall into the habit of using just one or two presser feet for every project. But if you can’t see what you own, you’re less likely to try something new – or even remember that you have a foot that could make your project easier.
In this tutorial, I’ll show you practical and creative ways to store your presser feet. The goal is to keep them safe, easy to find, and ready to use – so nothing slows you down when inspiration strikes.
Know What You’re Working With
Before you can store your presser feet properly, it’s helpful to know exactly what you have. Not all presser feet are the same, and the way you store them may depend on their size, shape, or how often you use them.
✅ Related tutorial: Sewing Machine Presser Foot Guide: Types to Elevate Your Projects
Most sewing machines come with a few basic feet – usually a standard zigzag foot, a buttonhole foot, and maybe a zipper foot. These are the ones we reach for most often, especially for garment sewing or simple projects.
But as your skills grow and you start exploring more techniques, your collection tends to grow too. You might add a walking foot for quilting, an overcasting foot to finish raw edges, or a stitch-in-the-ditch foot for precision work.
✅ Related tutorial: How to use a walking foot
And then there are specialty feet – like rufflers, Teflon feet for sticky fabrics, cording feet, pintuck feet, or even sequins and ribbon feet. These can be surprisingly delicate and not always easy to replace.
✅ Related tutorial: How to Use A Ruffler Presser Foot
As your machine capabilities expand, so does the variety of feet you’ll want to keep on hand. Some are machine-specific, others are universal. Some are bulky, while others are tiny and easy to lose if not kept in place.
Before deciding how to store your collection, take a moment to go through what you already own. Lay everything out. Check for duplicates. Identify which ones you use often and which ones you might want to use more – if only you remembered you had them.
This small step will help you choose the right storage method and give you a clear picture of what you need to keep safe and accessible.
Note: Some of the links on this page are affiliate links. This means I will receive a commission if you order a product through one of my links. I only recommend products I believe in and use myself.
Essential Features of a Good Storage System
Not all storage solutions are created equal. Here’s what to look for.
Visibility
A good storage setup allows you to see all your presser feet at a glance. When everything is visible, it’s easier to choose the right foot for your project. It also helps you remember what you already own, which means you’re more likely to actually use your specialty feet instead of defaulting to the standard one every time.
Protection
Presser feet might look sturdy, but some are surprisingly delicate. Metal feet can scratch each other. Plastic ones can crack. If your storage doesn’t cushion them properly, you could end up damaging an expensive tool without even realizing it. A well-designed storage solution keeps each foot separate and safe from impact.
Portability
If you attend sewing classes, retreats, or simply move between rooms, you’ll want a storage system that’s easy to carry. Compact cases or organizers with handles make it simple to take just what you need without packing your entire toolbox.
Customization
As your collection grows, your storage needs will change. Look for systems that can adapt over time. That could mean using boxes with adjustable dividers, organizers with extra slots, or fabric cases where you can stitch on new pockets. Having space for labels or tags is another plus. Clear labeling saves time and reduces the guesswork.
Keep these features in mind as you choose or design your own storage system. A thoughtful setup doesn’t just look nice – it helps you sew with less stress and more precision.
Storage Options (With Pros and Cons)
There are many ways for storing presser feet. The best method depends on your sewing habits, your space, and how many feet you’ve collected. Below are some tried-and-true options, each with their own benefits and things to consider.
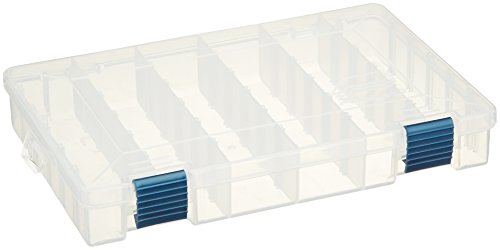
Plastic Storage Boxes with Compartments
These are one of the most popular choices for organizing small sewing supplies. Plastic storage boxes with individual compartments keep your presser feet separate, visible, and easy to grab. Most come with adjustable dividers so you can create just the right size slot for each foot.
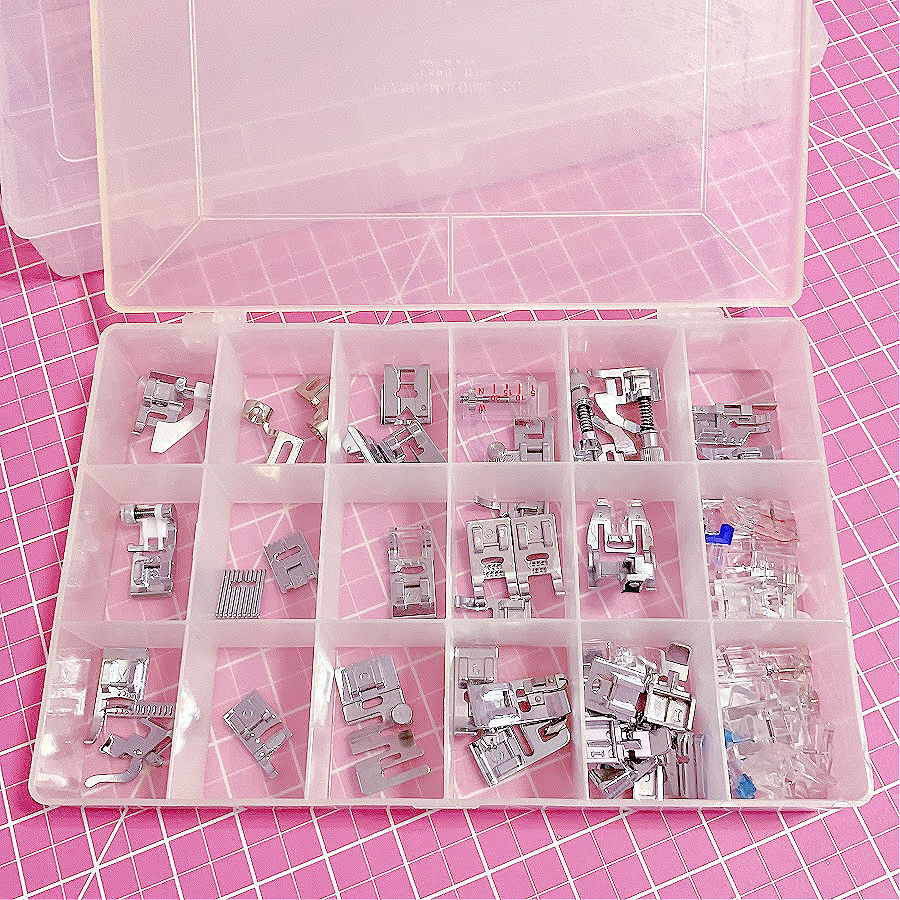
Boxes with clear lids are best (remember “visibility”?). You can see what’s inside without opening them, which saves time when you’re in the middle of a project. Brands like ArtBin, Plano, or even no-name fishing tackle boxes from craft stores can work beautifully for this.

Pros:
- Affordable and easy to find.
- Customizable compartments.
- Keeps feet visible and dust-free.
Cons:
- Some boxes don’t latch tightly and may open when you don’t expect this. The brand name ones are more expensive but the latching mechanism tends to be better.
- Feet can rattle around if the compartments are too big.
- Hard to label individual compartments, so you need to recognize each foot by sight. This might not be an issue for experienced sewists, but it can be confusing for beginners.
Tip: Before using, line the bottom of each compartment with a small piece of felt. This helps prevent scratching and keeps the feet from sliding around.
Special consideration must be given to this box for travel. It is unlikely that you will fill all compartments, so the feet inside will be able to move during transport. And if they move, they rattle. And if they rattle, they might break. For transportation, fill each compartment with something soft, like a piece of foam, a wad of paper or cotton, or a piece of scrap material. This will protect your feet during transport.
Hanging Jewelry Organizer with Pockets
One creative and surprisingly effective way to store presser feet is with a hanging jewelry organizer. The kind with clear vinyl pockets, like the double-sided 80-pocket version (you need to turn it to see the other side), can easily double as a presser foot storage.

This organizer hangs in a closet or on the back of a door and can hold a large number of feet in individual pockets. Each pocket keeps the foot visible, separated, and protected from scratches.
When you travel, you can simply roll it! The feet inside won’t move and they won’t touch each other.
Pros:
- Holds a large number of presser feet – great for growing collections.
- Clear pockets let you see each foot at a glance.
- Lightweight and easy to hang in a sewing room.
- Affordable.
- You can easily add your own labels or notes.
Cons:
I think this storage method doesn’t come with any drawbacks. It’s simple, effective, and fits a wide range of presser feet. Oh, I can think of one: you don’t see both sides at once 😀!
Custom DIY Presser Foot Organizer
If you enjoy sewing organizers, a custom fabric presser foot holder might be the perfect project. You can make a “presser foot book” with fabric pages and small pockets from clear vinyl, or create a roll-up style case (like Hanging Jewelry Organizer above) with slots to hold each foot in place.
This type of storage is especially useful if you want something soft, portable, and personalized. You can choose fabrics you love, add embellishments, and design it exactly to fit your collection.
Pros:
- Fully customizable to suit your collection and style.
- Soft and protective, especially for delicate or plastic feet.
- Easy to carry or store flat in a drawer.
- You can add as many pages or slots as you need.
Cons:
- Requires time to sew and plan the layout. Is this a pro or a con? Can’t figure it out 😀!
It’s best for sewists who enjoy making their own tools and want a more decorative, handmade way to store and protect presser feet.
Tip: include small labels for each pocket. This makes it easy to identify your feet at a glance and helps you remember what each one is used for.
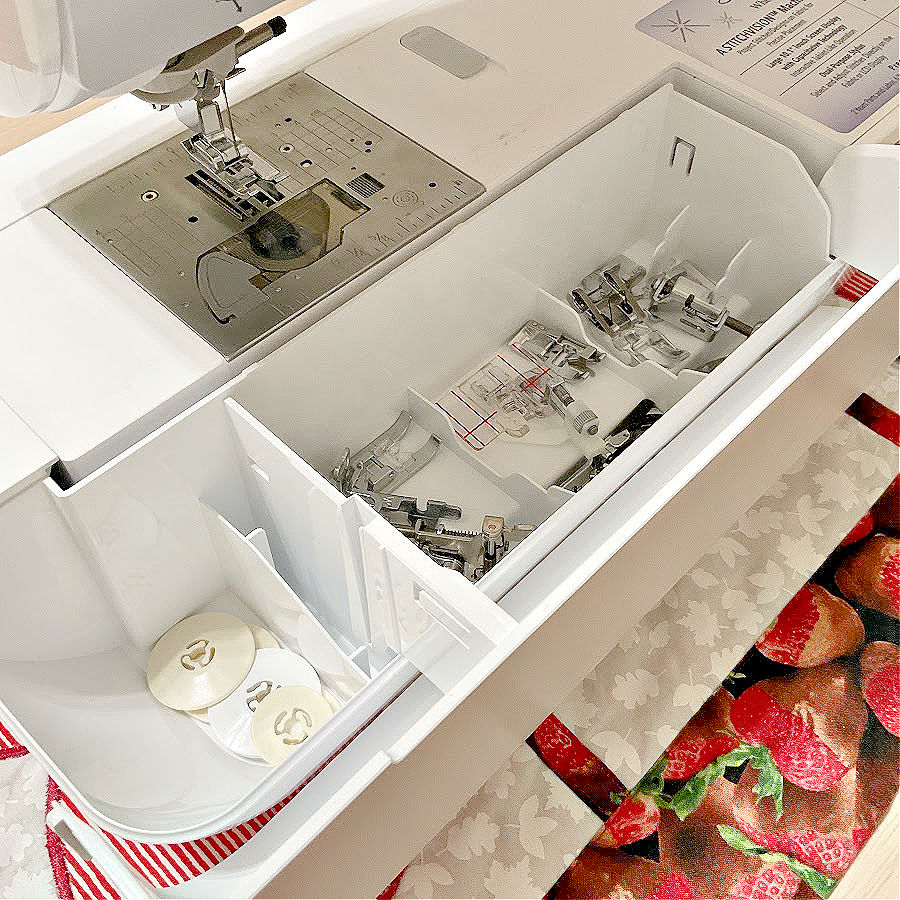
Sewing Machine Compartments
Many sewing machines come with built-in compartments or small accessory trays, usually tucked under the removable arm. These are convenient for holding a few essential presser feet, especially the ones you reach for most often.
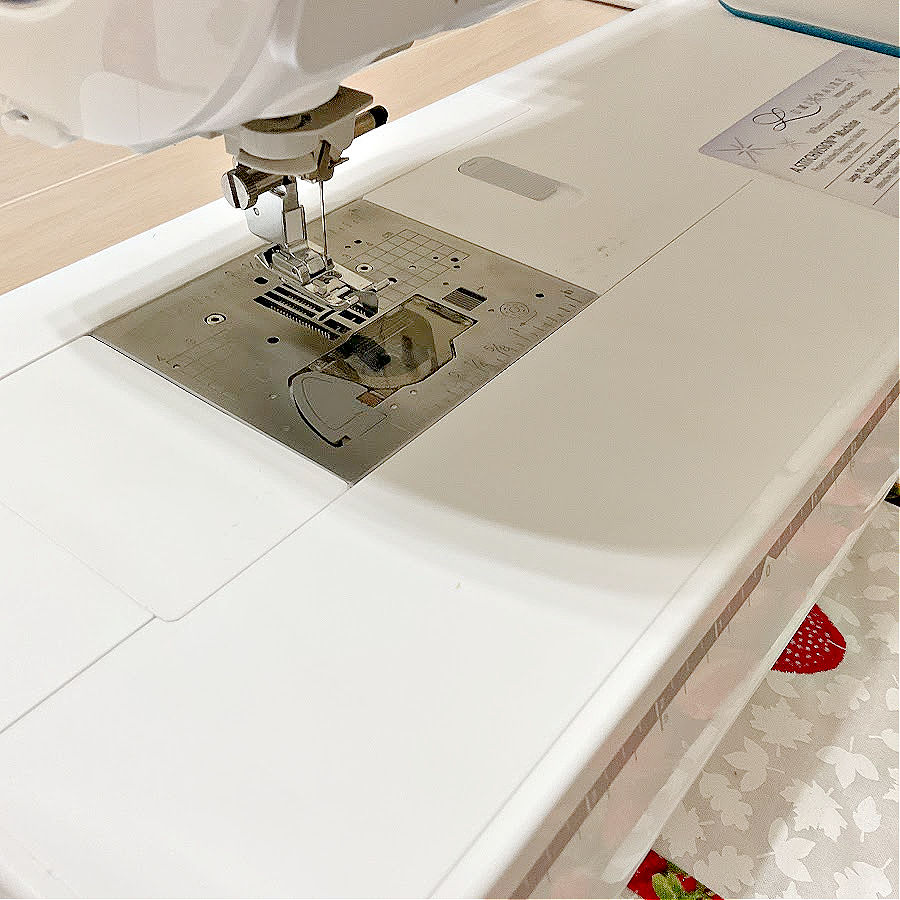
While the space is limited, it’s a practical choice for your standard zigzag foot, zipper foot, buttonhole foot, or any other you use regularly. They are close by and easy to reach when you need them, but they are also stored safely.
Pros:
- Always within reach while sewing.
- Designed to fit standard accessories, so no extra space is needed.
- Perfect for keeping your most-used feet close at hand.
Cons:
- These compartments often used as storage for other small sewing machine accessories, like bobbins, needles, or screwdrivers, so space fills up quickly.
- Not ideal for organizing a full collection or specialty feet.
- Easy to forget what’s stored inside if you don’t check it regularly.
Best for sewists who want quick access to their everyday presser feet. Also great as a backup storage spot when you’re in the middle of a project and need to keep your workspace tidy.
If you want a sewing machine that makes presser foot storage easier right from the start, it’s worth looking at models that come with built-in accessory cases. Here are a few I recommend that combine sewing features with smart storage design.


High-End Sewing Machine and Serger Storage
If you own a higher-end sewing machine or serger / overlock, you may already have the best presser foot storage available. These machines often come with custom-designed cases or zippered storage folders that hold every accessory in a designated spot. They’re well thought-out, secure, and tailored to the feet and tools that come with your machine.
Baby Lock Triumph Serger Storage
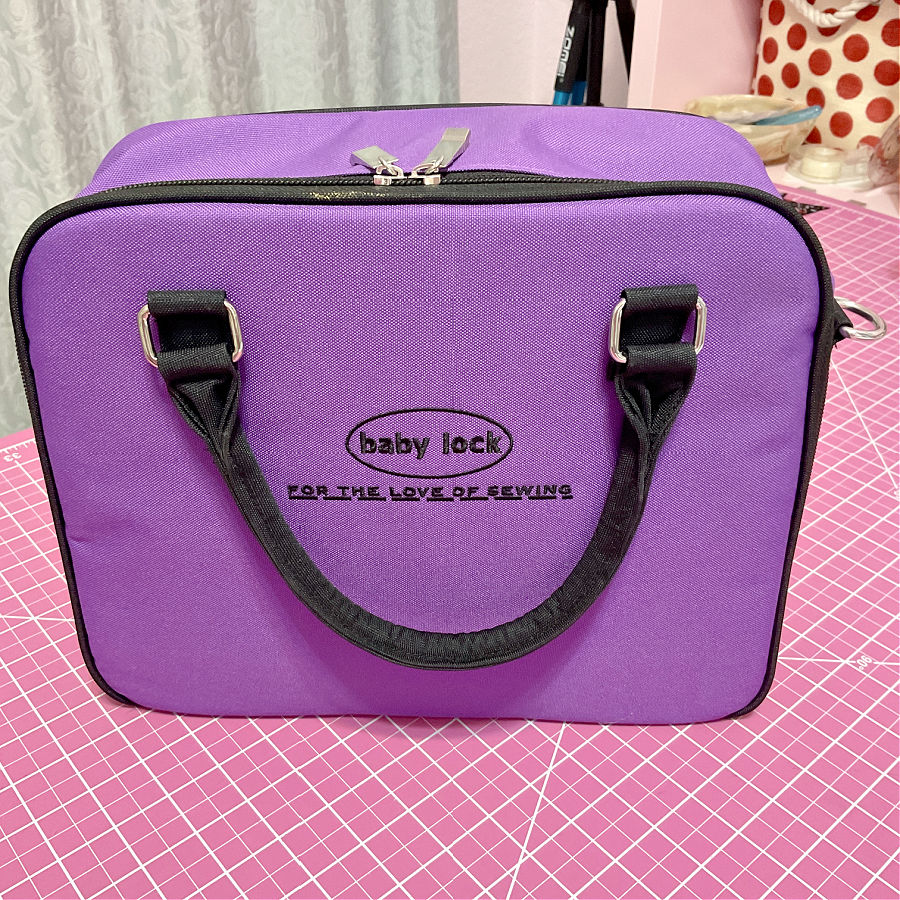
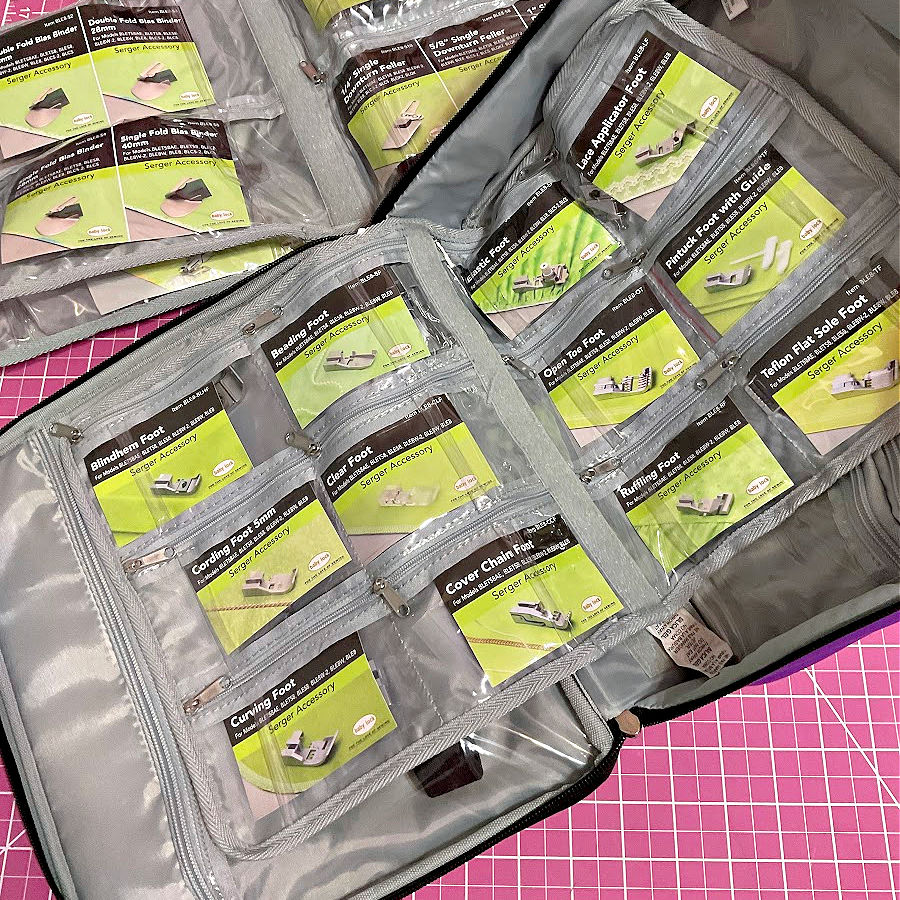
The Baby Lock Triumph includes a soft, zippered case with clear, labeled pouches – one of the most thoughtfully designed organizers for serger accessories. Each foot is stored in its own compartment, visible and protected. The book-style layout makes it easy to flip through and find what you need without rummaging.
- Each pocket is clearly labeled with the name of the foot and what it’s used for.
- Pockets zip closed, keeping the feet from falling out or bumping into each other.
- The soft-sided design is padded and travel-friendly, and you can take it to classes or sewing groups.
Brother Machine Accessory Box
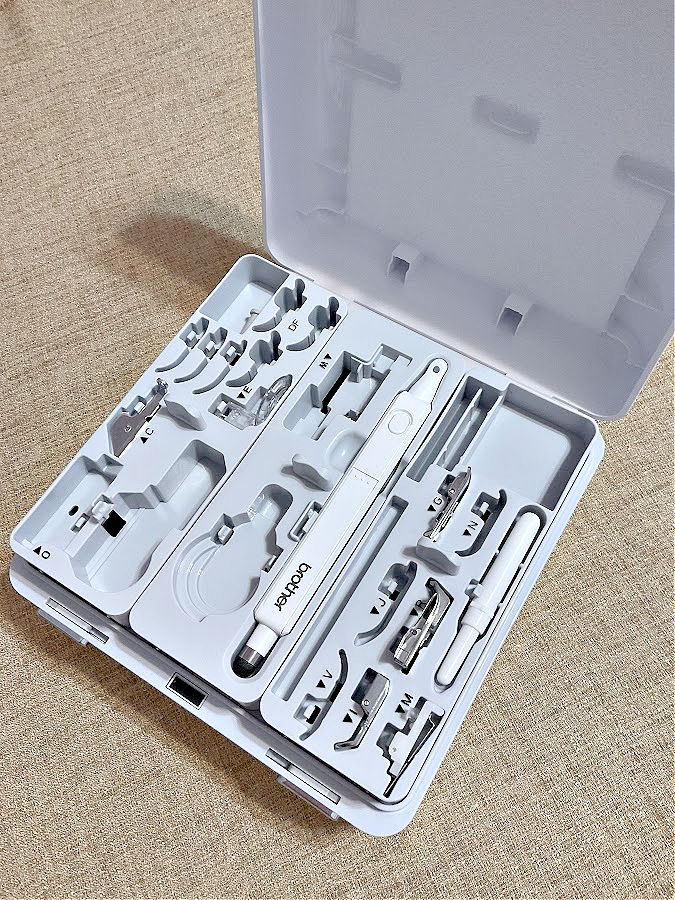
This case that came with my embroidery and sewing Brother Luminaire has molded slots for presser feet.
- Molded compartments fit each accessory exactly, reducing movement and protecting delicate feet.
- Excellent visibility and organization.
- The lid closes securely, and it’s compact enough to tuck away neatly in your sewing area.
This kind of presser foot storage offers superior protection, clear organization, and usually comes included with the machine – no extra cost required.
Just remember to use it consistently and return each foot to its place after sewing. In other words, do what the preaches (me) says, not what the preaches does, as you can clearly see many slots in my case are empty.
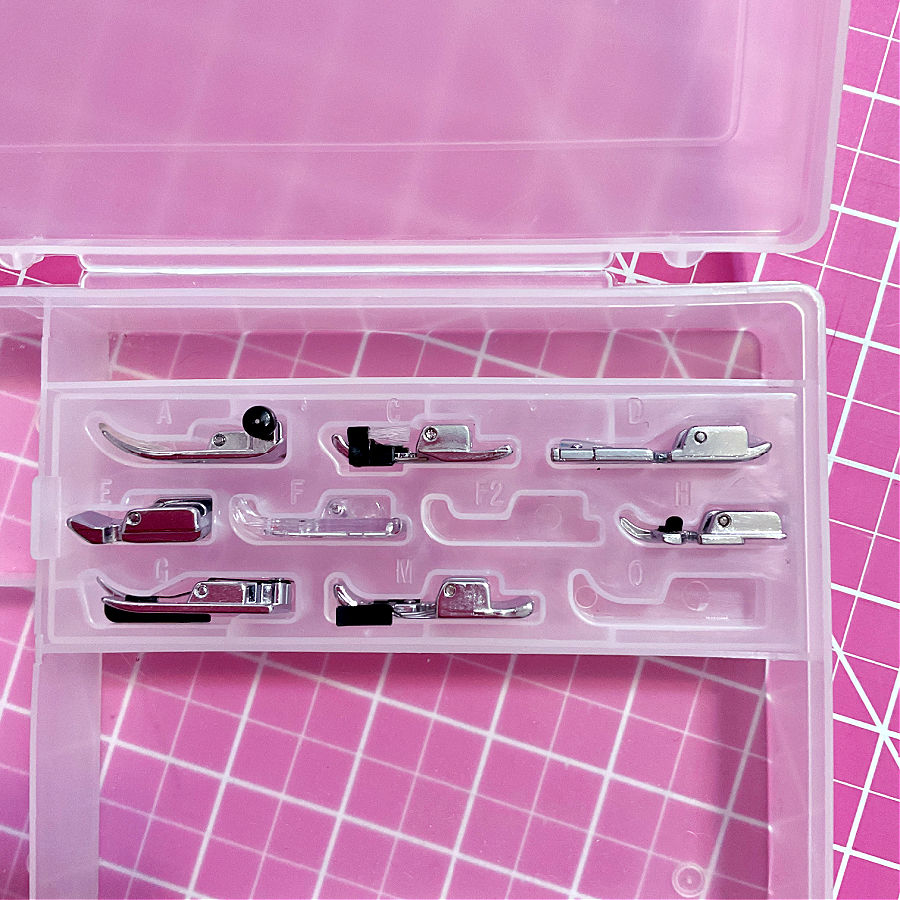
Janome 6600 Foot Box
Older models like my Janome 6600 may not have fancy cases, but they still offered sturdy, molded plastic boxes with individual compartments for each foot. Each slot holds the foot snugly, and it’s marked with letters.
A sewing machine does not need to be extra expensive to have a custom made storage case. This Bernette 33 sewing machine (actually, quite well reviewed by buyers) comes with its own storage case:

Presser Foot Kits with Molded Trays
Some time ago, I bought one of those big presser foot kits – the kind with dozens of feet arranged neatly in a molded plastic tray. Each foot had its own little spot, and it looked very tidy. I really liked it at first. Everything stayed in place, and I could see all the feet at once.
But the flimsy plastic lid didn’t snap shut. And then… I dropped it.
After that, all the feet popped out and got mixed up. I could technically put them back, but figuring out what goes where is a project in itself. And to be honest, I haven’t found the time. So now I keep all the presser feet from that kit in a different place.
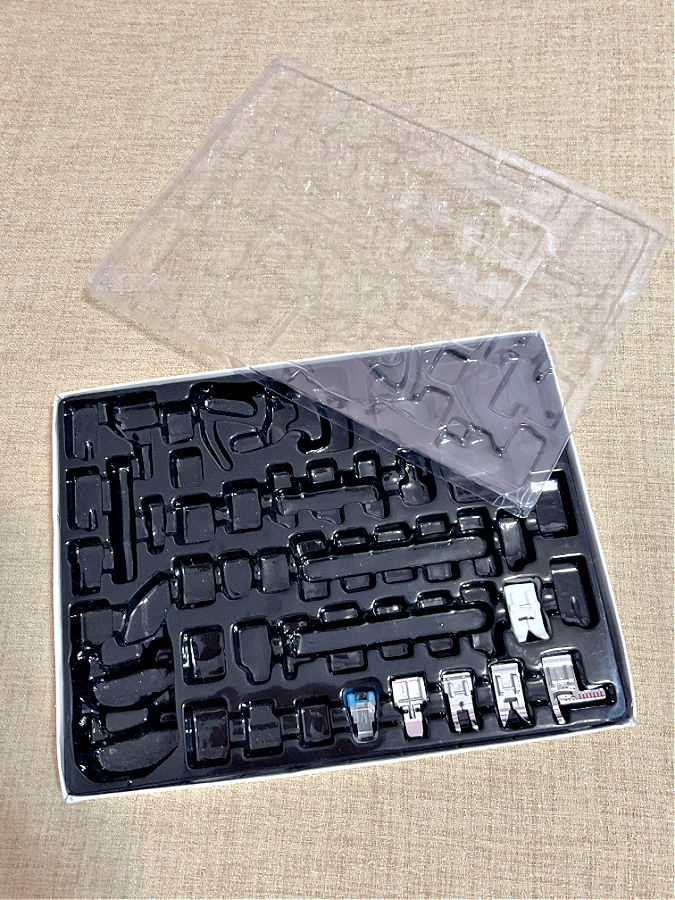
That said, this type of kit can be a great solution if you’re someone who keeps things in order. You should see the Madame Sew Presser Foot Kit which is a better version of what I had. It comes in a heavy-duty plastic case with a snap-locking lid. According to their description, it “protects pressers from drops and impacts by securing them safely in their own form-fitting recesses.”

Honestly, if you want everything in one place and you’re careful with your tools, this kind of case can be perfect. Just… don’t drop it when the lid is open.
How to Store Bulky Presser Feet
Not all presser feet are small and flat. Some, like walking feet, rufflers, or side cutters, are much bulkier and don’t fit neatly into pocket organizers or molded trays. These need a slightly different approach, but they can still be stored safely and in an organized way.
Here are a few practical ideas.
1. Small Lidded Boxes or Containers
Use individual plastic containers with lids for each bulky foot. Look for food storage containers – they keep the bulky foot protected and prevent it from damaging other tools.
I like to keep mine in an IKEA Skådis container with a lid. It attaches right onto the Skådis pegboard system, which I already use in my sewing room. It’s neat, accessible, and keeps everything off the table. The container is the perfect size for large presser feet (and for other small accessories).
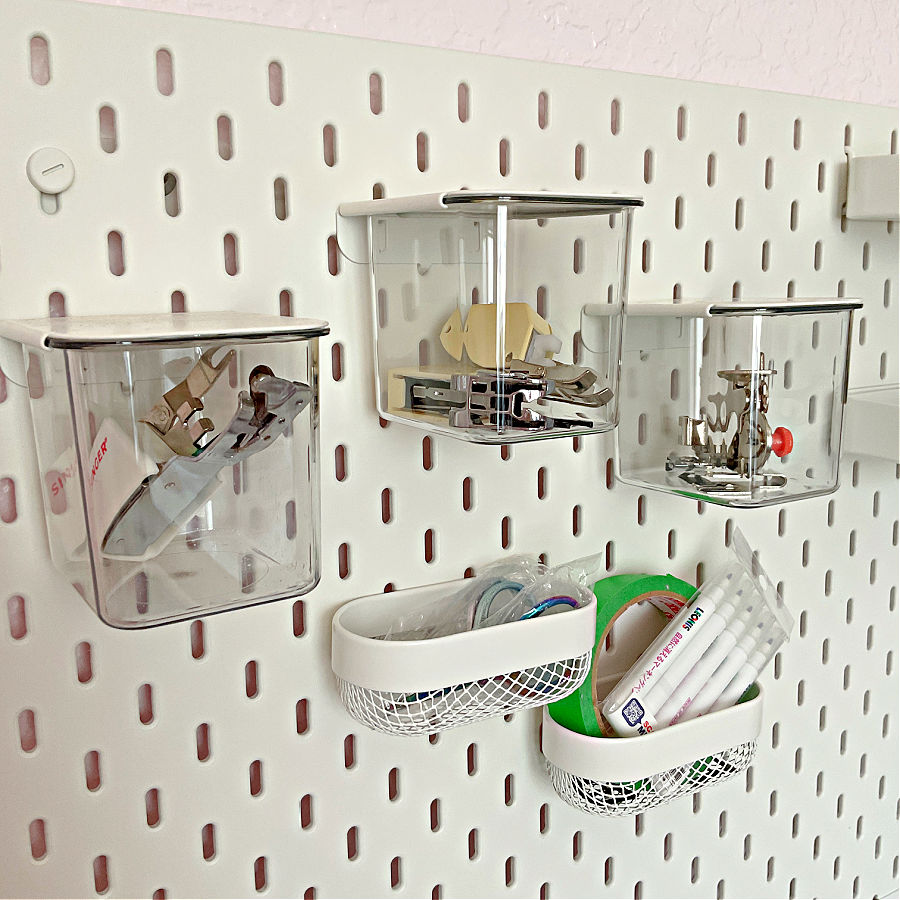
You can check it out here on the IKEA website. The only problem? It’s often out of stock.
If you can’t find it at IKEA, I did track down the same container on Amazon (Skadis Container with steel white lid compatible for IKEA). It’s a bit more expensive there, but it’s the exact match, and sometimes convenience wins.
It’s a simple solution, and it keeps my bulky feet safe and right where I can find them.
✅ Related tutorial: Organizing a Craft Room with IKEA Kallax: Styling, Storage, and Desk Hack
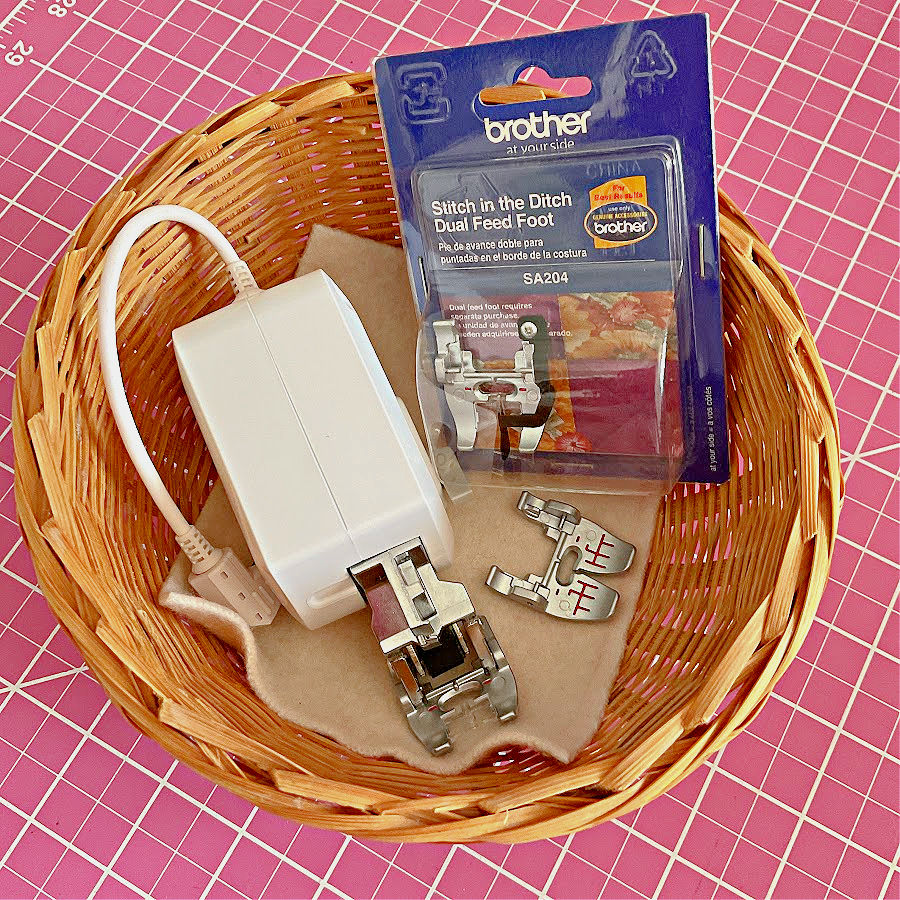
2. Sewing Baskets
A small sewing basket can hold several large feet together. I keep a very big Brother walking foot in a basket.
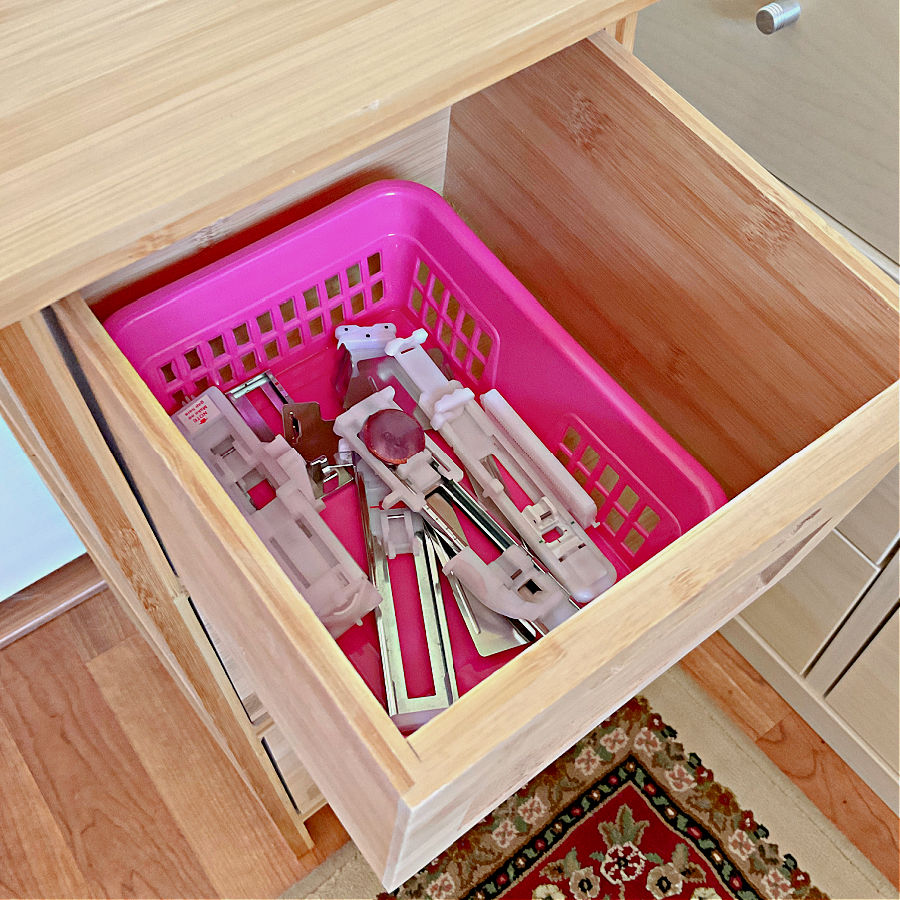
3. Drawer Compartments
If you have a drawer in your sewing cabinet, dedicate one section to larger feet. Use drawer dividers or small containers to keep them from sliding around.
4. Small Zip Pouches with Padding
Padded zip pouches (like makeup bags or tech accessory pouches) are another good option. They’re great for storing large feet that don’t get used often. Add a label on the outside so you know what’s inside at a glance.
5. Original Boxes or Cases
If the foot came in a hard case or box, keep it. Manufacturers often design those boxes with protection in mind. It may take a little more space, but it’s worth it for expensive attachments.
So, if you don’t use these bulky feet often, store them separately from your main presser foot organizer.
A Quick Note About Magnetic Storage
You may come across advice suggesting magnetic knife holders or strips to store presser feet. It sounds like a great idea but in most cases, it simply doesn’t work.
At first glance, many feet look like they’re made of metal, but looks can be deceiving. A lot of modern presser feet are made from some kind of aluminum alloy or other non-magnetic materials. Some even include plastic parts or composite materials and chrome plating. These materials won’t respond to magnets, even though they have a shiny, metallic appearance.
It’s better to skip magnetic storage altogether and choose something that keeps your feet truly secure and protected.
How do I know that? Simple. I tried. I bought the product below thinking I will have the best of both worlds: a secure storage (my husband uses magnetic holders for much heavier tools) and a storage that is easy to view and use. Well, most of my machine feet did not stick to the holder! Nothing wrong with the device, just not going to work on sewing machine feet.

Did you find this tutorial helpful? If so, save this pin (see below) on your sewing board so you can come to this tutorial later when you are ready, and follow me on Pinterest for more tips, tutorials, and inspiration!

latest posts
- What Do You Call a Person Who Sews? I Asked My Readers and Got 1,408 Opinions
- DIY Round Purse: PDF Sewing Pattern and Detailed Instructions
- Mini Wonder Clips By Clover: Useful Sewing Tool Or Just Another Notion?
- Non-Slip Grips For Quilting Rulers: A Small Notion With A Useful Job
- Fabric Eraser for Sewing: What It Removes and When to Use It
- What Is The Best Thread For Sewing Machine Projects? Let’s Find Out!
- Butterfly Quilt Block Tutorial – Foundation Paper Piecing
- How To Sew Quilt Squares So The Corners Match
- Sewing With Fork Pins: How They Help With Pattern Matching, Slippery Fabric, And Seams