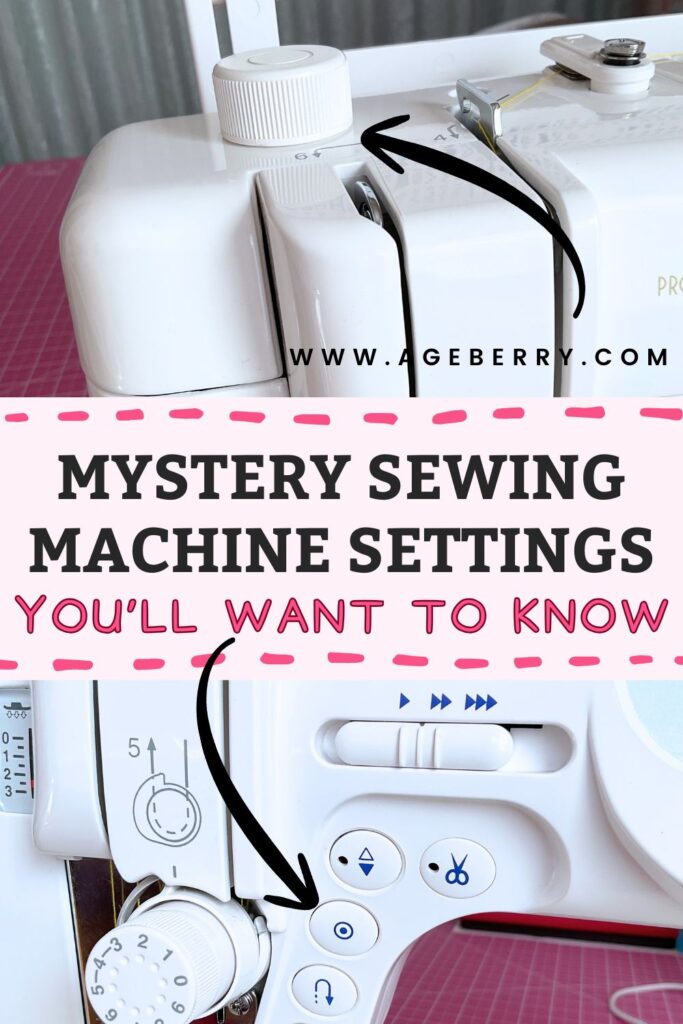
5 Sewing Machine Settings Nobody Mentions (But Should)
Most sewing machines have a few obvious controls — stitch length, stitch width, tensions, etc. that you’ve used a thousand times. But then there are the others. The mystery dials, the quiet buttons, the little levers hiding in shadowy corners of your machine.
These are the settings nobody talks about. Not because they’re unimportant, but because they tend to sit quietly in the background, doing their thing… until the day you meet a tricky fabric or a stubborn seam and realize they’ve been the missing piece all along.
Today, we’re pulling those controls out of hiding. Some will save you time, some will save your stitches, and some will save your sanity. And yes — a few of them might send you on a small scavenger hunt across your sewing machine.
────────── ✧ ──────────
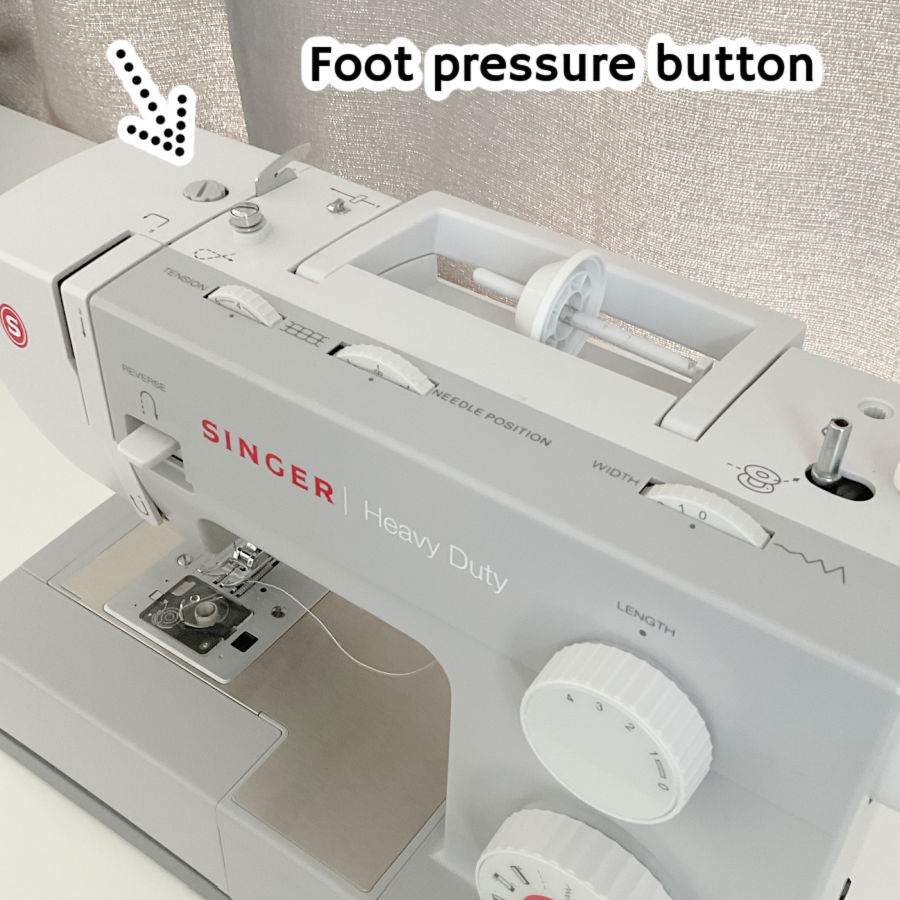
1. Presser Foot Pressure Dial – The Mysterious Setting Hiding in Plain Sight
Among the many knobs and dials on a sewing machine, this one rarely gets the spotlight. It’s the presser foot pressure dial, and while it might look like a minor feature, it plays a surprisingly big role in how your fabric behaves under the needle.
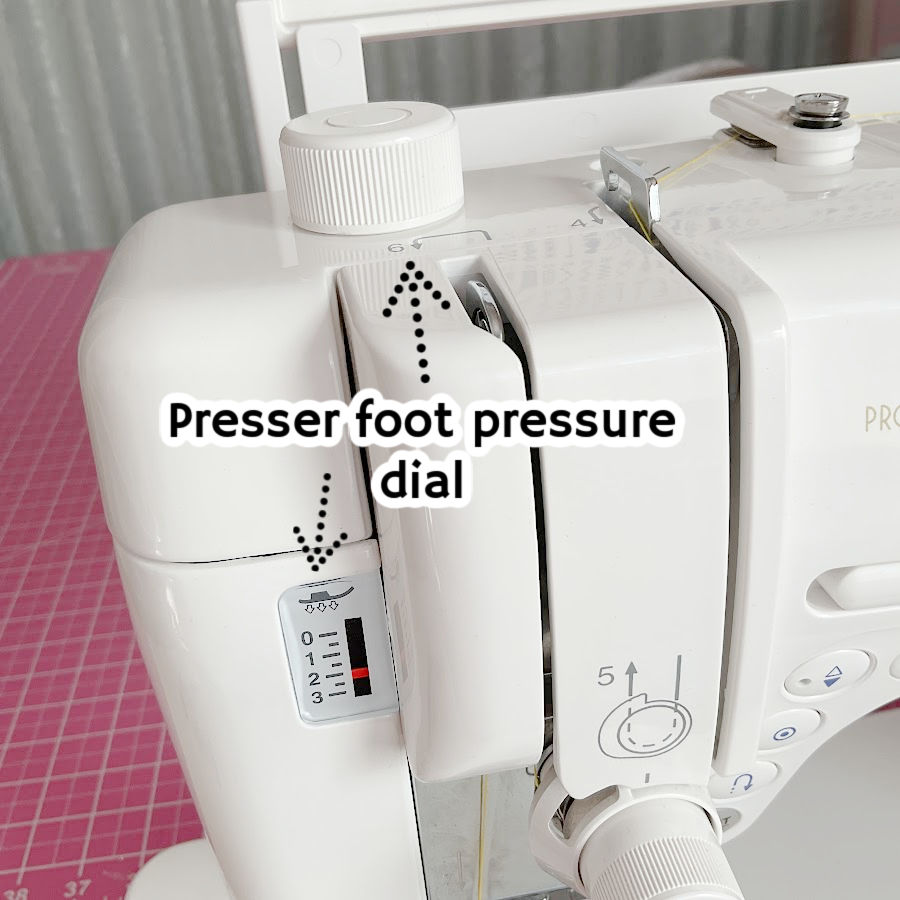
This dial adjusts how firmly the presser foot presses down on your fabric as it feeds through the machine. Think of it as the sewing machine’s grip – not the grip of the needle, but the gentle hand that holds the fabric steady while the feed dogs move it along.
Now, finding it can sometimes feel like a scavenger hunt. Depending on your machine, it could be sitting right on top, hiding on the side, or tucked somewhere obscure like it’s trying not to be noticed. It might be labeled with numbers, or just a plus and minus. Either way, once you know what it does, you’ll wonder why nobody ever pointed it out before.
This little dial is not decorative. It’s essential. If your stitches are acting up and you’ve already rethreaded everything twice, it might be time to give this little dial some attention.
Most sewists don’t even notice the presser foot pressure dial until something goes wrong – and that’s partly because, for many projects, it stays right where it is. You can sew for years on standard cottons or stable woven fabrics without ever needing to touch it.
For example, on my Janome machine, the “normal” pressure is usually set at 3. This setting works beautifully for most common projects – garments, quilting, home decor. No adjustments necessary.
Why It Matters: Fabric Types and Feed Consistency
The reason this setting doesn’t get much attention is because you only need to change it when your fabric starts acting like a drama queen. Stretchy knits, super fine silks, thick denim seams, lofty quilt sandwiches, anything beyond basic quilting cotton – these are the moments when it’s time to give that dial a little twist.
Too much pressure, and your fabric might get stretched out, especially knits. Not enough pressure, and those light or slippery fabrics might bunch or shift with every stitch. The pressure needs to be just right for the fabric you’re using so the feed dogs can do their job without resistance or chaos.
If your machine feels like it’s chewing on your jersey knit or if your satin looks like it’s ice skating under the needle, that’s usually a sign the pressure is off.
When to Adjust It (And What Happens If You Don’t)
Changing the presser foot pressure isn’t something you need to do constantly, but it does make a difference in certain sewing situations.
Take a look at your machine and locate the presser foot pressure control. Once you’ve found it, adjusting is easy.
Always test your setting on a scrap first.
And don’t worry – it’s a dial made to be adjusted. You’re not going to mess up your machine by changing it. In fact, not adjusting it when needed is what causes most of the trouble.
Here’s when to change it:
- Lightweight fabrics (voile, chiffon, silk) – decrease the pressure. Too much force will cause rippling and puckering.
- Heavy fabrics (denim, canvas, wool) – increase the pressure. They need more grip to stay put.
- Knits and stretchy fabric – decrease the pressure to avoid stretching and tunneling along the seam.
- Quilt sandwiches with batting – slightly increase the pressure to help all layers feed at the same rate.
Special cases to watch for:
- Cork and vinyl – These don’t slide easily under the presser foot. They’re more like sewing across a cutting board. Reduce the pressure slightly and consider a walking foot or Teflon foot for smoother feeding.
- Minky and velvet – These have texture, nap, and a mind of their own. Decrease the pressure to avoid crushing the nap or distorting the fabric as it feeds.
- Bulky joins (like jeans hems or bag seams) – Increase the pressure temporarily to power through thick, stacked layers without skipping or dragging.
When presser foot pressure isn’t properly adjusted, things go sideways fast:
- Puckering that no amount of pressing can fix.
- Fabrics sliding around like they have plans of their own.
- Stitches that are inconsistent, uneven, or skipped entirely.
- Dragging at the seam joins that throws everything off-course.
- Extra frustration – and no one needs more of that when sewing.
The fix is usually as simple as turning a dial a click or two in either direction. It’s quick, it’s easy, and it often works better than rethreading your machine five times and hoping for a miracle.
✅ Related tutorial: Troubleshooting Common Sewing Machine Problems (+ Solutions)
2. Needle Up/Down Position – Why Push a Button Instead of Turning the Wheel?
The needle up/down position button is a small feature that lets you choose exactly where your needle stops — either up and out of the fabric, or down and holding the fabric in place.
On most machines, it’s a small button near the needle area or on the front panel. Sometimes it has a needle icon, sometimes an arrow.

If your machine doesn’t have this button, you can achieve the same thing by manually turning the handwheel. But here’s the difference: the button does it instantly, perfectly, and without you having to take your hands off your fabric.
The Button Advantage
When you set the needle up/down position button, your machine doesn’t just move the needle once. It remembers your choice and follows it automatically every time you stop sewing.
If you’ve set it to needle down, it will stop with the needle in the fabric — no thinking, no reaching, no interruptions. Needle up? Same deal — it lifts clear every single time without you touching a thing.
Compare that to manual handwheel turning. Without the button, you have to reach up and move the wheel at every single stop. Every time you pause to pivot, adjust, or remove the fabric, you’re adding that extra step. It doesn’t sound like much, but over the course of a project with dozens (or hundreds) of stops, that’s a lot of extra motion — and a lot more chances for the fabric to shift before you start sewing again.
The button turns that repetitive task into something your machine does for you, silently and perfectly, so you can keep both hands exactly where they belong: guiding your fabric and keeping your seam steady.
With the button, you can:
- Pivot corners without lifting your hands.
- Stop mid-curve and keep control of the fabric.
- Pull your work out quickly without snagging.
- Resume stitching without any tiny “jump” in stitch length.
The Handwheel Reality
Turning the wheel by hand works fine — and for decades, it was the only option. But it’s slower and less precise, especially when you’re in the middle of a seam and want to keep both hands steady. Every time you reach for the wheel, the fabric has a chance to shift.
On tricky materials like satin, minky, or vinyl, even the smallest movement can show up as a wobble in the stitch line.
Both methods work. The handwheel is tried-and-true. But the button is like having a sewing assistant who gets the needle position right every single time, without interrupting your flow.
If your machine has the feature, it’s worth making it part of your sewing habit. Your seams will be smoother, your corners sharper, and your hands will stay exactly where they belong — guiding the fabric, not reaching for the wheel.
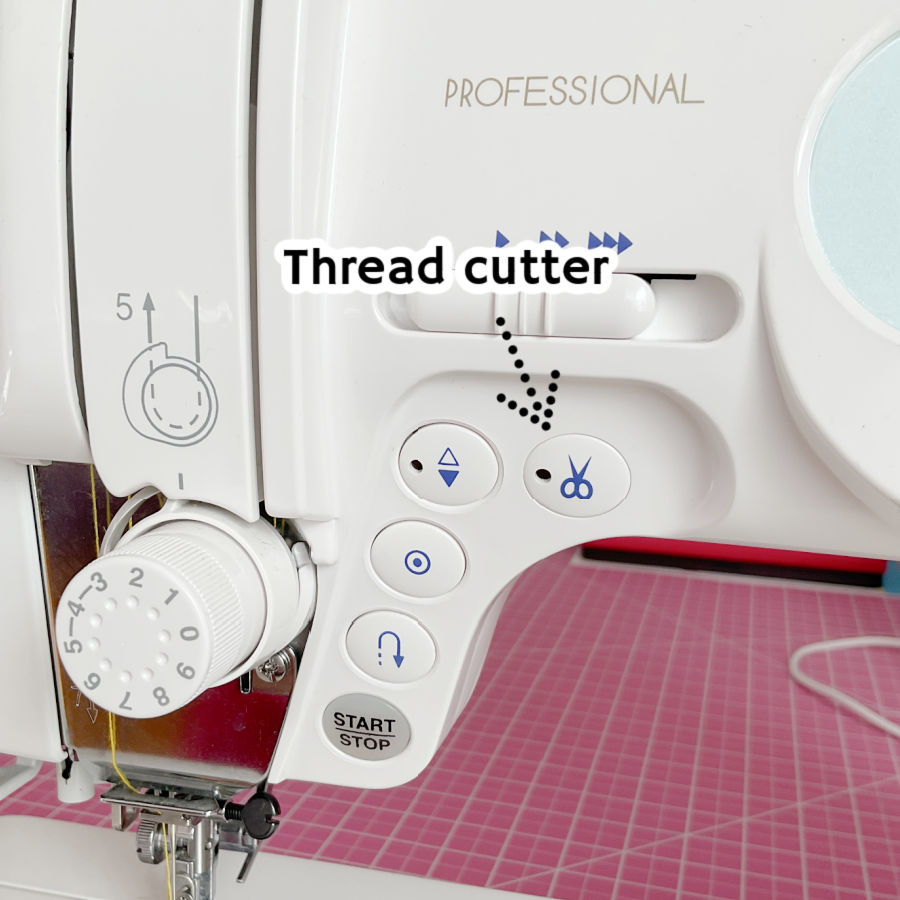
3. Thread Cutter – When Your Machine Does the Trimming for You
The thread cut feature is one of those small conveniences that feels like magic the first time you use it. Press the button, and your machine snips the upper and bobbin threads for you. No reaching for scissors, no dangling tails waiting to be trimmed later — it’s instant and tidy.
Trimming threads may seem like a small step, but it’s one you repeat constantly when sewing. Every seam, every project, every stop-and-start leaves you with tails to snip. The thread cut feature turns that repetitive step into something quick and efficient.
It’s also neater. Automatic thread cutting leaves shorter tails, which means less wasted thread.
Before built-in cutters, every stop meant grabbing scissors or snips, finding the thread tails, and trimming. Multiply that by dozens (or hundreds) of seams, and it adds up to extra time and movement.
With automatic cutting, the machine does it for you in a fraction of a second. Press once, and the machine cuts both the top and bobbin threads. On some machines, it also raises the needle and presser foot for you.
When to Use It
Built-in thread cutters are best when:
- You’ve backstitched to lock the seam.
- You don’t need long thread tails to secure the stitch by hand.
- The back of the project won’t be visible, so a tiny thread nest isn’t a problem.
Cautions and Common Issues
Automatic cutters aren’t the right choice for every seam. Here’s why:
- Loose threads at the start – After using the cutter, your top thread may slip out of the needle when you start the next seam. To avoid this, hold both thread tails for the first few stitches.
- Messy backs – Some machines leave a small knot or tangle on the underside after you start sewing again after cutting. If the back of your project will be visible (like a quilt backing or reversible garment), you may want to trim threads manually instead.
- Need for long tails – For techniques like gathering stitches, or sewing delicate fabrics, longer thread ends are better for securing the seam.
So, use the thread cut button when it suits the project, and stick to scissors when you need more control over how and where threads are trimmed.
✅ Related tutorial: The Hidden Features of Your Sewing Machine: What’s This Button For?
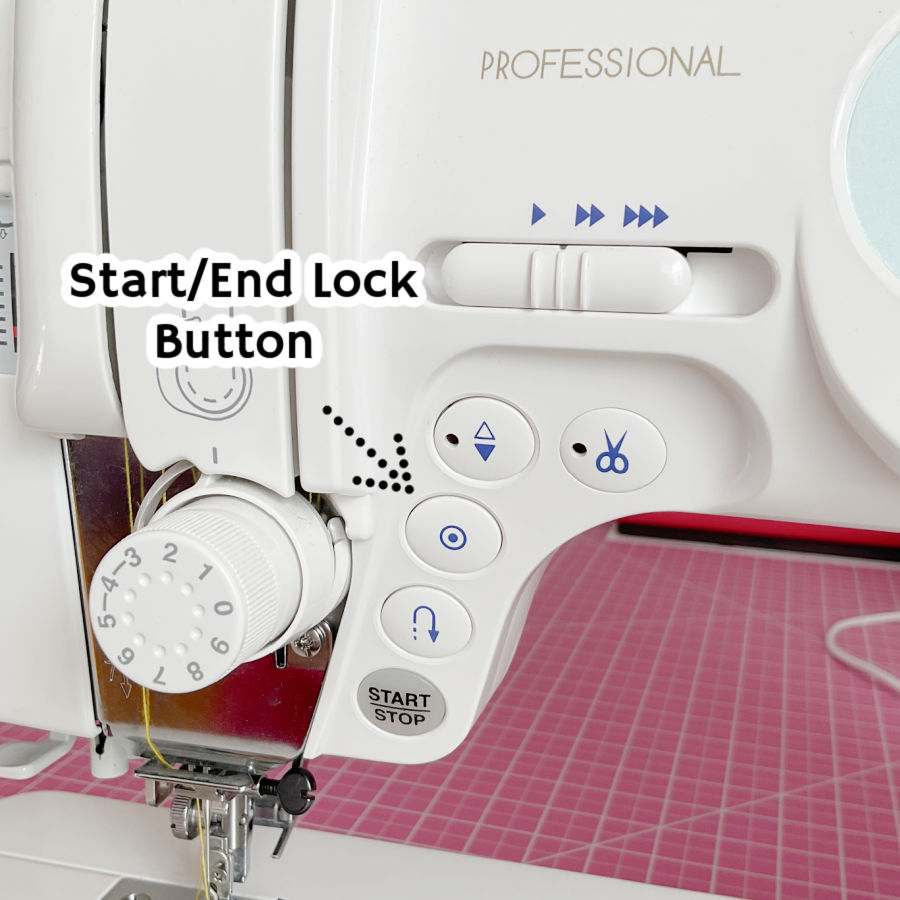
4. Start/End Lock Button – Secure Stitches Without Backstitching
The start/end lock button (also called Auto-lock button) is your shortcut to securing stitches without the usual back-and-forth motion. Press it at the start or end of a seam, and the machine sews several stitches in place to lock the thread ends. No reversing, no extra steering — just a neat, stationary knot built right into your stitching.
On most machines, it’s marked with a tiny knot or padlock symbol and sits near the stitch selection area. Some models let you program it so the lock stitches happen automatically at the start and end of every seam.
Why It Matters
Backstitching works well, but it can sometimes leave visible overlap, bulk, or wobbly stitches — especially on lightweight or delicate fabrics. The lock stitch secures the seam without changing its direction, so everything stays straight and smooth.
It’s also a lifesaver in places where reversing would be awkward or impossible, like when you’re sewing up to a seam edge, a decorative border, or a tight corner.
When to Use the Auto-Lock Button
- Topstitching – Prevents visible back-and-forth stitches.
- Decorative stitches – Locks the seam without disrupting the pattern.
- Lightweight fabrics – Avoids stretching or distortion caused by reversing.
- Small areas – Secures the seam where there’s no room to backstitch.
When to Skip It
Lock stitches aren’t invisible. On fine fabrics or sheer materials, the tiny knot can still show. They also work best when the back of the project isn’t a focal point — sometimes the locked area leaves a small thread buildup underneath.
For high-stress seams, backstitching may still give a stronger hold.
Button vs. Manual Backstitch
With manual backstitching, you reverse a few stitches, then sew forward again. It’s effective, but it takes more control, especially if you want the stitches perfectly lined up.
The auto-lock button does it for you in place — no reversing required, and no worrying about matching the stitch path. Press once, the machine locks it down, and you move on.

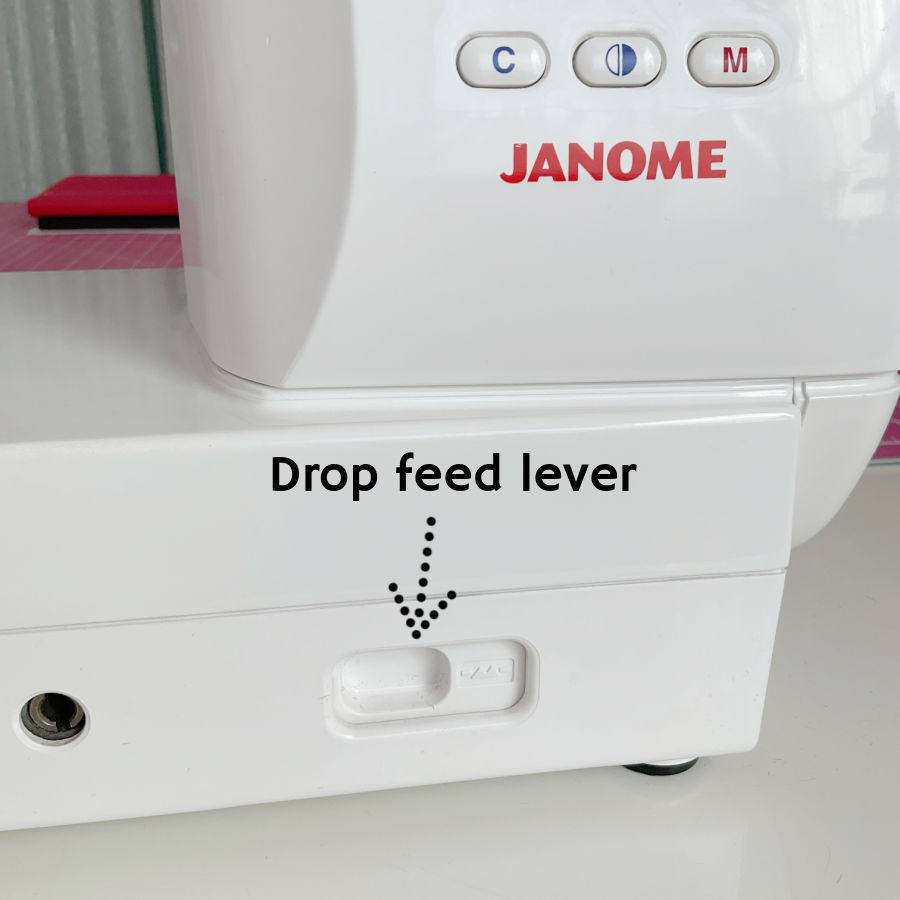
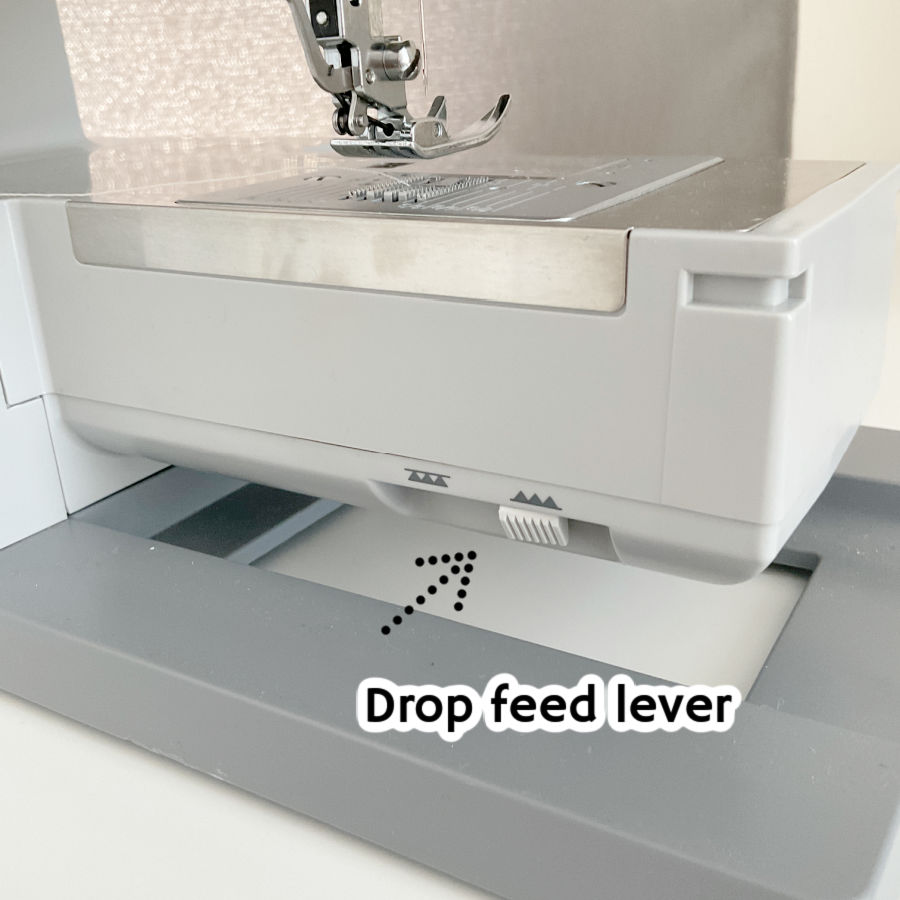
5. Free Motion Button – Dropping the Feed Dogs for Creative Control
The free motion button (or lever, also known as “drop feed dogs”) disengages your feed dogs so the fabric no longer moves forward automatically. With the feed dogs lowered, you can move the fabric in any direction you want — forward, backward, sideways, even in little loops.
This opens up a whole new set of possibilities: free motion quilting, embroidery, thread painting, darning, and creative stitching that doesn’t follow a straight seam.
How It Works
Normally, the feed dogs grab the fabric and feed it through at a steady pace with each stitch. When you drop them using the free motion button or lever, those little teeth disappear below the needle plate. This means you control the fabric movement entirely with your hands.
It’s essential for:
- Free motion quilting – creating fluid, curving designs instead of straight lines.
- Embroidery by machine – drawing with thread.
- Darning and repairs – covering worn spots or filling holes without the fabric creeping forward.
I learned firsthand that this button can be surprisingly elusive. I wanted to use a darning foot to repair my daughter’s shorts. She has a Singer Heavy Duty — a sturdy, no-nonsense machine. She didn’t have the manual, but I knew it was capable of free motion sewing.
So I thought, How hard can it be to find the button to drop the feed dogs? Very hard, apparently. I looked all over the top, front, and sides. No sign of it.
Turns out, the control was hiding under the free arm — at the very back of the machine. You have to remove the accessory tray to even see it.
Once I found it, I had that mix of satisfaction and mild annoyance: satisfaction because I could finally get on with my mending, annoyance because if a feature is hidden that well, you almost never think to use it.
✅ Related tutorial: Free Arm Sewing Machine: Do I Need One?
Why You Might Not Use It Often
The free motion button isn’t something you’ll use in everyday sewing. It’s a specialty control, and if it’s tucked away in an awkward spot, it can easily be forgotten. But for creative work or certain repairs, it’s essential.
Tips for Using It
- Always pair it with a darning foot or free motion quilting foot — regular presser feet can snag or push the fabric unevenly when the feed dogs are down.
- Set your stitch length to zero or ignore it entirely — with the feed dogs lowered, stitch length depends on how fast you move the fabric.
- Practice on scrap fabric to get a feel for coordinating hand movement speed with needle speed.
Remember to raise the feed dogs when you’re done — otherwise your next straight seam might not go anywhere.
────────── ✧ ──────────
The more you understand these “quiet” settings, the more your sewing machine feels like a true partner instead of just a tool. They’re not there to complicate things — they’re there to help you handle special fabrics, tricky seams, and moments when the usual settings just aren’t enough.
So the next time you spot a mysterious button or dial, don’t ignore it. Read the manual, who knows? It may prove to be useful. Give it a turn, a press, or a slide, see what it does and how it works. It might be exactly what your project has been waiting for.
Oh, and speaking of hidden features — take a look at this. I just spotted this mysterious dial on the side of my 15-year-old sewing machine. I’ve used this machine for years and somehow never noticed it.
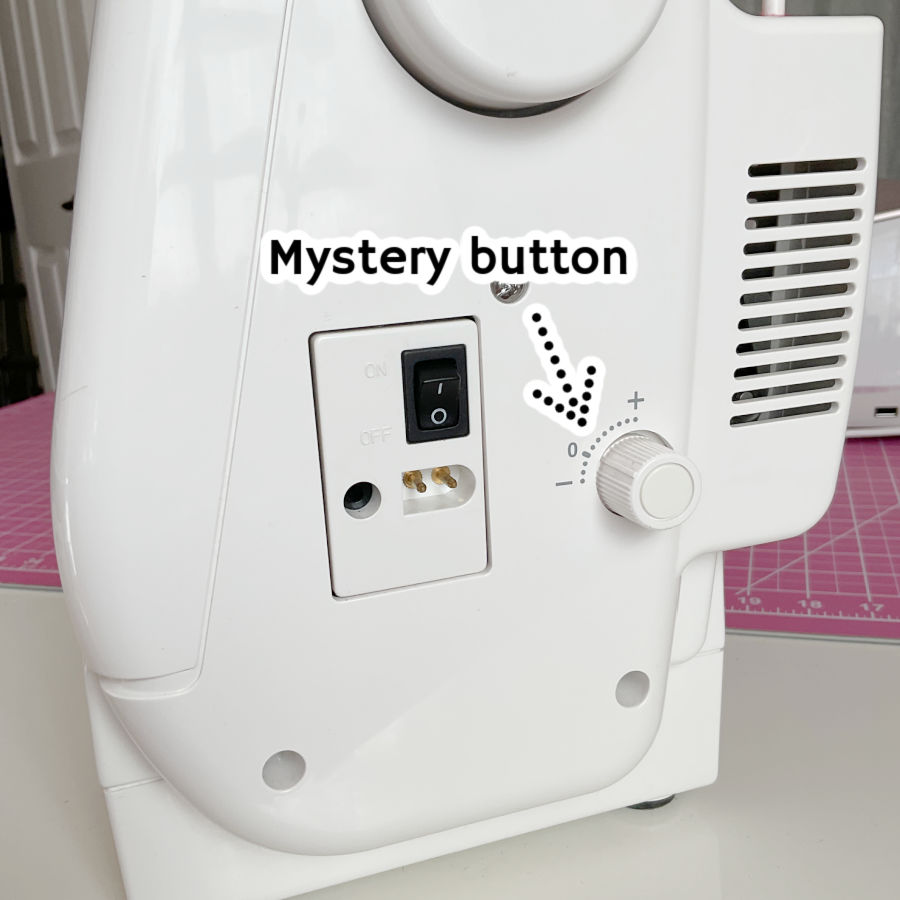
What is it? A secret turbo boost? A fabric-flattening laser? The self-destruct button they never told me about? (Let’s hope not — I like this machine.) Guess it’s time to dig out the manual and solve the mystery. Or maybe I’ll just press it and see what happens… kidding. Mostly.
✅ Related tutorial: 17 Sewing Tools You’re Not Using (But Absolutely Should Be)
So… did this mystery sewing machine settings guide clear up a few of those “what does THIS button do?” moments? If it did, save this pin to your sewing board now — because we both know that “I’ll find it later” usually means it disappears into the internet void forever. And while you’re at it, follow me on Pinterest for more sewing tips, tutorials, and the occasional deep dive into the quirks of sewing machines.
latest posts
- What Do You Call a Person Who Sews? I Asked My Readers and Got 1,408 Opinions
- DIY Round Purse: PDF Sewing Pattern and Detailed Instructions
- Mini Wonder Clips By Clover: Useful Sewing Tool Or Just Another Notion?
- Non-Slip Grips For Quilting Rulers: A Small Notion With A Useful Job
- Fabric Eraser for Sewing: What It Removes and When to Use It
- What Is The Best Thread For Sewing Machine Projects? Let’s Find Out!
- Butterfly Quilt Block Tutorial – Foundation Paper Piecing
- How To Sew Quilt Squares So The Corners Match
- Sewing With Fork Pins: How They Help With Pattern Matching, Slippery Fabric, And Seams