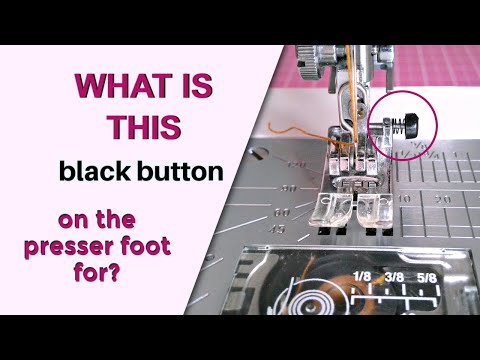
The Hidden Features of Your Sewing Machine: What’s This Button For?
I’ve had my trusty Janome 6600P sewing machine for over a decade now, and I used it for countless projects. I thought I knew it inside and out, yet today, a curious glance led me to a startling realization. Right there, on the face of the machine I thought I knew so well, were several buttons and dials that I had never actually put to use – they’ve been right in front of me all this time.
This discovery got me thinking – if I, a seasoned sewist, had overlooked these features, then perhaps others might have done the same. So, with a mix of curiosity and excitement, I opened the manual that came with my Janome 6600P and decided it was time to get acquainted with these overlooked aspects of my machine.
In this article, I want to share some insights about certain buttons and features that you might have also passed by on your own machine. While some of these are familiar to me, a few were completely new discoveries. Take a moment to examine your sewing machine – you might find functionalities you never realized were there, waiting to be explored and understood.
Attention! If you prefer visual learning and love to see every detail in action, check my YouTube video version of this tutorial. You’ll find the link at the bottom of this post. To get the full experience, I highly recommend checking out both the video and this written post.
The Leveling Button: More Than Meets the Eye
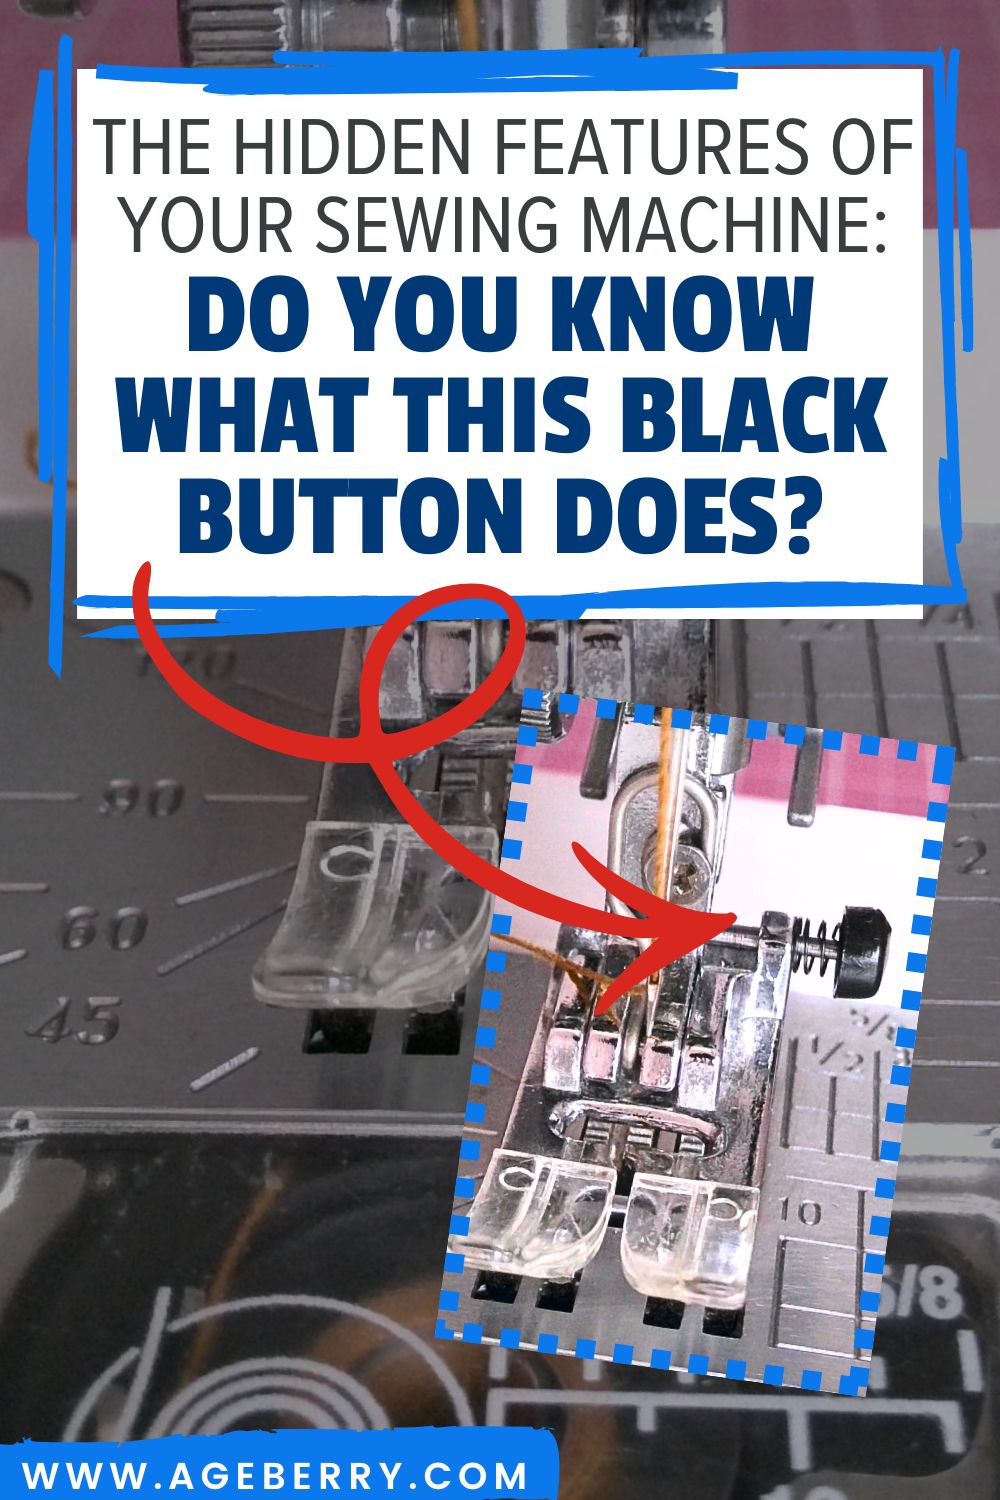
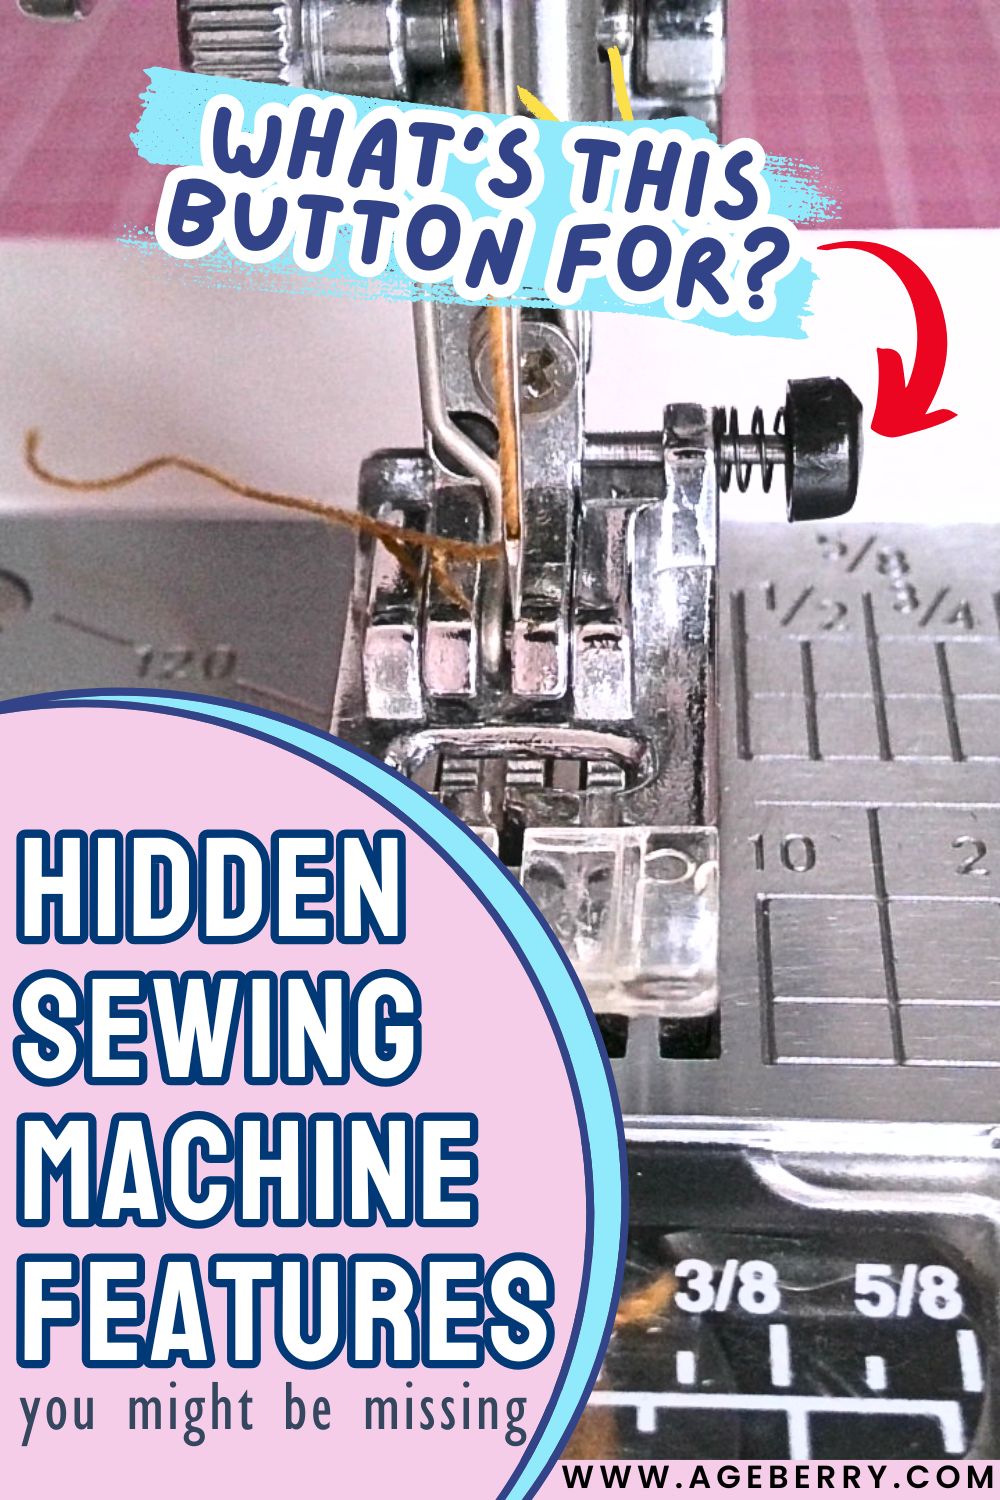
The so-called “leveling button” (or just a black button) on a sewing machine’s presser foot is a small feature that often goes unnoticed. On my Janome 6600P, as with many other machines, this button is positioned on the right side of the presser foot, and on my Brother Luminaire, the black button is on the left side. Not all presser feet have this button, as it depends on the design of the sewing machine and the accessories provided by the manufacturer.
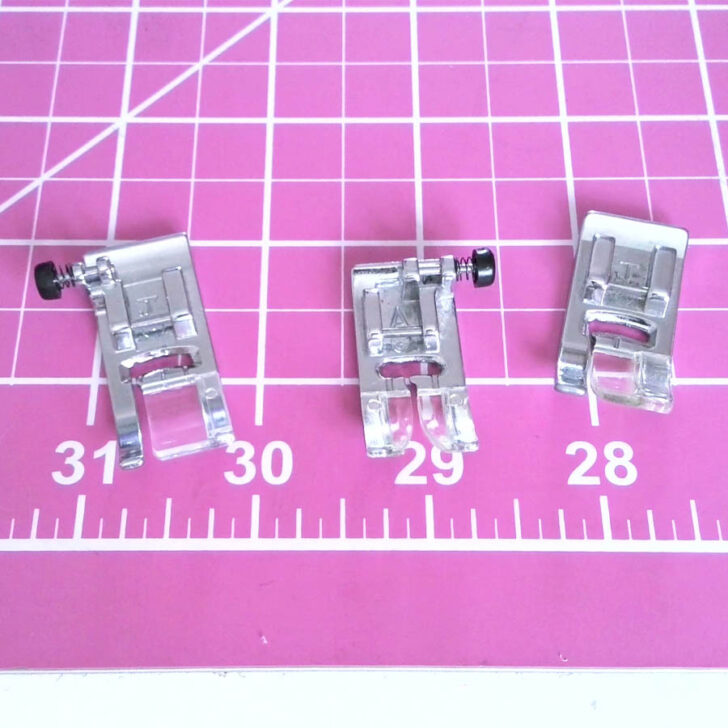
This small black button that can sometimes be mistaken for a screw or some kind of a decorative part rather than a functional tool.
Its color contrasts with the metal of the presser foot, making it visually distinguishable upon closer inspection.
The primary function of the leveling button is to assist your sewing machine’s presser foot in gliding smoothly (more or less) over thick seams or multiple layers of fabric.
When you approach a bulky seam, the front of the presser foot can tilt upwards.
It will lead to uneven stitches or even can cause the machine to stall. By engaging the leveling button, you temporarily increase the height of the presser foot and make it level with the thick seam, allowing it to maintain contact with the fabric and pass over the bulk.
How to Use the Black Button
Using the leveling button is really easy when working with thick materials like denim. Let me walk you through the process using a piece of denim cut from an old pair of jeans, which is a great way to practice.
For this demonstration, I had to set up my sewing machine with a denim needle, which is designed to handle thicker fabrics. I also used a strong, durable thread that’s appropriate for denim – jeans thread.
✅ Related tutorial: 19 Types of Sewing Machine Needles and What They’re Used For
Begin sewing towards the thick seam at a steady pace. As you sew and approach a thick seam, slow down a bit to prepare for the transition.
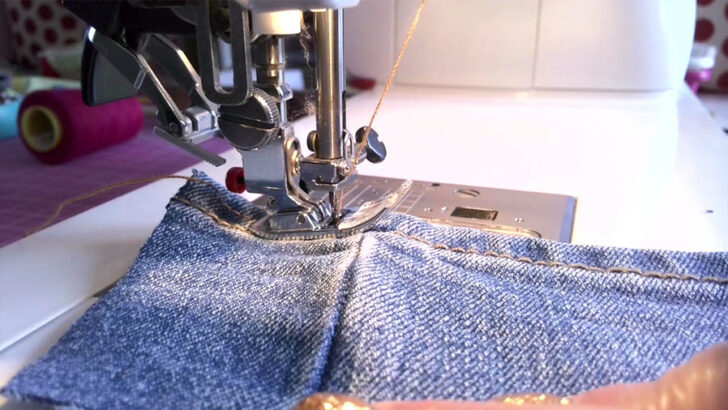
When the front edge of the presser foot reaches the thicker area, raise the presser foot.
Use your finger to press the black button. This will raise the back of the foot to match the height of the fabric.
Lower the presser foot back while keeping the black button pressed in.
With the button pressed, continue to sew over the seam. The presser foot should now move easier over the bulky section without causing any skipped stitches or loss of tension.
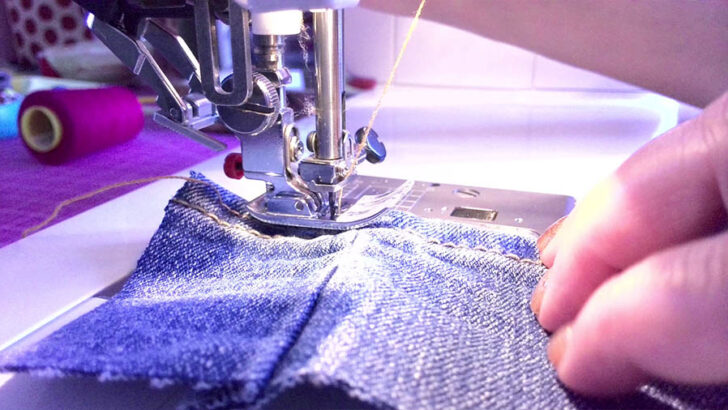
Once the presser foot has cleared the thick seam, the button will be released. The foot will return to its standard position, and you can carry on sewing as usual.
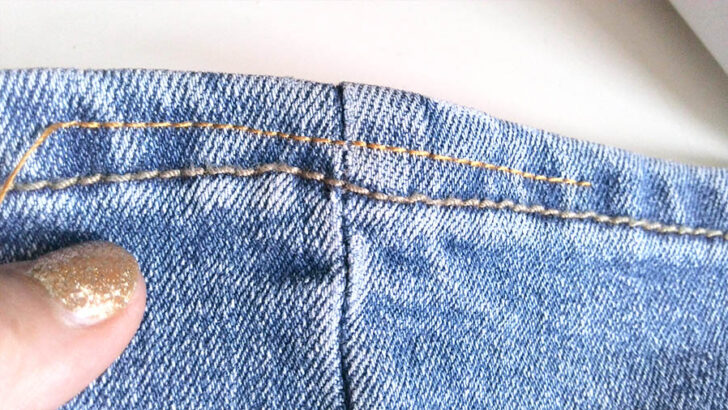
As you can see in the image, the black button has helped me maintain consistent stitch quality and stitch length across the challenging area. The seam I made is yellow, and the beige seam is from the manufacturer of these jeans.
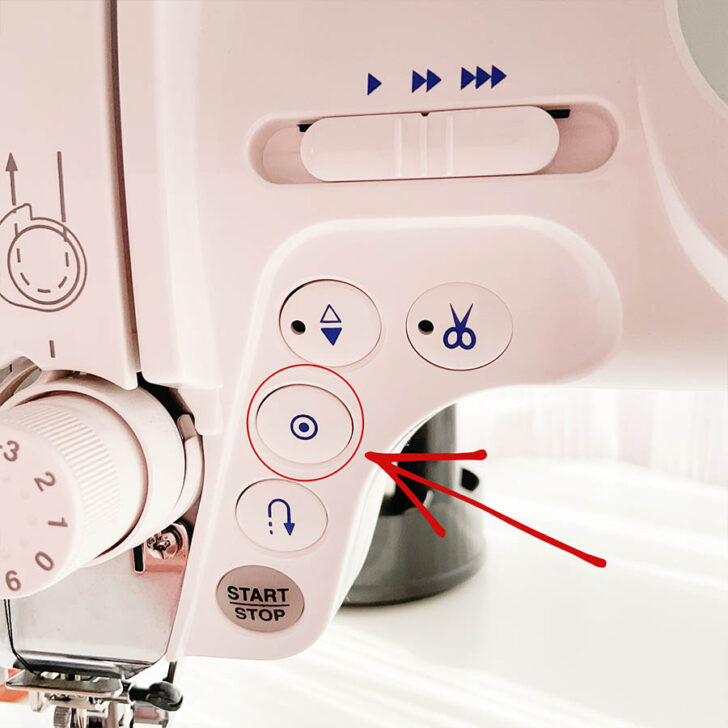
The Auto-Lock (or Reinforcement Stitch) Button: A Stitch-Securing Feature
I am used to manually backstitching to secure my seams at the start and finish. But sometimes it leads to a bulky accumulation of stitches. The auto-lock Button also known as the reinforcement stitch button eliminates this issue by automatically locking the end of the seam. With a simple press of this button, the machine can do it for me, locking the stitches neatly in place.
I have this button on my Janome machine, and my Brother machine has it too. It’s particularly handy for decorative stitches, ensuring they don’t unravel at the ends.
It’s a useful feature that I’ve come to appreciate over time.
Here’s how it works.
Once you reach the end of the seam or the point where you want to secure your stitches, press the auto-lock button. The machine will take over and perform a few small, tight stitches in place.
This will leave you with a secure seam that won’t unravel, and it looks much neater than a backstitched seam.
The auto-lock button is particularly useful when sewing decorative stitches. Since decorative stitches can be complex and prone to unraveling, using the auto-lock button ensures that the intricate stitch patterns are neatly secured at the ends.
While the auto-lock button is a great feature for many sewing projects, there are certain situations and fabrics where it might not be the best choice. Here’s when you might consider not using the auto-lock button:
- For fabrics that are extremely lightweight or delicate, such as chiffon, lace, or organza, the auto-lock stitch might be too dense and could cause the material to pucker or tear. In these cases, manually tying off the threads might be a safer option.
- When sewing with leather, vinyl, or other non-woven materials, the auto-lock stitch can create perforations that weaken the seam. Instead, you may want to manually knot the threads at the ends of the seam to prevent tearing.
- If you’re working with multiple layers of thick fabric, when quilting or when sewing through heavy denim seams, the auto-lock stitch might struggle to penetrate all layers effectively or could jam the machine. A backstitch might be more controlled and reliable in these instances.
- If the auto-lock stitch will be visible in the final product, such as in topstitching, you might prefer to manually tie off the threads for a more discreet finish.
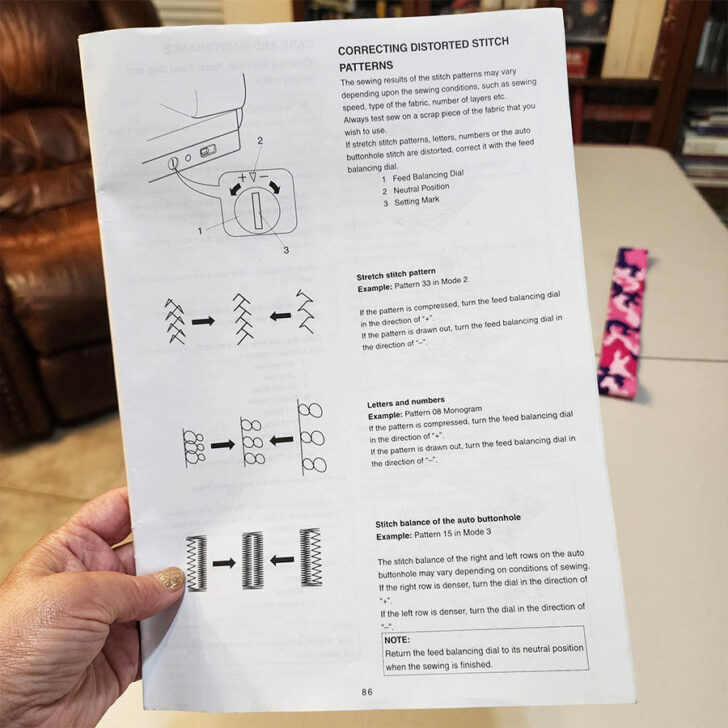
Stitch Balance Adjusting Screw: The Key to Perfectly Balanced Stitches
Then there’s the stitch balance adjusting screw. I must admit, I had never even noticed this one before. So I had to open my manual and see what it is for. And I realized right away that I have been missing out on an important aspect of my machine’s functionality.
I learned that the stitch balance adjusting screw is there to fine-tune the balance of stitches.
I remember times when my buttonhole stitches didn’t look quite right, with one side appearing looser than the other, creating an unbalanced appearance. This feature could have been the solution to those issues all along.
✅ Related tutorial: Buttonhole Presser Foot 101: What It Is And How To Use A Buttonhole Foot To Create Nice Buttonholes
When you’re creating decorative or stretch stitches, the fabric can sometimes be pulled too much or too little, causing the stitches to appear unbalanced or distorted. This screw allows you to adjust the balance so that the stitches lay even on the fabric, regardless of the stitch type or fabric weight.
So if your decorative or stretch stitches are looking a bit wonky, a slight turn of this screw can balance the stitch formation.
The screw is marked with a +/- symbol to indicate the direction for adjustment.
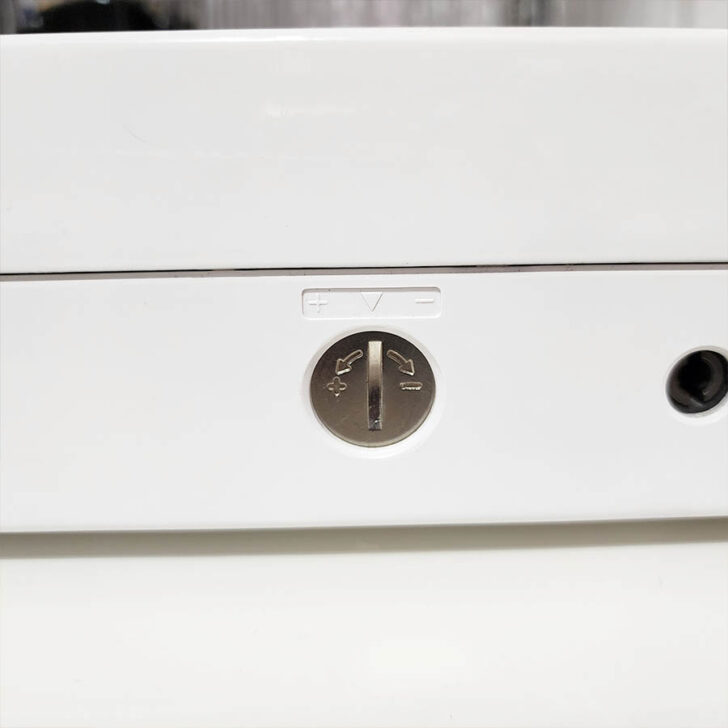
Use a small screwdriver to turn the stitch balance adjusting screw. Turn it towards ‘+’ to increase the balance or towards ‘-‘ to decrease it. Make small adjustments, a quarter turn at a time.
After each adjustment, sew another sample to check the stitch quality. Continue adjusting and testing until you achieve the desired stitch balance.
Keep a record of the balance settings that work well for different fabrics and stitches. This can save you time on future projects.
In conclusion: If you’ve been using your sewing machine for a while, it’s quite possible that you, like many sewists, have a few buttons or dials that you’ve never used or perhaps didn’t even know existed.
For example, here are the buttons I have never used on my Janome 6600P machine.
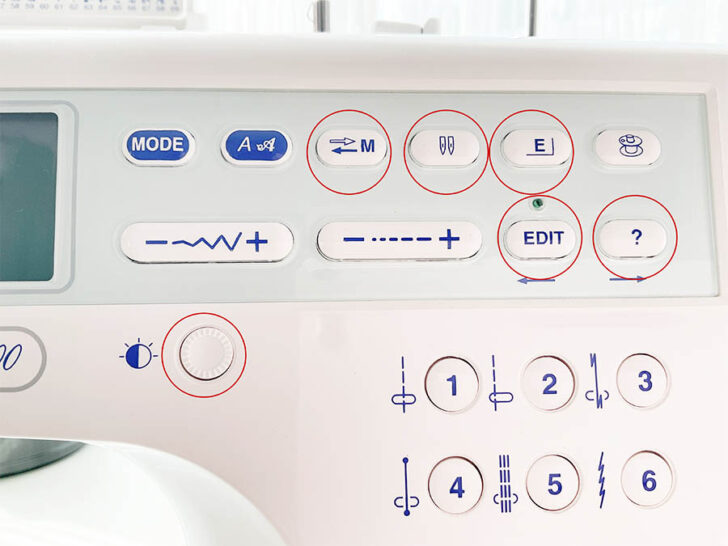
It’s easy to get comfortable with the functions you use regularly and overlook additional features that your machine offers. But these overlooked buttons and dials can unlock new possibilities for your sewing projects and enhance your sewing experience.
So take a moment to closely examine your sewing machine. Look for any buttons, dials, or switches that you’re not familiar with or haven’t used before.
Consult your sewing machine manual. It’s the best resource for understanding each part of your machine. It will have detailed descriptions and instructions for all the buttons, dials, and features. If you’ve misplaced your manual, many manufacturers provide digital copies online that you can download. You might be surprised at how much more you can do with your sewing machine once you uncover and understand all of its features.
So here is my YouTube video. Check this out if you like to see a helpful video on some hidden features of sewing machines (instead of reading).
Did you find this guide on hidden features of sewing machines useful? If yes, why not save this pin to your Pinterest board? That way, you can easily return to the article whenever you need a refresher on these buttons. And for an ongoing stream of handy tips, tutorials, and all sorts of creative inspiration, make sure to follow me on Pinterest!
latest posts
- What Do You Call a Person Who Sews? I Asked My Readers and Got 1,408 Opinions
- DIY Round Purse: PDF Sewing Pattern and Detailed Instructions
- Mini Wonder Clips By Clover: Useful Sewing Tool Or Just Another Notion?
- Non-Slip Grips For Quilting Rulers: A Small Notion With A Useful Job
- Fabric Eraser for Sewing: What It Removes and When to Use It
- What Is The Best Thread For Sewing Machine Projects? Let’s Find Out!
- Butterfly Quilt Block Tutorial – Foundation Paper Piecing
- How To Sew Quilt Squares So The Corners Match
- Sewing With Fork Pins: How They Help With Pattern Matching, Slippery Fabric, And Seams