How to Sew Elastic into Waistbands: A Casing Method by Serger
In this tutorial, I’m going to show you how to sew elastic into a waistband (with a casing) using a serger. This skill is great for giving your pants (or a skirt) a snug, yet comfortable fit. We’ll go through each step, from adjusting the elastic to attaching it seamlessly to your garment, making sure you end up with a neatly finished waistband that’s just the right size.
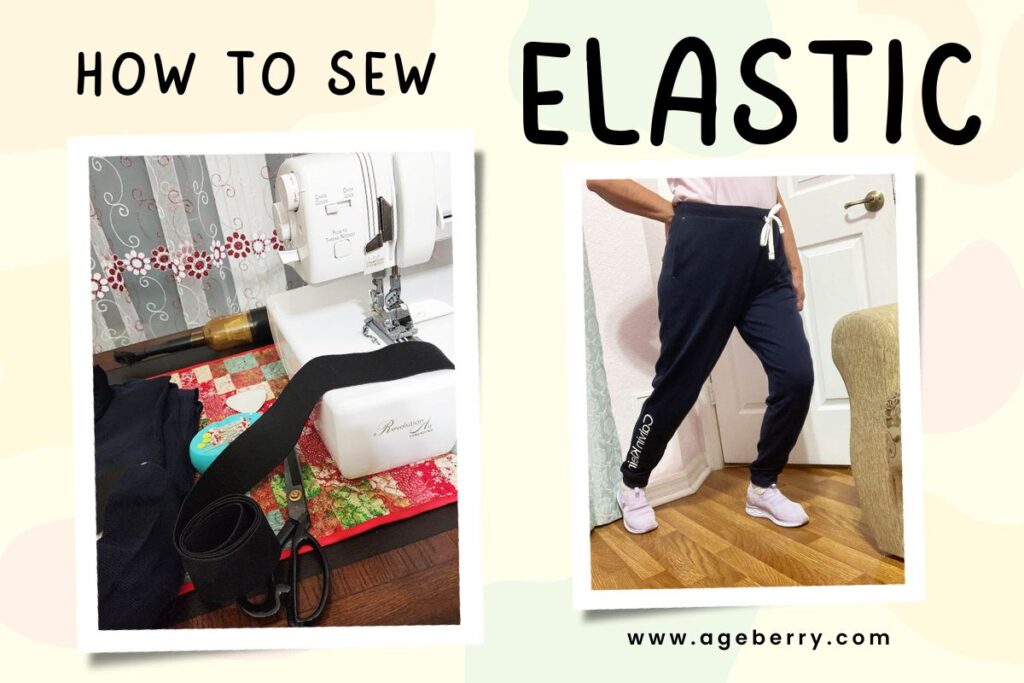
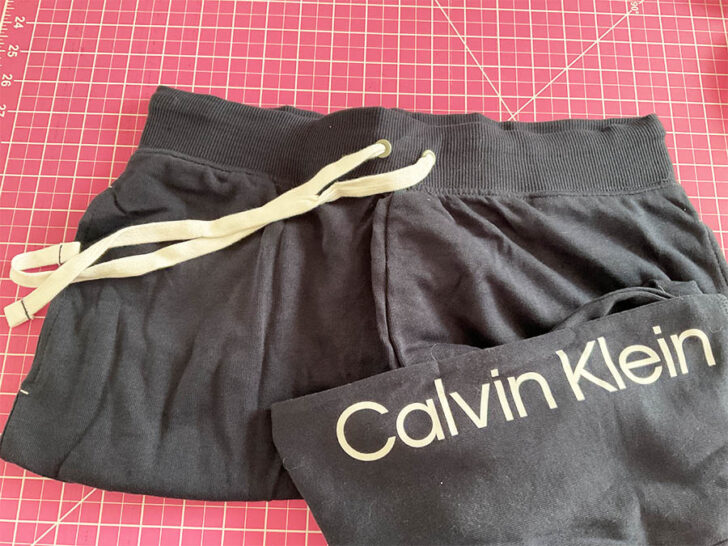
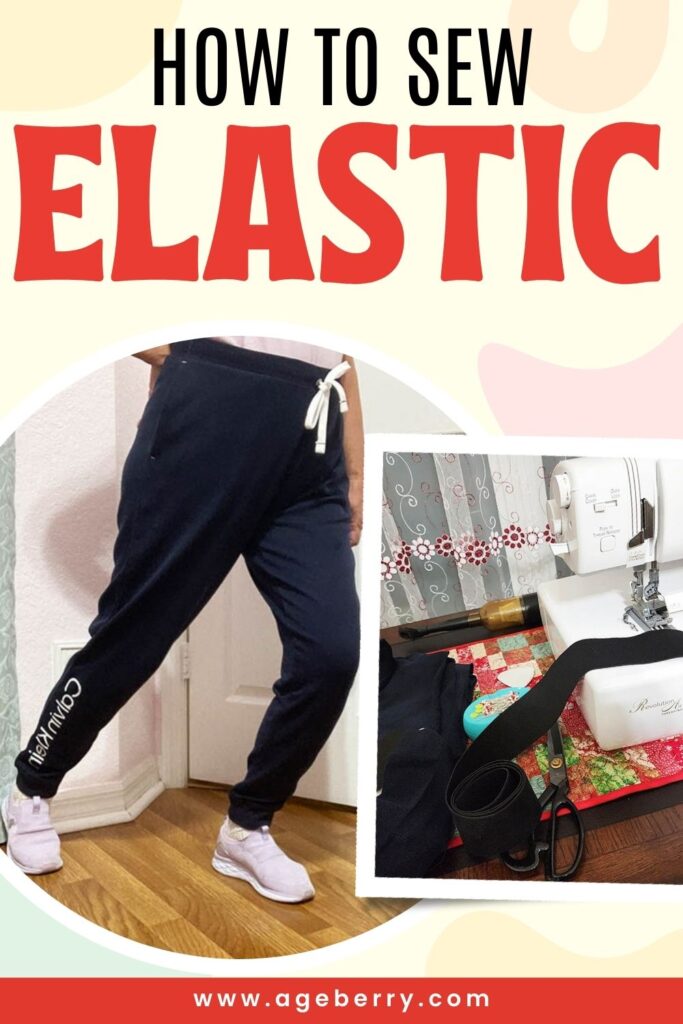
For this demonstration, I’ll be using a pair of exercise pants as an example.
Have you ever pulled on your favorite pair of knit exercise pants only to find the elastic waistband is a bit too tight? It’s a common issue that can be easily fixed. You can make them more comfortable for your workouts or lounging around in no time. Exercise pants are also made with stretchy knit fabric, which is ideal for practicing this technique.
What You’ll Need
- Serger
- Elastic (suitable for waistbands, in the width and length needed for your pants)
- Fabric scissors
- Measuring tape
- Pins or fabric clips
- Serger Threads (preferably a color that matches your pants)
- Chalk or fabric marker (for marking measurements on the fabric)
If you find that you’re missing something just scroll down to the bottom of this tutorial, and you’ll find my Amazon links to all the products you might need.
Before we get into the step-by-step process of sewing elastic, let me share the story that led me to this project in the first place.
I stumbled upon an incredible deal at my local Costco – a pair of Calvin Klein pants for just $3 each. Naturally, I grabbed 2 pairs of my size and couldn’t help but wonder why such a reputable brand was selling at such a low price. Retail markdowns can happen for a variety of reasons, of course.
When I got home and tried them on, it all made sense – the elastic waistband was way too tight for me. Perhaps that wasn’t an issue for everyone, but it certainly explained my initial question. It’s possible that a manufacturing inconsistency or a design choice made the waistband less accommodating than it should be, which could lead to discounted pricing if enough customers had the same experience.
While the tight waistband was a problem for me, it might not have been a deterrent for others obviously. Fit is such a personal preference and varies so much from one person to another. Some might not mind, or even notice, the snug fit depending on their shape.
But for me, it was a clear sign that these pants needed a bit of personal adjustment. Thankfully, with my sewing skills and a serger, I can easily modify the waistband to fit comfortably and make the most of this bargain find.
Step #1. Cut The Casing With Elastic
Take a close look at how the current elastic is fitted within the rib knit casing. Note any attachment points, especially where the elastic is secured to the casing. Carefully cut the casing away from the pants.

I wanted to preserve the back seam where the elastic and the drawstring were stitched to the casing, as this will maintain the integrity of the original garment’s construction. If you prefer to keep the back seam intact, as I have chosen to do, you’ll need to be extra cautious not to snip through it.
Step #2. Detach and Measure the Elastic
I decided against replacing the entire elastic in my pants for two main reasons.
Firstly, I didn’t want to deal with the hassle of ripping out the back seam where the elastic and drawstring were securely attached to the casing. It seemed like an unnecessary step that could potentially damage the garment.
Secondly, it felt wasteful to discard perfectly good elastic when I could simply add a small piece to extend it. By doing so, I could preserve the original elastic and avoid the extra work of a complete replacement, all while achieving the comfortable fit I was after.
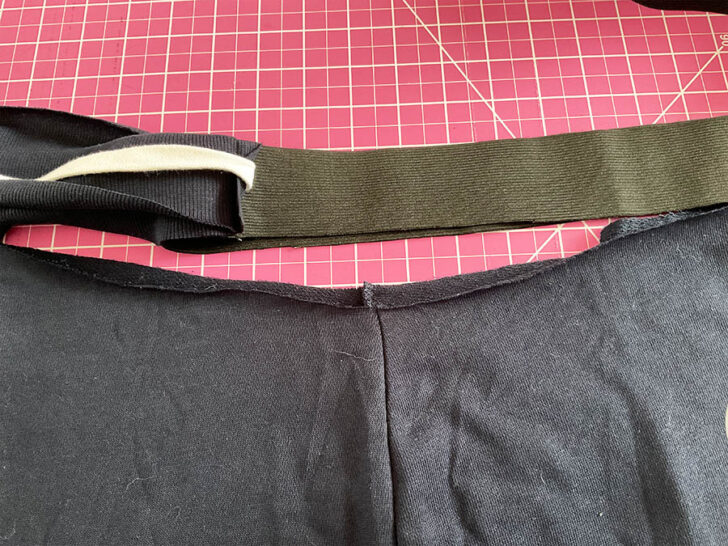
So, separate the elastic from the rib knit casing. Decide how much extra length you’ll need in the elastic to achieve the desired comfort level. For instance, I needed to add 3 1/4″ to the existing elastic to ensure the waistband wouldn’t be too tight. Use your measuring tape to determine this additional length accurately.
Step #3. Prepare the Additional Elastic
Once you have measured the additional length needed for your comfort, it’s time to prepare the new section of elastic. Look for a piece that closely matches the width of the original elastic in your pants. It’s okay if it’s not an exact match; for example, the new elastic I found was 1/8″ wider than the original, and that’s perfectly fine for this purpose. You can cut the slight difference in width, and it will still work well with your serger.
Step #4. Sew the New Elastic to the Old
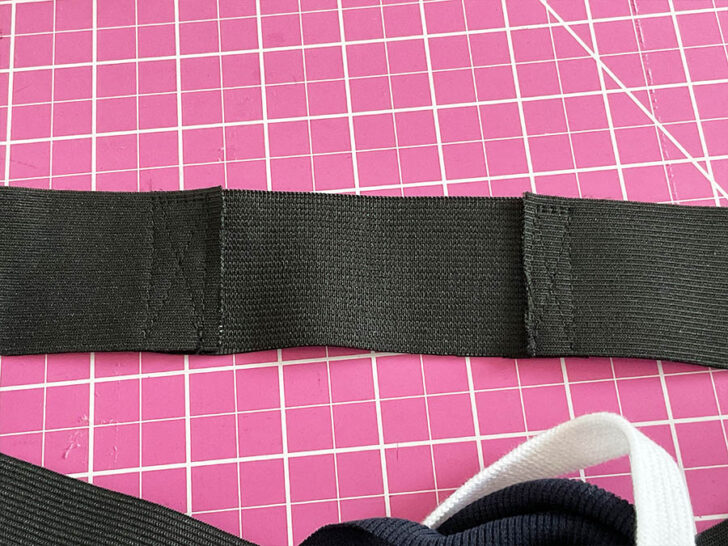
Cut the existing elastic at one point to open it up. Then, take the piece of the new elastic you’ve prepared and position it between the two ends of the old elastic. Sew each end of the new elastic to the old elastic using a sewing machine, making sure to create strong, flat seams.
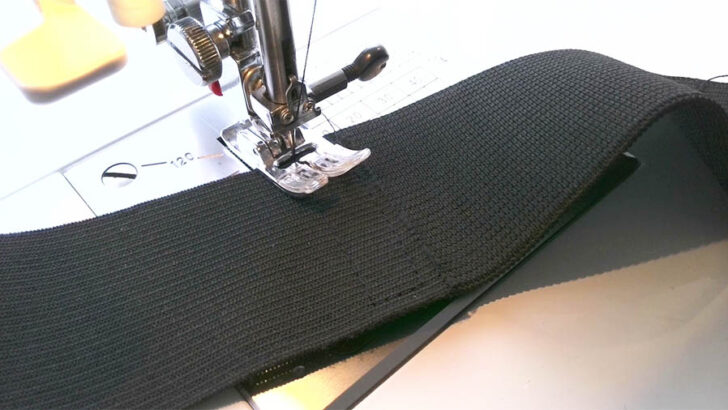
This will help to avoid any uncomfortable bulkiness in the waistband once you wear the pants. It’s important that these seams are robust because they will need to withstand the stretch and pull as you move.
Here’s how to sew two pieces of elastic together with your sewing machine:
- Place one end of the new elastic over one end of the cut original elastic. The overlap should be enough to provide a strong join, typically about half an inch.
- Set your sewing machine to a straight stitch. Sew across the overlap to secure the ends together.
- Rotate the elastic and sew other stitches connecting them to form a box. This reinforces the entire area.
- For additional strength, sew a diagonal stitch from each corner of the box to the opposite corner, creating an X inside the box. This distributes the stress across the seam even more evenly.
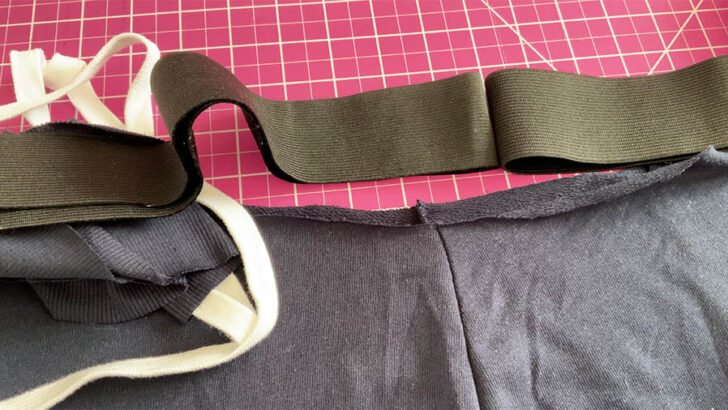
Step #5. Encase the Elastic
Take the original rib knit casing and wrap it around the enlarged elastic loop using pins or sewing clips.
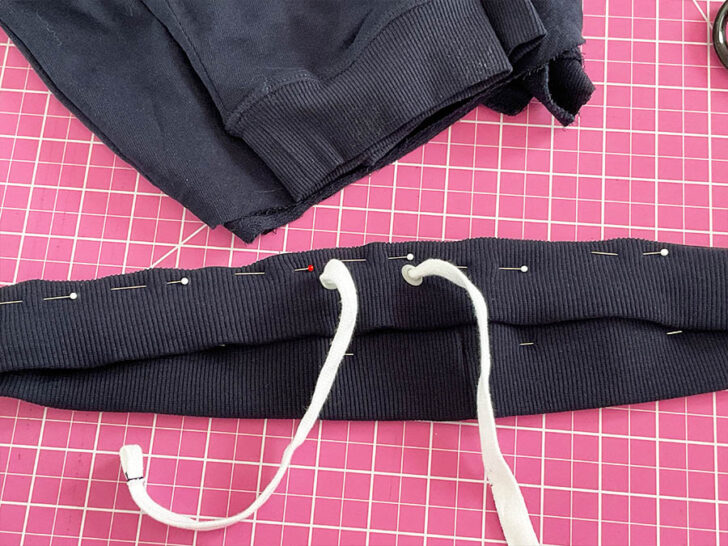
Make sure the edges of the casing align neatly with the edges of the elastic. This can be a bit fiddly, so take your time to ensure everything is even and lies flat. If the elastic is a little wider than the casing – cut the elastic to make it even with the edges of the casing.
✅ Related tutorial: Rib Knit Fabric: The Different Types and What They Are Used For
Once the casing is in place around the elastic, you’ll want to baste it together. Basting is a temporary straight stitch that holds fabrics in place until you complete the final sewing. Carefully baste around the entire loop, close to the edges, to prevent the fabric from puckering during the final attachment to the pants. This basting step is necessary for keeping everything stable and making the serging process smoother.

✅ Related tutorial: Basting Stitch: Why, When And How To Baste In Sewing
Step #6. Pin the Casing to the Pants
The next step is to attach it back to the pants.
Start by dividing the waistband and the pants’ waist into quarters. You can do this easily by folding and marking the waistband with pins or chalk to identify the quarter points. For the pants’ waist they are usually the center front and back and the side seams on the pants. This helps ensure that the elastic is evenly distributed around the waist.
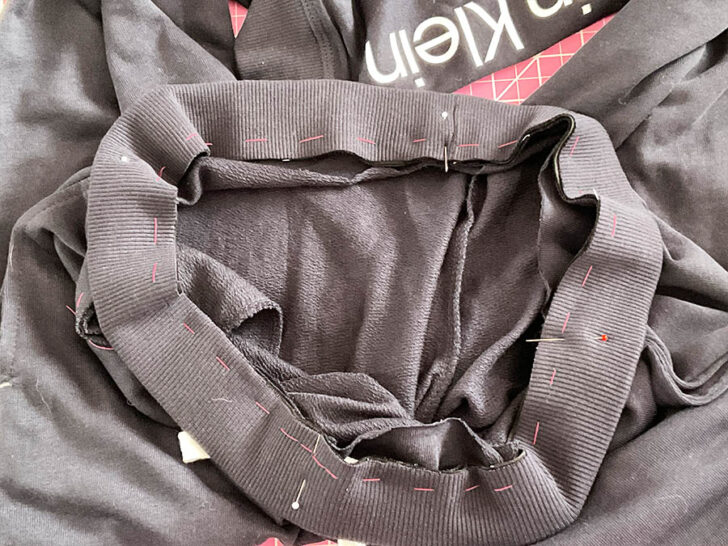
Once you have your quarter points marked, align the marks on the casing with the corresponding marks on the pants’ waist. Pin the casing to the pants at these points. The seam in the waistband should be aligned with the back seam of the pants.
After the quarters are pinned, go ahead and add more pins in between these quarter marks. This additional pinning helps to evenly distribute the fabric and elastic, preventing any unwanted gathers or puckering.

Step #7. Serge the Casing to the Pants
Set up your serger for a four-thread stitch, which uses two loopers and two needles, providing a strong, stretchable seam that is perfect for elastic waistbands.
✅ Related tutorial: What Is A Serger & What Can I Do With It?
Before you begin serging the actual waistband, it’s a good idea to test your serger settings on a scrap piece of similar fabric. This will allow you to adjust the tension and stitch length as needed, ensuring the best possible finish on your pants.
Once you’re satisfied with the settings, start serging the casing to the pants.
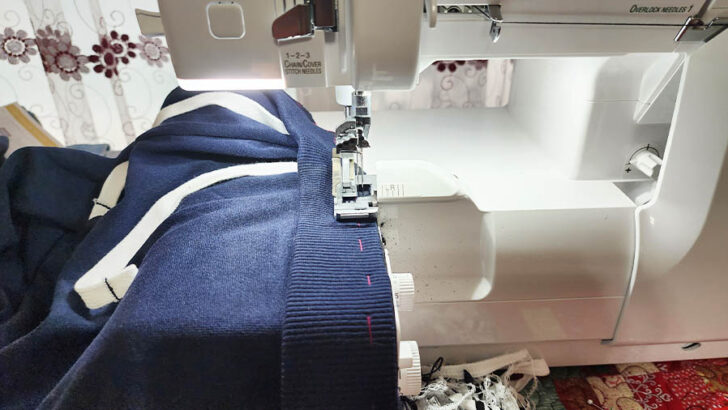
As you sew, gently stretch the elastic to match up with the fabric, but be careful not to overstretch, as this can cause rippling in the final product. Feed the fabric through the serger smoothly, letting the machine do most of the work, and keep an even pace to ensure a neat seam all the way around the waistband.
Make sure to remove any pins as you stitch so they don’t get in the way of your serger’s knife.
Step #8. Finish and Inspect
The final step is to finish and inspect your work.

Flip the rib knit casing back to its original position on the outside of the pants, if that’s where it was initially. This will neatly encase the elastic and give the waistband a clean, finished look.
Take a moment to inspect the waistband all the way around. You’re looking to make sure that the elastic is securely attached and that the serged seam is even, with no missed sections. Check for puckers or uneven areas that could cause discomfort or indicate that the elastic isn’t distributed evenly.
If everything looks good, you’ve successfully adjusted the waistband, and your pants are ready to wear with a new, more comfortable fit. If you find any issues, you can carefully correct them with your serger as needed.
Step #9. Topstitch (Optional)
Topstitching the casing to the pants is an optional step, but it can add both security and a polished look to your waistband. If you choose to topstitch, it’s important to use a stitch that will maintain the elasticity of the fabric, such as a coverstitch. A coverstitch machine creates a professional-looking seam that stretches with the fabric – it’s ideal for knit materials.
✅ Related tutorial: Coverstitch vs. Serger
To topstitch, carefully position the fabric under the presser foot of your coverstitch machine, making sure the casing is flat and even. Starting at a side seam, sew around the waistband. The coverstitch will neatly encase the fabric while allowing the waistband to retain its stretch.
Note: Some of the links on this page are affiliate links. This means I will receive a commission if you order a product through one of my links. I only recommend products I believe in and use myself.
List Of Materials For The Project


XKDOUS Elastic Band for Sewing

Professional Tailor Scissors 9 Inch
")

MumCraft Multipurpose Sewing Clips with Tin Box

Lohas Select Professional Tailors Chalk
Other Tutorials on Sewing Elastic

Did you find this tutorial helpful? If so, save this pin (see below) on your sewing board so you can come to this tutorial later when you are ready to sew elastic with casing by serger, and follow me on Pinterest for more tips, tutorials, and inspiration!
latest posts
- What Do You Call a Person Who Sews? I Asked My Readers and Got 1,408 Opinions
- DIY Round Purse: PDF Sewing Pattern and Detailed Instructions
- Mini Wonder Clips By Clover: Useful Sewing Tool Or Just Another Notion?
- Non-Slip Grips For Quilting Rulers: A Small Notion With A Useful Job
- Fabric Eraser for Sewing: What It Removes and When to Use It
- What Is The Best Thread For Sewing Machine Projects? Let’s Find Out!
- Butterfly Quilt Block Tutorial – Foundation Paper Piecing
- How To Sew Quilt Squares So The Corners Match
- Sewing With Fork Pins: How They Help With Pattern Matching, Slippery Fabric, And Seams