
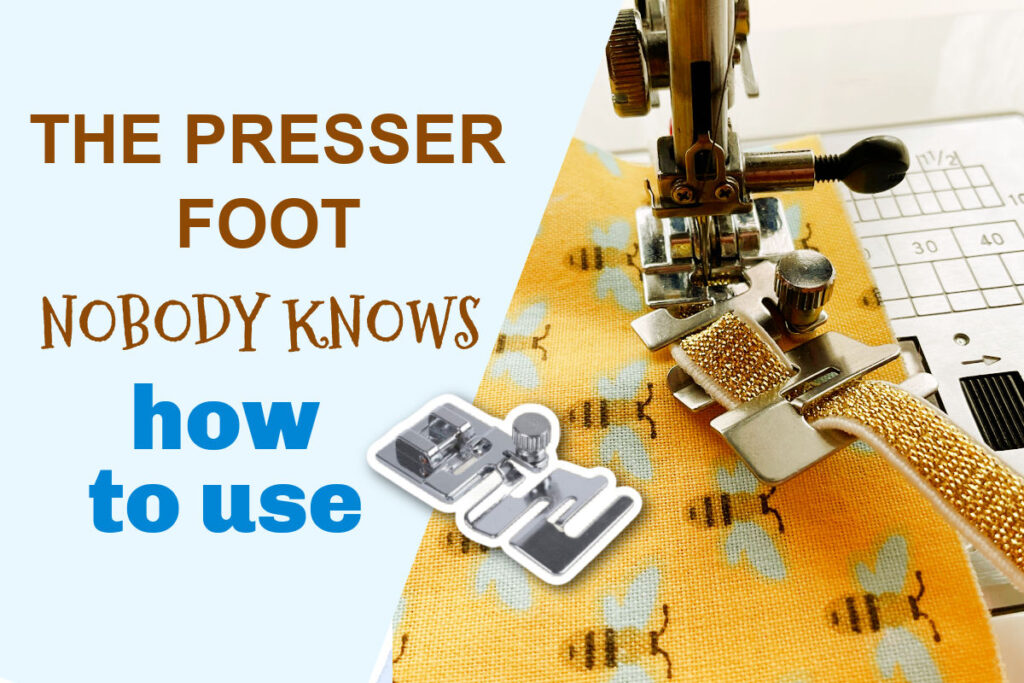
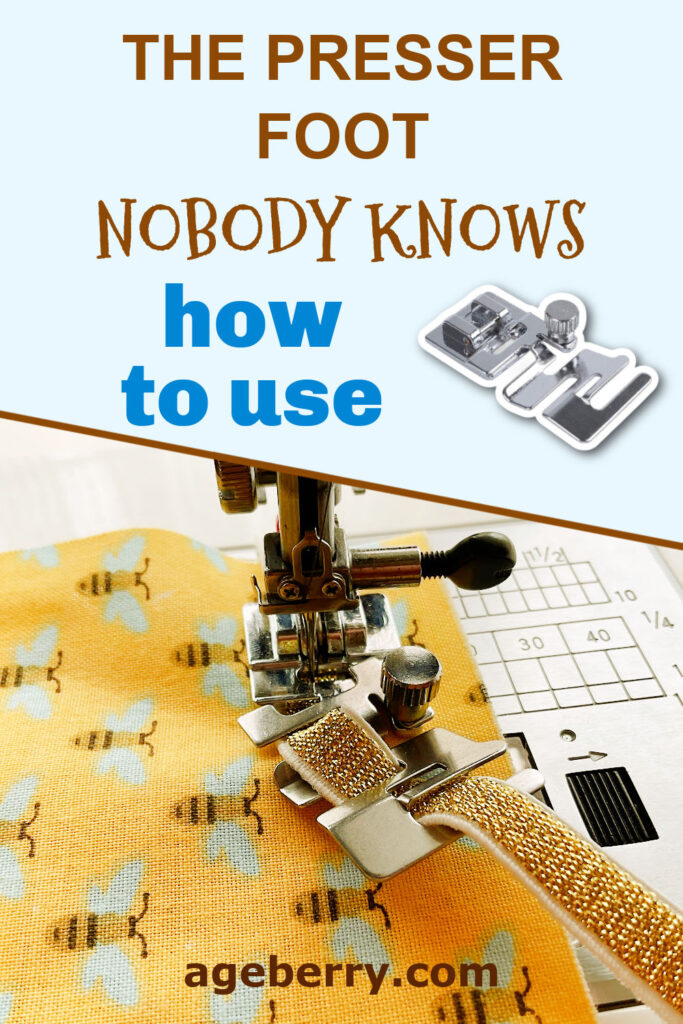
The Presser Foot Nobody Knows How To Use: The Elastic Foot
Have you ever come across a sewing machine presser foot that seems to baffle everyone? That’s the elastic foot for you – a peculiar-looking attachment that lacks any instructions. Well, I was curious and bought the foot. There were no instructions indeed. So I’ve taken the plunge and figured out how to use it, and I’m going to share it with you.
Here is a step-by-step guide on how to master the elastic presser foot.
Attention! If you prefer visual learning and love to see every detail in action, check my YouTube video version of this tutorial. You’ll find the link at the bottom of this post. To get the full experience, I highly recommend checking out both the video and this written post.
Description of the Elastic Foot
The elastic foot has a distinctive part that can be adjusted with a screw.
When I got the elastic presser foot, the presence of the screw caught my attention right away and left me a bit puzzled. “Why is it here?” I thought. It wasn’t immediately apparent how this screw was meant to be used, as the foot didn’t come with any instructions.
As I spent more time with the foot, I realized that the screw was an important component for adjusting the elastic guide. By loosening the screw, I could pivot the attachment part with the guide slots to the angle I needed.
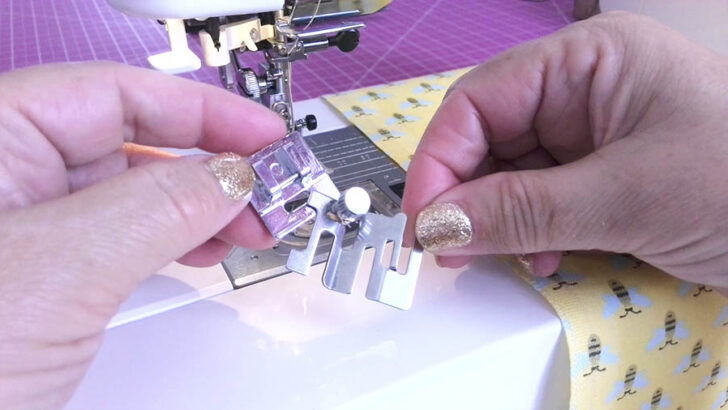
If I wanted to change the amount of gathers, I would simply unscrew the screw, reposition the attachment to increase or decrease the angle, and then tighten the screw again to hold the new position. This adjustability feature of the elastic foot gave me the flexibility to create varying degrees of gathers for different fabrics.
The key to using the elastic foot is finding the proper angle. A smaller angle results in less gathering, while a larger angle increases the gathers. It can take a bit of practice to get the tension adjusted just right, and it will vary depending on the different weights of elastic.
The elastic foot is a snap-on type, which means it’s compatible with most modern sewing machines and can be easily attached without special tools. The foot is designed for low shank snap-on domestic machines, which covers many models from brands like Brother and Singer. It isn’t compatible with industrial or mini sewing machines, or older models that don’t support snap-on feet. I used it on my Janome 6600P with no problem at all.
✅ Related tutorial: The best sewing machine for advanced sewers: Janome Memory Craft 6600P
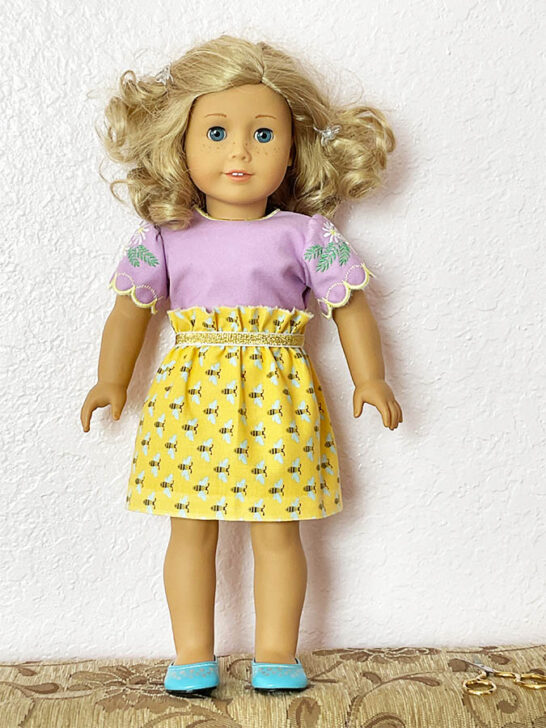
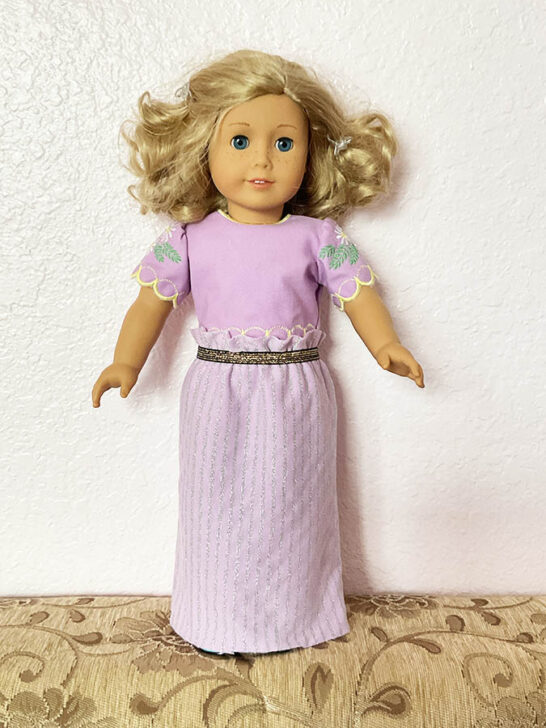
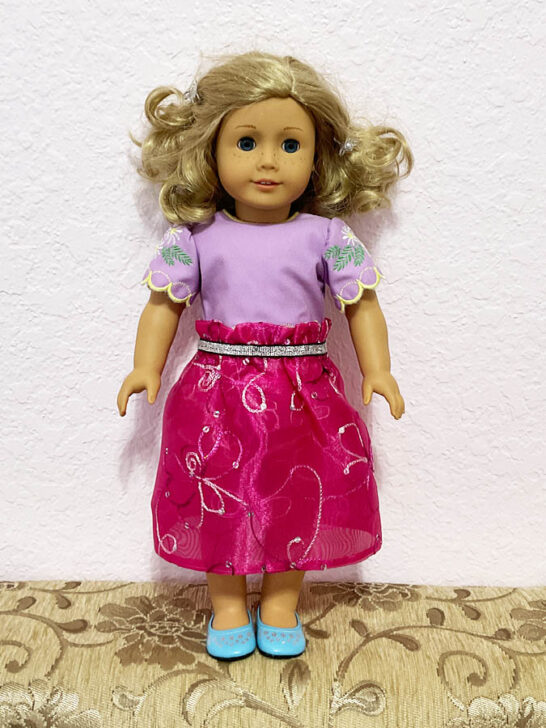
This foot is good for projects involving waistbands and cuffs that require elastic insertion. I used it to make skirts for an 18-inch doll, and it handled the job beautifully. It also can be a time-saver for home décor projects like fitted sheets or sofa slipcovers.
Preparing Materials for Using the Elastic Foot
Turn off your sewing machine for safety.
Remove the existing foot from the machine.
Attach the elastic presser foot by aligning it with the presser foot holder and lowering the lever.
Choose a piece of elastic. I used three different types but they all were 3/8 inch because that’s what I had. But you can choose elastic up to 1/2 inch as well.
✅ Related tutorial: Elastic Essentials: a Guide to the Different Types for Your Sewing Projects
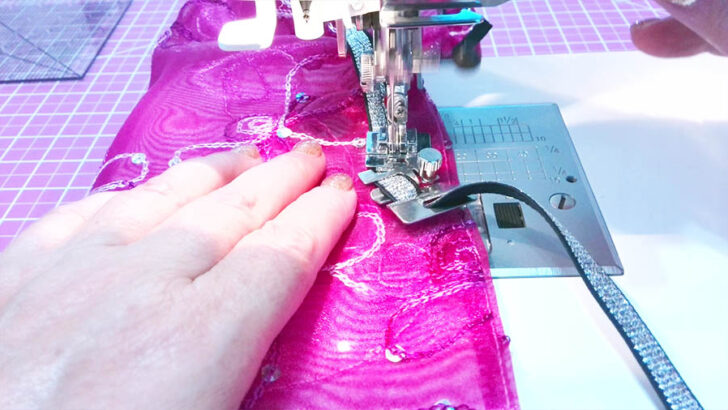
Select the fabric you’ll be attaching the elastic to. I decided to make 3 easy skirts for my 18-inch doll. I used three different fabrics for this demonstration – quilting cotton, rayon knit fabric (the type is called interlock knit), and polyester organza.

Configure your sewing machine to use a straight stitch. Set the stitch length to 3 mm for optimal performance.
✅ Related tutorial: Types of Sewing Machine Stitches: Unraveling the Mysteries of the Straight Stitch
Consider using a polyester thread size 40. Polyester threads are known for their strength and some stretch. The thread should be strong enough to handle the tension that comes with elastic stretching. A weak thread may break under the strain of stretched elastic.
Some specialty threads like Eloflex are designed for stretchy fabrics and can be ideal for use with an elastic presser foot. These threads are strong, and have excellent stretch recovery.
✅ Related tutorial: How to use Eloflex – an innovative stretchable sewing thread from Coats
The weight of the thread can also play a role. A medium-weight thread size 40 is often a good balance between strength and flexibility for most projects involving elastic.
Positioning the Fabric and Elastic
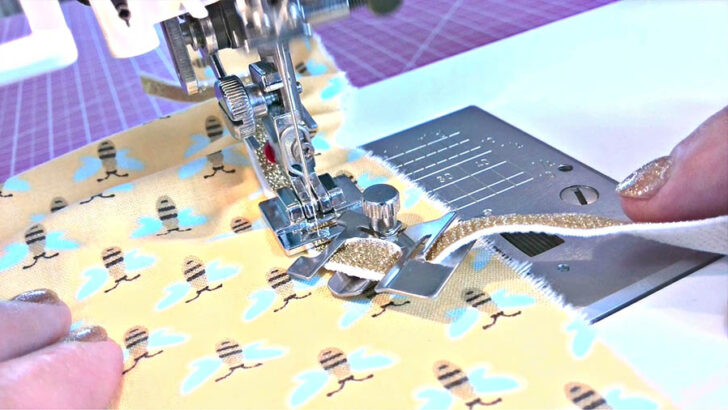
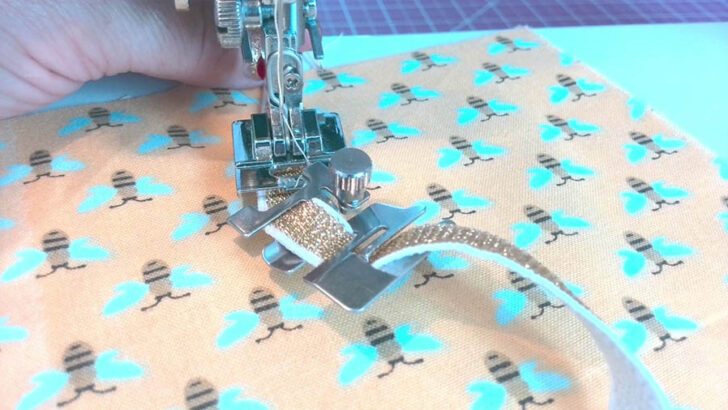
Place the fabric under the presser foot.
Loosen the screw and adjust the part of the foot to the desired angle for gathering.

Tighten the screw to secure the position.
Insert the elastic into the guide slots of the foot. Make sure the elastic is fed through the foot’s guides.
Sewing with the Elastic Foot
Start your sewing machine and guide the fabric and elastic through, allowing the foot to gather the elastic as you sew.
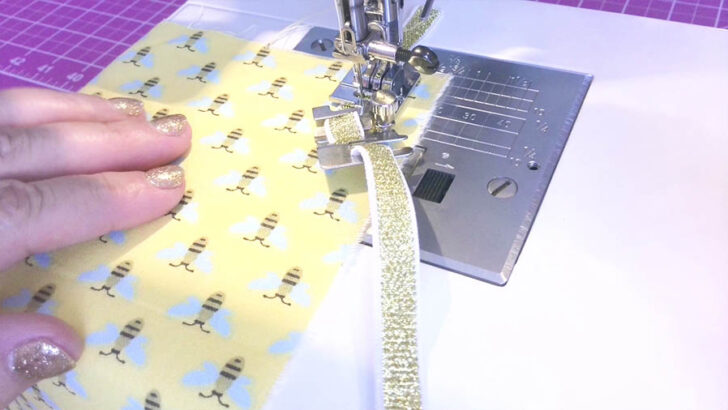
Once you’ve finished sewing, cut the threads and examine your fabric. In my case all the fabrics stretched evenly.
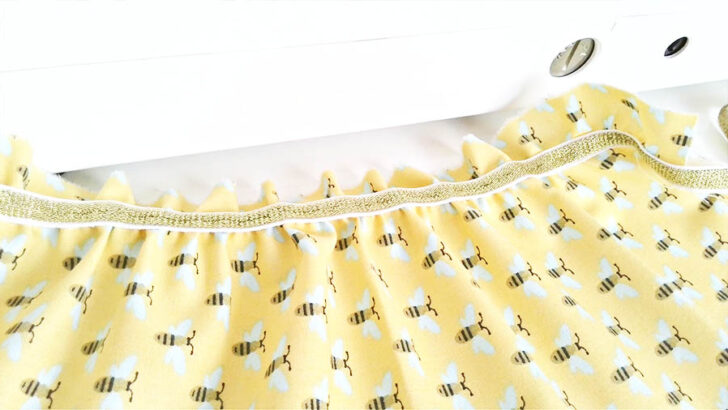
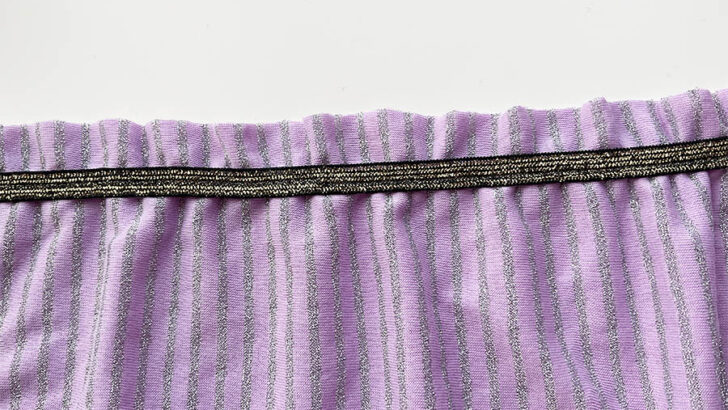
You should see a neatly gathered piece, thanks to the elastic foot. My experience showed that it’s great in maintaining even tension on elastic as it’s being sewn onto fabric. The foot has guides that feed the elastic smoothly.
For best results, I recommend doing a test run on scrap fabric to get a feel for the settings. Patience is key – don’t rush, sew with slower speed at least from the beginning, and allow the foot to do its job.
And here are the three skirts I made for the 18-inch doll using the elastic foot. It’s quite remarkable how quickly each one came together – about 5 minutes per skirt. Take a look at the images; I think the skirts turned out quite nice.
Note: Some of the links on this page are affiliate links. This means I will receive a commission if you order a product through one of my links. I only recommend products I believe in and use myself.
Interested in using the elastic foot? Click here to purchase the Elastic Presser Foot on Amazon and make your sewing projects simpler and more efficient.

So I hope the elastic presser foot won’t be a mystery for you any longer. It’s an interesting tool that, once mastered, can help you create beautifully gathered fabrics with ease.
So here is my YouTube video. Check this out if you like to see a helpful video on how to use the elastic foot (instead of reading).

If you found this tutorial on how to use an elastic foot helpful, please consider pinning the image on Pinterest so you can easily find it again and share it with others who might find it useful. Simply hover over the image and click the “Pin It” button that appears.
latest posts
- What Do You Call a Person Who Sews? I Asked My Readers and Got 1,408 Opinions
- DIY Round Purse: PDF Sewing Pattern and Detailed Instructions
- Mini Wonder Clips By Clover: Useful Sewing Tool Or Just Another Notion?
- Non-Slip Grips For Quilting Rulers: A Small Notion With A Useful Job
- Fabric Eraser for Sewing: What It Removes and When to Use It
- What Is The Best Thread For Sewing Machine Projects? Let’s Find Out!
- Butterfly Quilt Block Tutorial – Foundation Paper Piecing
- How To Sew Quilt Squares So The Corners Match
- Sewing With Fork Pins: How They Help With Pattern Matching, Slippery Fabric, And Seams


Love your content but hate all the pop up adds that seem to have attached themselves to your content over time. Don’t know what can be done but it is getting harder and harder to see your actual content
Ads are, unfortunately, necessary to maintain the site free for everyone. So while I am sorry for the difficulty, there is little I can do here.
I just found your content on YouTube, I love it! I’ve wanted to sew my whole life, but I never thought I’d really ever get the hang of it. Your tutorials are wonderful! I’ve already learned so much. Thank You ❤️
Thank you for this tutorial. I like the idea of the foot gathering the fabric, instead of having to stretch the elastic. I wish it worked for wide elastic. Did you use the same needle on the woven and the knit? And what size did you use?
I usually use different needles for woven fabrics and knits. With this foot, it’s better to use Schmetz stretch needle size 90/14. Here are the links to my tutorials on needles – https://www.ageberry.com/stretch-needle-sewing-machine/, https://www.ageberry.com/how-to-choose-the-right-sewing-machine-needle/, https://www.ageberry.com/schmetz-needles-guide/.