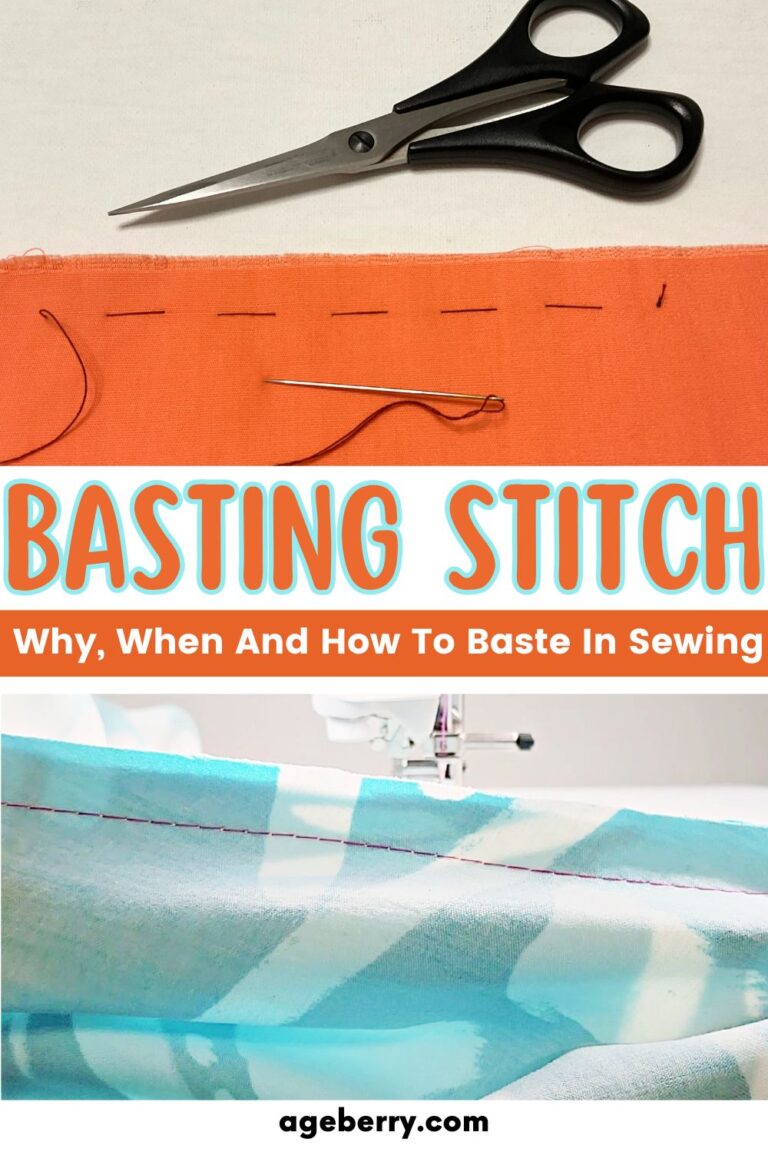
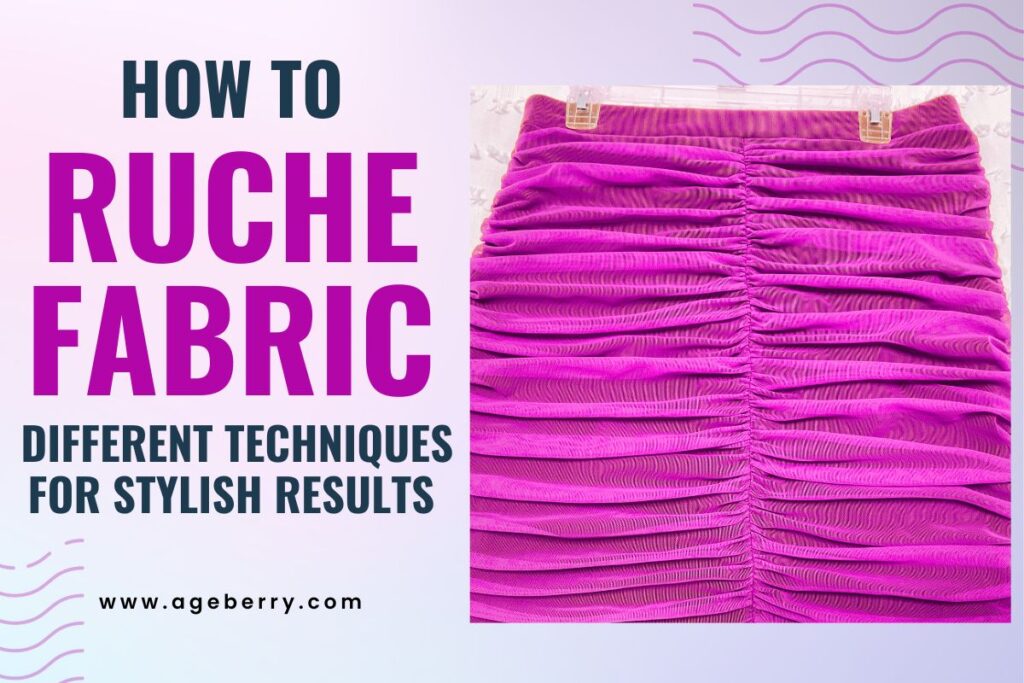
How to Ruche Fabric: Different Methods for Stylish Results
Are you interested in learning how to sew ruching? It’s a simple technique that can add texture and dimension to your sewing projects. In this article, I will show you how to ruche fabric step-by-step so you can try it out for yourself.
Ruching uses gathering to make lovely folds of fabric along the length of a garment. It usually consists of a few parallel lines of gathering stitches that are far enough apart that the fabric drapes between the lines of stitching.
✅ Related tutorial: What is Ruching: Benefits, Types, and Practical Applications
How Much Fabric to Sew Ruching?
Before starting your ruching project, determine the amount of fabric required to achieve the desired effect.
With all kinds of ruching, you have to account for the length of the fabric. You are going to want the item that you are ruching to be longer than what the finished product will be. For instance, an ankle length skirt might end up being knee-length or shorter after ruching.
Also, consider the type of garment you are working on and where the ruching will be applied. For example, a ruched dress may require more fabric than a ruched sleeve detail.
Next, measure the area you want to ruche. Keep in mind that the final ruched fabric will be considerably shorter than the initial length due to the gathering process. A general rule is to take at least twice the length of the area you want to ruche. Sometimes you can use 2.5 to 3 times the area length.
I also advise you to add extra seam allowance to your fabric measurements to account for any adjustments you might need during the sewing process.
How to Sew Ruching
If you’re looking for a quick answer on how to ruche fabric, follow these steps.
- Cut the fabric. Measure your fabric and outline the area you’re going to ruche.
- Set your stitching lines. Determine how far apart your ruching stitch lines should be on your fabric. The farther apart the lines, the fuller the ruching will be.
- Select a suitable thread for your project. Preferably, use a strong thread that matches the color of your fabric to make the ruching seamless.
- Prepare your fabric. Make sure it is clean and pressed to remove any wrinkles.
- Sew and gather. Gather the fabric to create the ruched effect.
For more detailed instructions and tips on how to achieve the best results, you can find all the information you need below.
Choosing the right fabric
Make sure to choose a suitable fabric type for ruching. Lightweight, drapey fabrics like satin, silk, cotton voile, lace or chiffon work best for this technique because the fine fabrics won’t add too much heaviness to the garment. Other fabrics that are suitable for ruching are jersey or lightweight knit fabrics. Avoid heavy or stiff fabrics that are difficult to gather, such as denim or upholstery material.
When you prepare fabric for ruching, you may need to pre-wash it.
Next, you need to decide on the method you’d like to use for ruching.
There are several methods for ruching fabric. Each method has its own advantages and disadvantages, and the best method for your project will depend on the type of fabric you’re using, the desired effect, and your personal preference.
Method #1. Basic Gathered Ruching with a Sewing Machine
Gathering stitches are a most common way to create ruching in fabric. Gathering stitches are made by sewing two parallel rows of stitches on the fabric, and then pulling on the threads to create a gathered effect. This technique is commonly used in sewing to create gathers and ruffles.
To sew ruching with gathering stitches, you will need the following materials:
– Fabric
– Strong Thread
– Sewing machine
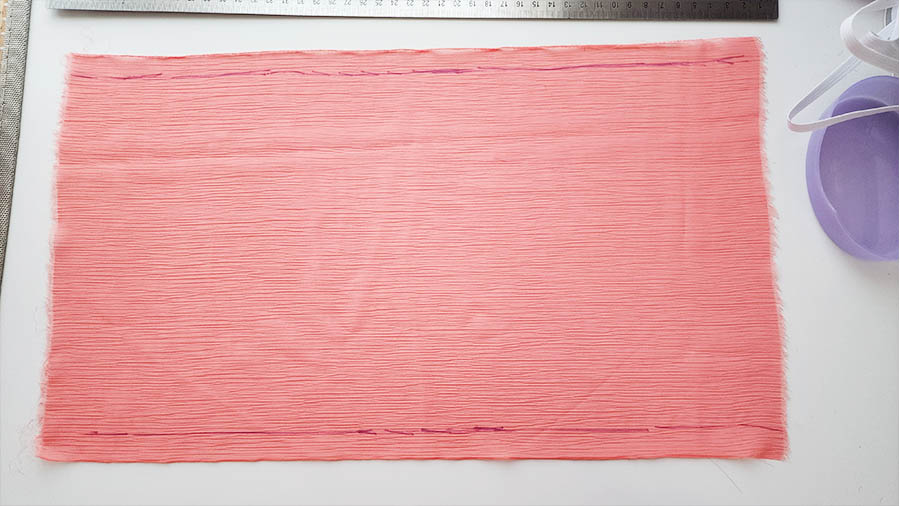
I used a piece of polyester chiffon fabric to demonstrate how to sew basic gathered ruching with a sewing machine. The fabric is a light, sheer material. I chose this fabric because is often used for creating ruching but it’s not the easiest fabric to work with.
Here are the step-by-step instructions for sewing ruching with gathering stitches.
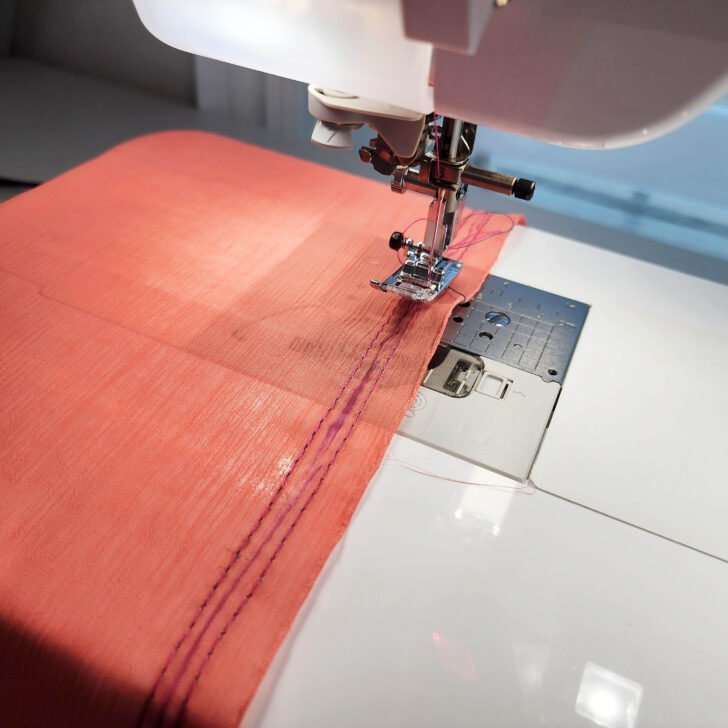
#1. Mark the stitching lines on the fabric where you want the ruching to be. You can use a marking pen or chalk to mark the area.
Chiffon can easily shift and move during the marking process, making it difficult to create accurate markings. So you may need some patience and careful handling.
In the image, you can see that I was able to mark the chiffon fabric. I carefully made small marks along the edges of the fabric. I also used a ruler.
One tip for marking chiffon fabric is to use a light touch and avoid pressing too hard with the marking pen.
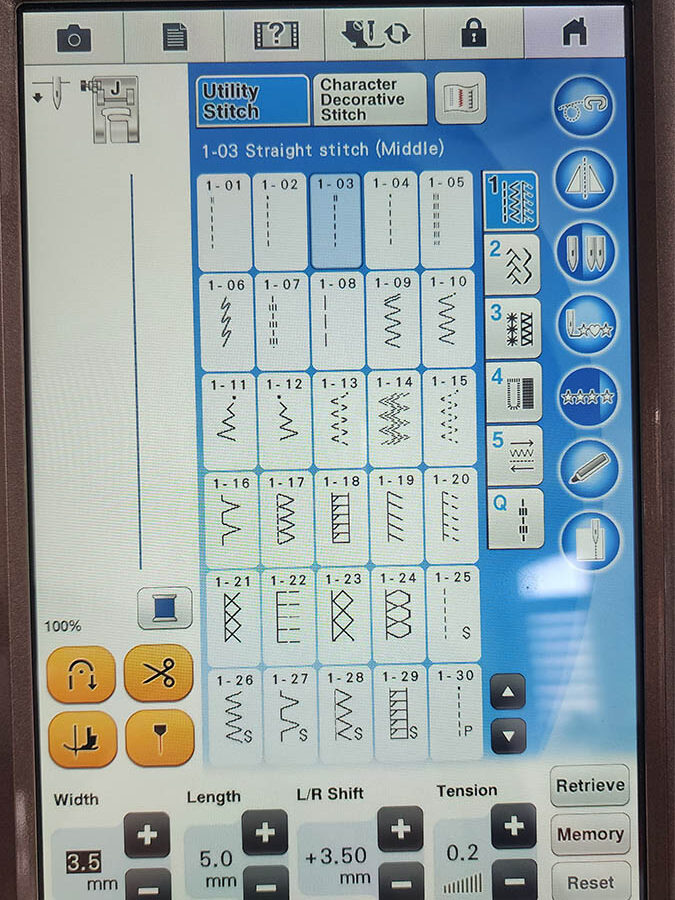
#2. Use a long stitch length (usually 5 mm) for the gathering stitches. Put the thread tension to 0 or almost 0 – very important! This will make it easier to pull on the threads and create the ruching effect.
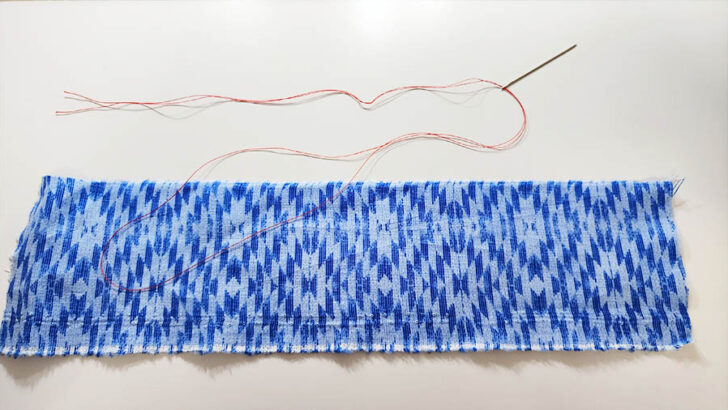
#3. Sew two parallel rows of stitches within the marked area. The first row of stitches should be about 1/8 inch from the marked line on one side, and the second row of stitches should be 1/8 inch from the marked line on the other side.
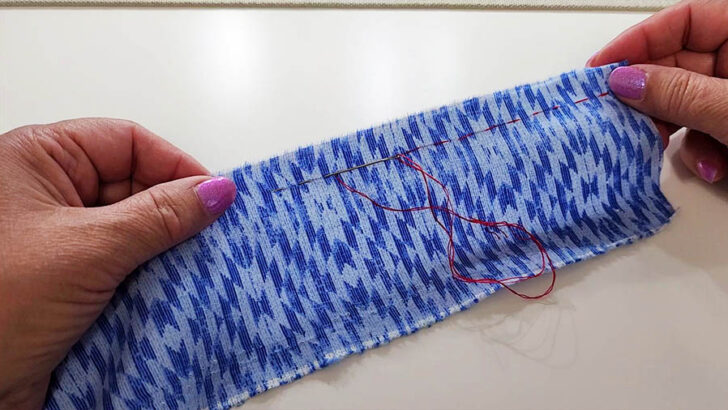
#4. Tie off the threads at the beginning of the rows of stitches, and leave long tails of thread at the end.
#5. Gently pull on the threads to create the ruching effect. The tighter you pull the threads, the tighter the ruching will be.
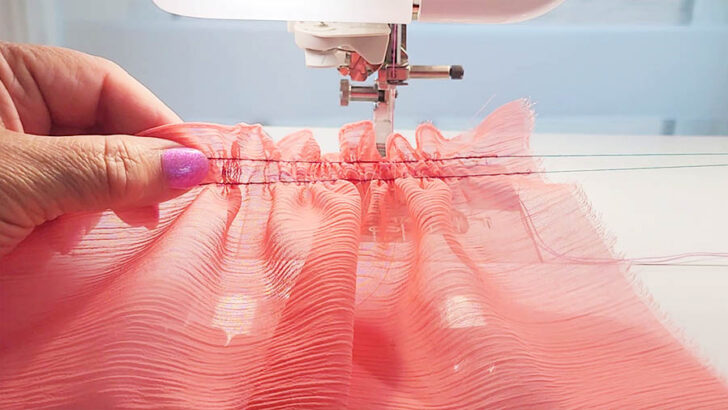
#6. Distribute the ruching evenly along the length of the fabric. You can do this by spreading out the gathers by hand.
#7. Once you are happy with the ruching, tie off the threads at the other end of the fabric to secure the gathers in place.
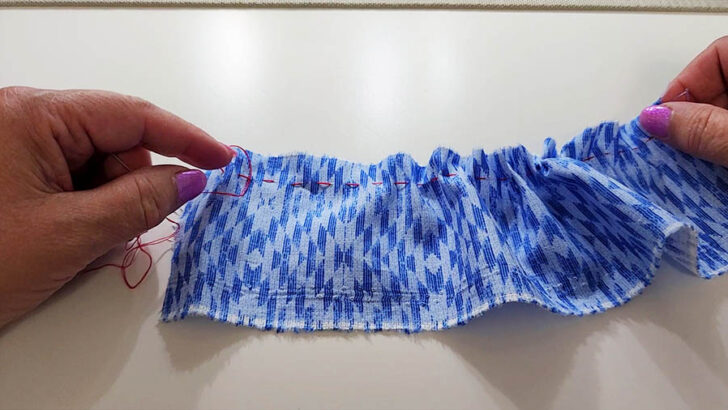
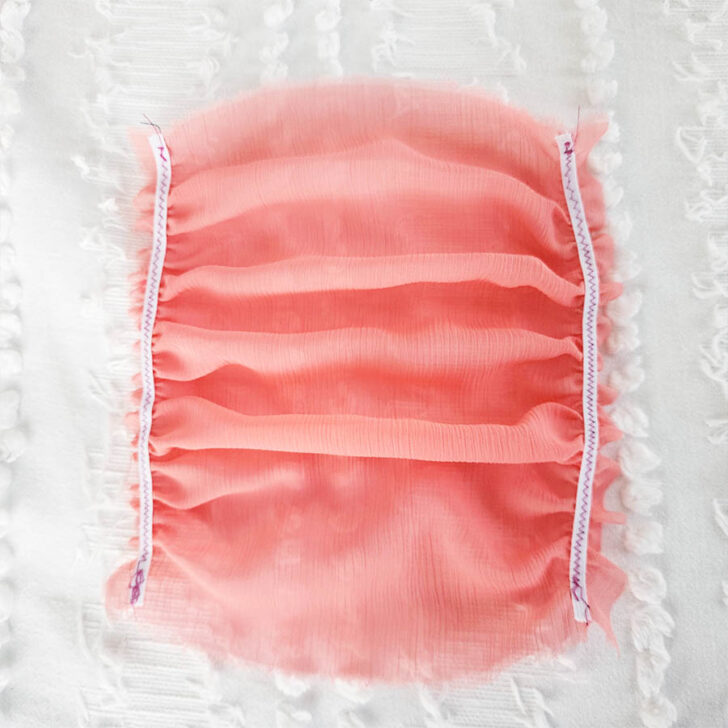
In the image below, you can see the fabric after I have gathered both sides. At this point, the ruching effect is not yet visible. This is because the fabric needs to be pulled evenly along the gathered areas to create the desired effect.
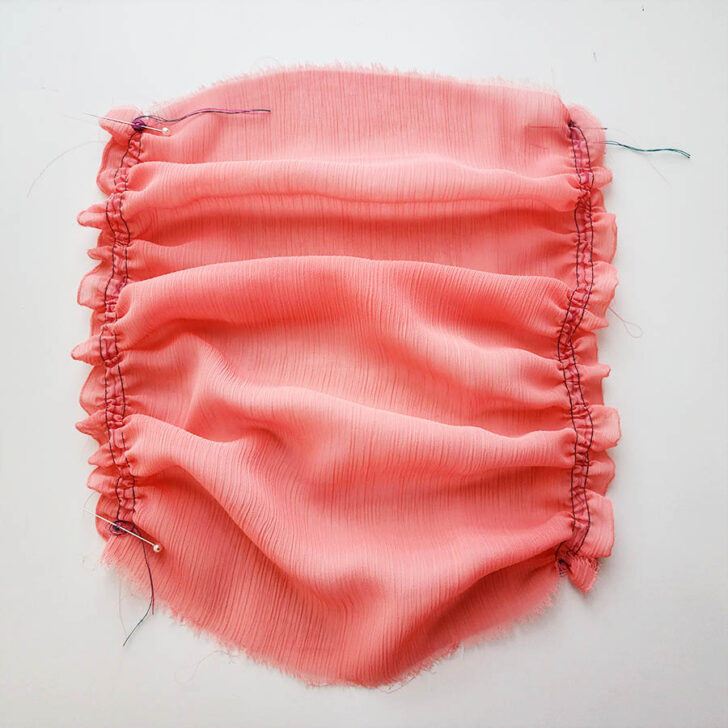
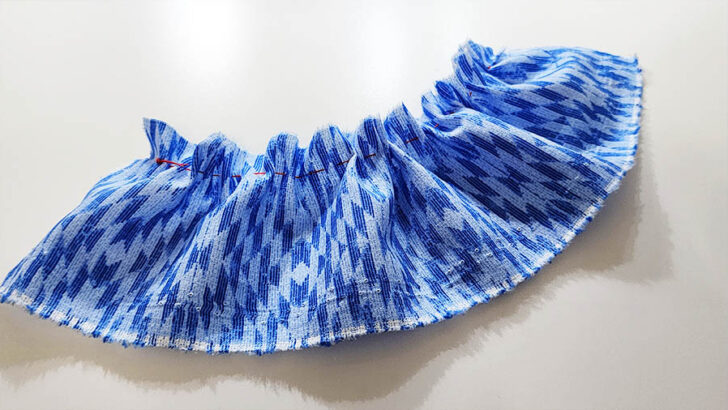
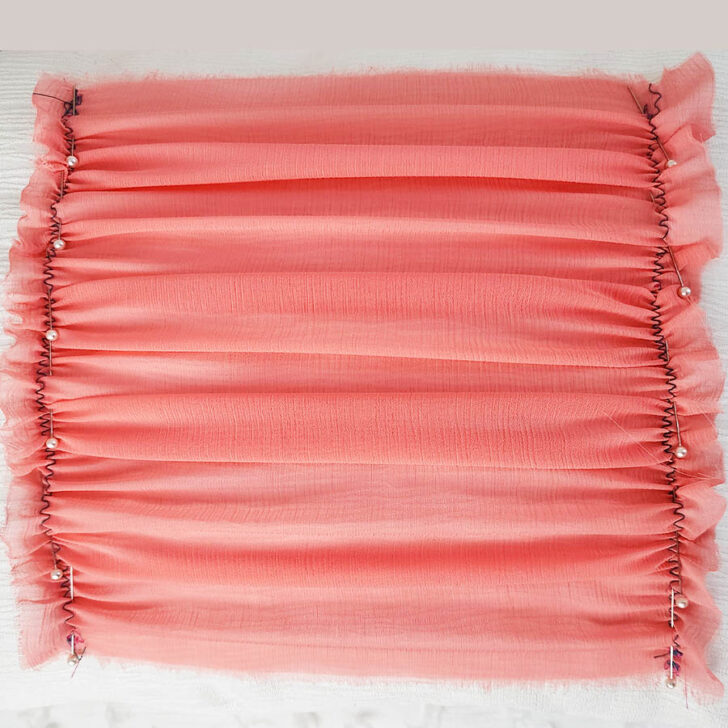
And in this image you can see the fabric ruched.
Tips for Success:
– Use a strong thread that will not break when pulled. Polyester thread is a good choice for gathering stitches.
– Practice on a scrap piece of fabric before you sew ruching on your actual project. This will help you get a feel for how to distribute the gathers evenly.
– You can press the ruching after you have sewn it. This will help set the gathers in place.
Method #2. Basic Gathered Ruching by Hand
Sewing ruching by hand is a traditional technique that has been used for centuries to create texture and dimension in fabric. This method is still popular today, especially for small projects or delicate fabrics that you don’t want to ruche on a machine. Sewing ruching by hand is time-consuming, but it can create a very delicate effect.
To sew ruching by hand, you will need the following materials:
- Fabric
- Thread
- Needle
- Pins
Here are the step-by-step instructions for gathering fabric (for ruching) by hand.
#1. Mark the stitching lines. If you want to ruche along seam lines, you may not need to mark the fabric; but, if you want separate ruching lines all across the front of a bodice, you will need a ruler to mark your stitching lines.
#2. Cut a piece of thread to the length of the marked area, plus a few extra inches. You want the thread to be a bit longer than the length of the final seam.
#3. Thread the needle with the thread, and make a sturdy knot.
#4. Begin sewing at one end of the marked area. Sew small stitches along the marked line.
#5. Once you have sewn the entire length of the marked area, gently pull on the thread to create the gathers. The tighter you pull the loops, the tighter the gathering will be.
#6. Distribute the gathers evenly along the length of the fabric.
#7. Once you are happy with the gathering, tie off the threads at the beginning and end of the marked area to secure the gathers in place.
Tips for Success
- Use a strong thread that will not break when pulled. Cotton or polyester thread is a good choice for sewing ruching by hand.
- Take small stitches along the marked line to create even gathers. If your stitches are too long, the ruching may be uneven.
- You can use a thimble to protect your fingers while sewing. This will help prevent soreness or injury from pushing the needle through the fabric.
- Practice on a scrap piece of fabric before you sew ruching on your actual project.
Method #3. Ruching with Elastic
Ruching with elastic is a popular technique to create visually appealing gathers in fabric.
Here are the step-by-step instructions for sewing ruching with elastic.
#1. Select the proper elastic for your fabric. I like to use quarter inch wide elastic. The length of the elastic should be the length of your desired finished product, while the fabric to be ruched should be significantly longer than the desired length. For instance, if you want a 10-inch ruched section, cut a 10-inch piece of elastic and a 20-inch piece of fabric (or even longer).
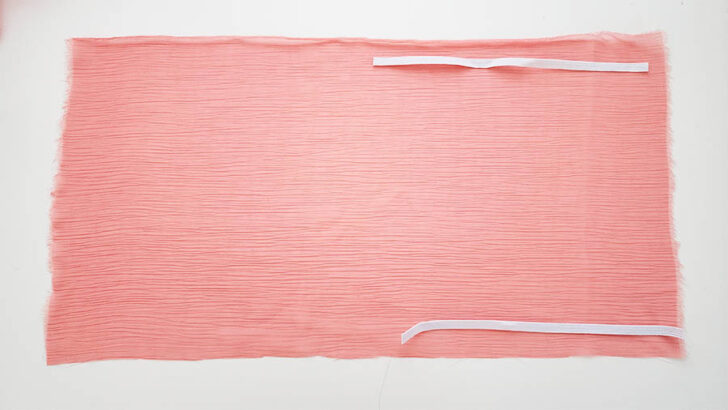
#2. Mark the stitching lines on the wrong side of the fabric. This will guide your stitching and help maintain a consistent gathering effect.
#3. Thread your sewing machine with a suitable thread color. Adjust your sewing machine settings.
What sewing machine stitch should be used?
When sewing ruching with elastic tape or clear elastic, you can use a zigzag stitch, a straight stitch, or a stretch stitch. A zigzag stitch is a good choice for sewing on elastic.
✅ Related article: Mastering the Zigzag Stitch on a Sewing Machine
A straight stitch can also be used, but it may not be as durable as a zigzag stitch. A stretch stitch is another option, if your sewing machine has it, but the stretch stitch doesn’t work well with chiffon fabric.
✅ Related article: Types Of Stretch Stitches On A Sewing Machine And When To Use Them
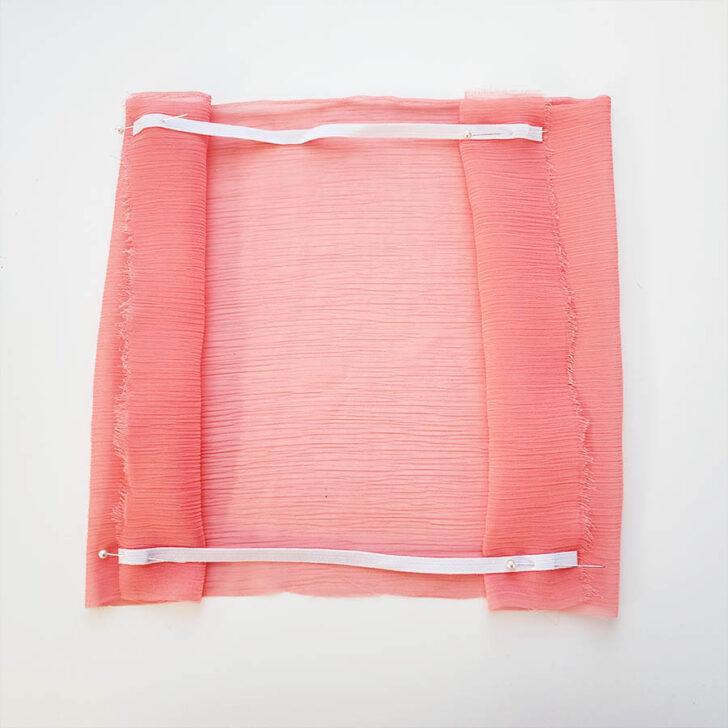
#4. Secure one end of the elastic to the fabric’s edge, either with a pin or by making a few backstitches.
#5. Stretch the elastic until it reaches the ending of your stitch line, pinning it at the end. You can’t keep the elastic stretched so the fabric will fold or bunch up before you take it to the sewing machine.
#6. Begin stitching, stretching the elastic as you go. This way, you’ll create evenly spaced gathers that enhance the appearance of your garment. Be mindful not to stretch the fabric along with the elastic, as this might result in uneven gathering.
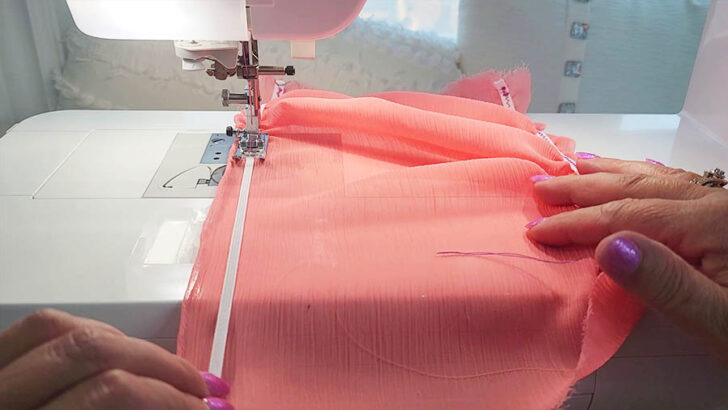
I turned the fabric around in this image.
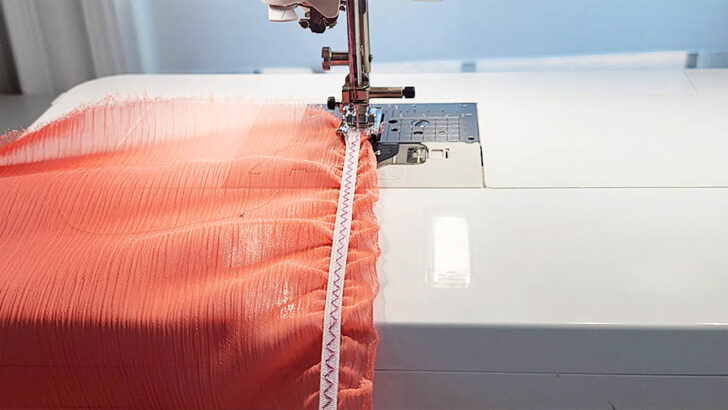
#7. When you reach the end of your elastic and fabric, secure the seam with a few backstitches.
This is how it looks after gathering is done.
And now I just need to pull the fabric to create the ruching effect.
Method #4. Sewing with Elastic Thread
Elastic thread is a type of thread that is made with rubber or another elastic material. When sewn into fabric, it can create a ruched effect by gathering the fabric together.
Elastic thread is a popular choice for gathering because it is easy to use and can create a very tight and even gathers. But it’s mostly used for shirring.
To sew ruching with elastic thread, you will need the following materials:
– Fabric
– Elastic thread
– Regular thread
– Sewing machine
Here are the step-by-step instructions for sewing ruching with elastic thread.
1. Wind the elastic thread onto your bobbin. Elastic thread is different from regular thread, so you may need to wind it by hand. Make sure to leave a tail of elastic thread at the end of the bobbin.
2. Thread your sewing machine with regular thread in the needle and the elastic thread in the bobbin.
3. Set your sewing machine to a straight stitch.
4. Begin sewing at the edge of the fabric where you want the ruching to start. Sew a straight line of stitching, backstitching at the beginning.
5. Make sure to keep the fabric flat and smooth as you sew. Elastic thread will create the gathering.
7. When you reach the end of the area where you want ruching, tie off the elastic thread and regular thread with a knot.
Tips for Success
– Use a longer stitch length than you would with regular thread.
– Test the tension of your sewing machine before you start sewing. You may need to adjust the tension to get the best results with elastic thread.
– Practice on a scrap piece of fabric before you sew ruching on your actual project. This will help you get a feel for how the elastic thread works and how much tension you need to use.
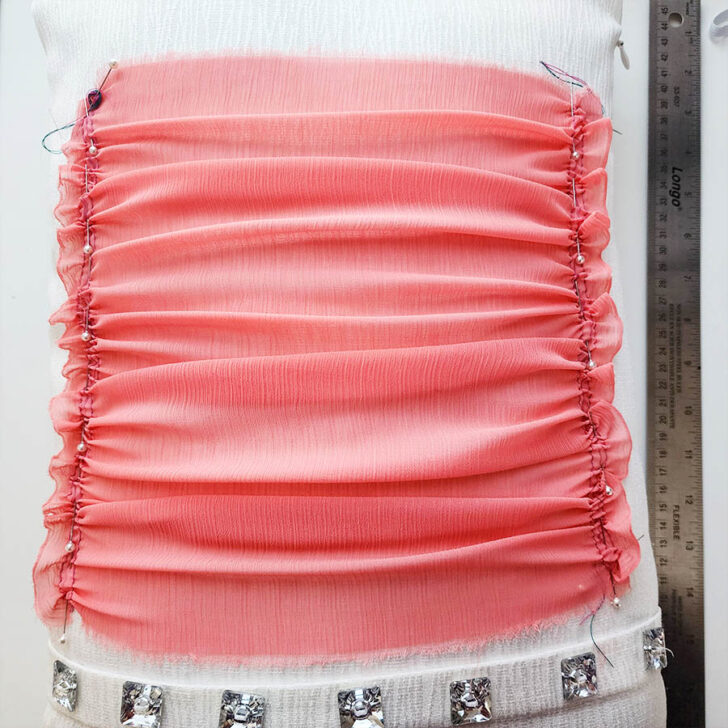
How to Sew Gathered Fabric to Base Fabric to Make Ruching
Once you have gathered the fabric to your desired length, it’s time to attach it to the base fabric. Align the edges of the gathered fabric with the raw edge of the base fabric, ensuring that the right sides of both fabrics are facing each other. Pin the fabrics in place to secure the gathered fabric.
Sew the gathered fabric to the base fabric using a straight stitch. Remove pins as you sew, and make sure to keep the gathers evenly distributed. Trim any excess fabric, finish the raw edges, and press the seam allowance towards the base fabric.
Are Ruching and Gathering the Same?
No, ruching and gathering are not the same, but I guess you could say the ruching and gathering are cousins in the family of sewing techniques. To create ruching you have to use gathering stitches. Ruching is at least two lines of gathering stitches that create fullness and a draping to a piece of fabric.
However, when you have plain old gathering, it releases the stitching into fullness, like for a skirt or a ruffle. In other words, for gathering, the stitching is only on one edge of the fabric piece.
Note: Some of the links on this page are affiliate links. This means I will receive a commission if you order a product through one of my links. I only recommend products I believe in and use myself.
Applying Ruching to Different Clothing
Ruching skirts
Adding lines of ruching at the side seams or even across the whole front of skirts will totally change their look. Remember that ruching a skirt significantly alters its length. Just add the ruching to the side seams or across the front of the skirt with one of the above-mentioned methods.
Or you can easily buy a ruched skirt on Amazon.

Ruching dresses
You can alter the length of a dress by ruching it, and you can even change where the waistline falls by ruching the bodice. This is a great sewing tip for petite gals who find that certain items are too long! Use the above-mentioned methods of ruching along the skirt or bodice of a dress.

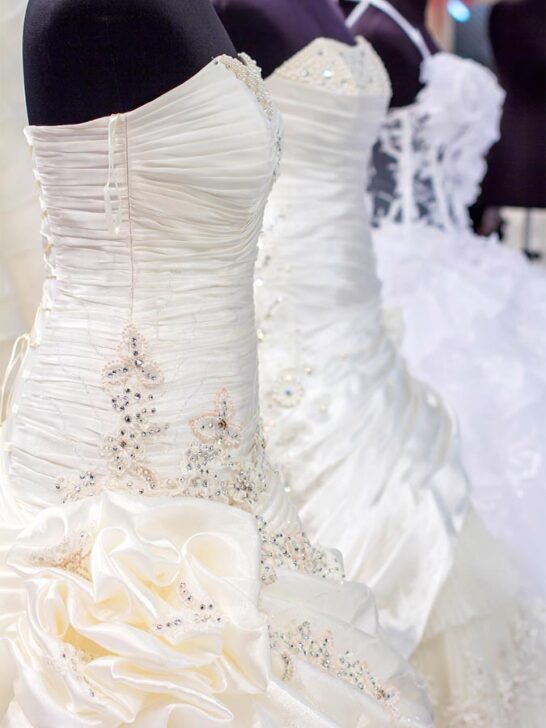
Ruching Wedding and Bridal Gowns
Ruching is a common style found in bridal gowns. It’s likely that you want to ruche the fabric before you sew the dress. This means that you will want to add significant length to the fabric pieces as you cut them out.
Experiment with muslin fabric and the pattern pieces before you start cutting into expensive bridal satin. Determine the number of inches by which you will want to lengthen each piece. Then, gather the stitches until the fabric piece is the size of the original pattern piece. How do you think the ruching looks? Is it too full or not full enough? Play with the pieces, writing down each attempt until you get the look that you like. Once your fabric pieces are ruched to your own taste, stitch them together as directed. If you like the overall look, recreate it in your bridal satin.
Ruching Swimwear
Ruching is a designer secret in swimwear, since the folds and gathers can camouflage trouble spots on someone’s figure as well as accentuating the positive. Most of the time, ruching on swimwear should happen during construction because it is unlikely that the bathing suit will have enough length if it is not ruched as it is sewn.
Most ruching on swimwear is done along the length of the bodice. In the case of two piece suits, it’s common for ruching to be done on the bottom. Simply extend the length of these pattern pieces and cut extra fabric before ruching them. You probably want to make up a sample piece to be sure that you get it right before you use your expensive fashion fabric.

Ruching Sleeves and Other Details
Ruched sleeves and other garment sections add special style touches to an otherwise plain garment. You can ruche the length of sleeves simply by extending the length and then ruching them. If you typically have to shorten long sleeves, knowing how to add ruching to a sleeve can help your clothes fit better.
On curved pattern pieces, it is a bit more complicated. To ruche curved pattern pieces, slash the pattern in V-shapes along the sides that you want to ruche. Cut the pattern pieces of fabric and gather along the slashed sides. It may take a few attempts to get it the way that you want it. The main thing is to make sure that the finished, ruched pieces are the same size and shape as the original pattern piece.
How to add ruching to a dress
Ruching dress patterns is fairly simple. To add ruching detail to a dress, simply mark your stitching lines and gather along them, using one of the above listed techniques. Be sure to account for the extra length when cutting fabric pieces. If you need to know how to add ruching to a dress that is ready-made, just add the gathering lines and gather the fabric to the desired length.
How to remove ruching from a dress
Removing ruching from a dress can be a complicated process, depending on the type of dress and the location of the ruching. Sometimes it may not even be possible or practical. Some dresses are designed with ruching as a structural element, and removing it may compromise the fit or integrity of the dress.
But sometimes it’s possible to remove ruching if it is causing the dress to fit poorly or uncomfortably. Ruching can add bulk to certain areas of the dress, which may not be flattering or comfortable for all body types.
Here are the step-by-step instructions for removing ruching from a dress.
- Turn the dress inside out and locate the area where the ruching is located.
- Use the seam ripper to carefully cut the seams and remove the gathering stitches that hold the ruching in place. Take care not to cut or damage the fabric of the dress.
- Once all the gathering stitches have been removed, gently pull on the fabric to release the ruching. You may need to use scissors to cut any remaining threads or knots.
- Iron the fabric to remove any creases or wrinkles left by the ruching.
I hope you found this tutorial on how to sew ruching helpful. If you\’re interested in learning more about sewing, I have a collection of posts on my site that cover different techniques and tools. Here are four tutorials that I recommend.

If you found this tutorial on how to sew ruching helpful, please consider pinning the image (see below) on Pinterest so you can easily find it again later and share it with others who might find it useful. Simply hover over the image and click the “Pin It” button that appears. Thanks for your support!

latest posts
- What Do You Call a Person Who Sews? I Asked My Readers and Got 1,408 Opinions
- DIY Round Purse: PDF Sewing Pattern and Detailed Instructions
- Mini Wonder Clips By Clover: Useful Sewing Tool Or Just Another Notion?
- Non-Slip Grips For Quilting Rulers: A Small Notion With A Useful Job
- Fabric Eraser for Sewing: What It Removes and When to Use It
- What Is The Best Thread For Sewing Machine Projects? Let’s Find Out!
- Butterfly Quilt Block Tutorial – Foundation Paper Piecing
- How To Sew Quilt Squares So The Corners Match
- Sewing With Fork Pins: How They Help With Pattern Matching, Slippery Fabric, And Seams