How To Embroider A Hoodie: A Complete Guide
Are you ready to dive into a world where creativity meets coziness? In this tutorial, I’m going to unravel the secrets of embroidery on hoodies. This will be your trusted guide through the perilous path of hoodie selection, hooping heroics, the intricacies of stabilizing knit fabrics and the mysterious embroidery machine settings. I’ll share tips and tricks to troubleshoot any stitch-related conundrums that may arise.
Now, you might be wondering, “Why hoodies? What makes them the chosen canvas for our machine embroidery escapades?”
Everyone wears a hoodie. For your morning jog, if you go out to shovel snow, or for a quick trip to the yard to do some work. Or for a short trip to the convenience store. Teenagers wear hoodies as a fashion statement, but this does not mean that mature people do not wear them. I do, because they are so practical.
Hoodies, those cozy companions of comfort, are begging to be transformed into embroidered masterpieces. With their smooth surfaces and stable fabric, they offer the perfect canvas for your creative stitches to shine. And everyone loves a personalized hoodie. From “Dog mom” for people like me, to “Superman” for your 6 years old or “Just Breathe” for your cool daughter, I am certain you will find the proper design for the specific person.
For this article I chose designs from a site (Machine Embroidery Downloads, Designs and Digitizing Services) that I use from time to time. It is not the only site I like and use but they have a variety of designs with prices that are not out of this world. Unfortunately the quality of their designs is not the best, I had to fix slightly some of the designs to be able to use but the end result was pleasing.

- Choosing The Type Of Hoodies For Embroidery
- Selecting The Right Hoodie For Machine Embroidery
- Preparation And Set-Up For Machine Embroidery On Hoodies
- Popular Machine Embroidery Designs For Hoodies
- Placement Of The Design On The Hoodie
- Stabilization Techniques for Hoodies
- Marking, Hooping and Embroidering the Hoodie #1
- Machine Embroidery On Hoodie #2
- Machine Embroidery On Hoodie #3
Choosing The Type Of Hoodies For Embroidery
There are different types of hoodies that are suitable for machine embroidery at home. Some favor a classic pullover style, while others prefer the convenience of a zipped hoodie and the choice depends on personal preference and the specific design you plan to embroider.
In this section, we will explore three popular styles: Pullover Hoodies, Zip-Up Hoodies, and Quarter-Zip Hoodies. Each style has its advantages and challenges when embroidery is concerned.
Note: Some of the links on this page are affiliate links. This means I will receive a commission if you order a product through one of my links. I only recommend products I believe in and use myself.
Pullover Hoodies
But pullover hoodies can be a bit more challenging to hoop compared to zip-up hoodies. Since pullovers don’t have an opening in the front, you’ll need to slide the hoop through the neck opening to reach the embroidery area. This requires some maneuvering and careful alignment of the fabric and stabilizer within the hoop.
Zip-Up Hoodies
Zip-Up hoodies, also known as full-zip hoodies, feature a zipper that extends the full length of the front, providing a slimming look and the ease of wearing it open or closed.
Embroidery placement should be considered carefully to avoid issues with the zipper or seams. Designs are typically placed on either side of the zipper or on the back.
Since the working area on each side of the zipper is smaller than on a Pullover hoodie, designs may need to be scaled down or split to fit properly.
But zip-up hoodies are generally easier to hoop since you can easily open the front and lay the fabric flat within the hoop. This allows for straightforward access to the embroidery area and straightforward alignment.
Here is the current offer on Amazon for men and for women.
Quarter-Zip Hoodies
Quarter-Zip Hoodies combine elements of both Pullover and Zip-Up hoodies. These hoodies have a zipper that only extends a quarter of the way down, leaving ample space for embroidery on the chest. When working with Quarter-Zip hoodies ensure the zipper does not interfere with the embroidery machine’s operation. Due to the partial zipper, the design may need to be adjusted for size and placement to best fit the available space.
Here is the current offer on Amazon for men and for women.
Selecting The Right Hoodie For Machine Embroidery
The quality of the hoodie, its fabric, and design will greatly impact the final result of your embroidered artwork. Here are the key factors to consider when choosing hoodies for embroidery if you want a professional and long-lasting finish.
Hoodie Quality
Look for quality hoodies made from durable materials, as they tend to hold up well to embroidery. Avoid hoodies that are too thin or flimsy, as they may not provide a stable base for the embroidery stitching and can lead to puckering or distortion.
Fabric Density
The density of the hoodie fabric is another important aspect to consider. Opt for hoodies with a higher fabric density, as this will provide a smoother and more stable surface for embroidery. A higher fabric density also helps ensure that the embroidered design stands out and doesn’t get lost within the fabric. Avoid hoodies with loosely knit fabrics, as they may cause the embroidery to pucker or stretch over time.
Color And Contrast
Consider the color of the hoodie and how it will complement your embroidered design. Solid colors provide a visually striking backdrop for your embroidery. Designs on solid color hoodies tend to have better clarity and definition. Without distractions from patterns or prints, your artwork can stand out and make a bold statement.
Minimal Stretch
While a little stretch is acceptable, too much of it can turn your carefully crafted design into a distorted piece of wonky stitches. To avoid such a calamity, give the fabric a gentle tug to gauge its stretchiness. Aim for a hoodie that strikes the perfect balance between elasticity and stability. Fabrics with 100% cotton or a lower percentage of spandex/elastane tend to work better for machine embroidery.
Avoid Ribbed Or Heavy Texture
Hoodies with ribbed or heavily textured surfaces can make it difficult for the embroidery machine to produce detailed designs. The ridges and bumps of these fabrics can leave you with a lumpy, less-than-impressive outcome. It’s generally better to choose hoodies with smooth surfaces for better embroidery results.
Check The Sizing And Dimensions For Hooping Compatibility
Make sure that the hoodie’s sizing and dimensions are hooping-compatible. Check that it comfortably fits within your embroidery hoop, allowing ample space for your design to shine without getting squished or crammed.
Preparation And Set-Up For Machine Embroidery On Hoodies
In this section I will guide you through the necessary steps to get ready for embroidering your hoodies.
Gather The Necessary Materials And Equipment
Before you start embroidering, make sure you have all the required materials and equipment within reach. This includes:
Embroidery Machine
Embroidery Hoop: Select an appropriate hoop size. The hoop will hold the fabric taut and secure during the embroidery process. For my hoodies I chose to use a hoop that came with my machine (9 1/2 x 9 1/2″, or 24 x 24 cm) but for larger designs you might want to consider a magnetic hoop like this one: Snap Hoop Monster for Baby Lock/Brother (10.5″ x 16″). I like these magnetic hoops because it does not leave marks on the fabric and it is easy to hoop and rehoop when you need to shift the fabric.
Stabilizer: Stabilizer is a crucial component that provides support to the fabric during embroidery. Choose the appropriate type of stabilizer based on the hoodie fabric and the complexity of your design. I will talk more about stabilizer when I describe that step because I used multiple types of stabilizer.
Embroidery Threads: Select high-quality embroidery threads that match the desired colors for your design. Polyester or rayon threads are commonly used for embroidery projects due to their durability and vibrant appearance.
Always use high quality threads like these Brothread spools. Low quality threads will break and may leave lint you do not want in your machine.
If you’re opting for a light-colored hoodie, make sure the embroidery thread colors will stand out and create a striking contrast. Similarly, if you choose a dark-colored hoodie, select embroidery thread colors that will be visible and add visual interest.
Needles: Ensure you have the correct embroidery needles for your machine. Different needles may be required depending on the fabric and design complexity.
✅ Related tutorial: Machine Embroidery Needles 101: how to choose the right needle for your embroidery project
Scissors: Have a pair of sharp embroidery scissors on hand for trimming threads and cutting stabilizer.
✅ Related tutorial: Duckbill Scissors: What They Are And How To Use Them
Marking Tools: Depending on the embroidery design, you may need marking tools such as tailor’s chalk or washable fabric markers to outline or trace your design onto the hoodie.
✅ Related tutorial: Your Guide For Choosing The Best Quilt Marking Pens For Every Project
Prepare The Embroidery Design
When selecting an embroidery design for machine embroidery on hoodies, consider the density of the design. Choosing a design with the appropriate density can make all the difference in the quality and appearance of the finished product.
In general, high-density designs are not suitable for hoodies as they can cause distortion and puckering. This is because hoodies are made from stretchy knit fabrics (French terry and fleece are the most common), and high-density designs can cause the fabric to pull and warp, resulting in an uneven and unattractive finished product.
On the other hand, medium-density and light designs are more suitable for knit fabrics as they typically have fewer stitches and the stitches are spaced further apart.
However, it can be difficult to know if the design you like is not high density, especially if you are new to machine embroidery.
One way to determine the density of a design is to look at the stitch count. Typically, high-density designs will have a higher stitch count than medium-density designs. You can usually find the stitch count information in the design’s specifications.
Another way to determine the density of a design is to look at the spacing between stitches. High-density designs will have stitches that are closely spaced together, while medium-density designs will have more space between stitches. But not all digitizing companies provide actual images of the embroidery design. You can sometimes see this spacing in a close-up image of the design but if you have embroidery software you can try to zoom in on the design on your computer.
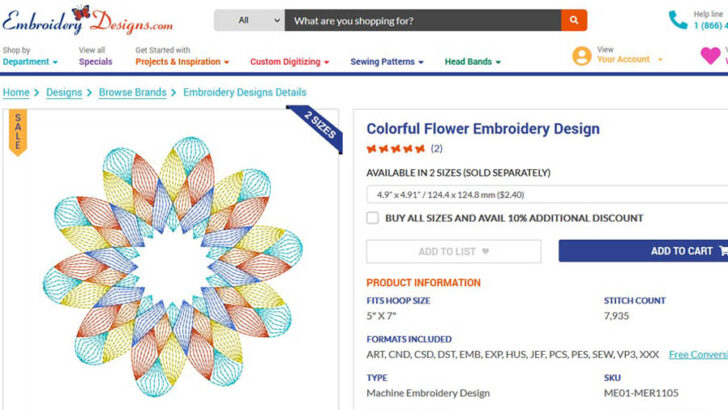
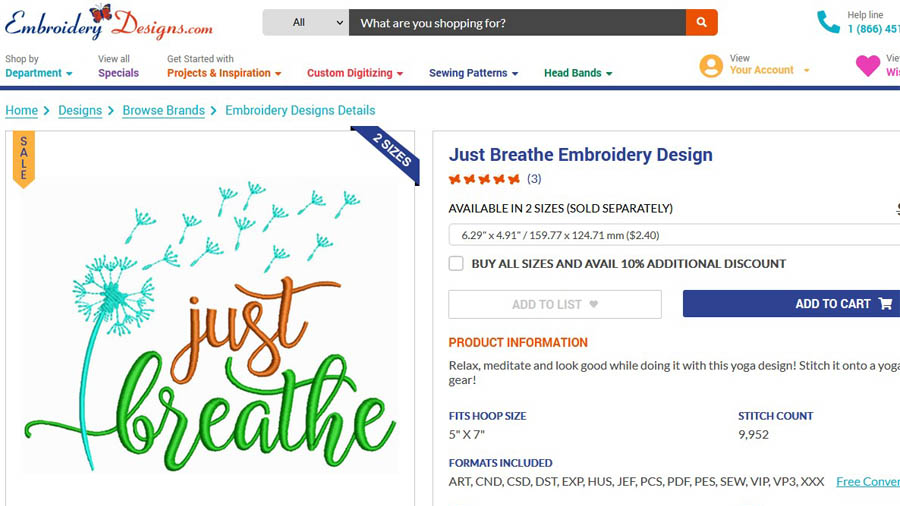
Let me give you an example of lightweight design I think would be very good for a hoodie.
✅ Related tutorial: Best Computers to Use with an Embroidery Machine in 2023
It’s also a good idea to choose a reputable source for your embroidery designs. Many embroidery design websites and marketplaces will provide information about the density of their designs, making it easier for you to choose a medium-density design that will work well on your fabric.
After choosing the design make sure it’s in a compatible format for your embroidery machine.
Transfer the design to your embroidery machine.
Pre-Wash And Pre-Shrink The Hoodie If Necessary
Washing and pre-shrinking the hoodie before embroidery can be beneficial to prevent any unwanted distortion or shrinkage after the embroidery is complete. Follow the care instructions provided by the hoodie manufacturer to ensure the fabric is clean and stable.
Plan The Placement Of The Design On The Hoodie
Before hooping the hoodie, carefully plan the placement of your design. Consider factors such as the size of the design, the hoodie’s style and features, and any specific requirements or preferences.
Popular Machine Embroidery Designs For Hoodies
Digitizing companies provide numerous design options for personalizing hoodies. Some popular embroidery design ideas include monograms, quotes and artwork.
Monograms
Monograms are one of the most classic and timeless embroidery designs. They usually feature an individual’s initials, and can be created in various fonts and styles.
The easiest way to create a personalized monogram is to use an appropriate font and then design the monogram in your software or directly on the machine. Most embroidery machines already offer a number of built in fonts but extra sets can easily be found.
Consider the following monogram styles:
- Classic: Traditional script or serif fonts
- Modern: Clean lines and minimalist designs
- Embellished: Decorative elements like swirls, flowers, or border elements
Here is a very nice example of a monogram font:

Quotes
Many people find inspiration and motivation in quotes. Embroidering uplifting or motivational quotes on hoodies can serve as a reminder of personal goals, aspirations, or mantras. Wearing such hoodies can instill a positive mindset and provide encouragement throughout the day.
If you are considering quotes for embroidery on hoodies, choose quotes that resonate with you personally and align with your values. Ensure the quote is meaningful and represents your desired message. Pay attention to the readability of the quote by considering the size and style of the embroidery.
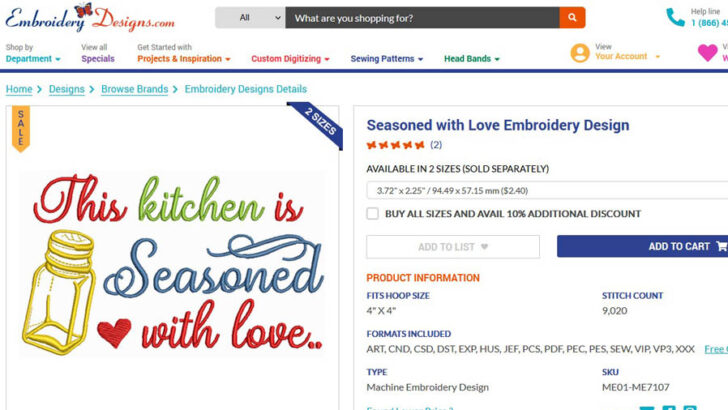
The quote can be from a well known author, probably abbreviated (ex. “Whatever you are, be good / Abraham Lincoln”) or a funny original like the one below:
Artwork
Artistic designs can truly transform a hoodie into a one-of-a-kind piece of wearable art. From intricate patterns to original illustrations, machine embroidery offers limitless design possibilities.
Consider these artwork styles for hoodie embroidery:
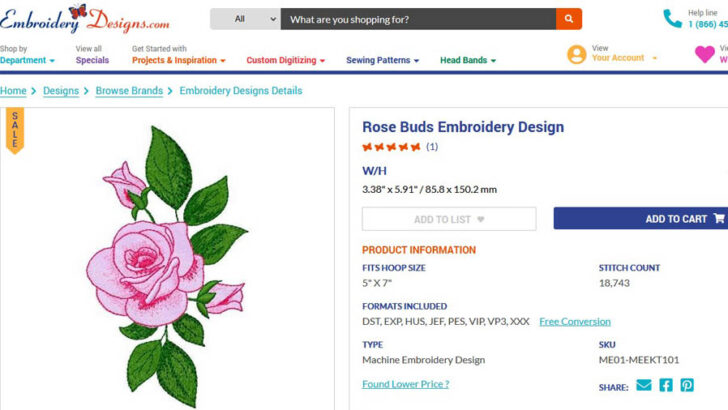
- Floral motifs: Delicate flowers and vines can add an feminine touch
- Abstract designs: Bold, eye-catching patterns or shapes
- Wildlife and Animal Motifs: Whether it’s a majestic lion, a graceful bird, or a cute woodland creature, these designs can make a statement.
- Abstract Landscapes or Cityscapes: Create an impressionistic representation of mountains, forests, skylines, or iconic landmarks.
- Child-friendly designs: These designs can feature various themes, such as cute animals, cartoons, superheroes, or imaginative characters, to spark children’s imagination. Choose animals that children adore, such as pandas, elephants, owls, dogs, or cats. Kids often have favorite cartoon or storybook characters they love. Embroidering their beloved characters onto hoodies can bring joy and excitement. Whether it’s classic characters like Mickey Mouse, superheroes like Spider-Man, or princesses from popular fairy tales, these designs can make children feel connected to their favorite stories.
Placement Of The Design On The Hoodie
You have several placement options depending on the desired aesthetic and the specific design you’re working with. Here are some common placement areas to consider:
Left Chest Area: The left chest area is a classic and popular placement for embroidery on various garments, including hoodies. Typically, the design is positioned on the left side of the chest, around where a pocket might be located on a traditional button-up shirt. This placement is often used for logos, monograms, or smaller designs.
Right Chest Area: The right chest area is another option for placement if you want to use multiple designs or create a mirrored design. It provides a symmetrical balance for your embroidery.
Across the Chest: For larger designs or statement pieces, you can consider placing the embroidery across the chest area of the pullover type of hoodie. This placement allows for more prominent and eye-catching designs that span the width of the hoodie’s front. Ensure that the design is centered for a balanced appearance.
Sleeve: The sleeve is a unique placement option. You can place the embroidery on either the upper arm or lower arm of the sleeve. This placement works well for smaller designs. But you might need to undo the sleeve’s seam.
Hood: Embroidering on the hood is another option. The top or back portion of the hood is the common area for placement.
Back: Placing the embroidery design on the back of the hoodie provides a prominent focal point. This area offers ample space for larger or more detailed designs. Ensure that the design is centered vertically and horizontally on the back for a balanced appearance.
The placement of the embroidery design is subjective and depends on personal preference and the specific design elements. Consider factors such as the size, shape, and complexity of the design, as well as the overall style you want to achieve.
Stabilization Techniques for Hoodies
Knit fabrics, commonly used for hoodies, can stretch or distort during the embroidery process if not properly stabilized. This can lead to uneven stitching, puckering, or misalignment of the design.
The stabilizer acts as a foundation, providing support and preventing the fabric from distorting. By stabilizing the hoodie, you create a stable surface for embroidery.
There are different types of embroidery stabilizers: cut-away, tear-away, wash-away, adhesive stabilizers, etc. The choice of stabilizer for a hoodie depends on the specific fabric, design, and desired outcome.
Cut-away stabilizers are a popular choice for hoodies, especially when working with medium to heavyweight knit fabrics. They provide excellent support and prevent stretching or distortion during the embroidery process.
I like to use tear-away stabilizers. They are available in various weights, allowing you to choose the appropriate thickness based on the design and fabric. They provide stability while being gentle on the fabric, and are easy to remove without leaving residue or causing damage.
Adhesive stabilizers, also known as sticky stabilizers or self-adhesive stabilizers, have an adhesive coating on one side that adheres to the fabric. Adhesive stabilizers hold the fabric firmly in place, preventing shifting or movement during embroidery. They are available in both cut-away and tear-away varieties, providing stability and easy removal after stitching.
Water-soluble stabilizers, often in the form of clear film or stabilizer sheets, are used for hoodies in combination with other stabilizers or as a topping for certain fabrics. They are particularly useful when embroidering on textured areas of the hoodie. Water-soluble stabilizers prevent stitches from sinking into the fabric and help maintain crispness and definition. After completing the embroidery, the stabilizer is dissolved or washed away with water.
I used all these types of stabilizer for my hoodies. For the first two designs I user the tear away variety and for the third one I used both the cut away and the water soluble film.
Marking, Hooping and Embroidering the Hoodie #1
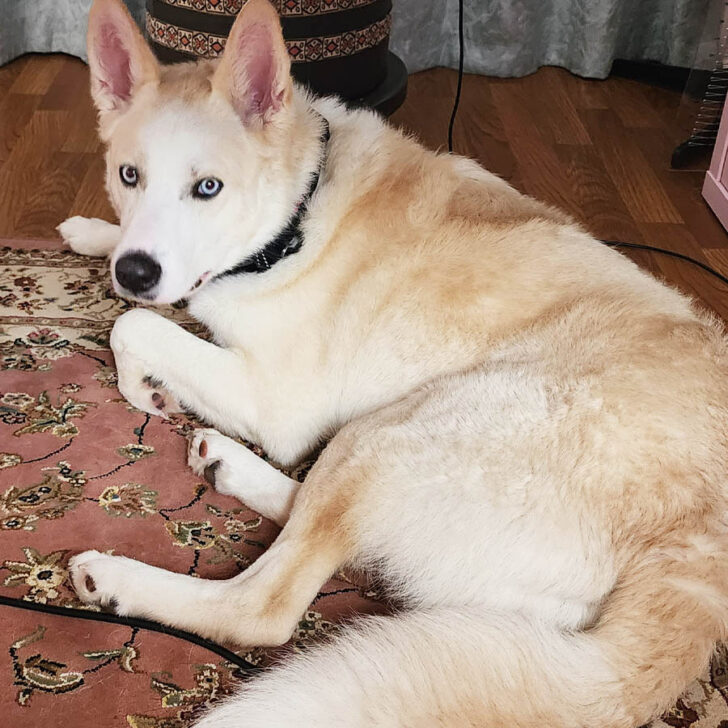
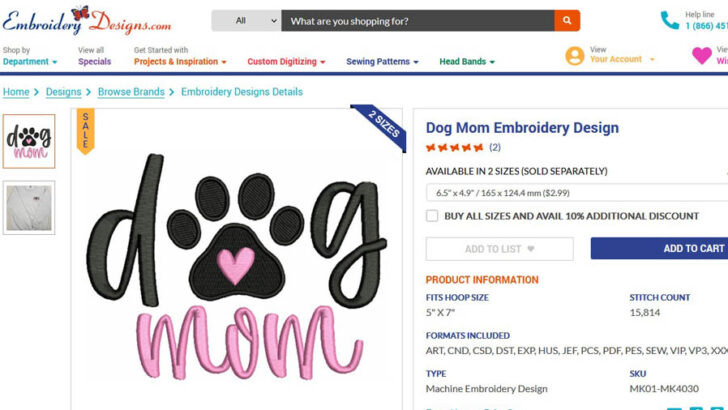
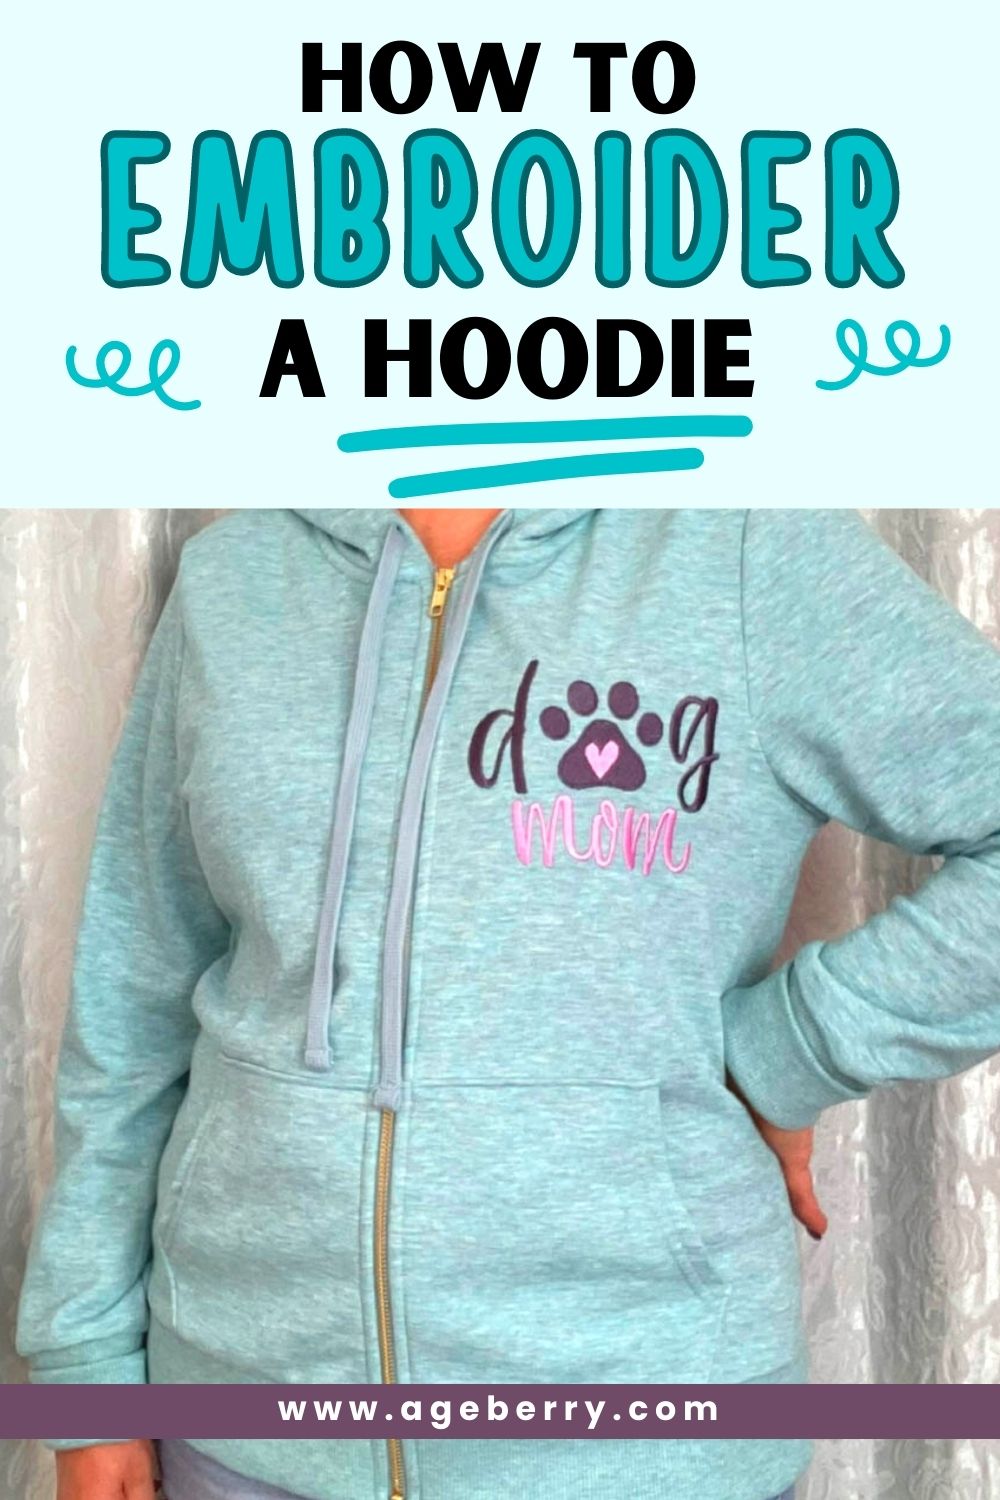
I chose as the first example for my embroidery on hoodies the design below. It fits a reasonably small hoop (5×7”), it has a reasonable number of stitches and not a lot of color changes. And it conveys a message that I like, especially because I have a new best friend in Ace, my 2 years old white (well, off-white already) husky mix!
Prepare The Hoodie
Lay the hoodie flat on a table, ensuring that it is free from wrinkles or folds.
For this project, I decided to use a hoodie made from a blend of cotton and polyester. The fabric was on the thinner side and quite stretchy, which posed some challenges for me when embroidering.
That’s why I recommended using a hoodie with a more stable fabric and medium weight, rather than lightweight, for machine embroidery. From my experience, stable fabrics provide a better surface for embroidery and are less likely to distort or pucker during the embroidery process.
While the end result was still very nice, I did encounter a small problem along the way (see below).
Visualize The Design Placement
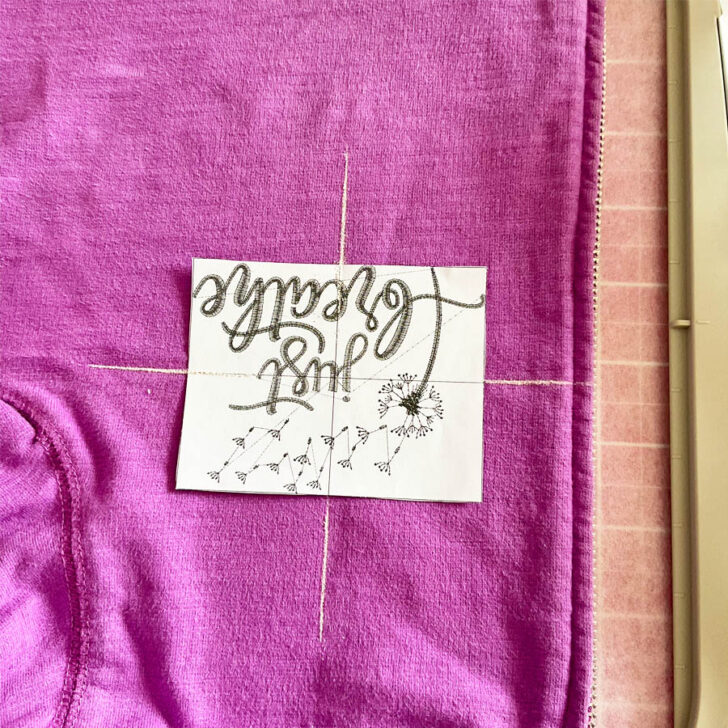
Consider the desired position and size of the design on the hoodie. I usually print the designs I want to use on paper first. You can place it where you want on your project. This way, you can preview your embroidery before even starting your machine and make adjustments.

You can print embroidery designs using any embroidery editing software – just make sure you print them in actual size and select an option to print black guidelines to indicate the embroidery area and the center axes for proper design placement.
✅ Related tutorial: (Almost) Free Embroidery Software?
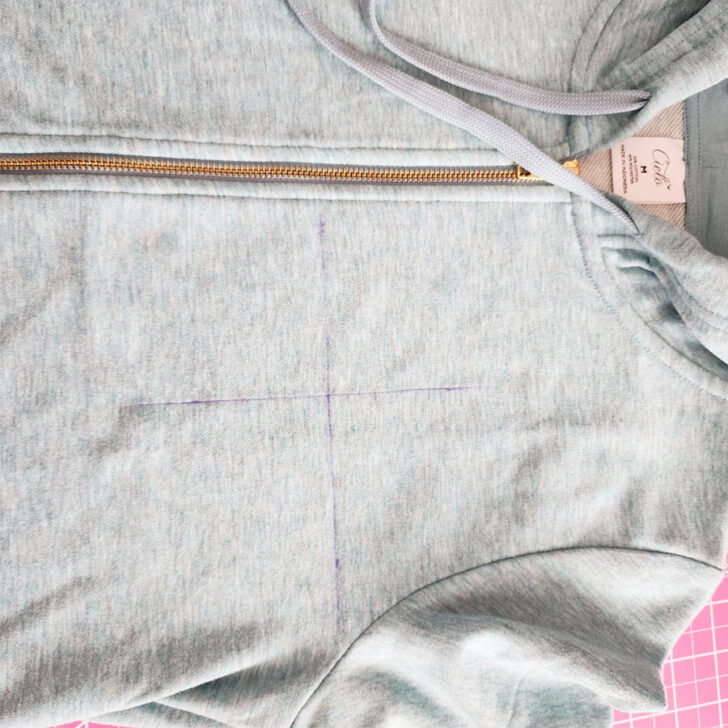
Mark the center
Use temporary fabric markers or chalk to mark the center point of the embroidery area on the hoodie. This will serve as a reference point for aligning the hoop. Draw horizontal and vertical lines to mark the center.
Hooping the hoodie
Select the appropriate hoop size: Choose a hoop that comfortably fits the design and allows for proper tensioning. This design is made for 5 x 7 hoop but you can use a bigger hoop too. I used my 6 x 10 hoop in this case.
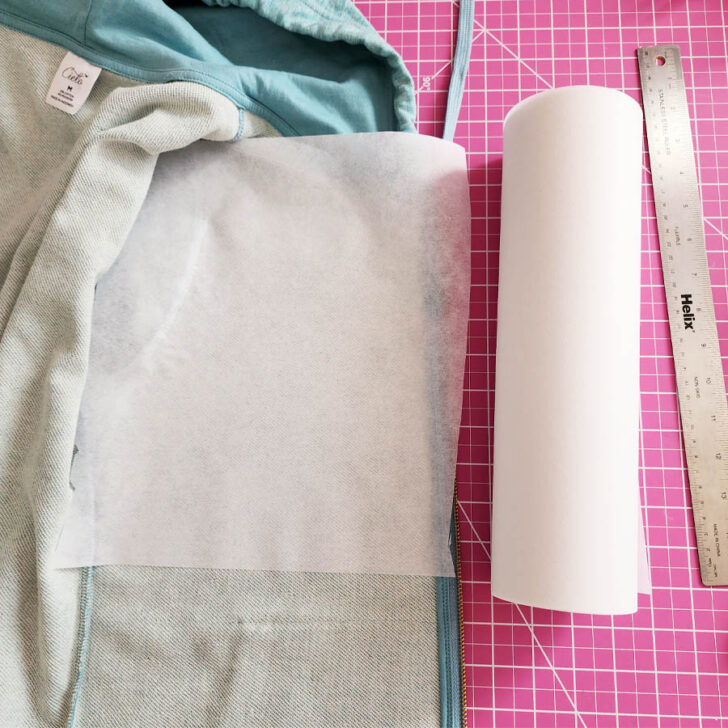
Prepare the stabilizer: Cut the stabilizer for the project. I usually cut it bigger than the hoop size so it extends one or two inches beyond the hoop size on each side. This extra margin provides ample room for stability and support during the embroidery process. For this project I used tear-away stabilizer.
Position the stabilizer: Place the stabilizer on the inside of the hoodie, directly beneath the embroidery area. You can use a temporary fabric adhesive spray which works wonders in simplifying the hooping process. Apply a small amount, being mindful not to overdo it. Spray the stabilizer itself, rather than the fabric of the hoodie.
Align the hoop: Carefully position the hoop over the marked center point, ensuring the design is correctly aligned with the fabric. Adjust as needed to achieve the desired placement. Sometimes I even place a plastic hoop template on top of the marked area for easy hooping.
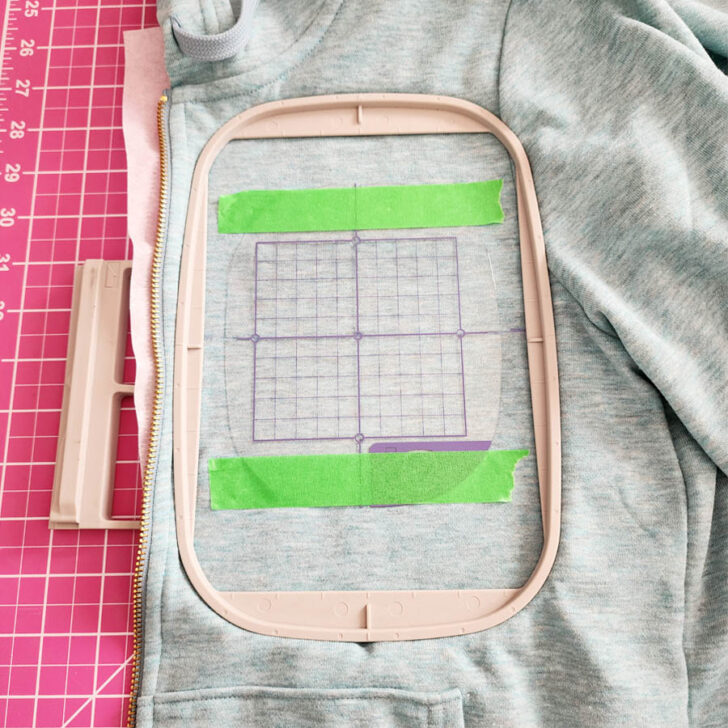
Hoop the hoodie: Hoop the hoodie and stabilizer together to create a secure and stable embroidery surface. Smooth out any wrinkles or folds in the fabric and make sure the stabilizer is flat against the fabric. Carefully place the outer hoop over the hoodie and the inner hoop.
Tension the hoop: Press down on the outer hoop while tightening the screws or clamps to secure the hoodie and stabilizer. Check that all layers are taut and evenly tensioned. Avoid over-tightening, as this may distort the fabric.
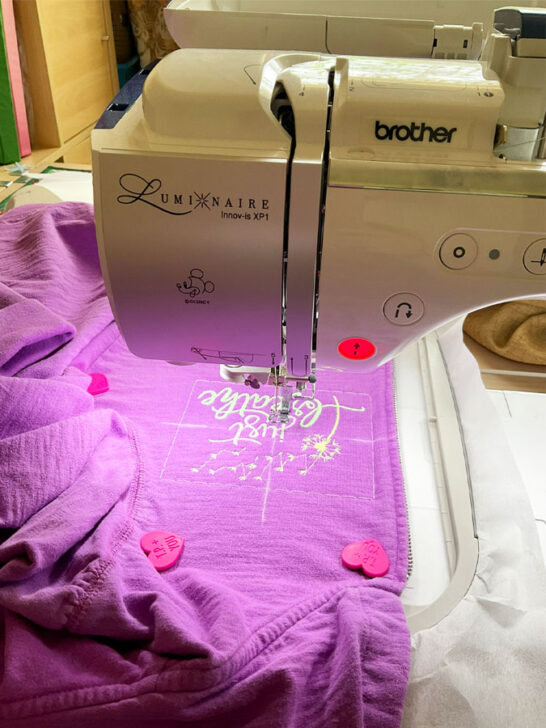
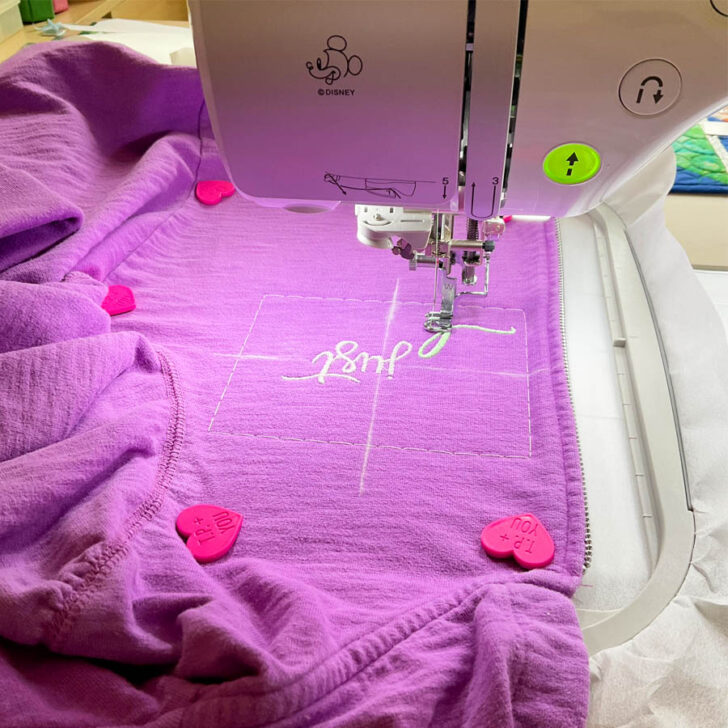
Start the Embroidery Machine and Monitor the Stitching Process
- Thread the machine: Thread the embroidery machine with the desired thread color(s) for the design.
- Add a basting stitch around the design to keep the fabric taut.
- Begin the embroidery: start the embroidery machine and monitor the stitching process.
- Check periodically: Regularly check the embroidery progress to ensure the hoodie fabric remains taut and there are no thread breaks or other issues.
Throughout the embroidery process, maintain a clean working environment, check thread tension, and make any necessary adjustments to ensure the design stitches smoothly and accurately.
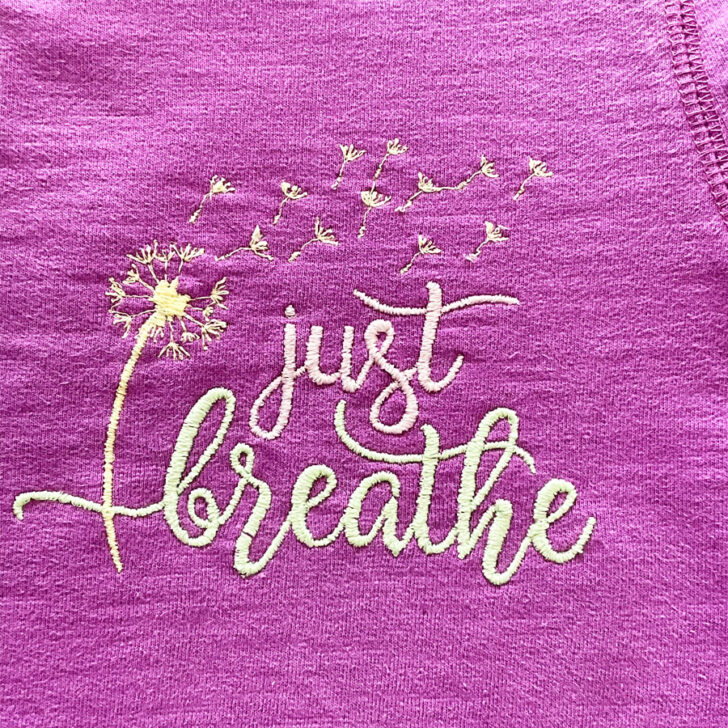
You can see the result of my machine embroidery on the hoodie in this image.
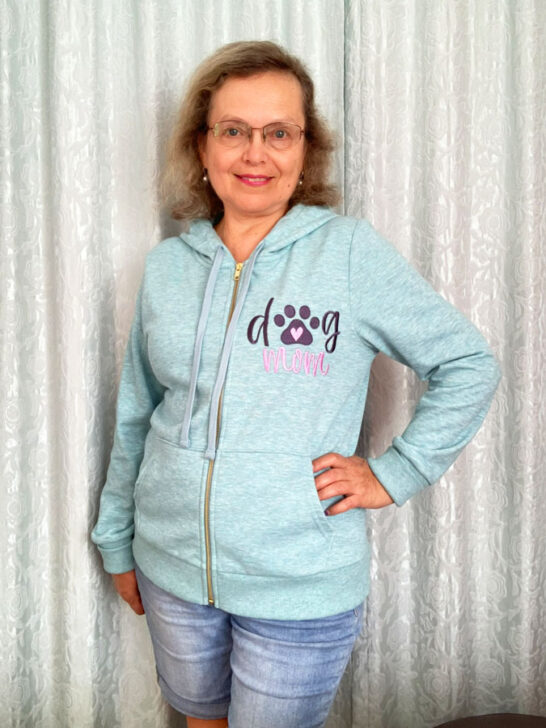
I’m pleased with how the embroidery turned out. I feel that the design I chose enhances the overall look of the hoodie.
But, as previously mentioned, I did encounter some challenges during the embroidery process. Specifically, I noticed some puckering and distortion in the fabric due to its thinner and stretchier nature. While the end result is still very nice, I would have preferred a smoother finish.
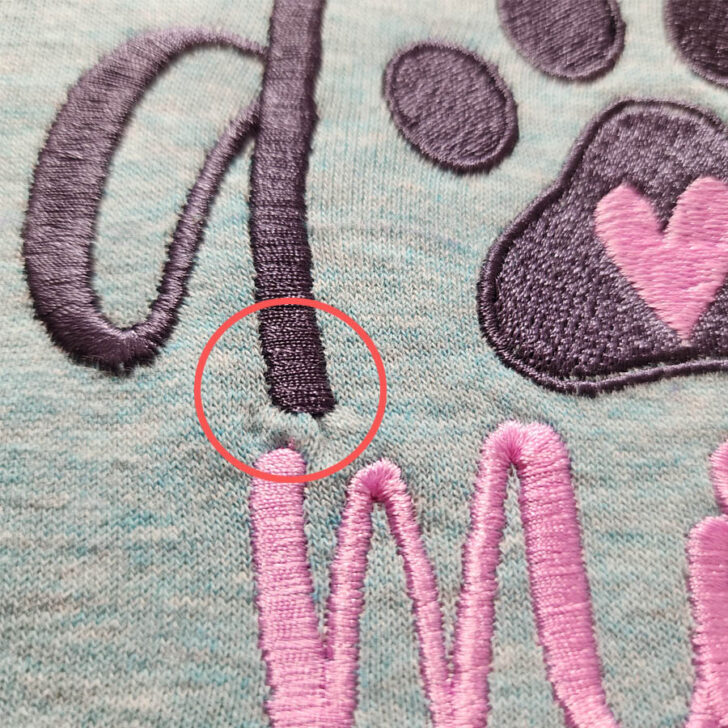
Additionally, I noticed that the embroidery design I chose had a small problem. Specifically, the stitches for some of the letters were very wide, which caused the fabric to be “squished” under the stitches during the embroidery process. This was particularly noticeable when embroidering the letter “D.” I decided I can live with this since the outcome looks quite good.
I think, I will likely use a more stable fabric for my machine embroidery projects on hoodies. However, I’m glad that I took on this challenge and was able to learn more about how to work with thinner and stretchier fabrics in machine embroidery.
Machine Embroidery On Hoodie #2
This hoodie is made entirely from 100 % cotton (still French terry fabric). The knit fabric of this hoodie is thicker and less stretchy, making it perfect for machine embroidery.
I selected this design, which appeared to be less dense and suitable for knits.
I followed pretty much the same steps as for hoodie #1, but I also made some changes. In this section, I will mainly describe the different steps I took to machine embroider this hoodie.
So, I printed the design and visualized its placement on the hoodie.
I marked the center of the embroidery and decided to go with a floating placement for this hoodie. This meant that I did not hoop the hoodie itself, but only the stabilizer, using a larger hoop. It was a tear-away stabilizer, the same as for the previous hoodie.
Floating embroidery is a technique that involves hooping only the stabilizer and not the fabric being embroidered. I actually prefer this method instead of hooping the fabric when embroidering small designs on clothes. By hooping only the stabilizer, the fabric is allowed to “float” on top of the stabilizer and I don’t need to hoop the hoodie together with the zipper, I keep the zipper out.
Also, since the hoop is not touching the fabric, there are no marks left on the hoodie’s fabric.
This technique also allowed me to easily move the hoodie around to ensure that the design was placed correctly.
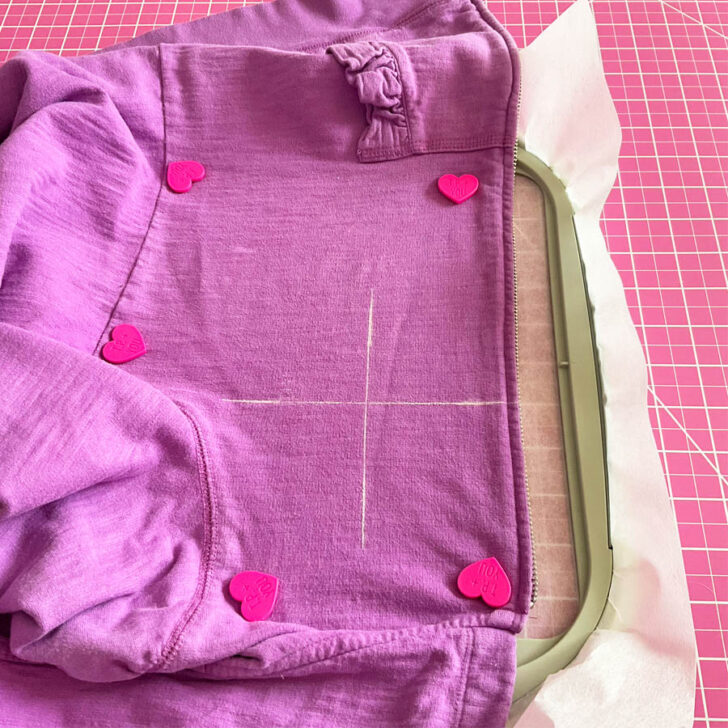
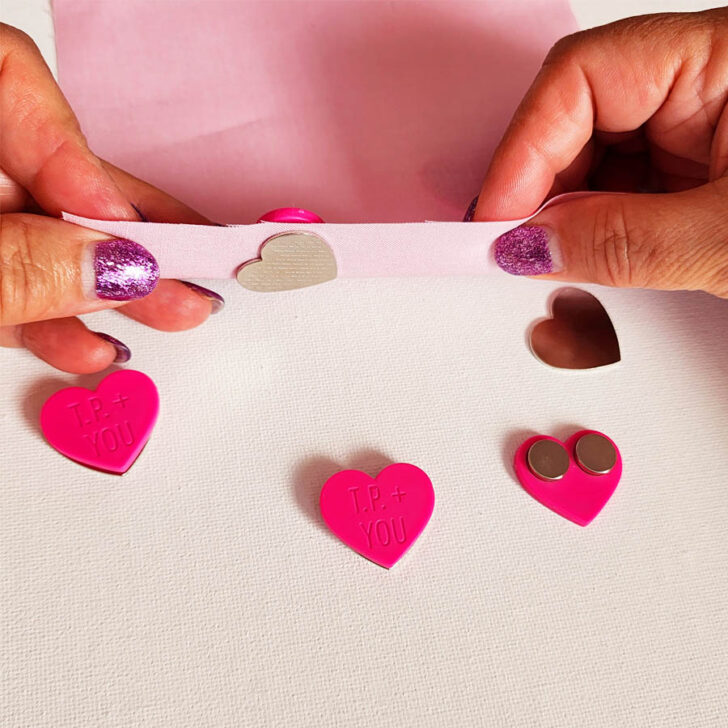
To keep the fabric taut and in place during the embroidery process, I used Sewtites. Sewtites are small, magnetic clips that hold fabric in place during embroidery. Simply place them on the fabric where you want to attach it to the stabilizer and they will magnetically attach to each other, keeping the fabric taut and in place.
✅ Related tutorial: The Essential Guide To SewTites: What They Are | How To Use | Types
When using the floating placement technique, it’s important to pay attention to the orientation of the fabric on the hoop. In this case, I placed the hoodie on the hoop with the hood facing down and the bottom of the hoodie facing up. Placing the hoodie in this orientation allowed me to keep the bulk of the fabric to the left of the embroidery machine and not on the machine bed which made it easier to maneuver the fabric during the embroidery process.
However, because of this orientation, I needed to flip the embroidery design 180 degrees before stitching it out. This is because the design needs to be oriented correctly when viewed from the front of the hoodie, and flipping it ensures that the design will be embroidered in the correct orientation.
When using the floating embroidery technique, it’s important to ensure that the fabric is properly stabilized to prevent shifting or stretching during the embroidery process. So I like to use basting stitches around the design. Basting stitches are long, temporary stitches that hold the fabric and stabilizer together. They can be easily removed after the embroidery is complete.
They help to keep the fabric taut and in place during the embroidery process, which is especially important for stretchy knit fabrics.
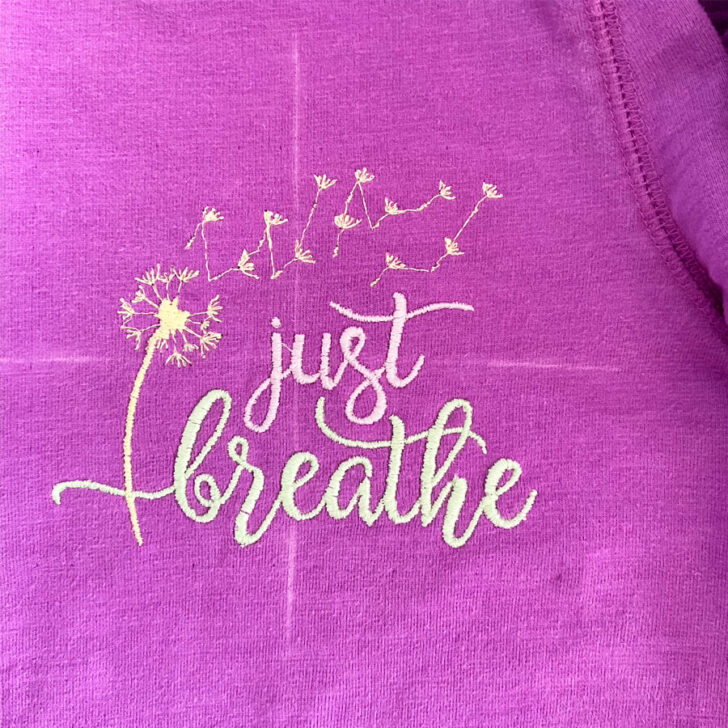
This image displays the embroidery on hoodie #2, showcasing the final result of the project. I like the design very much and I am pleased with how it turned out.
Now I want to mention some small problems I had with this design.
First of all, the yellow center of the dandelion is too dense. My thread got broken while the machine was putting lots of stitches in one place.
Second, the puffballs are connected with stitches that had to be removed because they are not part of the design. And it took a lot of time to remove them. If you want to make the same design start removing them from the wrong side, it’s easier to do.
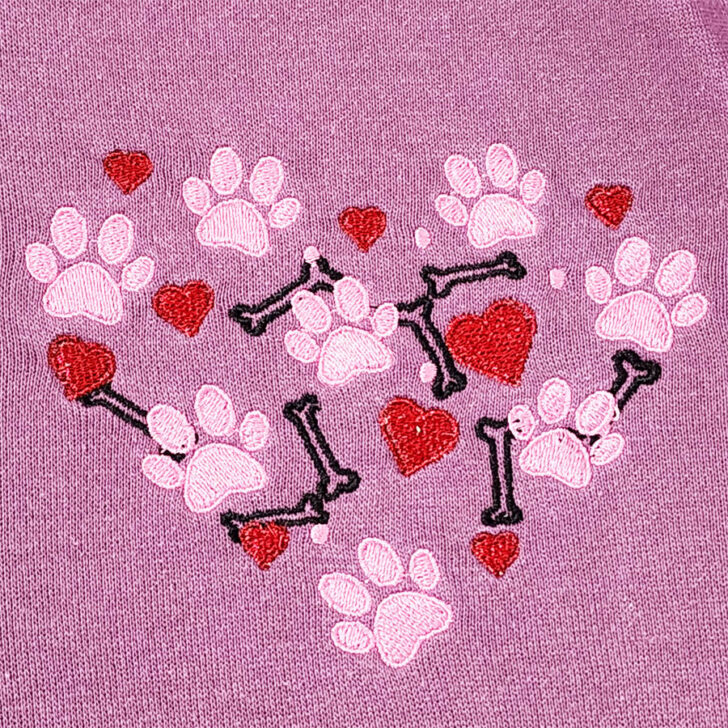
Machine Embroidery On Hoodie #3
The fabric of this hoodie is fleece that has fur-like texture on the wrong side. This could be a problem with machine embroidery but I wanted to try it anyway as an example. In the end, it all worked well.
I used this embroidery design from the same company.
The result was nice I think, I like how it turned out.
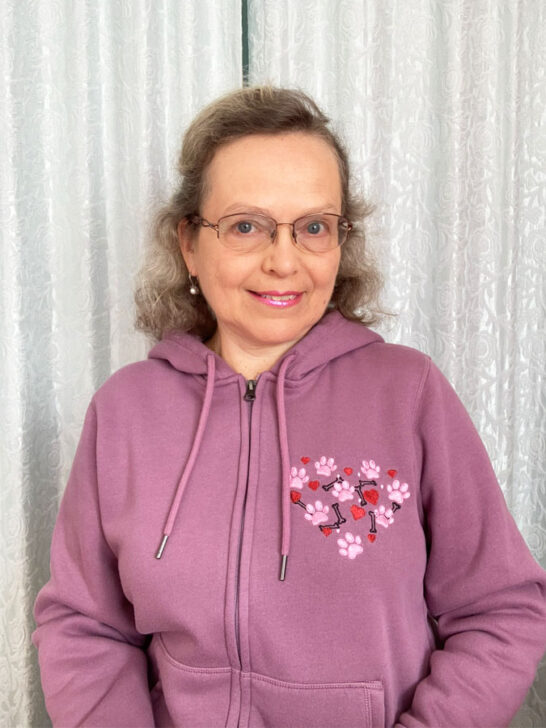
So now let me tell you what was different about this hoodie #3.
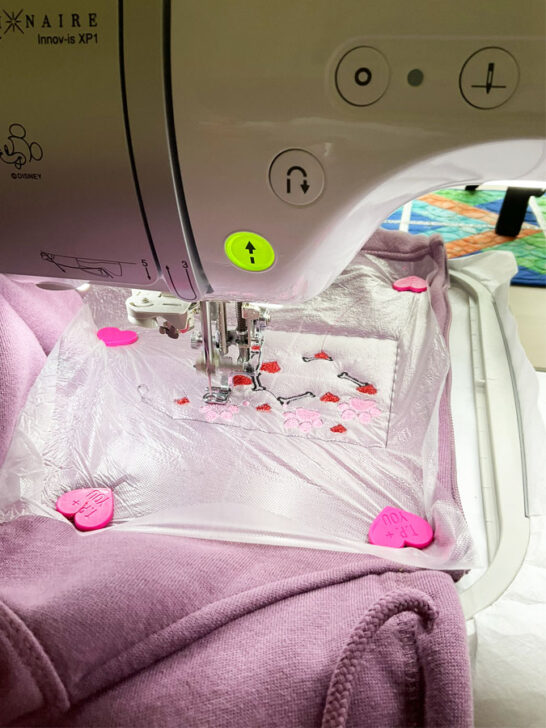
For hoodie #3, I wanted to ensure that the fleece fabric was properly stabilized, so I decided to use cut-away stabilizer. While this type of stabilizer is ideal for embroidery, it can be difficult to remove later, especially when the design is made up of small shapes. Despite this, I felt that the added stability was worth the extra effort required to remove the stabilizer later.
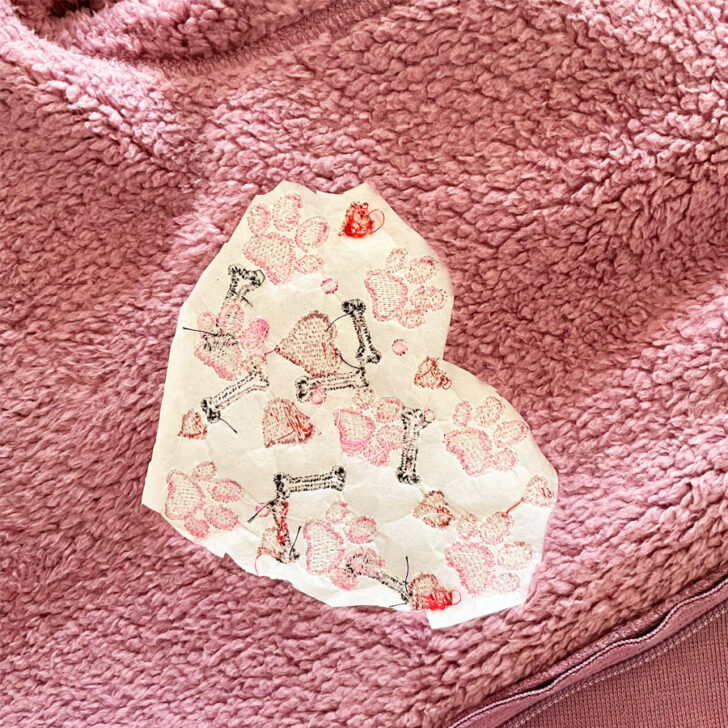
As with the previous hoodies, I used the floating embroidery technique for hoodie #3. However, I made a mistake and started the embroidery upside down, resulting in the bones in the final design being in the wrong position. To correct this, I had to flip the design in the middle of the embroidery process so that the heart would be in the correct orientation. So now I see how important it is to take the time to double-check the orientation of the design before stitching it out to avoid any mistakes or errors in the final embroidery.
The other different thing was that I added water soluble stabilizer/film on top of the fabric to prevent the stitches from sinking into the fabric and ensure that the embroidery is defined. This is important when embroidering on fleece, as the stitches can easily get lost in the fabric. The film was very easy to keep in place with my SewTites. I actually own a number of SewTites, the hearts I used is only one type of them.
And I also noticed a small problem in the design. It seems to me that the satin stitches around each shape in the design were too small and too dense, which caused the water-soluble stabilizer to break right away when the needle made holes too close to each other.
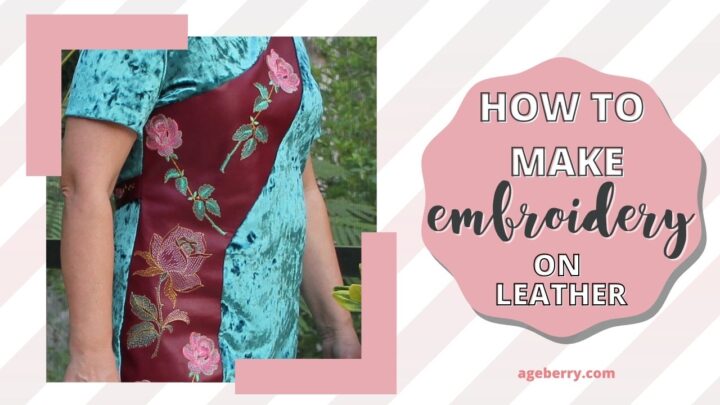
Once you’ve mastered the art of embroidering a hoodie and you’re looking for a new challenge, check out my tutorial on how to embroider on leather. My step-by-step guide will show you how to create stunning designs on this unique material, so you can take your embroidery skills to the next level. Click here to read the tutorial and start exploring the world of leather embroidery.
Did you find this tutorial helpful? If so, save this pin (see below) on your sewing board so you can come to the article later when you need this information on machine embroidery on hoodies, and follow me on Pinterest for more tips, tutorials, and inspiration!
latest posts
- What Do You Call a Person Who Sews? I Asked My Readers and Got 1,408 Opinions
- DIY Round Purse: PDF Sewing Pattern and Detailed Instructions
- Mini Wonder Clips By Clover: Useful Sewing Tool Or Just Another Notion?
- Non-Slip Grips For Quilting Rulers: A Small Notion With A Useful Job
- Fabric Eraser for Sewing: What It Removes and When to Use It
- What Is The Best Thread For Sewing Machine Projects? Let’s Find Out!
- Butterfly Quilt Block Tutorial – Foundation Paper Piecing
- How To Sew Quilt Squares So The Corners Match
- Sewing With Fork Pins: How They Help With Pattern Matching, Slippery Fabric, And Seams