How to Sew Neat Mitered Corners at Acute Angles
You probably know how to make a neat mitered corner when two fabric edges meet at 90 degrees. But what happens when the corner is much sharper than that?
Acute corners can be surprisingly awkward to hem. If you simply fold both edges under, too much fabric collects at the point. The corner becomes bulky, the hem may not lie flat, and the finished point can look thick or uneven.
Prefer to read without ads?
I created a PDF version of this guide for anyone who likes to keep sewing guides saved, printed, or easy to read without ads. It includes the same helpful information in a simple format you can download and use whenever you need it.
The PDF is available in my shop for a small fee. It’s a nice option if you want to support my work and keep this tutorial close to your sewing machine.
In this mitered corners tutorial, I’ll show you my method for sewing mitered corners at acute angles. A small diagonal seam removes the excess fabric before the corner is turned, so the two hems can lie flat and meet neatly at the point.
I’ll start with the more challenging acute corner, then show how the same basic idea works for a standard 90-degree corner.
What Is a Mitered Corner in Sewing?
A mitered corner is a way of finishing two fabric edges so they meet neatly at the corner without a bulky stack of folded fabric. Instead of simply folding one hem over the other, the excess fabric is removed and the corner is joined with a diagonal seam.
Mitered corners can be made at different angles. An acute angle is less than 90°, a right angle is exactly 90°, and an obtuse angle is greater than 90°.
Most instructions for sewing mitered corners focus on 90-degree corners because they are so common on napkins, placemats, quilts, table runners, and similar projects. But when two hemmed edges meet at an acute angle, there is even less room for all those folded layers. That is where a good mitered-corner technique becomes especially useful.
Decide How Wide Your Hem Will Be
Before you start marking the corner, decide how wide you want the finished hem to be. In this tutorial, I’m using a 1/2-inch hem.
To make the measurements easier to follow, I’ll call the finished hem depth H.
So in my example:
H = 1/2 inch
Whenever you see 2H, that means twice the hem depth:
2H = 1 inch
If you want a different hem width, the method stays the same. Just replace my 1/2-inch measurement with the hem depth you are using.
For example, if your finished hem is 3/4 inch, then:
H = 3/4 inch
2H = 1 1/2 inches
How to Sew a Mitered Corner at an Acute Angle: Step-by-Step
Now we can start mitering the actual corner. I’m using a 1/2-inch hem, so H = 1/2 inch and 2H = 1 inch throughout these steps.
Step 1. Place the Fabric Right Side Up
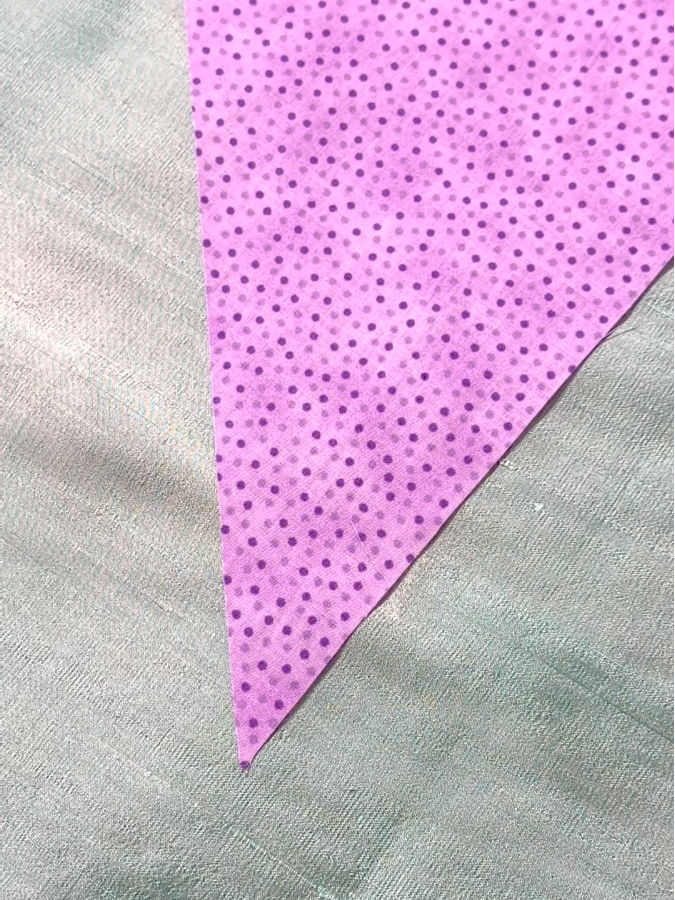
Lay the fabric flat with the right side facing up and the acute corner pointing toward you.
Smooth the fabric flat so the edges and the shape of the acute angle are easy to see.
Step 2. Fold the Acute Corner in Half
Fold the corner in half, bringing the two raw edges together. The fabric should be right sides together after folding.
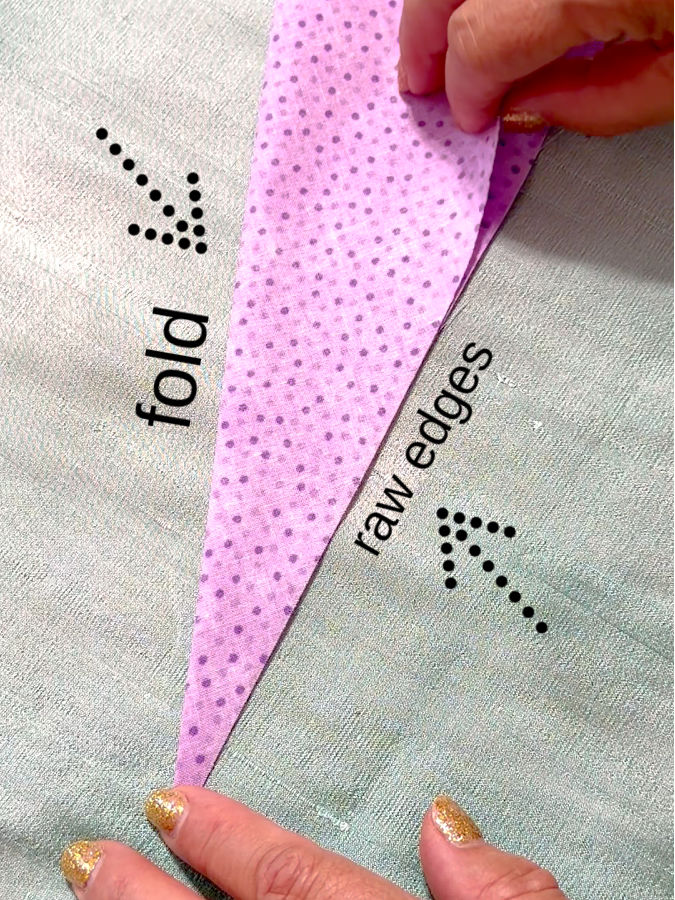
Carefully align the two raw edges and make sure the corner point matches exactly. Finger-press the fold so it stays in place.
Make sure the fold isn’t twisted.
This fold bisects the angle, dividing it into two equal parts. It gives us the reference we need to create a symmetrical miter.
Note: Some of the links on this page are affiliate links. This means I will receive a commission if you order a product through one of my links. I only recommend products I believe in and use myself.
Step 3. Mark the First Reference Line
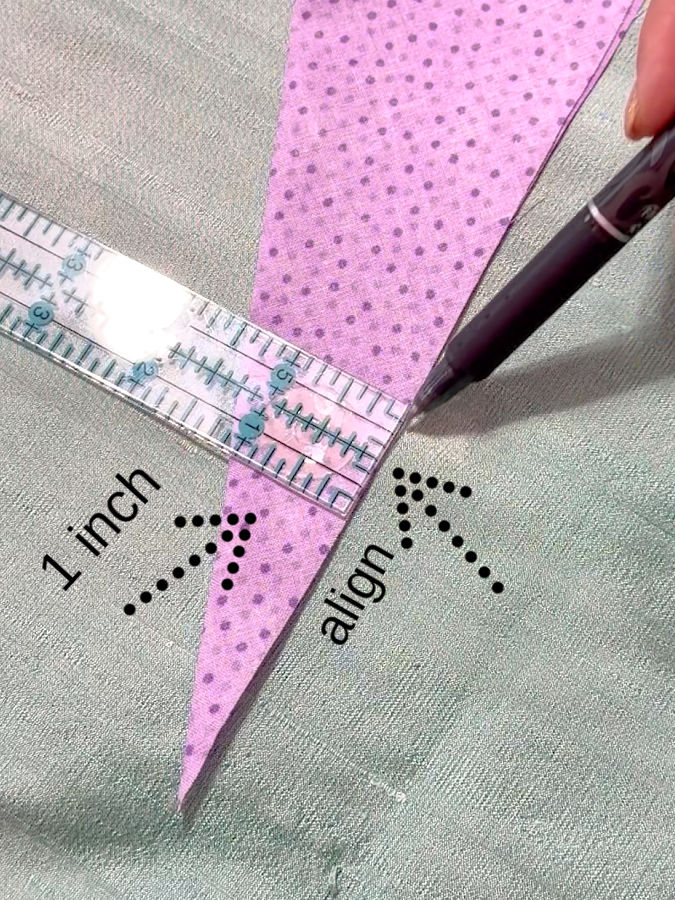
Because my finished hem will be 1/2 inch wide, I need to use twice that measurement for this step:
H = 1/2 inch
2H = 1 inch
Keep the two raw edges carefully aligned. Place a ruler perpendicular to the aligned raw edges and move it along the folded corner until the distance from the folded edge to the aligned raw edges is exactly 1 inch.
Draw a line at this point, perpendicular to the raw edges.
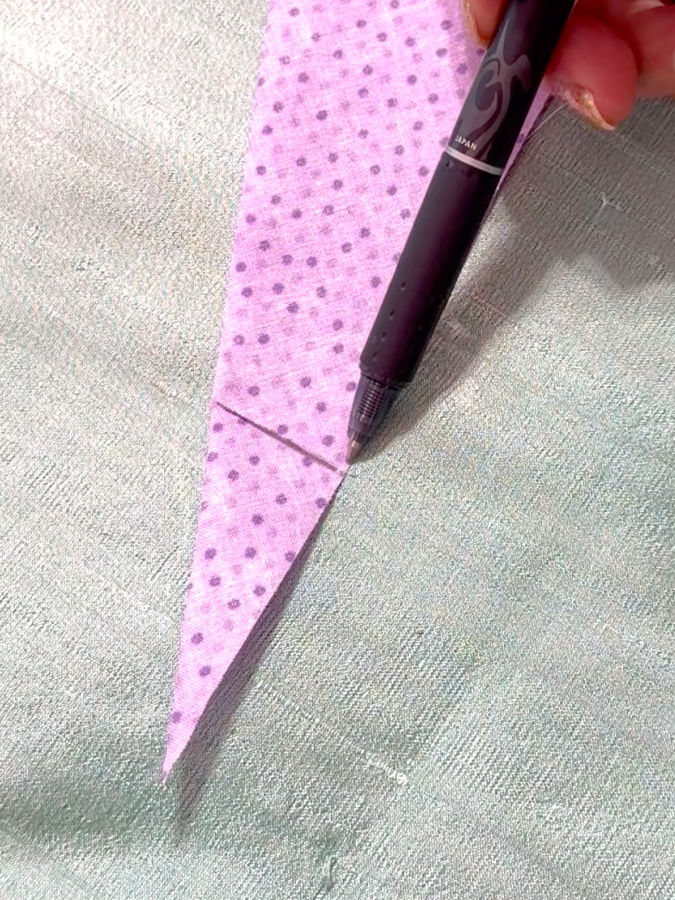
In other words, you are looking for the place where the folded corner is 1 inch wide. This is not a measurement of 1 inch from the corner point along the raw edge.
This 1-inch measurement is twice the width of my finished 1/2-inch hem and gives us the reference line we need for the next fold.
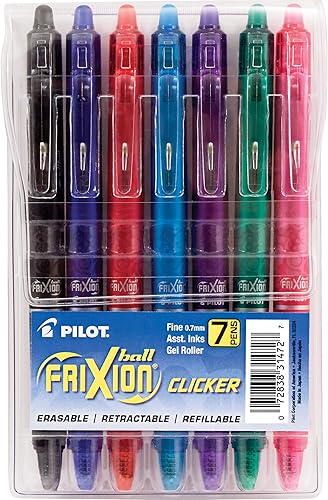
I often use a Frixion pen for marking lines like this because the marks disappear with heat when I press the fabric. Just test it first on a scrap—some fabrics can retain a faint mark, and the ink may reappear in very cold temperatures.

Step 4. Fold Along the Marked Line
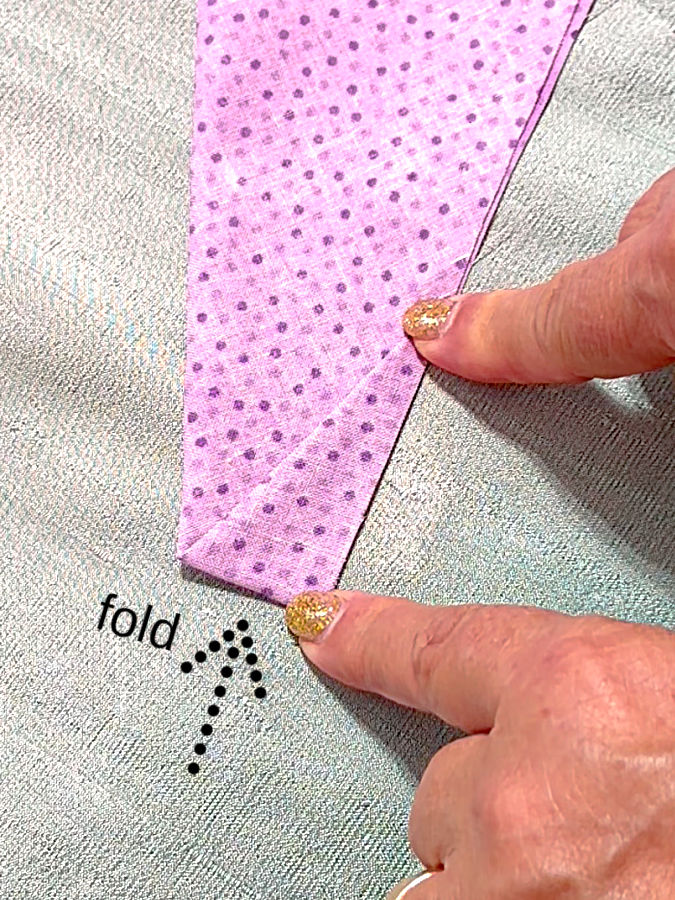
Fold the fabric along the 1-inch reference line you just drew. Bring the raw edges together again and align them carefully so they sit exactly on top of each other.
You can pin the fold in place so the layers don’t shift (but this is optional).
This is a temporary fold. Its edge shows us where the fabric needs to meet when the 1/2-inch hems are formed, and we’ll use that folded edge to mark the diagonal line for the miter in the next step.
Step 5. Mark the Diagonal Corner Line
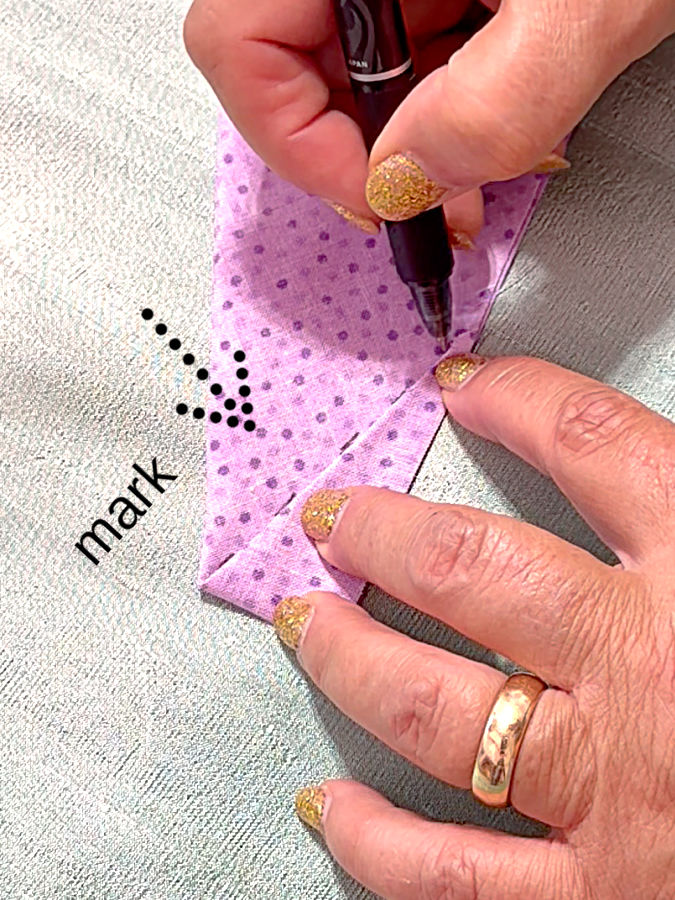
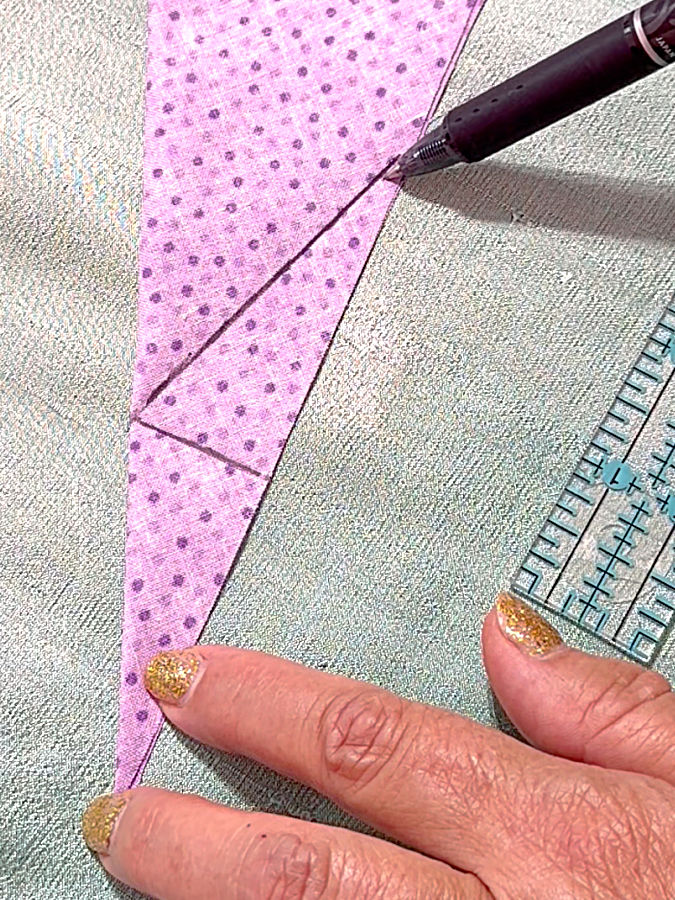
With the fabric still folded along the 1-inch reference line, run your fabric marker right along the folded edge.
Then unfold the fabric. You should now see a diagonal line across the corner.
Step 6. Find the Exact End of the Stitching Line
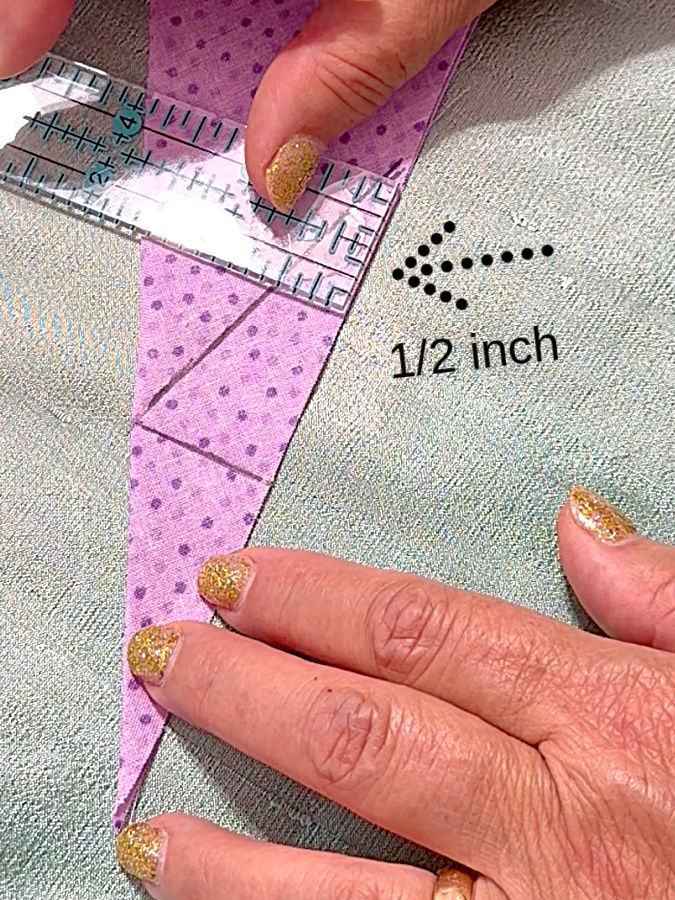
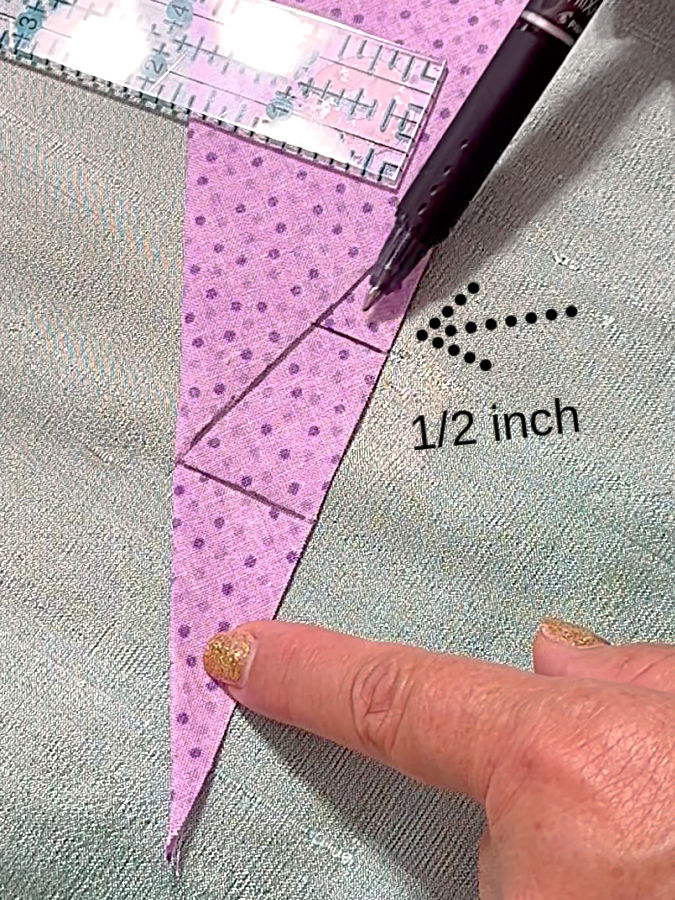
Keep the raw edges aligned.
Place your ruler perpendicular to the aligned raw edges and measure 1/2 inch from the raw edges toward the diagonal line. Remember, 1/2 inch is the width of our finished hem, so this measurement is H.
Mark the point where this 1/2-inch perpendicular measurement intersects the diagonal line.
This point is where the stitching line needs to end.
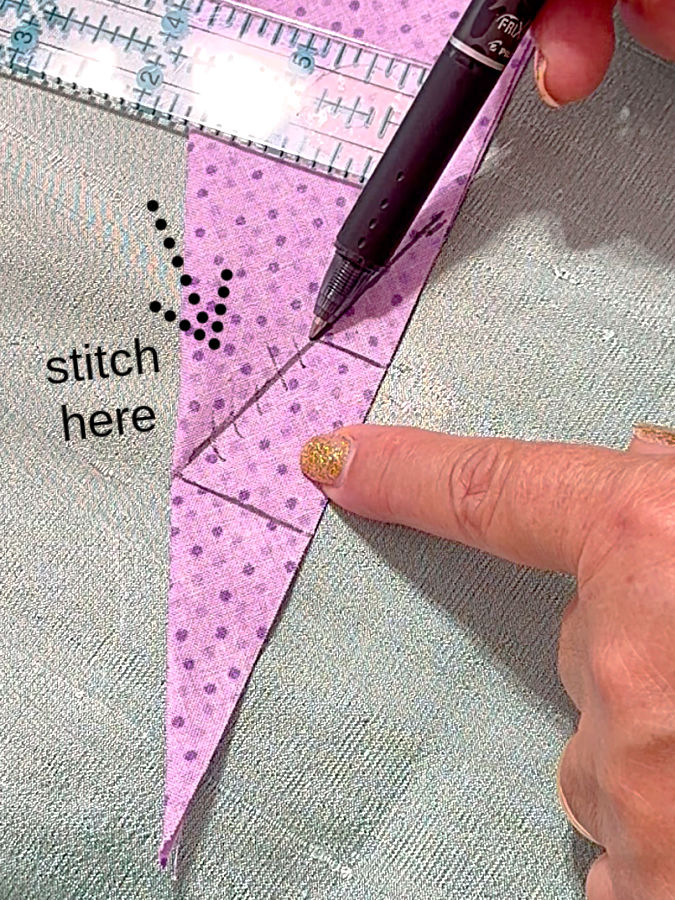
Step 7. Stitch the Mitered Corner
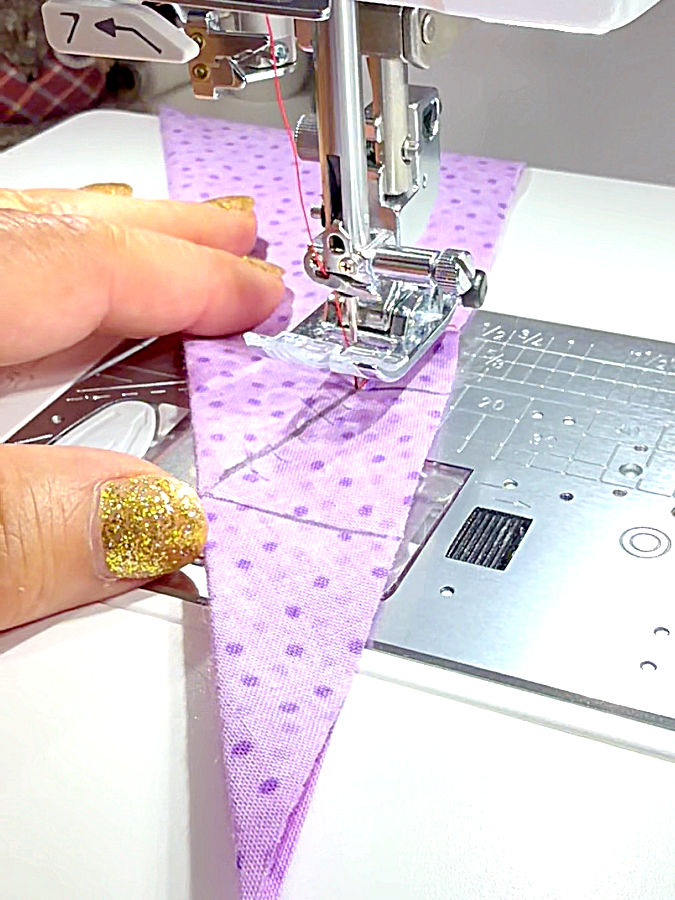
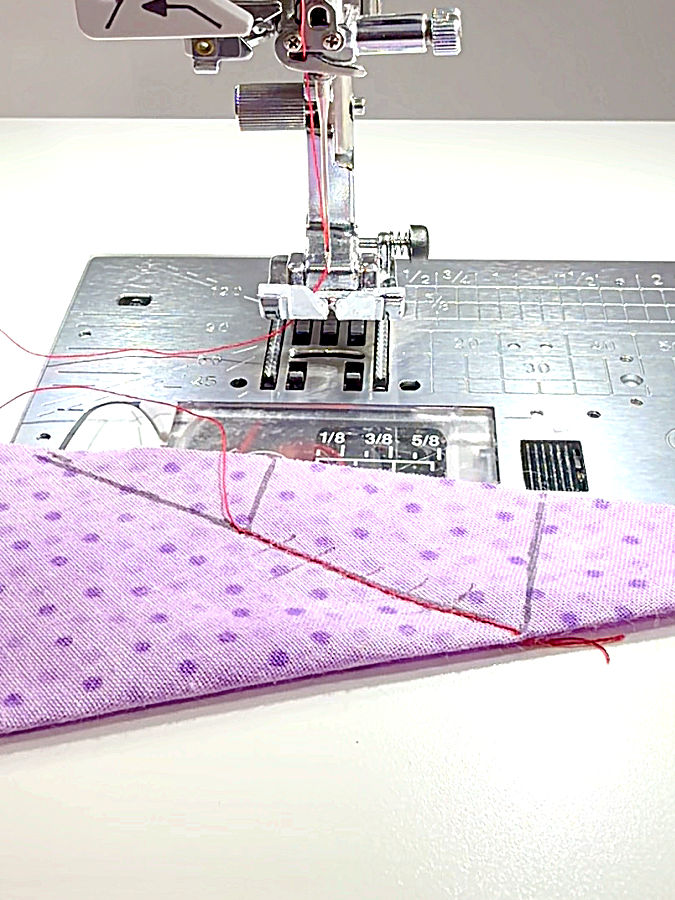
Sew directly on the marked stitching line using a regular straight stitch. Secure the stitch at the beginning and end.
You can also shorten the stitch length near the end of the seam. This helps keep the stitching secure after the corner is trimmed and turned.
Step 8. Trim Away the Excess Fabric
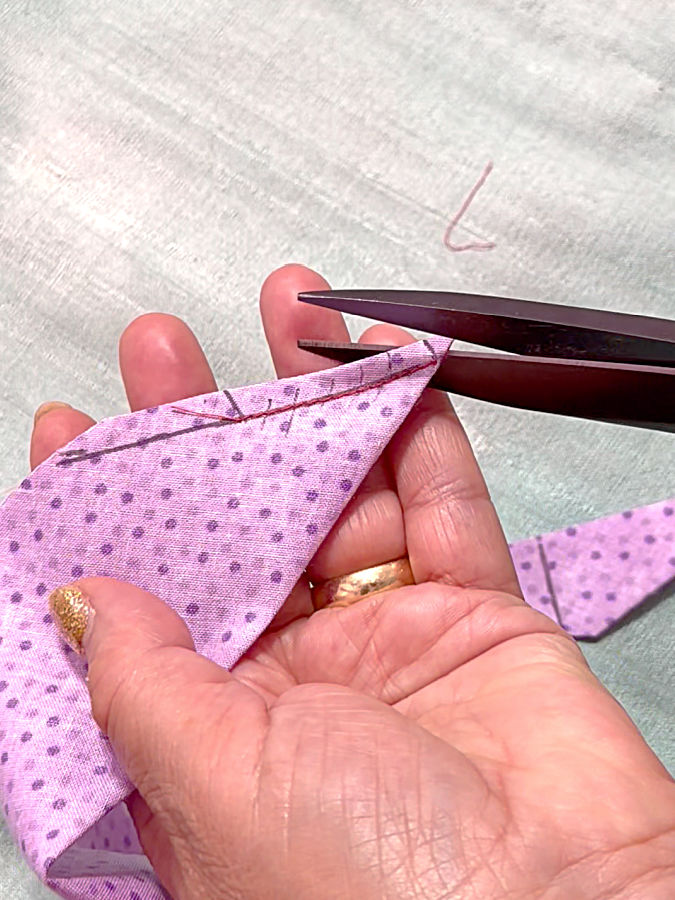
Now that the corner is stitched, the seam has established the finished shape of the miter. The extra fabric beyond the stitching line is no longer needed and can be trimmed away.
First, trim the excess fabric, leaving a small seam allowance next to the stitching, enough to make sure the stitch is secure. You will use the line marked at step 5 for cutting.


Then make a second careful cut closer to the pointed end to remove some of the extra bulk there. This will help the seam allowances open more easily and allow the sharp corner to turn neatly.
Be careful not to cut through the stitching. Leave enough fabric at the point to keep the seam secure.
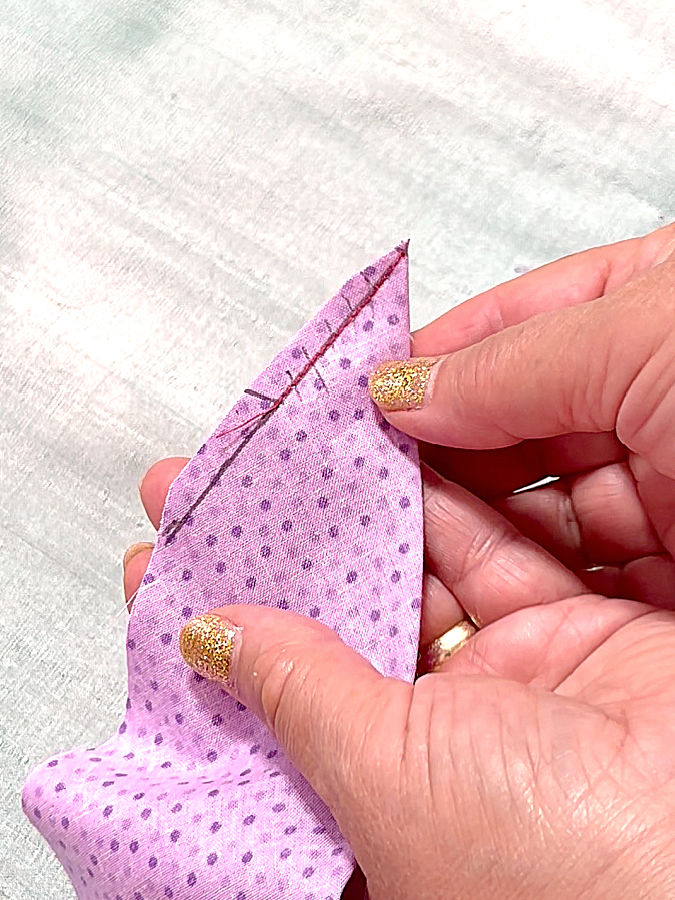
Step 9. Open the Small Seam Allowances
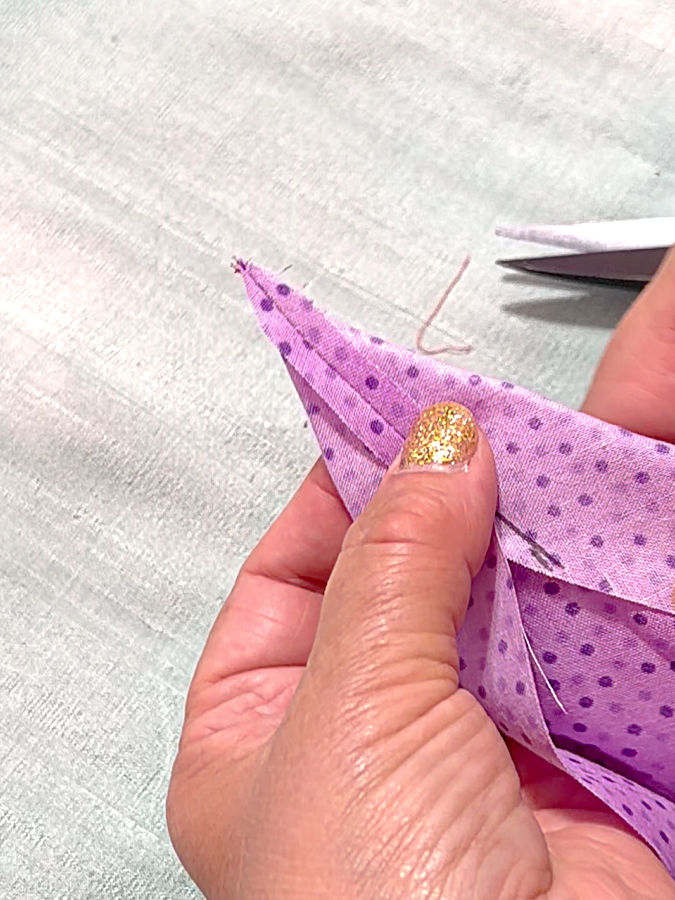
Open the small seam allowances and finger-press them flat in opposite directions.
At a sharp acute corner, this little seam can be too narrow to press comfortably with an iron. Finger-pressing is usually enough and helps keep the tiny point from becoming distorted.
Step 10. Turn the Corner Right Side Out
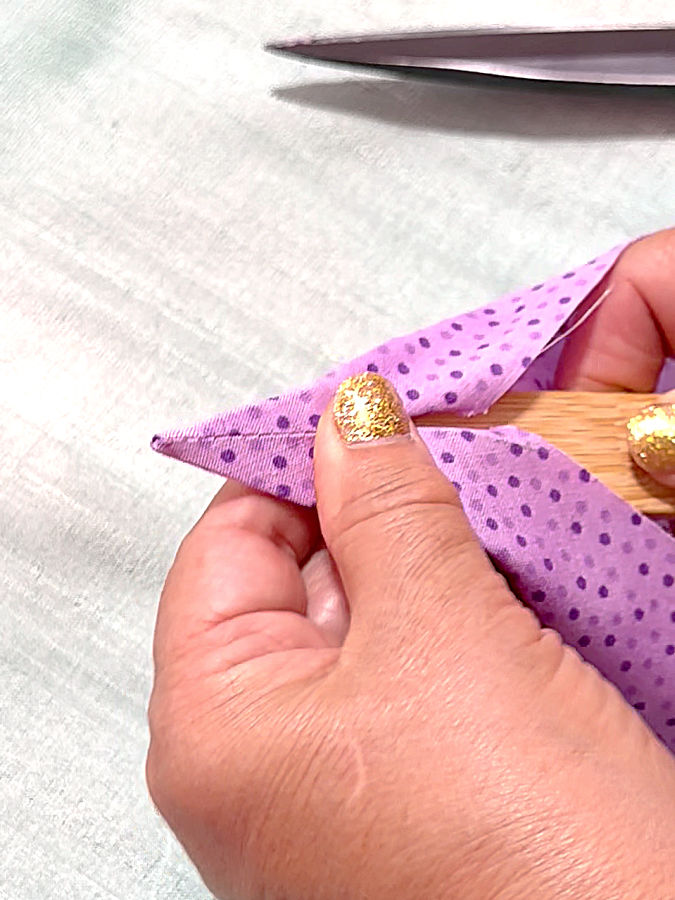
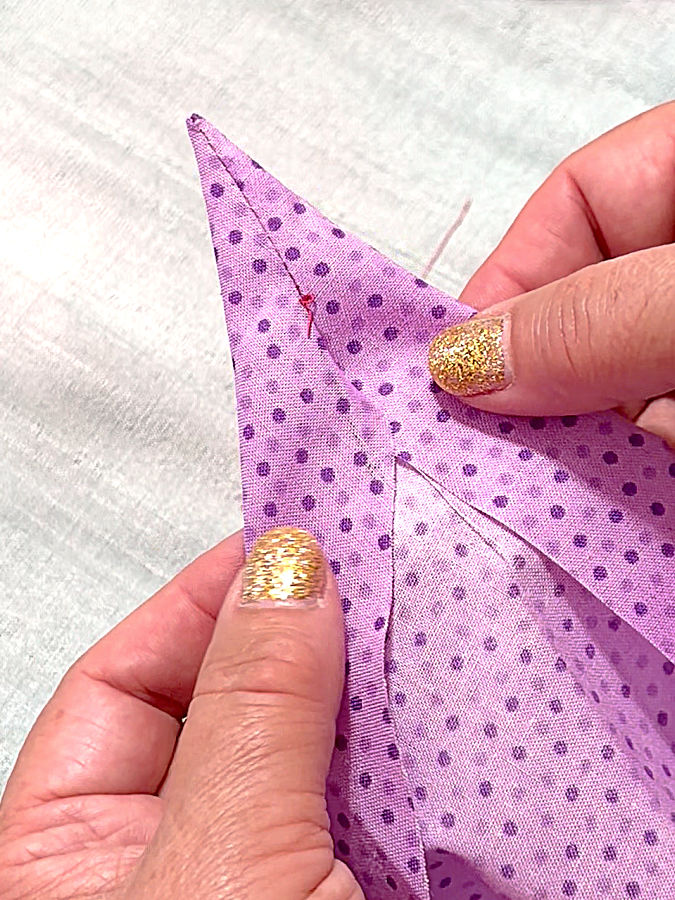
Carefully turn the corner right side out.
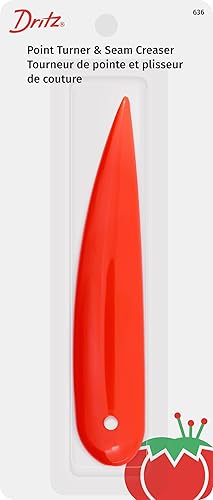
Use a point turner, bamboo stick, blunt knitting needle, or another suitable tool to gently shape the point from the inside.
Work slowly and avoid pushing too hard into the tip. A neat, sharp corner comes mostly from accurate stitching and careful trimming, not from forcing the point with a tool.

Step 11. Fold and Finish the Hem
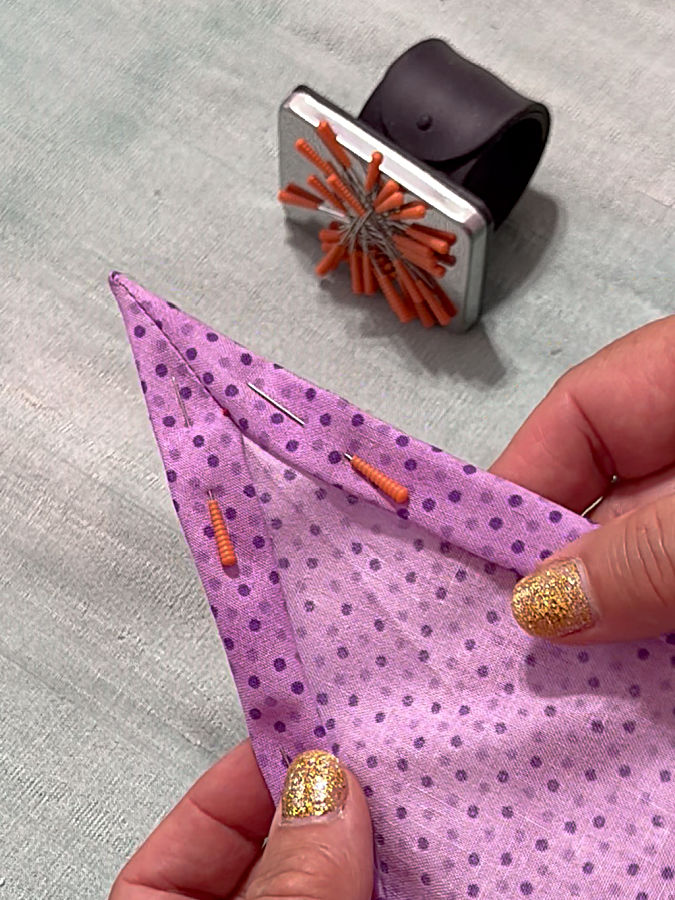
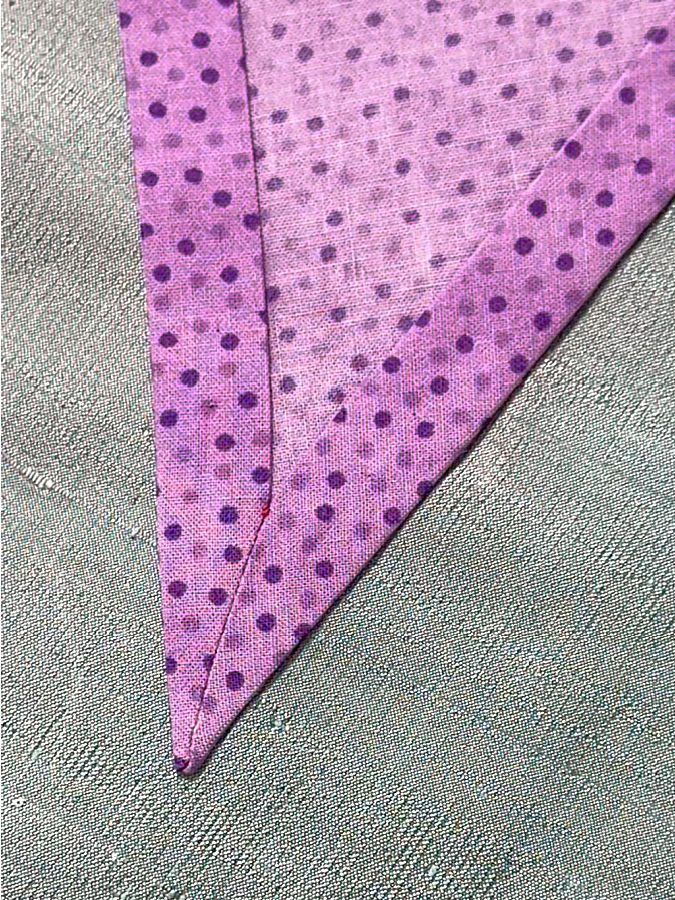
Fold both hems along the intended hemline and press them into place. At the corner, the two hems should meet neatly with the small diagonal miter between them.
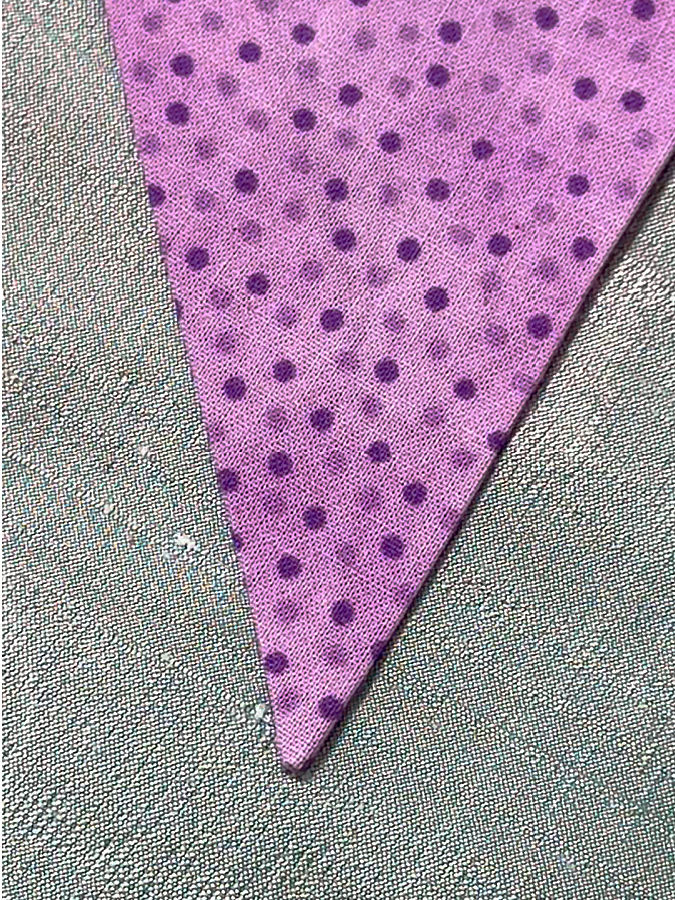
Check the corner from both sides. On the wrong side, the miter should lie flat without extra bulk. On the right side, the point should look clean and sharp.
Finish the hem in whatever way suits your project — topstitch it, sew a blind hem, stitch it by hand, or use another appropriate hem finish.
Common Problems When Sewing Acute Mitered Corners
Even with careful marking, a sharp acute corner can sometimes need a little troubleshooting. Here are the most common problems and what usually causes them.
The Corner Is Bulky
If the finished corner feels thick or doesn’t lie flat, there may still be too much fabric inside.
Check that you trimmed away enough excess fabric after stitching. A very narrow hem can also create more bulk than a sharp angle can comfortably hold.
The Corner Looks Rounded Instead of Pointed
A rounded point usually means there is still extra fabric at the tip, the stitching line was slightly off, or the corner wasn’t turned completely.
Use your point-turning tool gently. Pushing harder into the tip usually won’t fix the problem and can damage the fabric or push through the seam.
There Is a Hole at the Tip
This can happen if you trimmed too close to the stitching, accidentally cut through a stitch, or didn’t secure the seam well enough.
When trimming a very sharp point, leave just enough fabric to keep the stitching secure.
One Side of the Hem Is Wider Than the Other
This usually goes back to the earlier marking and folding steps. The raw edges may not have been perfectly aligned, the fabric may have shifted while marking, or the stitching may have wandered away from the marked line.
Accurate alignment at the beginning makes a big difference here.
The Corner Twists After Turning
A twisted corner usually means the layers shifted while you were folding or sewing.
If you notice something looks wrong before trimming the seam allowance, open the corner back up and check the alignment. It is much easier to correct at this stage than after the excess fabric has been cut away.
The Fabric Is Slippery and Keeps Moving
Silk, rayon, and other slippery fabrics can shift while you are marking or stitching the corner.
If pins aren’t holding the layers accurately enough, hand-baste the corner before sewing. A few temporary stitches can keep everything aligned while you stitch the miter.
Where You Might Need an Acute Mitered Corner
Acute corners show up in more sewing projects than you might expect, especially in garments with pointed or asymmetrical edges.
Pointed and asymmetrical skirt hems
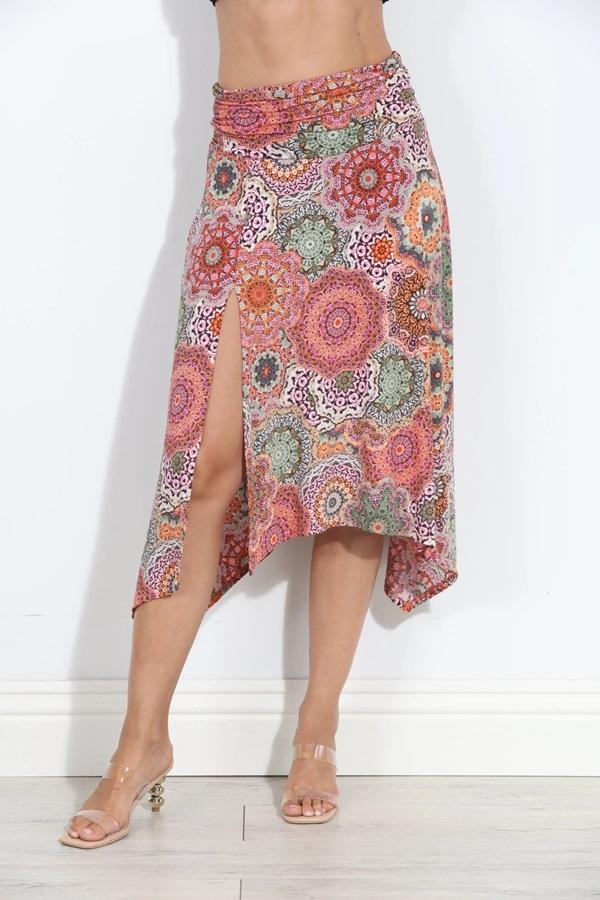
Skirts with handkerchief-style or uneven hems can have very sharp points where two hemmed edges meet, like the one below from Veronica M: Ari Stretch Slit Midi Skirt-BEST SELLER – Veronica M ®
Slits and angled skirt details
A slit combined with an angled hem can create an acute corner that needs to stay flat and neat instead of becoming thick with overlapping fabric. Below are two examples from Amazon Women’s Color Block Faux Leather Skirts High Waisted Asymmetrical Long Skirt and editorialist.com Alice + Olivia Harmony Drapey Slit Asymmetric Skirt – Green | Editorialist.


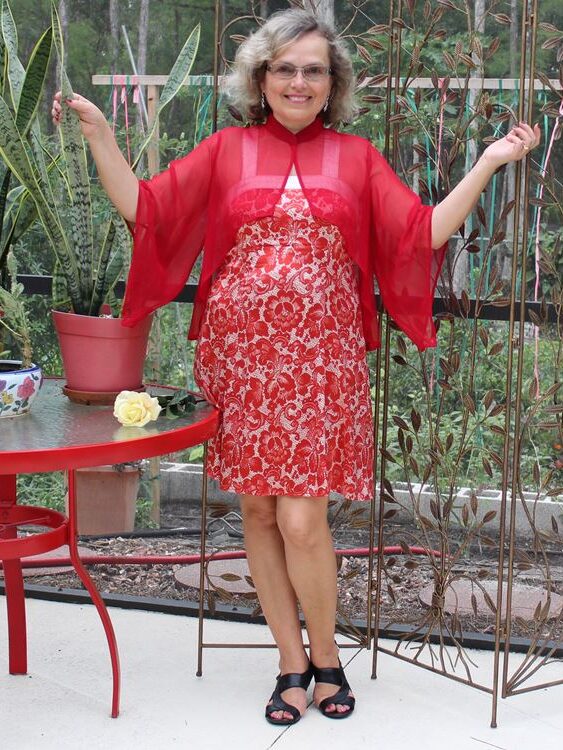
Sleeves with pointed edges
I used this type of corner on my sheer red shrug, where the sleeves end in sharp points and both edges need to be hemmed cleanly.
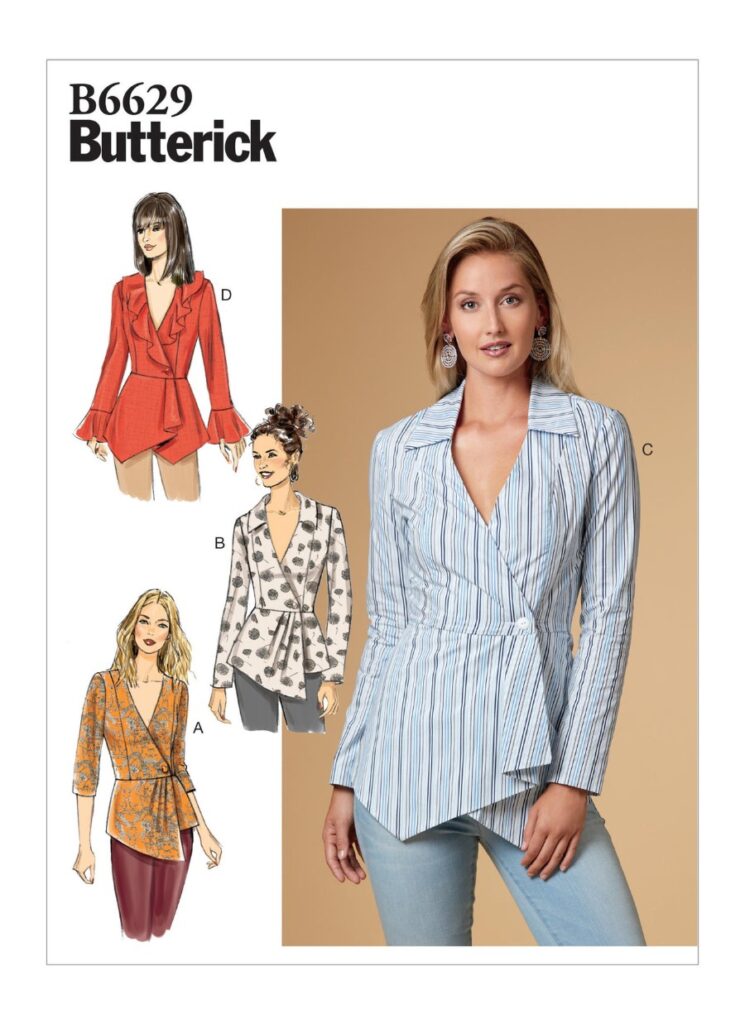
Asymmetrical garment hems and fronts
I also used this technique when I made a dress from Butterick B6629 — the pattern was originally for a blouse, but I lengthened it into a dress while keeping the pointed asymmetrical hem.
You may also run into acute corners on scarves, neckerchiefs, wraps, triangular fabric pieces, unusual table linens, decorative panels, and other sewing projects with angled or geometric edges.
Sewing a 90-Degree Mitered Corner
Acute angles are the harder case. Once you understand how the fabric has to be folded, stitched, and trimmed at a sharp angle, a regular 90-degree mitered corner is much easier.
The basic principle is the same: instead of folding several layers of fabric on top of one another at the corner, you create a diagonal seam and trim away the excess. After the corner is turned and pressed, the two finished edges meet neatly without unnecessary bulk.
I use 90-degree mitered corners quite often in real sewing projects, especially when making self-binding quilts, table runners, and placemats. Rather than demonstrate another corner on a scrap of fabric, here are a few projects where you can see exactly how I used this technique.
See This 90-Degree Mitered Corner Technique in Real Projects
I’ve used 90-degree mitered corners in several projects where the backing or outer fabric becomes a self-binding. Here are three examples where you can see the technique used on an actual finished project.
Self-Binding Quilt
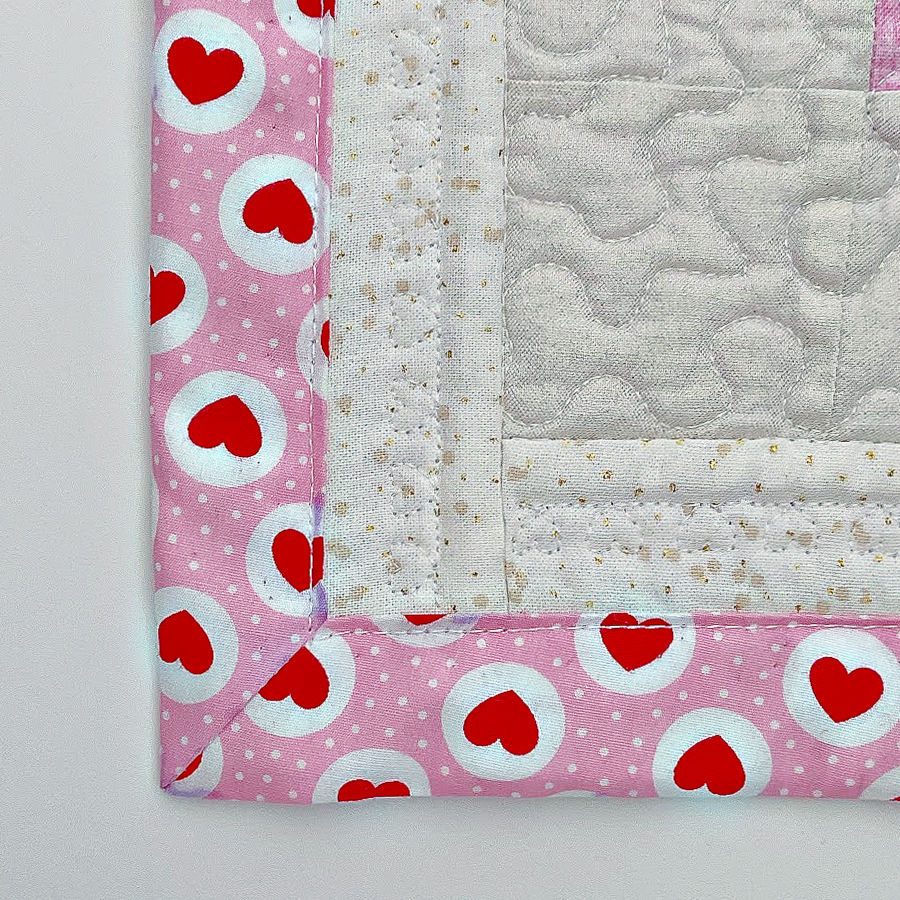
I used mitered corners when making this self-binding quilt, where the backing fabric wraps around to the front and forms the binding. The diagonal corner seam removes the extra fabric before the binding is folded into place, so the finished corners stay flat and neat.
You can see the full process in my self-binding quilt tutorial.
Self-Binding Easter Table Runner
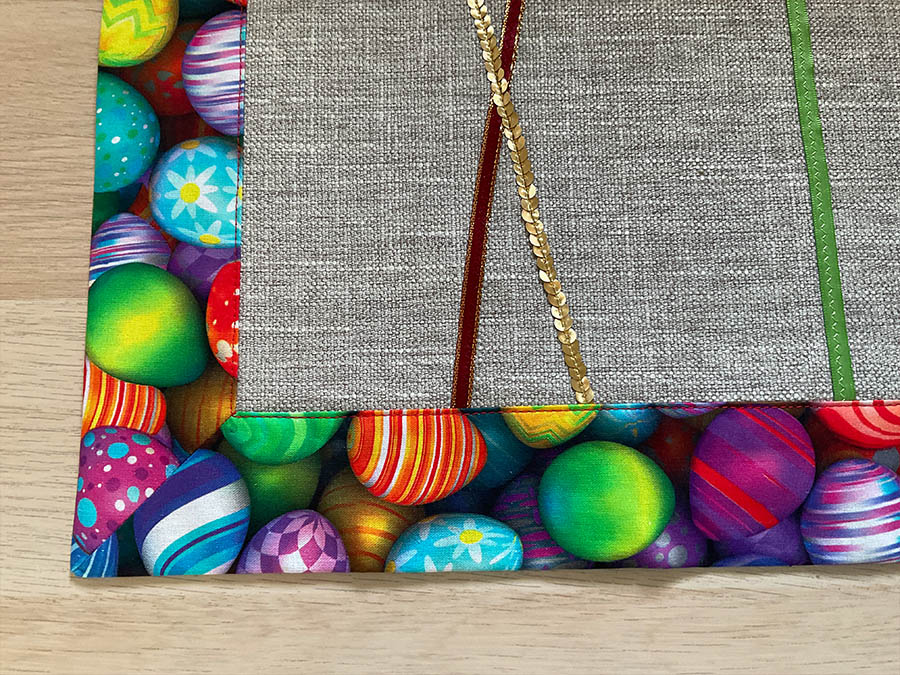
I used the same basic mitered-corner technique on this Easter table runner. Here the self-binding is wider, which makes it especially important to remove the extra fabric at each corner instead of simply folding all those layers on top of one another.
See how I made it in my DIY Easter table runner sewing tutorial.
Self-Binding Placemats
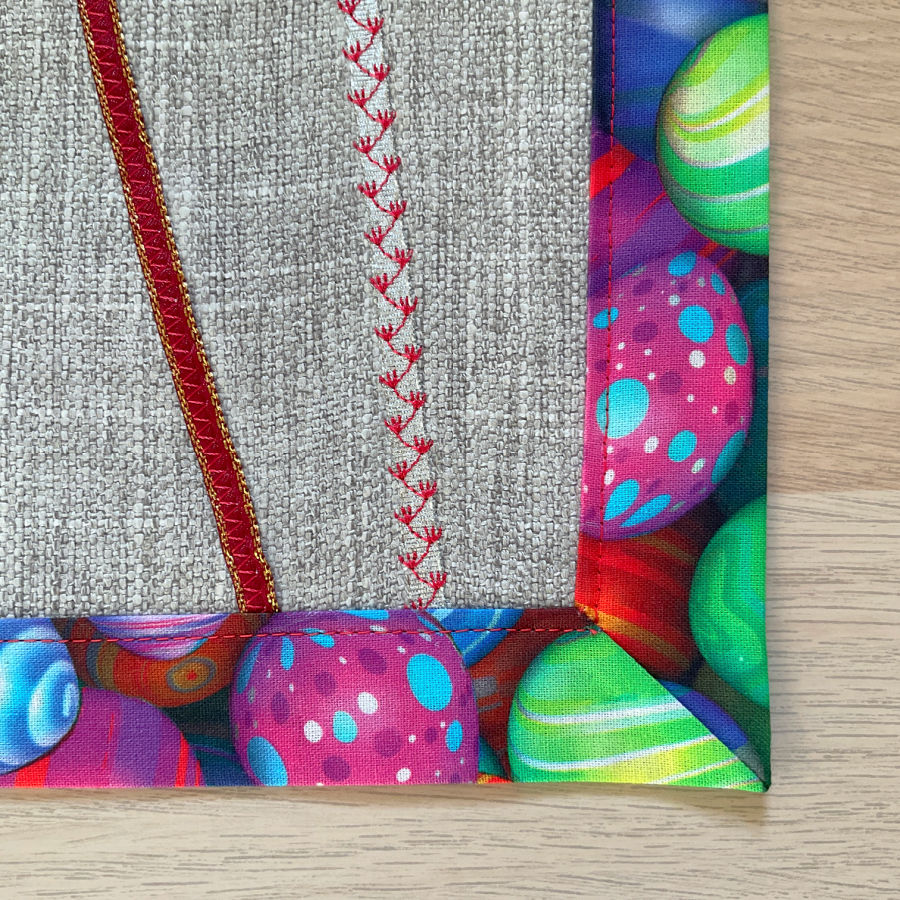
These self-binding placemats are another good example of 90-degree mitered corners. The backing folds over to create the finished edge, while the miter keeps each corner clean without a bulky stack of fabric.
You can find the complete project in my self-binding placemats tutorial.
Frequently Asked Questions
Can You Sew Mitered Corners That Aren’t 90 Degrees?
Yes. That is the main point of this tutorial. A mitered corner can be made at an acute angle, a right angle, or even an obtuse angle. The measurements and folds change with the angle, but the goal is the same: remove the excess fabric so the finished edges can meet neatly without unnecessary bulk.
What Is an Acute Corner?
An acute corner is a corner that measures less than 90 degrees. The sharper the angle, the less room there is for folded fabric at the point, which is why these corners can be more challenging to hem neatly.
Why Miter a Fabric Corner?
Mitering removes the extra fabric that would otherwise build up where two folded edges meet. This helps the corner lie flatter and gives it a cleaner, more finished appearance.
Do I Need a Special Presser Foot?
No. A regular presser foot and a straight stitch are all you need. Accurate marking, folding, and trimming are much more important than using a special foot.
Can I Sew Mitered Corners on Lightweight Fabric?
Yes. Lightweight fabrics can work very well with this technique. If the fabric is slippery or delicate, hand-basting the layers before stitching can help keep everything from shifting.
What Is the Difference Between a Mitered Corner and a Boxed Corner?
A mitered corner creates a diagonal join where two finished fabric edges meet. It is mainly used to reduce bulk and create a neat, flat corner.
A boxed corner is different. It is formed by sewing across a corner to create depth and a three-dimensional shape, often on bags, baskets, pouches, and similar projects.
Think you might use this technique the next time you come across a tricky acute corner? Save the pin below to your sewing board so you can easily find this tutorial when you need it. And follow me on Pinterest for more sewing tips, tutorials, and ideas.

latest posts
- 10 Easy-to-Miss Features on Sewing Supplies You Should Be Using
- Twin Needle Sewing: My First Try Was a Mess, But Here’s What Worked
- 10 Rules That Made Me a Better Sewist
- How to Make a Lightweight Summer Neck Scarf with a Lettuce Hem
- What Sewists Hate About Sewing: Common Complaints and Practical Fixes
- Knit Presser Foot: How It Works, How to Use It, and My Sewing Tests
- How to Sew Neat Mitered Corners at Acute Angles
- Sewing Machine Needle Organization: A Clever System I Tried
- DIY Car Armrest Organizer: Sewing Tutorial