
How to Make a Tiered Skirt: Step-by-Step Instructions
There I was, staring into my closet, surrounded by a sea of boring pencil skirts and uninspired A-lines. “Where’s the fun?” I cried. “Where’s the flair?” That’s when I heard it – a faint whisper from the back of my closet: “Psst… make a tiered skirt!”
Okay, maybe my clothes don’t actually talk (or do they?), but that moment of inspiration was real. So I decided to make a tiered skirt that’s part skirt, part mood-lifter. They are actually perfect for those “I have nothing to wear” moments, or “I ate too much at lunch” days.
But what fabric should I use? I found myself staring at a motley crew of leftover fabrics – vibrant cotton prints, a cheeky checkered knit, even some quilt binding strips that were cut so perfectly straight that it was a pity to discard them. They were like misfit toys, each with a story, each begging for a second chance.
So, I did what any self-respecting fabric hoarder would do. I decided to use them to make a gloriously eclectic tiered skirt.
Prefer to read without ads?
I created a PDF version of this tutorial for anyone who likes to keep sewing guides saved, printed, or easy to read without ads. It includes the same helpful information in a simple format you can download and use whenever you need it.
The PDF is available in my shop for a small fee. It’s a nice option if you want to support my work and keep this tutorial close to your sewing machine.
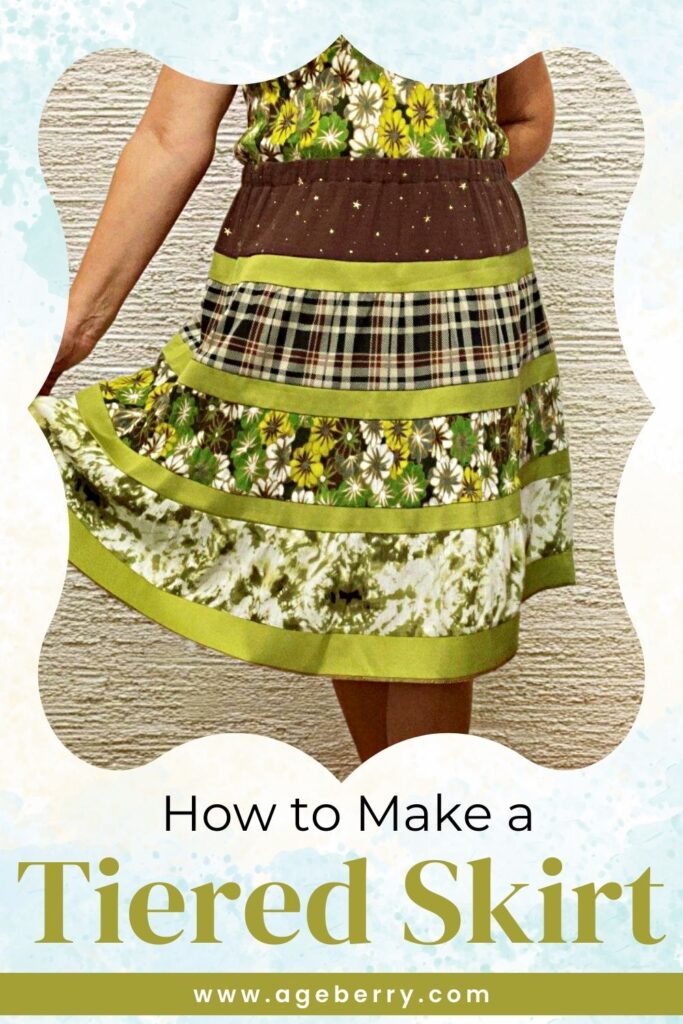
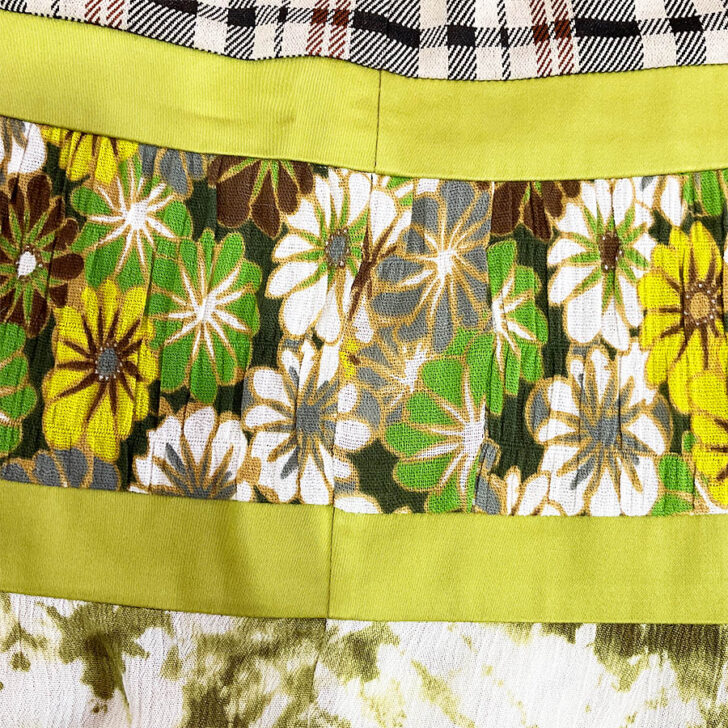
This is a skirt that’s part treasure hunt, part wearable scrapbook. Each tier tells a story – the green floral from that summer dress, the brown plaid from my daughter’s school skirt, the white/green abstract print from my mother-in-law’s blouse. And dancing between each layer, those sassy quilt binding strips.
The result? A tiered skirt that’s as unique as a fingerprint and as cozy as a patchwork quilt.
✅ Related tutorial: 17 Fun And Unique Fabric Scrap Projects
Perhaps you also would like to turn your fabric scraps into a wearable work of art? Stick around, and I’ll show you how to create your own one-of-a-kind tiered skirt. Who knows? Your lonely leftovers might just become your new favorite outfit.
What You’ll Need: Your Tiered Skirt Toolbox
Alright, here’s what you’ll need to bring your tiered skirt to life.
- Fabric: Well, this is the star of the show, of course. Amount varies based on your desired length and tiers. This is your chance to use up those lovely leftovers or mix and match to your heart’s content.
- Elastic: For that comfy waistband that’ll keep your skirt where it belongs. I used 1 inch wide elastic.
- Thread: Choose a color that plays nice with your fabric. Or go wild and pick a contrasting shade – we don’t judge.
- Sewing Machine: Your main tool in this adventure. If yours has been gathering dust, it’s time for a reunion.
- Fabric Scissors: The sharper, the better. We’re going for clean cuts, not fabric fringe.
- Measuring Tape: Because “eyeballing it” is great for cooking, not so much for sewing.
- Pins: Your fabric’s temporary best friends. These pointy pals will keep your layers lined up. Just remember, evict them before you sit down to sew your new skirt.
- Your Creativity: Not technically a material, but absolutely essential. Bring it in buckets!
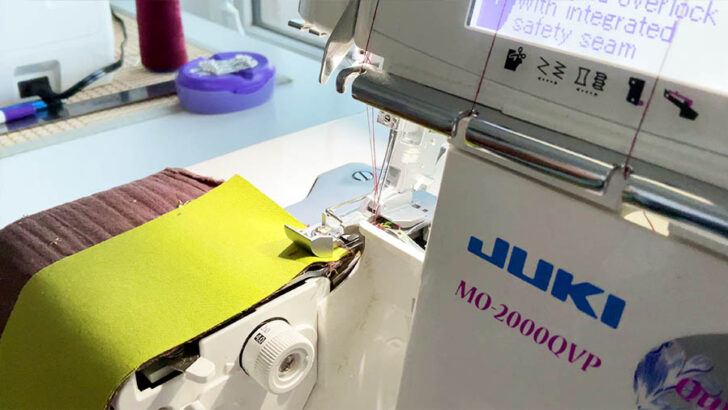
- Serger/Overlock (optional but beneficial tool for the project): The secret weapon for professional-looking seams! Don’t have one? No worries! A regular sewing machine will still get the job done, but if you’ve got a serger, it’s time to let it shine.
And now, for the star of the show – your fabric. Think lightweight and flowy for the best results. Cotton lawn or voile will give you that perfect swish, while viscose (rayon) will make you feel like you’re floating on air. Feeling fancy? Chiffon or silk charmeuse will turn your tiered skirt into a red-carpet-worthy masterpiece. Also, try double gauze – it’s like wearing a cloud! Lightweight polyester blends can offer good drape and flow, often with the added benefit of being wrinkle-resistant. Generally, the lighter and flowier, the better – we want those tiers to dance with every step.
Got everything? Fantastic! You’re now armed and dangerous (to boring wardrobes everywhere). Let’s move on to transforming these humble materials into a tiered masterpiece!
Measurements and Preparation
Alright, it’s time to channel your inner mathematician (don’t worry, we’ll keep it simple).
#1. Measure Twice, Cut Once
- Wrap that measuring tape around your waist where you want the skirt to sit. Breathe normally – this isn’t a contest.
- For length, measure from your waist to where you want the skirt to end. Feeling daring? Go shorter. Want to sweep the floor? Go longer.
✅ Related tutorial: How To Take Body Measurements For Sewing
#2. Fabric Calculations: The Fun Part (Really!)
To determine the width of each tier, divide the total length of your skirt by the number of tiers. This calculation gives you the base width of each tier without seam allowances. For example, if your skirt is 22 inches long and you want 4 tiers, each tier would be 5.5 inches wide (22 ÷ 4 = 5.5). If you want a skirt 28 inches long and you want 4 tiers, each tier would be 7 inches wide.
This simple division is the foundation for creating evenly proportioned tiers in your skirt design.
But this is just the starting point. If you want to add narrow strips to each tier, you’ll need to adjust for the strips and seam allowances.
So, decide on the number of tiers. Three is classic, but hey, it’s your skirt. I decided to go with 4 tiers/layers.
- Total skirt length for my skirt: 22 inches
- Number of tiers: 4
- Tier width calculation:
- Base tier width: 22 inches ÷ 4 = 5.5 inches
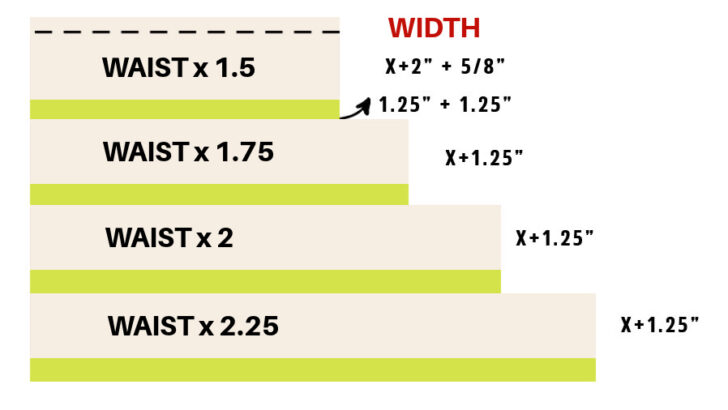
- Subtract a strip width: 5.5 inches – 1.25 inches = 4.25 inches. Let’s mark it as X.
- Add seam allowance for each side: 4.25 inches + 1.25 inches seam allowance = 5.5 inches
- Don’t forget to add about 2 inches to the top tier for the waistband casing.
- Calculate the approximate length of each tier (including strips) based on your waist measurement:
- Top tier: 1.5 times your waist
- Second tier: 1.75 times your waist
- Third tier: 2 times your waist
- Bottom tier: 2.25 times your waist
These calculations provide a good starting point, but don’t stress if you end up with an inch more or less on any tier. The nature of a gathered skirt is quite forgiving. Due to the gathering process, small variations in length won’t significantly impact the final look or fit of your skirt. This flexibility is part of what makes tiered skirts so fun and adaptable to work with.
Also, these calculations are specifically for lightweight to medium-weight cotton fabrics, not for very lightweight materials like tulle. For super lightweight fabrics, you would typically need more fullness, which would require longer tier lengths.
If you’re working with a different fabric weight or want a different level of fullness, you may need to adjust these calculations accordingly.
#3. Cutting Time
- For 3 bottom tiers of my skirt, I cut main fabric pieces 5.5 inches wide (your number should be different though)
- Top tier: I cut 7.5 inches wide (5.5 inches + 2 inch for waistband)
- I already had cut strips 2.5 inches wide (1.25 inches + 1.25 inches seam allowance)
Precision is key here of course, but don’t stress too much. Even if your measurements are a smidge off, the gathering process is forgiving as I said above. Plus, a little wonkiness just adds to the charm of a handmade garment.
Creating the Tiers: Combining Fabrics
For each tier you’ve cut, follow these steps to attach the narrow strips:
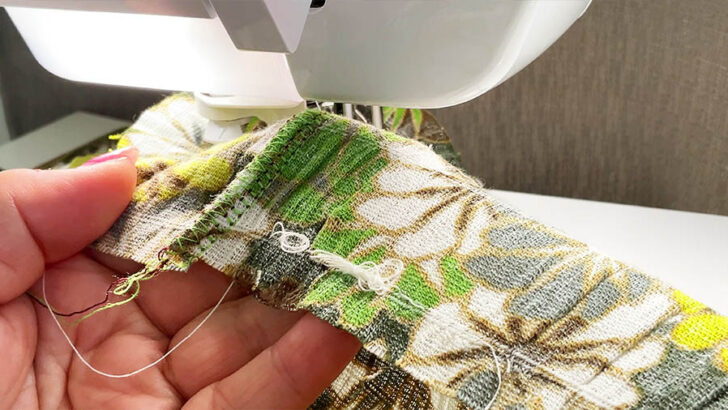
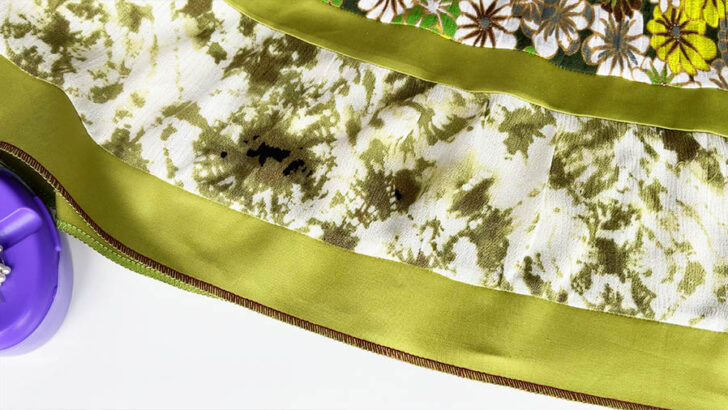
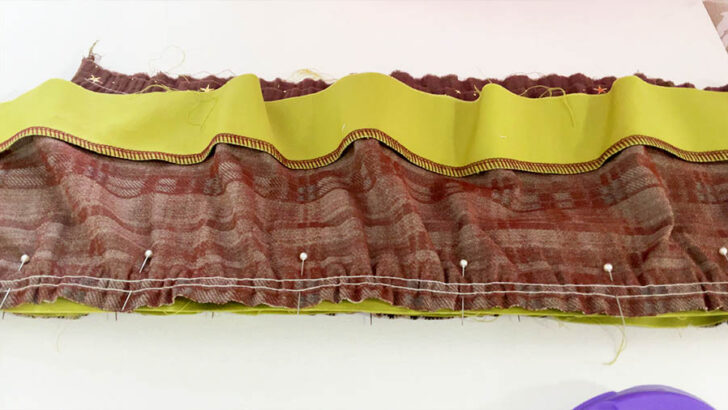
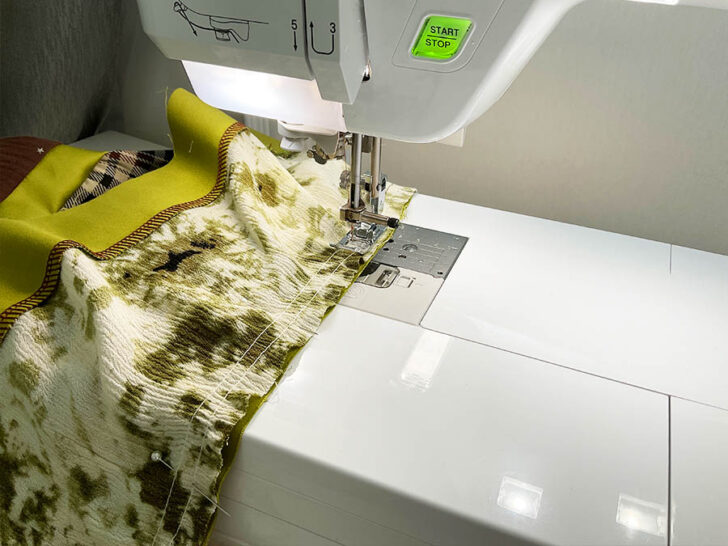
#1. Align the raw edge of a narrow strip with the bottom edge of the main fabric piece, right sides together.
#2. Sew the strip to the main fabric using a 5/8 inch seam allowance. If you have access to a serger (overlocker), this is an ideal time to use it as it will sew and finish the edge in one step.
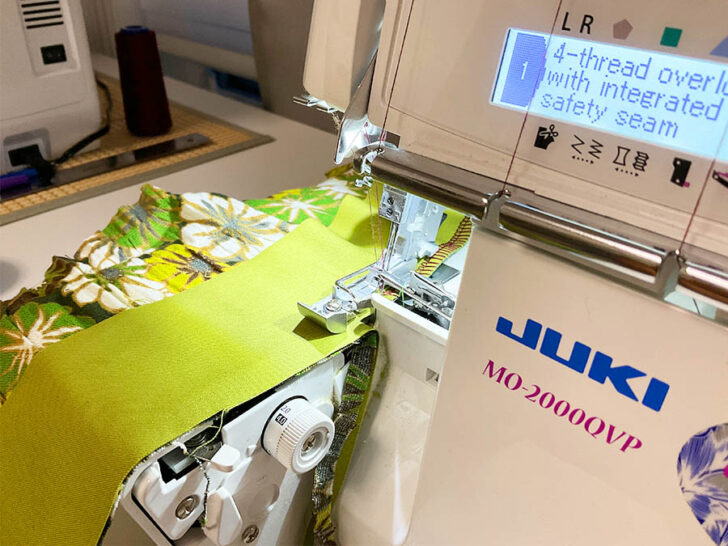
#3. After sewing, press the seam allowance towards the main fabric. This will help the strip lay flat and create a clean finish.
#4. Repeat this process for all four tiers.
If the narrow strips don’t have enough length to match the length of main fabric tiers, simply sew multiple strips together end-to-end and then cut to match the length of each tier. This ensures you have continuous strips that perfectly fit each tier’s circumference.
Using a serger can make this process quicker and give your seams a professional finish, but a regular sewing machine will work just as well. The key is to maintain consistent seam allowances for a polished look.
✅ Related tutorial: The Self-Threading Serger – Yes, It Exists!
Gathering Skirt Tiers: The Manual Method
Step 1. Adjust your sewing machine settings (very important!)
- Set your machine to the longest stitch length available (usually 5mm).
- Loosen your upper thread tension (between 0 and 1).
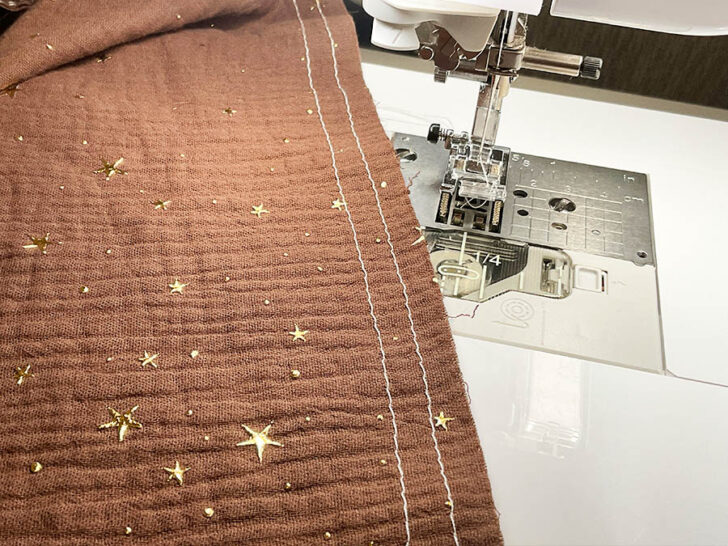
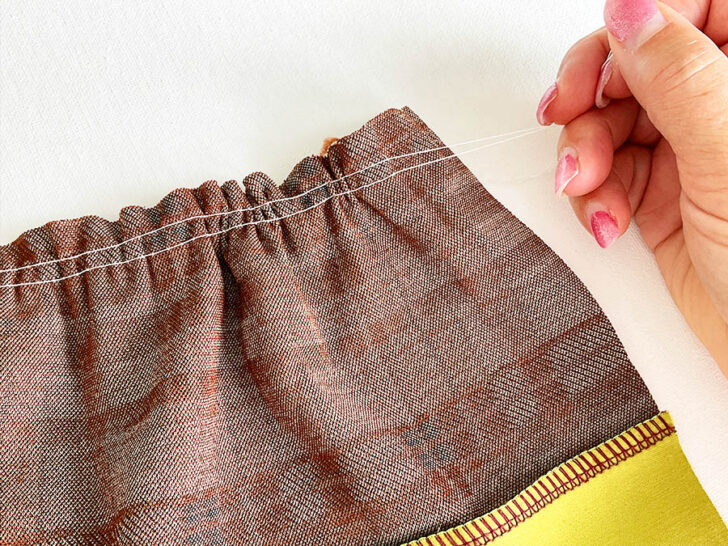
Step 2. Sew the gathering stitches
- Sew two parallel rows of stitches along the top edge of your tier on the right side of your fabric.
- Place the first row about 3/8 inch from the raw edge.
- Sew the second row about 3/8 or 1/2 inch below the first row.
- Leave long thread tails (about 4-6 inches) at both ends.
Now, let’s talk about a little hiccup that happened with my machine. Just as I started my gathering stitch, my sewing machine decided it’s time for some drama. Yep, I’m talking about the dreaded thread bunching underneath the fabric.
These things happen to all of us, whether we’re beginners or seasoned sewists. It’s just part of the sewing adventure! If you find yourself facing a similar situation, don’t panic. I’ve got a few tutorials about sewing machine troubleshooting that might come in handy. They’re like a first-aid kit for your sewing projects, ready to save the day when your machine gets a bit rebellious.
✅ Related tutorial: Troubleshooting Common Sewing Machine Problems (+ Solutions)
Now, assuming your machine behaves and you finished sewing gathering stitches, let’s move on to the next step…
Step 3. Create the gathers
- On one end of your stitching, tie the upper threads and bobbin threads together in a knot.
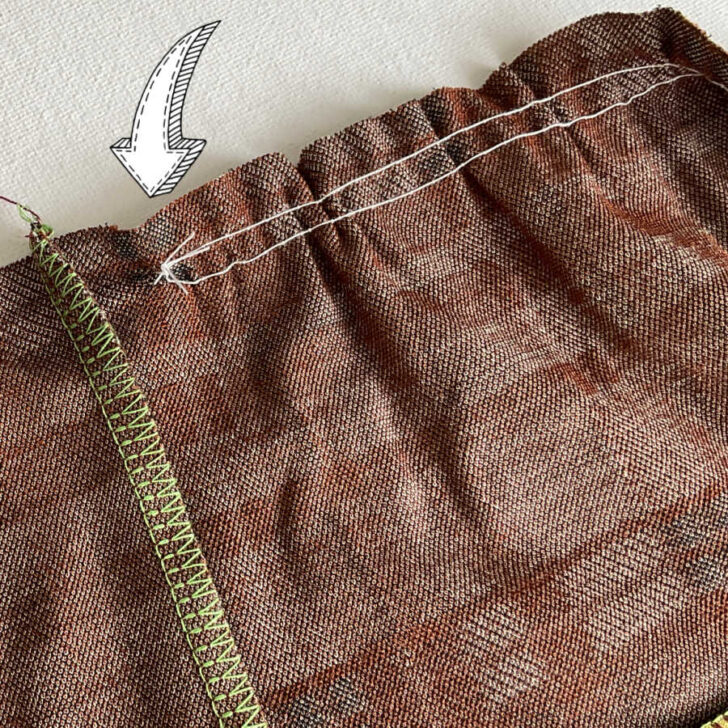
- Hold the fabric securely with one hand.
- Gently pull on the bobbin thread, sliding the fabric along it to create gathers.
- Try to distribute the gathers evenly along the length of the tier.
- Once you’ve gathered the tier to the desired width, wrap the threads around a pin to secure them.
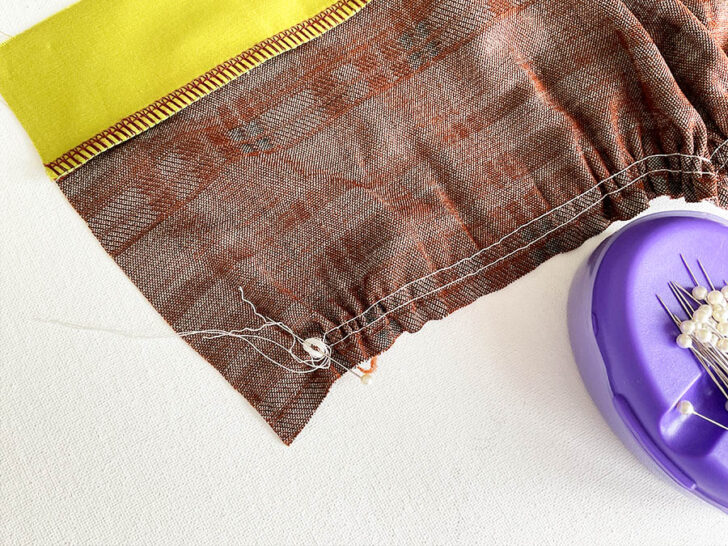
- Spread out the gathers evenly across the tier.
It’s easier to control the gathers if you work with manageable sections rather than trying to gather the entire tier at once. You can divide your tier into halves or even quarters and gather each section separately for more precise control.
Sewing the Tiers
Now that we’ve got our pieces ready, it’s time to move on to the really fun part – assembling our tiered masterpiece.
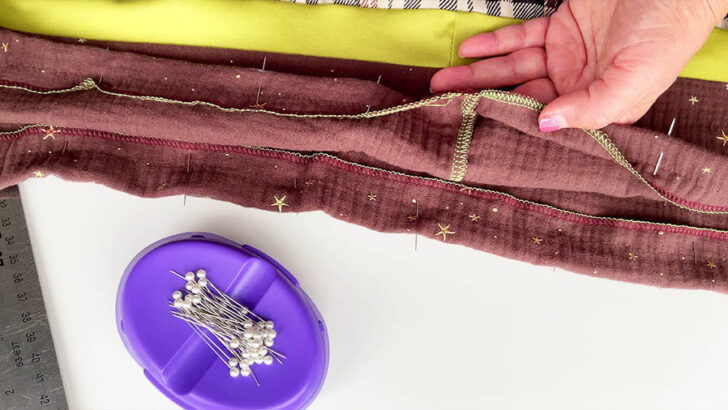
#1. Side Seams Shenanigans: Well, it’s time to play matchmaker with your tiers. Line up those side seams of each tier and sew them together. Of course, right sides together – we’re not running a inside-out fashion show here.
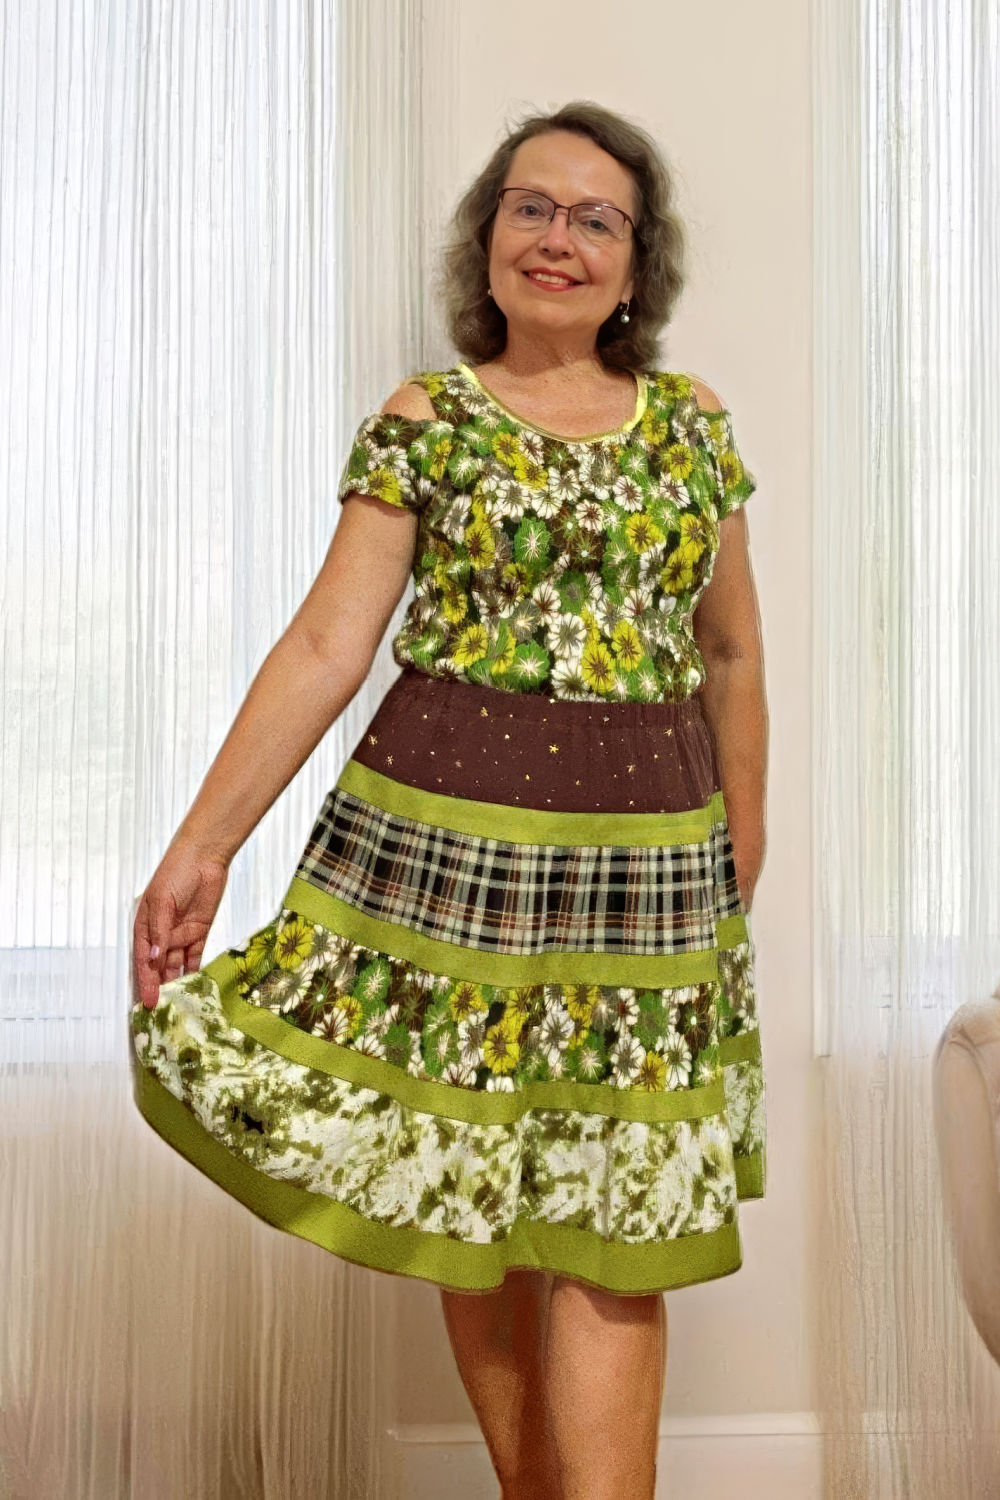
#2. The Great Hem Debate: Now, for the bottom tier, I went a bit rogue. I used an overlock stitch for the hem, rocking brown thread on green fabric. Bold move? Maybe. But here’s where I need your fashion expertise. Did I nail it with this edgy look, or should I have played it safe with a traditional folded hem? Drop your thoughts in the comments – this skirt needs your vote!
#3. Tier-rific Assembly: Here comes the next part – attaching those tiers together! It’s like building a fabric layer cake, but way more wearable. Line up those gathered edges with the tier above, pin like your life depends on it, and sew away. Each tier you attach brings you one step closer to twirl-worthy perfection (ha-ha).

Sewing should be fun, but there’s also joy in creating something well-crafted. If your stitches go wonky, don’t hesitate to befriend your seam ripper and give it another go. It’s not about being perfect on the first try – it’s about learning, improving, and taking pride in your work. After all, the satisfaction of a well-executed seam is part of what makes sewing so rewarding.
✅ Related tutorial: Why Does Your Seam Ripper Have a Red Ball? Discover Its Purpose!
Creating the Waistband
Step #1. Casing
Take that top tier fabric and fold it over to create a snug little tunnel for your elastic. It reminds me of making a burrito, but instead of tasty fillings, we’re stuffing it with stretchy goodness. Fold, pin, and sew – easy peasy.
Step #2. Elastic
Now, let’s play “Measure Twice, Cut Once” with your elastic. Wrap it around your waist, do a little shimmy to make sure it’s comfy, then cut. We want it snug but not “I can’t breathe” tight.
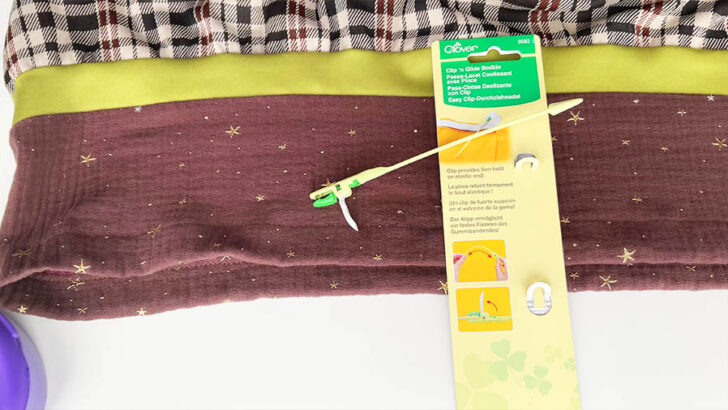
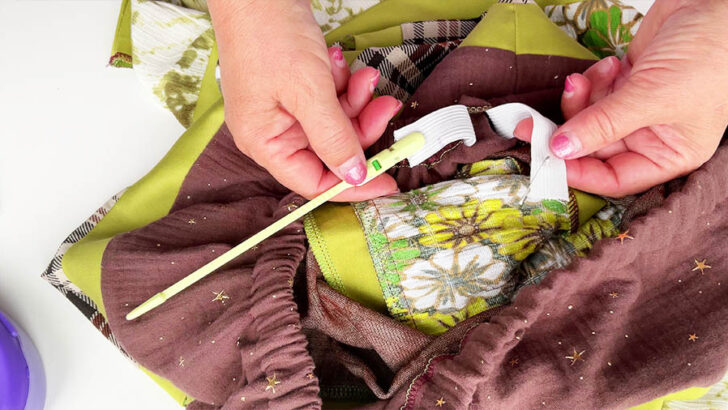
Step #3. Threading Adventure
Attach a safety pin to one end of your elastic (or a bodkin!) and embark on a journey through your fabric tunnel – wiggle, push, and pull until you emerge victorious on the other side.
You know what? I used to be all about the safety pin for threading elastic. It’s like, classic, right? But then I got this fancy new tool called a bodkin. I mean, who comes up with these names? It sounds so serious!
Anyway, this bodkin thing is pretty neat. Don’t get me wrong, safety pins still work just fine. But using a bodkin? It’s like I’ve suddenly gone all professional or something. And it’s way easier to grip than a safety pin. No more fumbling around trying to feel where that tiny pin is through the fabric. The bodkin’s just there, doing its job, making me feel like I’ve got my sewing life together.
✅ Related tutorial: What is a bodkin and how to use it?
So yeah, safety pin or bodkin – either way, you’ll get that elastic through. But if you want to feel a bit fancy while you’re at it, give the bodkin a try. Just don’t ask me to pronounce it in public.
I also like to attach a safety pin to the other end of my elastic. I think it’s still a smart move. I hope I won’t need it, but I’m glad it’s there. Plus, it gives me something to do with all those safety pins I;ve been hoarding since 1995.
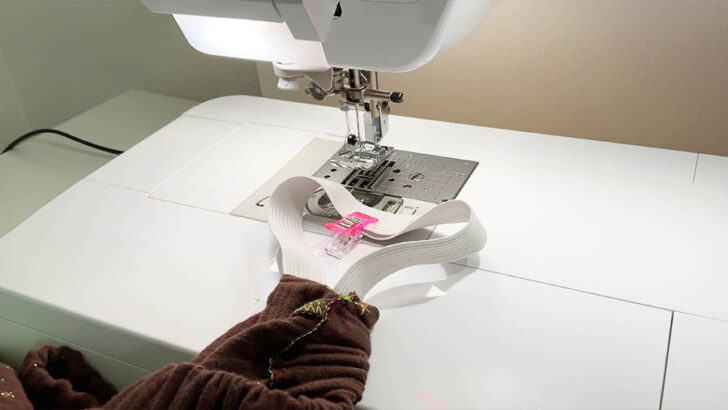
Step #4. Secure the Ends
Overlap those elastic ends and stitch them together like your skirt depends on it (because, well, it does).
Finishing Touches and Styling Tips
Give your skirt the spa treatment it deserves. A good press will have those tiers looking crisp and ready for their debut. Ironing can transform your skirt from “just sewn” to “wow, where did you buy that?”
- If your skirt has many colors, pair it with a top that matches one of the tiers, and your skirt will brighten up even the dullest Monday morning. Also, a solid-colored top can be your skirt’s best friend. Choose accessories that pick up one or two colors from your skirt.
- Casual Cool: Pair with a tucked-in tee and sleek sandals for a fun, everyday look. Perfect for farmer’s markets or brunch with friends.
- Date Night: Dress it up with a silky camisole and strappy sandals.
- Beach: Throw it over your swimsuit with a floppy hat. You’ll be the most stylish girl on the shore.
✅ Related tutorial: Discover the Many Ways to Combine Green and Brown in Fashion
In the end, fashion is all about having fun and expressing yourself. With your unique, handmade skirt, you’re already winning the style game. After all, homemade clothes are like homemade cookies – full of love and character!
If you found this tutorial on how to sew a tiered skirt, please pin this image on Pinterest so you can easily find it again and share it with others who might find it useful. Simply hover over the image and click the “Pin It” button that appears. Be sure to follow me on Pinterest for more tips, tutorials, and inspiration. I regularly post new content on all things sewing, including project ideas, sewing techniques, and product reviews.
latest posts
- What Do You Call a Person Who Sews? I Asked My Readers and Got 1,408 Opinions
- DIY Round Purse: PDF Sewing Pattern and Detailed Instructions
- Mini Wonder Clips By Clover: Useful Sewing Tool Or Just Another Notion?
- Non-Slip Grips For Quilting Rulers: A Small Notion With A Useful Job
- Fabric Eraser for Sewing: What It Removes and When to Use It
- What Is The Best Thread For Sewing Machine Projects? Let’s Find Out!
- Butterfly Quilt Block Tutorial – Foundation Paper Piecing
- How To Sew Quilt Squares So The Corners Match
- Sewing With Fork Pins: How They Help With Pattern Matching, Slippery Fabric, And Seams


I don’t think it matters what color thread you used for the bottom hem. your dress is an inspiration for me to make, I want to make one before the style goes away. 🙂
You are perfectly right. That is why I said, this type of dress is very forgiving when it comes to choosing colors and even in case one makes an error in a seam. After all, it may be a design feature 😀And I personally doubt the style will ever go away.
Beautiful skirt! Could you tell me about the pattern of the cold shoulder shirt you are wearing with it? Makes a great outfit. Love your site.
That is a blouse I made more than 25 years ago; I was much younger then. The pattern I drafted myself but this is so long ago that I don’t really remember if I started from an existing pattern which I modified or I drafted it myself (trial and error). Sorry I can’t be more precise …
please if you want the tiers in a light flare curve instead of gathers, how to you cut them?
Instead of cutting rectangles, cut each tier as a slightly curved piece. Draw each tier as part of a large circular shape (like a gentle “rainbow” shape), with the upper edge slightly shorter and the lower edge slightly longer.
But make sure that the upper curve of the second tier exactly matches the bottom curve of the first tier. And each subsequent tier should flare gently outward (by adding extra width to the lower edge).
You can use the “slash-and-spread” method for drawing the curved tiers.
Draw the original rectangular tier pattern.
Make vertical cuts (slashes) evenly along the piece, leaving a hinge at the top edge.
Spread these slashes evenly apart at the bottom edge until you achieve the desired flare.
Redraw the curves smoothly along the top and bottom edges.