Seam Allowances in Sewing Patterns: What They Are and How to Use Them
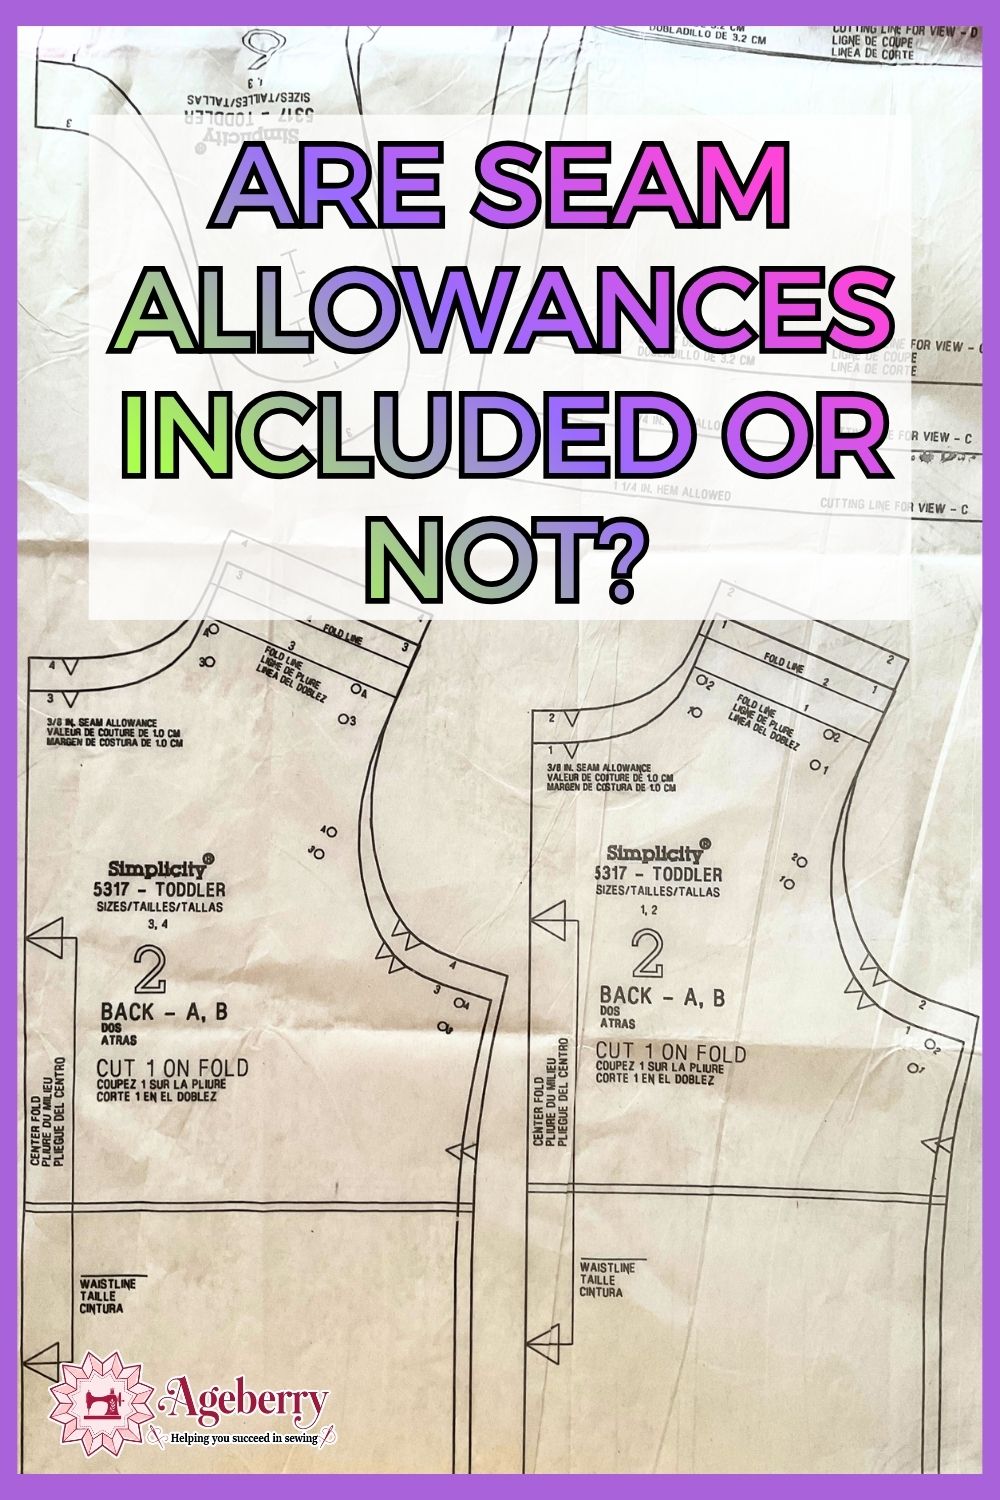
If you’ve been sewing for a while, you’ve probably opened a pattern at least once and spent a few seconds wondering: are seam allowances included or not? Checking before you cut is one of those habits every sewist learns — often the hard way. But have you ever stopped to think about why patterns handle this so differently in the first place?
A printable version of this guide is available in my shop. It is included as a bonus with my DIY Bunny with a Dress sewing pattern and step-by-step tutorial, so you get both PDFs together.
Let’s start at the beginning.
What Are Seam Allowances?
A seam allowance is the strip of fabric between the cut edge of your fabric piece and the stitching line. It’s the extra fabric you need to actually sew two pieces together. Without it, your finished piece would be the same size as the pattern — which means smaller than intended, because the stitching eats into the fabric.
It’s purely functional. You never see it in the finished project; it lives inside the seam. But without it, nothing fits together.
Why Different Sizes?
Seam allowances are not one-size-fits-all, and the size matters depending on what you’re sewing.
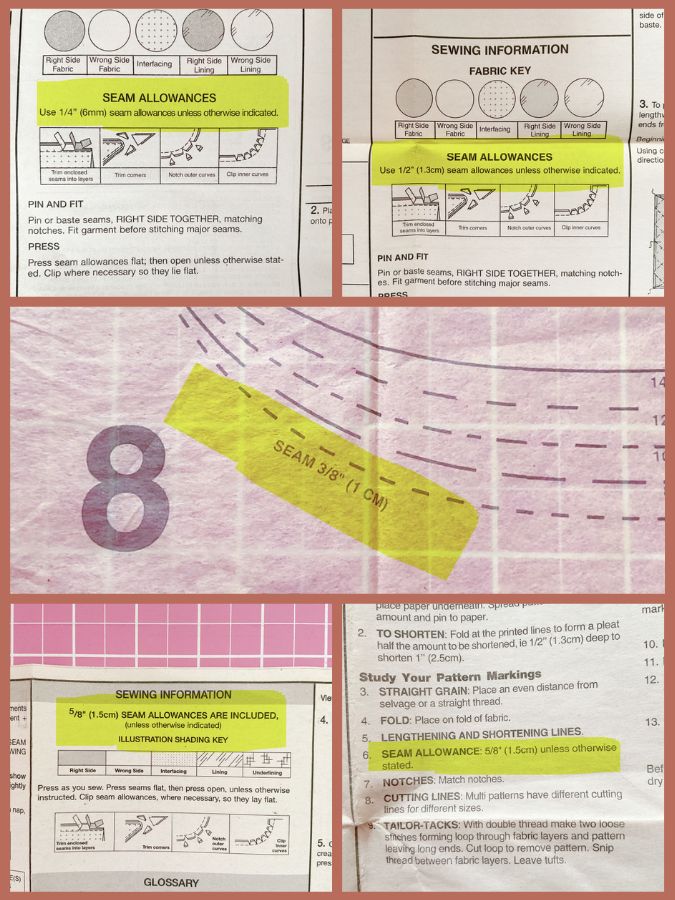
- ¼ inch (6 mm) — common in quilting and small-scale projects. Precise, minimal fabric waste, but leaves no room for adjustments.
- ⅜ inch (1 cm) — used on curved seams, necklines, and tight corners where a larger allowance would create too much bulk or be difficult to clip.
- ½ inch (1.2 cm) — a middle ground used by many independent pattern designers, especially in modern indie patterns.
- ⅝ inch (1.5 cm) — the North American commercial standard. You’ll find it on virtually every pattern from companies like McCall’s, Simplicity, Butterick and Vogue. It became the industry standard largely because it leaves enough room to let a seam out for fitting adjustments.
- ¾ inch (2 cm) — used in some European patterns and couture sewing, particularly on straight seams, where extra fabric is intentional to allow for significant fit adjustments.
A single project can use multiple seam allowance sizes — larger on long straight seams, smaller on tight curves — and good pattern instructions will specify which to use where.
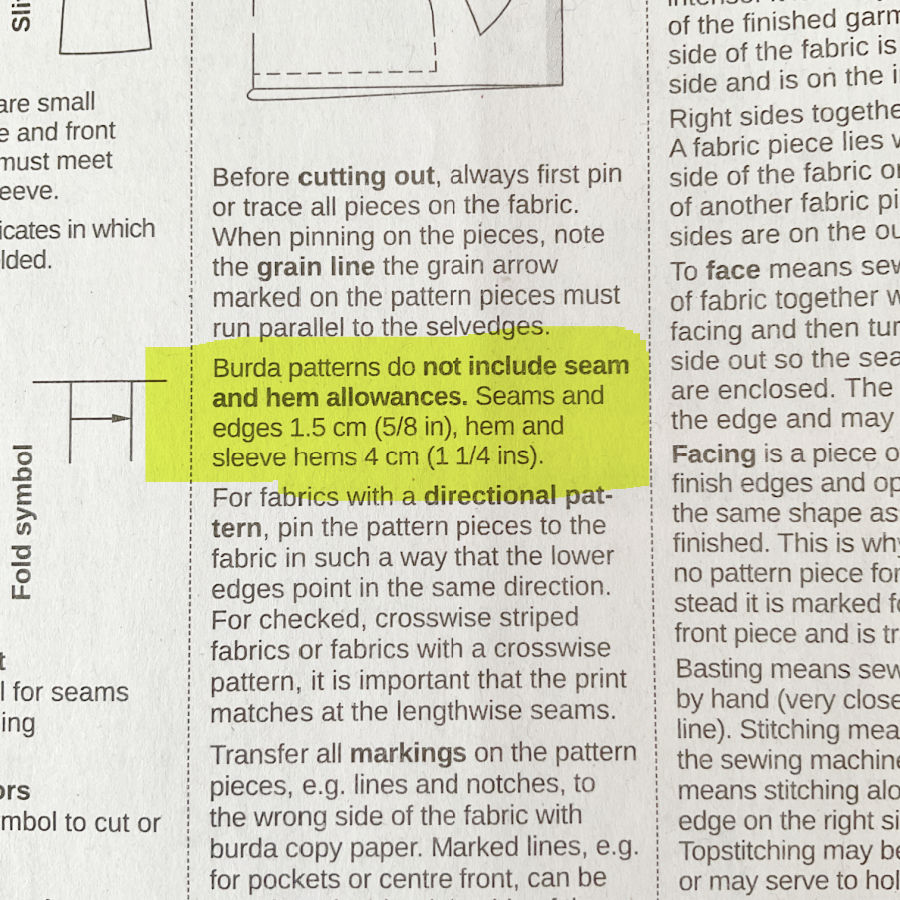
Why Most Patterns Include the Seam Allowance
The majority of commercial patterns — think Big 4 brands, most indie PDF patterns, and craft project patterns — print the seam allowance directly into the pattern piece. The cutting line is the outer edge; the stitching line may or may not be printed, but the math is already done for you.
This approach is beginner-friendly and fast. You cut on the line, you sew at the stated distance from the edge, and the pieces fit together as designed. There’s no extra calculation between tracing and cutting. For large pattern runs, garment patterns with multiple sizes nested together, or projects aimed at a wide audience, including the allowance is simply the most practical choice.
It also reduces errors. When you’re cutting out ten pattern pieces at once, you are not really happy to manually add ⅝ inch around every edge while holding scissors. Pre-included allowances remove one variable from the process.
Patterns That Don’t Include Seam Allowances
Not everyone works this way — and there are some reasons for it.
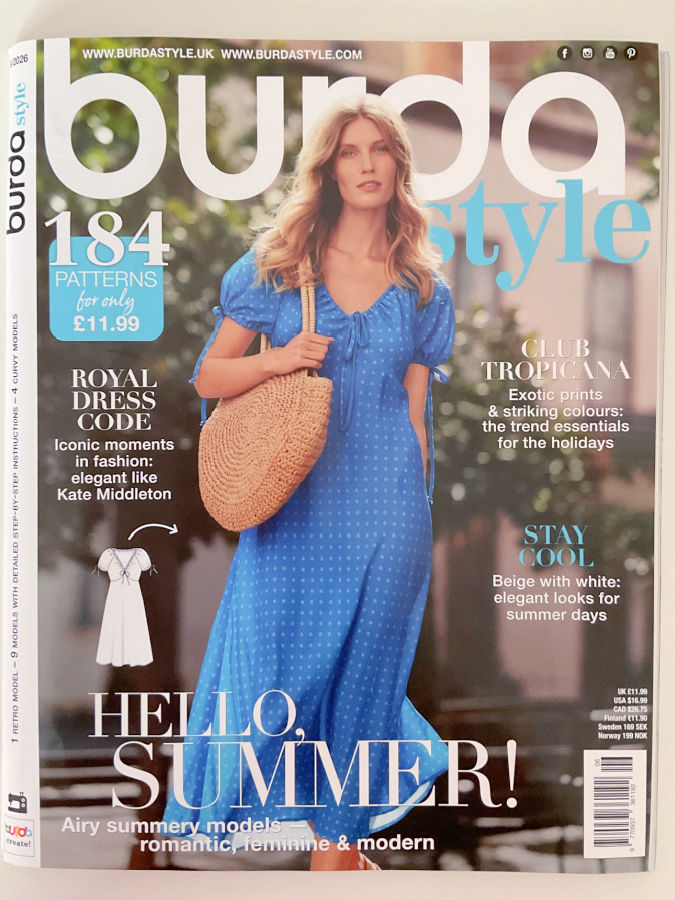
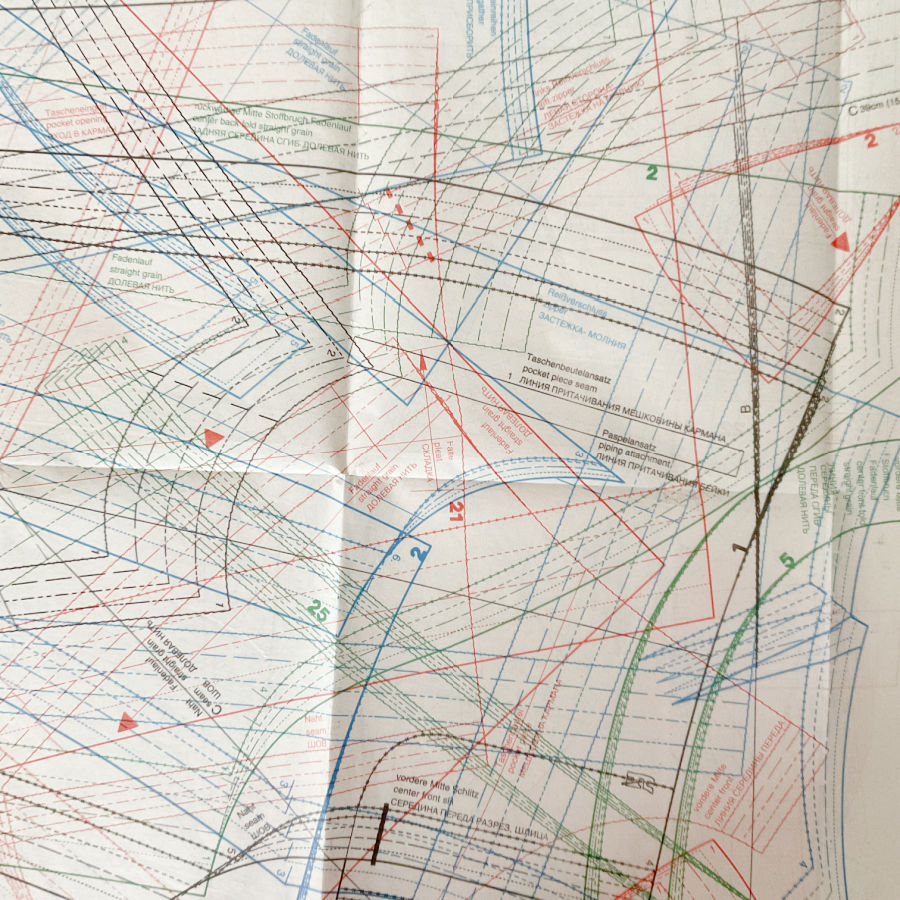
Burda Style magazine is probably the best-known example. Burda, the German sewing publication with decades of history, has never included seam allowances in its printed patterns.
This is partly tradition and partly practical: Burda patterns are printed on large sheets with many pattern pieces layered on top of each other, all sharing the same space. A single issue of Burda Style contains dozens of patterns, all printed at full size on a handful of large shared sheets.
If every pattern piece were enlarged by a seam allowance on all sides, the pieces would simply be too big to fit. There wouldn’t be enough room on the sheets for the full issue’s worth of patterns. Besides, the number of lines on the pattern – which is already large – would make the pattern unreadable.
It’s a magazine, not a pattern packet — and that format has a hard limit on how much paper it can contain.
Worth noting: Burda patterns sold as individual packaged patterns — the kind you find in US fabric stores — do include seam allowances. The omission is specific to the magazine format, not to Burda as a company.
Burda assumes you’ll trace the pattern pieces onto tracing paper, then add your own seam allowances before cutting fabric. Their recommendation is 1.5 cm (⅝ inch) for all seams. The tracing step doubles as the moment you add those allowances.
Burda also traditionally aimed at experienced home sewers who know their own fitting adjustments and preferred seam allowance sizes — giving them flexibility rather than locking them into one preset amount.
Other European pattern magazines and many vintage patterns (particularly pre-1950s, before seam allowance standardization existed) work the same way. If you’ve ever picked up an older pattern and felt confused about why there are no cutting lines, that’s the tradition.
The practical advantage for experienced sewists: you see the true finished shape of the piece. You can alter the seamline itself — draw it in differently, blend between sizes — without seam allowances getting in the way. For fitting-heavy garments, this extra visibility is genuinely useful.
Small Projects, Small Pieces — A Different Challenge
Toy sewing is different from garment sewing. Small curved pieces, enclosed seams, turning, clipping, and stuffing create unique challenges. Techniques that work perfectly on a blouse or skirt don’t always work as well on a bunny ear or tiny dress bodice.
Seam allowances get complicated in a specific situation that garment sewers don’t often think about: very small pattern pieces.
When a pattern piece is 2 inches wide and has a ¼ inch seam allowance printed around it, the printed shape is noticeably larger than the finished shape. On tiny, curved pieces, the printed lines may crowd together so tightly that the shape becomes hard to read and harder to cut accurately.
The seam allowances start to change the apparent silhouette of the piece.
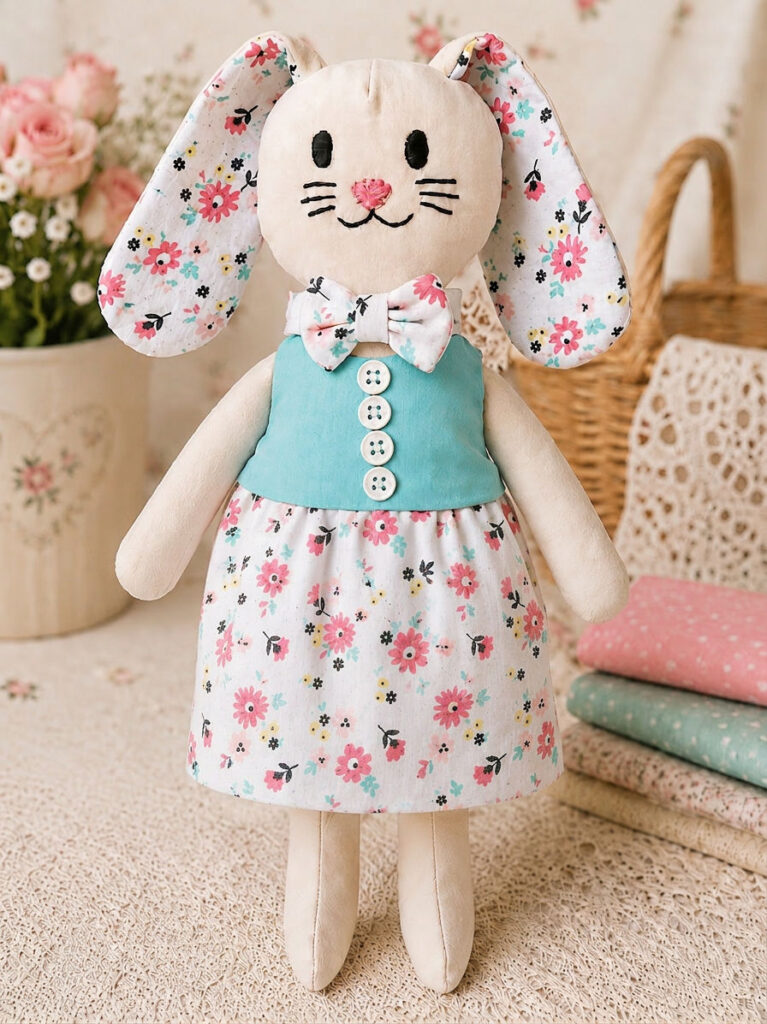
This is exactly why I chose not to include seam allowances in my DIY Bunny with a Dress pattern.
There’s also one situation where the decision to omit seam allowances has nothing to do with space on a sheet or tradition — it’s about how small curved pieces actually get sewn.
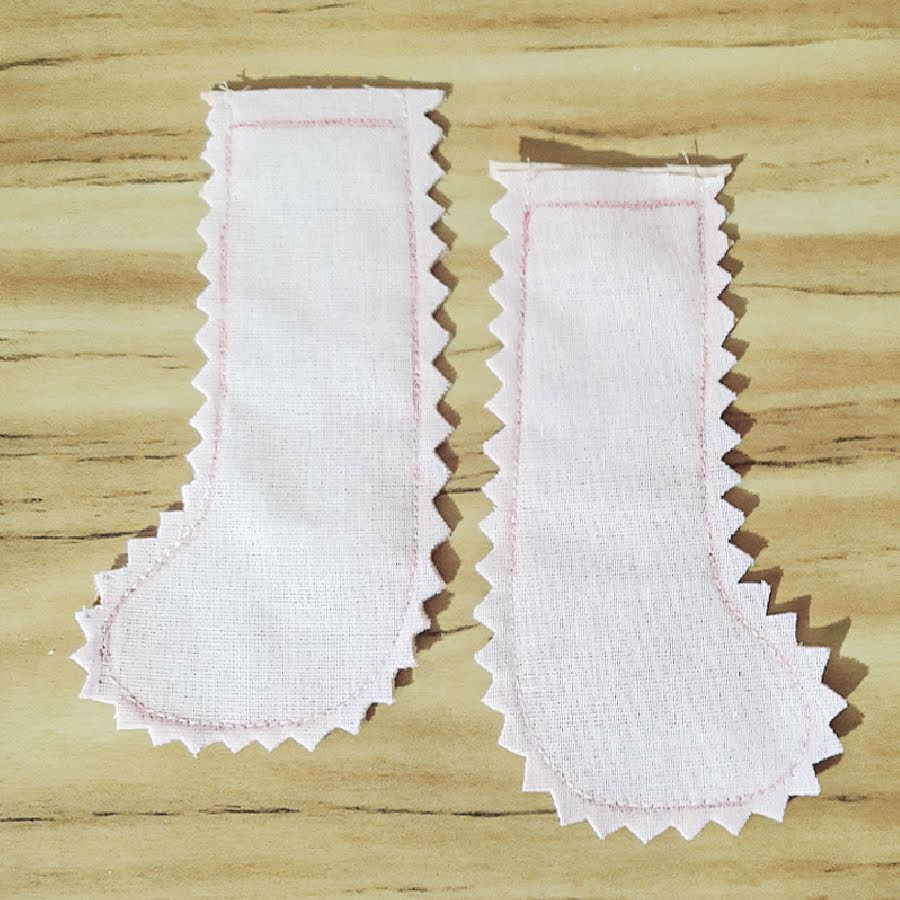
Some pieces in my Fabric Bunny pattern — particularly the top of the dress — are sewn using a sew-first, cut-later method. You transfer the pattern shape onto fabric, sew along the marked line first, and then trim the seam allowance around the stitching.
This sounds backward, but it solves a real problem. Tiny curved pieces are notoriously difficult to cut with a precise, smooth seam allowance in advance. The fabric shifts, the curves distort, the scissors don’t cooperate.
When you sew first on a larger piece of fabric and trim afterward, you get smooth, accurate edges every time — because the stitching acts as a guide and the fabric stays stable throughout.
Because the seam allowance is added after sewing rather than before cutting, printing it on the pattern piece would be irrelevant — you’re not cutting it before you sew anyway.
Another reason is consistency. Even on pieces where you do cut first, maintaining a precise, even seam allowance around a small curved shape is genuinely difficult. The piece shifts. The curves don’t cooperate. And the smaller the piece, the bigger the impact of even a slight inconsistency — a seam allowance that wanders by ⅛ inch on a large garment seam is barely noticeable; on a 2-inch bunny ear, it changes the shape.
By showing the clean finished shape without a seam allowance, the pattern gives you a precise line to sew on.
For the sew-first pieces, you stitch directly on that line while the fabric is still stable and large, then trim. For the cut-first pieces, you add ¼ inch around the edge before cutting — and with a small, clear shape to work from, that ¼ inch stays consistent because you can see exactly where the stitching line needs to be.
Want to try the sew-first-cut-later method?
My DIY Bunny with a Dress pattern uses this technique on small curved pieces, where accuracy matters most. The pattern includes the bunny, her removable dress, two-tone ears, embroidered face, and beginner-friendly step-by-step instructions. The pattern is available in my shop for a small fee: DIY Bunny with a Dress.
The seam allowances are left out on purpose, so the pattern lines stay clear and easy to trace. This helps the small pieces keep their intended shape.
How to Sew Consistent Seam Allowances
Knowing your seam allowance size is only half the job. Sewing it consistently from start to finish is what actually makes your pieces fit together correctly.
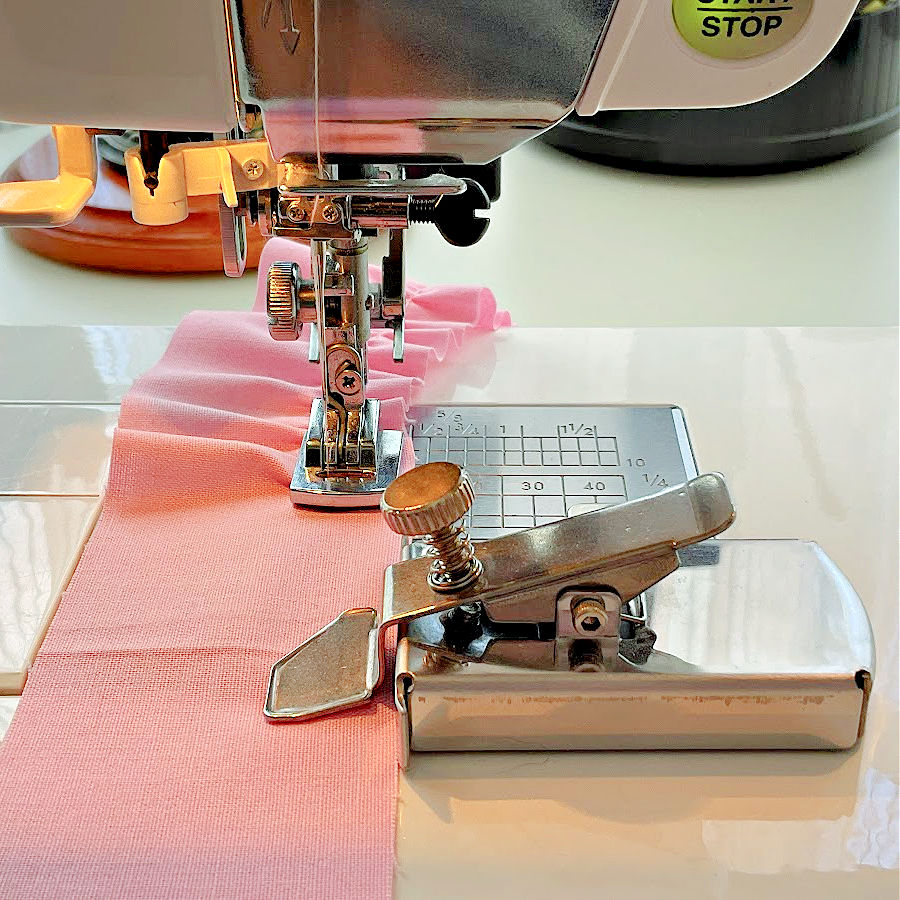
The regular method is to use your sewing machine’s throat plate markings. Most machines have etched lines to the right of the needle, typically marked at ¼”, ½”, and ⅝”. They might also have markings in millimeters. Keep your fabric’s raw edge aligned with the correct marking as you sew, and let the machine do the measuring for you.

There are many other ways to make seam allowances more accurate and easier to maintain, especially if you struggle to keep the fabric edge lined up with the throat plate markings. Here are a few of them:
- Washi tape or masking tape — Measure from the needle to the right and place a strip of tape on the machine’s bed. The tape edge becomes your guide. Inexpensive and easy to reposition.
- Magnetic seam guide — A small magnetic bar that snaps onto the throat plate and creates a raised edge to guide your fabric against. More stable than tape, especially for long seams.
- Specialty presser feet — A ¼” foot is standard in quilting and common for toy and doll sewing. The foot itself is sized to give you an automatic ¼” seam as long as the fabric edge sits flush with the right side of the foot.

If you need extra help keeping your seam allowances consistent, check out my detailed Seam Guide Tutorial. It covers different types of seam guides, practical setup tips, and techniques that help improve stitching accuracy from the first stitch to the last.
For projects that require a precise ¼-inch seam, such as quilting, doll clothes, and many small sewing projects, a dedicated quarter-inch foot can make a noticeable difference. This guide explains how quarter-inch seams work and why even small variations can affect the final result — Quarter Inch Seam Quilting Math Guide.
If you sew long seams or prefer a raised guide instead of tape, a magnetic seam guide can be a useful addition to your sewing machine. It provides a firm edge for the fabric to follow and helps maintain a consistent seam allowance throughout the seam — Magnetic Seam Guide for Sewing Straight.
Whatever method you use, the goal is the same: your eye and your hands guide the fabric edge to the mark, not the stitching line. This single habit — guiding the raw edge rather than watching where the needle goes — is what separates consistently accurate seams from wandering ones.
What Happens After You Sew: Trimming Seam Allowances
Once a seam is stitched, you might assume you’re done with the seam allowance. But there’s still work to do, and skipping it is one of the most common reasons a finished project looks homemade in the wrong sense.
Why trim? Seam allowances add bulk. On visible seams, excess bulk creates a ridge that shows through to the outside of your project. On enclosed seams — pieces that are sewn and then turned right side out, like a collar, a cuff, a stuffed animal body part, or a toy ear — untrimmed allowances don’t have anywhere to go. They bunch up inside, distort the shape, and prevent the piece from pressing or turning cleanly.
So here are some general rules.
- Open seams (pressed flat with allowances on either side): trim to about ¼” if the original was ⅝”, unless you need to let the seam out later
- Enclosed seams (sewn, then turned right side out): trim more aggressively, to ⅛–¼”, because there’s no need for a buffer — the seam is permanent
- Curved seams: trimming alone isn’t enough. You also need to clip (cut small notches into) the seam allowance so the curve can spread out and lie flat after turning. On an outward (convex) curve, cut small V-shaped notches. On an inward (concave) curve, cut straight snips. Either way, cut close to the stitching line without cutting through it.
- Corners: trim diagonally across the corner point before turning, removing the triangular excess. This is what gives you a sharp, clean corner instead of a blunt lump.
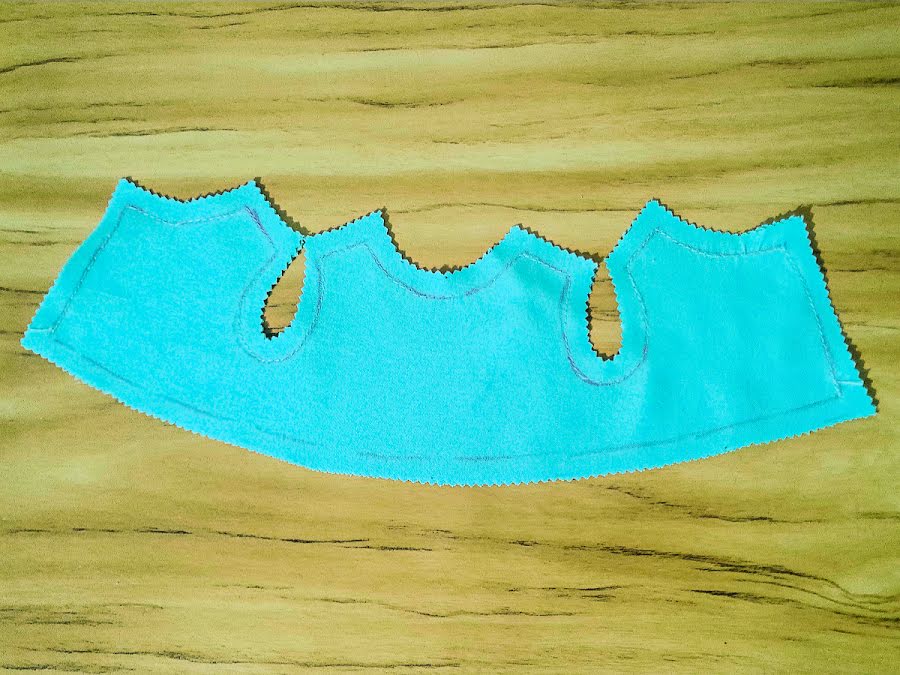
I cut the pieces below with pinking shears which are ideal for this operation. Just be careful not to cut into the seam itself.
Seam Allowance Grading: The Step We Often Skip
Grading takes trimming one step further, and it’s specifically for enclosed seams — any seam where the allowances end up permanently trapped inside and can’t be pressed open.
When you have two or more layers of bulky fabric sewn together and then turned (a collar, a waistband, a pocket flap), all those seam allowances are stacked on top of each other inside. If they’re all the same width, that stack creates a noticeable ridge that shows through to the right side of the fabric.
Grading solves this by trimming each layer to a different width, so the layers are staggered rather than stacked. The layer closest to the outside of the finished piece gets the most fabric. The inner layers are trimmed shorter, each one a little narrower than the one outside it.
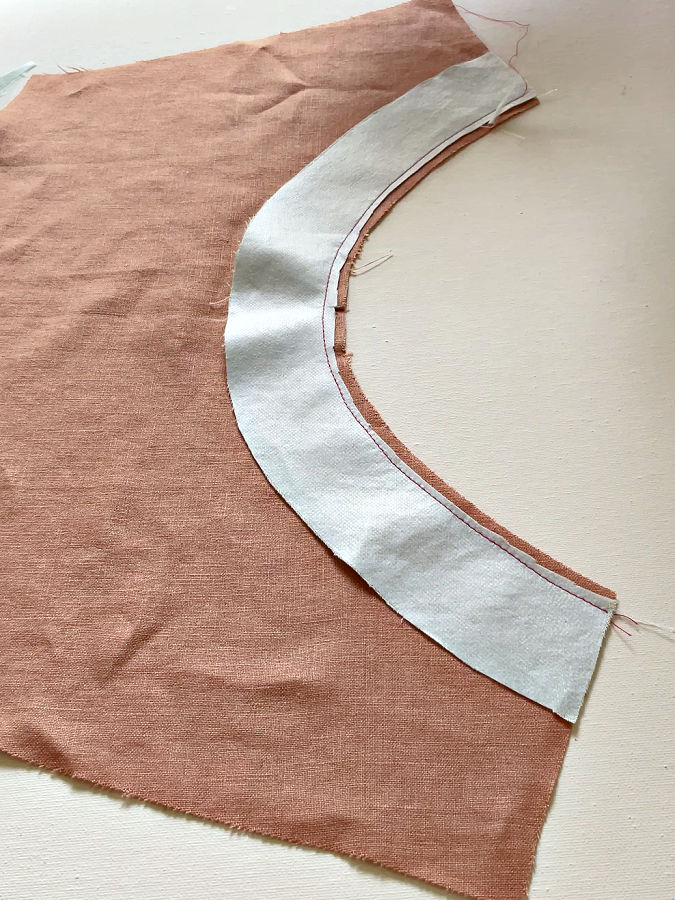
The result is a gentle taper instead of a hard edge, and the outside of your project lies smooth and flat.
When do you need it? Any time you have an enclosed seam with two or more heavyweight fabric layers — collars, cuffs, waistbands, facings, toy pieces that are turned right side out. In garment sewing it’s considered a standard finishing step; in craft and toy sewing it’s less often mentioned, but just as useful.
Pressing: Open or to One Side?
After sewing and trimming, the seam gets pressed. And here’s where a surprisingly fierce debate exists in sewing circles: should you press seam allowances open (each allowance lying flat to its own side), or to one side (both allowances lying together toward one piece)?
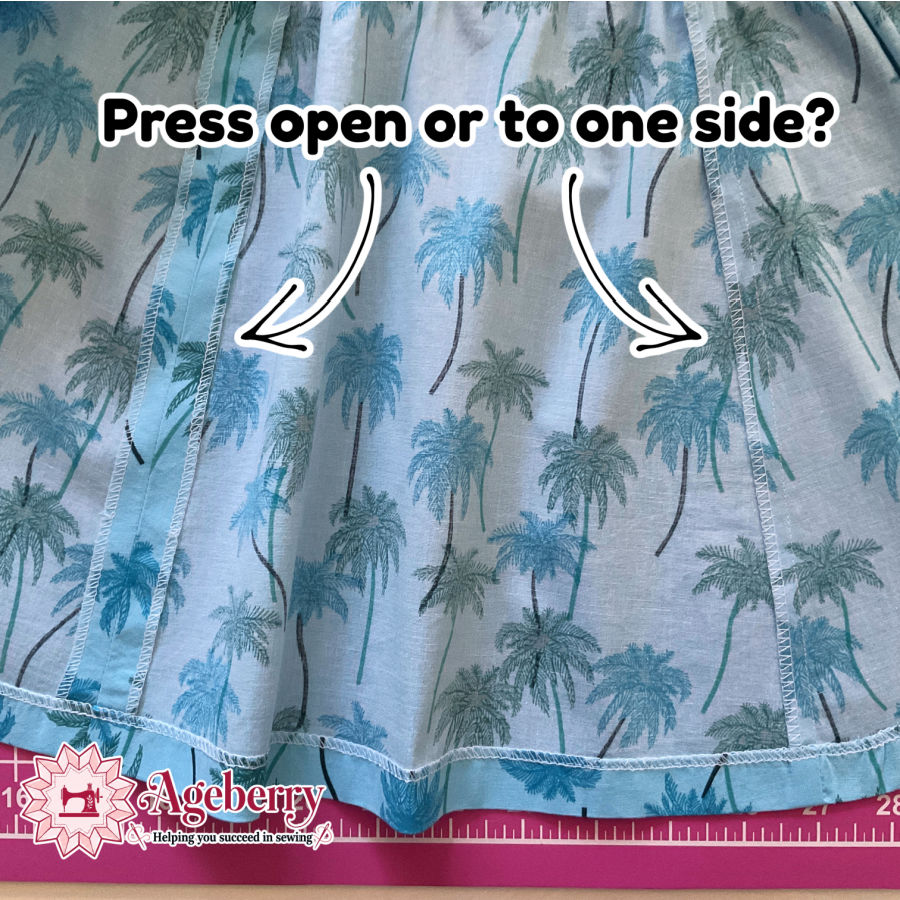
Both are correct. The choice depends on what you’re making.
This topic sparked quite a discussion on my Facebook page. I shared the photo above and asked a simple question: should seam allowances be pressed open or pressed to one side?
The responses came in quickly, and it became clear that sewists have strong opinions on the subject. Some preferred pressing seams open because it reduces bulk and creates a flatter finish. Others almost always press seams to one side, especially when making garments, because it can strengthen the seam and make construction easier.
By the way, “sewist” seems to be a preferred word now for “a person who sews”. I like it, but not everyone does. I wrote an article about this topic: What Do You Call a Person Who Sews? I Asked My Readers and Got 1,408 Opinions.
What I found most interesting was that many experienced sewists said their answer depends entirely on the project. Quilters often have different preferences than garment makers. A delicate blouse may require a different approach than a tailored jacket. Fabric type, seam location, and finishing methods all play a role in the decision.
The discussion served as a good reminder that sewing rarely offers a single “correct” answer. Techniques that work beautifully in one situation may be less suitable in another. Understanding the purpose of the seam and the characteristics of the fabric is often more important than following a rigid rule.
Press open when:
- You want maximum flatness — open seams distribute bulk evenly and create the least visible ridge on the right side
- You’re working with heavier or more structured fabrics
- You want the seam to be as inconspicuous as possible from the outside
- You’re sewing garments where fit and drape matter
Press to one side when:
- You need the seam to be strong — pressing to one side means both fabric and thread carry the stress, rather than just the thread
- You’re working with seams that will be intersected by other seams and need to “nest” (fit together cleanly at the intersection)
- You’re sewing patchwork, quilted projects, or children’s toys that will be handled frequently
- You’re pressing a small, curved, or enclosed seam where opening the allowance flat simply isn’t practical
Toy sewing is a different story altogether. Many seams in a stuffed toy are enclosed — the pieces are sewn together, turned right side out, and stuffed — which means the seam allowances end up permanently trapped inside where no iron can reach them.
In practice, a lot of toy seams simply don’t get pressed at all, and that’s fine. What matters is that the seam is strong and the piece turns and shapes cleanly.
That said, if you can get an iron to a seam before turning — press it. Not open, not to one side: just press it flat after sewing, exactly as it came off the machine. This sets the stitches, flattens the thread into the fabric, and makes the piece easier to handle in the next step.
Note: Some of the links on this page are affiliate links. This means I will receive a commission if you order a product through one of my links. I only recommend products I believe in and use myself.
For the small pieces in a project like the bunny, a mini iron is genuinely useful here — it fits into areas a full-size iron can’t reach and gives you much more control without scorching the surrounding fabric.
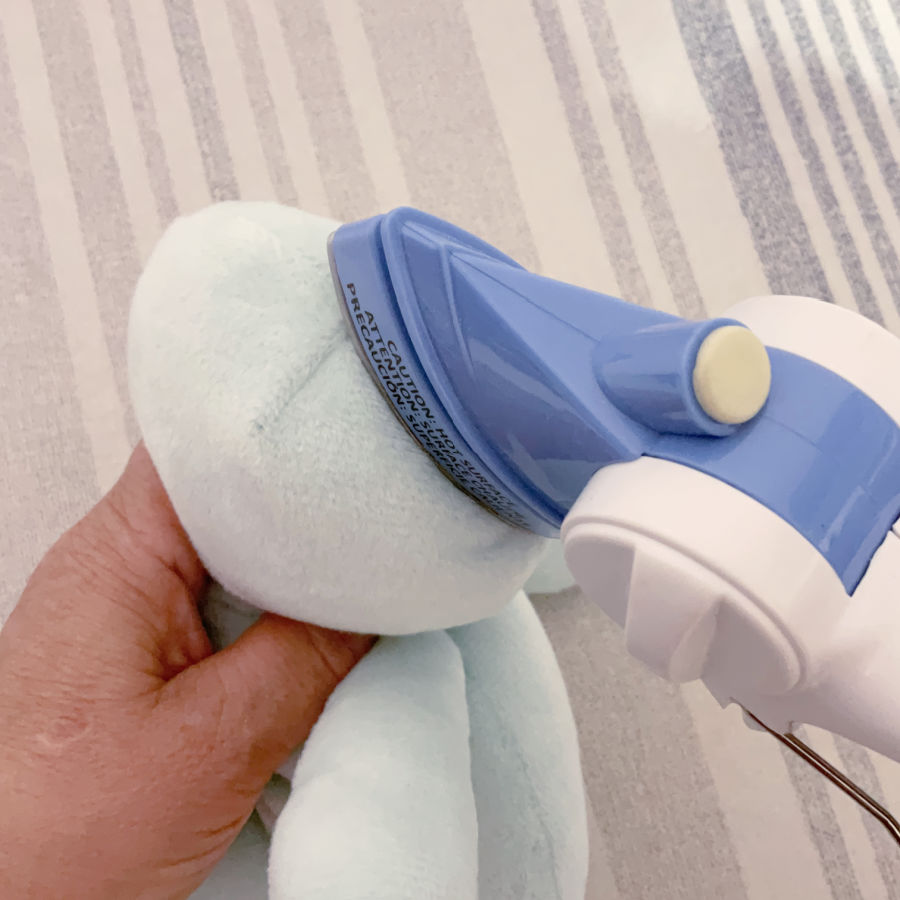


One practical note: always press, not iron. Pressing means lifting and lowering the iron with gentle pressure. Ironing (dragging sideways) stretches seams, especially bias-cut edges and curves. This distinction matters most on the small, curved pieces you’ll find in toy sewing.
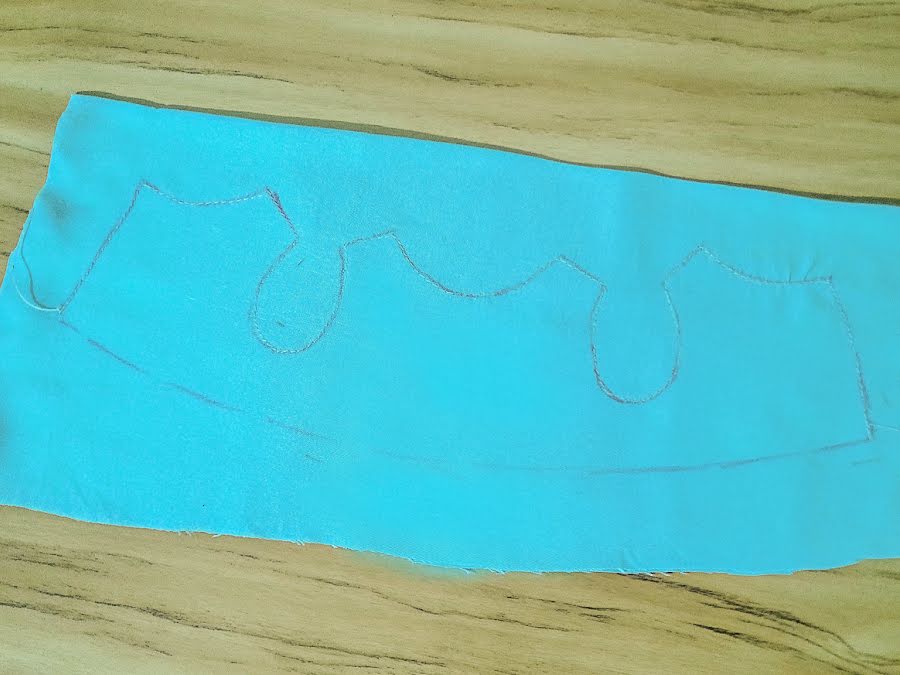
How To Add Seam Allowances
This step is not difficult, especially on small projects. You just need a steady guide and a little patience.
First, trace the pattern piece onto your fabric or paper. That traced line is your sewing line. Do not cut on it. If you cut on that line, your bunny may end up smaller than planned.
For most stuffed toy pieces, I like to add a ¼ inch seam allowance unless the pattern says something different.
The easiest method is to use a small ruler. Measure ¼ inch away from the traced line and make little marks all around the shape. Then connect those marks into a smooth outer line. That outer line is your cutting line.
For curves, you can make a little homemade helper. Cut a narrow strip of cardstock exactly ¼ inch wide. Place one edge of the strip on the traced line and draw along the other edge. Slide it around the curve as you go. It works better than trying to wrestle a large ruler around a tiny bunny foot.
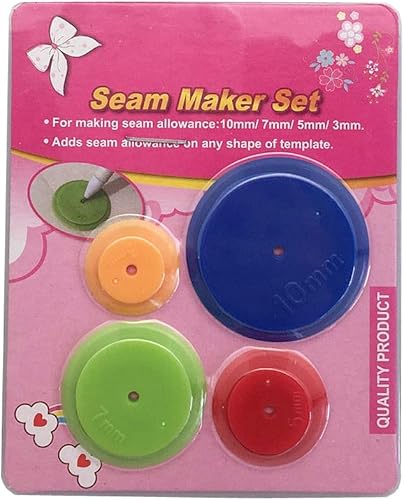
You can also use a seam allowance ruler if you have one. These rulers have little slots for common seam allowance widths. Place your pen in the right slot and trace around the pattern. It feels fancy, but the humble cardstock strip works too.
After the seam allowance is marked, cut on the outer line.
Remember the important part: the original traced line is where you sew. The outer line is where you cut.
That small difference keeps tiny toy pieces accurate. It also helps the finished bunny keep the shape the pattern intended, instead of becoming a mystery woodland creature with uneven limbs.
Ready to put all of this into practice? My DIY Bunny with a Dress tutorial (with the pattern) walks you through every one of these techniques — including the sew-first-cut-later method. Get the pattern here DIY Bunny with Dress.
And while you are here, why not save this pin (see below) on your sewing board so you can come to this tutorial later when you are ready, and follow me on Pinterest for more tips, tutorials, and inspiration!
latest posts
- Seam Allowances in Sewing Patterns: What They Are and How to Use Them
- What Do You Call a Person Who Sews? I Asked My Readers and Got 1,408 Opinions
- DIY Round Purse: PDF Sewing Pattern and Detailed Instructions
- Mini Wonder Clips By Clover: Useful Sewing Tool Or Just Another Notion?
- Non-Slip Grips For Quilting Rulers: A Small Notion With A Useful Job
- Fabric Eraser for Sewing: What It Removes and When to Use It
- What Is The Best Thread For Sewing Machine Projects? Let’s Find Out!
- Butterfly Quilt Block Tutorial – Foundation Paper Piecing
- How To Sew Quilt Squares So The Corners Match