Sewing Thread Secrets: 8 Tiny Details You Probably Never Noticed — But Should
A spool of sewing thread looks so simple. We pick the color we need, put it on the machine, and start sewing. Most of the time, we barely look at the spool itself.
But there is much more going on than it seems.
Once I started looking closely, I found a surprising number of tiny details that can affect how that thread feeds, how often it breaks, how much lint it leaves behind, and even whether the spool works well on a sewing machine.
These are small details, but they can explain sewing machine thread problems that are easy to blame on the needle, tension, or even the machine itself.
So if you like practical sewing tips and want to understand your sewing thread a little better, here are 8 small details worth noticing before you sew another stitch.
Prefer to read without ads?
I created a PDF version of this guide for anyone who likes to keep sewing guides saved, printed, or easy to read without ads. It includes the same helpful information in a simple format you can download and use whenever you need it.
The PDF is available in my shop for a small fee. It’s a nice option if you want to support my work and keep this tutorial close to your sewing machine.
1. Cross-Wound or Parallel-Wound? This Tiny Detail Can Change Everything
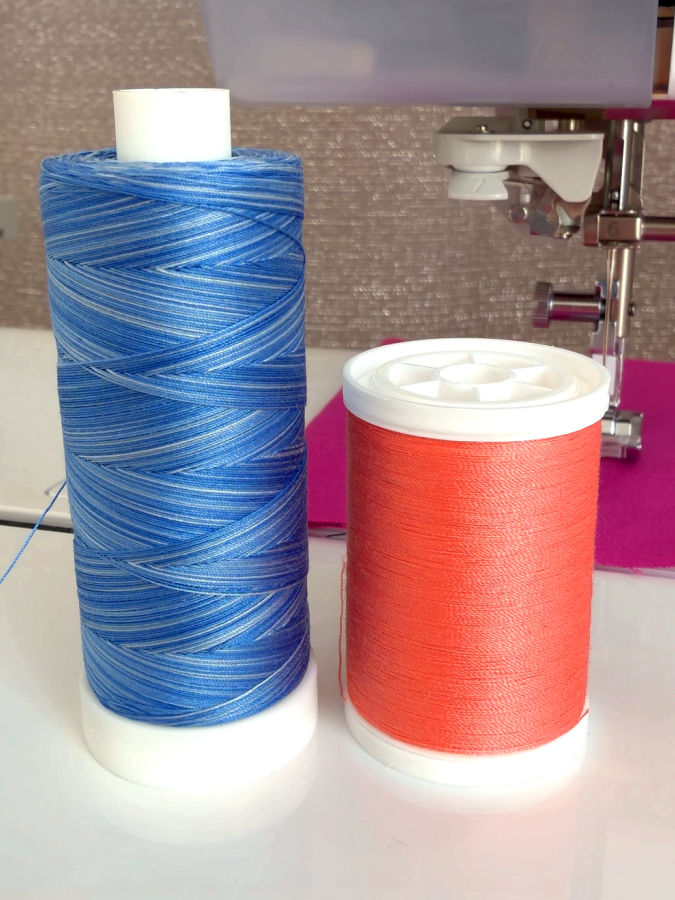
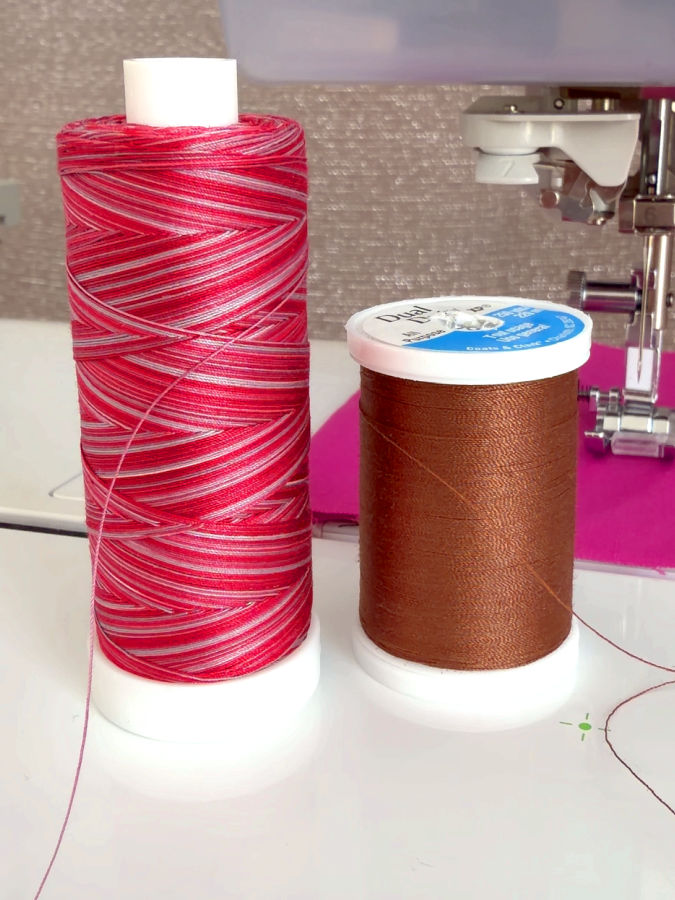
Look at these two spools of thread. What secret is hiding here? They may look completely ordinary, but pay close attention to the way the thread is wound. One small difference can determine how the spool should sit on your sewing machine, how the thread should come off it, and even whether you end up sewing happily or wondering why your thread keeps breaking.
On one spool, the thread is wound in neat rows, with the strands lying almost parallel to one another. On the other, the thread travels diagonally back and forth across the spool, forming a crisscross pattern. These are the two main winding styles: parallel wound, sometimes called stacked, and cross wound. It is easy to dismiss this as nothing more than the way a manufacturer happened to put thread on a spool. But it matters. A lot.
Parallel-Wound Thread Needs the Spool to Turn
With parallel-wound thread, the thread is wrapped around the spool in layers, one row beside another. As you sew, the thread is meant to come off from the side of the spool while the spool itself rotates.
Think about a roll of toilet paper. The roll turns while the paper comes off the side. Parallel-wound thread works in much the same way. If you try to pull it from the end instead, you are asking the thread to unwind in a way it was not designed to.
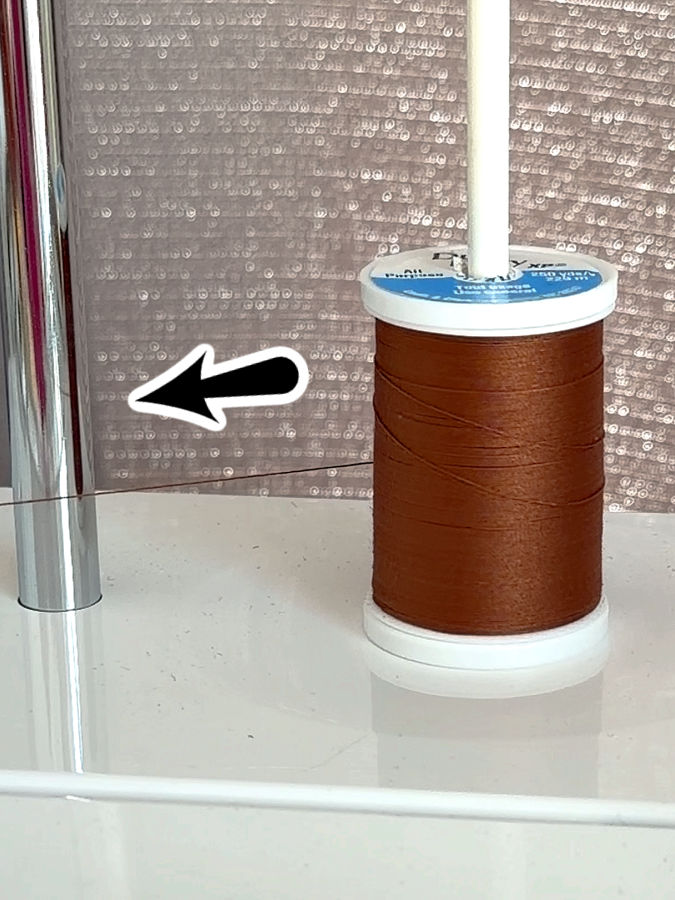
This is where the spool pin on your sewing machine becomes important. A traditional vertical spool pin allows the spool to rotate freely while the thread feeds from the side. Many older sewing machines were set up this way, and some modern machines still are.
But not every vertical spool pin works the same way.
Some modern machines have a vertical pin where the thread is guided upward from the top of the spool. The spool may not rotate freely at all. So simply seeing a vertical spool pin does not automatically mean it is the right setup for a parallel-wound thread.
The real question is: Can the spool rotate freely while the thread comes off the side?
That is the detail to watch.
Note: Some of the links on this page are affiliate links. This means I will receive a commission if you order a product through one of my links. I only recommend products I believe in and use myself.
My Eloflex Thread Showed Me Exactly Why This Matters
I saw this very clearly while sewing with Eloflex, a stretchy thread that I like for knit fabrics. It can be used in both the needle and bobbin, and it stretches with the fabric, which makes it useful for seams that need some give.
But Eloflex has another important feature: it is parallel wound.
On my Janome, I could place the spool on the machine, thread everything normally, and start sewing. At first glance, nothing looked wrong. But the spool wasn’t feeding the thread the way a parallel-wound spool really needs to feed it.
The trouble became much more obvious when I sewed faster. The thread could catch and break because the spool wasn’t rotating.
And this is where sewing problems can become misleading. If your thread breaks, what do you suspect first? The needle? Tension? Thread quality? Maybe even the machine itself?
Sometimes the answer is sitting right in front of you on the spool pin.

I solved the problem with a simple spool-pin adapter that lets the spool rotate as the thread comes off the side. Once the thread was allowed to unwind the way it was designed to, it fed much more smoothly. The image shows a spool of metallic thread which behaves the same as my Eloflex did.
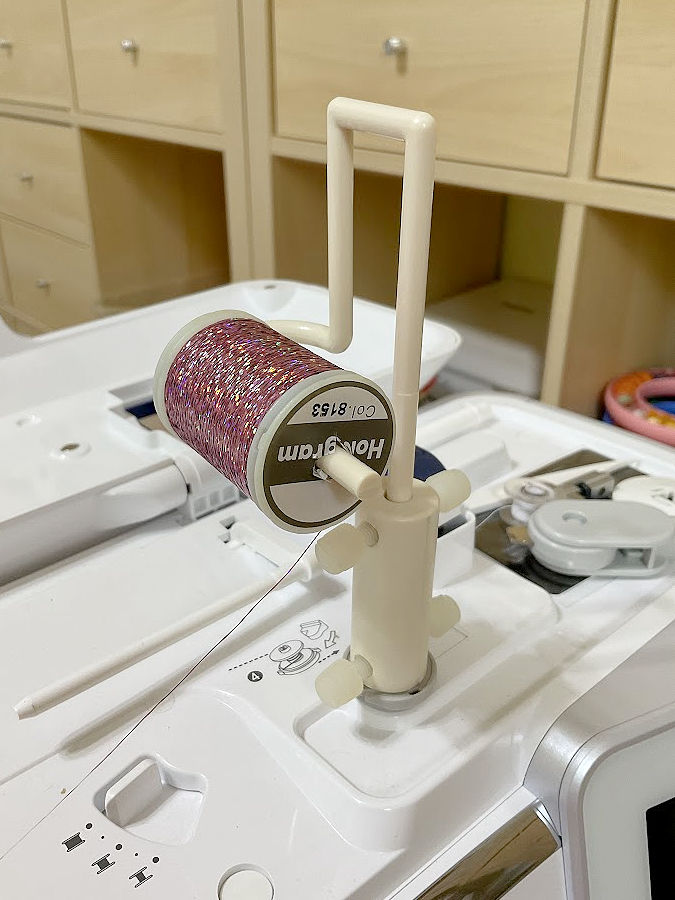
✅ Related tutorial: Unique Sewing Tool You Didn’t Know Existed: Thread Spool Pin Adapter
That little experience made me pay much more attention to how the thread is wound before I even put it on the machine.
Cross-Wound Thread Wants to Move Differently
Now look at a cross-wound spool. Instead of thread sitting in straight parallel rows, it travels diagonally from one end of the spool to the other and then back again. If you look closely, you can see tiny X shapes throughout the winding. Variegated thread makes this pattern especially easy to spot.
Cross-wound thread is generally meant to come off over the end of the spool rather than making the whole spool rotate.
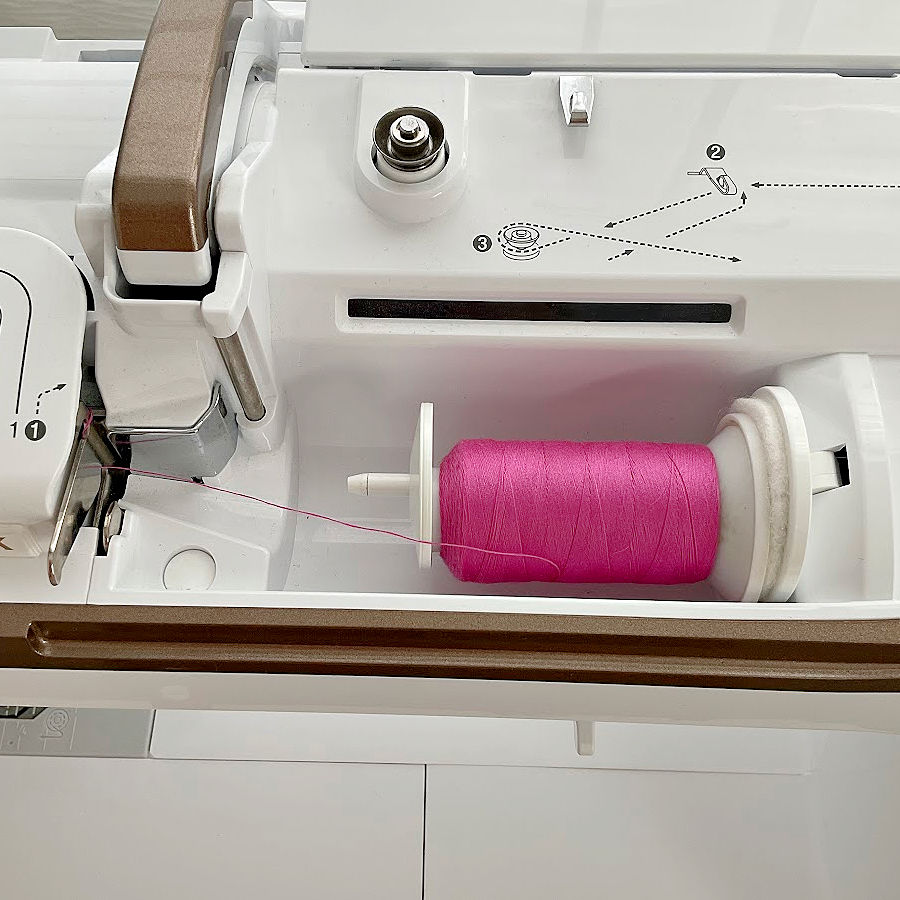
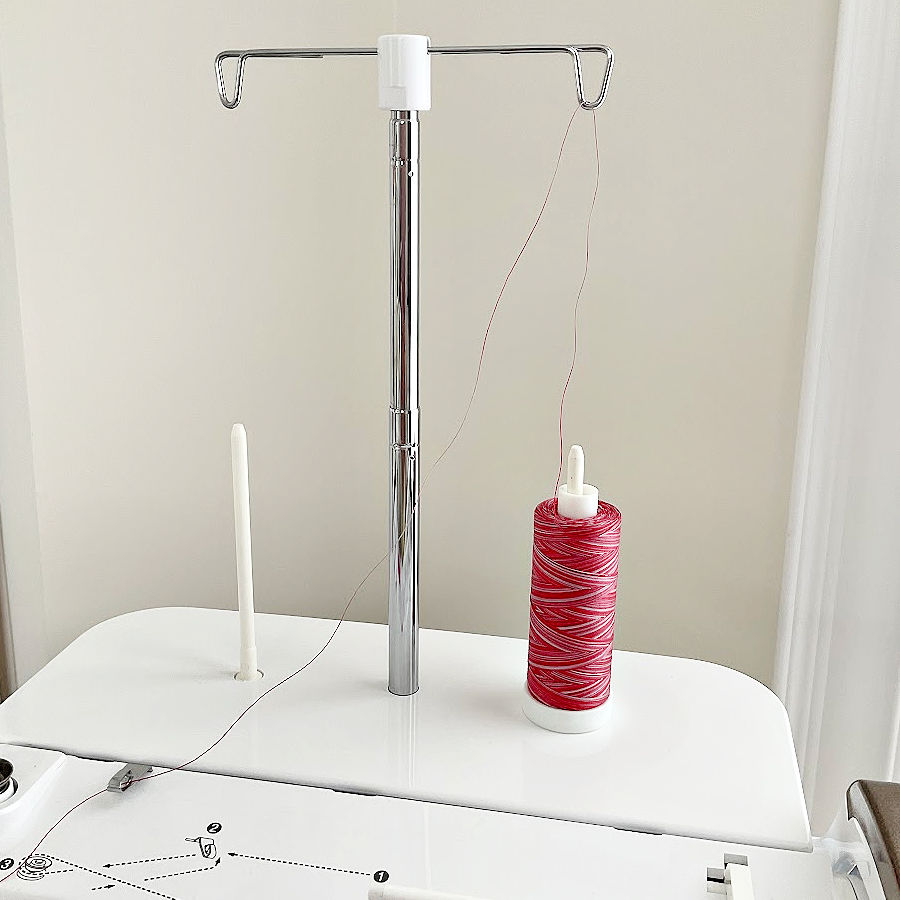
This is why a horizontal spool pin works so well for many cross-wound threads. The spool sits horizontally, usually held in place with a spool cap, while the thread slides off the end as the machine pulls it.
You can also use cross-wound thread with certain vertical spool setups where the thread is directed upward and off the end of the spool. Again, what matters is not simply whether the spool pin points up or sideways. What matters is how the thread is leaving the spool.
Watch the two types in motion and the difference becomes much easier to understand. With parallel-wound thread, the spool turns. With cross-wound thread, the thread can peel off over the end while the spool stays still.
Same object. Same thread job. Very different behavior.
So Which Spool Pin Should You Use?
Before putting a spool on your sewing machine, look at the winding pattern first.
If the thread is parallel wound, you generally want a setup that lets the spool rotate freely while the thread comes off from the side. A simple vertical spool pin often does exactly that.
If the thread is cross wound, it generally feeds best when the thread can come off over the end of the spool. A horizontal spool pin with the correct spool cap is commonly designed for this, and some vertical arrangements work this way too.
There are different sewing-machine designs, so the shape of the spool pin alone doesn’t tell the whole story. Watch what the spool is doing. Is it rotating? Is the thread sliding over the end?
Those few seconds of observation can tell you a surprising amount.
And once you start noticing cross-wound and parallel-wound spools, you may find yourself examining every spool in your thread drawer.
2. That Tiny Cut in the Spool? It Has a Job
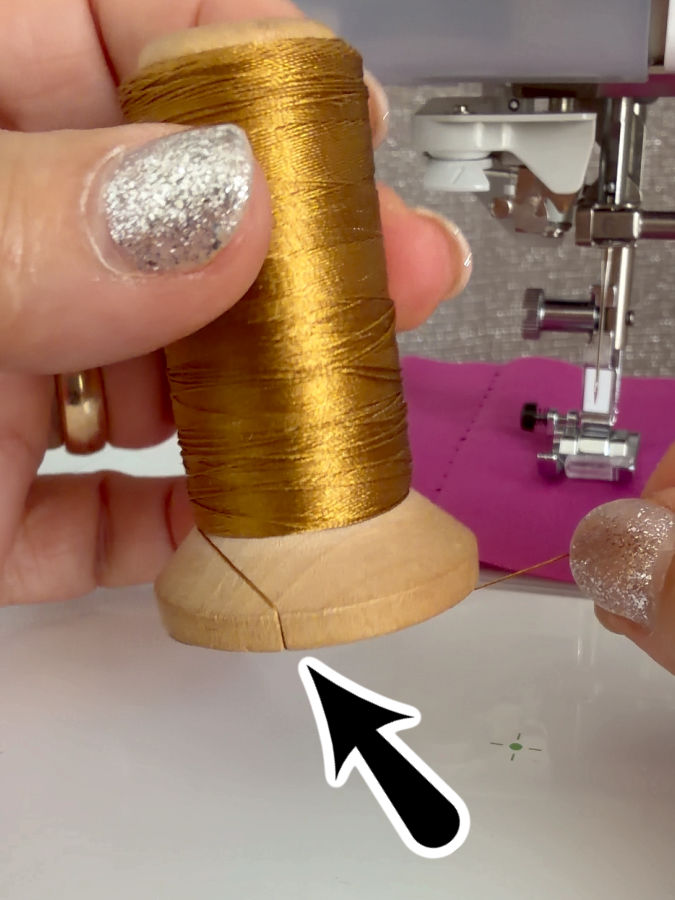
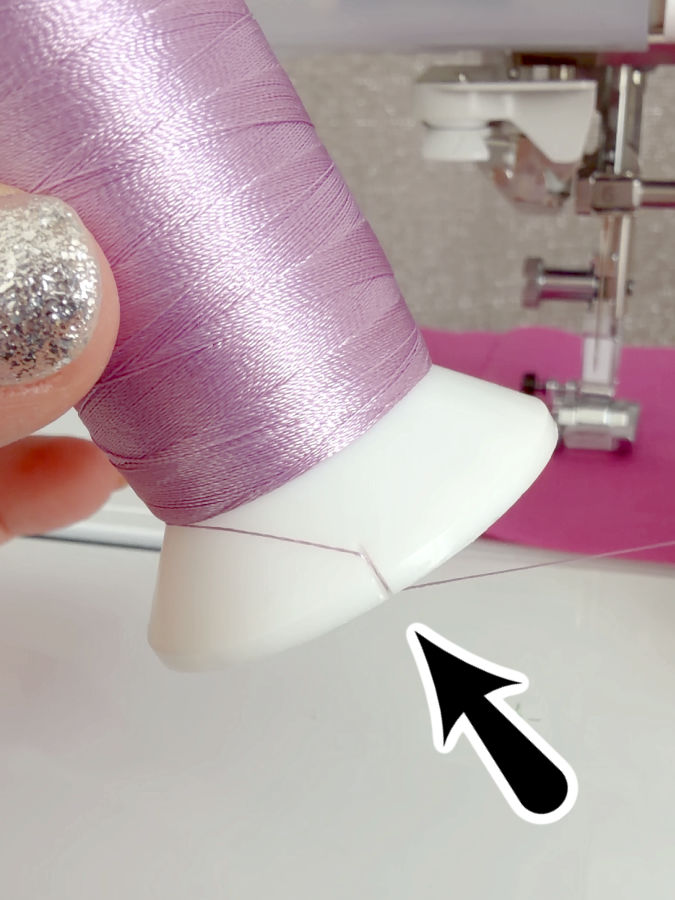
Here is another detail that is so small you can use a spool for years without really noticing it.
Look closely at the edge of the spool. See that tiny slit or cut? It is not damage, and it is not left over from manufacturing. It is there for one very practical reason: to catch the loose end of the thread and keep the spool from unraveling in storage.
I have this feature on old spools, but what surprised me is that the same idea is still used on some modern spools. Different materials, different decades, same tiny solution.
A Very Old Idea That Never Completely Disappeared
The system could hardly be simpler. When you finish sewing, pull the thread into the little cut and it stays there instead of unwinding around everything else in your thread box.
And it works. But there is a catch.
The Same Notch That Holds the Thread Can Also Catch It
Here is the part worth remembering when you put the spool on your sewing machine.
That slit doesn’t know whether you want it to hold the thread or not.
If the working thread passes close enough to the notch while you sew, it can slip into it. Suddenly the thread stops feeding freely. The tension increases. The thread may jerk, snag, or break.
And now you may start looking everywhere else for the problem.
Needle? Tension? Thread path? Machine?
Meanwhile, the culprit may be a cut in the edge of the spool that is only a few millimeters long.
✅ Related tutorial: 20+ Reasons Your Sewing Machine Thread Keeps Breaking (+ Solutions)
It is such a small thing, but this is exactly the kind of detail I am talking about in this article: something you barely notice until you know what to look for.
3. See That Tiny Gap on the Spool? It’s There for a Reason
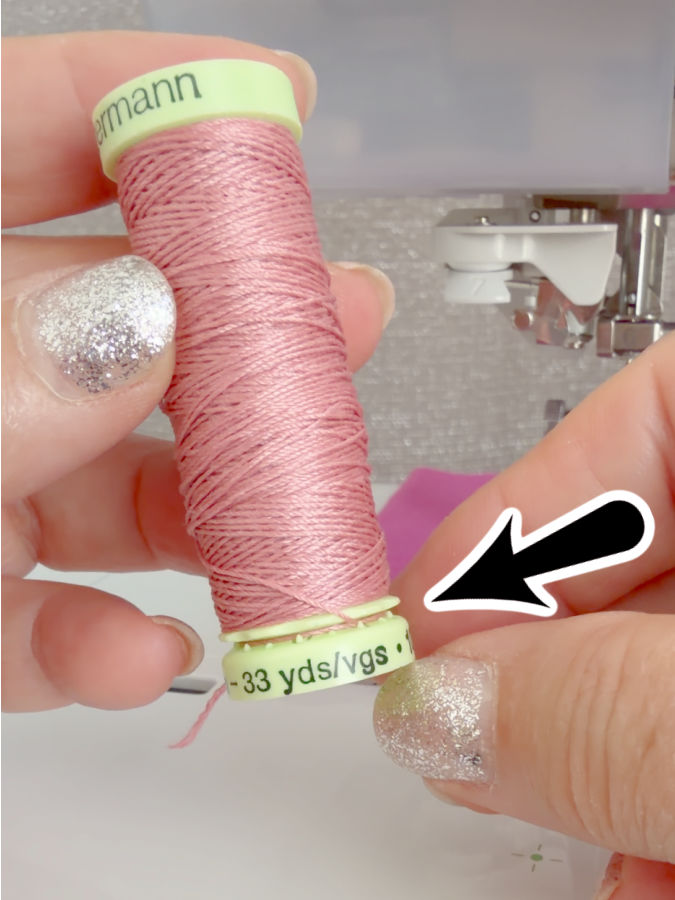
Look closely at the bottom edge of this spool. See that very narrow gap between the two plastic parts? It is easy to overlook because it looks like nothing more than part of the spool construction.
But that little gap is useful.
It is there to hold the loose end of the thread.
You simply slide the thread into the gap, and it stays in place instead of unwinding around the spool, tangling with other threads, or trailing through your storage box.
The spool itself is doing the job.
Some Spools Have a Permanent Gap
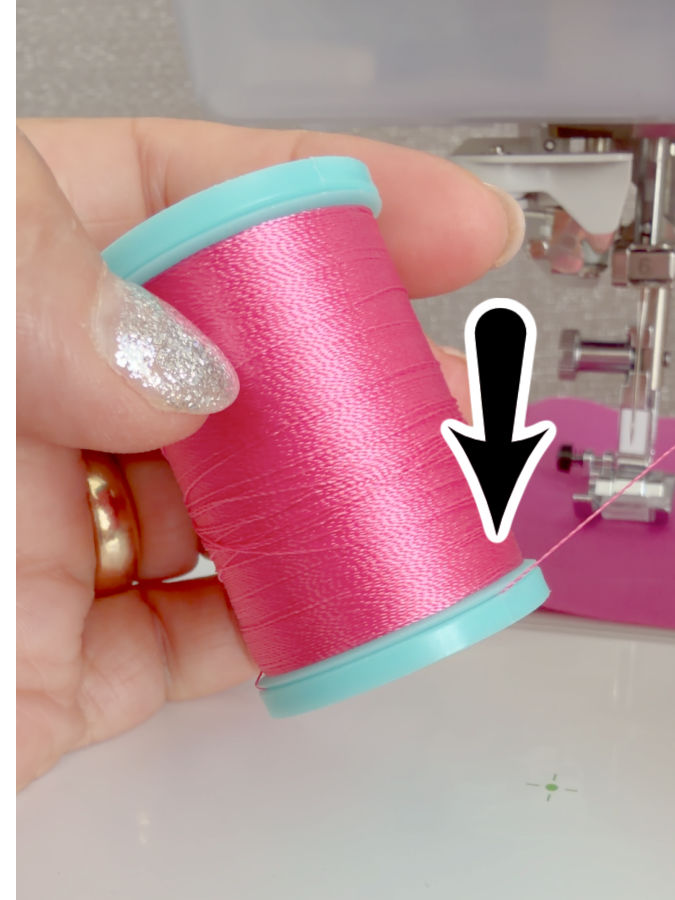
On spools like the one in my photo, you do not need to pull or open anything. The narrow space is already there between the two parts of the spool.
You just guide the loose thread into it.
It is such a simple feature that you may not even realize it was designed for that purpose.
Other Spools Make You Open the Gap First
There is another version of the same idea.
On some spools, the bottom section can be pulled out slightly. That movement creates a narrow opening. You place the thread into the gap, then push the base back into position so the thread is held between the two parts.
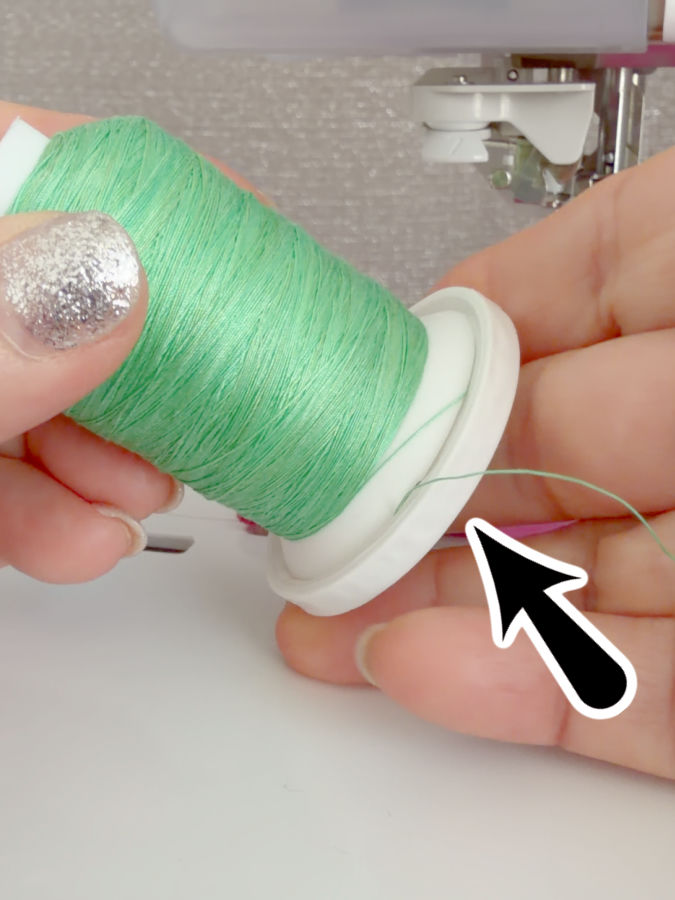
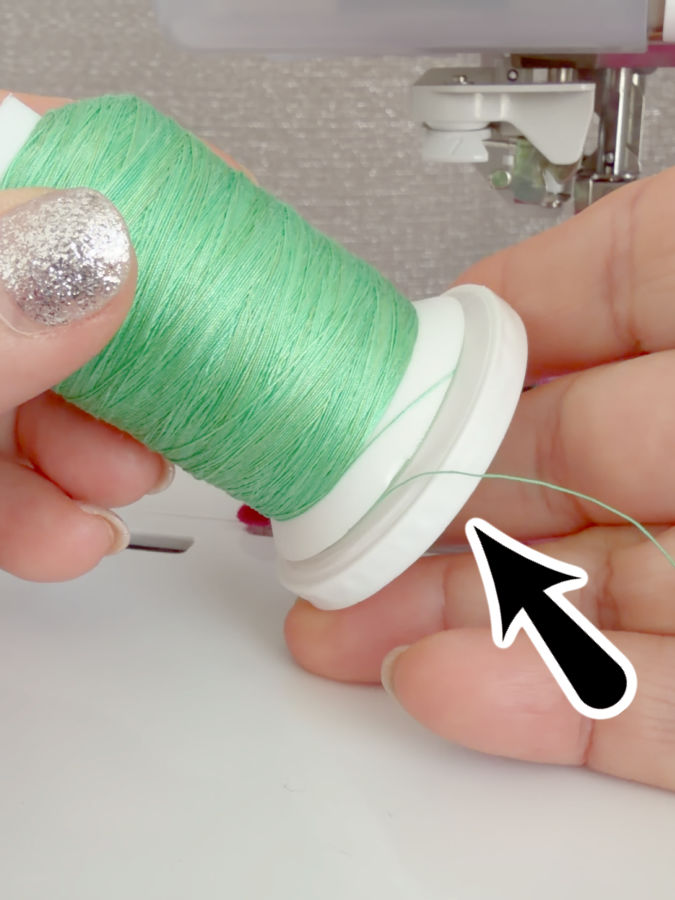
So the designs are a little different, but the purpose is the same: keep the thread end under control without cutting a notch into the spool.

Why I Like This Better Than the Little Cut
The tiny slit from the previous section works, but the thread has to be pressed into one narrow cut. If that cut is rough or very tight, it can catch the thread.
This design spreads the holding area between two plastic surfaces instead.
And with the permanent-gap type, there is nothing to pull out, move, or remember. The little space is simply waiting there whenever you need it.
It is one of those features that is almost invisible until somebody points it out.
After that, you start checking the bottoms of all your thread spools.
And you may find that several of them have been quietly holding a useful little secret all along.
4. What If the Spool Has No Thread Keeper at All?
Then you find a spool with no notch, no moving base, no little gap — nothing.
At first that may not seem important. You finish sewing, leave a few inches of thread hanging, and put the spool away. But come back later and that loose end may have wrapped itself around another spool, slipped underneath several others, or unwound enough thread to make a small mess in the drawer.
This is one of those problems that seems too minor to think about — until you have twenty spools stored together.
No Built-In Holder? I Use Hugo’s Amazing Tape

For spools like these, I use Hugo’s Amazing Tape. It is available in 1/2″, 1″and 2″ widths.
I cut a small piece, wrap it around the spool over the loose thread end, and press the tape onto itself. The thread stays in place until I need the spool again.
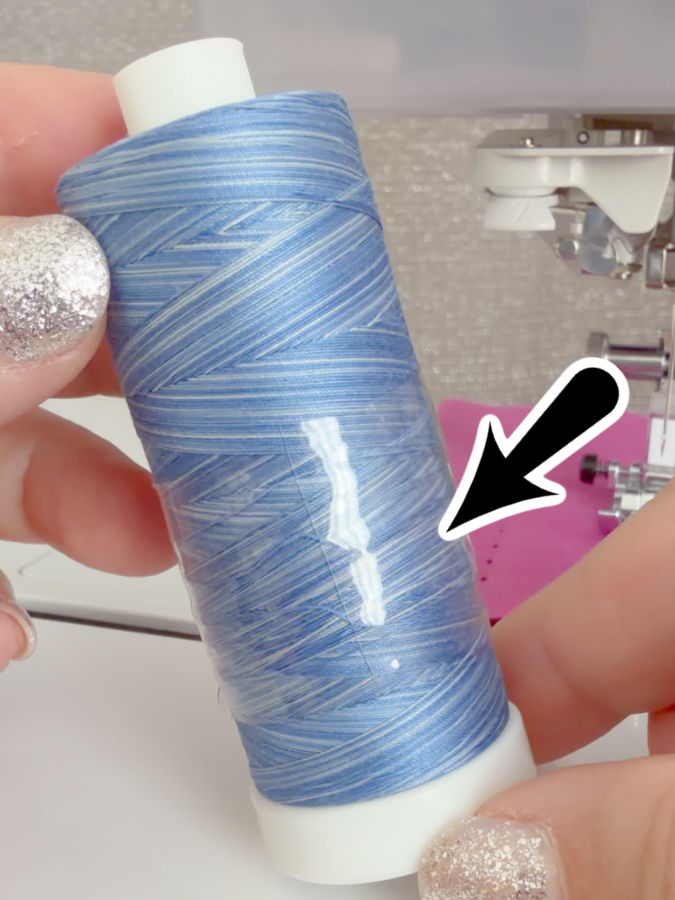
That’s all I need it to do, but it works especially well for thread because the tape clings to itself rather than relying on a sticky adhesive. I don’t want ordinary adhesive tape sitting directly against my thread, especially if the spool may stay in storage for months.
And one piece can often be used again.
✅ Related tutorial: Are These ‘Magic’ and ‘Wonder’ Tools the Secret to Sewing Perfection?
Why Not Just Use Regular Tape?
You certainly could grab whatever tape is nearby, but I don’t like the idea of adhesive touching the thread or leaving residue on the spool. Thread passes through tension discs, guides, the needle eye, and finally into the fabric. I would rather not introduce anything sticky into that path.
Hugo’s Amazing Tape is stretchy too, so one small strip can fit around different spool sizes. It holds snugly without needing to be wrapped several times.
I also like that I can see the thread through it, so the spool does not disappear under a bulky holder.
So if you look at a spool and find no clever little thread-holding feature anywhere, you don’t have to let the thread hang loose.
Sometimes the solution isn’t built into the spool.
You add your own.
✅ Related tutorial: Sewing Thread Organizers: Top Picks for Spool Racks, Spool Boxes, and Holders
5. Why Are Thread Spools Different Colors?
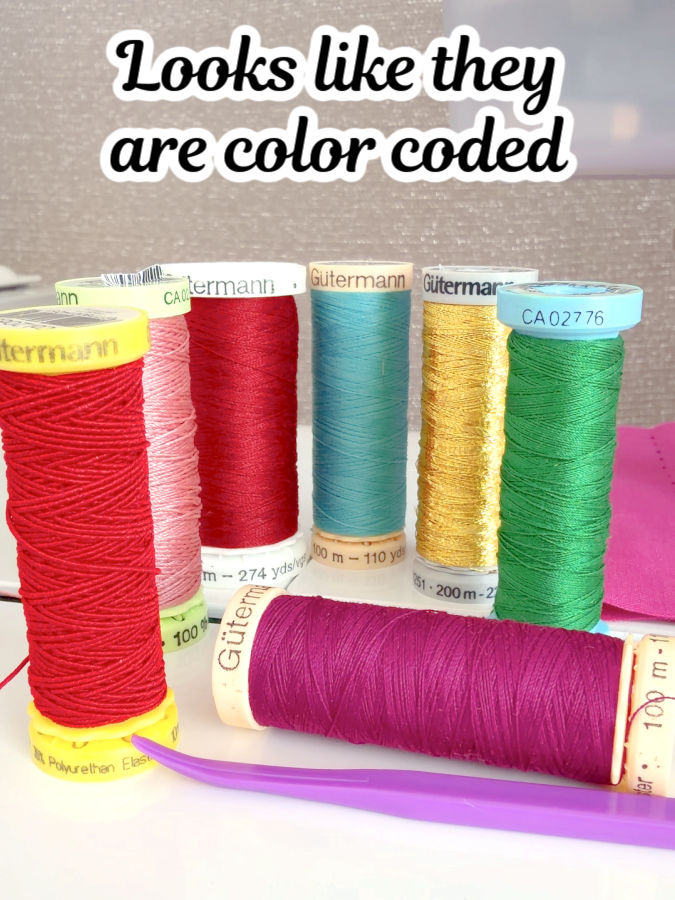
Here is another detail I used to see without really seeing it.
Look at several spools from the same manufacturer. The thread itself may be red, pink, gold or green — but now ignore the thread color completely and look at the plastic spool underneath it.
Why is one spool blue? Another beige? Another yellow or green?


Sometimes that color is telling you something.
The Plastic Color May Be Part of the Label
Thread manufacturers make many products that can look surprisingly similar once they are sitting together in a drawer. Cotton, polyester, elastic thread, specialty thread — and sometimes the easiest clue is not printed in tiny letters at all.
It is the color of the spool or its ends.
Coats & Clark, for example, has used color coding on its thread packaging to help distinguish different thread types and sizes. I can see it in my own collection. My 100% cotton Coats & Clark thread is on a light-brown spool, while my Eloflex stretch thread has blue plastic.
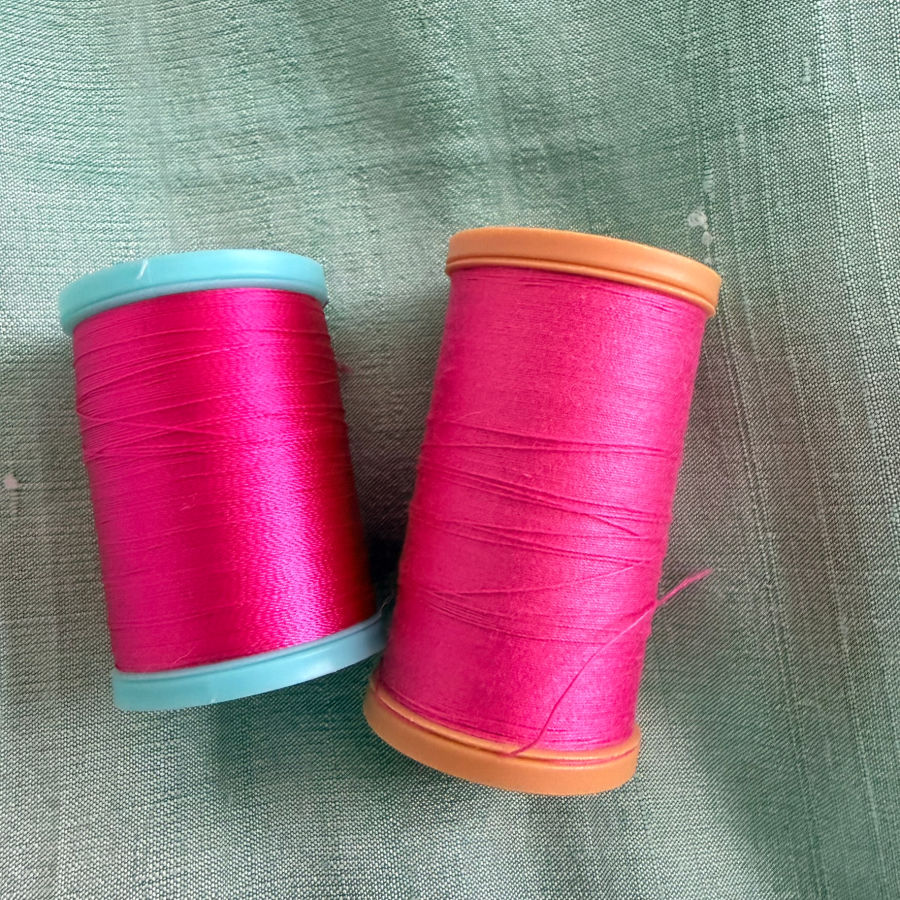
Put the two next to each other and you don’t even need to read the label to know immediately that they are not the same kind of thread.
But that made me look at my other spools more closely.
Gütermann Gives Me Even More Colors to Investigate
When I lined up my Gütermann spools, I started noticing something very specific: the plastic color often changes with the type or size of thread.
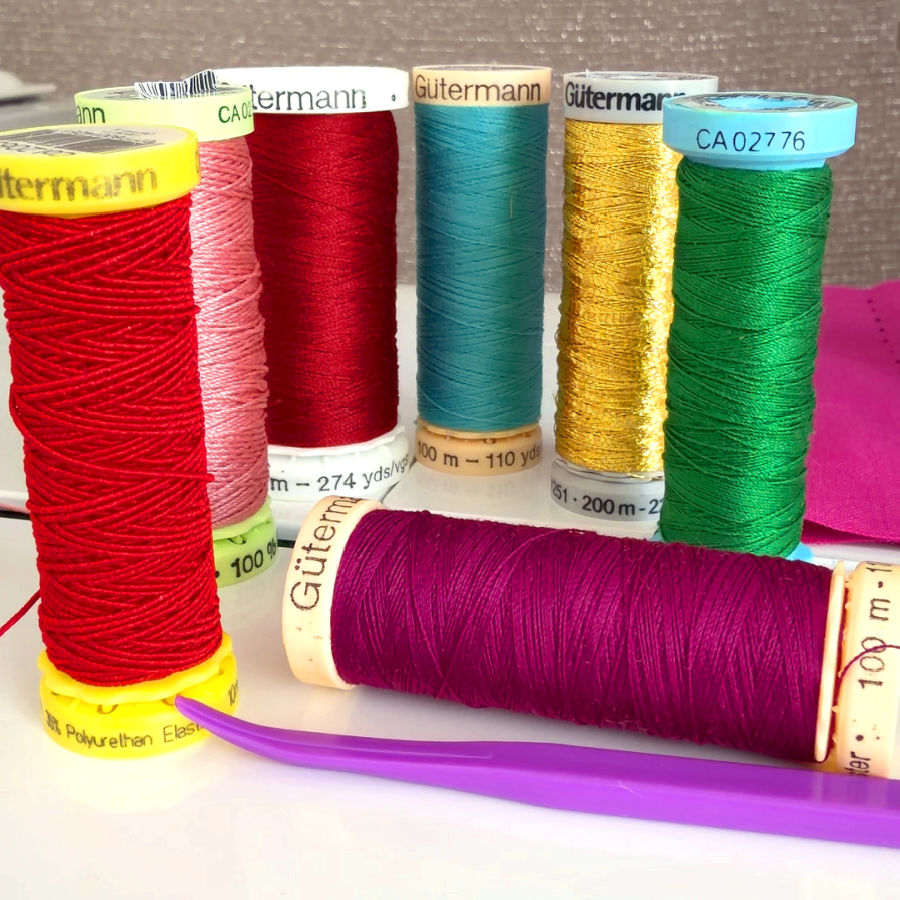
In my own collection, the cream-colored spools hold 100% polyester thread, 110 yards. I also have white spools with 100% polyester thread, 274 yards, and those are larger spools.
Then the specialty threads start getting even more interesting.
My green spool holds a thick, very strong thread. The blue spool is 100% silk. The yellow spool is elastic thread for the bobbin, and the gray spool is metallic thread.
Once I saw all of them together, the colors stopped looking random.
At a glance, I can often tell which spool is likely to be regular polyester and which one contains something more specialized before I even read the label.
But Is There an Official Gütermann Color Code?
This is where I would be careful.
From my own spools, there definitely seems to be a pattern. But I would not treat these colors as a universal rule for every Gütermann spool ever made. Packaging can change with thread type, spool size, age, and possibly market.
So I use the spool color as a quick clue.
If I see the blue spool, I know I should check whether it is silk. If I see yellow, I know it may be my elastic thread. If I see gray, I immediately think specialty or metallic.
But I still read the label before sewing.
Because the color may help you recognize the thread faster, but the label is the final answer.
6. Why Does This Part of a Gütermann Spool Come Out?
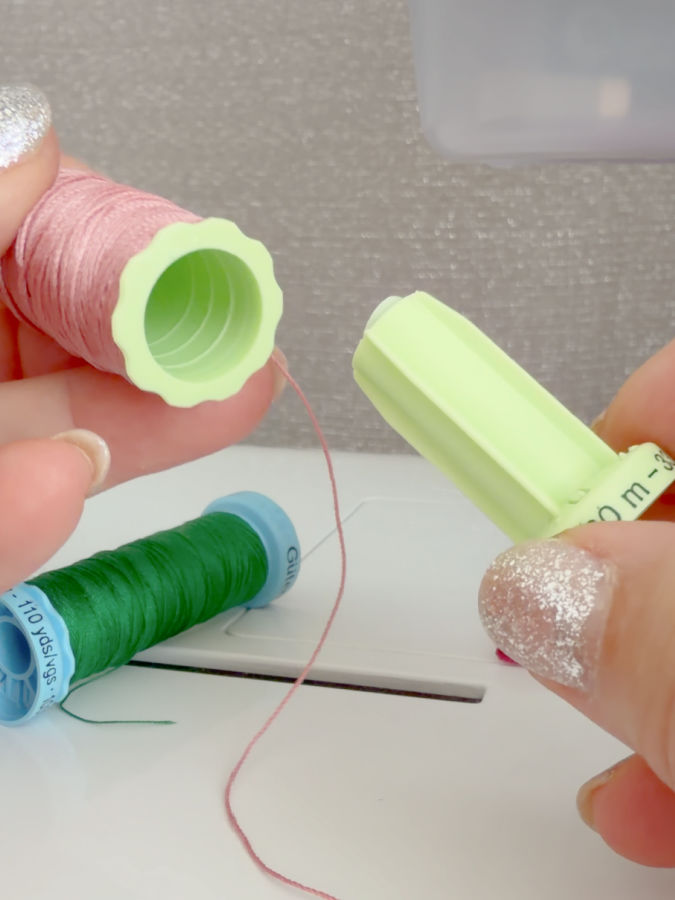
Here is one I never gave much thought to until I pulled the spool apart.
On Gütermann spools, the center piece can come completely out. Once you remove it, you are left with a surprisingly large hollow space inside the spool.
So of course I had questions.
Why make the spool in two pieces at all? Why not simply mold one spool with a narrow hole for the sewing-machine spool pin? And what are all those little ridges around the removable part doing?
There is a reason for all of it.
The Big Hollow Space Is Not There to Make the Spool Look Fuller
My first thought was probably the same one many people would have: is all that empty space there so the spool looks bigger even though there is less thread on it?
No.
The explanation goes back to how plastic thread spools were designed.
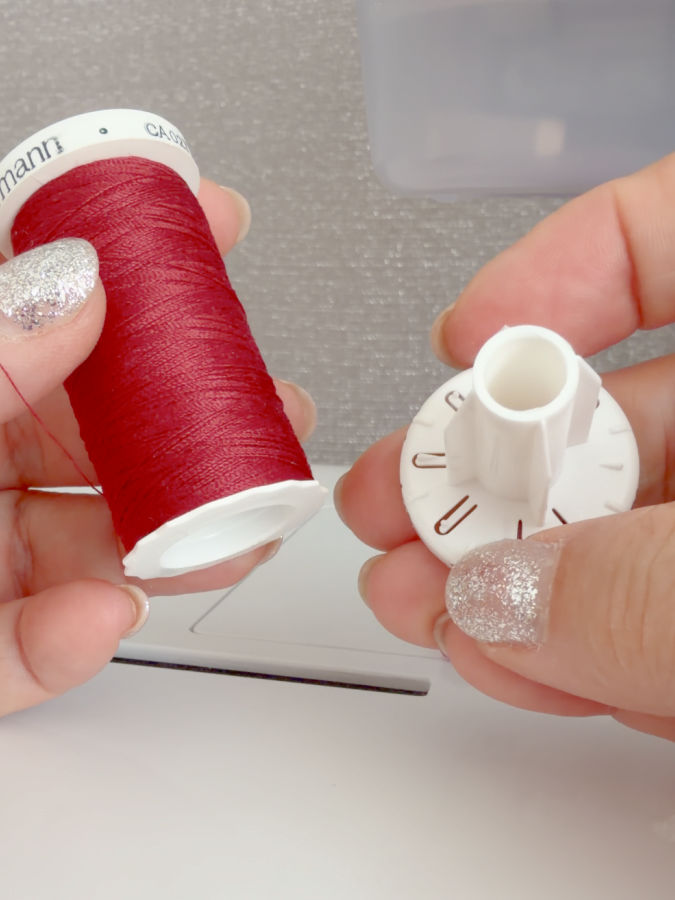
An older Gütermann patent from 1972 describes this same basic construction: a large hollow outer spool that carries the thread, plus a smaller inner tube that fits over the sewing-machine spool pin (Free Patents Online for reference).
And suddenly the strange removable piece starts making sense.
Why Not Just Make the Whole Spool With a Tiny Hole?
Traditional wooden spools were made from solid wood and simply drilled through the center. You could have a fairly wide spool on the outside and a small hole in the middle for the spool pin.
Doing the same thing in plastic would mean using a large amount of plastic just to fill space that serves no purpose.
Gütermann’s patent explains that they wanted a spool with a fairly substantial outside diameter, while the center opening still needed to be small enough to sit securely on the relatively thin spool pin of a sewing machine. The solution was to make the spool hollow and add a separate inner tubular piece (Free Patents Online).
So the removable part is not just an odd extra piece.
It is the part that gives a large hollow spool a small, properly fitting center hole.
The patent even notes that the larger outside diameter was useful for winding thread onto the spool efficiently during manufacturing (Free Patents Online).
And That Moving Piece Has Another Job
Gütermann used that same inner piece to solve another problem we already talked about: what to do with the loose end of the thread.
When the inner piece is pushed into the outer spool, its wide end meets the rim of the spool and creates a narrow groove. The thread end can be pulled into that groove and held there.
So one little plastic part is doing more than it appears to be doing.
It helps the spool fit the machine’s spool pin, and it also helps create the built-in thread keeper.
That is a pretty clever use of a piece that looks completely unimportant until you pull it out.
Why Does It Look Like a Little Flower?
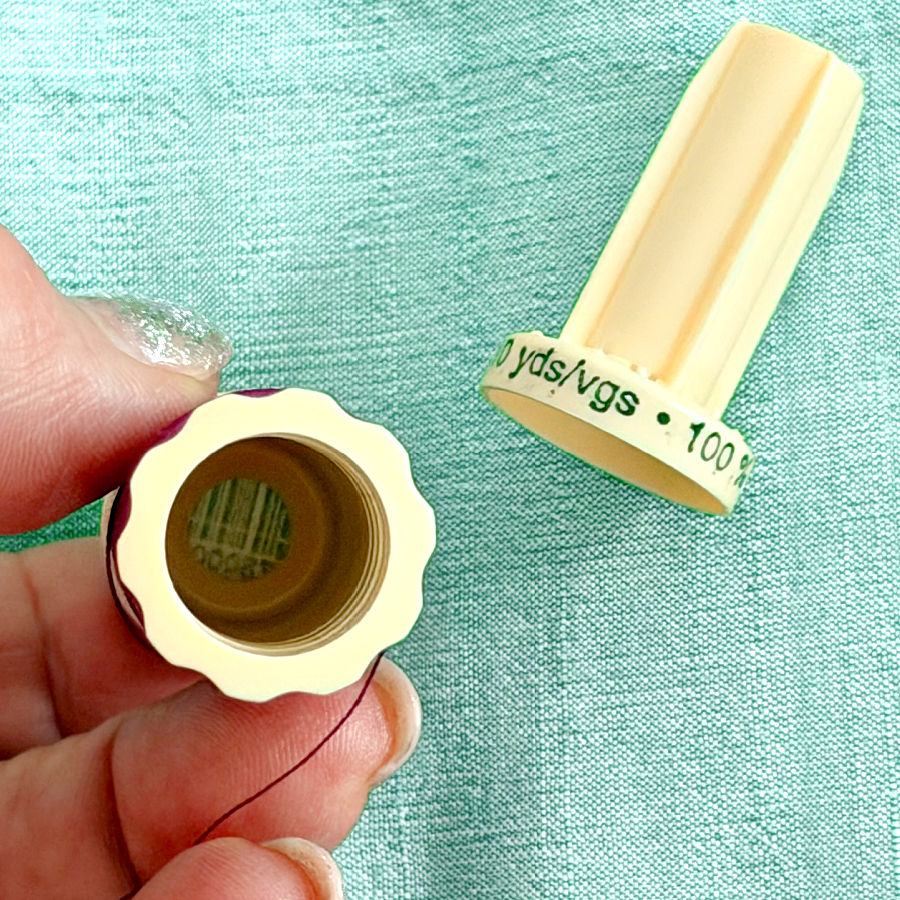
Now look closely at that removable part.
The scalloped edge and all those little ridges make it look almost decorative, but the original patent describes fins, flexible tongues, openings and small projections around this part. They help position the inner tube inside the hollow spool and help guide and hold the loose thread in the groove.
So that little flower shape is not there simply to look pretty. It comes from the way all those molded parts are arranged around the center.
My current spool does not have to be identical to the spool shown in a patent filed more than 50 years ago, of course. Designs change. But the basic idea is remarkably similar: a hollow outer spool, a smaller inner tube, supporting fins, and a movable end that can help secure the thread.
7. Why Do Some Thread Spools Have Such a Wide Bottom?
Here is another tiny spool detail that looks almost too boring to notice — until you put two spools side by side.
Look at the bottom edge. On some spools, there is barely any flange extending past the thread. On others, the base sticks out quite a bit farther.
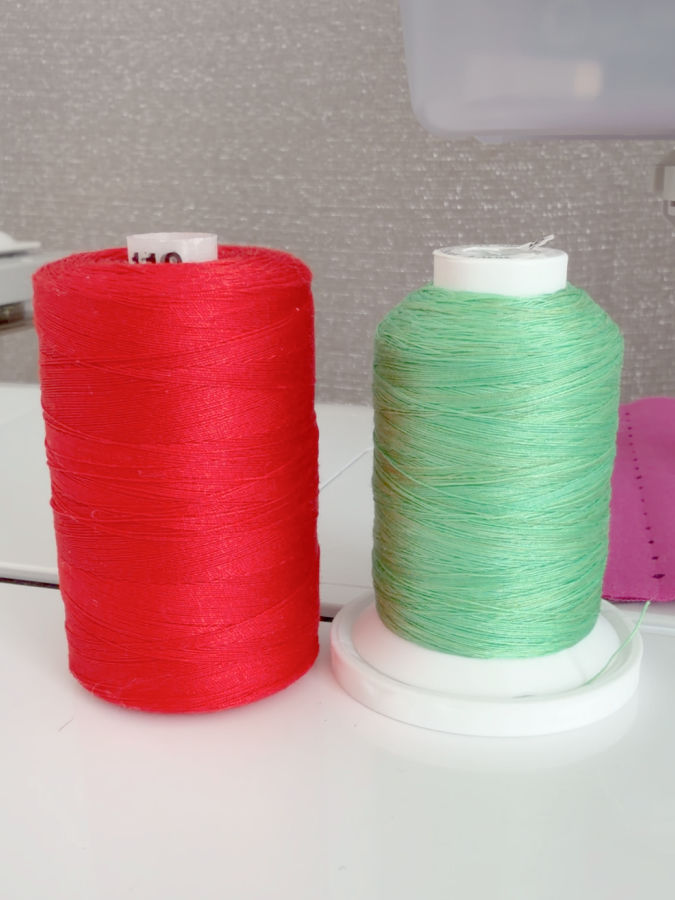
Why?
That extra plastic is not there just to make the spool look different. The shape of the bottom can affect what happens to the thread as it comes off the spool.
That Wide Flange Helps Keep the Thread Where It Belongs
One job of the flange is very simple: it helps contain and support the wound thread on the spool.
But it can also become important once the spool is on the sewing machine.
As thread feeds, especially when it is coming off the end of a spool, a loose loop can sometimes drop downward. If the bottom of the spool is very narrow, that loop has more opportunity to slip below the thread spool and get into places where you definitely don’t want it.
And one of those places is around the spool pin.
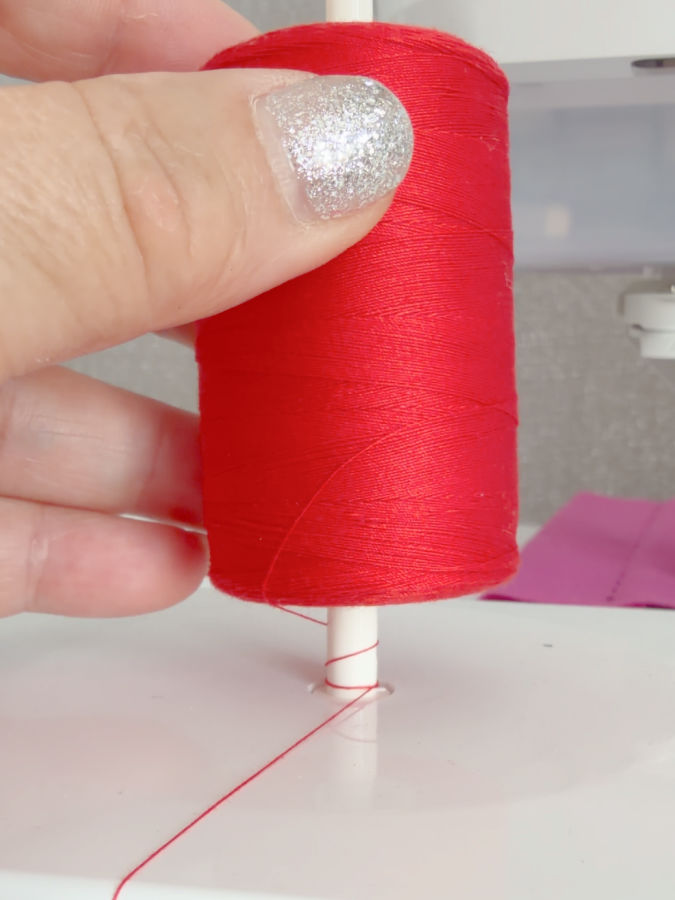
The result can look like a completely different sewing problem: sudden extra tension, jerking thread, thread breakage, or even a machine that seems to have stopped feeding the thread for no obvious reason.
So, a wide flange can help keep loose loops from dropping directly below the spool, but it is only one part of the setup.
But when you compare two spools and notice that one has almost no bottom edge while another has a broad one, now you know that difference is worth noticing.
It is not just extra plastic.
That little ledge can help keep the thread from wandering into the wrong place.
This Mattered a Lot With My First Embroidery Machine
I learned this the hard way when I bought my first embroidery machine.
At the time, I bought good-quality rayon embroidery thread made in Japan, so I had no reason to suspect the thread itself. But while the machine was embroidering, the thread kept breaking.
Again and again.
At first, I thought I had bought a bad embroidery machine.
The real problem was much smaller.
The embroidery spools I was using had very little flange at the bottom. As the thread came off the spool, loose loops could drop down and wind themselves around the spool pin. Once that happened, the thread tightened suddenly and broke.
When I switched to embroidery thread spools with a much wider bottom flange, the problem disappeared. The machine embroidered beautifully.
Nothing was wrong with the machine. Nothing was wrong with the rayon thread quality either.
The shape of the spool was the problem.
This Can Be Especially Important With Embroidery Thread
Embroidery machines often sew fast and keep pulling thread continuously for long stretches, so there are many opportunities for a loose loop to fall where it should not.
That is why I now pay much more attention to the bottom of an embroidery spool than I did when I first started.
A wider flange is not a guarantee that every thread will feed well, but in my case it made an enormous difference because it helped stop the thread from dropping around the spool pin.
It was a very small design detail with a very big effect.
And it also taught me something useful: when embroidery thread keeps breaking, the machine may not be the problem at all.
8. Look at the Surface of Your Thread — The Difference Can Be Huge
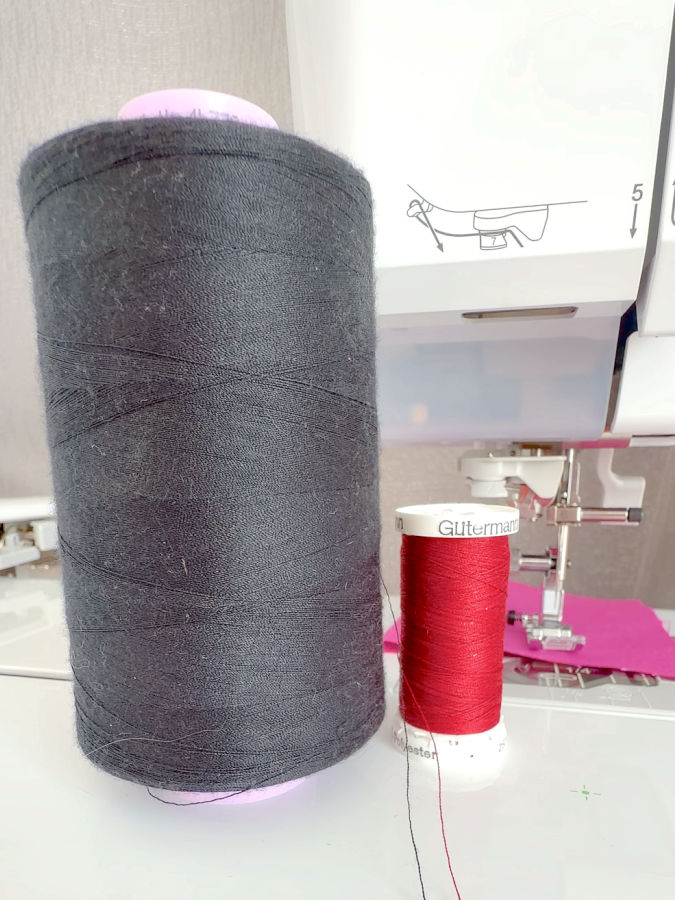
You do not always need a magnifying glass to see whether a thread has a smooth surface.
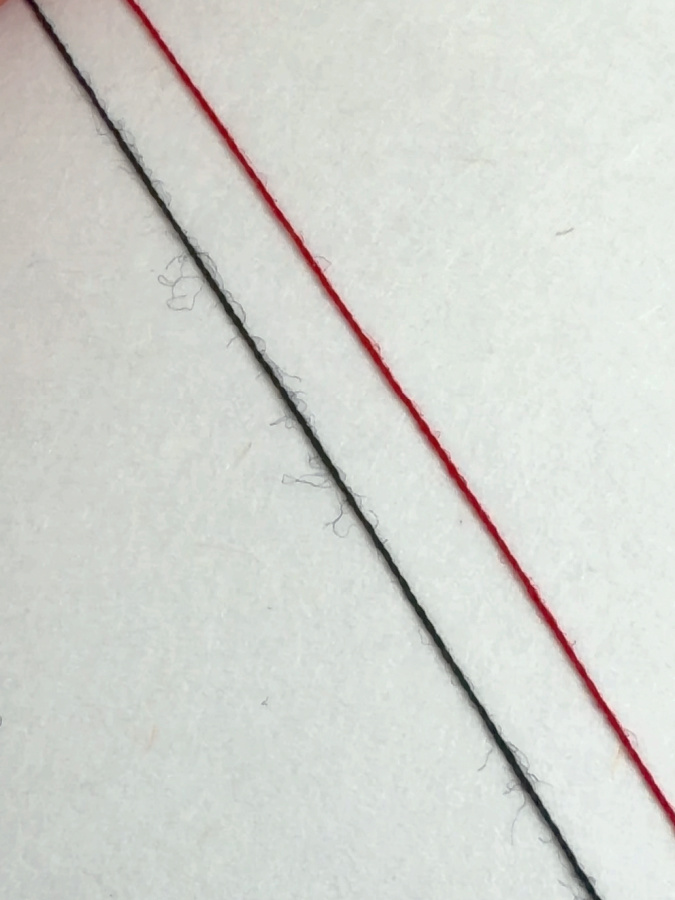
Look at these two spools in my photo. Both threads are labeled 100% polyester, but they look remarkably different. The red Gütermann thread appears smooth and even. The large black spool is covered with visible fuzz — and I can see it without zooming in at all.
That caught my attention because if both are polyester, why does one look so much hairier than the other?
Polyester Thread Is Not All Made the Same Way
“100% polyester” tells us what the fiber is made from, but it does not tell us exactly how the thread was constructed.
Polyester sewing thread can be made in different ways. Some is made from continuous filaments, which can produce a very smooth surface. Some is spun from shorter fibers. There are also corespun threads, where one type of polyester construction forms the core and another surrounds it.
So two spools can both say 100% polyester and still look and behave quite differently.
That is exactly why I like this photo. If one thread had been cotton and the other polyester, the fuzzier surface would not be particularly surprising. Here, I am comparing polyester with polyester, and the difference is obvious before the thread even reaches the sewing machine.
A Little Fuzz Is Not Automatically a Problem
Some surface fibers are normal, especially with threads made from staple fibers. A thread does not have to look completely glass-smooth to sew well.
But there is a difference between a few tiny fibers that you need magnification to see and a thread where the fuzz is clearly visible while the spool is sitting on the table.
In my photo, the black thread has many loose-looking fibers standing away from the main strand and across the surface of the spool. The red thread looks much cleaner and more uniform.
That does not mean I would declare one thread “bad” based on a photograph alone. Thread construction, intended use, finish, thickness and manufacturing method can all affect its appearance.
But it is a clue worth noticing.
Why Does Lint Matter to the Sewing Machine?
All those loose fibers have to go somewhere.
As the thread travels from the spool, through the guides and tension system, and down toward the needle, some surface fibers can come loose. Over time, that lint can collect inside the machine, especially around the needle plate, feed dogs and bobbin area.
If you sew a lot, the difference can become surprisingly noticeable.
And embroidery makes this especially interesting because the machine can run thousands of stitches in one design. A slightly lintier thread passing through the machine again and again has plenty of opportunity to leave fibers behind.
So when I am looking at an unfamiliar thread now, I don’t just read polyester, cotton, silk on the label.
I look at the thread itself.
Is the surface fairly smooth and consistent? Are there lots of fibers sticking out? Do I see uneven little lumps? Does the thread shed when I handle it?
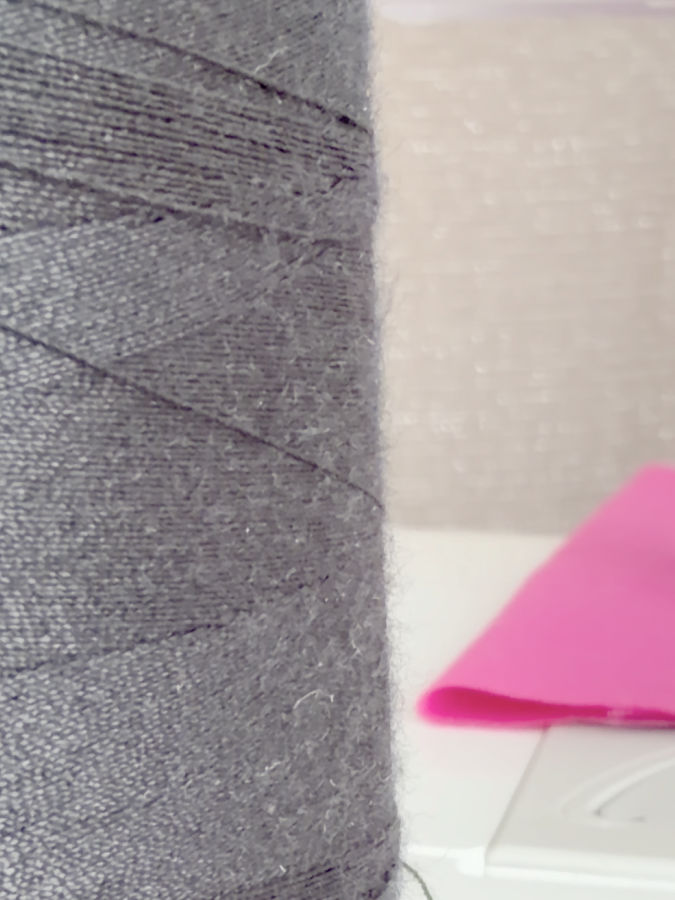
Those tiny details can tell me something the words “100% polyester” cannot.
If you found a useful thread detail here, save the pin below to your sewing board so you can find this article again when you need it. And follow me on Pinterest for more sewing tips, projects, and practical ideas.

latest posts
- Sewing Thread Secrets: 8 Tiny Details You Probably Never Noticed — But Should
- Bias Tape Tutorial: How to Make Bias Tape With a Bias Tape Maker
- 10 Easy-to-Miss Features on Sewing Supplies You Should Be Using
- Twin Needle Sewing: My First Try Was a Mess, But Here’s What Worked
- 10 Rules That Made Me a Better Sewist
- How to Make a Lightweight Summer Neck Scarf with a Lettuce Hem
- What Sewists Hate About Sewing: Common Complaints and Practical Fixes
- Knit Presser Foot: How It Works, How to Use It, and My Sewing Tests
- How to Sew Neat Mitered Corners at Acute Angles