5 Sewing Machine Bobbin Features You May Have Never Noticed
I’ve been sewing since I was a teenager, and that was a long time ago. After years of making garments, home decor, Christmas ornaments, and almost everything in between, you might think I would know it all by now.
Not even close.
I still find little things I never noticed or simply explained the wrong way in my head. This time, it started with a bobbin.

A bobbin looks so simple—a tiny spool with thread. But look closer, and there is more going on than you might expect. Here are the bobbin features that surprised me most.
Prefer to read without ads?
I created a PDF version of this guide for anyone who likes to keep sewing guides saved, printed, or easy to read without ads. It includes the same helpful information in a simple format you can download and use whenever you need it. You will in fact receive printable PDFs of two of my articles, this one and 20 Sewing Tips You Didn’t Know 5 Minutes Ago.
The PDFs are available in my shop for a small fee. It’s a nice option if you want to support my work and keep this tutorial close to your sewing machine.
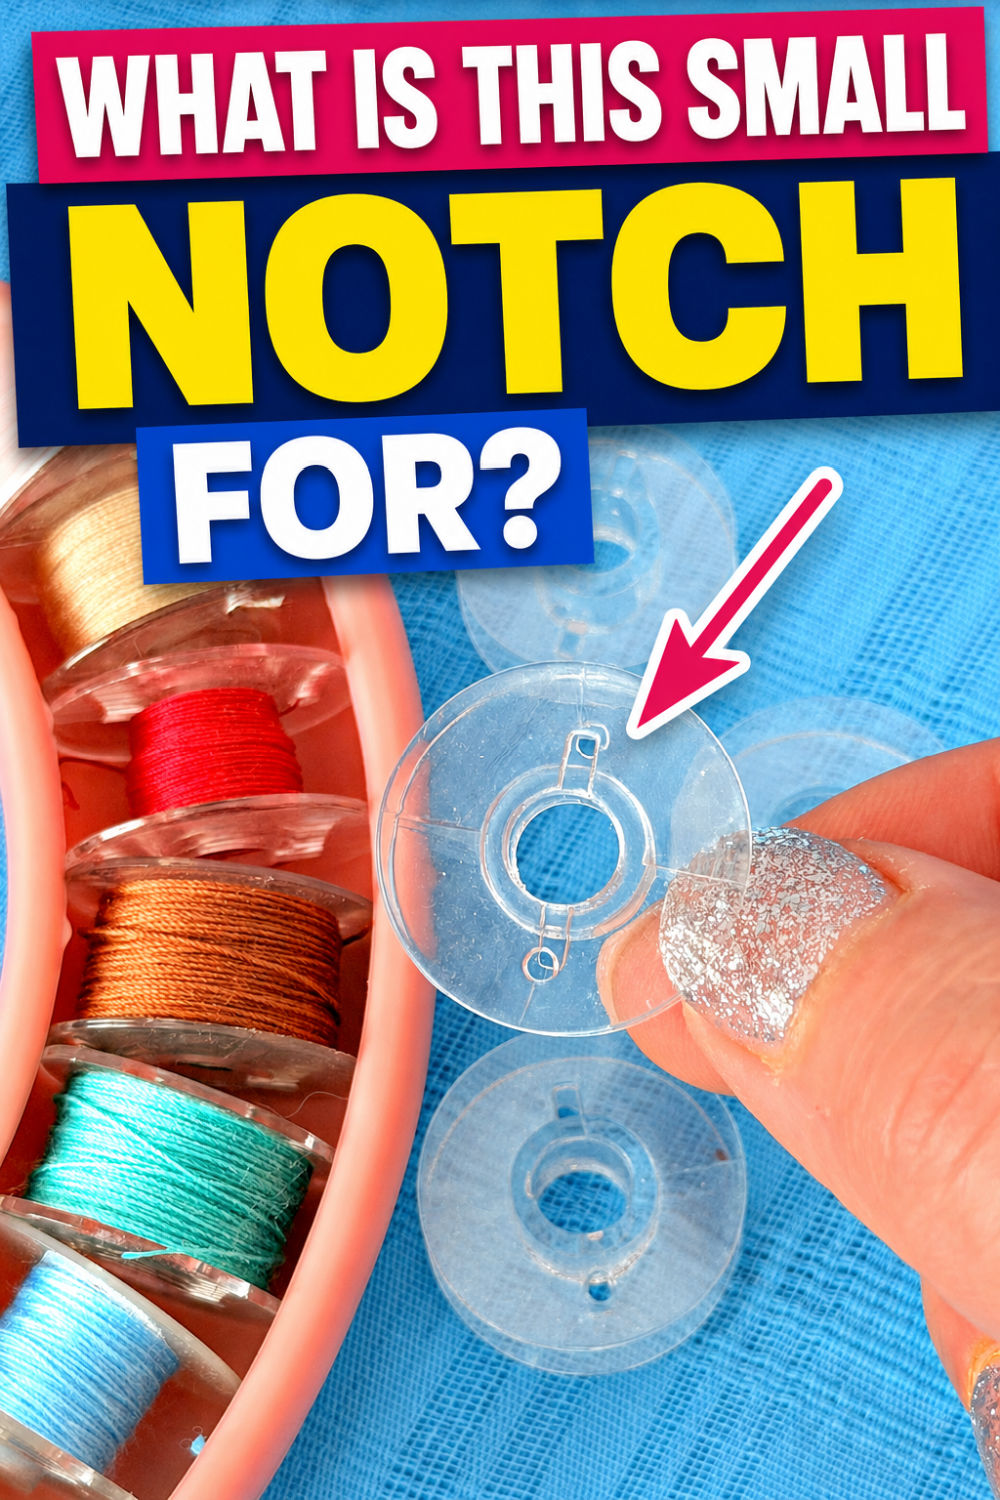
#1. The Small Notch Inside the Bobbin
I used bobbins for years and never paid attention to this tiny detail. Then one day I suddenly noticed it—and now I want you to look at your bobbins and notice it too, because it’s there for a reason.
Look inside the center opening of a clear plastic bobbin. Do you see that small rectangular notch?
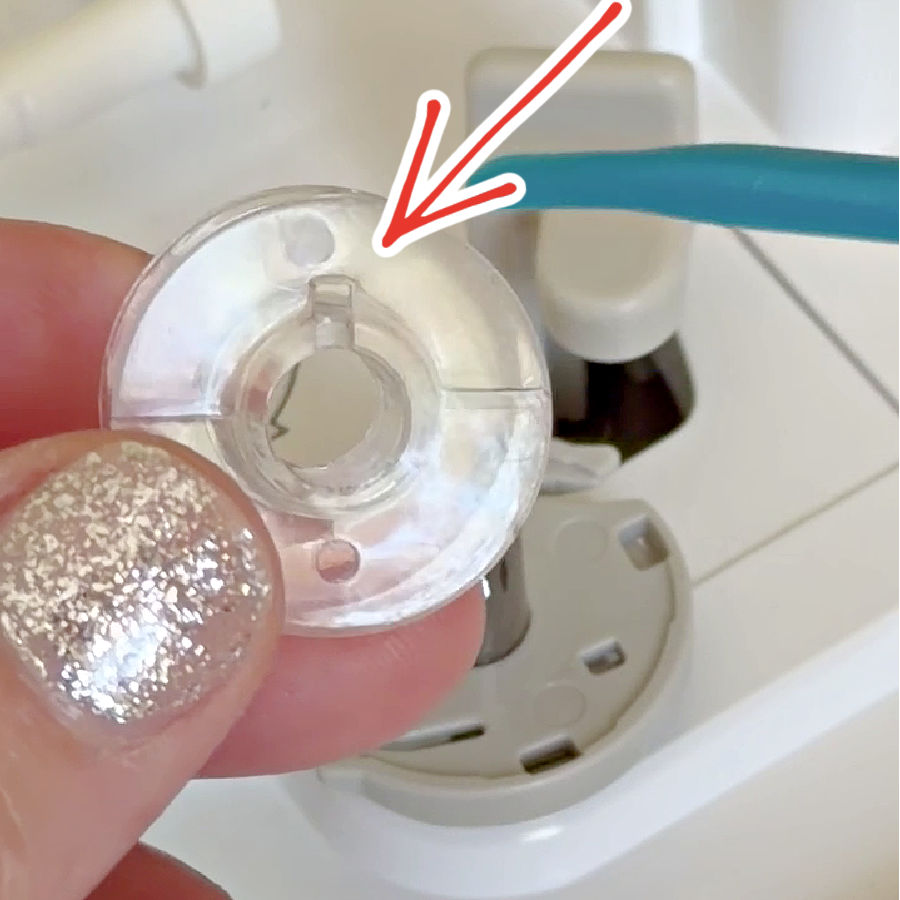
It isn’t a crack, a missing piece, or a tiny manufacturing mistake. That notch must line up with the small spring or projection on the bobbin-winder shaft.
Place the bobbin on the shaft, press it down, and turn it slightly until the spring enters the notch. Now the shaft can grip the bobbin and spin it while the thread winds.
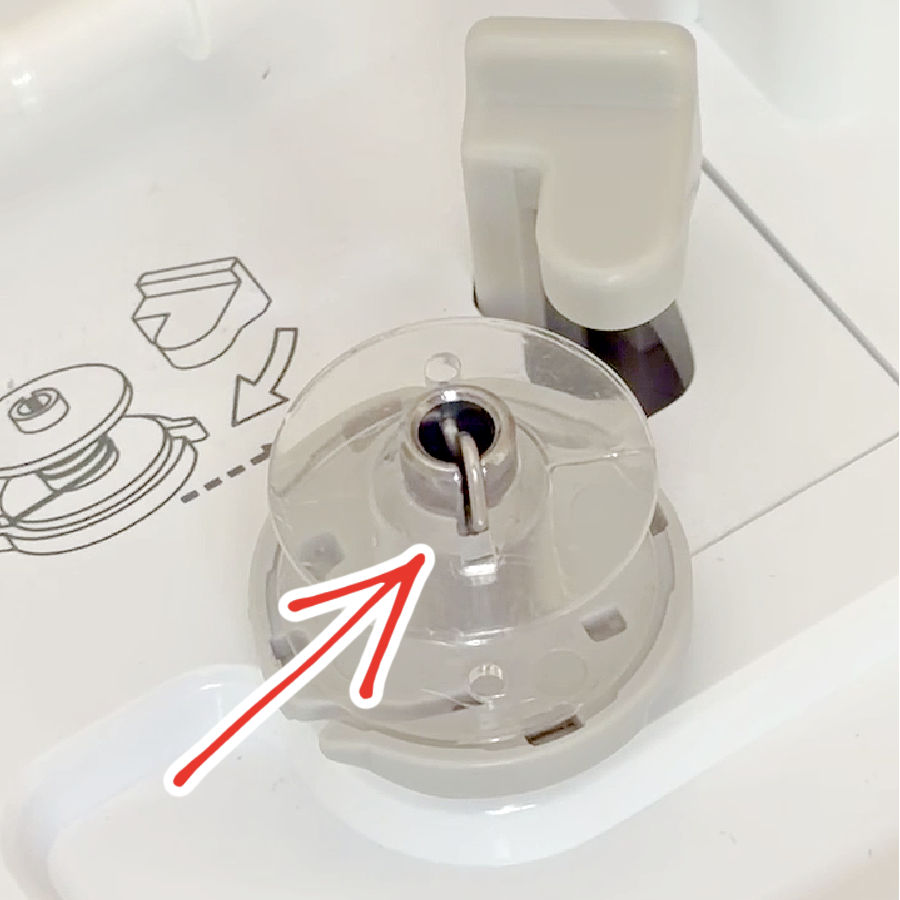
Now, I admit that I have wound bobbins without checking this, and they still filled with thread. Most likely, the bobbin moved into place on its own—or friction kept it turning. But aligning the notch gives the shaft a better grip and helps the bobbin turn securely while it fills.
So no, that tiny rectangle isn’t a defect, or an indentation caused by the fabrication method. It is more like a little parking spot for the spring and it has a functional role.
Such a tiny detail, and I had looked at it countless times without really seeing it. Take a close look at your own bobbins. Did you know what that notch was for?
✅ Related tutorial: Common Sewing Machine Bobbin Problems And Solutions (+Videos)
#2. The Tiny Diagram Beside the Bobbin Winder
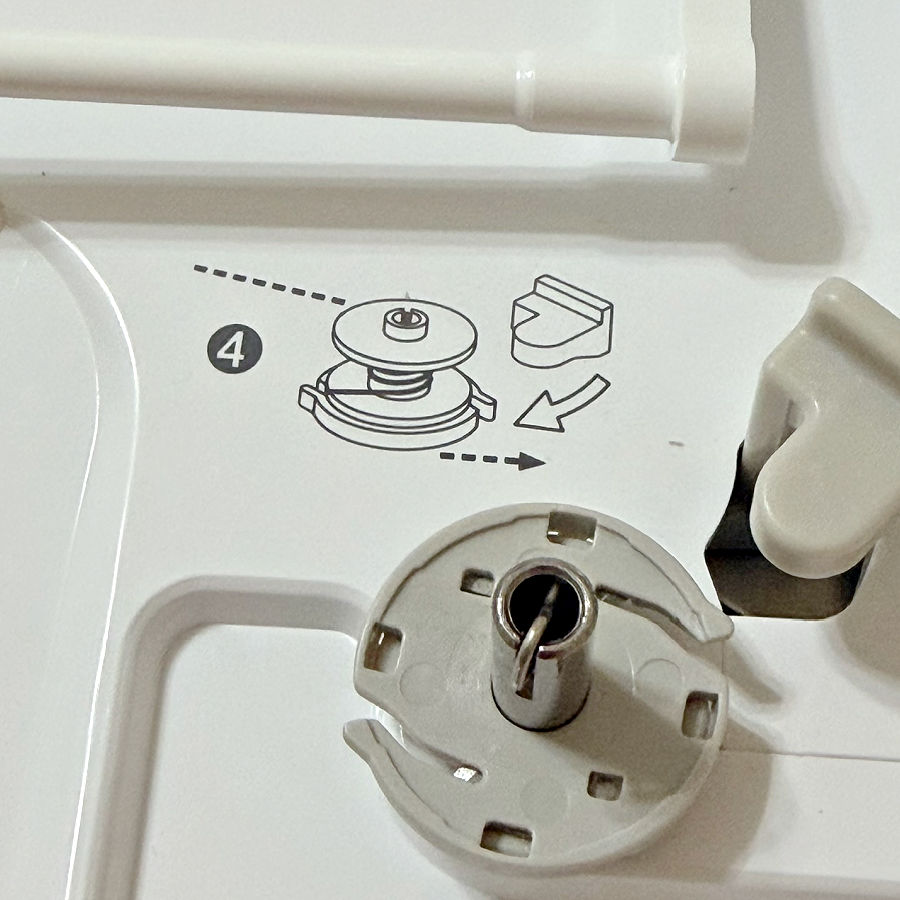
I’ve had this sewing machine for six years, and this tiny diagram had been right in front of me the whole time. I had looked at it countless times without really seeing it.
Then one day I finally paid attention so I looked in the manual. I know, I should have done what I preached in the first place (read the manual before)!
The diagram shows a simpler way to start winding a bobbin. Instead of passing the thread through the small hole in the bobbin, you wrap the thread around the bobbin in the direction shown on the machine.
That was a surprise to me. I had always used the little hole because that was how I learned to wind a bobbin. Meanwhile, my machine had been quietly showing me another method for six years.
Of course, not every machine uses the same system, so check the diagram or instructions for your model. But take another look at the markings beside your bobbin winder. You may find that your machine has been trying to tell you something too.
✅ Related tutorial: Bobbin Thread 101: Answers to Your Frequently Asked Questions
#3. The Built-In Bobbin Thread Cutter
What else did I notice in that tiny diagram? Apparently, my bobbin winder has its own built-in thread cutter!
I had never used it because I always started the bobbin the traditional way—by putting the thread through the small hole in the bobbin. With that method, there was no reason to cut the thread before winding.
But with the method shown in the diagram, the thread is wrapped around the bobbin first. Then it is pulled into the narrow slot beside the bobbin winder, where a tiny blade cuts the loose end close to the bobbin.
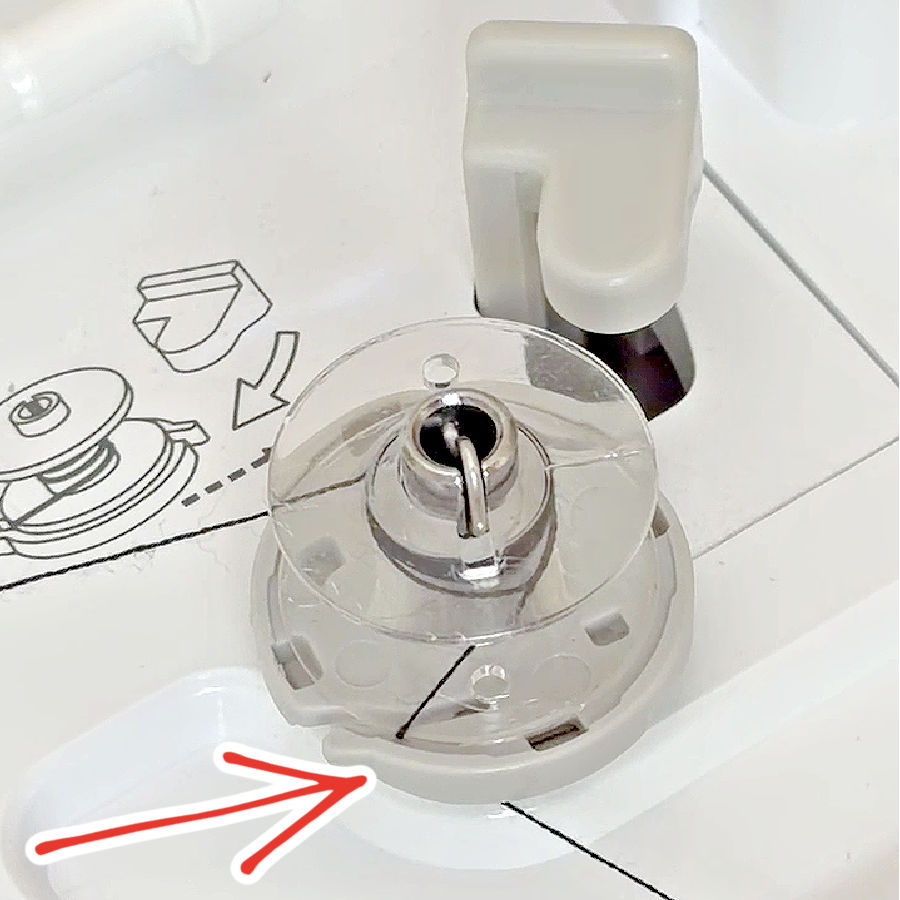
So the diagram was showing me the whole process: wrap the thread around the bobbin, pull it into the cutter, and start winding. Six years later, I finally understood what those little lines meant.
✅ Related tutorial: Top Bobbin Thread Holders and Organizers
How to Wind a Bobbin This Way
Once I finally understood that little diagram, I had to try the method for myself. It turned out to be simpler than pushing the thread through the tiny hole in the bobbin and holding the end while the first few turns formed.
This is how it works on my machine. Bobbin winders are not all the same, so follow the markings and instructions for your model.
Step 1: Place the spool of thread on the machine
Put the spool on the spool pin and secure it with the correct spool cap, if your machine uses one.
Step 2: Follow the bobbin-winding thread path
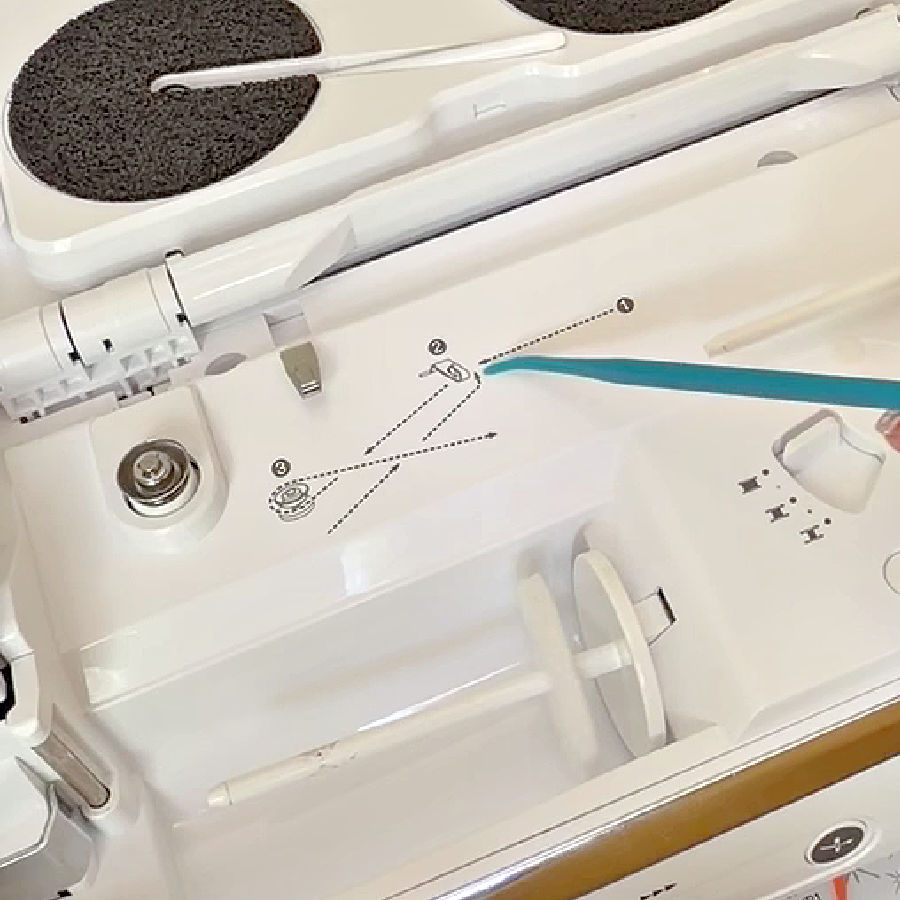
Guide the thread around the parts marked for bobbin winding. Make sure it slips firmly into the bobbin-winding tension guide or pretension disk.
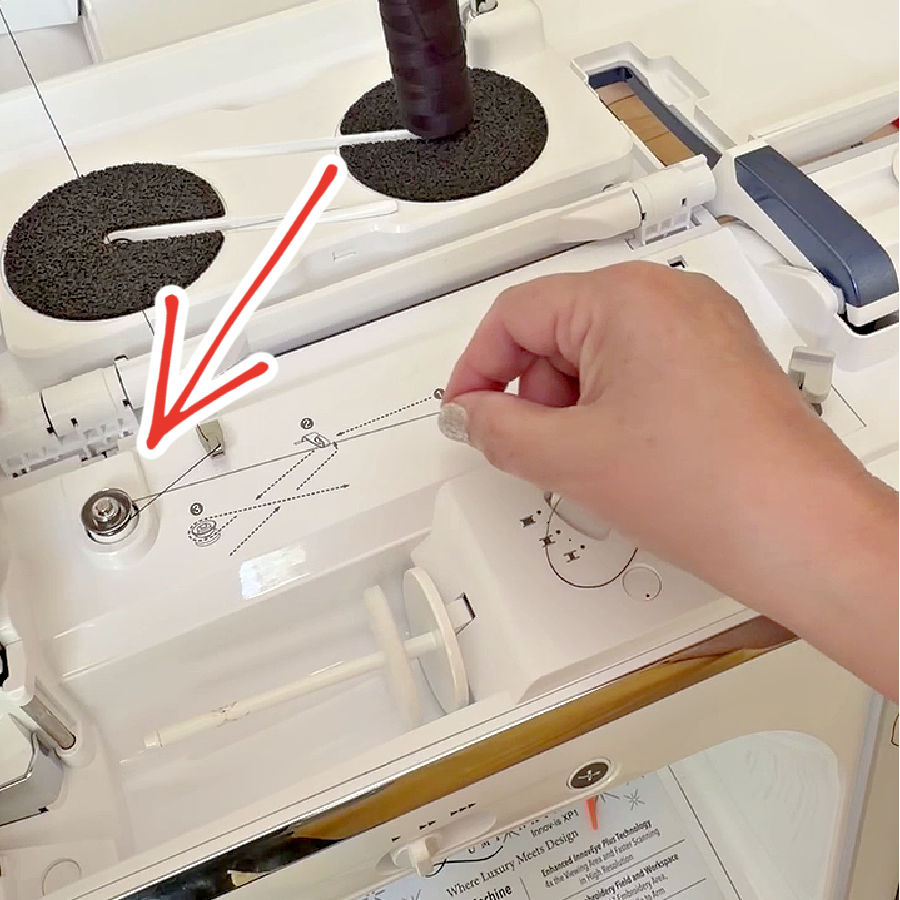
This part matters. If the thread misses the tension guide, the bobbin may fill loosely or unevenly.
Step 3: Position the empty bobbin
Place the bobbin on the winding shaft. Press it down and turn it slightly until the small notch inside the bobbin lines up with the spring on the shaft.
Then move the bobbin-winder shaft into the winding position.
Step 4: Wrap the thread around the bobbin
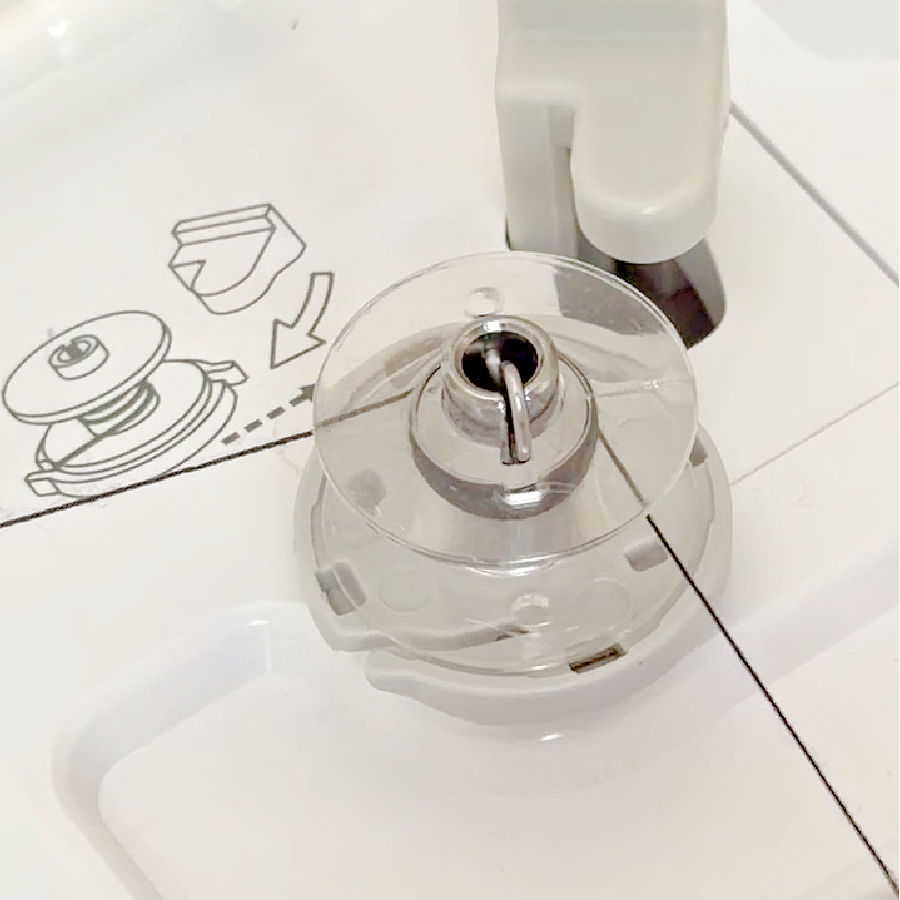
Instead of putting the thread through the small hole, wrap it around the center of the bobbin several times in the direction shown by the diagram.
Keep the wraps neat and close together. They only need to hold the thread firmly enough for the winding to begin.
Step 5: Use the built-in cutter
Follow the printed line beside the bobbin winder and pull the loose thread end into the narrow cutting slot.
The small blade inside trims the tail close to the bobbin.
Step 6: Start winding
The thread should begin filling the bobbin smoothly and evenly. Stop when the bobbin is full. Modern machines stop automatically when the bobbin is full.
Step 8: Remove the bobbin
Move the winding shaft back to its sewing position, lift off the bobbin and cut the thread connecting it to the spool.
And that’s it. The tiny diagram I had ignored for six years was showing me the entire process: wrap the thread, pull it through the cutter and begin winding.

#4. The Low-Bobbin Thread Sensor
Some time ago, I asked my followers this question: What sewing machine feature would you most like to have but don’t have yet?
Many people gave the same answer—a warning that tells them when the bobbin thread is running low.
And I understand why. Running out of bobbin thread in the middle of topstitching is especially annoying. You may finish a beautiful straight line, turn the fabric over and discover that the last few inches have no stitches at all.
A machine with a low-bobbin thread sensor gives you a warning before the bobbin is completely empty. On many machines, an optical sensor uses light to monitor the amount of thread remaining on the bobbin. When the level gets low, a message appears on the screen.
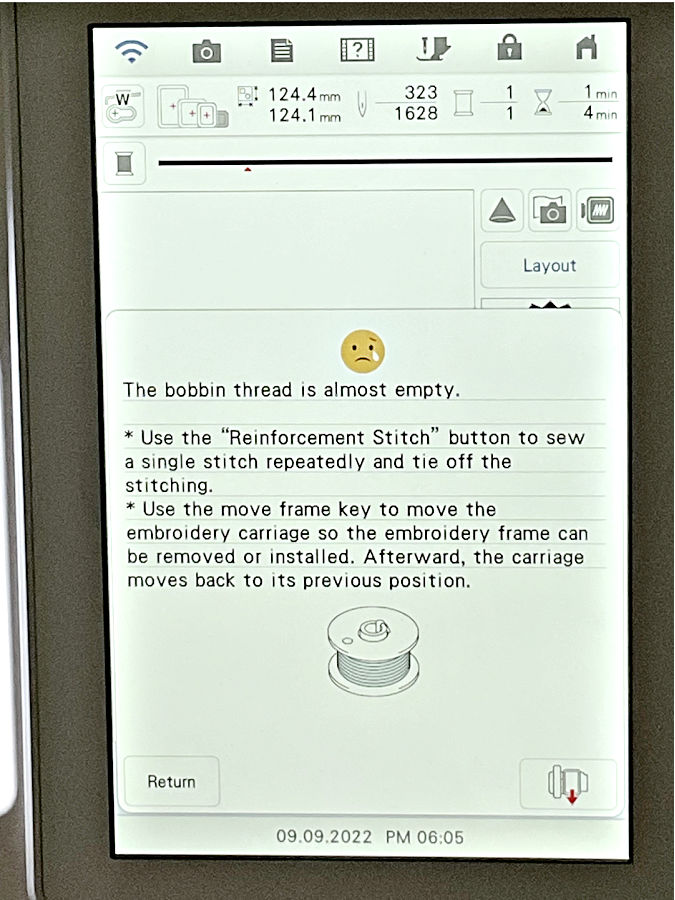
You will still run out eventually—the sensor cannot refill the bobbin for you—but at least you get some warning. You may decide not to start that long row of topstitching. If you are already sewing, you might have enough thread left to finish the short section. Or you can stop at a good place, secure the threads properly, insert a full bobbin and continue.
Not every sewing machine has this feature, but after running out of bobbin thread at the worst possible moment a few times, it is easy to understand why so many sewists want it.
✅ Related tutorial: I Went From a Basic Singer to a Brother Luminaire — The Shock Was Immediate
#5. The Interchangeable Bobbin Case
For a long time, I thought a drop-in bobbin meant exactly that: drop in the bobbin, close the cover and forget about everything underneath it.
But the bobbin sits inside another removable part. Depending on the manufacturer, it may be called a bobbin case or a bobbin holder. And on some sewing and embroidery machines, you can replace it with a different one.
Why would anyone need two bobbin cases? After all, they appear to be identical. Well, that is the key here: they appear to be, but probably they are not identical.
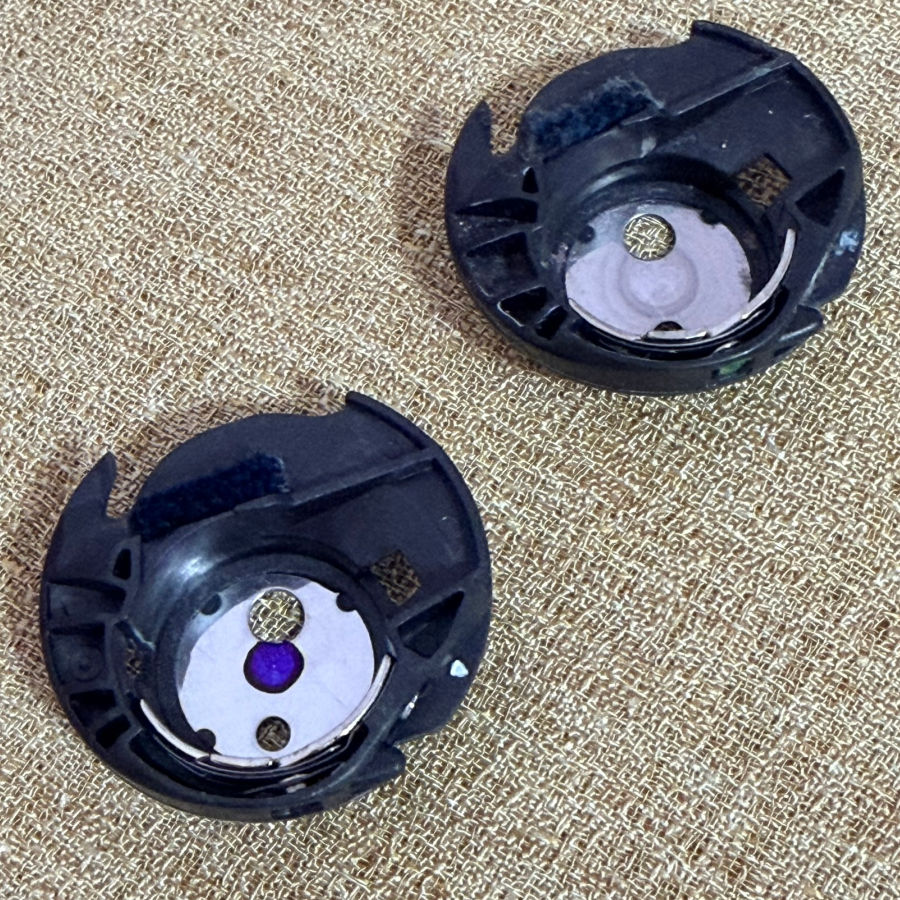
Because the bobbin case controls the tension on the lower thread. As the thread leaves the bobbin, it passes under a small tension spring. The pressure from that spring determines how easily the thread feeds while you sew.
The standard bobbin case is usually adjusted at the factory for ordinary sewing and the recommended bobbin thread. But some machines include—or allow you to buy—another bobbin case with a different tension setting.
On certain models, the alternate case is set to a lower tension. The colors and markings are not universal, so the machine manual is the place to check what each one means.
✅ Related tutorial: Sewing machine tension guide: everything you need to know about the bobbin tension
Why use a second bobbin case?
Having a separate case lets you change the bobbin tension for a special job without disturbing the factory setting on your regular one.
Some specialty bobbin-work cases even have a separate slot that allows thick decorative thread or yarn to bypass the normal tension spring.
This makes much more sense than turning the tiny tension screw on the regular bobbin case, forgetting how far it moved and then trying to restore the original setting by memory.
Look for markings
If your machine came with more than one bobbin case, the cases may look almost identical. Look closely for:
- A colored dot or painted screw
- A small letter or symbol
- A different-colored mark inside the case
- A label on the accessory package
Do not assume that one marked case can be used the same way as another.
Also, use only a bobbin case made for your exact machine model. A case that looks similar may have a different shape, height or tension system.
Now take a look in your accessory box. Is there a second little bobbin case hiding in there? You may have wondered why the machine came with what appeared to be a spare. It might not be a spare at all.
Did this article tell you something you did not know, or may have overlooked? If so, save this pin (see below) on your sewing board so you can come to this tutorial later, and follow me on Pinterest for more tips, tutorials, and inspiration!

latest posts
- 10 Rules That Made Me a Better Sewist
- How to Make a Lightweight Summer Neck Scarf with a Lettuce Hem
- What Sewists Hate About Sewing: Common Complaints and Practical Fixes
- Knit Presser Foot: How It Works, How to Use It, and My Sewing Tests
- How to Sew Neat Mitered Corners at Acute Angles
- Sewing Machine Needle Organization: A Clever System I Tried
- DIY Car Armrest Organizer: Sewing Tutorial
- Easy DIY Potholder Sewing Tutorial: Better Shape, Better Grip, Smart New Design
- How to Buy a Sewing Machine (Even If You Already Have 10)