
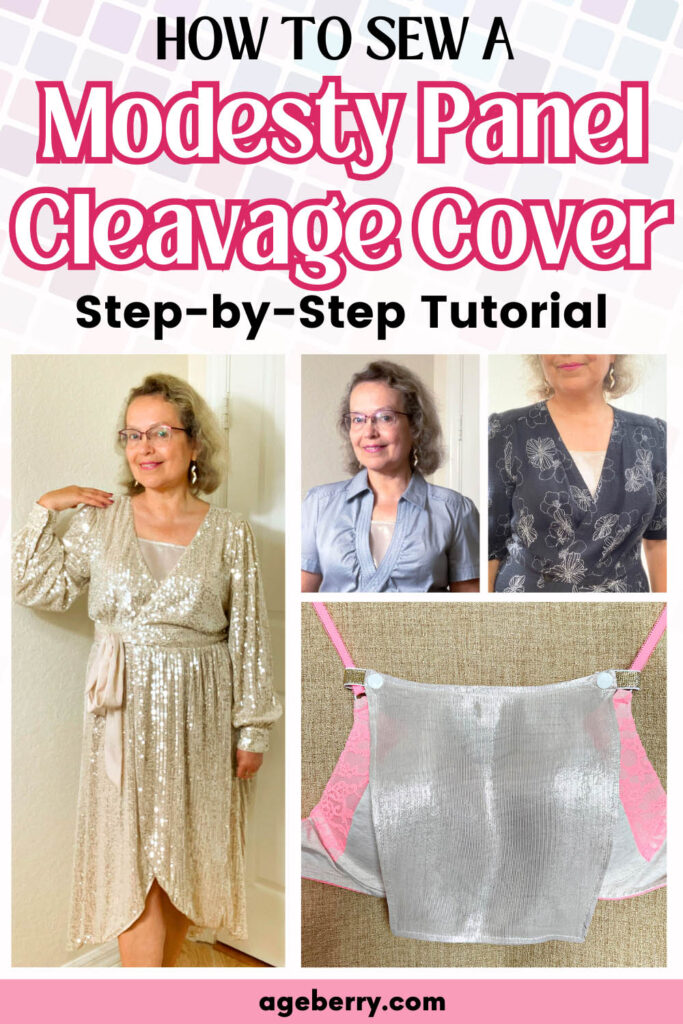
How to Sew a Modesty Panel Cleavage Cover: Step-by-Step Tutorial
If you are someone who enjoys wearing low-cut tops or dresses, but would prefer to cover up more, then you might be interested in learning about modesty panel cleavage covers.
Prefer to read without ads?
I created a PDF version of this tutorial for anyone who likes to keep sewing guides saved, printed, or easy to read without ads. It includes the same helpful information in a simple format you can download and use whenever you need it.
The PDF is available in my shop for a small fee. It’s a nice option if you want to support my work and keep this tutorial close to your sewing machine.
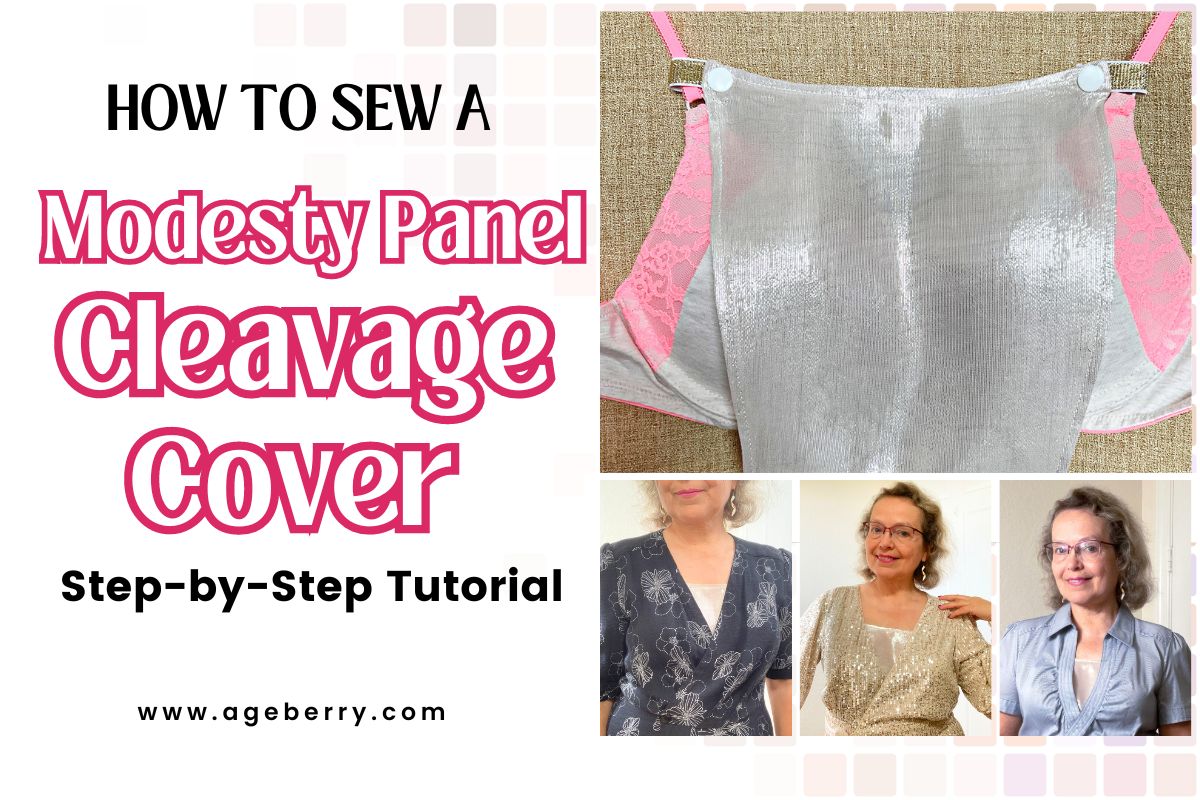
What is a Modesty Panel Cleavage Cover for a Low Cut Dress
These handy accessories are designed to provide extra coverage to the chest area, without adding bulk or discomfort. A cleavage cover typically attaches to the bra straps or sits comfortably inside the top to cover the chest area.
Modesty panels can be worn under any type of clothing. These panels can be made of various fabrics, including lace, cotton, or synthetic blends, and may come in different colors to match or complement the outfit.
They are particularly useful for situations where a full underlayer would be too warm or would add unwanted bulk to an outfit. Women use them to adapt their clothing for different levels of modesty required by the setting, whether for professional environments, social norms, or personal comfort.

Not only do modesty panels provide extra coverage, but they can also help to prevent wardrobe malfunctions. With a cleavage cover in place, you can move around with confidence, knowing that you are fully covered. Whether you are attending a wedding, going out on a date, or simply running errands, a modesty panel can be a useful addition to your wardrobe.
Note: Some of the links on this page are affiliate links. This means I will receive a commission if you order a product through one of my links. I only recommend products I believe in and use myself.
Purchasing a modesty panel is a convenient option. You can find a variety of modesty panels on Amazon and Etsy. I like this store – “Chemisettes by Anne.” The store provides a selection of modesty panels (also known as chemisettes) in different colors, fabrics, and styles to match various outfits and occasions.

If you prefer a custom solution, making your own modesty panel is an easy DIY project. Creating your own allows you to choose the exact fabric, color, and size to suit your specific needs and preferences.
By making your own, you also have the freedom to design a panel with unique features, such as adjustable straps, specific shapes, or decorative elements like lace or embroidery. It’s an excellent way to personalize your clothing and ensure that you feel both comfortable and stylish.
How to Make a DIY Modesty Panel Cleavage Cover
Here is a simple tutorial on how to make a modesty panel cleavage cover. With basic sewing skills, a few materials, and a little bit of time, you can make a modesty panel that complements your wardrobe perfectly.
Step-by-step Instructions
Step 1: Gather Your Materials
- Fabric of your choice (stretchy lace, cotton jersey, lightweight woven fabric, etc.)
- Matching thread
- Sewing machine
- Paper (pattern paper, tracing paper, or any large sheet of paper)
- Pencil
- Ruler or measuring tape
- Hooks, snaps, or Velcro (for attaching to bra straps)
- Narrow elastic or ribbon to make strap loops
- Basic sewing supplies (scissors, needles, pins, etc.)
- Optional: lightweight interfacing (for structure if using very lightweight fabrics)
- Optional: French curve (for drawing smooth curves)
For my modesty panel, I had an interesting fabric choice – 100% silk chiffon with metallic silver threads. I chose the fabric because it matched well with a sequin wrap dress I bought for a New Year’s party. The dress had a deep cleavage, which called for a modesty panel to provide extra coverage. Having silver silk chiffon on hand, it seemed like the perfect material to complement the dress, despite the fabric’s known difficulty to work with. The silver color of the panel adds a coordinated look to the outfit. What do you think?
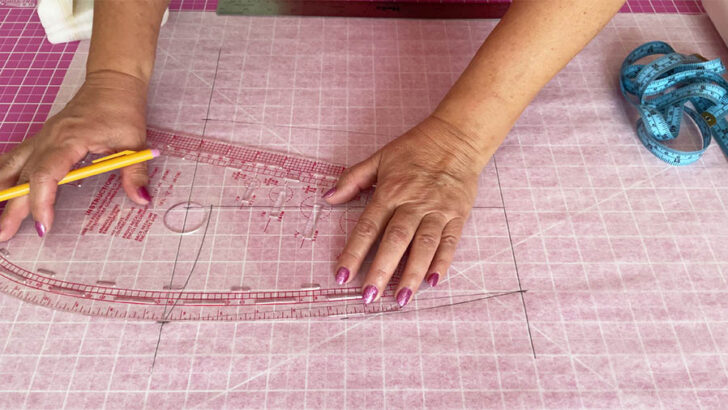
Step 2: Make a Pattern for Your Modesty Panel
Before you start cutting your fabric, you’ll need to make a pattern. Determine the size of the panel you need by measuring the distance between your bra straps across the chest (the width) where you want the cover to sit, and the length from the point where you want it to start to where you want the cover to end.
- Start by drawing a straight horizontal line on your paper, which represents the width between your bra straps that you’ve measured.
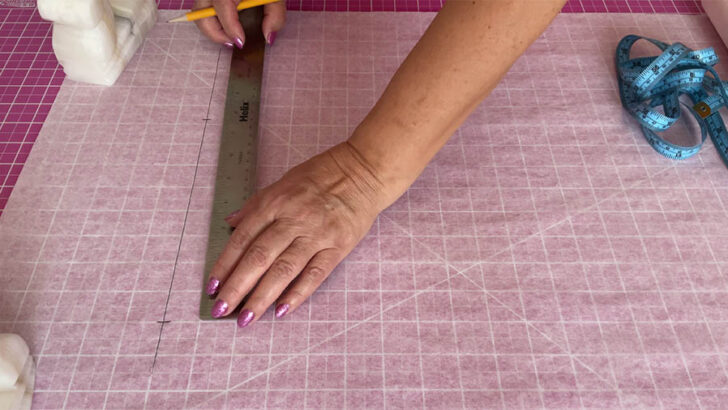
2. Find the center point of the width line you just drew and draw a perpendicular line downwards from this point. This line represents the center of your modesty panel and will be used as a line of symmetry. This line also is your grainline. It indicates the direction in which the fabric should be laid out.
The length of this center line should be the length you want your modesty panel to be, based on the measurement you took. However, you need to add 5/8 of an inch to this measurement to account for the seam allowance at the top and bottom of the panel.
Mark this adjusted measurement on the center line, starting from the top width line downwards.
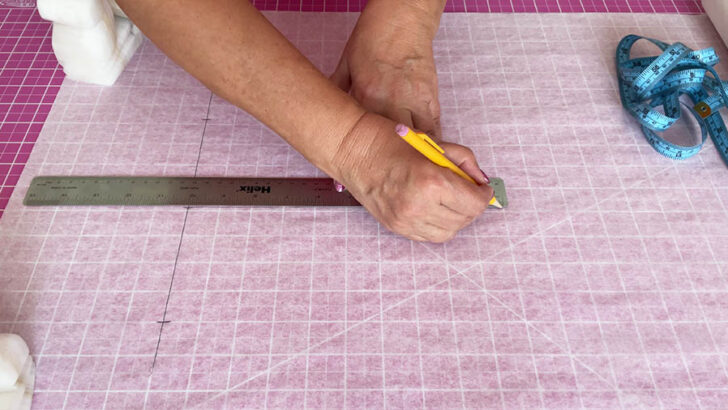
3. Measure 1 inch less than the half-width of your panel on both sides from the center line. Mark these points on your paper.
Draw a straight horizontal line connecting these two points. This line will be shorter than the top width line and will create the bottom edge of your trapezoid.
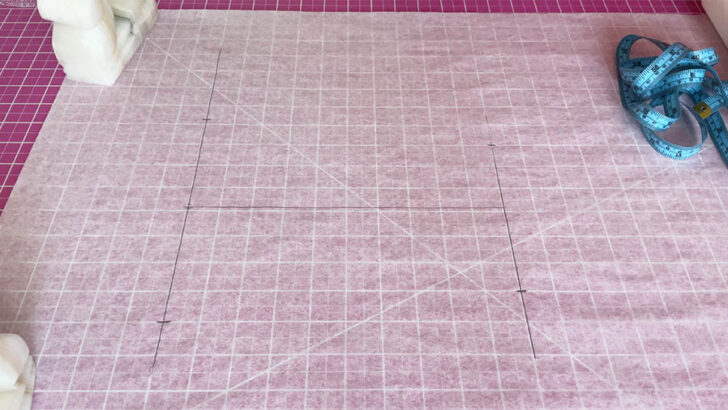
4. Connect the ends of the top width line to the corresponding ends of the bottom line with straight lines. This will give you a trapezoid shape.
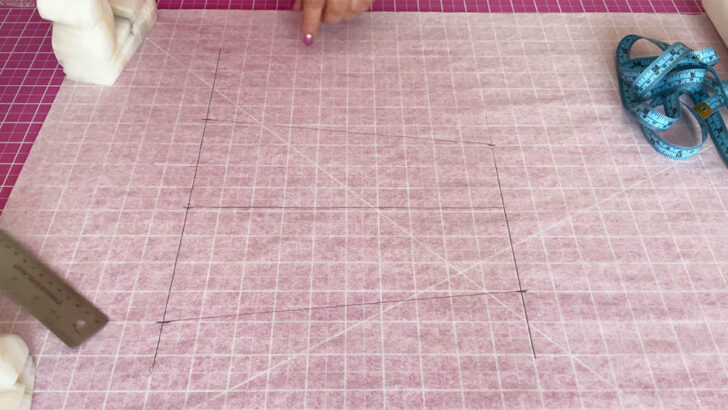
5. On the center line, measure 3/4 inch down from the top width line and make a small mark.
Connect this mark to the left top corner of the trapezoid with a smooth curved line. This will be the neckline of your modesty panel. You can use a French curve for precision or draw it freehand.
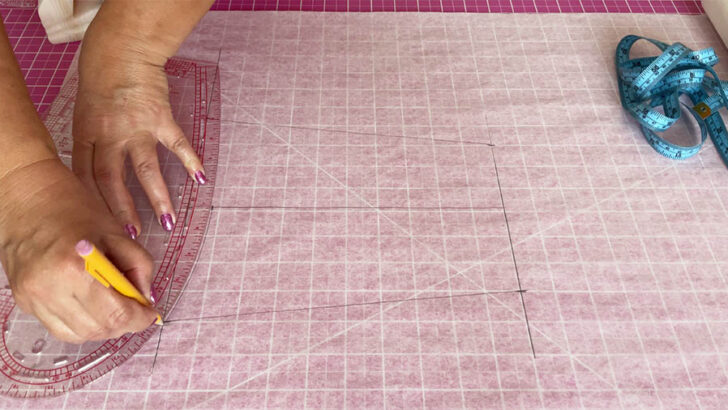
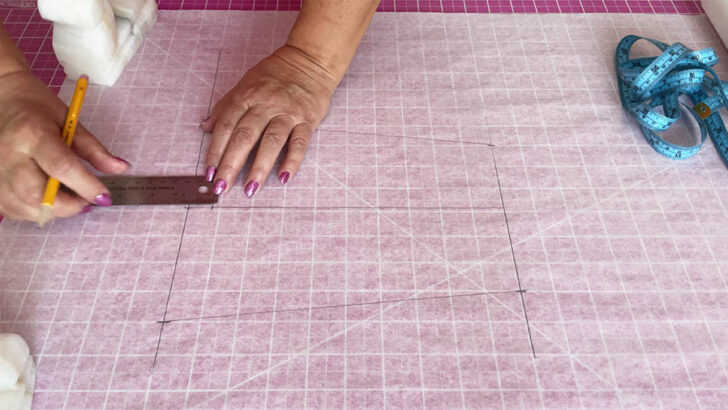
6. Next, connect the top left corner of the trapezoid to the bottom left corner with a curved line. This will form the side of your modesty panel. Again, use a French curve or draw by hand to create a gentle curve.
7. Fold the paper along the center line so that the left side of your trapezoid lies on top of the right side.
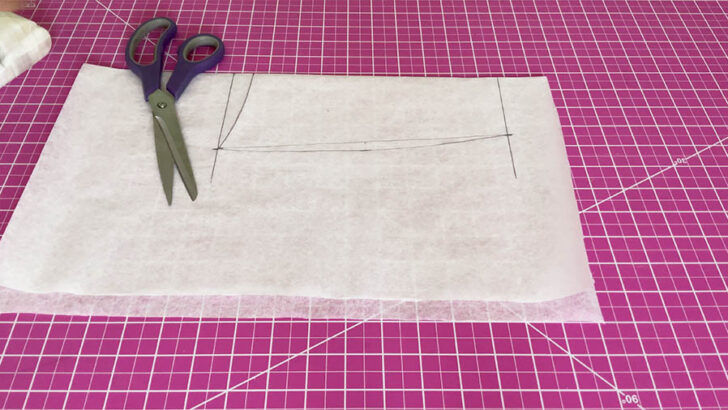
Use the folded edge as a guide, and trace the curves you’ve drawn onto the right side to mirror the left side. This ensures that both sides of your pattern are symmetrical.
8. Once you are satisfied with the shape and size of your pattern, cut it out with scissors.
This pattern will now serve as the template for cutting your fabric. You can always adjust the pattern as needed for a better fit or to match the style of the garment you will be wearing it with.
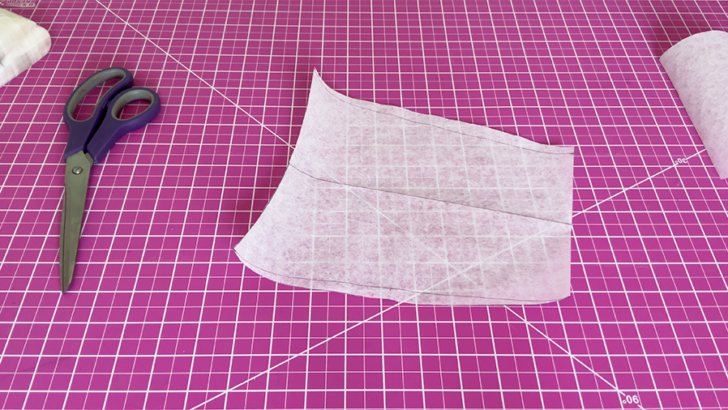
Step 3: Cut Your Fabric
Once you have your pattern, you can use it to cut your fabric. Cut two pieces of fabric in the shape of your pattern. One piece will be the front of the modesty panel, and another piece will be the back (or you can call it lining). You can cut the pieces from the same fabric or from different fabrics. You can also cut a piece of fusible interfacing if you want to add extra structure to your panel.
✅ Related article: Cutting Tools For Sewing: The Ultimate Guide
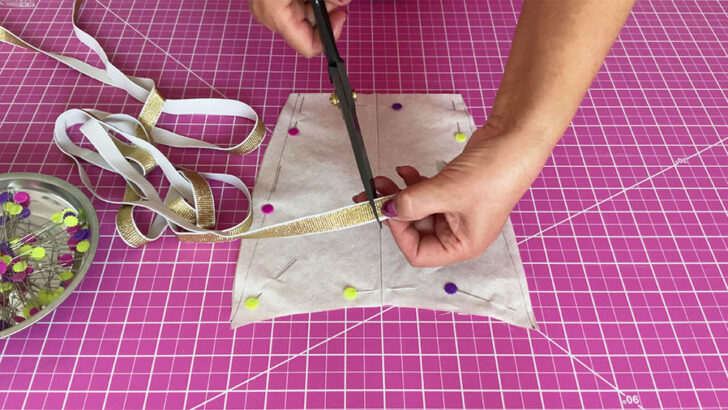
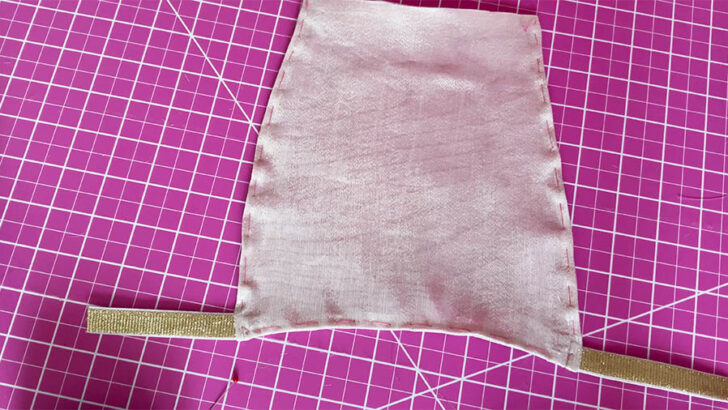
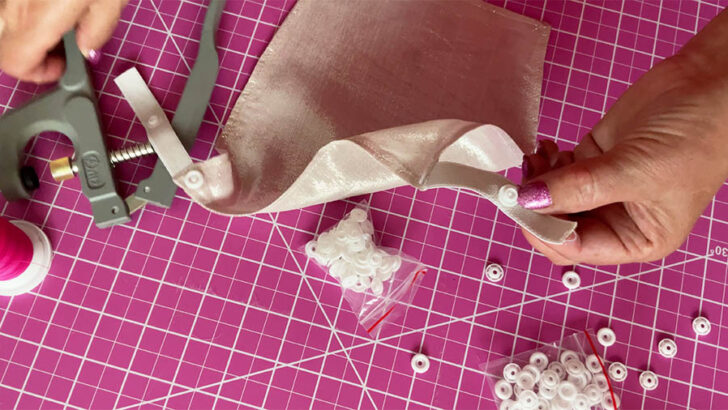
Step 4: Prepare Two Strap Loops for Your Modesty Panel
Cut 2 pieces of narrow elastic or ribbon, 3” or 3 ½ “ long. The best width is about ⅜ “ or ½ “.
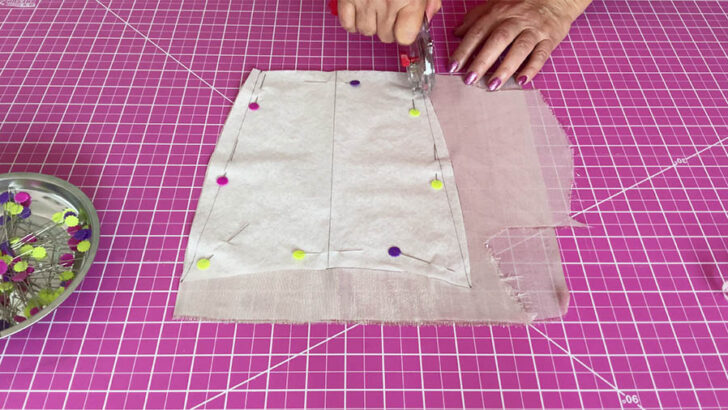
Step 5: Sew Your Fabric
Place one of your panel pieces on your table with the right side facing up.
Take each strap loop and pin it to the top corners of the panel, with the loop pointing inwards towards the center of the panel and the raw edges of the loops aligned with the raw edges of the fabric.
✅ Related article: Types of sewing pins and their uses: all you need to know about straight pins for sewing
Ensure the loops are pinned about half an inch from the top edge to provide enough space for stitching without sewing over the loops.
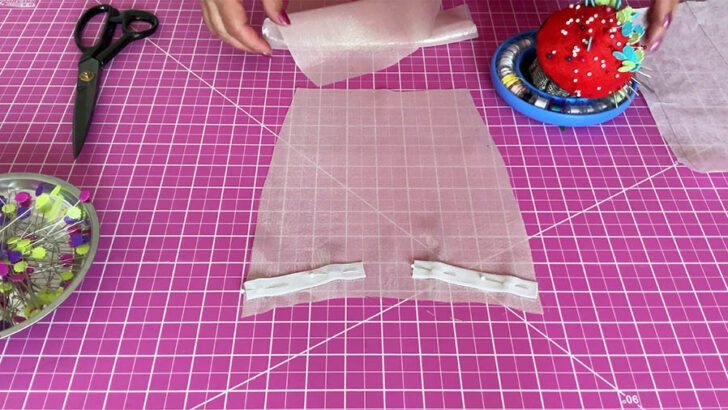
Lay the second piece of fabric over the first, with the right sides together. The strap loops should be sandwiched between the two pieces of fabric.
Prepare the bottom edges for a neat finish. Take both pieces of fabric and fold the bottom edges up by 3/8 of an inch on the wrong side of the fabric.
The folded bottom edges should align neatly. The pre-folded bottom edges will make it easier to sew the opening closed with a clean finish.
Pin around the edges or use basting thread to temporarily hold the layers together, making sure the strap loops stay in place and are not caught in the seam allowance.
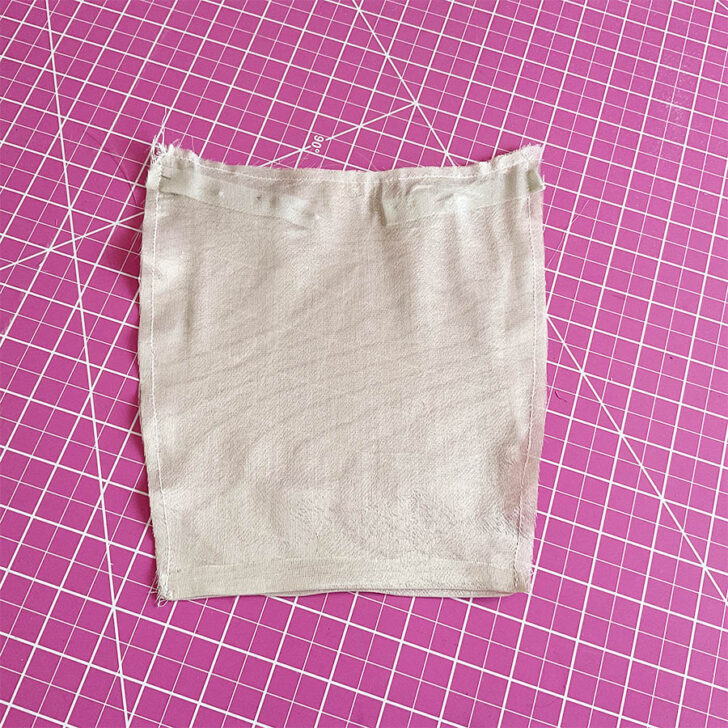
Stitch around the perimeter of the panel, leaving about a 1/4 inch seam allowance. Leave an opening at the bottom edge for turning the panel right side out.
Backstitch at the beginning and end of your sewing to secure the stitches, and remember not to sew over the strap loops.
If you used knit fabric for the modesty panel, make the stitch by serger.
✅ Related article: What Is A Serger & What Can I Do With It?
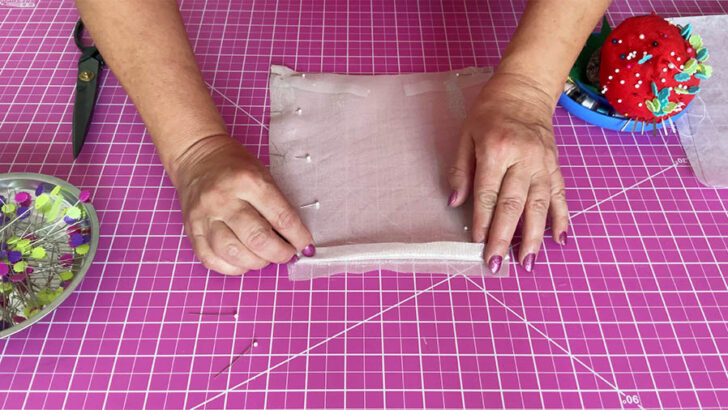
After stitching the panel, I noticed there was a small gap between the strap loops and the top seam, as you can see in the image below.
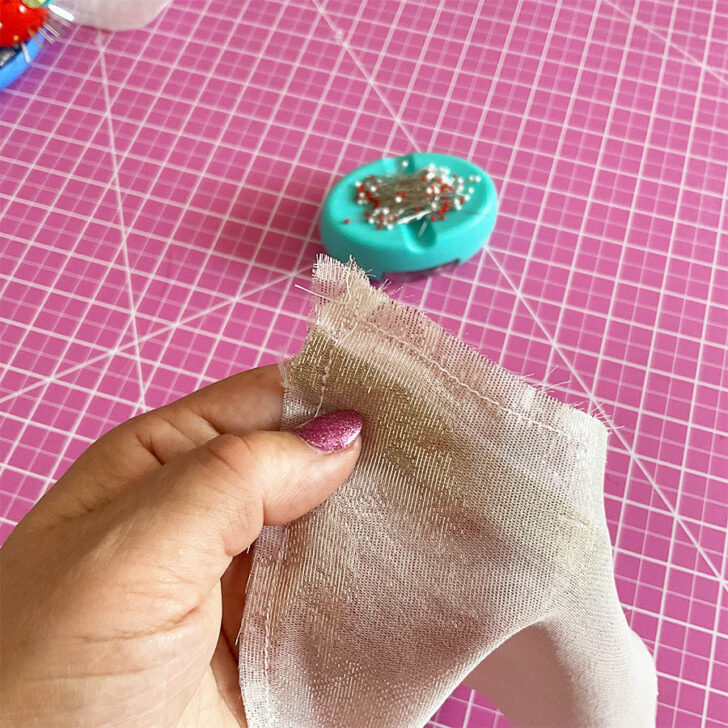
I wanted the loops to sit flush with the top edge of the panel for a more polished look. To achieve this, I decided to add another line of stitching closer to the elastic loops at the top. So I stitched the new line, making sure to reinforce the area around the loops for added durability.
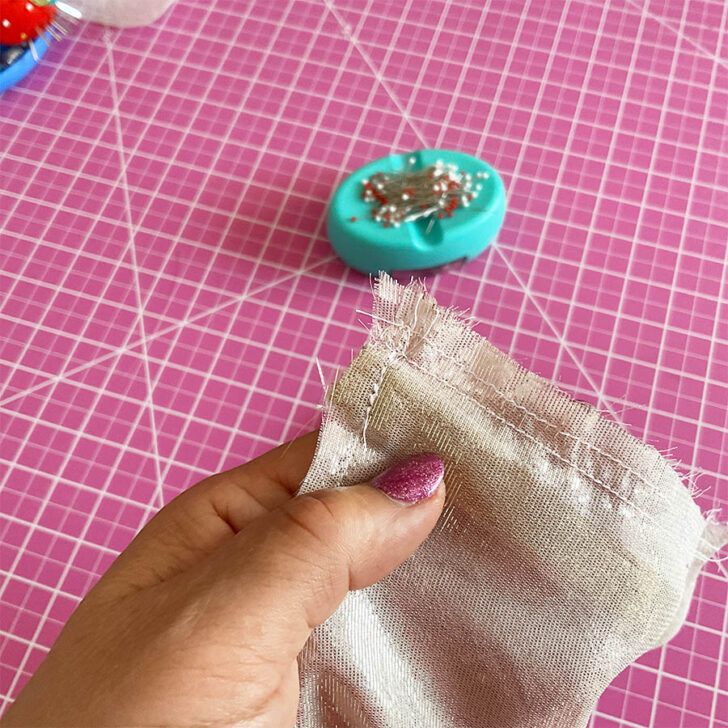
After that I carefully trimmed the excess fabric about the new seam line making sure not to cut too close to the stitching.
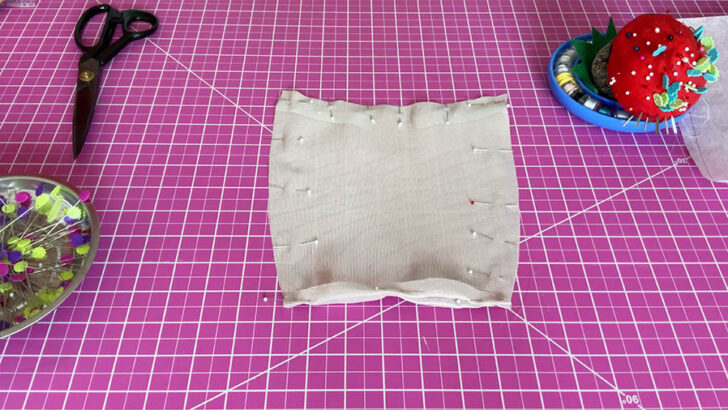
Turn the panel right side out through the opening you left at the bottom. Use a point turner or a blunt tool to gently push out the corners and make them crisp.
Press the panel flat with an iron, neatly folding in the raw edges of the opening so that they are in line with the sewn edges.
Hand stitch the opening closed with a ladder stitch or slip stitch for an invisible finish.
✅ Related article: Invisible Stitch Tutorial: How To Fix A Tear (+ Sewing “Blind” Hems)
Finally, topstitch around the entire perimeter of the panel close to the edge. This gives the panel a finished look, helps to keep the edges flat, and secures the opening.
To topstitch my delicate chiffon modesty panel, I chose very thin needles, specifically size 55/7, which were perfect for the thin fabric. I also selected thin thread (size 50) to ensure that the stitching would be subtle and not overwhelm the fine chiffon material.
✅ Related article: How To Topstitch | 17 Topstitching Tips Every Beginner Should Know
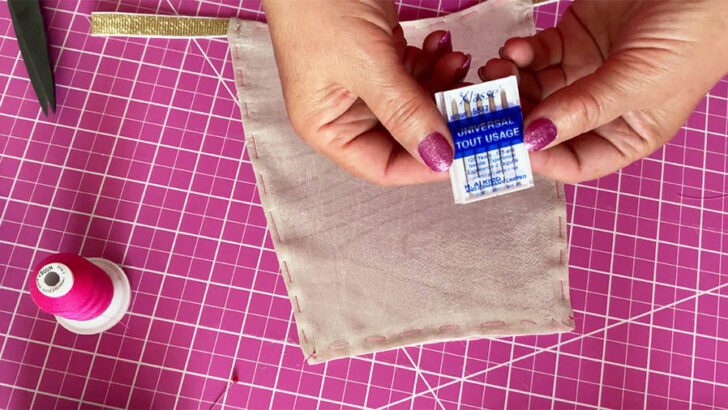
Step 6: Add Snaps to the Modesty Panel
To attach your modesty panel to your top or dress, you’ll need to add some fasteners. I like to use plastic snaps known as KAM snaps. They are really easy to apply, available in a variety of colors. The great thing about KAM snaps is that they make a very easy and secure closure and also look nice!
They’re available at most fabric stores, and come with a starter kit that includes the tool to install KAM snaps. You can also easily find them on Amazon.

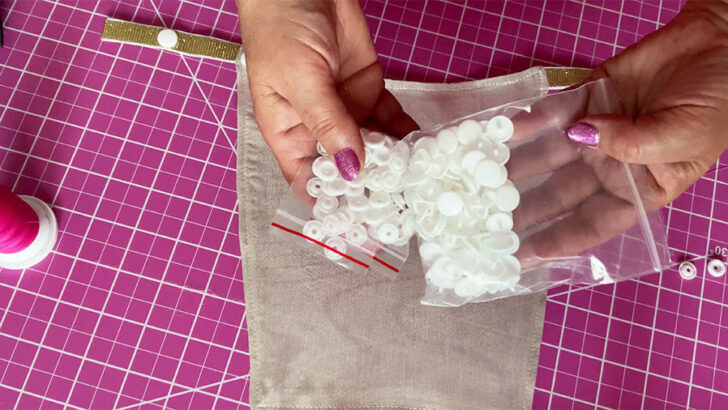
KAM Snaps Buttons + Snap Pliers
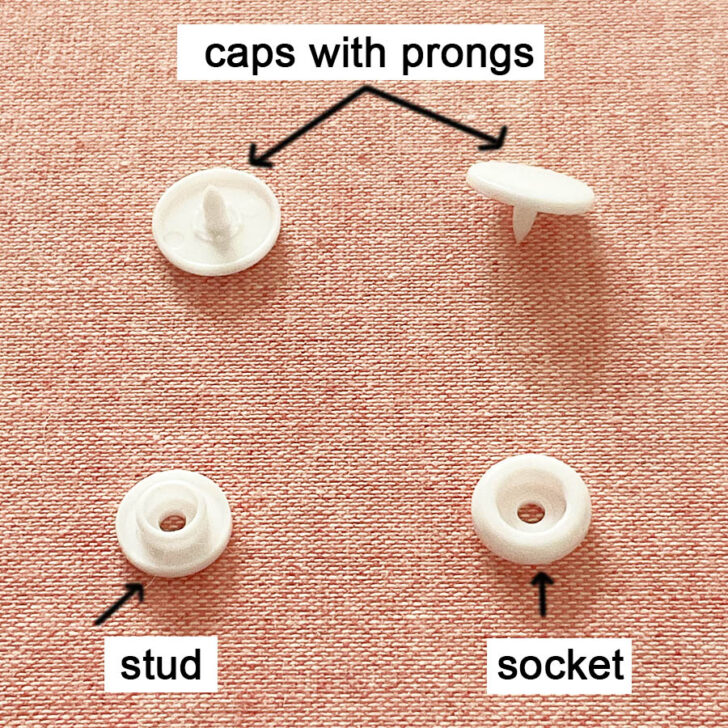
A plastic KAM snap set contains four tiny pieces. See the image below for an idea of what they look like. The one set has four parts: two caps (with tiny prongs) that are visible on the outside of the garment and two backings that are relatively flat: one socket and one stud.
We’ll just need one set for the modesty panel.
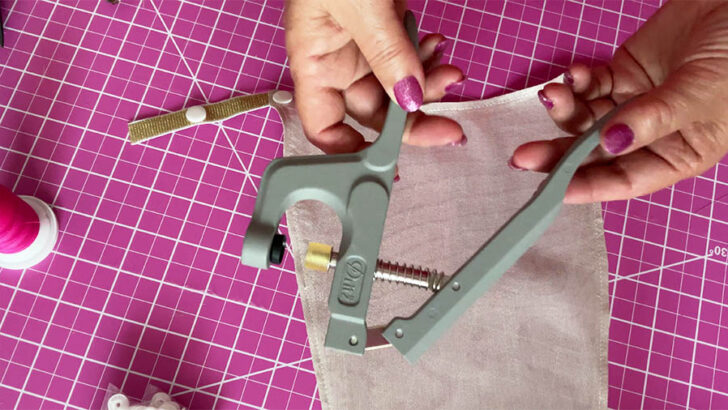
You will need special pliers to install the KAM snaps.
Here is how to install the KAM snaps on the modesty panel.
Decide on your snap placement. You may use an awl, to make a small hole in the fabric where you want to place your snaps. Don’t make the holes big, they should be only as big as the cap prongs.
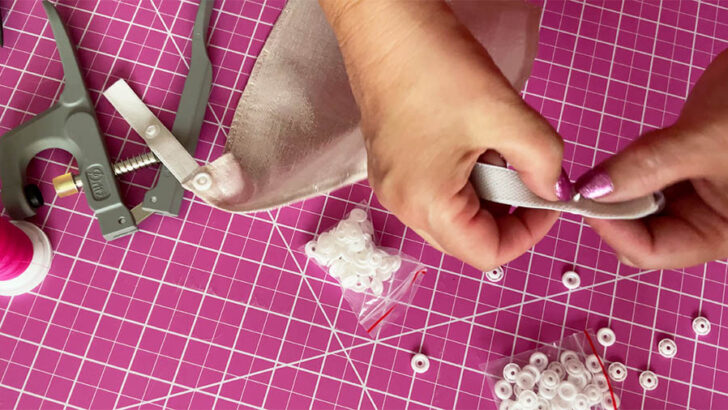
Push the cap from the front side of the strap loop to the back through the hole. Place the stud piece onto the cap prong from the back side of the elastic.
Take the pliers and position it like you see in the image below.
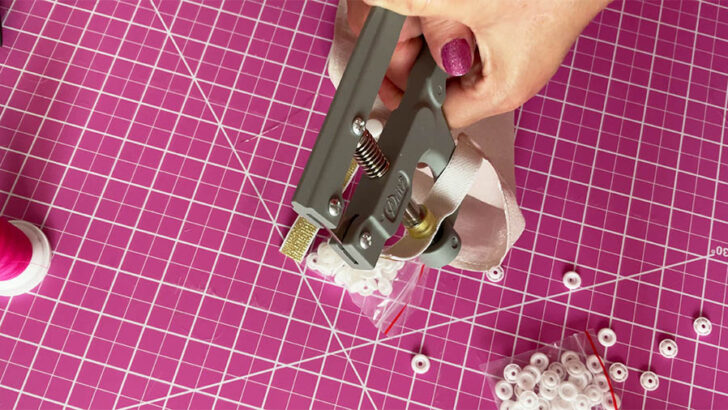
The cap should go on the black die tray (the size of the cap) and the stud should be placed under the clear rubber head.
Make sure both parts of the snap (the cap and the stud) sit correctly in the pliers without any portion of the cap or stud sticking out beyond its edges.
Hold the pliers and press them firmly for a few seconds. The prong will be flattened, keeping the stud secured in the position.
Repeat the process on the other side of the strap loop, installing the second part of the snap but this time use a cap and a socket piece.
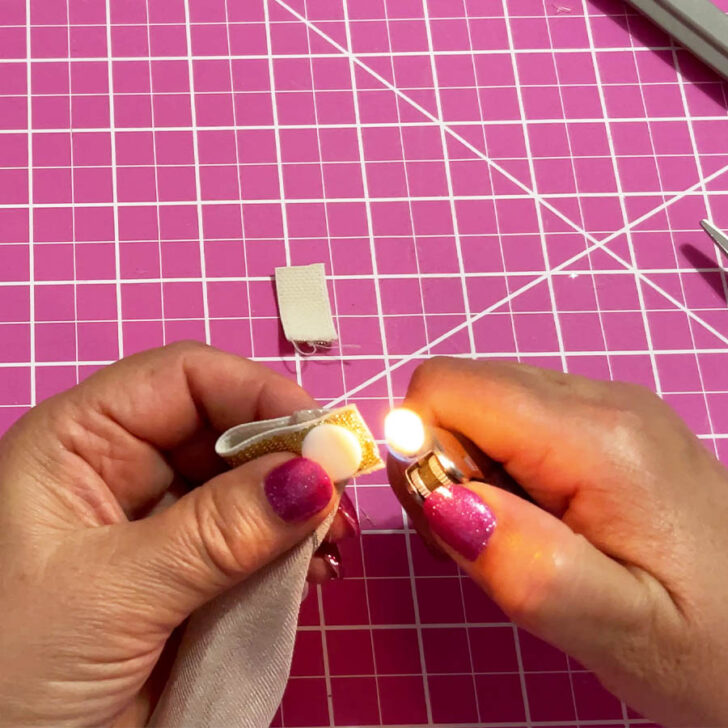
To finish the raw edges of the elastic, I carefully used a lighter to burn off the unraveling threads. I had to be very cautious with this method to avoid damaging the elastic or causing any discoloration. By quickly passing the flame over the edges, I was able to seal them and prevent any further fraying.
You can see how it’s done in this YouTube video.
Step 7: Try It On
Attach your new modesty panel to your bra and put on your low-cut top or dress to ensure it provides the desired coverage. Adjust the positioning if necessary.
If the panel tends to shift, you can add additional snaps to the strap loop.
And there you have it – a simple, homemade modesty panel cleavage cover that you can use with various outfits to ensure you feel comfortable and covered.


Did you enjoy this tutorial? If you did, don’t forget to bookmark this pin (see below) on your sewing Pinterest board! That way, you can easily return to this guide on making a modesty panel whenever you’re ready to start sewing. Plus, make sure to follow me on Pinterest to stay updated with more sewing advice, step-by-step guides, and creative inspiration!
latest posts
- What Do You Call a Person Who Sews? I Asked My Readers and Got 1,408 Opinions
- DIY Round Purse: PDF Sewing Pattern and Detailed Instructions
- Mini Wonder Clips By Clover: Useful Sewing Tool Or Just Another Notion?
- Non-Slip Grips For Quilting Rulers: A Small Notion With A Useful Job
- Fabric Eraser for Sewing: What It Removes and When to Use It
- What Is The Best Thread For Sewing Machine Projects? Let’s Find Out!
- Butterfly Quilt Block Tutorial – Foundation Paper Piecing
- How To Sew Quilt Squares So The Corners Match
- Sewing With Fork Pins: How They Help With Pattern Matching, Slippery Fabric, And Seams

Thank you so much for this post! I’ve been searching for a camisole to wear under a linen top that has a low front opening. Since I wanted the linen top to wear in our Florida heat, I haven’t been able to find anything that would not be too hot. I have a small piece of white tissue linen which will be perfect for this, so that is on my to-do list this week. I love reading your tips and learning so much.