
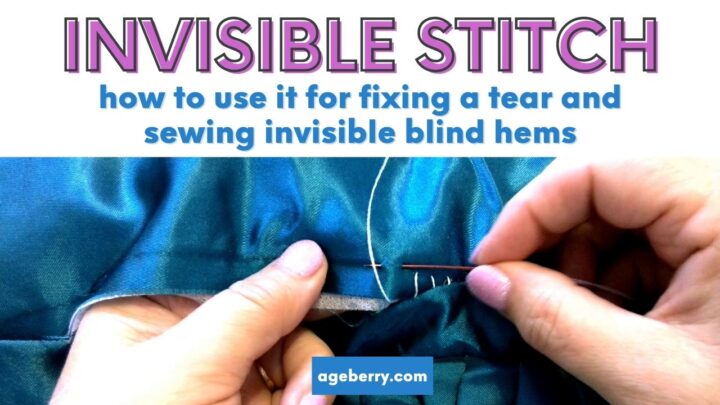
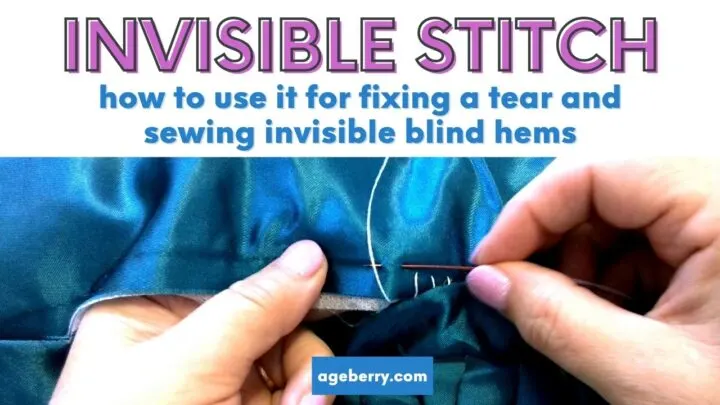
Using a hidden stitch technique is useful when you don’t want to be able to see the stitches in hems. In this sewing tutorial, I will show you how to make an invisible stitch by hand.
Table Of Contents
- What is an invisible stitch and how to do it correctly
- How to do an invisible stitch step-by-step while fixing a tear in a pillow
- How to sew an invisible hem by hand
- How to make a truly invisible hem on silk garments
What is an invisible stitch?
An invisible stitch (also called slip stitch, hidden stitch, or blind hem stitch) is a popular stitch you can sew by hand. It’s a hidden stitch that connects fabric edges without showing on the right side of the fabric. It’s suitable for most materials, including thin silk chiffon, fur, and leather.
The right side of the item should look like the item was sewn exclusively using a sewing machine, but it will only appear that way if all the stitches are neat and spaced apart evenly.
Note: Some of the links on this page are affiliate links. This means I will receive a commission if you order a product through one of my links. I only recommend products I believe in and use myself.
When To Use An Invisible Stitch
Knowing how to do a no-show stitch by hand is really helpful. You can use it to extend the life of many things (garments, stuffed toys, pillows, or furniture). Plus, if you can mend holes in leather and other expensive fabrics, you can use invisible stitch sewing to save money on alterations and repairs.
Mastering this technique will allow you to hem pants, skirts, and curtains. You can also carefully repair a tear in your favorite pillow, attach patches, etc.
In addition, we use it to finish waistbands on skirts and pants, sew pieces of a bodice lining to a bodice or a zipper, finish sleeveless armholes, etc.
Invisible Stitch Sewing Tips
Sewing a hidden stitch is relatively simple to do and doesn’t require the special skills of a seamstress. But, in order to make a beautiful and really hidden stitch, you should follow some guidelines, which I will share with you.
I have to warn you that this would not work well immediately without practice, so make a test sample first on scrap fabric.
Use High-Quality Thread
Always pay attention to the quality of the thread and use strong threads, so you’ll never have an invisible stitch come out because of a broken thread.
You want to choose a thread that’s strong enough to hold the seam closed but isn’t thicker than the fabric. It can be difficult to find an inexpensive, good-quality thread. Thankfully, Amazon’s excellent return policy helps! Just test the thread, and if it’s not good enough, you can simply return it!


Reading reviews on Amazon tells us that all brands have quality issues from time to time. The reality is that some batches are just better than others.
Pro Tip: Beware that embroidery thread, while good quality, might be too thin, so it may not always be suitable for regular sewing.
Match Thread Color
Choose a thread that matches the project’s fabric color. If you can’t match the color perfectly, pick a thread that is a shade darker than the fabric.
Always Use A Sharp Needle
The goal is to avoid unnecessary puncture marks, so never use a blunt needle.
Before you begin sewing, check the needle to make sure it’s thin enough for the fabric. You also want the needle eye to be small enough that it doesn’t leave large punctures in the fabric.
Needles cost very little and will last a long time when sewing by hand, so it’s better to use a new needle than a blunt one.
Pro Tip: Invest in good quality brand-name needles.


Space Your Stitches Evenly
For your invisible stitch hem to be truly invisible, your stitches should be uniform and evenly spaced.
Avoid making the distance between stitches too large because those small sections with greater spacing may become noticeable on the finished garment.
Avoid Pulling The Thread Too Tight
Don’t tighten the thread too much. This is good general practice for sewing anyway because you want just a little give and movement in your stitching. Plus, when the thread is pulled too tight, it’s more visible and more likely to break.
Make Sure Everything Stays Inside Stuffed Items
When repairing toys or pillows with foam inside, make sure that the foam doesn’t stick out from the item.
How To Sew An Invisible Stitch: Step-By-Step Tutorial
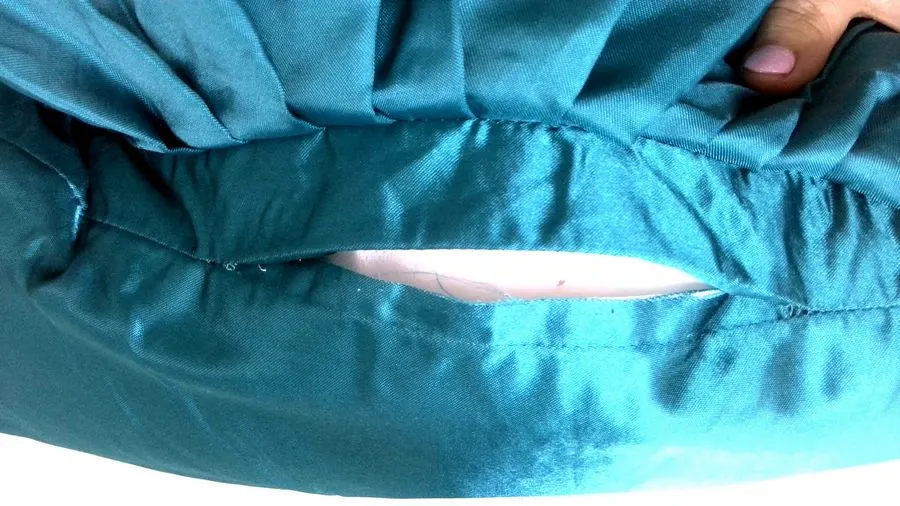
Here, I’ll show you how to do invisible stitches by hand to repair a tear in a pillow. When you want to sew without thread showing, this is the method you’ll follow.
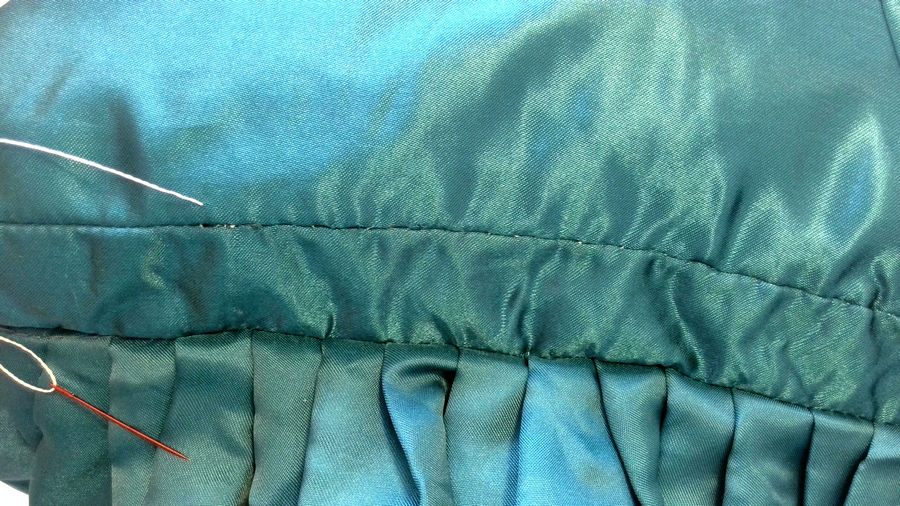
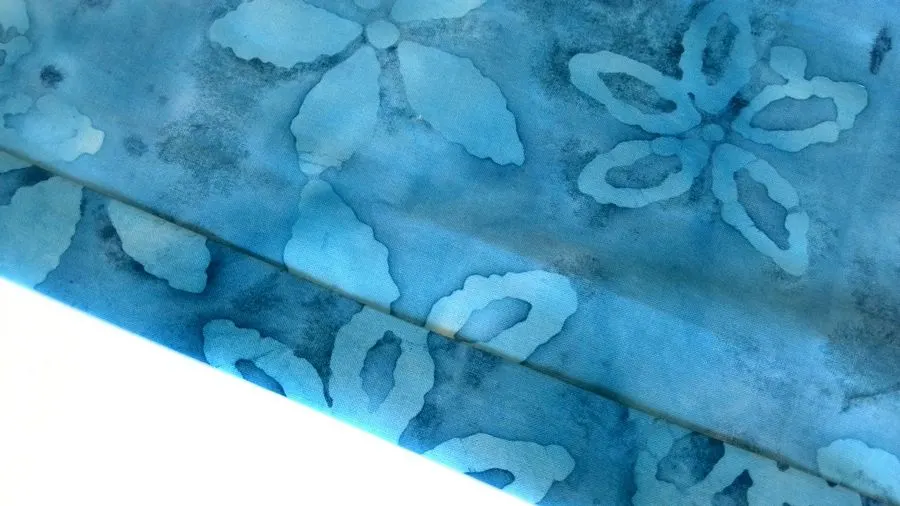
I am going to use this pillow shown in the image below. As you can see, some stitches came out on one of the sides of the pillow. I am sure this is a common problem, and everybody has a pillow, a toy, or a chair they need to repair.
I will fix it and will show you how to sew a hidden stitch to repair a tear.

Step 1
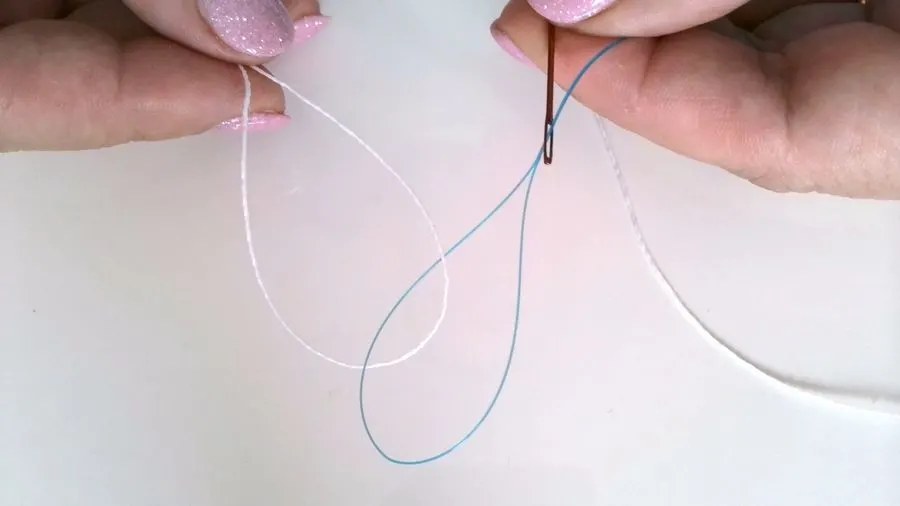
Thread a needle and make a knot (don’t skip reading this part, trust me).
The needle for this stitch has to be sharp and thin with a small eye. You also want your needle to be on the shorter side. Learn more about threading a hand sewing needle and making a knot if you want to grab some useful tips and tricks for doing it quickly and easily.
Well, I know what you may think now – “I have been sewing for 20 years, and she tells me to go and read how to thread a needle, huh!?” Just do it, and you may be surprised at how many helpful tricks are there – I didn’t know half of them myself before my vision got worse.
For this particular tutorial, I used thick white thread so you can see it clearly. But I always recommend using thread that matches and is a little bit thinner than the fabric. Then your hand-sewing stitches will be really invisible.
In the image below, you can see how I was threading the needle with dental floss.

Step 2
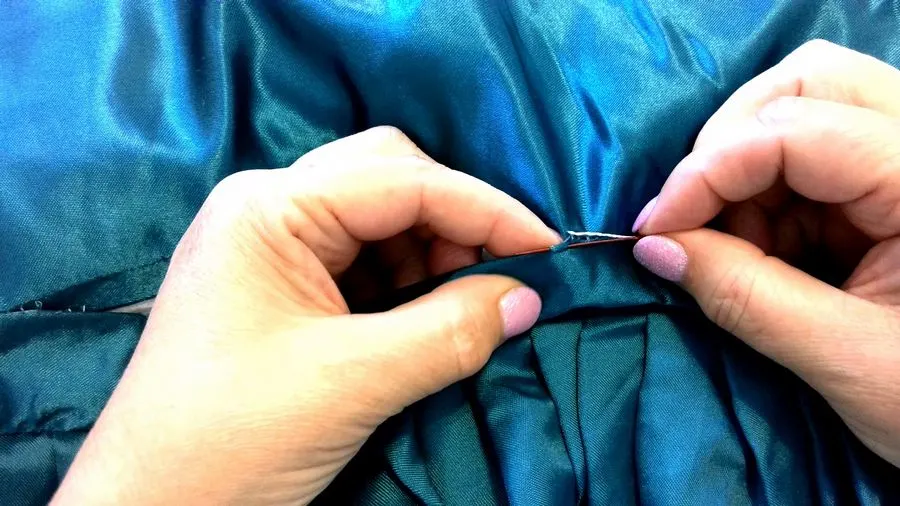
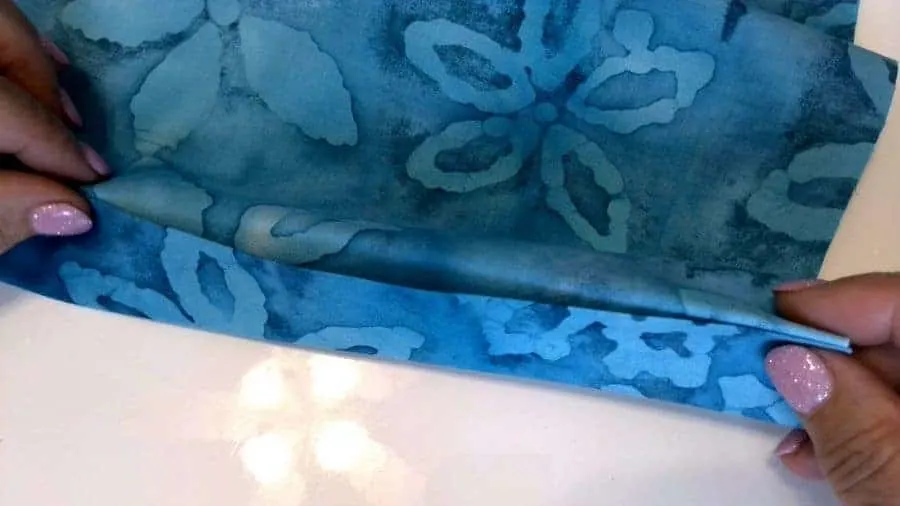
Pull out the needle from the inside of the item so that the knot is hidden in the fold.
Run the needle through the fold so that the working thread comes out exactly from the fold of the fabric.


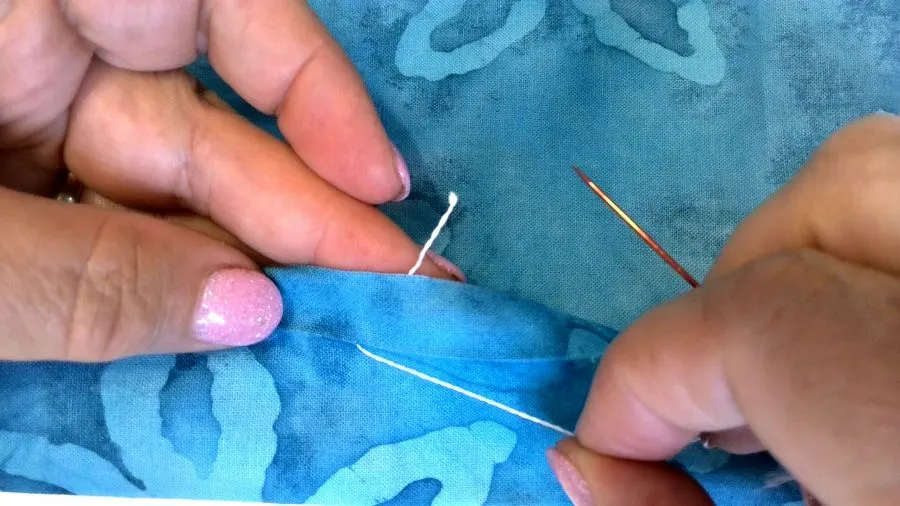
Step 3
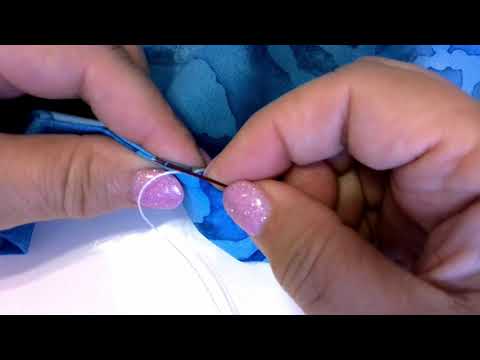
Move to the opposite side of the opening and insert the needle close to the starting point. Grab 2-6 mm (1/16 – 1/4 in) of fabric with the needle connecting the two parts.
Make sure the needle goes directly into the fold.

Step 4
Move to the opposite side again and grab 2-6 mm (1/16 – ¼ in) of fabric.

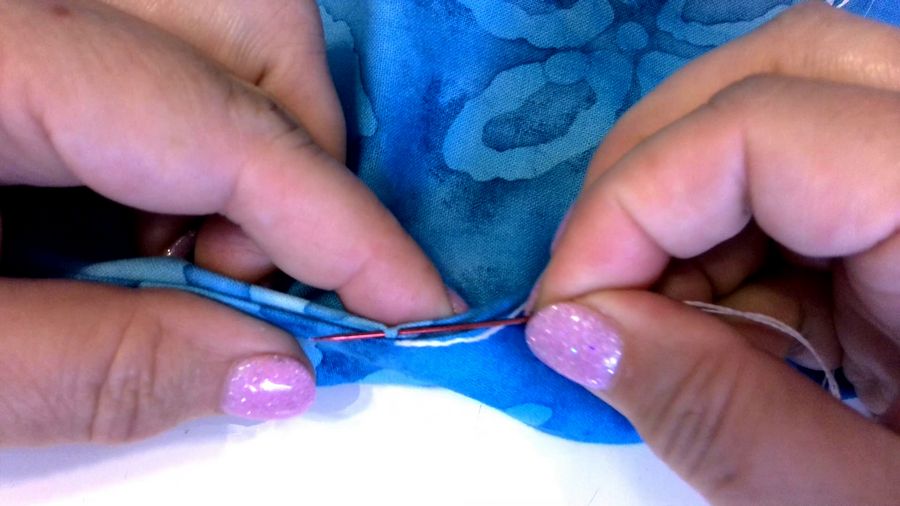
Step 5
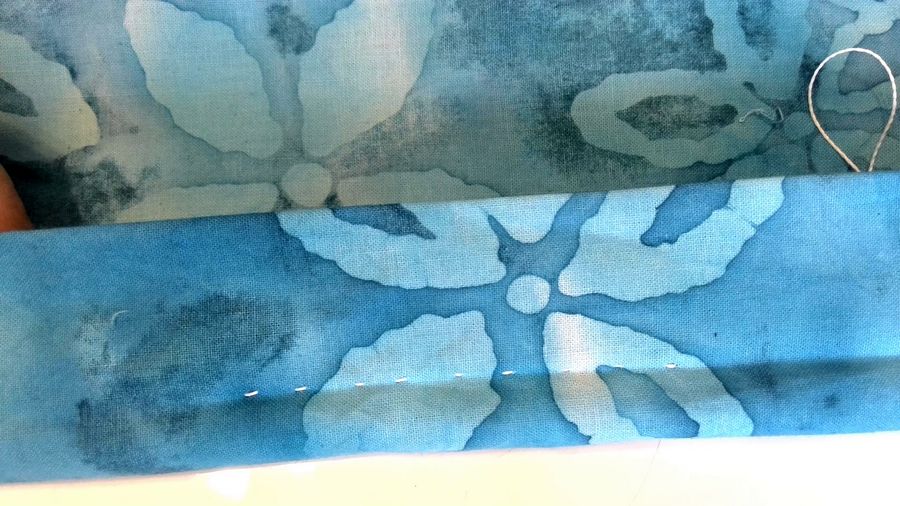
Pull the thread until the stitch is hidden in the crease between the fabric folds.

Continue doing that until you come to the end of the opening, pulling the thread every couple of stitches.
Pro Tip: Don’t over-tighten the thread here.

Want to improve your sewing skills?
Get my detailed guide on SEWING MACHINE TENSION ADJUSTMENTS free!
Subscribe to my weekly newsletter with sewing tips and tutorials, free sewing patterns, printable PDFs, and other useful content and you’ll find the eBook in your inbox.
Subscriber exclusive offer.
Don’t miss the free HELPFUL eBook!
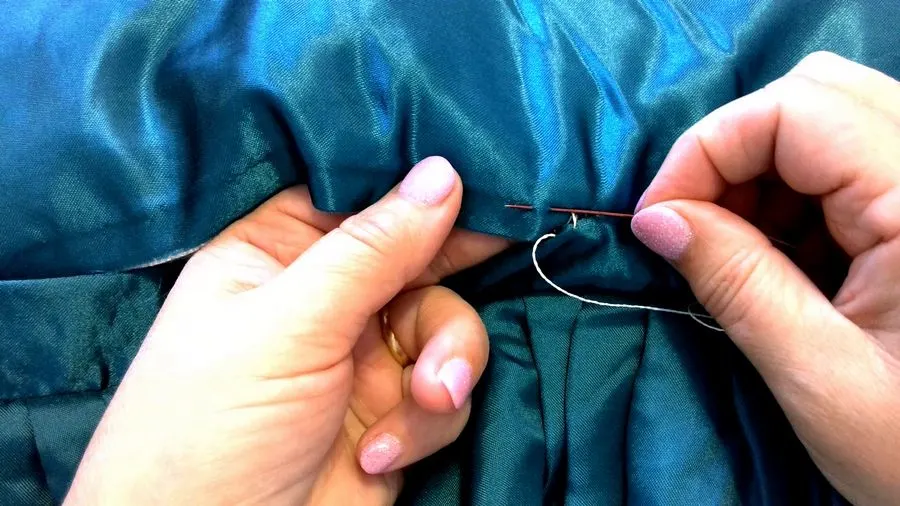
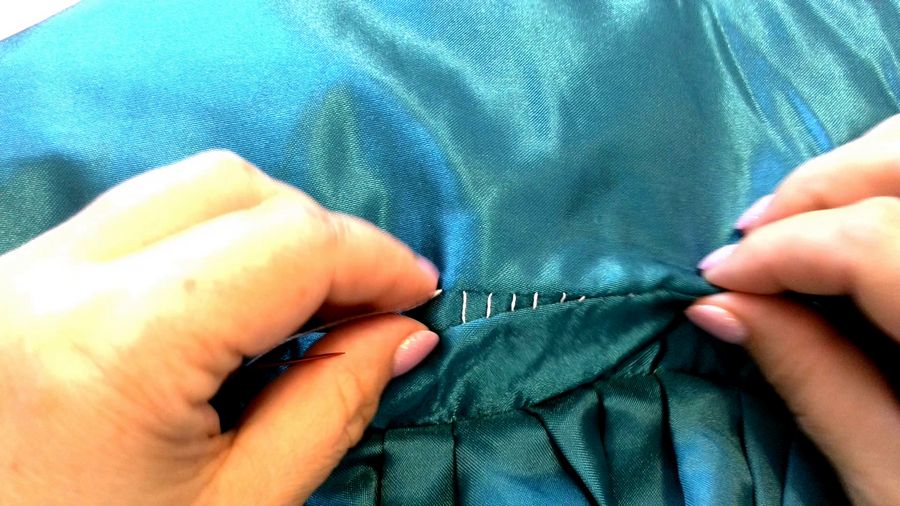
The image below shows how the thread is supposed to go into the fabric folds (before you tighten it).

Step 6
At the end of the opening (when you reached the part that wasn’t undone), finish sewing by tying a knot.

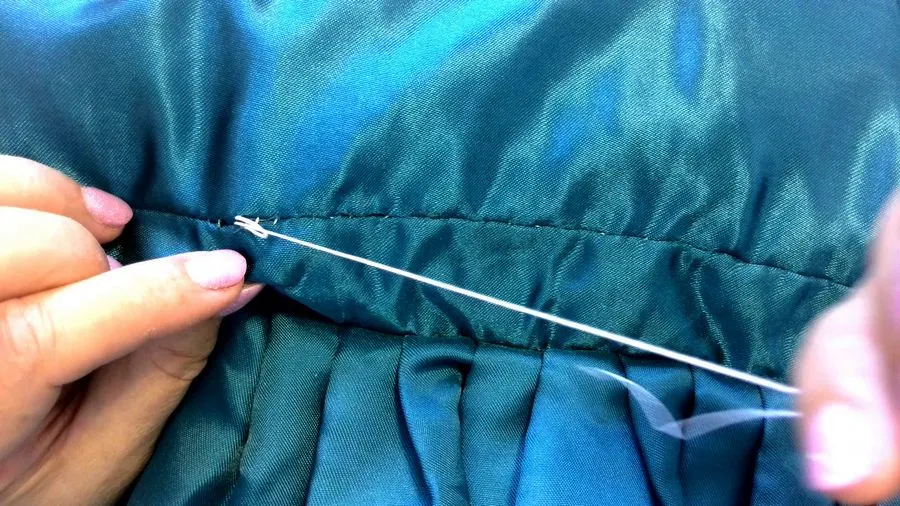
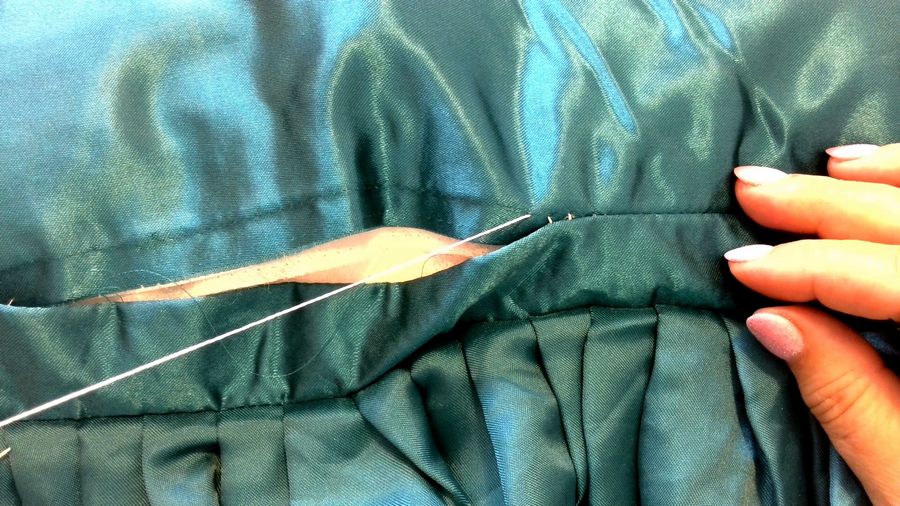
But don’t cut the thread yet. First, you should try to hide the thread tail inside the item.
To do that, just run the needle (still threaded) through the fabric and come out of the fabric in some random spot. Pull the thread a little to make sure the knot got inside the seam, then cut the thread. The thread tail will be hidden inside.

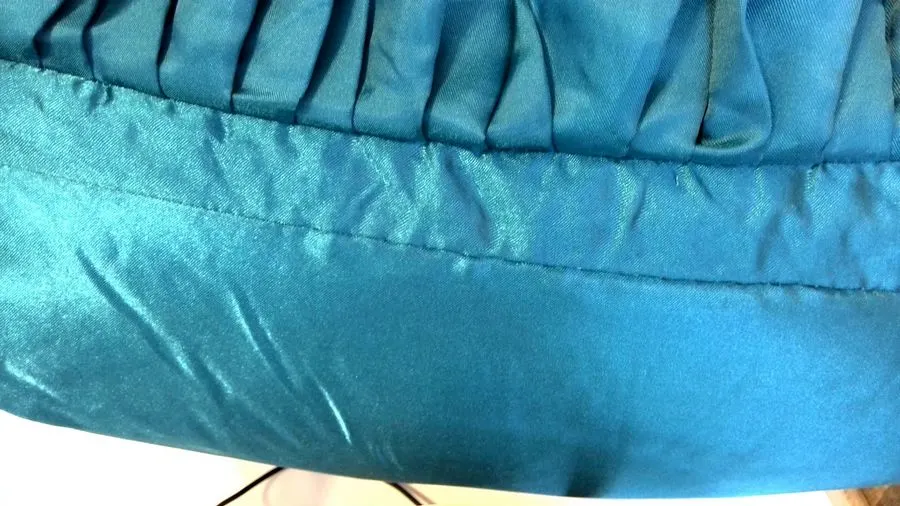
As you can see, even though I used white thread for the green pillow, the stitch I made is completely invisible. I made a disappearing stitch with white thread inside the fabric folds.

I hope you learned how to sew an invisible stitch correctly.
But wait, there is more info on making invisible stitching.
Blind Hem Stitch By Hand
An invisible stitch is also called a BLIND HEM STITCH and is used for sewing a hem by hand.
It’s very easy to make an invisible hem using a blind stitch presser foot of a sewing machine, and you can see my tutorial on blind hem stitching by machine for more information.
Now let’s see how to use an invisible hem stitch for sewing blind hems by hand. It is a quick and easy way to make a professionally looking invisible hem on the clothes you sew.
If you want to learn how to hand sew a hem, continue reading.
NOTE: The technique is essentially the same as in the example above, even though the type of work is really different. So, do not be surprised if the steps are the same.
Step 1
Draw a line with a sewing marker 1 cm (⅜ in) from the edge of the fabric. Fold the fabric with pins or a running stitch, and press with an iron.

Draw another line 3 cm (1 1/4″) from the folded edge. Fold the fabric inside again with pins or a running stitch, and press.
Now you are ready to learn how to hand sew a hem.
NOTE: I am going to use a thick white thread so you can see how an invisible hem is done. In your projects, use matching thread, and pick one that’s thinner than the fabric.
Fold the fabric like this in the image below.

Step 2
Hide the knot of the thread inside the fold, run the needle into the fold, then draw it up through the top crease.

Step 3
Grab a few threads of the fabric just above the fold with the needle so that nothing (well, almost nothing) can be seen on the outside of the fabric.

Step 4
Put the needle back into the fold, keeping it parallel to the fold.
The length of the stitch in the fold is 3-5 mm (1/8 – 1/4 in)
Don’t overtighten the thread here!
As you can see on the right side of the item, we have only tiny stitches that cover only a few threads from the fabric structure.
If I had used matching thread, it would be an invisible hem (or, as they say, a blind hem). I didn’t use the correct thread for this fabric, so the stitches are a little bit more noticeable. But I did it on purpose, so you can see how it’s done.

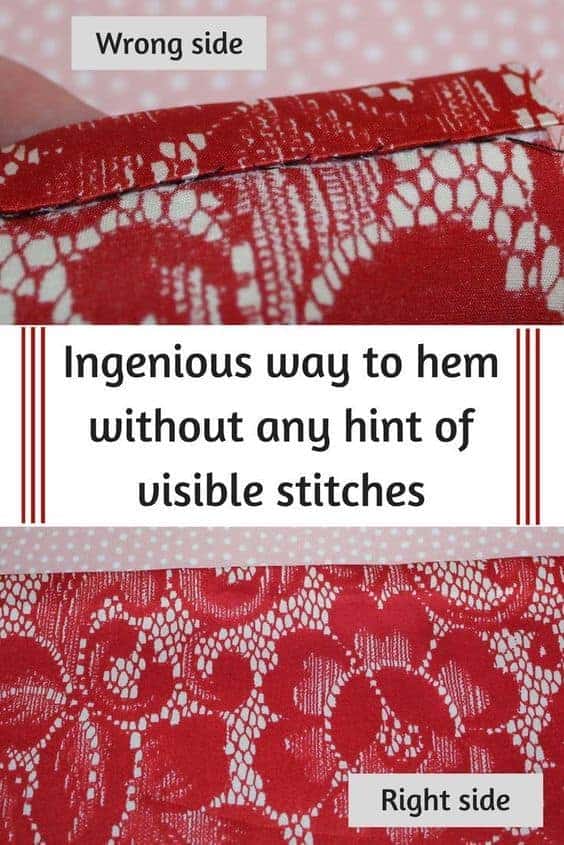
How To Sew An Invisible Stitch On Silk Garments
Now let me show you some amazing techniques I use for how to do a blind stitch on silk garments. With these techniques, the hem turns out to be absolutely invisible.
It’s worth noting that this technique is a little bit time-consuming because hems are sewn by hand. But the result is fantastic, with absolutely no hint of visible stitches on the right side of the fabric!
I never want to spoil such exquisite fabric (ex: a delicate silk blouse or dress) with a line of stitches along the hem. Regular hem finishes just don’t fit the style of the garment.
NOTE: This method is only good for straight hems or only slightly curved ones.
If you want to remember this article for the invisible hem on silk, please save the pin below and come back whenever you need to refer to the information!

Step 1
Make sure that your hemline is straight. If you would like to know how to cut fabric perfectly straight, check out 8 simple ways to cut fabric perfectly straight.
Step 2
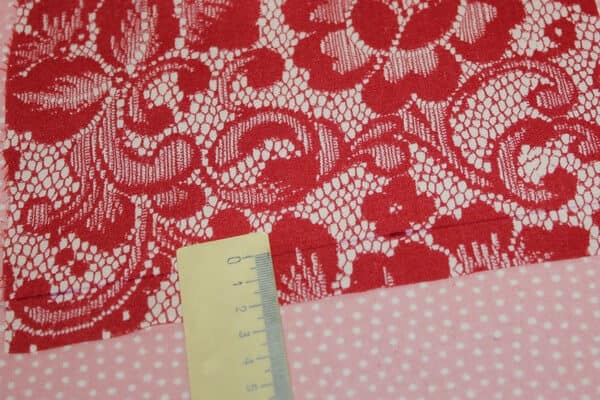
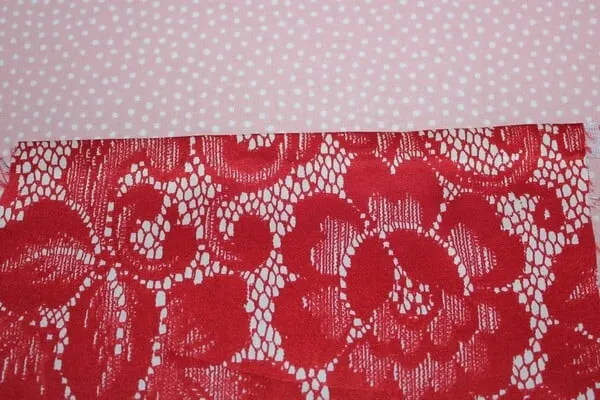
Using a special marking pen or chalk, mark a straight line 1.5 – 2 cm from the edge. If you need to convert centimeters to inches and fractions, use my conversion calculator here.

Step 3
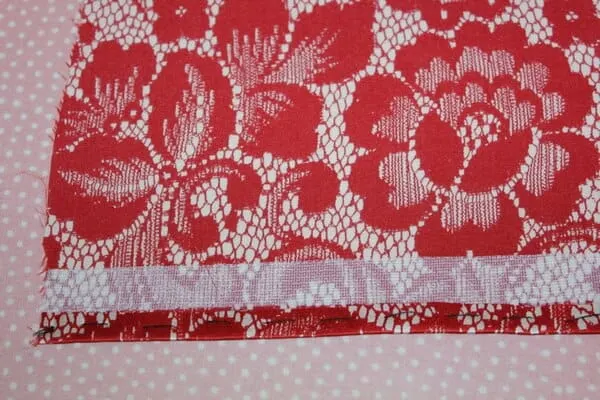
Apply a piece of thinnest knit fusible webbing 1.5 cm wide with an iron.
NOTE: There are ready-made fusible tapes, but I used my regular fusible knit interfacing (for knits). I just cut a strip of it 1.5 cm wide.
Regular fusible tape will not work well with delicate silk fabric. So for silk, I always use Pellon fusible knit interfacing.

Step 4
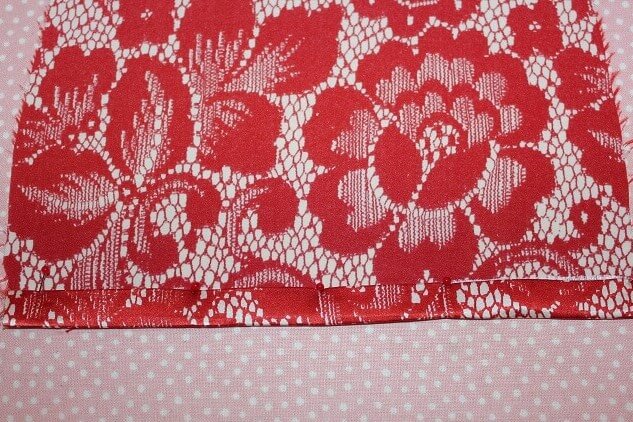
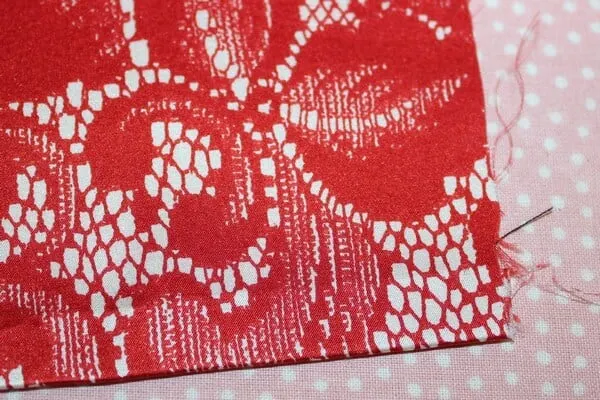
Fold the fabric edge to the bottom line of the fusible tape, baste and press.

Fold the hem again, but this time to the upper line of the fusible tape. You can use pins to do it, but they have to be very thin and sharp. Basically, use special pins for delicate silk fabric.
Baste and press again.
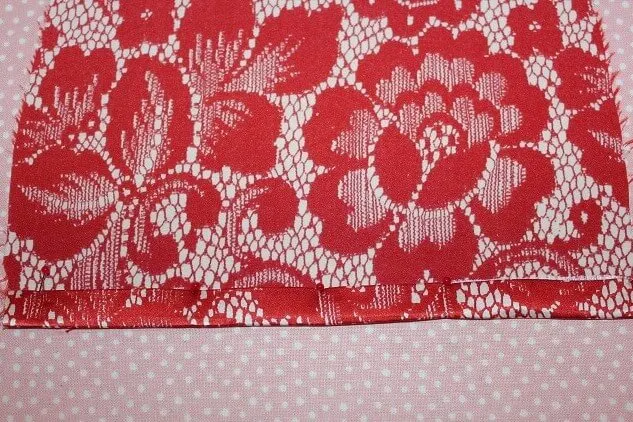
Step 5
Sew the hem by hand with invisible stitches, inserting the needle only into the fusible tape. Be careful not to grab some threads from the silk fabric.
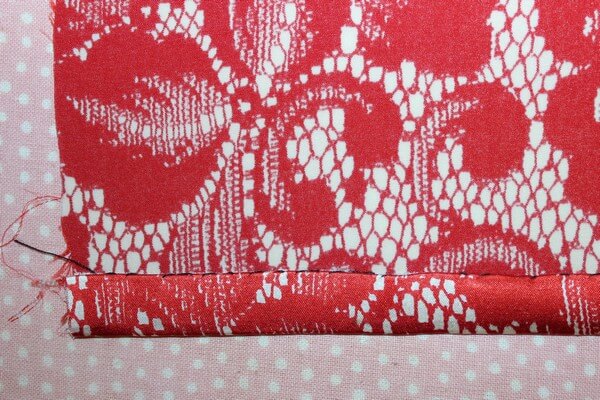

Take out the basting thread and press.


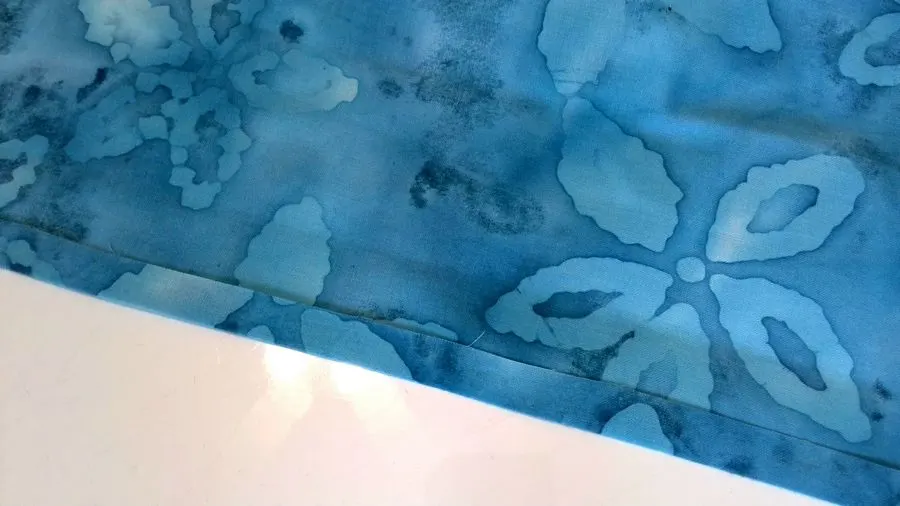
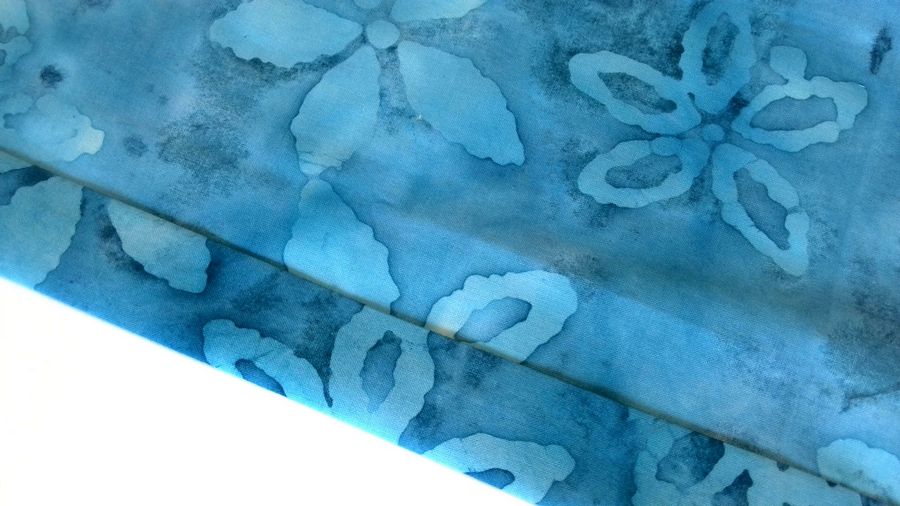
As you can see in the images above, the hemline is clean, without a hint of black thread stitches (I used the black thread just for this tutorial for you to see it clearly).
How To Do An Invisible Stitch On Pants
If you need to do a blind hem on pants, follow this process (it’s very similar to the process outlined above).
Step 1
Thread a needle and make a knot.
Step 2
Fold the fabric inside, pin it in place, and press, ensuring that your hemline is straight.
Step 3
Hide the knot of the thread inside the fold. Run the needle into the fold, then draw it up through the top crease.
Step 4
Run the needle through a few threads of fabric on the other side of the opening and pull the thread tight (but not too tight) so the thread is hidden between the folds of fabric.
Step 5
Move to the opposite side of the opening and insert the needle close to the starting point. Grab a small amount of fabric with the needle and pull the thread to connect the two parts.
Step 6
Continue this process all the way around the pant hem. When you reach the starting point, tie a knot and cut off the excess thread.
I hope this post was able to show that with the right technique, sewing hidden stitches to create a blind hem isn’t difficult. It just takes a little practice and patience.
Did you find this tutorial helpful? If so, save this pin (see below) on your sewing board so you can come to this tutorial later when you are ready to sew an invisible stitch, and follow me on Pinterest for more tips, tutorials, and inspiration!


Like sewing tips? I have other popular tutorials on my site that might be interesting for you. Check them out below.

How to sew sheer fabric using only the bobbin thread for stitching


Narrow hem tutorial: how to make a narrow hem using a Ban Roll tape


How To Choose Flattering Clothes For A Big Stomach


How To Cut Fabric Straight | 8 Easy Ways Explained
latest posts
- Adorable DIY Needle Book | Easy Tutorial for Beginners
- Master the Seam Ripper: Your Ultimate Guide to Precision Stitch Removal
- Think You Know Zippers? This Installation Guide Might Surprise You
- Why Does Your Seam Ripper Have a Red Ball? Discover Its Purpose!
- Topstitching Troubles? This Simple Trick Will Turn It Around Instantly!
- How to Sew Shirring: A Step-by-Step Guide to Elastic Thread Gathering
- Are Self-Threading Needles Really Useful?
- Amazon Spring Sale: Best Choices
- Elevate Your Prom Look: A Guide to 10 Neckline Choices (2024)
Darai
Sunday 20th of October 2019
Thumbs up Olga for the useful sewing tutorials
Olga Balasa
Wednesday 30th of October 2019
Thank you!